10 11
gOperating Instruction
10. Bedienung (optional Fernbedienung)
Die Beleuchtungen können über die Steuerbox gesteuert werden, bzw. über die optional
verfügbare Fernbedienung. Die Erweiterungssets können nur als Ergänzung zu einem Set
inklusive Steuerbox verwendet werden. Bestes Ergebnis wird mit 4 Röhren erzielt. Maximal
dürfen nur 8 Röhren in Reihe geschaltet werden.
1. Manueller Farbwechsel: Zum Einschalten POWER/MODE Taste drücken. Durch
mehrfaches Drücken insgesamt 7 Farbmodi durch wechseln. Durch erneutes Betätigen wird
die Beleuchtung wieder abgeschaltet.
2. Tonsteuerung, mehrfarbig: bei eingeschalteter Beleuchtung die „UP“-Taste betätigen.
Durch Drücken von „UP“ und „DOWN“ kann die Empfindlichkeit in 5 Schritten reguliert
werden.
3. Tonsteuerung, einfarbig: bei eingeschalteter mehrfarbiger Tonsteuerung können durch
die Betätigung der „POWER/MODE“ – Taste einzelne Farben durchgeschaltet werden. Die
Empfindlichkeit kann wie bei 2.) durch die Tasten „UP“ und „DOWN“ reguliert werden.
4. Farbwechselmodus: bei eingeschalteter Beleuchtung „POWER/MODE“ – Taste
mindestens 2 Sekunden gedrückt halten. Alle 7 Farben werden nacheinander durch
gewechselt. Geschwindigkeit des Farbwechsels kann durch die Tasten „UP“ und „DOWN“
reguliert werden.
--------------------------------------------------------------------------------------------------
11. Sicherheitshinweise
- Die Beleuchtung nicht anschließen, solange sie noch in der Verpackung ist
- Verwenden Sie die Beleuchtung nur in trockenen und geschlossenen Räumen
- Die LEDs können nicht ersetzt werden
- Die Beleuchtung nicht mit andersartigen Beleuchtungssystemen zusammenschließen
- Stellen Sie sicher, dass Netzspannung 100-240V ~59/60Hz beträgt
- Verlegen Sie die Kabel so, dass man nicht darauf treten oder darüber stolpern
und nicht durch darauf liegende Gegenstände beschädigt werden kann
- Es dürfen keine Gegenstände wie z.B. Büroklammern in die Gehäuse gelangen,
da diese einen Kurzschluss verursachen könnten
- Vermeiden Sie jeglichen Kontakt mit Flüssigkeiten
- Verwenden Sie zum Reinigen nur ein trockenes Tuch
- Zur vollständigen Trennung von der Netzspannung muss der Netzstecker
aus der Steckdose gezogen werden
- Reparaturen dürfen nur von autorisiertem Fachpersonal durchgeführt werden
- Maximal dürfen Röhren mit einem Verbrauch von 16 W angeschlossen werden
- Auf keinen Fall Rückwand des TV-Gerätes beschädigen
- Belüftungsschlitze nicht überkleben
--------------------------------------------------------------------------------------------------
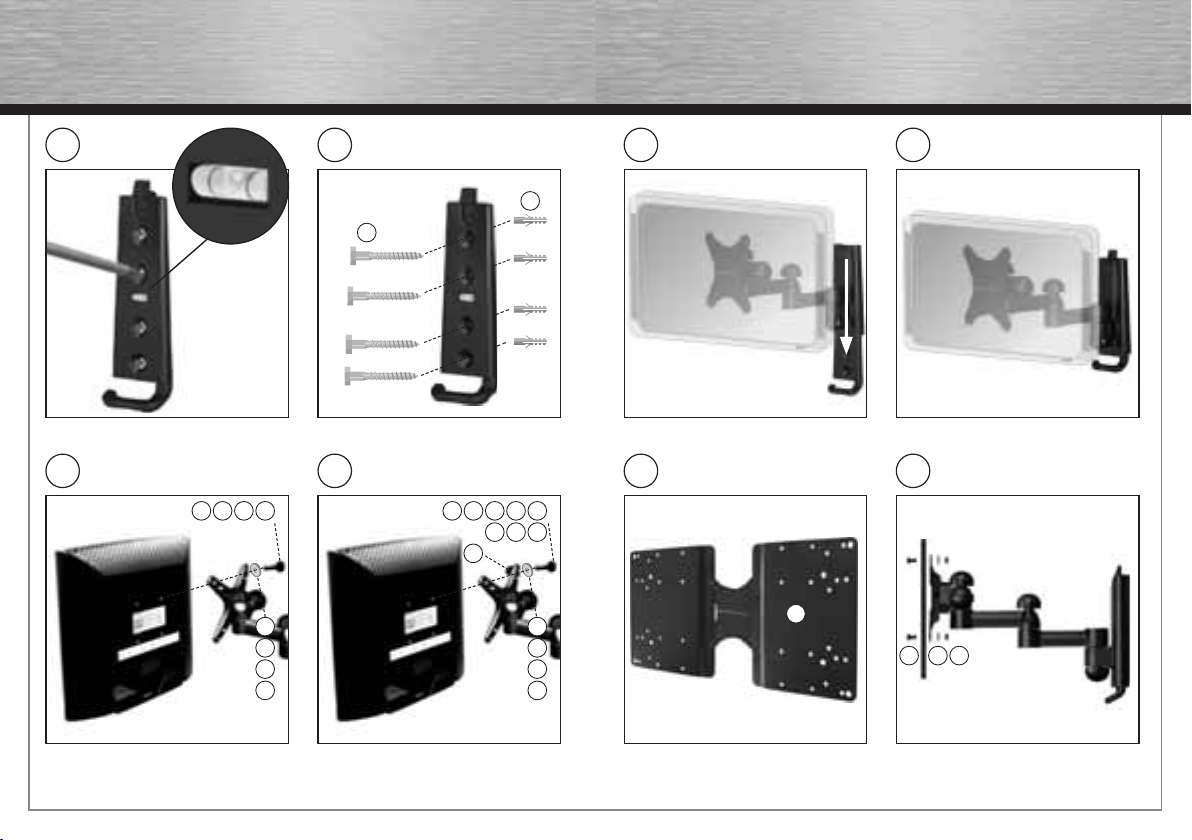
6. Bedienung & Wartung
Sollte die Halterung nach der Montage schief sein, kann das TV-Element nachträglich um
+/-5° ausgeglichen werden. Die Verstellschraube befindet sich unter der Kunststoffhaube
(Levelmount-Aufdruck)
Verstellen der Halterung immer zu zweit durchführen. Für Neigungseinstellung und die
seitliche Bewegung die Rändelschraube leicht öffnen, gewünschte Neigung/gewünschten
Schwenkbereich einstellen und Schraube wieder sicher fixieren
TV-Element komplett auf Wandplatte schieben, bis es in die Sicherung einrastet.
Beigepackte Adapterplatten dienen zur Erweiterung auf VESA Standard 400x200.
Die Festigkeit und Betriebssicherheit sind in regelmäßigen Abständen (mindestens
vierteljährlich) zu überprüfen. Reinigung nur mit Wasser oder handelsüblichen
Haushaltsreinigern.
--------------------------------------------------------------------------------------------------
TV-Relax
7. Hinweise zur Anleitung
Bewahren Sie die Anleitung während der gesamten Lebensdauer des Produkts auf und
geben Sie diese an nachfolgende Benutzer oder Besitzer weiter.
--------------------------------------------------------------------------------------------------
8. Packungsinhalt
Siehe Seite 6-7
Set beim Auspacken auf Vollständigkeit prüfen und sicherstellen, dass keine äußerlichen
Schäden (geknickte Kabel, beschädigte Isolierung, etc.) vorhanden sind. Verpackung mit den
Einlagen für spätere Transporte aufbewahren.
--------------------------------------------------------------------------------------------------
9. Positionierung und Installation
LED-Röhren mit Hilfe der Befestigungsclips und dem aufgebrachten Klebeband befestigen.
Die Röhren sind vielseitig einsetzbar und besonders für die stimmungsvolle, indirekte
Hintergrundbeleuchtung bei Flachbildschirmen geeignet.
Röhren über die Stecker verbinden, gegebenenfalls mit Hilfe der Verlängerungskabel. Die
erste Röhre in die Buchse der Steuerbox stecken. Das entgegengesetzte Ende wird nirgends
eingesteckt.
Steuerbox mit dem Netzteil verbinden und anschließend das Netzteil in die Steckdose
stecken. Die Steuerbox hat eine magnetische Rückseite, mit deren Hilfe Sie die Box z.B. an
einer Wandhalterung aus Metall befestigen können.
Vor Inbetriebnahme die Sicherheitshinweise durchlesen und beachten.
--------------------------------------------------------------------------------------------------
00096007bda.indd Abs1:10-Abs1:11
00096007bda.indd Abs1:10-Abs1:11 08.12.2009 13:28:16 Uhr
08.12.2009 13:28:16 Uhr