H&S H D 7+4 FEEDER BOX Installation and maintenance instructions

OPERATOR’S MANUAL
and
PARTS LIST
WARNING READ AND UNDERSTAND THIS MANUAL
BEFORE OPERATING THIS EQUIPMENT.
UNSAFE OPERATION OR MAINTENANCE OF THIS EQUIPMENT CAN RESULT
IN SERIOUS INJURY OR DEATH.
H&S
H D 7+4 FEEDER BOX
3-18-2009
Manufactured By
H&S MANUFACTURING CO., INC.
P.O. BOX 768 • (715) 387-3414 FAX (715) 384-5463
MARSHFIELD, WISCONSIN 54449

H&S H D 7+4
FEEDER BOX
CONTENTS
Warranty & Warranty Registration Card . . . . . . . . . . . . . . . . . . . . . . . . . . . . . . . . .1-2
Dealer Pre-Delivery & Delivery Checklist . . . . . . . . . . . . . . . . . . . . . . . . . . . . . . . . 3
Be Alert Symbol . . . . . . . . . . . . . . . . . . . . . . . . . . . . . . . . . . . . . . . . . . . . . . . . . . . . 5
Explanation of Safety Signs . . . . . . . . . . . . . . . . . . . . . . . . . . . . . . . . . . . . . . . . . . . 6
Danger - Warning - Caution Signs . . . . . . . . . . . . . . . . . . . . . . . . . . . . . . . . . . . . . 7-8
Warning - Owner Must Read And Understand . . . . . . . . . . . . . . . . . . . . . . . . . . . 9
Emergency Stop . . . . . . . . . . . . . . . . . . . . . . . . . . . . . . . . . . . . . .10-11
Before Operation - Adjustments - Cross Conveyor - Shear Bolts . . . . . . . . . . . .12-13-14
Lubrication Guide . . . . . . . . . . . . . . . . . . . . . . . . . . . . . . . . . . . . . .14-15
Decal Location - Description . . . . . . . . . . . . . . . . . . . . . . . . . . . .16-17
Field Operation . . . . . . . . . . . . . . . . . . . . . . . . . . . . . . . . . . . . . . . . . 18
Lights - Description . . . . . . . . . . . . . . . . . . . . . . . . . . . . . . . . . . . . .19
Ordering Parts - About Improvements . . . . . . . . . . . . . . . . . . . . . . . . . . . 20
Service Notes . . . . . . . . . . . . . . . . . . . . . . . . . . . . . . . . . . . . . . . . . . . . . . . . . 21
Figure 1 - Housing Components - Description . . . . . . . . . . . . . . . . . . . . . . . . . 22-23
Figure 2 - Beaters & Main Apron Drive - Description . . . . . . . . . . . . . . . . . . . . 24-25
Figure 3 - Cross Apron & Drive Assembly - Description . . . . . . . . . . . . . . . . . . 26-27
Figure 4 - Shields - Description . . . . . . . . . . . . . . . . . . . . . . . . . . . . 28-29
Figure 5 - Bevel Gearbox - Description . . . . . . . . . . . . . . . . . . . . . . .30-31
Figure 6 - Worm Gearbox - Description . . . . . . . . . . . . . . . . .32-33
Figure 7 - Box Component Parts - Description . . . . . . . . . . . . . . 34-35
Figure 8 - Hydraulic Assembly - Description . . . . . . . . . . . . . . . . . . . . . 36
Figure 9 - Hydraulic Cylinder - Description . . . . . . . . . . . . . . . . . . . . . . 37
Figure 10 - Elevator Extension - Description . . . . . . . . . . . . . . . . . . . . . . 38-39
Figure 11 - Control Box Assembly - Description . . . . . . . . . . . . . . . . . . 40-41
Figure 12 - Running Gear - Description . . . . . . . . . . . . . . . . . . . . . 42-43
Service Notes . . . . . . . . . . . . . . . . . . . . . . . . . . . . . . . . . . . . . . . . . . . . . . . . . 44
SPECIFICATIONS . . . . . . . . . . . . . . . . . . . . . . . . . . . INSIDE BACK COVER

AFTER COMPLETION, DEALER SHOULD REMOVE AND RETAIN FOR RECORDS
H&S
DEALER PRE-DELIVERY CHECK LIST
After the Self-Unloading Feeder Box has been completely set-up, check to be certain it is in correct running
order before delivering to the customer. The following is a list of points to inspect. Check off each item as you
have made the proper adjustments and found the item operating satisfactorily.
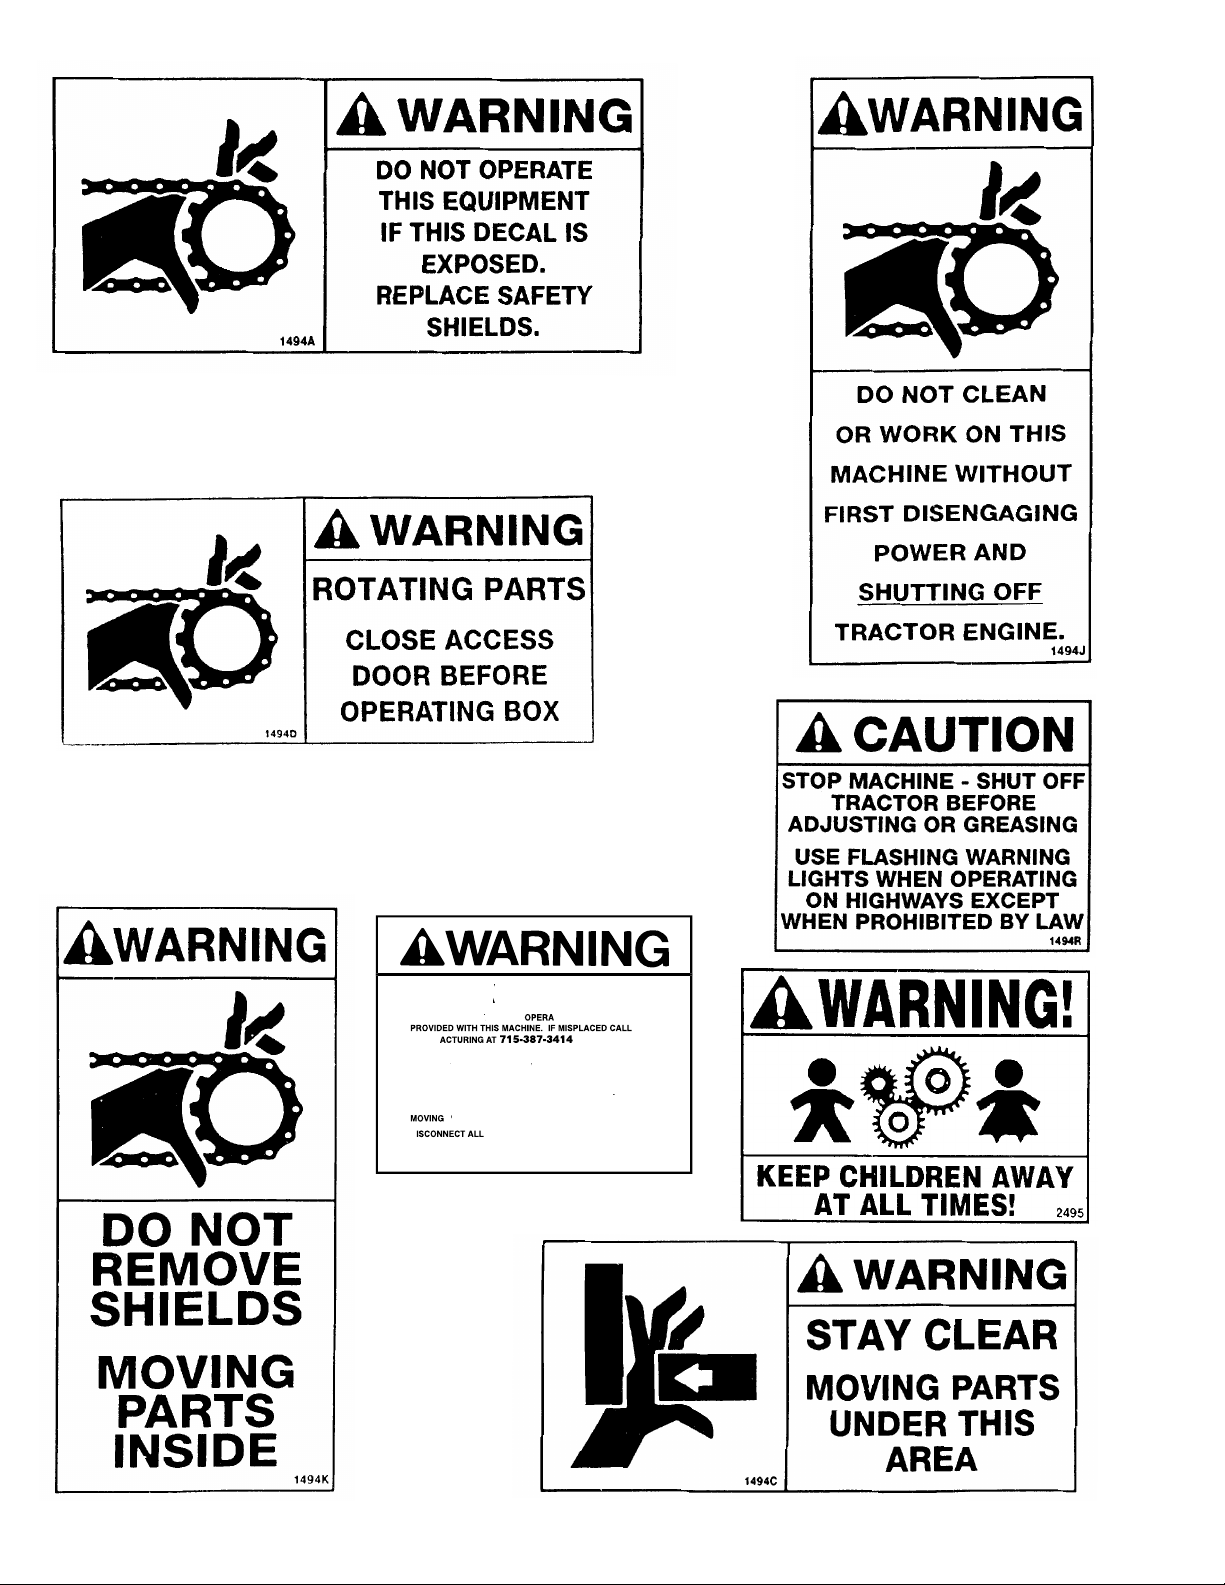
o All Shields and Guards are in place and fastened.
o All grease fittings have been lubricated and gear box filled to proper level –
See lubrication guide in this manual.
o All mechanisms are operating trouble free.
o All Roller Chains are at proper tension.
o Apron Chains are adjusted properly.
o All bolts and fasteners are tight.
o Extra Shear Bolts are provided.
o All decals are in place and legible.
(Remove Dealers File Copy At Perforation)
(Dealer’s Name) Model Number
(Signature of Pre-Delivery Inspector) (Inspection Date)
Serial Number
DEALER DELIVERY CHECK LIST
This check list that follows is an important reminder of valuable information that should be passed on to the
customer at the time this Self-Unloading Feeder Box is delivered.
Check off each item as you explain it to the customer.
This pre-delivery check list, when properly filled out and signed assures the customer that the pre-delivery
service was satisfactorily performed.
o Explain to the customer that the pre-delivery inspection was made.
o Explain to the customer all the safety precautions they must exercise when operating this unit.
o Explain recommended loads for different types of materials.
o Explain to customer that regular lubrication is required for proper operation and long life of
machine. Show customer the lubrication section of Owner’s Manual.
o
Give the customer Owner’s Manual and make sure he reads and understands all operating and
service instructions.
o Record Model and Serial Numbers on Page 20 of this Manual.
o Have customer sign a completed “Warranty Registration,’’ and mail it promptly.
Date Delivered ________________________ Dealer’s Name ______________________________
By
________________________________________
Note: Warranty is not valid until warranty card is completed and returned to H&S Mfg. Co., Inc.
-3-
Signature of Original Buyer


THIS SYMBOL IS USED THROUGHOUT THIS BOOK WHENEVER YOUR PERSONAL SAFETY IS
INVOLVED. TAKE TIME TO BE CAREFUL. REMEMBER: THE CAREFUL OPERATOR IS THE BEST
OPERATOR. MOST ACCIDENTS ARE CAUSED BY HUMAN ERROR. CERTAIN PRECAUTIONS MUST
BE OBSERVED TO PREVENT THE POSSIBILITY OF INJURY OR DAMAGE.
TRACTORS
This operator’s manual uses the term “Tractor” when identifying the power source.
H&S MANUFACTURING CO. INC.
BE
ALERT! YOUR SAFETY
IS INVOLVED.
-5-

RECOGNIZE SAFETY INFORMATION
This is the safety-alert symbol. When you see this symbol
on your machine or in this manual, be alert to the potential
for personal injury.
Follow recommended precautions and safe operating
practices.
UNDERSTAND SIGNAL WORDS
A signal word—DANGER, WARNING, or CAUTION—is
used with the safety-alert symbol. DANGER identifies the
most serious hazards.
Safety signs with signal word DANGER or WARNING are
typically near specific hazards.
General precautions are listed on CAUTION safety signs.
FOLLOW SAFETY INSTRUCTIONS
Carefully read all safety messages in this manual,
and all safety signs on your machine. Follow all
recommended precautions and safe operating pro-
cedures.
Keep signs in good condition. Immediately replace
any missing or damaged signs.
-6-
CAUTION
WARNING
CAUTION

-7-
DO NOT GO NEAR LEAKS
•High pressure oil easily punctures skin causing
serious injury, gangrene or death.
•If injured, seek emergency medical help.
Immediate surgery is required to remove oil.
•Do not use finger or skin to check for leaks.
•Lower load or relieve hydraulic pressure
before loosening fittings. 11599

-8-
HELP
A
VOID
A
A
INJUR
Y
•
READ
&
UNDERST
AND
T
T
THE
T
T
O
R
S
MANUAL
H
&
S
MANUF
F
WITH
M
O
DE
L
AND
S
ERIA
L
NUMBER
.
•
UNDERST
AND ALL
T
T
S
AFET
Y
W
ARNINGS AND
W
W
F
UN
C
TI
O
N
OF
CO
NTR
O
L
S
.
•
KEEP
S
AFET
Y
DEVI
C
E
S
IN
PLA
C
E AND W
O
RKING
.
•
KEEP
Y
O
UR
S
ELF AND
O
THER
S
WELL
C
LEAR
OF
P
ARTS.
P
P
•
D
P
O
WER BEF
O
RE
S
ERVI
C
ING
O
R
C
LEANING THI
S
MA
C
HINE.
72203
A
• D
O
N
O
T EX
C
EED 20 MP
H

H&S H D 7+4 FEEDER BOX
W A R N I N G
TO PREVENT SERIOUS INJURY OR DEATH
BEFORE YOU ATTEMPT TO OPERATE THIS EQUIPMENT, READ AND STUDY THE FOLLOWING
INFORMATION. IN ADDITION, MAKE SURE THAT EVERY INDIVIDUAL WHO OPERATES OR WORKS
WITH THIS EQUIPMENT, WHETHER FAMILY MEMBER OR EMPLOYEE, IS FAMILIAR WITH THESE
SAFETY PRECAUTIONS.
KNOW HOW TO STOP UNLOADING MECHANISM BEFORE STARTING IT.
If the machine becomes clogged, disengage the Tractor Hydraulics. Stop the tractor engine and allow all
mechanisms to stop before cleaning or working on the machine.
DO NOT attempt to perform maintenance or repair with tractor running and tractor hydraulics hooked up.
DO NOT step up on machine at any time.
NEVER manually feed material into the beaters.
DO NOT allow minors to operate or be near the machine.
DO NOT ALLOW PERSONNEL OTHER THAN THE QUALIFIED OPERATOR NEAR THE MACHINE.
DO NOT clean, adjust, reset the emergency stop valve, or lubricate the machine when any part is in
operation.
Check frequently to be assured that the emergency stop mechanism is in proper operating condition.
Keep hands, feet and clothing away from beaters when they are revolving.
Loose or floppy clothing should not be worn by the operator.
Be sure the machine is clear of people, tools, and other objects before engaging the tractor hydraulics.
NEVER start feeder box until all guards and safety shields are secured in place.
NEVER put hand in cross conveyor outlet openings while tractor is running.
CAUTION – Beware of electrical wires.
STAY CLEAR of Hydraulic lines and fittings, they may be under extreme pressure or heat.
H&S Mfg. Co. always takes the operator and his safety into consideration and guards exposed moving
parts for his protection. However, some areas cannot be guarded or shielded in order to assure proper
operation. In addition, the operators manual and decals on the machine itself warn you of further danger
and should be read and observed closely.
Study The Above Safety Rules
ATTENTION - BE ALERT - YOUR SAFETY IS INVOLVED
-9-

TO PREVENT SERIOUS INJURY OR DEATH
NEVER OPERATE THIS UNIT UNLESS EMERGENCY STOP
FUNCTIONS PROPERLY
MAINTENANCE
1. Pushing the emergency stop bar rearward or pulling the trip cables will activate the stop to off position.
2. Activating emergency stop, will stop all box functions.
3. Trip emergency stop occasionally, and when starting the unit after periods of storage, to insure proper function.
4. Keep excessive slack out of trip cables.
5. Oil stop bar periodically to assure that valve mechanism will trip.
RESETTING THE EMERGENCY STOP
To reset emergency stop, apply hand pressure to the top of the hinged bar. When the bar is once again in a horizontal
position, all box functions will resume.
W A R N I N G
-10-

In case of an emergency, pushing
emergency stop panel or pulling the
safety cable will stop cross convey-
or, beaters, and main aprons. Trip
emergency stop occasionally to insure
proper function
A. Emergency Stop Cable
B. Emergency Stop Panel
EMERGENCY STOP
DO NOT GO NEAR LEAKS
•High pressure oil easily punctures skin causing
serious injury, gangrene or death.
•If injured, seek emergency medical help.
Immediate surgery is required to remove oil.
•Do not use finger or skin to check for leaks.
•Lower load or relieve hydraulic pressure
before loosening fittings. 11599
WARNING: Some photographs used in the following pages show guards or
shields removed for clarification. NEVER operate machine until these guards or
shields are in proper operating position.
Emergency Stop Tripped Emergency Stop Re-set
-11-

BEFORE OPERATION
Check entire unit carefully before first operation. Tighten bolts, set screws, and chains which might have
come loose in handling. Lubricate as explained in the lubrication guide. Run entire feeding mechanism
and unloading mechanism for several minutes. This will serve as a break-in and as a check that all parts
are assembled and lubricated properly. Successful operation will be achieved by periodic adjustments and
experience of the operator. Make sure to read and understand the main feeder apron adjustments.
A
B
Mounting Socket for SMV Emblem (A)
Red Reflective Tape (B)
WHEN TRANSPORTING ON THE
HIGHWAY OR ROADS, PLACE SMV SIGN
IN SOCKET PROVIDED AND REGULARLY
CLEAN THE REFLECTIVE TAPE AT THE
REAR OF THE FORAGE BOX.
NOTE: Obey all state and local laws, con-
cerning towed equipment, on public roads.
For light information (See Page 19)
-12-
MAIN FEEDER APRON ADJUSTMENT
Main feeder apron adjustment bolts are located behind the convenient
access door located in the bottom portion of rear tailgate. Remove handle
nuts (A) to open access door and swing door downward.
All apron chains must be taken up evenly before you use the feeder box.
Check again after the first few loads. The Main Feeder Aprons should be
at proper tension at all times. Tighten the full threaded bolts (B) to adjust
aprons. Aprons are properly adjusted when two Cross Slats, or about
three feet of chain lift off the Chain Return Slides from the rear of the box.
Maintain this tension when operating the box.
A
B

CROSS CONVEYOR
ADJUSTMENT
Proper tension should be maintained on
cross conveyor chain when operating
box. To adjust cross conveyor, loosen the
jam nuts (A) on tightener bolts (B)). Move
adjusting nuts (C) on tightener bolts until
proper tension on chain is reached. The
chain is properly adjusted when the cen-
ter slats clear the bottom return pan by
about 1/16 of an inch. Adjust both sides
equally. Lock in place with jam nuts.
B A C
-13-
Shown here is the spring loaded plastic
guard (A) which protects the operator
from accidentally being exposed to the
bottom beater at the discharge opening
during operation of forage box. Keep
this guard in proper position at all times
when operating forage box.
A

CROSS CONVEYOR (Continued)
OIL
LEVEL
OIL
LEVEL
LUBRICATION GUIDE
The operator should become familiar with all lubrication
points and establish a systematic routine to insure complete
and quick lubrication of the machine.
GEAR BOXES – Before using your new machine, check the
oil in the main apron drive and beater drive gear box. Keep
the main apron gear box filled to the oil level plug in cover of
gear box. Beater drive gear box should be filled to the center
of the shafts. Use 80W-90 gear lube.
DRIVE CHAINS – Lubricate the drive chains with a light
machine oil. Keep chains aligned with sprockets, this will
lengthen the life of the sprockets and chain. Lubricate
chains often.
-14-
SHEAR BOLT
The main drive and cross conveyor are
protected by one shear bolt each, as
shown. Spare shear bolts are provided
as shown.
Always determine the cause of failure,
and eliminate the cause before installing
a new shear bolt.
Use only H&S shear bolts, part number
S84, when replacing.
A. Shear Bolt
B. Spare Shear Bolt
B
B
A
A

LUBRICATION GUIDE (Continued)
There are 21 grease fittings on your new H&S 7+4 Feeder Box.
Grease daily during normal use and before and after storage.
Use a good grade of high quality grease.
A. (2) One at each end of brace - gearbox to main drive shaft
B. (4) Beater Bearings - one at each end of beaters
(sealed bearings - do not overgrease)
C. One on left hand drive shaft bushing
D. One on sprocket type chain tightener - beater drive chain
E. (2) Remote fittings for right hand and center main drive shaft bushings
F. (4) One on each rear main apron idler sprocket
G. One on cross conveyor drive shear hub
H. (4) One on each wheel hub
I. (2) One on each walking beam pivot tube
B
E A
C
B
F I
H
-15-
D
G

DECAL LOCATION
Your H&S H D 7+4 Feeder Box was manufactured with operator safety in mind. Located on the Feeder Box
are various decals to aid in operation, and warn of danger or caution areas. Pay close attention to all the
decals on your Feeder Box.
DO NOT REMOVE ANY OF THESE DECALS. IF DECALS ARE LOST, DAMAGED, OR
IF FEEDER BOX IS REPAINTED, REPLACE DECALS. REMEMBER: DECALS ARE FOR
YOUR PROTECTION.
Listed below are the decals on your H D 7+4 Feeder Box. These decals may be ordered individually by part
number or by ordering complete set.
ITEM PART NO. DESCRIPTION
A 1494A (2) Warning - Do Not Operate
B 1494K Warning - Do Not Remove Shields
C 1494J Warning - Do Not Hand Clean
D 1494G (2) Danger - No Step
E Serial Number
F 1494P Danger - Stay Clear Power Lines
G 11695 (4) Danger - Stay Clear
H 5896C Warning - Emergency Stop Reset
I (3) H&S H D 7+4
J 104-3185 Push This Panel
K 103-3185 Emergency Stop
L 7+4-3185G Instructions-Entering Forage Box
M 120-2177 (2) Pull to Stop
N 112-11176 (2) Shear Bolt
O 107-3185 H&S Metal Sign (12x24)
P 1494C (2) Warning - Moving Parts Under
Q 72203A Warning - Help Avoid Injury
R (3) Red Reflector
S (5) Amber Reflector
T 1494R Caution - Flashing Lights
U 1494D Danger - Close Access Door
V 1494F Danger - Entering Forage Box
W FEMA
X 2494 Warning - Children
Y H83092 Speed Indicator
Z 11599 Warning - Do Not Go Near Leaks
AA 1494H Danger - Stay Clear
BB 42495 Electric Control Decal
42104-7+4FB Complete Set of Decals
H&S Red Paint
ZX21 Gallon
ZX22 Quart
ZX23 Pint
-16-

S
C
B I Z E Q W Y
V M A
L
G M C P
S
D
R
BB
R U T
(Under open Shield)
N
-17-
K H J Z F AA

FIELD OPERATION OF H D 7+4 FEEDER BOX
SAFETY REMINDERS:
1. Operate your 7+4 Feeder Box on level ground whenever possible while unloading.
2. Any time the Feeder Box is in operation, the operator should be positioned on the tractor seat, as
shown below.
3. Make sure that the draw pin, hydraulic & electric controls are securely fastened to the tractor power
sources.
TO BEGIN UNLOADING:
1. Switch electric control to elevator position
2. Activate tractor hydraulics to lower elevator to desired position. NOTE: The elevator will operate most
efficiently at 0° to 45° angle.
3. Switch electric control to unload position
4. Activate tractor hydraulics to begin unloading
5. Using electric control, select desired unloading speed
AFTER UNLOADING IS COMPLETED:
1. Return speed selector to slow position
2. Switch electric controls to elevator position
3. Activate tractor hydraulics to raise elevator to transport position
4. When unhooking your H D 7+4 Feeder Box from the Tractor, use the convenient hanger (A) to hold
hydraulic hoses and electric cable. Hydraulic coupler ends are to be inserted into the coupler storage
block provided (B)
A
B
-18-
FEEDER BOX
TRACTOR
OPERATORS POSITION

FIGURE A
-19-
H D 7+4 FEEDER BOX
LIGHTING ASSEMBLY
ITEM PART NO. DESCRIPTION
1. S308 Rubber Light Mount
2. S309 Amber Light
3. S310 Red Light
4. S311 Light Harness
5. S313 16’ Longitudinal Cord
6. S331 4 Pole Round Connector
7. S317 Optional Tractor Cord
8. S319 16’ Complete Lighting Assm.
Less Optional Tractor Cord
9. S316 Mounting Bracket
WIRING CODE
White - Ground
Yellow - LH Flashing & Turn Signal
Green - RH Flashing &Turn Signal
Brown - Tail Lamp

INSTRUCTIONS FOR ORDERING PARTS
All service parts should be ordered through your authorized H&S dealer. He will be able to give you faster
service if you will provide him with the following.
1. Model & Serial Number - Both can be located on the front, center of your unit.
2. All reference to left or right apply to the machine as viewed from the rear.
3. Parts should not be ordered from illustration only. Please order by complete part number.
4. If your dealer has to order parts - give shipping instructions.
VIA truck - large pieces (please specify local truck lines)
VIA United Parcel Service (include full address)
PLEASE RECORD NUMBERS FOR YOUR UNIT FOR QUICK REFERENCE
ABOUT IMPROVEMENTS
H&S IS CONTINUALLY STRIVING TO IMPROVE ITS PRODUCTS.
We must therefore, reserve the right to make improvements or changes whenever it becomes practical to
do so, without incurring any obligation to make changes or additions to the equipment previously sold.
-20-
Table of contents
Other H&S Farm Equipment manuals

H&S
H&S Top Shot 5215 User manual

H&S
H&S 4142 User manual

H&S
H&S 6116 User manual

H&S
H&S HDNR 7+4 User manual

H&S
H&S 4242 User manual

H&S
H&S 3108 User manual

H&S
H&S WIDE BODY Installation and maintenance instructions

H&S
H&S 8200 Series User manual

H&S
H&S 7116 User manual

H&S
H&S BW1000 LINEWRAP BW1000 LINEWRAP User manual

H&S
H&S GM 170 Installation and maintenance instructions

H&S
H&S 6118 User manual

H&S
H&S 2957 User manual

H&S
H&S 2958 User manual

H&S
H&S LOADMASTER 2X User manual

H&S
H&S 2208 User manual

H&S
H&S 1226 User manual

H&S
H&S HT8 User manual

H&S
H&S 2958 Programming manual

H&S
H&S HAY MACHINE II Installation and maintenance instructions