HEATSTRIP THH1500VS Instruction manual

THERMOFILM AUSTRALIA PTY LTD www.heatstrip.com.au
27 Rosalie Street, Springvale VIC 3171 Australia
ELECTRIC RADIANT OUTDOOR / INDOOR HEATER
INSTALLATION, OPERATION & MAINTENANCE MANUAL
IMPORTANT INSTRUCTIONS
SAVE THESE INSTRUCTIONS
Prior to installing and operating the heater, read these instructions carefully and
retain for future reference.
INTRODUCTION
The HEATSTRIP product range offers an elegant solution for both indoor and outdoor
heating requirements.
Casing options include powder coat finish and stainless steel. (Stainless steel model is
recommended in coastal areas.)
All HEATSTRIP products have an IPX5 rating for protection against water ingress and are
suitable for undercover outdoor installation.
MODEL CODES
model watts
rating
branch
circuit
dimensions weight
THH1500US / THH1500US-SS 1500 120V 15A 33 ½ x 7 ¾ x 1 ¾
12.0lbs
THH2400US / THH2400US-SS 2400 240V 15A 52 ½ x 7 ¾ x 1 ¾
17.0lbs
THH3200US / THH3200US-SS 3200 240V 20A 69 ¾ x 7 ¾ x 1 ¾
22.0lbs
MODEL CODE NOTES
SS Denotes stainless steel casing.
UL / CSA APPROVAL E321448

THERMOFILM AUSTRALIA PTY LTD www.heatstrip.com.au
27 Rosalie Street, Springvale VIC 3171 Australia
CAUTION
When using electrical appliances, basic preparations should always be followed to reduce
the risk of fire, electric shock, and injury to persons, including the following:
•Read all instructions before using the heater.
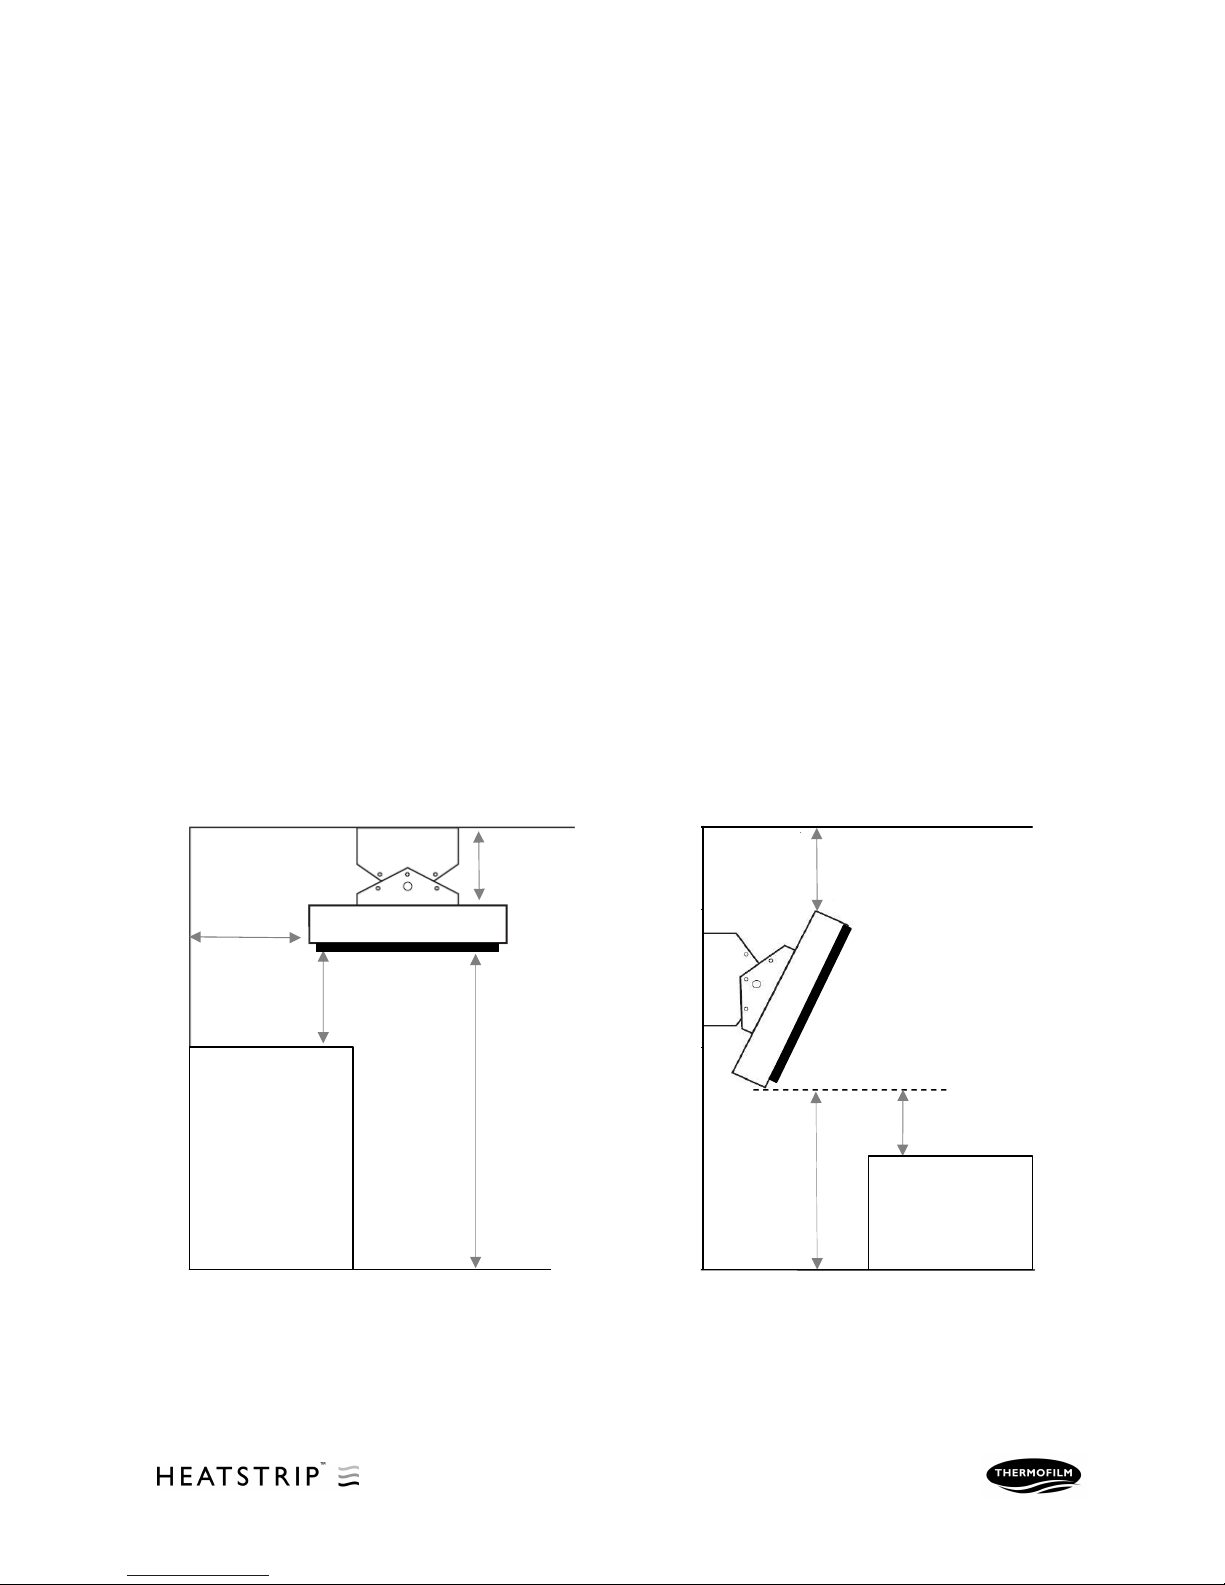
•This heater is hot when in use. To avoid burns, do not let bare skin touch hot
surfaces. Keep combustible materials, such as furniture, pillows, bedding,papers,
clothes and curtains at least 39” (1000mm) from the front of the heater and keep
them away from the sides and rear.
•Do not touch any part of the heater while it is turned on or for 30 minutes after it is
turned off.
•Extreme caution is necessary when any heater is used by or near children or
invalids and whenever the heater is left operating and unattended.
•Do not operate any heater after the heater malfunctions, or has been dropped or
damaged in any manner. Return heater to an authorised service facility for
examination, electrical or mechanical adjustment, or repair.
•This heater is not intended for use in bathrooms, laundry areas and similar indoor
locations. Never locate heater where it may fall into a bathtub or other water
container; for example pool or spa.
•The heater is fitted with an electrical connection box and should be connected as a
fixed installation by a licensed electrical professional in ac
cordance with the relevant
electrical code.
•
The heater is required to be fitted with an “ON/OFF” isolation switch and can also be
controlled via thermostat, timer or dimmer type control. A wall switch should be
installed on fixed wire installations. The heater should also be connected via an
R.C.D. (Residual Current Device).
•Do not insert or allow foreign objects to enter any ventilation or exhaust opening as
this may cause an electric shock or fire, or damage the heater.
•To prevent a possible fire, do not block air intakes or exhaust in any manner.
•A heater has hot and arcing or sparking parts inside. Do not use it in areas where
gasoline, paint, or flammable liquids are used or stored.
•Use this heater only as described in the manual. Any other use not recommended
by the manufacturer may cause fire, electric shock, or injury to persons.
•Save these instructions.
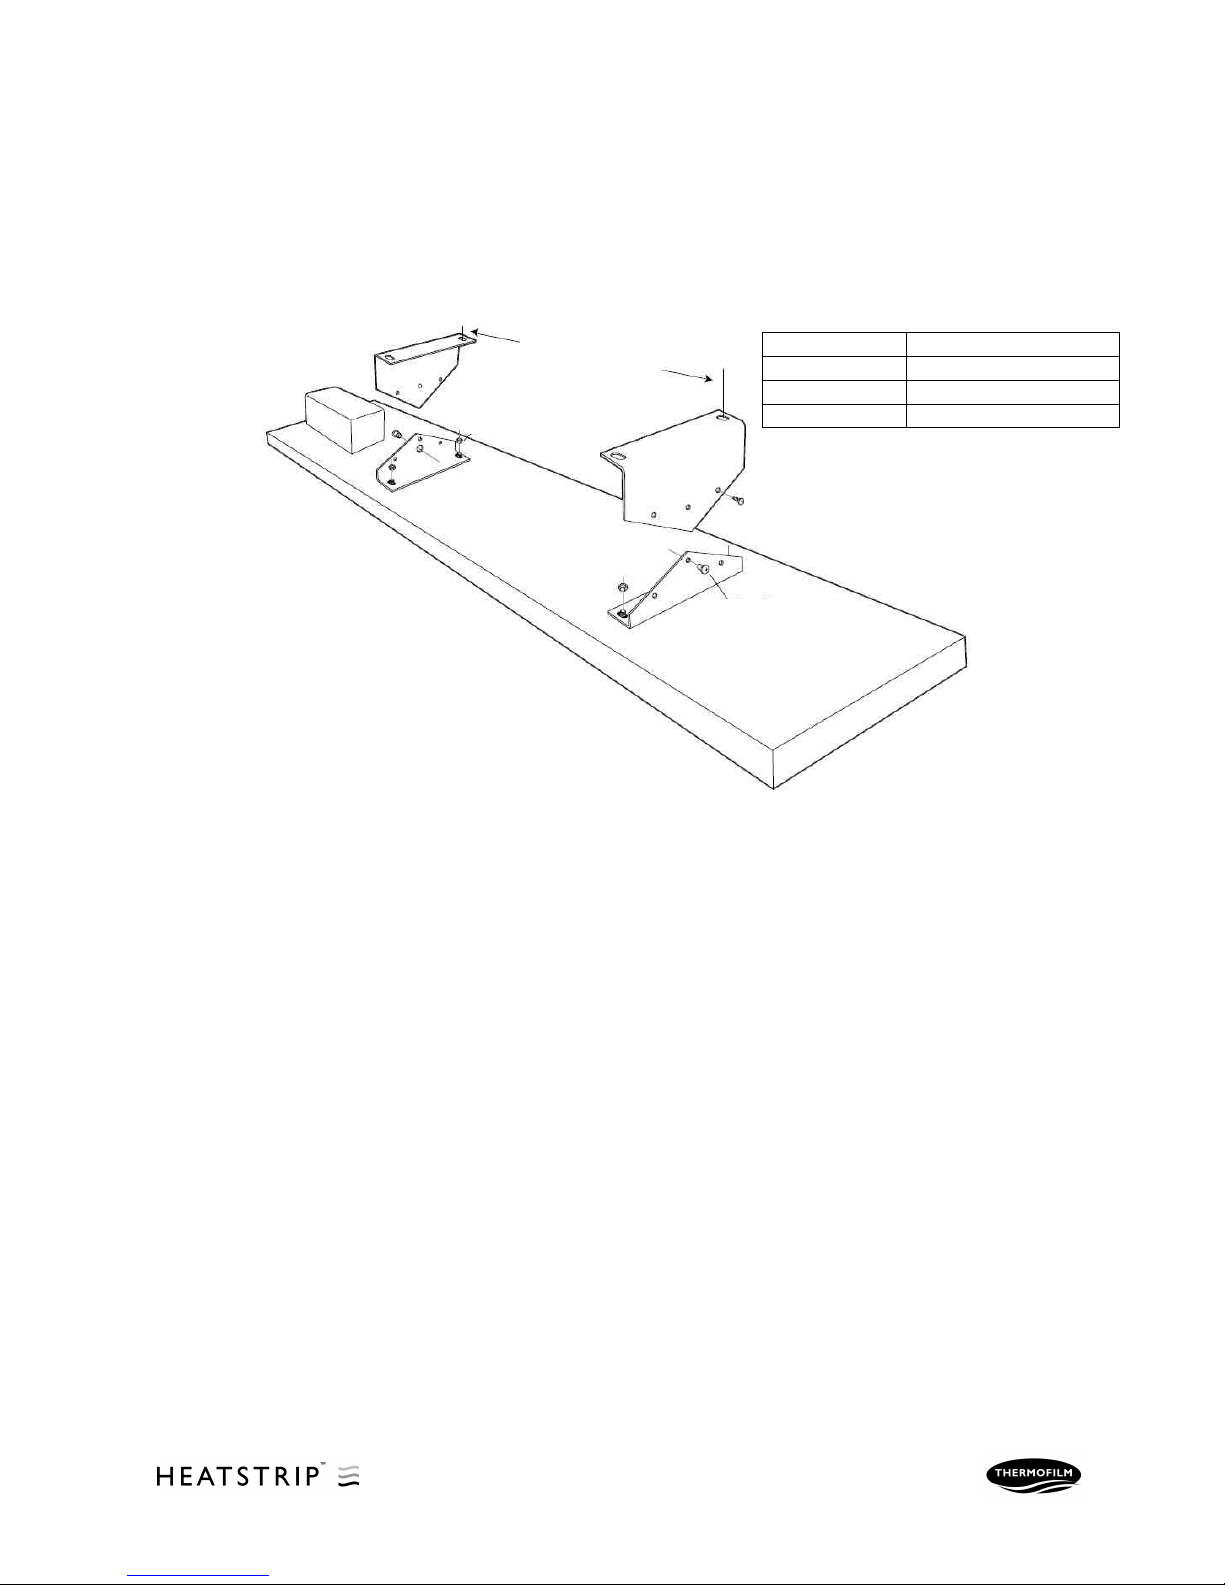
INSTALLATION –PREPARATION
The HEATSTRIP product is a high intensity radiant heater designed for domestic and
commercial heating applications within indoor and undercover outdoor areas, and should
not be used for any other purpose.
Before commencing installation, make sure the electrical supply voltage is the same as
that shown on the rating plate of the heater.
The heater is fitted with an electrical connection box and should be connected as a fixed
installation by a licensed electrical professional according to the relevant electrical code.
This appliance must be earthed.
The heater is required to be fitted with an “ON/OFF” isolation switch and can also be
controlled via thermostat, timer or dimmer type control. A wall switch should be installed
on fixed wire installations. The heater should also be connected via an R.C.D. (Residual
Current Device).
In case of heater fault, the appliance should be returned to the distributor/manufacturer
or
and authorised service specialist for repair.

THERMOFILM AUSTRALIA PTY LTD www.heatstrip.com.au
27 Rosalie Street, Springvale VIC 3171 Australia
INSTALLATION
–LOCATION
For both wall and ceiling mounting, the lower part of the heater must be located a minimum
of
96” (2400mm) above floor level.
Within
an outdoor undercover location, the recommended most effective mounting height
for performance and comfort is between
96”(2400mm) and 106” (2700mm).
Recommended maximum effective mounting height
–122” (3100mm).
For further information refer to www.hea
tstrip.com.au
The heater should have a clearance of
39”(1000mm) to adjacent walls, a minimum 4”
(100mm)
clearance from back of heater to any mounting surface and a minimum clearance
of
39”(1000mm) or more from bottom of heater to any surface below.
The
heater should have a minimum clearance of 12” (300mm) from the ceiling to the back
of the heater, when wall mounted at an angle.
The heater must not be mounted immediately below or in front of a socket outlet.
If installed in wet areas, the heater switc
hes or controls must be located so they cannot be
touched by persons in the bath or shower.
Do not allow thermal insulation, cables, flammable materials or any other items to come in
contact with any surface of the heater (purpose designed brackets exclud
ed).
MINIMAL CLEARANCES
Horizontal Ceiling mounting Angled Wall mounting
96” (24
00mm)
39” (1000mm)
Surface below heater
Ceiling
Floor
12” (300mm)
Wall
Ceiling
Floor
Surface below heater
Wall
Ceiling
Wall
Ceiling
4” (100mm)
39
” (1000
mm)
96”
(2400mm)
Floor Floor
39” (1000mm)

THERMOFILM AUSTRALIA PTY LTD www.heatstrip.com.au
27 Rosalie Street, Springvale VIC 3171 Australia
INSTALLATION
-MOUNTING
1. Fix the two ceiling brackets to the ceiling or wall in the desired location, ensuring that
the fixing method (bolts or screws) will be more than strong enough to support the
weight of the heater and allow for strong winds and other conditions. Note the two
fixing brackets face inwards.
2. Secure the two small brackets to the heater using the nuts provided. Make sure the
brackets face inwards.
3. Lift the heater up to the ceiling brackets and secure the top and bottom brackets using
the screws provided.
4. Use the self tapping screws to lock the top and bottom brackets in either horizontal or
angle mounting position.
INSTALLATION –WIRING CONNECTION
For supply connections, use wir
es suitable for at least 90°C or equivalent.
Connect the earth, active and neutral wires to the connector block in the junction box
mounted on the heater. Ma
ke sure the earth cable is connected to the earth location on the
connector block.
½ inch flexible conduit should be connected to the junction block. In outdoor applications
the conduit must be suitable for outdoor use.
Test the complete electrical inst
allation prior to fixing the top on the connector block.
All electrical wiring and connections should comply with relevant local and national electrical
standards and codes.
Model Dimension “A”
THH1500US 12 13/16” (300mm)
THH2400US 23 5/8” (600mm)
THH3200US 35 1/2” (900mm)
Dimension “A”
Hex Nut
Self Tapping Screw
Thread Screw

THERMOFILM AUSTRALIA PTY LTD www.heatstrip.com.au
27 Rosalie Street, Springvale VIC 3171 Australia
Options for connecting ½ inch flexible conduit:
Wiring Assembly
Earth

THERMOFILM AUSTRALIA PTY LTD www.heatstrip.com.au
27 Rosalie Street, Springvale VIC 3171 Australia
OPERATING INSTRUCTIONS
T
he heater is required to be fitted with an “ON/OFF” isolation switch and can be also
controlled via thermostat, timer or dimmer type control.
Once the unit is turned ON via a switch or other control device, it will take approximately 15
minutes to warm up
to normal operating temperature.
Make sure the unit is turned OFF after use.
MAINTAINING & CLEANING
It is important that HEATSTRIP units installed in outdoor locations are regularly cleaned to
ensure long and efficient operating life. It is also a con
dition of the warranty that the heater
must be cleaned and maintained on a regular basis.
As a guide, the heater should be cleaned as often as windows or outdoor furniture requires
cleaning in the same area. In coastal areas an additional rinsing on a wee
kly basis with a
light spray from a hose will provide extra protection.
HEATSTRIP units should be cleaned and inspected every 3 months.
In coastal locations in particular, salt in the air can cause rusting and staining of metal
(including stainless steel)
.
Even in city locations, pollution in the air can contaminate surfaces and will affect the ability
of the coatings and materials of the HEATSTRIP to
resist rust and stains. This applies to
both the painted and stainless steel models.
As the HEATSTRIP ha
s a protection rating for water ingress of IPX5, it can be safely washed
and cleaned with water.
The heater can be lightly sprayed with a hose, but the preferred method of cleaning is to
rinse the heater, using a soft cloth and warm water with mild deterge
nt. Ensure any soap
residue is rinsed off after cleaning.
If the heater is removed from mounting brackets, it should be stored in an undercover dry
location.
IMPORTANT MAINTENANCE & CLEANING NOTES
Do not use any abrasive materials or products to clean
the heater.
Before any cleaning or inspection activity, the heater must be switched off and cooled down
completely.
After cleaning, turn on the heater for 20 minutes to dry any residue water.
When cleaning the heater, always inspect the back of the heat
er for build-up of insects, bird
droppings, dust, salt build
-up, etc. and clean back thoroughly.
Always inspect the heater after high winds, earthquake, vandalism or any other unusual
event that may have affected the heater.
Do not use
a high pressure hose or high pressure water equipment to clean heaters, light
water spray only.

THERMOFILM AUSTRALIA PTY LTD www.heatstrip.com.au
27 Rosalie Street, Springvale VIC 3171 Australia
The heater casing and other surfaces may become discoloured or stained when located in
areas where cigarette smoke, oil lamps, incense, cooking appliance, etc are present.
In
this case, additional cleaning and maintenance may be required to keep the appliance in
good appearance and condition.
PRODUCT WARRANTY
Thermofilm warrants to the original owner that HEATSTRIP products will be free from
defects in materials and workmansh
ip for a period of 12 months from date of purchase in
accordance with the following warranty terms and conditions.
The HEATSTRIP product must be installed in accordance to the installation instructions and
relevant electrical standards and codes.
The HEA
TSTRIP product must be maintained and cleaned according to instructions detailed
in the Installation, Operation and Maintenance Manual.
Provision of the Warranty is subject to:
oThe customer has not repaired or altered the product in any unauthorised manner.
oThermofilm obligation under this warranty is limited to repair or replacement at
Thermofilm’s factory of any components of the product which Thermofilm identifies to
its satisfaction to be defective.
oTransportation charges involved in return of the product to the Thermofilm factory (or
any other location authorised in writing by Thermofilm) is the sole responsibility of the
customer.
oThermofilm does not participate in any site related costs or labour expenses incidental
to replacement of parts, repairing, removing, installing, servicing, transportation or
handling of parts or complete products, and assumes no liability on parts repaired or
replaced without written authorisation.
oAll warranty requests for repairs or replacements must be accompanied by a completed
“Warranty Claim Form” available from Thermofilm, together with proof of purchase (and
wherever possible, photos of the installation).
oNo product or components will be supplied in advance of an examination of the faulty
product or components by Thermofilm or an authorised representative of Thermofilm.
oThere is no warranty expressed or implied with regard to capacity requirements. The
selection of the unit or units depends entirely upon the system design and capacities as
determined by the purchaser.
oThe warranty excludes damage to the product or components arising from
circumstances outside the control of Thermofilm, including, without limitation, where the
product is not used for intended purpose, where the product has been rectified in any
way, incorrect installation, incorrect power supply, damaged caused during delivery,
misapplication, misuse, abuse, vandalism, lack of maintenance or accident.
oThermofilm shall not be liable for any default or delay in performance of its warranty
obligations caused by any circumstances beyond its control, including, without
limitation, judicial or government restrictions, strikes, fires, floods, abnormal weather
conditions, delayed supplies of components.

THERMOFILM AUSTRALIA PTY LTD www.heatstrip.com.au
27 Rosalie Street, Springvale VIC 3171 Australia
oAll products are inspected and tested before despatch and are at the risk of the
purchaser after shipment from the Thermofilm factory, if not delivered by Thermofilm to
destination.
oShould products be determined as damaged on arrival, immediately notify the transport
company of the condition and have them noted on the freight documents. If damage is
discovered after unpacking, demand immediate inspection by the transportation
company and insist that a record of the damage is made on the freight documentation.
The Customer warrants to use the product in ac
cordance with:
oAny instructions provided to it by Thermofilm from time to time.
oAll government and local regulations, including, but not limited to all relevant electrical,
environmental laws and regulations governing the installation, storage use, handling
and maintenance of the goods.
All necessary and appropriate precautions and safety measures relating to the installation,
storage, use, handling and maintenance of goods
This manual suits for next models
11
Table of contents
Other HEATSTRIP Electric Heater manuals
Popular Electric Heater manuals by other brands

Kroll
Kroll E18SH operating instructions

Harvia
Harvia BC45 Instructions for installation and use

Honeywell
Honeywell HZ2800P - Turbo Heater Fan instructions

Olimpia splendid
Olimpia splendid CALEO 2 TURBO TIMER Instructions for installation, use and maintenance

HELLER
HELLER HEBDF user manual

Pahlen
Pahlen Aqua HL Series user manual

Kambrook
Kambrook KCE45 manual

Sears
Sears 583.35601 owner's manual

Gude
Gude GEH 3000 Translation of the original instructions

Pfannenberg
Pfannenberg FLH operating instructions

Atlas Metal
Atlas Metal HB Series Service and installation manual

Plein Air
Plein Air CONVEX SLIM TURBO TCVP-2000 instruction manual