Hella 8ES 004 417-081 User manual
BEDIENUNGSANLEITUNG
BATTERIELADEGERÄT 7A
OPERATING INSTRUCTIONS
BATTERY CHARGER 7A
MODE D’EMPLOI
CHARGEUR DE BATTERIE 7A
INSTRUKTIONSBOK
BATTERILADDARE 7A
GEBRUIKSAANWIJZING
ACCULAADAPPARAAT 7A
MANUAL DE INSTRUCCIONES
CARGADOR DE BATERÍA 7A
ISTRUZIONI PER L’USO
CARICABATTERIE 7A
KÄYTTÖOHJE
AKKULATURI 7A
INSTRUKCJA OBSŁUGI
ŁADOWARKA DO AKUMULATORÓW 7A

Technische Änderungen vorbehalten
DE
Con riserva di modifiche tecniche
IT
Vi förbehåller oss rätten till tekniska ändringar
SV
Subject to technical changes
EN
Tekniset oikeudet pidätetään
FI
Onder voorbehoud van technische wijzigingen
NL
Sous réserve de modifications techniques
FR
Nos reservamos el derecho de introducir modificaciones técnicas
ES
2
Zmiany techniczne zastrzeżone
PL
BEDIENUNGSANLEITUNG
LADEGERÄT 7A
OPERATING INSTRUCTIONS
?????????? 7A
MODE D’EMPLOI
?????????? 7A
INSTRUKTIONSBOK
?????????? 7A
GEBRUIKSAANWIJZING
?????????? 7A
MANUAL DE INSTRUCCIONES
?????????? 7A
ISTRUZIONI PER L’USO
?????????? 7A
KÄYTTÖOHJE
?????????? 7A
INSTRUKCJA OBSŁUGI
?????????? 7A
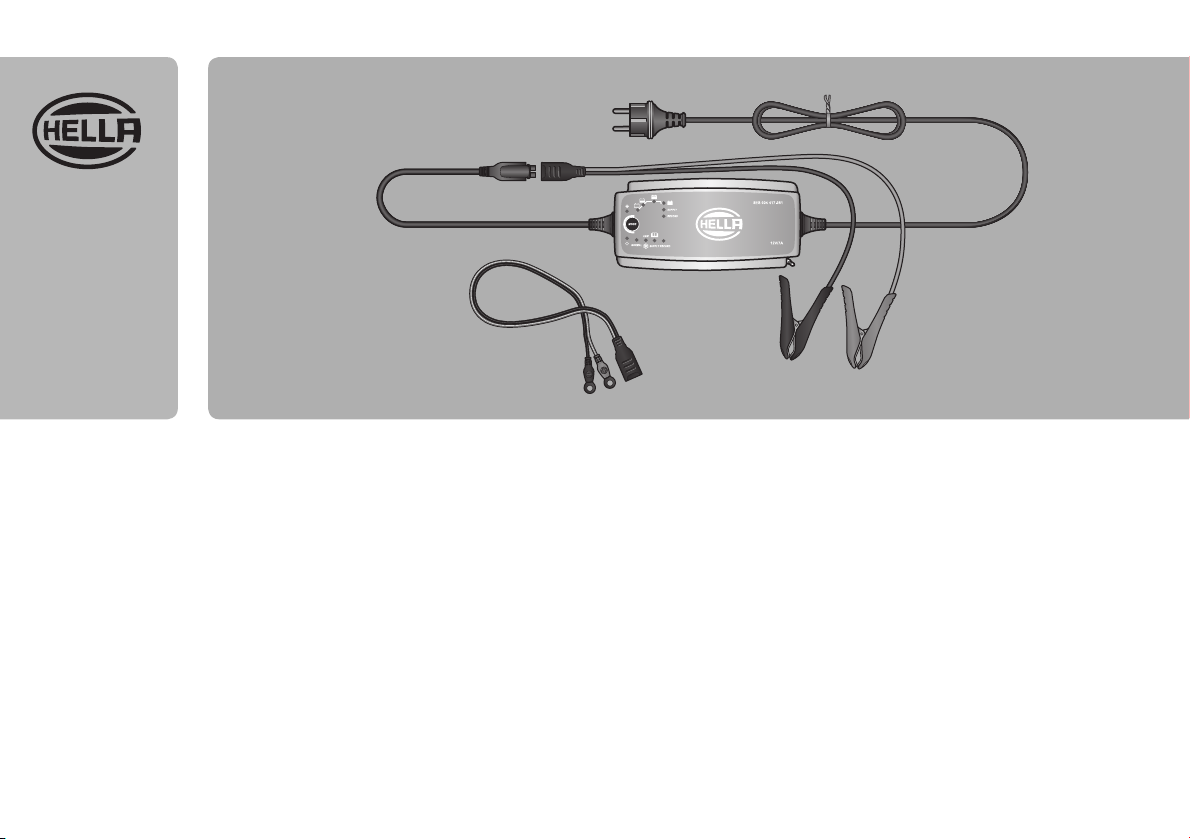
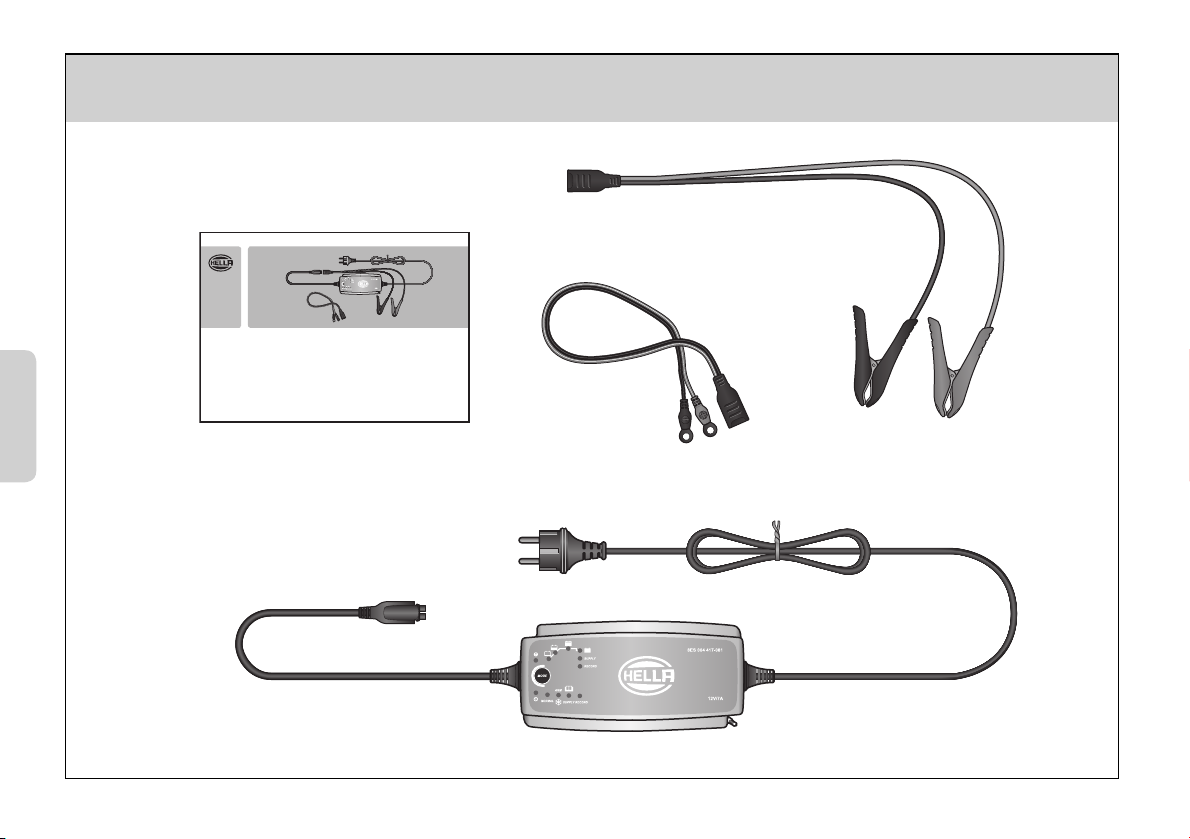
Lieferumfang
Scope of delivery
Fourniture
Leveransomfattning
Leveringsomvang
Alcance de suministro
Contenuto della confezione
Toimituksen sisältö
Zakres dostawy
3
8ES 004 417-081

Informationstext 5-12
DE
Testo informativo 53-60
IT
Informationstext 29-36
SV
Information Text 13-20
EN
Informaatioteksti 61-68
FI
Tekst informacyjny 69-76
PL
Informatie tekst 37-44
NL
Texte d’information 21-28
FR
Texto informativo 45-52
ES
4
5
DEUTSCH
DE
LADEN
1. Schließen Sie das Ladegerät an die Batterie an (siehe Geräteanschluss).
2. Schließen Sie das Ladegerät an die Steckdose an. Die Netzleuchte zeigt an, dass das Netzkabel an die Steckdose angeschlossen wurde.
Die Fehlerleuchte zeigt an, dass die Batterieklemmen falsch angeschlossen wurden. Der Verpolungsschutz stellt sicher, dass die
Batterie oder das Ladegerät nicht beschädigt werden.
3. Drücken Sie die MODE-Taste zur Wahl des Ladeprogramms.
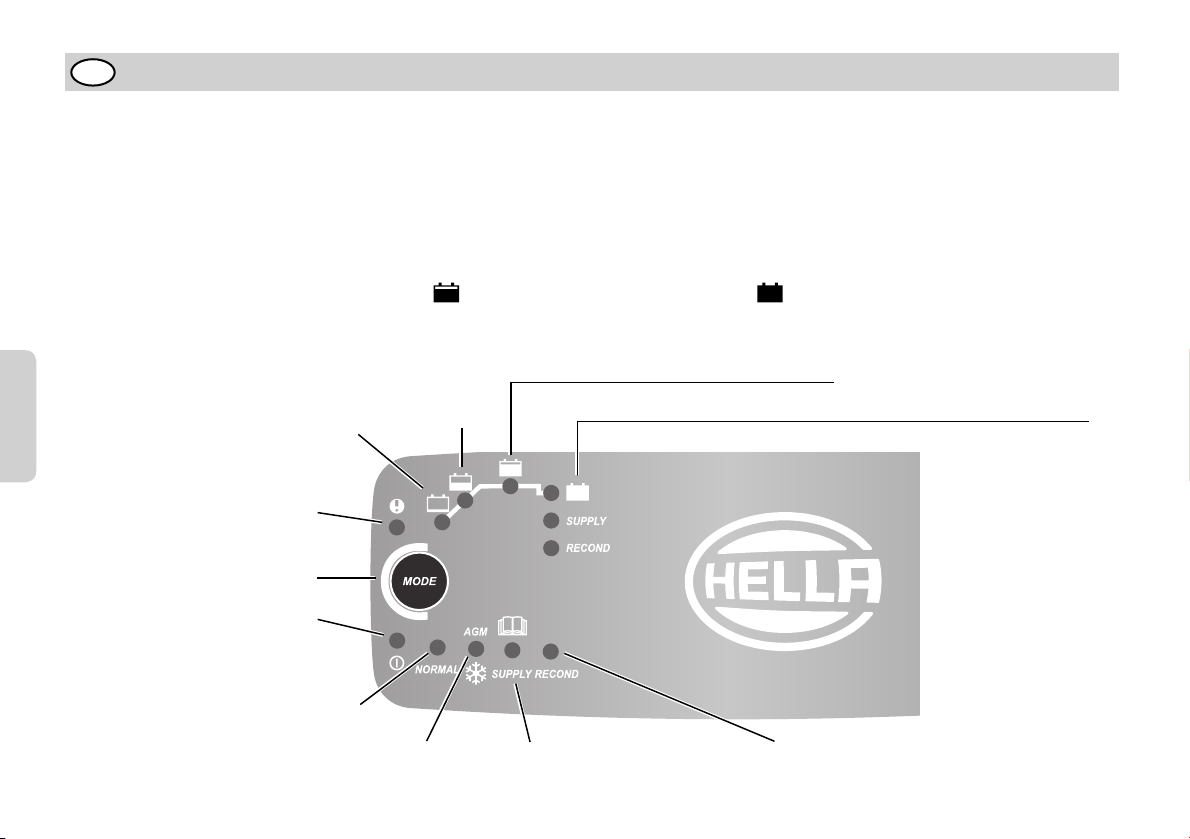
4. Achten Sie während des Ladevorgangs auf die Anzeigeleuchten. Sobald leuchtet, ist die Batterie zum Starten eines Motors bereit.
Die Batterie ist vollständig geladen, sobald leuchtet.
5. Sie können den Ladevorgang jederzeit durch Abziehen des Netzsteckers aus der Netzsteckdose unterbrechen.
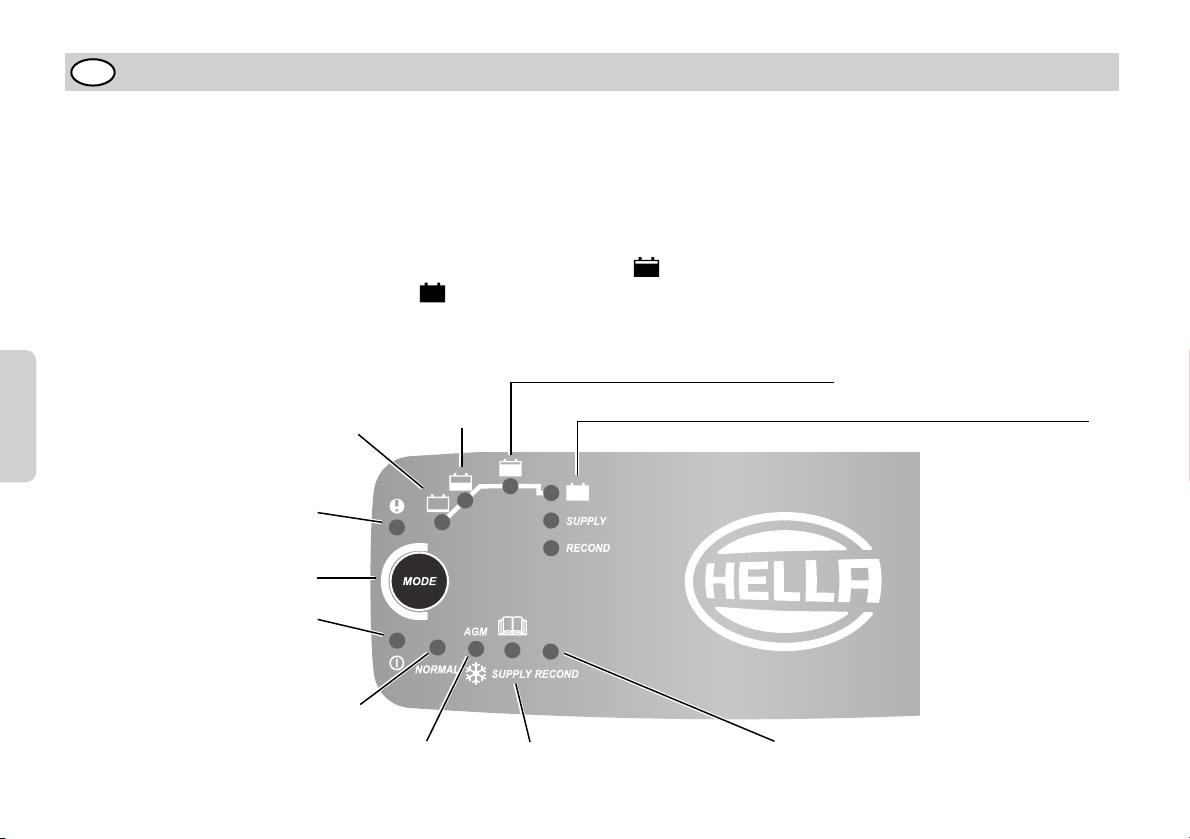
FLOAT, BATTERIE VOLL GELADEN PULSE, WARTUNGSLADUNG
ABSORPTION, EINSATZBEREIT ANALYSE
BULK
DESULPHATION SOFT START
FEHLERLEUCHTE
MODE-TASTE
NETZLEUCHTE
PROGRAMM FÜR AGM-BATTERIEN VERSORGUNGSPROGRAMM REKONDITIONIERUNGSPROGRAMM
PROGRAMM FÜR
NORMALE BATTERIEN

6
DEUTSCH
DE
LADE-PROGRAMME
Durch Druck auf die Taste MODE werden Einstellungen vorgenommen. Nach etwa zwei Sekunden aktiviert das Ladegerät das gewählte
Programm. Das gewählte Programm wird beim nächsten Einschalten des Ladegerätes wieder gestartet.
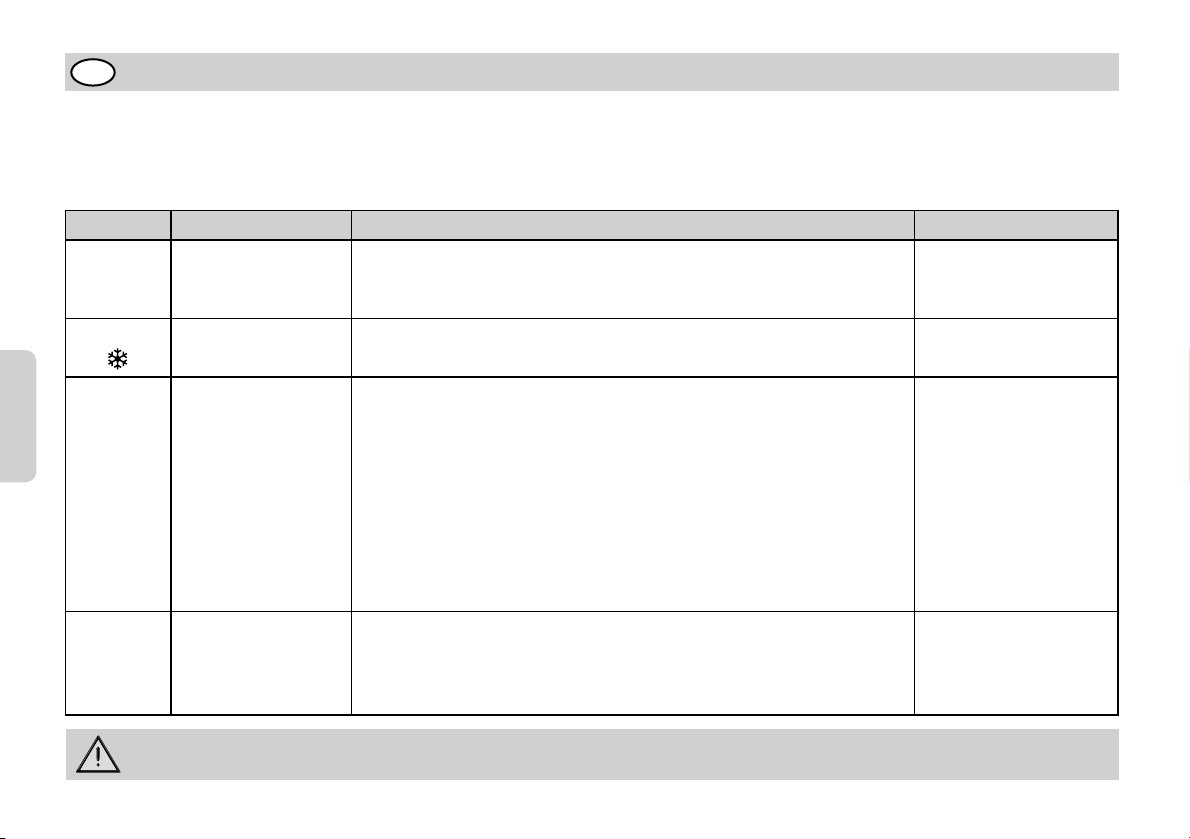
Die nachfolgende Tabelle erläutert die verschiedenen Ladeprogramme:
WARNUNG! Der Funkenschutz des Batterieladegeräts ist während des Programmes SUPPLY (Versorgung) deaktiviert.
Programm Batteriegröße (Ah) Erläuterung Temperaturbereich
NORMAL 14–225Ah Programm für normale Batterien
14.4V/7A. Wird für Nassbatterien, Ca/ Ca-, wartungsfreie
Batterien und die meisten Gel-Batterien verwendet.
+5°C–+50°C
(41ºF–122ºF)
AGM 14–225Ah Programm für AGM-Batterien
14.7V/7A. Wird für AGM-Batterien verwendet.
-20°C–+5°C
(-4ºF–41ºF)
RECOND 14–225Ah Rekonditionierungsprogramm 15.8V/1,5A. Wird zum Wiederbelebung
leerer Nass- und Ca/Ca-Batterien verwendet. Rekonditionieren Sie Ihre
Batterie einmal im Jahr und nach Tiefentladungen, um Lebensdauer und
Kapazität zu maximieren. Das Recond-Programm fügt dem normalen
Batterieprogramm den Recond-Schritt hinzu. Eine häufige Verwendung
des Programmes Recond kann zu Wasserverlust in den Batterien und
zu einer Verkürzung der Lebensdauer von elektronischen Systemen
führen. Wenden Sie sich hierzu an Ihren Fahrzeughersteller
bzw. Batterielieferanten.
-20°C–+50°C
(-4ºF–122ºF)
SUPPLY 14–225Ah Versorgungsprogramm 13.6V/7A. Als 12V-Spannungsversorgung oder
für Puffer-Wartungsladung, wenn 100% Batterieleistung erforderlich
sind, verwenden. Das Versorgungsprogramm (Supply) aktiviert den
Erhaltungsschritt (Float) ohne Zeit- oder Spannungsbegrenzung.
-20°C–+50°C
(-4ºF–122ºF)

7
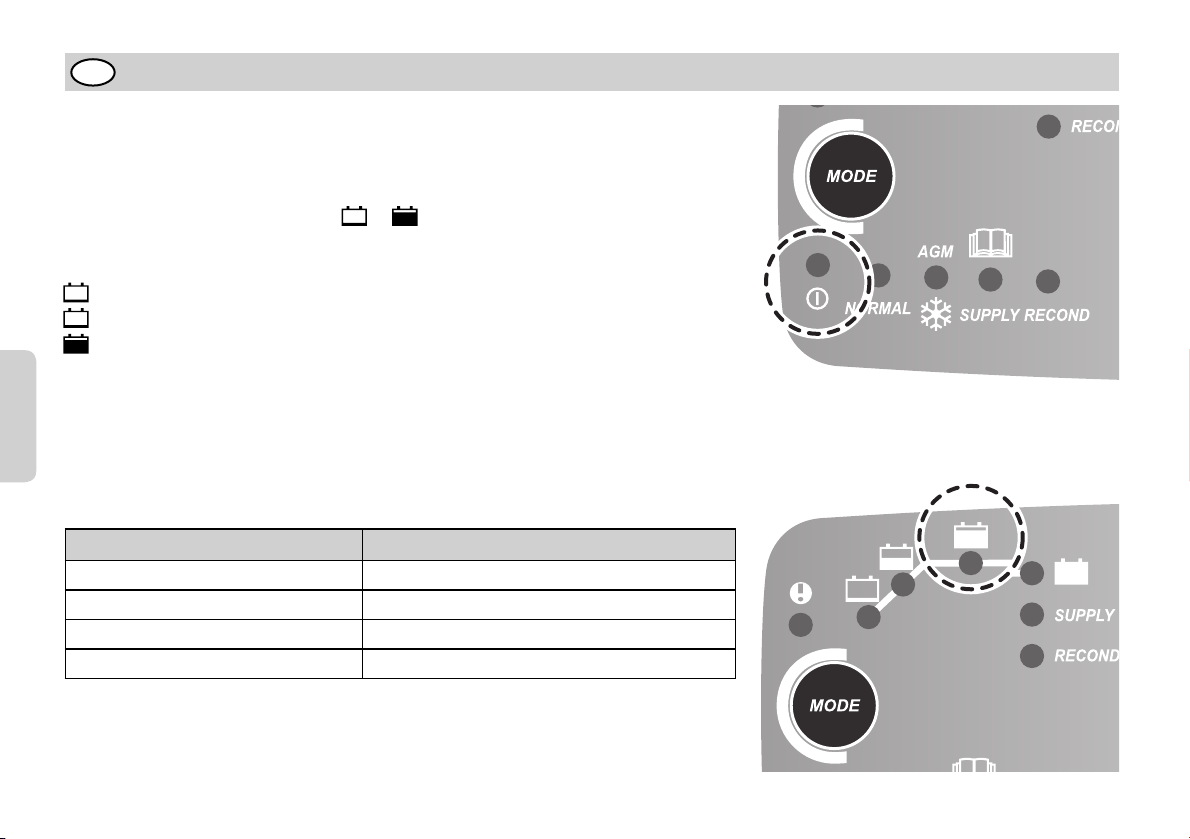
FEHLERLEUCHTE
Wenn die Fehlerleuchte aufleuchtet, prüfen Sie folgendes:
1. Ist die positive Leitung des Ladegerätes an den Pluspol der Batterie angeschlossen?
2. Ist das Ladegerät an eine 12V-Batterie angeschlossen?
3. Sind die Klemmen kurzgeschlossen?
4. Wurde der Ladevorgang in oder unterbrochen?
Starten Sie das Ladegerät erneut, indem Sie auf die Taste MODE drücken. Wenn der
Ladevorgang immer noch unterbrochen ist, ist die Batterie…
...erheblich sulfatiert und muss ggfs. ersetzt werden.
...nicht in der Lage, die Ladung aufzunehmen und muss ggfs. ersetzt werden
...nicht in der Lage, die Ladung zu halten und muss ggfs. ersetzt werden.
EINSATZBEREIT
Die Tabelle zeigt die geschätzte Zeit für das Aufladen einer leeren Batterie bis
auf 80% ihrer Ladung an.
DEUTSCH
DE
BATTERIEGRÖSSE (Ah) ZEIT BIS ZU CA. 80% LADUNG
20Ah 2h
50Ah 6h
100Ah 12h
150Ah 17h
8
DEUTSCH
DE
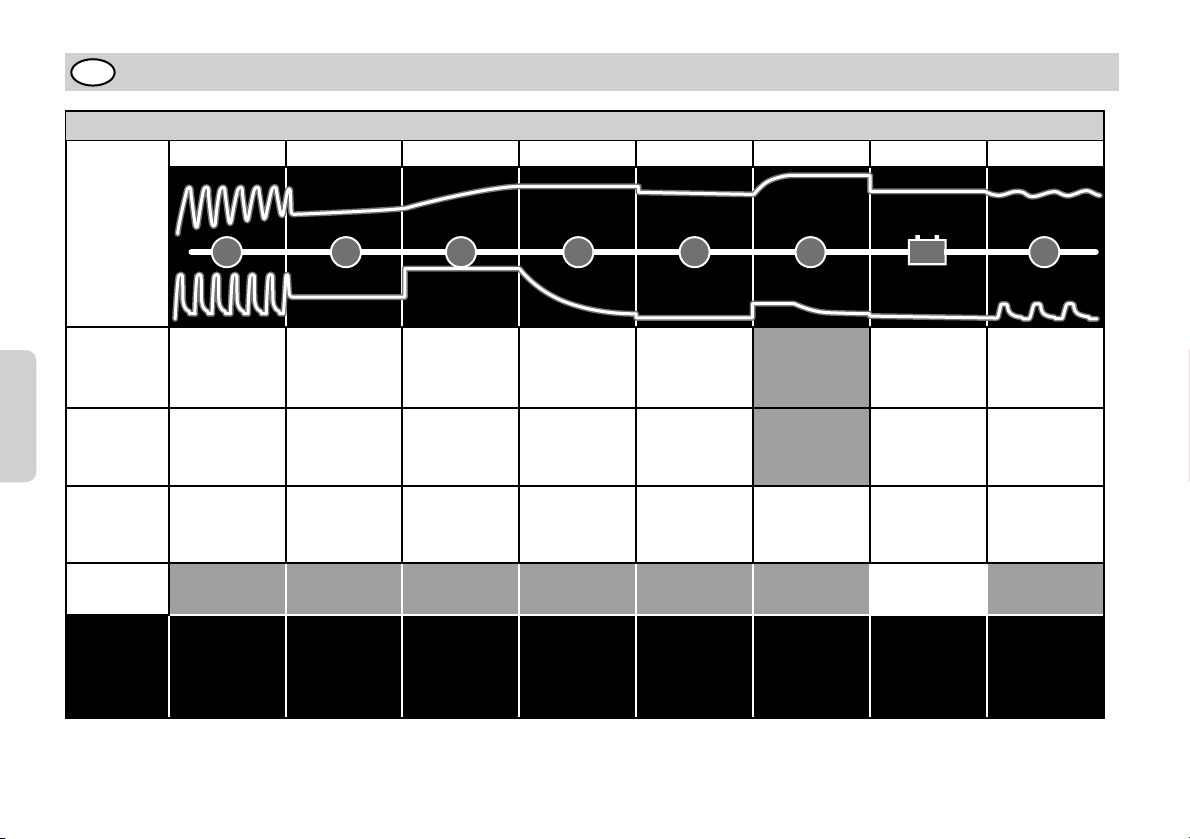
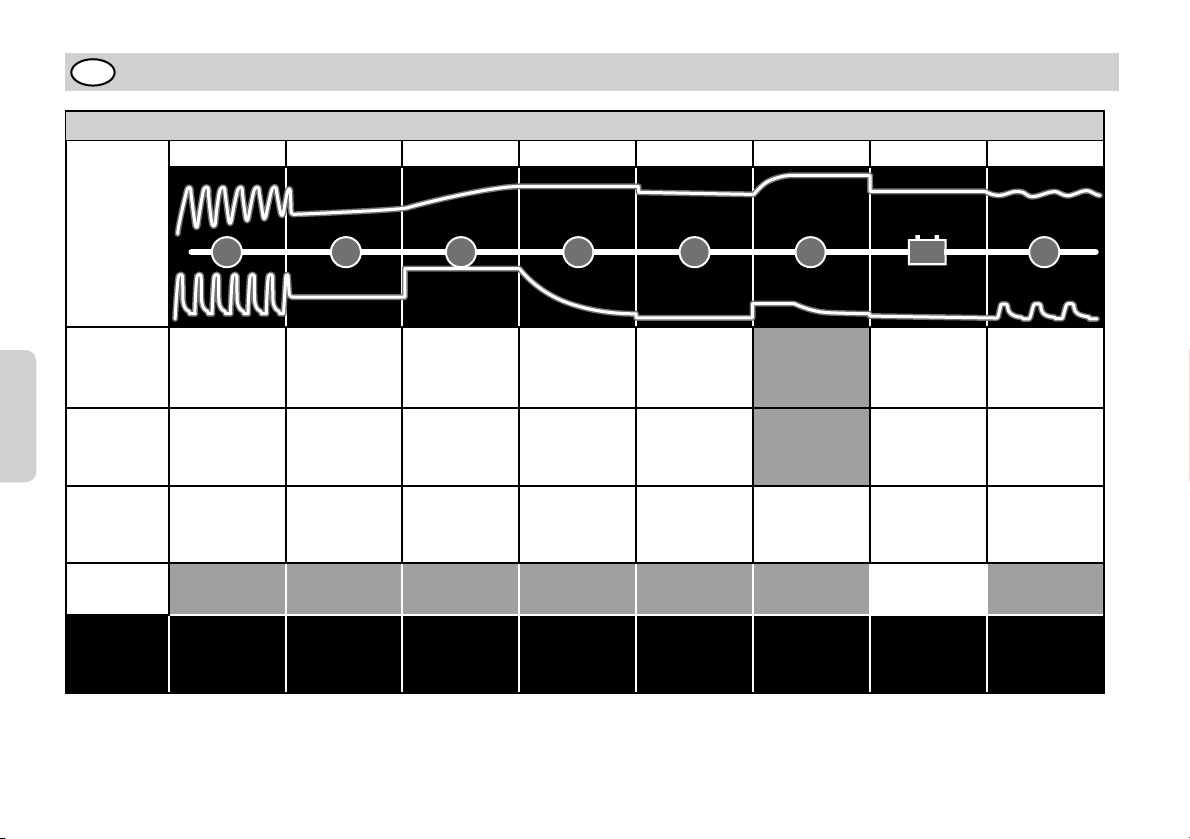
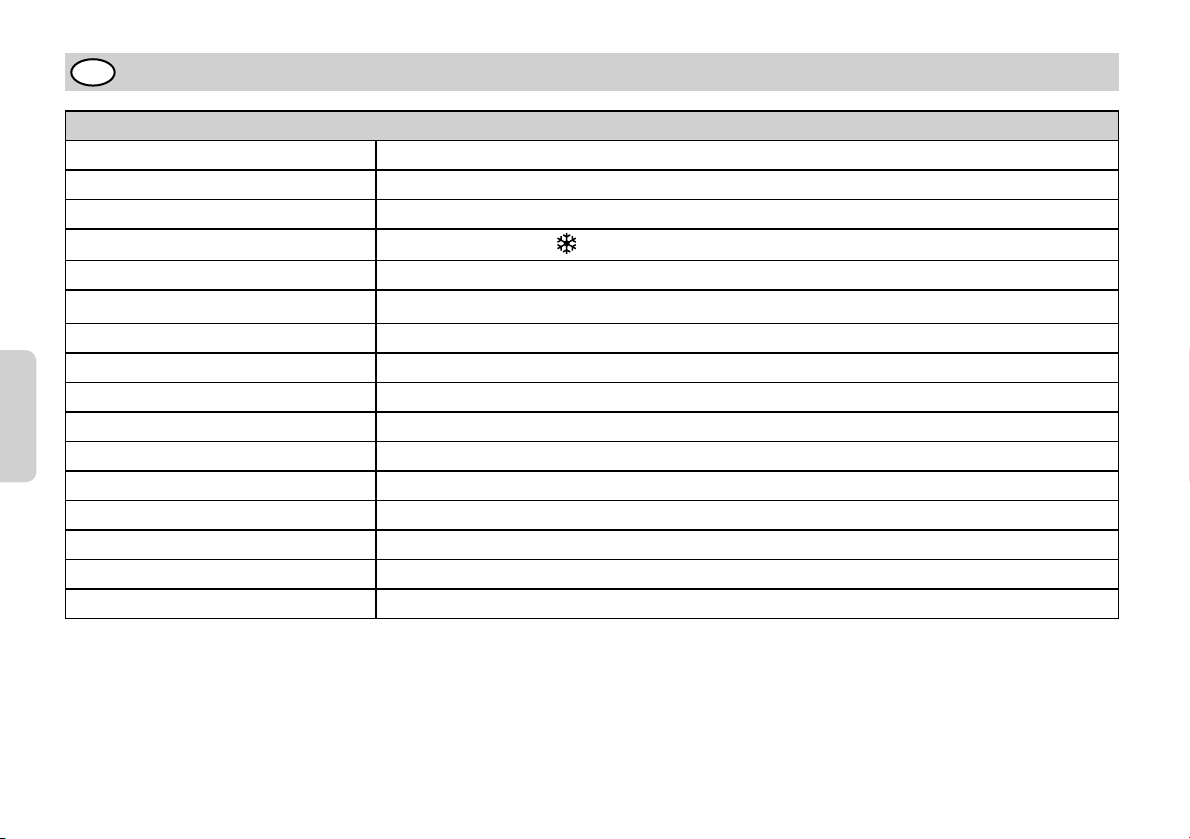
LADEPROGRAMM
DESULPHATION SOFT START BULK ABSORPTION ANALYSE RECOND FLOAT PULSE
NORMAL 14,4V 7A bis 12,6V Erhöhen der
Spannung auf
14,4 V bei 25 °C 7A
14,4 V bei 25°C
Abfallender
Strom
Prü, ob
Spannung
auf 12V abfällt
13,6V
7A
12,9V-14,4V
7-2A
AGM 14,4V 7A bis 12,6V Erhöhen der
Spannung auf
14,7 V bei 25 °C 7A
14,7 V bei 25°C
Abfallender
Strom
Prü, ob
Spannung
auf 12V abfällt
13,6V
7A
12,9V-14,4V
7-2A
RECOND 14,4V 7A bis 12,6V Erhöhen der
Spannung auf
14,4 V bei 25 °C 7A
14,4 V bei 25°C
Abfallender
Strom
Prü, ob
Spannung
auf 12V abfällt
Max 15.8V
1.5A
13,6V
7A
12,9V-14,4V
7-2A
SUPPLY Max 13,6V
7A
Limit: Max. 8h Max. 8h Max. 20h Max. 10h 3 Minuten 30 min oder 4h
je nach Batterie-
spannung
10 Tage. Lade-
zyklus startet
neu, wenn Span-
nung abfällt*
Ladezyklus
startet neu,
wenn Spannung
abfällt
* Das Versorgungsprogramm hat keine Zeit- oder Spannungsbegrenzung.
SPANNUNG (V)
STROM (A)
1 2 3 4 5 6 87

9
DEUTSCH
DE
LADEPROGRAMM
SCHRITT 1 DESULPHATION
Erkennt sulfatierte Batterien. Strom und Spannung pulsieren und entfernen auf diese Weise Sulfat von den Bleiplatten der Batterie, wodurch
die Batteriekapazität wiederhergestellt wird.
SCHRITT 2 SOFT START
Prü die Ladefähigkeit der Batterie. Mit diesem Schritt wird verhindert, dass der Ladevorgang bei defekter Batterie fortgesetzt wird.
SCHRITT 3 BULK
Laden mit Maximalstrom bis zum Erreichen von ca. 80% der Batteriekapazität.
SCHRITT 4 ABSORPTION
Laden mit schwächer werdendem Strom bis zum Erreichen von bis zu 100% der Batteriekapazität.
SCHRITT 5 ANALYSE
Test der Ladungserhaltung der Batterie. Batterien, die ihre Ladung nicht halten können, müssen ggfs. ersetzt werden.
SCHRITT 6 RECOND
Wählen Sie das Programm Recond, um den Rekonditionierungsschritt in den Ladevorgang einzufügen. Während des Rekonditionierungss-
chritts wird die Spannung erhöht, um eine kontrollierte Gasbildung in der Batterie zu erzeugen. Bei der Gasbildung wird die Batteriesäure
vermischt, was der Batterie Energie zurückgibt.
SCHRITT 7 FLOAT
Die Batteriespannung wird auf ihrem Maximalwert gehalten, indem sie mit konstanter Spannung geladen wird.
SCHRITT 8 PULSE
Die Batteriekapazität wird bei 95–100% gehalten. Das Ladegerät überwacht die Batteriespannung und gibt, sobald erforderlich, einen Lade-
impuls, um die Batterie vollständig geladen zu halten.

10
DEUTSCH
DE
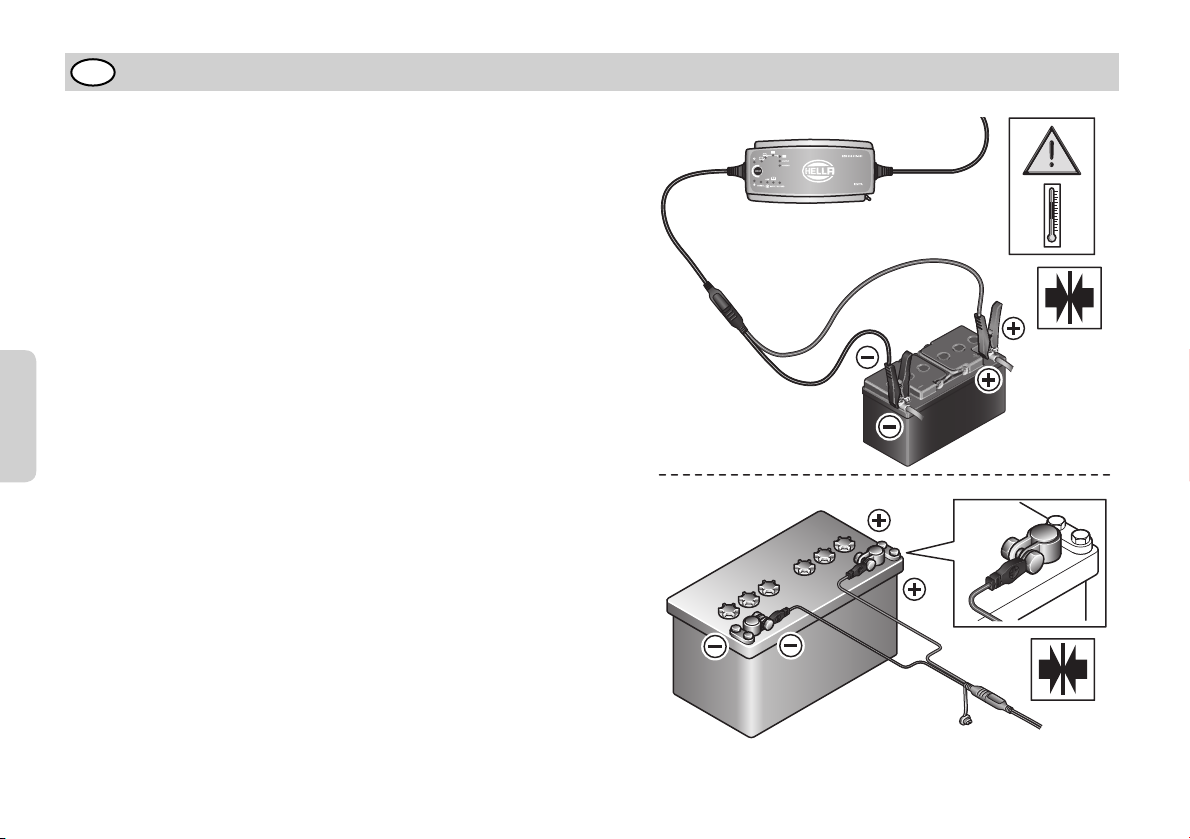
GERÄTEANSCHLUSS
INFO
Bei falschem Anschluss der Batterieklemmen stellt der Verpolungsschutz
sicher, dass Batterie und Ladegerät nicht beschädigt werden.
Für in einem Fahrzeug eingebaute Batterien
1. Schließen Sie die rote Klemme an den Pluspol der Batterie an.
2. Schließen Sie die schwarze Klemme, von der Batterie selbst und von
Krastoffleitungen entfernt, an die Fahrzeugkarosserie an.
3. Schließen Sie das Ladegerät an die Steckdose an.
4. Ziehen Sie den Netzstecker des Ladegerätes aus der Wandsteckdose,
bevor Sie die Batterie abklemmen.
5. Klemmen Sie erst die schwarze and dann die rote Klemme ab.

11
DEUTSCH
DE
*) Der Rückentladestrom ist der Strom, um den sich die Batterie entlädt, wenn das Ladegerät nicht an die Stromversorgung
angeschlossen ist.
**) Die Qualität der Ladespannung und des Ladestroms ist sehr wichtig. Eine hohe Stromwelligkeit heizt die Batterie auf, wodurch die
positive Elektrode altert. Eine hohe Spannungswelligkeit kann andere an die Batterie angeschlossene Ausrüstungen beschädigen.
TECHNISCHE DATEN
Ladegerät-Modell: 7,0 A
Modellnummer: 8PE 004 417-081
Nennwechselspannung: 220–240VAC, 50–60Hz
Ladespannung: NORMAL 14.4V, AGM 14.7V, RECOND 15.8V, SUPPLY 13.6V
Min. Batteriespannung: 2,0V
Ladestrom: 7.2A max.
Netzstrom: 1,2A effektiv (bei vollem Ladestrom)
Rückentladestrom: * < 1Ah/Monat
Welligkeit: ** <4%
Umgebungstemperatur: -20°C bis +50°C, Ausgangsleistung wird bei hohen Temperaturen automatisch reduziert
Ladegerät-Typ: 8-stufiger, vollautomatischer Ladezyklus
Batterietypen: Alle Typen von 12V-Blei-Säure-Batterien (nass, wartungsfrei, Ca/Ca, AGM und Gel)
Batteriekapazität: 14 bis 150Ah, bis zu 225Ah für Erhaltungsladung
Abmessungen: 191 x 89 x 48mm (L x B x H)
Isolationsklasse: IP65
Gewicht: 0,8kg

12
DEUTSCH
DE
SICHERHEIT
• Das Ladegerät ist für das Laden von 12V Blei-Säure-Batterien konstruiert. Verwenden Sie das Ladegerät nicht für irgendwelche anderen Zwecke.
• Vor der Verwendung die Kabel des Ladegerätes prüfen. Die Kabel und der Biegeschutz dürfen keine Brüche aufweisen. Ein Ladegerät
mit beschädigten Kabeln darf nicht verwendet werden.
• Niemals eine beschädigte Batterie aufladen.
• Niemals eine eingefrorene Batterie aufladen.
• Das Ladegerät während des Ladevorgangs niemals auf der Batterie abstellen.
• Während des Ladevorgangs immer auf ausreichende Belüung achten.
• Das Ladegerät darf nicht bedeckt werden.
• Eine Batterie kann während des Ladevorgangs explosive Gase abgeben. Funkenbildung in der Nähe der Batterie vermeiden. Wenn
Batterien das Ende ihrer Nutzungslebensdauer erreicht haben, kann eine interne Funkenbildung aureten.
• Alle Batterien haben nur eine begrenzte Nutzungslebensdauer. Eine Batterie, die während des Ladevorgangs ausfällt, wird normaler-
weise von den hochentwickelten Steuerelementen des Ladegerätes instandgesetzt; es können jedoch noch immer einige seltene Fehler
in der Batterie bestehen. Lassen Sie Batterien während des Ladevorgangs nicht über einen längeren Zeitraum unbeaufsichtigt.
• Die Verkabelung darf nicht eingeklemmt werden oder heiße Flächen oder scharfe Kanten berühren.
• Batteriesäure ist ätzend. Wenn Batteriesäure in Ihre Augen oder auf Ihre Haut gelangt, sofort mit viel Wasser abspülen und einen Arzt aufsuchen.
• Bevor Sie das Ladegerät für längere Zeit unbeaufsichtigt und angeschlossen lassen, prüfen Sie immer, ob es auf geschaltet hat.
Wenn das Ladegerät nicht innerhalb von 45 Stunden auf geschaltet hat, ist dies eine Fehleranzeige. Klemmen Sie das Ladegerät
manuell ab.
• Während des Ladevorgangs und während der Verwendung verbrauchen Batterien Wasser. Bei Batterien, bei denen Wasser nachge-
füllt werden kann, muss der Füllstand regelmäßig geprü werden. Wenn der Füllstand zu niedrig ist, destilliertes Wasser nachfüllen.
• Dieses Gerät eignet sich nicht für die Verwendung durch kleine Kinder oder Personen, die die Bedienungsanleitung nicht lesen oder
verstehen können, es sei denn, diese befinden sich unter der Aufsicht einer verantwortlichen Person, die sicherstellt, dass diese Perso-
nen das Batterieladegerät sicher verwenden können. Das Batterieladegerät darf nur außerhalb der Reichweite von Kindern gelagert und
verwendet werden. Kinder dürfen nicht mit dem Batterieladegerät spielen.
• Der Anschluss an die Stromversorgung muss den nationalen Richtlinien für elektrische Anschlüsse entsprechen.
13
CHARGING
1. Connect the charger to the battery.
2. Connect the charger to the wall socket. The power lamp will indicate that the mains cable is connected to the wall socket. The error
lamp will indicate if the battery clamps are incorrectly connected. The reverse polarity protection will ensure that the battery or charger
will not be damaged.
3. Press the MODE-button to select charging program.
4. Follow the indication lamps through the charging process.
The battery is ready to start the engine when is lit. The battery is fully charged when is lit.
5. Stop charging at any time by disconnecting the mains cable from the wall socket.
FLOAT, FULLY CHARGED PULSE, MAINTENANCE CHARGING
ABSORPTION, READY TO USE ANALYS
BULK
DESULPHATION
SOFT START
ERROR LAMP
MODE-BUTTON
POWER LAMP
AGM BATTERY PROGRAM SUPPLY PROGRAM RECOND PROGRAM
NORMAL BATTERY
PROGRAM
ENGLISH
EN
14
CHARGING PROGRAMS
Settings are made by pressing the MODE-button. Aer about two seconds the charger activates the selected program. The selected
program will be restarted next time the charger is connected.
The table explains the different Charging Programs:
Program Battery Size (Ah) Explanation Temp range
NORMAL 14–225Ah Normal battery program
14.4V/7A. Use for WET batteries,
Ca/Ca, MF and for most GEL batteries
+5°C–+50°C
(41ºF–122ºF)
AGM 14–225Ah AGM battery program 14.7V/7A
Use for AGM batteries.
-20°C–+5°C
(-4ºF–41ºF)
RECOND 14–225Ah Recond program 15.8V/1.5A
Use to return energy to the empty WET and Ca/Ca batteries. Recond
your battery once per year and aer deep dischare to maximise lifetime
and capacity. The Recond program adds the Recond step to the normal
battery program. Frequent use of the Recond program may cause
water loss in the batteries and reduce service life of electronics. Contact
your vehicle and battery supplier for advice.
-20°C–+50°C
(-4ºF–122ºF)
SUPPLY 14–225Ah Supply program 13.6V/7A
Use as 12V power supply or use for float maintenance charging when
100% capacity of the battery is required. Supply program activates Float
step without time or voltage limitation.
-20°C–+50°C
(-4ºF–122ºF)
WARNING! The spark protection on the battery charger is disabled during SUPPLY program.
ENGLISH
EN
15
ERROR LAMP
1. Is the chargers positive lead connected to the batterys positive pole?
2. Is the charger connected to a 12V battery?
3. The clamps are short circuited?
4. Has charging been interrupted in or ?
Restart the charger by pressing the MODE-button. If charging is still being interrupted,
the battery...
...is seriosly sulphated and may need to be replaced.
...can not accept charge and may need to be replaced.
...can not keep charge and may need to be replaced.
READY TO USE
The table shows the estimated time for empty battery to 80% charge
BATTERY SIZE (Ah) TIME TO 80% CHARGED
20Ah 2h
50Ah 6h
100Ah 12h
150Ah 17h
ENGLISH
EN
16
DEUTSCH
DE
CHARGING PROGRAM
DESULPHATION SOFT START BULK ABSORPTION ANALYSE RECOND FLOAT PULSE
NORMAL 14,4V 7A until 12,6V Increasing
voltage to 14,4 V
@ 25 °C 7A
14,4 V @ 25°C
Declining current
Checks if voltage
drops to 12V
13,6V
7A
12,9V-14,4V
7-2A
AGM 14,4V 7A until 12,6V Increasing
voltage to 14,7 V
@ 25 °C 7A
14,7 V @ 25°C
Declining current
Checks if voltage
drops to 12V
13,6V
7A
12,9V-14,4V
7-2A
RECOND 14,4V 7A until 12,6V Increasing
voltage to 14,4 V
@ 25 °C 7A
14,4 V @ 25°C
Declining current
Checks if voltage
drops to 12V
Max 15.8V
1.5A
13,6V
7A
12,9V-14,4V
7-2A
SUPPLY Max 13,6V
7A
Limit: Max. 8h Max. 8h Max. 20h Max. 10h 3 minutes 30 min or 4h
depending on
battery voltage
10 daysCharge
cycle restarts if
voltage drops*
Charge cycle
restarts if voltage
drops
*Supply program is not time or voltage limited.
1VOLTAGE (V)
CURRENT (A)
ENGLISH
EN
1 2 3 4 5 6 87

17
CHARGING PROGRAM
STEP 1 DESULPHATION
Detects sulphated batteries. Pulsing current and voltage, removes sulphate from the lead plates of the battery restoring the battery
capacity.
STEP 2 SOFT START
Tests if the battery can accept charge. This step prevents that charging proceeds with a defect battery.
STEP 3 BULK
Charging with maximum current until approximately 80% battery capacity.
STEP 4 ABSORPTION
Charging with declining current to maximize up to 100% battery capacity.
STEP 5 ANALYSE
Tests if the battery can hold charge. Batteries that can not hold charge may need to be replaced.
STEP 6 RECOND
Choose the Recond program to add the Recond step to the charging process. During the Recond step voltage increases to create controlled
gasing in the battery. Gasing mixes the battery acid and gives back energy to the battery.
STEP 7 FLOAT
Maintaining the battery voltage at maximum level by providing a constant voltage charge.
STEP 8 PULSE
Maintaining the battery at 95–100% capacity. The charger monitors the battery voltage and gives a pulse when necessary to keep the
battery fully charged.
ENGLISH
EN
18
CONNECT AND DISCONNECT THE CHARGER TO A BATTERY
INFO
If the battery clamps are incorrectly connected, the reverse polarity
protection will ensure that the battery and charger are not damaged.
For batteries mounted inside a vehicle
1. Connect the red clamp to the battery’s positive pole.
2. Connect the black clamp to the vehicle chassis remote from the fuel
pipe and the battery.
3. Connect the charger to the wall socket
4. Disconnect the charger from the wall socket before disconnecting the
battery.
5. Disconnect the black clamp before the red clamp.
ENGLISH
EN
19
*) Back current drain is the current that drains the battery if the charger is not connected to the mains.
**) The quality of the charging voltage and charging current is very important. A high current ripple heats up the battery which has an aging
effect on the positive electrode.
TECHNICAL SPECIFICATIONS
Charger model: 7,0 A
Model number: 8PE 004 417-081
Rated Voltage AC: 220–240VAC, 50–60Hz
Charging voltage: NORMAL 14.4V, AGM 14.7V, RECOND 15.8V, SUPPLY 13.6V
Start voltage: 2,0V
Charging current: 7.2A max.
Current, mains: 1.2A rms (at full charging current)
Back current drain: * < 1Ah/month
Ripple: ** <4%
Ambient temperature: -20°C bis +50°C, output power is reduced automatically at high temperatures
Charger type: 8-step, fully automatic charging cycle
Battery types: All types of 12V lead-acid batteries (WET, MF, Ca/Ca, AGM and GEL)
Battery capacity: 14―150Ah up to 225Ah for maintenance
Dimensions: 191 x 89 x 48mm (L x W x H)
Insulation class: IP65
Weight: 0.8kg
ENGLISH
EN
20
SAFETY
• The charger is designed for charging 12V lead-acid batteries. Do not use the charger for any other purpose.
• Check the charger cables prior to use. Ensure that no cracks have occurred in the cables or in the bend protection. A charger with
damaged cables must not be used.
• Never charge a damaged battery.
• Never charge a frozen battery.
• Never place the charger on top of the battery when charging.
• Always provide for proper ventilation during charging.
• Avoid covering the charger.
• A battery being charged could emit explosive gasses. Prevent sparks close to the battery. When batteries are reaching the end of their
lifecycle internal sparks may occur.
• All batteries fail sooner or later. A battery that fails during charging is normally taken care of by the chargers advanced control, but
some rare errors in the battery could still exist. Don’t leave any battery during charging unattended for a longer period of time.
• Ensure that the cabling does not jam or comes into contact with hot surfaces or sharp edges.
• Battery acid is corrosive. Rinse immediately with water if acid comes into contact with skin or eyes, seek immediate medical advice.
• Always check that the charger has switched to before leaving the charger unattended and connected for long periods. If the charger
has not switched to within 45 hours, this is an indication of an error. Manually disconnect the charger.
• Batteries consume water during use and charging. For batteries where water can be added, the water level should be checked regu-
larly. If the water level is low add distilled water.
• This appliance is not designed for use by young children or people who cannot read or understand the manual unless they are under
the supervision of a responsible person to ensure that they can use the battery charger safely. Store and use the battery charger out of
the reach of children, and ensure that children cannot play with the charger.
• Connection to the mains supply must be in accordance with the national regulations for electrical installations.
ENGLISH
EN
Table of contents
Languages:
Other Hella Batteries Charger manuals


