manuals.online logo
Brands
  1. Home
  2. •
  3. Brands
  4. •
  5. Helvex
  6. •
  7. Plumbing Product
  8. •
  9. Helvex VP-1 User manual

Helvex VP-1 User manual

Cada metro de altura de
su producto a la base
del tinaco equivalen a
(0,1 kg/cm²) [1,42 PSI].
Every meter of height of
your product to the base
of the water tank (0,1
kg/cm²) [1,42 PSI]
equivals.
Hola soy Fluxy, te
ayudaré a instalar
tu producto.
INSTALLATION GUIDE
GUÍA DE INSTALACIÓN
1-02-3150-2
Hi I'm Fluxy, I'll
help you to install
your product.
VP-1
Llave para Lavabo con Pedal
Expuesto sin Contra
Exposed Pedal Sink Faucet
without Drain
ADVERTENCIA / WARNING
Para disminuir el riesgo de lesiones o daños a la propiedad, lea todas las instrucciones antes de instalar el
producto. Utilice gafas de seguridad. En obras de construcción, instalación, modificación, ampliación y
reparación deben cumplir con el reglamento de construcción y obras de su localidad. El producto ilustrado
puede sufrir cambios de aspecto como resultado de la mejora continua a la que está sujeto.
Agradecemos su elección por los productos HELVEX.
Estamos seguros de que su confiabilidad por el producto excederá sus más altas expectativas, cuya
funcionalidad, estética, durabilidad, respaldo integral y alta calidad le otorgarán plena satisfacción por años,
reflejando el compromiso con la calidad, innovación y el medio ambiente que forman parte de Helvex.
Thank you for choosing HELVEX products.
We are confident that the product reliability will exceed your maximum expectations. The functionality,
aesthetics, durability, quality and support will grant you full satisfaction for years, it is Helvex commitment to
the quality, innovation and the environment.
To reduce the risk of injury or property damage, read all instructions. Before installing the product, please
remember to use safety glasses. Apply building normative for any construction, installation, alteration,
extension or repair. As result of continuous improvement, the product illustration may change in appearance.
Requerimientos de Instalación
Installation Requirements
VP-1
Requerimientos de Instalación
Installation Requirements
Modelo / Model Mínima / Minimum Máxima / Maximum
kg/cm² PSI kPa kg/cm² PSI kPa
Para el correcto funcionamiento de éstos productos, se
recomiendan las siguientes presiones:
For the correct operation of these products, the following
pressures are recommended:
0,25 3,55 24,51 6,0 85,3 588,3
Instalación General / General Installation
VP-1
fixing kit
kit de sujeción
desarmador
phillips and slotted
screwdriver
cortador de tubo
pipe cutter
teflón
plumber’s
tape 5/64” allen
wrench
llave allen
5/64”
taladro con
broca de Ø ¼”
drill with Ø ¼
drill bit
lápiz
pencil
de cruz y plano
*El producto ya cuenta con la calibración del
sistema de tensado desde fábrica en el pedal,
para su funcionamiento.
*The product already has the calibration of the
tension system from the manufacture on the
padal, for its operation.
Herramientas y Materiales Recomendados / Recommended Tools and Materials
Esta Guía de Instalación Aplica al Producto en Cualquier Acabado
This Installation Guide Applies to the Product in any Finishing
[email protected]
Original Spare Parts:
Consultancy and Technical
(52) 55 53 33 94 31
(52) 55 53 33 94 00
Refacciones Originales:
Asesoría y Servicio Técnico:
Ext. 5913, 5068 y 4815
Service:
(52) 55 53 33 94 21
[email protected]
www.refaccioneshelvex.com.mx
Artículos Incluidos en el Producto
Items Included in the Product
*55 cm
(21,6”)
1Cierre el suministro de agua. / Close the water supply.
Ubique y cierre la válvula de suministro de agua.
Generalmente se encuentran debajo del lavabo. Si se trata de un
reemplazo de grifo, quite el grifo viejo y limpie completamente la
superficie del lavabo.
Locate and close the water supply valve.
Usually found under the sink. If it is a replacement faucet, remove
the old faucet and clean the entire surface of the sink’s surface.
LLAV-01 or TV-012
angle valve (not
included)
LLAV-01 ó TV-012
válvula angular
(no incluida)
*Recommended Dimensions
*Medidas Recomendadas
NPT
(Nivel de Piso Terminado)
(Finished Floor Level) FFL
llave de plomero ó
plumber’s wrench or
RH-1242
llave hexagonal
(se vende por separado)
hexagonal wrench
(sold separately)
Instalación General / General Installation
2
45
empaque
gasket
Retire la tuerca, la rondana y el
separador. / Remove the nut, washer
and separator.
separador
separator
rondana
washer
tuerca
nut
Inserte la salida en el lavabo y
verifique que se coloque el empaque. /
Insert the faucet in to the sink hole and
check that gasket is placed.
Inserte el separador y la rondana y
enrosque la tuerca para fijar./ Insert
the separator and the washer and
screw the nut to fix.
separador
separator
rondana
washer
empaque
gasket
tuerca
nut
678
I n s t a l e l a v á l v u l a y e l p e d a l
considerando la profundidad respecto
a la instalación del lavabo, marque los
barrenos y perfore. / Install the valve
and the pedal considering the depth
with respect to the sink installation,
mark the holes and drill.
Inserte los taquetes (incluidos) y
enrosque las pijas para fijar el pedal y la
válvula, finalmente coloque los botones
en el pedal. / Insert the anchors
(included) and screw the lag screws to
fix the pedal and valve, finally place the
covers on the pedal.
Marque, perfore, inserte los taquetes y
enrosque los tornillos para fijar las
abrazaderas. / Mark, drill, insert the
anchors and screw the screws to fix the
clamps.
Medidas Recomendadas / Recommended Measures
3
2
Acot. cm (pulg.) / Dim. cm (inch.)
Nota: NO hacer curvas
menores a 10 cm /
Note: DO NOT make
curves less than 10 cm
*10 cm
(3,9”)
NPT (Nivel de Piso Terminado)
FFL (Finished Floor Level)
*10 cm
(3,93”)
válvula
valve
pedal
pedal
taquete
anchor
pija
lag screw
válvula
valve
botón
cover
pija
lag
screw
taquete
anchor pedal
pedal
90°
Nota: NO doblar el
resorte a menos de 90° /
Note: DO NOT bend
spring less than 90 °
*10 cm - 15 cm
(3,93” - 5,9")
resorte
spring
abrazadera
clamp
pija
lag screw
taquete
anchor
90°
NO sugerido
NOT suggested
NO sugerido
NOT suggested
NO sugerido
NOT suggested
*4 cm
(1,5")
Ø barreno 3,2 cm max.
Ø 1¼” drill max.
3
Instalación de las Mangueras
/ Hoses Installation
9
línea de
alimentación
supply line
Purgue la línea de alimentación
abriéndola y cerrándola. / Purge the
supply line by opening and closing it.
Enrosque la manguera (incluida) al
espárrago y a la válvula del pedal. /
Screw the hose (included) to the shank
and the valve.
11
Enrosque la manguera (no incluida) a
la línea de alimentación y después a la
válvula. / Screw the hose (not
included) to the supply line and the
valve.
10
manguera
(no incluida)
hose (not
included)
manguera
(incluida)
hose
(included)
línea de
alimentación
supply line
válvula
valve
válvula
valve
Para abrir el flujo de agua presione el pedal. / Press the pedal to
open the water flow.
13
Operación / Operation
12 Abra el suministro de agua. / Open the water supply.
Desenrosque el aireador y límpielo a chorro de agua y un cepillo
suave. / Unscrew the aerator and clean with water and a soft
brush.
aireador
aerator
empaque
gasket
barril
barrel
14
Aerator Maintenance
Mantenimiento del Aireador /
Arme nuevamente. / Reassemble.
15
Apriete firmemente. / Tighten firmly.
aireador
aerator
empaque
gasket
barril
barrel
Enter our free
training courses.
Participa en nuestros
cursos gratuitos
de capacitación.
Recomendaciones de Limpieza / Cleaning Recommendations
HELVEX, S. A. DE C. V. Calzada Coltongo # 293, Col. Industrial Vallejo, Alcaldía Azcapotzalco, C. P. 02300, Ciudad de México.
Es muy importante seguir las siguientes instrucciones para conservar los
acabados de los productos HELVEX, con brillo y en perfecto estado:
1. Utilice únicamente agua y un paño limpio.
2. No utilice fibras, polvos, abrasivos, ni productos químicos.
3. No utilice objetos punzo-cortantes para limpiar los acabados.
4. Se recomienda realizar la limpieza de su producto diariamente.
Visite nuestras páginas www.helvex.com.mx para México y www.helvex.com
para el mercado Internacional
It is very important to follow the instructions below to preserve HELVEX products
finishings, shiny and in perfect conditions:
1. Use only water and a clean cloth.
2. Do not use fibers, powders, abrasives, or chemicals.
3. Do not use sharp objects to clean the finishings.
4. It is recommended to clean your device daily
Visit our websites www.helvex.com.mx for México and www.helvex.com
for the international market
In Guadalajara:
Contact:
In Monterrey:
En la Ciudad de México:
In Mexico City:
En Monterrey: En Guadalajara:
(52) 55 53 33 94 00
Ext. 5806, 5805 y 5804
33 36 19 01 13
Comunícate:
81 83 33 57 67
81 83 33 61 78
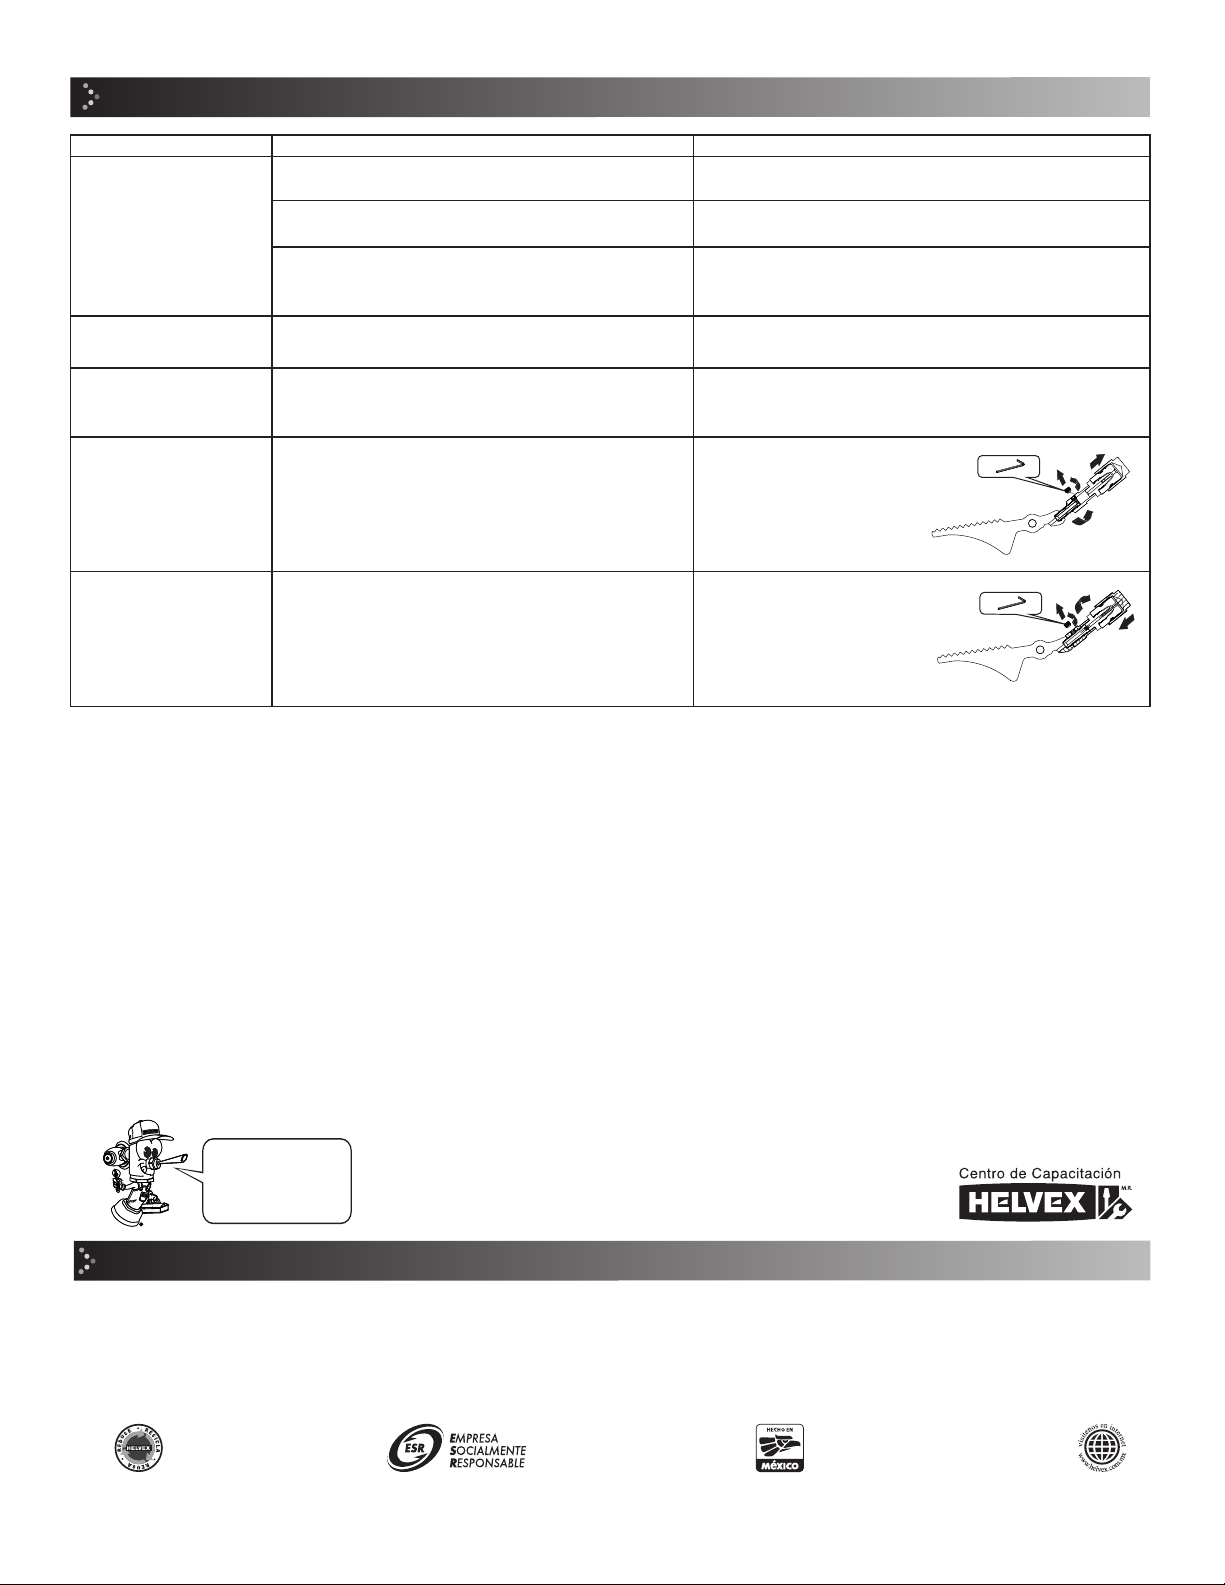
Posibles Causas y Soluciones / Troubleshooting
Problema / Problem Causas / Causes Soluciones / Solutions
Existe poco flujo de agua. /
There is low water flow.
Aireador obstruído. / Clogged areator.
La presión de opreación no es la adecuada. /
The operating pressure is not adequate.
Las válvula angular no esta totalmente abierta. /
The angle valve is not fully open.
Retire el aireador y límpielo (Pág 3. pasos 14 y 15). /
Remove the aereator and clean (Page 3, steps 14 and 15).
Abrir totalmente la válvula angular. (Pag. 3, paso 9)
/ Fully open angular valve (page 3, step 9)
La salida está floja.
/ The faucet is loose.
La tuerca espárrago no está apretada.
/ The nut is not tightened.
Apriete firmemente la tuerca del espárrago (Pag. 2, paso 5).
/ Tigthen the nut of shank (Page 2, step 5).
Hay fuga en las conexiones.
/ There are leaks in the
connections.
Es posible que las conexiones no estén firmemente apretadas.
/ Connections are possibly not tigh enough.
Apriete firmemente las conexiones (Pag. 3, paso 9 al 11)
“Instalación de las mangueras”. / Thigten the connections
(page 3, step 9 to 11) “Hoses Installation”.
Verifique que la presión mínima de operación sea la correcta (Pag. 1). /
Verify that the minimum operating preasure is correct (Page 1).
No existe flujo de agua al
accionar el pedal.
/ There is no water flow when
the pedal is operated.
El pedal no presenta tensión. /
The pedal has no tension.
Ajustar hacia la condición máxima
para control de tensión de chicote. /
Adjust to maximum condition to
control the whip cable tension.
El pedal presenta sensación de sobre tensado. /
The pedal has an over-stressed feeling.
Existe flujo de agua sin
accionar el pedal.
/ There is water flow without
pressing the pedal.
Ajustar hacia la condición mínima
para control de tensión de chicote. /
Adjust to minimum condition to
control the whip cable tension.

Other Helvex Plumbing Product manuals

Helvex C-69-S User manual

Helvex

Helvex C-69-S User manual

Helvex 5424 User manual

Helvex

Helvex 5424 User manual

Helvex 22 User manual

Helvex

Helvex 22 User manual

Helvex U16105 User manual

Helvex

Helvex U16105 User manual

Helvex Albatros HM-37 User manual

Helvex

Helvex Albatros HM-37 User manual

Helvex TV-121 User manual

Helvex

Helvex TV-121 User manual

Helvex TV-012 User manual

Helvex

Helvex TV-012 User manual

Helvex Forza TV-304 Instruction Manual

Helvex

Helvex Forza TV-304 Instruction Manual

Helvex SQUADRA E-711 User manual

Helvex

Helvex SQUADRA E-711 User manual

Helvex Elegance 8148 User manual

Helvex

Helvex Elegance 8148 User manual

Helvex Nuva TV-061-S User manual

Helvex

Helvex Nuva TV-061-S User manual

Helvex MAGNA DX UE-914 User manual

Helvex

Helvex MAGNA DX UE-914 User manual

Helvex UH-105-WOA User manual

Helvex

Helvex UH-105-WOA User manual

Helvex Nuva TV-203 User manual

Helvex

Helvex Nuva TV-203 User manual

Helvex 444 User manual

Helvex

Helvex 444 User manual

Helvex 27 User manual

Helvex

Helvex 27 User manual

Helvex 312-WC-4,8 User manual

Helvex

Helvex 312-WC-4,8 User manual

Helvex LIQUIDA UTV-302 Manual

Helvex

Helvex LIQUIDA UTV-302 Manual

Helvex Piura PIU-101 User manual

Helvex

Helvex Piura PIU-101 User manual

Helvex RM-27 User manual

Helvex

Helvex RM-27 User manual

Helvex SPACIO HSTRWDSP User manual

Helvex

Helvex SPACIO HSTRWDSP User manual

Helvex ELITE UE-300-DX User manual

Helvex

Helvex ELITE UE-300-DX User manual

Helvex KUBICA E-776 User manual

Helvex

Helvex KUBICA E-776 User manual

Helvex Explora H-201 User manual

Helvex

Helvex Explora H-201 User manual

Popular Plumbing Product manuals by other brands

Toto TX111LRYR quick start guide

Toto

Toto TX111LRYR quick start guide

Hans Grohe Talis M54 270 1jet 72860 Series Instructions for use/assembly instructions

Hans Grohe

Hans Grohe Talis M54 270 1jet 72860 Series Instructions for use/assembly instructions

Hans Grohe FlowStar 52105 1 Series Installation/User Instructions/Warranty

Hans Grohe

Hans Grohe FlowStar 52105 1 Series Installation/User Instructions/Warranty

KWC 12.203.151.000 Installation and service instructions

KWC

KWC 12.203.151.000 Installation and service instructions

Voda Plumbingware Olympia VOP91BN manual

Voda Plumbingware

Voda Plumbingware Olympia VOP91BN manual

Brizo ARTESSO 61025LF quick start guide

Brizo

Brizo ARTESSO 61025LF quick start guide

Grohe Grohtherm XL 35 003 installation instructions

Grohe

Grohe Grohtherm XL 35 003 installation instructions

Hans Grohe Raindance E 300 1jet 26239007 Instructions for use/assembly instructions

Hans Grohe

Hans Grohe Raindance E 300 1jet 26239007 Instructions for use/assembly instructions

Mora TERM installation instructions

Mora

Mora TERM installation instructions

Newport Brass 2460 installation instructions

Newport Brass

Newport Brass 2460 installation instructions

Moen CA87003 Series quick start guide

Moen

Moen CA87003 Series quick start guide

Presto DL800S installation instructions

Presto

Presto DL800S installation instructions

Riobel PFTQ12T installation guide

Riobel

Riobel PFTQ12T installation guide

Moen T6125WR quick start guide

Moen

Moen T6125WR quick start guide

Hans Grohe Flexaplus 58185 Series Instructions for use/assembly instructions

Hans Grohe

Hans Grohe Flexaplus 58185 Series Instructions for use/assembly instructions

Hans Grohe Focus 31741180 Assembly instructions

Hans Grohe

Hans Grohe Focus 31741180 Assembly instructions

Stern Engineering D28 Series manual

Stern Engineering

Stern Engineering D28 Series manual

Sapir SP-7100-IE instruction manual

Sapir

Sapir SP-7100-IE instruction manual

manuals.online logo
manuals.online logoBrands
  • About & Mission
  • Contact us
  • Privacy Policy
  • Terms and Conditions

Copyright 2025 Manuals.Online. All Rights Reserved.