manuals.online logo
Brands
  1. Home
  2. •
  3. Brands
  4. •
  5. Helvex
  6. •
  7. Plumbing Product
  8. •
  9. Helvex 22 User manual

Helvex 22 User manual

1-04-0242-2
Hola soy Fluxy, te
ayudaré a instalar
tu producto.
Hi I'm Fluxy, I'll
help you to install
your product.
*Estas coladeras no aplican en caso de
remodelación (solo si se remueven los
acabados).
*These strainers are not applicable in case of
remodeling (only if the finishes are removed).
1
INSTALLATION GUIDE
GUÍA DE INSTALACIÓN
22 22-CH
22-HL 22-CHL
22-HLI 22-CHLI
22
Coladera Corta de Una Boca con Rejilla Redonda de Acero
Inoxidable
Side Outlet Short Floor Drain with Stainless Steel Round Grid
22-HL
Coladera Corta de Una Boca con Desagüe de Contorno
Redondo, Cromo
Side Outlet Short Floor Drain with Round Contour Drain, Chrome
22-HLI
Coladera Corta de Una Boca para Inserto Redondo, Cromo
Side Outlet Short Floor Drain for Round Insert, Chrome
22-CH
Coladera Corta de Una Boca con Rejilla Cuadrada de Acero Inoxidable
Side Outlet Short Floor Drain with Stainless Steel Square Grid
22-CHL
Coladera Corta de Una Boca con Desagüe de Contorno Redondo, Cromo
Side Outlet Short Floor Drain with Round Contour Drain, Chrome
22-CHLI
Coladera Corta de Una Boca para Inserto Cuadrado, Cromo
Side Outlet Short Floor Drain for Square Insert, Chrome
Para disminuir el riesgo de lesiones o daños a la propiedad, lea todas las instrucciones antes de instalar el
producto. Utilice gafas de seguridad. En obras de construcción, instalación, modificación, ampliación y
reparación deben cumplir con el reglamento de construcción y obras de su localidad. El producto ilustrado
puede sufrir cambios de aspecto como resultado de la mejora continua a la que está sujeto.
Agradecemos su elección por los productos HELVEX.
Estamos seguros de que su confiabilidad por el producto excederá sus más altas expectativas, cuya
funcionalidad, estética, durabilidad, respaldo integral y alta calidad le otorgarán plena satisfacción por años,
reflejando el compromiso con la calidad, innovación y el medio ambiente que forman parte de Helvex.
To reduce the risk of injury or property damage, read all instructions before installing the product. Please
remember to use safety glasses. In construction, installation, alteration, extension and repair, the rules of
constructions must be applied. As result of continuous improvement, the illustration product may change in
appearance.
ADVERTENCIA / WARNING
Esta Guía de Instalación Aplica al Producto en Cualquier Acabado
This Installation Guide Applies to the Product in any Finishing
Thank you for choosing HELVEX products.
We are confident that the product reliability will exceed your maximum expectations. The functionality,
aesthetics, durability, quality and support will grant you full satisfaction for years, it is Helvex commitment to
the quality, innovation and the environment.
Relación
Altura Tinaco-Presión
Relation
Herramientas y Materiales Recomandados /
Recommended Tools and Materials
llave inglesa
adjustable
wrench
desatornillador plano
slotted screwdriver
Herramienta Incluida en el Producto /
Tools Included in the Product
Mod. 22-HL
Mod. 22-CHL
Mod. 22-HLI
maintenance wrench
llave para mantenimiento
teflón
plumbler´s tape
[email protected]
Original Spare Parts:
Consultancy and Technical
(52) 55 53 33 94 31 (52) 55 53 33 94 00
Refacciones Originales:
Asesoría y Servicio Técnico:
Ext. 5913, 5068 y 4815
Service:
(52) 55 53 33 94 21
[email protected]
Modelo /
Model
Altura del
Cuerpo /
Body Height
(A)
91
(3,6)
22
22-CH 22-HL
22-CHL 22-HLI
22-CHLI
Medidas Generales / General Dimensions
Ajuste de la Contra
Strainer Adjustment
(B)
Mínimo
Minimum
Máximo
Maximum
30
(1,18)
40
(1,57)
45
(1,77)
55
(2,1)
A
B
A
B
A
B
El ajuste de instalación se debe de generar antes de colocar el acabado final o el nivel de piso terminado (NPT). / The installation adjustment must be
generate before to place the final finished or the finished floor level (FFL).
Acot. mm [pulg.] / Dim. mm [inch.]
30
(1,18)
45
(1,77)
55
(2,1)
40
(1,57)
22
22-HL
22-HLI
22-CH
22-CHL
22-CHLI
2
Instalación General / General Installation
tezontle
gravel
concreto
concrete
adhesivo
adhesive
tezontle
gravel
concreto
concrete
NPT (Nivel de Piso Terminado)
FFL (Finished Floor Level)
2
5
4Coloque la coladera encima de una base de cemento para
nivelarla y fijarla. / Place the floor drain on top of a cement
base to level and fixing it.
NOTA: Para nivelar la coladera, retire la tapa protectora y vuelva
a colocarla después de nivelar.
NOTE: To level the floor drain, remove the protective cap and
place it again after to level.
tubería (no incluida)
pipe (not included)
2” - 11 ½ NPSM
6Rellene el área con tezontle. / Fill the area with gravel.
3
tapa protectora
protective cap
D: altura de la base de fijación
fixing base height
C: altura de instalación
installation height
C
D
cemento
concrete
conector roscado
threaded connector
2" - 11 ½ NPSM
NPT
FFL
2%
A
A
salida
outlet
2" - 11 1/2 NPSM
VISTA FRONTAL / FRONT VIEW
Enrosque el conector roscado de 2" - 11 ½ NPSM e instale la tubería
con el 2% de inclinación por cada metro. / Screw the 2" - 11 ½ NPSM
threaded connector and install the pipe with 2% tilt per meter.
NPT
FFL
Ubique la coladera en el área a instalarse. Confirme y marque la
altura necesaria para que la coladera quede al nivel del piso
terminado. / Place the floor drain in the area to be installed.
Confirm and mark the height required for the floor drain to be
installed at the level of the finished floor.
tezontle
gravel
3
7Coloque tezontle en el plato de la coladera. / Place the gravel over
the floor drain receptor.
8
Coloque una sección de tubo PVC sanitario para separar la
contra del concreto cuando se coloque. / Place an sanitary PVC
pipe section to separate the adjustable drain barrel from the
concrete when placed.
Coloque el concreto y cuando seque retire la sección del tubo de
PVC. / Place the concrete and when dry remove the PVC pipe
section.
910 Coloque el adhesivo y el acabado final. / Place the adhesive and the
final finished.
NOTA: Retire la tapa protectora de la contra para insertar el acabado final.
NOTE: Remove the protective cap from the drain to insert the final finished.
12
porta inserto
con inserto
insert holder
with insert
inserto
insert
Para los modelos 22-HLI y 22-CHLI,
corte el acabado final a la medida del
interior del porta inserto y colóquelo con el
adhesivo correspondiente. / For model
22-HLI and 22-CHLI, cut the final finished
to fit the insert holder and place it with the
adhesive corresponding.
porta inserto
insert holder
Instalación General /
Mantenimiento / Maintenance
11 Para los modelos 2 y 2 CH, desenrosque los tornillos y retire la rejilla. Retire el casquillo 2 2-
armado, posteriormente desenrosque el embudo del casquillo para limpiar todas las partes y
el interior de la coladera. Arme nuevamente. / For the models 2 and 22-CH, unscrew the 2
screws and remove the grid. Remove the assembled bushing, then unscrew the funnel from
the bushing to clean all parts and the floor drain inside. Assemble again.
tornillo
screw
Instalación General /
Ceramic Insert Installation
Instalación del Inserto Cerámico /
NPT
FFL
casquillo
armado
assembled
bushing
rejilla
grid
casquillo
bushing
embudo
funnel
NPT
FFL
tezontle
gravel
tubo PVC sanitario
PVC sanitary pipe
NPT
FFL
tezontle
gravel
NPT
FFL
tubo PVC sanitario
PVC sanitary pipe adhesivo
adhesive
Se recomienda realizar al menos un mantenimiento por año. / It is recommended that at least
one maintenance per year.
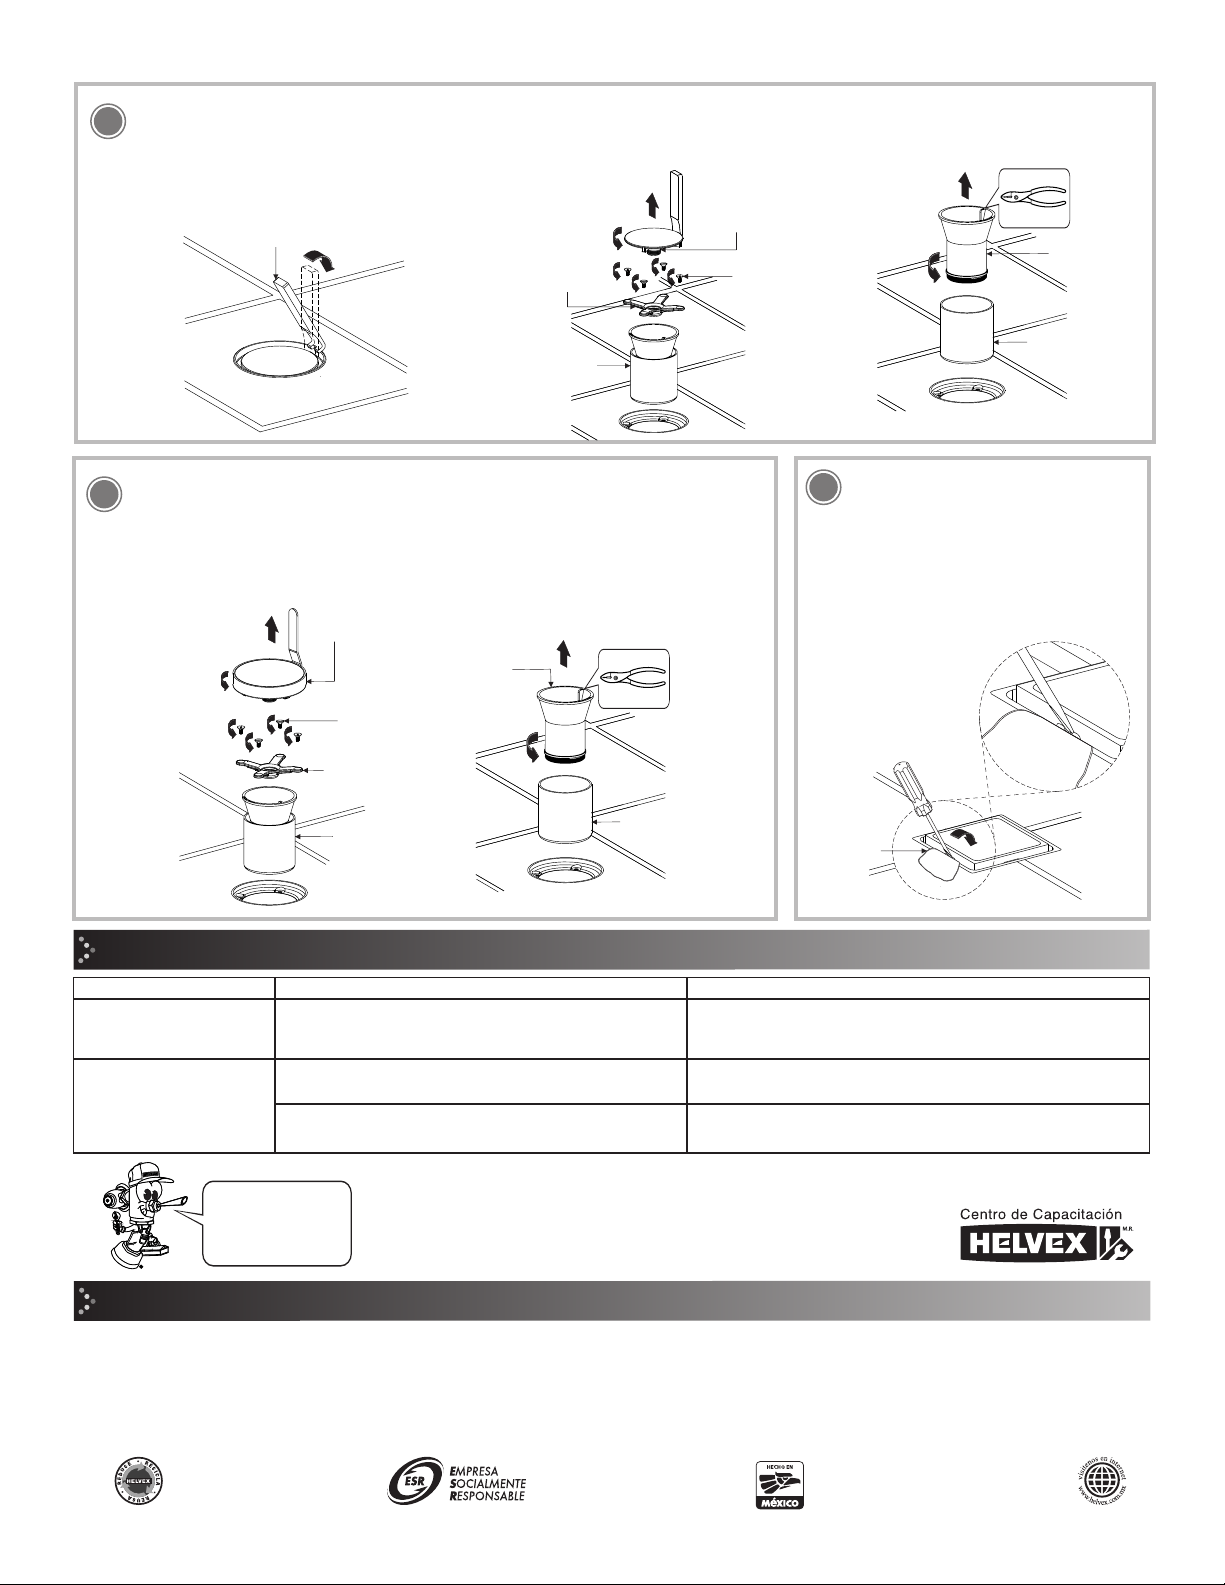
Para el modelo 22-HLI utilice la herramienta (incluida) para desenroscar el porta inserto.
Desenrosque los tornillos y remueva el soporte para porta inserto y el casquillo armado,
posteriormente desenrosque el embudo del casquillo para limpiar todas las partes y el
interior de la coladera. Arme nuevamente. / For the 22-HLI use the wrench (included) to
unscrew the insert holder. Unscrew the screws and remove the insert holder and the
assembled bushing, then unscrew the funnel from the bushing to clean all parts and the floor
drain inside. Assemble again.
4
Es muy importante seguir las siguientes instrucciones para conservar los
acabados de los productos HELVEX, con brillo y en perfecto estado:
1. Utilice únicamente agua y un paño limpio.
2. No utilice fibras, polvos, abrasivos, ni productos químicos.
3. No utilice objetos punzo-cortantes para limpiar los acabados.
4. Se recomienda realizar la limpieza de su producto diariamente.
Visite nuestras páginas www.helvex.com.mx para México y www.helvex.com
para el mercado Internacional
It is very important to follow the instructions below to preserve HELVEX products
finishes, shiny and in perfect condition:
1. Use only water and a clean cloth.
2. Do not use fibers, powders, abrasives, or chemicals.
3. Do not use sharp objects to clean the finish.
4. It is recommended to clean your product daily.
Visit our pages www.helvex.com.mx for Mexico and www.helvex.com
for the International market.
Recomendaciones de Limpieza / Cleaning Recommendations
In Guadalajara:
Contact:
Enter our free
training courses.
In Monterrey:
En la Ciudad de México:
In Mexico City:
En Monterrey: En Guadalajara:
(52) 55 53 33 94 00
Ext. 5806, 5805 y 5804
33 36 19 01 13
Comunícate:
Participa en nuestros
cursos gratuitos
de capacitación.
81 83 33 57 67
81 83 33 61 78
HELVEX, S. A. DE C. V. Calzada Coltongo # 293, Col. Industrial Vallejo, Alcaldía Azcapotzalco, C. P. 02300, Ciudad de México.
Posibles Causas y Soluciones / Troubleshooting
Problema / Problem Causas / Causes Soluciones / Solutions
La rejilla o el desagüe de contorno estan bloqueados. /
The grid or the contour drain are blocked.
Realice mantenimiento de la coladera (Pág. 3 y 4, paso 12, 13, 14 ó 15
“Mantenimiento”). / Clean the perimeter groove
(Page 3 y 4, step 12, 13, 14 or 15 “Maintenance”)
Se regresan los olores.
/ Odors return.
No se colocó el casquillo / armado.
The assembled bushing is not placed.
Coloque el casquillo armado.
/ Place the assembled bushing.
No hay agua en la coladera para hacer el sello de hidráhulico. /
/ There is no water to make the hydraulic seal.
Vierta agua la coladera para hacer el sello hidráulico. /
Pour water in the floor drain to make the hydraulic seal.
El desalojo de agua es lento
o nulo. / Water eviction is
slow or null .
15
franela
flannel
porta inserto
insert holder
soporte para
porta inserto
holder for
insert holder
casquillo armado
assembled bushing
13
wrench for dome
(incluida)
Para los modelos 22-HL y 22-CHL utilice la llave (incluida) para desenroscar la cúpula. Desenrosque los tornillos y remueva el soporte para cúpula
y el casquillo armado, posteriormente desenrosque el embudo del casquillo para limpiar todas las partes y el interior de la coladera. Arme
nuevamente. / For models 22-HL and 22-CHL use the wrench (included) to unscrew the dome. Unscrew the screws and remove the dome holder
and the assembled bushing, then unscrew the funnel from the bushing to clean all parts and the floor drain inside. Assemble again.
Para el modelo 22-CHLI utilice un
desarmador plano para remover el porta
inserto y remueva el casquillo armado
para realizar la limpieza de cada parte y
del interior de la coladera. / For the 22-
CHLI use a slotted screwdriver to
remove the insert holder and remove the
assembled bushing to clean each part
and floor drain inside.
14
cúpula
dome
soporte
para cúpula
dome holder
casquillo armado
assembled bushing
tornillo
screw
casquillo
bushing
embudo
funnel
tornillo
screw
casquillo
bushing
embudo
funnel
llave para cúpula
(incluida)

This manual suits for next models

5

Other Helvex Plumbing Product manuals

Helvex Nuva EP-2006 User manual

Helvex

Helvex Nuva EP-2006 User manual

Helvex TH-062 User manual

Helvex

Helvex TH-062 User manual

Helvex LV CASSINI User manual

Helvex

Helvex LV CASSINI User manual

Helvex PREMIER TV-062 User manual

Helvex

Helvex PREMIER TV-062 User manual

Helvex E-937 User manual

Helvex

Helvex E-937 User manual

Helvex E-60 User manual

Helvex

Helvex E-60 User manual

Helvex CENTURY E-928 User manual

Helvex

Helvex CENTURY E-928 User manual

Helvex E-931 User manual

Helvex

Helvex E-931 User manual

Helvex ATR-1 User manual

Helvex

Helvex ATR-1 User manual

Helvex ELITE UE-300-DX User manual

Helvex

Helvex ELITE UE-300-DX User manual

Helvex Elegance 8128 User manual

Helvex

Helvex Elegance 8128 User manual

Helvex TV-302 User manual

Helvex

Helvex TV-302 User manual

Helvex IG-20-PTM User manual

Helvex

Helvex IG-20-PTM User manual

Helvex Deco UDC-05 User manual

Helvex

Helvex Deco UDC-05 User manual

Helvex Argos TV-296 User manual

Helvex

Helvex Argos TV-296 User manual

Helvex RM-24 User manual

Helvex

Helvex RM-24 User manual

Helvex MAGNA UTV-048 User manual

Helvex

Helvex MAGNA UTV-048 User manual

Helvex Argos TV-296 User manual

Helvex

Helvex Argos TV-296 User manual

Helvex AC10-8 User manual

Helvex

Helvex AC10-8 User manual

Helvex SQUADRA E-793 User manual

Helvex

Helvex SQUADRA E-793 User manual

Helvex PIAZZA PIA-200 User manual

Helvex

Helvex PIAZZA PIA-200 User manual

Helvex Europeo EP-2001 User manual

Helvex

Helvex Europeo EP-2001 User manual

Helvex Gourmet E-305 User manual

Helvex

Helvex Gourmet E-305 User manual

Helvex 312-WC-4,8 User manual

Helvex

Helvex 312-WC-4,8 User manual

Popular Plumbing Product manuals by other brands

KWC FIT-DUO Z.535.095.000 Specification sheet

KWC

KWC FIT-DUO Z.535.095.000 Specification sheet

Gessi VIA MANZONI 38606 manual

Gessi

Gessi VIA MANZONI 38606 manual

Oras HANSA 5526 2203 Installation and maintenance guide

Oras

Oras HANSA 5526 2203 Installation and maintenance guide

Luxart PA341-PS Installation

Luxart

Luxart PA341-PS Installation

Almost Heaven Saunas Spectrum Series Installation and owner's manual

Almost Heaven Saunas

Almost Heaven Saunas Spectrum Series Installation and owner's manual

Santec DESIGNER Series Instruction booklet

Santec

Santec DESIGNER Series Instruction booklet

Grohe 30 080 manual

Grohe

Grohe 30 080 manual

Sanela SLPN 04CB Mounting instructions

Sanela

Sanela SLPN 04CB Mounting instructions

VOXORT IRIS 56461B Installation instruction

VOXORT

VOXORT IRIS 56461B Installation instruction

ESS Easy Drain Diamond TAF Installation advice

ESS

ESS Easy Drain Diamond TAF Installation advice

Sunlighten Signature I Assembly instructions

Sunlighten

Sunlighten Signature I Assembly instructions

Alpha Industries RR-110 user guide

Alpha Industries

Alpha Industries RR-110 user guide

selsiuz Unlimited User and installation manual

selsiuz

selsiuz Unlimited User and installation manual

JOOLCA JCA11001 user guide

JOOLCA

JOOLCA JCA11001 user guide

RUVATI RVH9201 quick start guide

RUVATI

RUVATI RVH9201 quick start guide

Riobel Parabola PBS01BG installation guide

Riobel

Riobel Parabola PBS01BG installation guide

Hans Grohe Talis M51 200 Eco 2jet 73876000 Instructions for use/assembly instructions

Hans Grohe

Hans Grohe Talis M51 200 Eco 2jet 73876000 Instructions for use/assembly instructions

Bradley Verge LVGD1 Installation

Bradley

Bradley Verge LVGD1 Installation

manuals.online logo
manuals.online logoBrands
  • About & Mission
  • Contact us
  • Privacy Policy
  • Terms and Conditions

Copyright 2025 Manuals.Online. All Rights Reserved.