HemoCue Hb 201+ User manual

1
HemoCue Hb 201+
Operating Manual
Manuel d’utilisation

2

3
HemoCue Hb 201+
Operating Manual
HemoCue Hb 201+
Manuel d’utilisation de l’appareil
The HemoCue Hb 201+Analyzer provides determination of hemoglobin quickly, easily and with lab quality results. Capillary, venous or arterial whole blood may
be used. This manual provides the basic instructions for use as well as technical specifications. Additional information may be obtained from HemoCue, Inc.
US
L’appareil HemoCue Hb 201+Analyzer permet de déterminer rapidement et facilement le taux d’hémoglobine, avec des résultats de qualité équivalente à celle
des tests effectués en laboratoire. On peut utiliser au choix du sang capillaire, veineux ou artériel. Ce manuel fournit les instructions nécessaires à l’utilisation du
dispositif ainsi que ses spécifications techniques. Pour toute information supplémentaire, contacter HemoCue, Inc.
CFR

4
QRG
CD
2
3
4
5
1
6
Components
Éléments

5
CFR
US
The HemoCue Hb 2011. +Analyzer*
AC adapter**2.
4 type AA batteries***3.
A vial of HemoCue Hb 2014.
Microcuvettes***
Individually packaged HemoCue Hb 201
Microcuvettes***
HemoCue Hb 2015. +Operating Manual,
HemoCue Hb 201+Quick Reference
Guide and Instruction CD
HemoCue Cleaner6.
The HemoCue Hb 201+and its adapter are
delivered in a carton. Open the carton on a
stable surface and lift out the instrument and
accessories. On the bottom of the analyzer
there is a lid covering the battery compart-
ment. Press the flap to remove the lid. Place
4 type AA batteries in the battery compart-
ment, observing the indication of polarity in
the battery holders. Replace the lid. Consult
local environmental authorities for proper
disposal of batteries.
* Do not open the cover of the analyzer.
**
!
Only use adapters listed under speci-
fications.
*** Not included.
Appareil HemoCue Hb 2011. +Analyzer*
Adaptateur courant alternatif (c.a.)**2.
4 piles de type AA***3.
Un flacon de HemoCue Hb 2014.
Microcuvettes***
HemoCue Hb 201 Microcuvettes embal-
lées séparément***
Manuel d’utilisation HemoCue Hb 2015. +,
Guide de référence rapide HemoCue
Hb 201+et CD d’instructions
HemoCue Cleaner6.
L’appareil HemoCue Hb 201+et son adap-
tateur sont fournis dans un carton. Placer ce
dernier sur une surface stable pour l’ouvrir,
puis en sortir l’appareil et ses accessoires. Au
fond de l’analyseur, un couvercle recouvre le
compartiment à piles. Appuyer sur le volet
pour retirer le couvercle. Placer les 4 piles de
type AA dans le compartiment en respectant
la polarité indiquée sur le support. Remettre
le couvercle. Consulter les autorités locales
compétentes en matière d’environnement
pour une élimination adéquate des piles.
* Ne pas ouvrir le boîtier de l’analyseur.
**
!
Utiliser uniquement les adaptateurs
mentionnés dans la liste des spécifications
techniques.
*** Non fournis.

6
1a
2
1c
4
1b
3
5
Start-up
Mise en service

7
CFR
US
1a. If AC power is available, plug the sup-
plied power adapter into the power inlet
at the back of the analyzer.
1b. If no power is available, insert the 4 type
AA batteries, 1.5 V, into the battery com-
partment.
1c. If a battery symbol appears on the
display, the batteries are running low on
power. The analyzer will continue to give
accurate results, but the batteries should
be replaced as soon as possible.
2. Pull the cuvette holder out to the load-
ing position.
3. Press and hold the left button until the
display is activated (all symbols appear
on the display).
4. The display shows the version number
of the program, after which it will show
”6” and ”Hb” and ” ” (audio sig-
nal). During this time the analyzer will
automatically verify the performance of
the optronic unit by performing an auto-
matic SELFTEST.
5. After 10 seconds, the display will show
three flashing dashes and the HemoCue
symbol. This indicates that the HemoCue
Hb 201+has passed the SELFTEST and
is ready for use. If the SELFTEST fails, an
error code will be displayed.
To turn the analyzer off, press and hold the
left button until the display reads OFF and
then goes blank. Disconnect the equipment
from the power source by removing the AC
adapter from the outlet.
1a. Si une alimentation en c.a. est disponi-
ble, brancher l’adaptateur fourni dans la
prise située à l’arrière de l’analyseur.
1b. S’il n’y a pas de courant, insérer les
4 piles 1,5 V (type AA ou R6) dans le
compartiment prévu à cet effet.
1c. Un symbole de pile s’affiche à l’écran,
dès que les piles sont faibles. L’analyseur
continue à donner des résultats précis,
mais les piles doivent être remplacées
dès que possible.
2. Sortir le support de cuvette dans sa posi-
tion de charge.
3. Appuyer sur le bouton gauche et le
maintenir enfoncé jusqu’à ce que l’écran
s’allume (tous les symboles s’affichent).
4. L’écran affiche le numéro de version du
programme, puis « 6 », «Hb» et « »
(signal audio). Pendant ce temps, l’ana-
lyseur effectue un contrôle automatique
de l’unité optoélectronique en procédant
à un AUTOCONTRÔLE automatique.
5. Au bout de 10 secondes, trois tirets
clignotants et le symbole HemoCue
apparaissent à l’écran. Ceci indique que
l’appareil HemoCue Hb 201+a réussi
l’AUTOCONTRÔLE et qu’il est prêt à
l’utilisation. Un code d’erreur s’affiche si
l’AUTOCONTRÔLE échoue.
Pour éteindre l’analyseur, appuyer sur le
bouton à gauche et le maintenir enfoncé
jusqu’à ce que l’écran indique OFF puis
s’éteigne. Débrancher l’équipement de la
source d’alimentation en retirant l’adaptateur
c.a. de la prise.

8
4
3
21
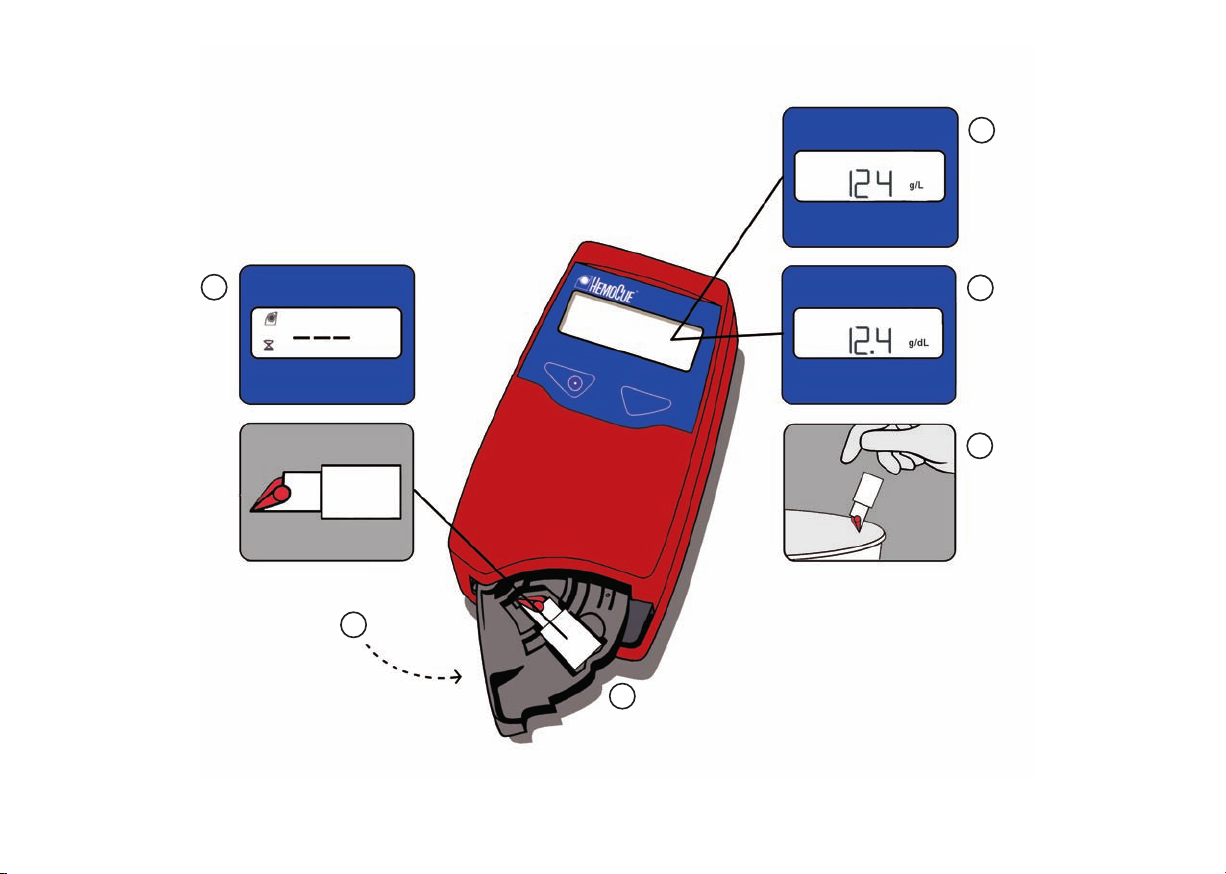
Measuring Capillary blood
Mesure Sang capillaire

9
CFR
US
To perform a test using capillary blood,1.
the cuvette holder should be in its
loading position. The display will show
three flashing dashes and the HemoCue
symbol.
Make sure the patient’s hand is warm2.
and relaxed. Use only the middle or ring
finger for sampling. Avoid fingers with
rings on.
Clean the finger with alcohol or a suit-3.
able disinfectant and allow to dry or
wipe off with a dry, lint-free wipe.
Using your thumb, lightly press the fin-4.
ger from the top of the knuckle towards
the tip. This stimulates the blood flow
towards the sampling point.
Pour effectuer un test avec du sang1.
capillaire, le support de cuvette doit être
en position de charge. L’écran affiche
trois tirets clignotants et le symbole
HemoCue.
S’assurer que la main du patient est2.
chaude et détendue. Le prélèvement
devra être effectué sur le majeur ou
l’annulaire. Éviter que le patient porte
des bagues.
Nettoyer avec de l’alcool ou un désinfec-3.
tant approprié le bout du doigt à piquer
et laisser sécher ou essuyer avec un
chiffon sec non pelucheux.
Avec le pouce, presser doucement le4.
doigt, de l’articulation vers l’extrémité
pour stimuler le débit sanguin vers le
point de prélèvement.

10
8
7
65

11
CFR
US
For best blood flow and least pain,5.
sample at the side of the fingertip, not
in the center.
While applying light pressure towards6.
the fingertip, puncture the finger using
a lancet.
Wipe away the first 2 or 3 drops of7.
blood.
Re-apply light pressure towards the8.
fingertip until another drop of blood
appears.
Pour améliorer le débit sanguin et dimi-5.
nuer la douleur, prélever l’échantillon
sur la partie latérale du doigt et non
au centre.
En appuyant doucement vers le bout du6.
doigt, piquer le point de prélèvement à
l’aide d’une lancette.
Essuyer les 2 ou 3 premières gouttes7.
de sang.
Exercer de nouveau une légère pression8.
vers le bout du doigt pour faire apparaî-
tre une nouvelle goutte de sang.

12
910 11

13
CFR
US
When the blood drop is large enough,9.
fill the microcuvette in one continuous
process. Do NOT refill!
Wipe off excess blood from the outside10.
of the microcuvette with a clean, lint-
free wipe, being careful not to touch the
open end of the microcuvette, which
could result in blood being drawn out of
the microcuvette.
Look for air bubbles in the filled11.
microcuvette. If present, discard the
microcuvette and fill a new microcuvette
from a new drop of blood. Small bubbles
around the edge can be ignored.
Quand la goutte de sang est assez gran-9.
de, appliquer la microcuvette et la laisser
se remplir d’un seul trait. NE JAMAIS la
remplir une seconde fois !
Nettoyer la surface externe de la micro-10.
cuvette avec un chiffon propre non
pelucheux. Prendre garde de ne pas tou-
cher le côté ouvert de la microcuvette,
car du sang pourrait s’échapper de la
microcuvette.
Vérifier que la microcuvette remplie ne11.
contient pas de bulles d’air. S’il y en
a, jeter la microcuvette et prélever un
nouvel échantillon avec une nouvelle
microcuvette. Les petites bulles d’air en
périphérie peuvent être ignorées.
14
15
16
13
12
15
14

15
CFR
US
Place the filled microcuvette in the12.
cuvette holder. This must be performed
within ten minutes after filling the
microcuvette!
Gently slide the cuvette holder to the13.
measuring position.
During the measurement “14. 6” and three
fixed dashes will be shown on the
display.
After 15–60 seconds, the hemoglobin15.
value of the sample is displayed. The
result will remain on the display as long
as the cuvette holder is in the measur-
ing position. When operating on battery
power, the analyzer will automatically
turn off after approximately 5 minutes.
Although the reagents are present in the16.
microcuvette in extremely low quantities,
consult local environmental authorities
for proper disposal. Always handle blood
specimens with care, as they might be
infectious.
Placer la microcuvette remplie dans son12.
support. Cette opération doit être effec-
tuée dans les dix minutes qui suivent le
remplissage de la microcuvette !
Faire glisser lentement le support de13.
cuvette en position de mesure.
Pendant la mesure, le symbole «14. 6 » et
les trois tirets clignotants s’affichent à
l’écran.
Après 15 à 60 secondes, le taux d’hé-15.
moglobine de l’échantillon s’affiche. Le
résultat reste affiché tant que le support
de cuvette est maintenu en position de
mesure. En cas d’utilisation de piles,
l’analyseur s’éteindra automatiquement
au bout de 5 minutes environ.
Bien que les réactifs soient présents en16.
très petites quantités dans la microcu-
vette, il est nécessaire de consulter les
autorités locales compétentes en matière
d’environnement pour une élimination
appropriée. Pour éviter tout risque de
contamination, on recommande de
manipuler les échantillons de sang avec
la plus grande précaution.

16
3
12a 2b
4
Measuring Control material, venous or arterial blood
Mesure Solution de contrôle, sang veineux et artériel

17
CFR
US
The HemoCue Hb 201 system can be verified
on the days of testing through the use of
commercially available hemotology controls.
Contact HemoCue, Inc. for control information.
1. The blood or control material should be
well mixed prior to performing a mea-
surement.
2ab.Place a drop of blood or control mate-
rial onto a hydrophobic surface, e.g., a
plastic film, using a pipette or a suitable
blood transfer device.
3. Fill the microcuvette in one continuous
process. Do NOT refill! Wipe off excess
blood from the outside of the microcu-
vette with a clean, lint-free wipe, being
careful not to touch the open end of the
microcuvette, which could result in blood
being drawn out of the microcuvette.
4. Look for air bubbles in the filled
microcuvette. If present, discard the
microcuvette and fill a new microcuvette
from a second drop of sample. Small
bubbles around the edge can be ignored.
Perform the analysis as per steps 12–16 on
page 15.
Le système HemoCue Hb 201 peut être vérifié
les jours de test par l’utilisation de solutions
de contrôle d’hématologie disponibles dans
le commerce. Contacter HemoCue, Inc. pour
de plus amples informations.
1. Bien mélanger le sang ou la solution de
contrôle avant d’effectuer la mesure.
2ab.À l’aide d’une pipette ou d’un autre
dispositif de transfert de sang, placer
une goutte de sang ou de solution de
contrôle sur une surface hydrophobe
(film plastique, par exemple).
3. Remplir la microcuvette d’un seul trait.
NE JAMAIS la remplir une seconde
fois ! Nettoyer la surface externe de la
microcuvette avec un chiffon propre non
pelucheux. Prendre garde de ne pas tou-
cher le côté ouvert de la microcuvette,
car du sang pourrait s’échapper de la
microcuvette.
4. Vérifier que la microcuvette remplie ne
contient pas de bulles d’air. S’il y en
a, jeter la microcuvette et prélever un
deuxième échantillon avec une nouvelle
microcuvette. Les petites bulles d’air en
périphérie peuvent être ignorées.
Effectuer l’analyse en suivant les étapes 12
à 16, décrites à la page 15.

18
1
2
3
4
5
Maintenance
Entretien

19
CFR
US
The cuvette holder should be cleaned after
each day of use.
Check that the analyzer is turned off. The1.
display should be blank.
Pull the cuvette holder out to its loading2.
position. Carefully press the small catch
positioned in the upper right corner of
the cuvette holder.
While pressing the catch, carefully rotate3.
the cuvette holder towards the left as
far as possible. Carefully pull the cuvette
holder away from the analyzer.
Clean the cuvette holder with alcohol or4.
mild detergent. It is important that the
cuvette holder is completely dry before
being replaced.
The optronic unit should be cleaned when
directed to do so in the Troubleshooting
Guide or as desired.
A dirty optronic unit may cause the analyzer
to display an error code. To clean the optron-
ic unit, proceed as follows.
5. Push the HemoCue Cleaner swab into
the opening of the cuvette holder. Move
from side to side 5–10 times. If the swab
is stained, repeat with a new swab. No
further cleaning is required if the swab
remains clean.
6. Wait 15 minutes before replacing the
cuvette holder and using the analyzer.
The cover may be cleaned with alcohol or a
mild soap solution.
As an alternative to the HemoCue Cleaner,
a cotton tip swab moistened with a alcohol
(without additive) or water may also be used
for cleaning.
Le support de cuvette doit être nettoyé tous les
jours.
S’assurer que l’analyseur est hors tension.1.
L’écran doit être vide.
Placer le support de cuvette dans sa position2.
de charge. Abaisser délicatement le petit
fermoir situé dans le coin supérieur droit du
support de cuvette.
Tout en abaissant le fermoir, tourner le sup-3.
port de cuvette au maximum vers la gauche.
Retirer délicatement le support de cuvette de
l’analyseur.
Nettoyer le support de cuvette avec de l’al-4.
cool ou un détergent doux. Il est important
qu’il soit complètement sec avant de le
remettre en place.
L’unité optoélectronique doit être nettoyée lors-
que cela est indiqué dans le Guide de dépannage
ou au besoin.
Une unité optoélectronique sale peut entraîner
l’affichage d’un code d’erreur. Pour nettoyer l’unité
optoélectronique, procéder de la manière suivante.
5. Pousser le tampon HemoCue Cleaner dans
l’ouverture du support de cuvette en le
faisant bouger d’un côté à l’autre de 5 à 10
fois. Si le tampon est taché, recommencer
l’opération avec un nouveau tampon. Aucun
autre nettoyage n’est nécessaire si le tampon
reste propre.
6. Attendre 15 minutes avant de remettre le
support de cuvette en place et d’utiliser
l’analyseur.
Il est possible de nettoyer le boîtier de l’analyseur
avec de l’alcool ou une solution savonneuse douce.
Outre les tampons HemoCue Cleaner, on peut
utiliser un coton-tige imbibé d’alcool (sans additif)
ou de l’eau pour le nettoyage.

20
Trouble Shooting Guide
If you are unable to resolve the problem by following this Trouble Shooting Guide,
please contact HemoCue Inc. The analyzer has no serviceable parts.
US
Symptom Explanation Action
The analyzer shows an error code. May be a temporary fault. Turn off the analyzer and turn it on again after 30 seconds.
Take a new microcuvette and repeat the measurement.
If the problem continues, see specific error code below.
E00 No stable endpoint is found within the time range.
1. The cuvette is faulty.
2. The circuit board is out of order.
1a. Check the expiration date for the microcuvettes.
1b. Take a new microcuvette and repeat the
measurement.
2. The analyzer needs service. Contact HemoCue, Inc.
E01–E05 1. Dirty optronic unit or faulty electronic or optronic
unit.
1a. Turn off the analyzer and clean the optronic unit as
described in the maintenance section.
1b. The analyzer needs service. Contact HemoCue, Inc.
E06 1. Unstable blank value The analyzer might be cold. 1. Turn off the analyzer and allow it to reach room
temperature. If the problem continues, the analyzer
needs service. Contact HemoCue, Inc.
E07 1. The battery power is too low. 1a. The batteries need to be replaced. Turn off the
analyzer and replace the batteries, 4 type AA.
1b. Use the power adapter.
E08 The absorbance is too high.
1. An item is blocking the light in the cuvette holder.
1a. Check that the analyzer and microcuvettes are being
used according to the HemoCue Hb 201+operating
manual and instructions for use.
1b. The analyzer needs service. Contact HemoCue, Inc.
E09–E30 1. Dirty optronic unit or faulty electronic or optronic
unit.
1a. Turn off the analyzer and clean the optronic unit as
described in the maintenance section.
1b. The analyzer needs service. Contact HemoCue, Inc.
Other manuals for Hb 201+
5
Table of contents
Other HemoCue Measuring Instrument manuals


