Heraeus Biofuge Primo R User manual

Instructions for use
Biofuge

How to use this manual
Use this manual to get acquainted with your centrifuge
and its accessories.
The manual helps you to avoid inappropriate handling.
Make sure to keep it always close to the centrifuge.
A manual that is not kept handy cannot provide
protection against improper handling and thus
against damage to persons and objects.
This manual comprises chapters on
• Safety regulations
• Instrument description
• Rotor program and accessories
• Transportation and hook-up
• Use of the centrifuge
• Maintenance and care
• Troubleshooting
• Technical data
• Index
Please fold out
Overleaf you will find a graphic
representation of the control panel
with a survey of the most important
functions
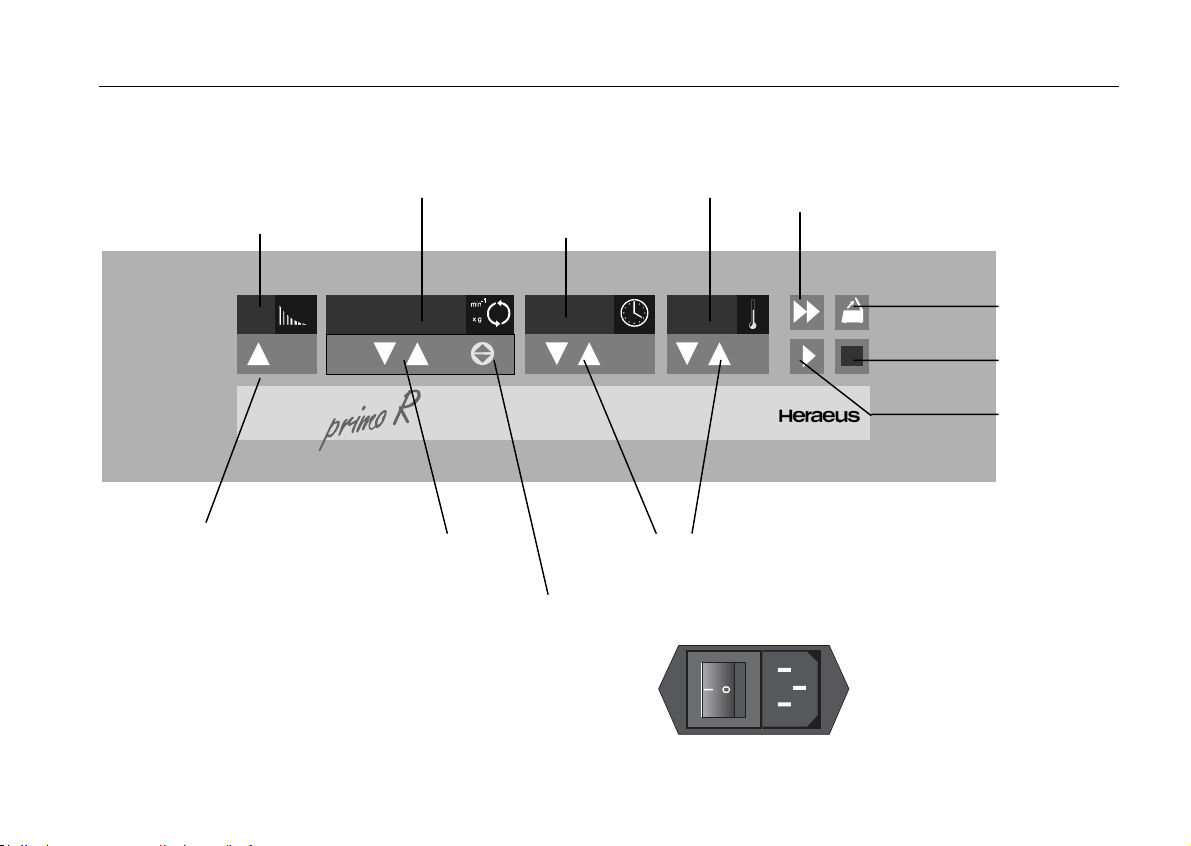
Biofuge
0
250009.597
"set" keys
quick run
speed/RCF
run time
open lid
stop
start
rpm/RCF
display switch
braking
profiles
"set" keys
temperature
back panel
socket for mains cable
mains switch
"set" key

Control panel of the
Biofuge primo R
Display
Braking profiles
Continuous display : braking profile last used, 1 - 9;
2 - 9 = max. acceleration and various
braking profiles (2 [weak] to 9 [strong])
1 = slow acceleration and braking curve 2
Speed / RCF
During run: current rpm or RCF (after actuation of dis-
play switch)
End of run: "End"
Lid open: "OPEN"
(before start)
Lid open : "0" with flashing point
(rotor not yet recognized)
Error message: alternating display (if relevant)
Run time
Preselected time : remaining run time to 0
Continuous:
operation (hLd) run time passed (in hours, minutes)
"Quick run": run time passed (in minutes, seconds)
Temperature
During run: current sample temperature in °C
at temperature equilibrium)
Keys
Start: normal start
Stop: manual stop
Open lid: open lid (possible only with the instrument
switched on)
Quick run: short-term operation of the centrifuge as
long as key remains pressed
rpm/RCF
switch: switching between rpm and RCF display
"set" keys: stepwise increase/decrease of setpoint
values
Short pressing of any of the "set" keys: switch from current to
preset value, signaled by flashing display.
Error codes (troubleshooting see chapter
"Troubleshooting"):
E-00: motor blockage
E-03 speed measurement
E-08: overvoltage; overtemperature in the electronics
E-14: no rotor or rotor identification impossible
E-17: lid does not open
rotor: set speed higher than permissible speed
of the rotor
bAL: unbalance
Lid: lid opened or popped open during run
OPEN: with lid closed: safety circuit triggered
(drive overheated)

Contents
1
Contents
For your safety............................................ 3
Proper use................................................................ 3
Improper use ............................................................ 3
Centrifuging hazardous materials ............................ 3
Handling ................................................................... 4
Conformity to current standards............................... 5
Safety instructions in this manual ............................ 5
The Biofuge primo R .................................. 7
Safety systems......................................................... 7
Properties................................................................. 8
Items delivered......................................................... 8
Functions and features............................................. 9
The "Easycontrol" user interface............................ 10
Rotor program and accessories.............. 13
Rotor program ........................................................ 14
Adapters................................................................. 16
Before use................................................. 19
Transport and installation....................................... 19
Proper location ....................................................... 19
Positioning the instrument .................................. 20
Mains connection ................................................... 20
Operation...................................................21
Switching on the centrifuge.....................................21
Lid operation ...........................................................21
Opening the lid ....................................................21
Closing the lid......................................................21
Inserting the rotor....................................................22
Handling of rotors and seals ...............................23
Important application information for rotor
7500 7599! ..........................................................24
Aerosol-tight application .........................................25
Permissible rotor temperature.............................26
Lifetime of the rotor .............................................26
Loading the rotor.....................................................27
Maximum loading................................................27
Filling the centrifuge tubes ..................................27
Loading instruction for rotors 7590 and 7595 .....28
Loading for aerosol-tight operation .....................28
Checking for aerosol tightness............................30
Placing the tubes in the rotor ..............................31
Entering parameters ...............................................32
Braking curves ........................................................32
Switching from speed to RCF display and vice versa
................................................................................32
Selecting the speed ................................................32
Entering the RCF value ..........................................33
Concerning the RCF value..................................33

Contents
2
Selecting the run time............................................. 34
Preselected run time........................................... 34
Continuous operation ......................................... 34
Selecting the temperature ...................................... 35
Starting the centrifuge ............................................ 36
Unbalance detection............................................... 36
Changing the settings during the run ..................... 36
Stopping the centrifuge .......................................... 37
Stopping with preset time ................................... 37
Stopping with continuous operation ................... 37
Temperature regulation at rest............................... 37
Short-time centrifugation ........................................ 38
Removing the rotor................................................. 38
Maintenance and care .............................. 39
Maintenance operations to be carried out by the
customer................................................................. 39
Cleaning.............................................................. 39
Disinfection ......................................................... 40
Disinfection with eau de Javelle ......................... 42
Autoclaving ......................................................... 42
The Service of KENDRO........................................ 43
Warranty conditions................................................ 43
Troubleshooting........................................45
Emergency lid release ............................................45
Problems you can handle yourself..........................47
In case you must call the Service ...........................54
Technical data.........................................................55
Electrical connections/fuses ...................................56
Appendix....................................................57
Braking and acceleration curves.............................57
Speed / RCF diagrams ...........................................59
Standard values for minimum sample temperature65
Autoclaving protocol for rotor 7500 7599................67
Index...........................................................69

For your safety
3
For your safety
Heraeus centrifuges are manufactured according to
current technical standards and regulations. Nonethe-
less, centrifuges may pose dangers if
• they are not used as designed
• they are operated by untrained personnel
• their design is improperly changed
• the safety instructions are not heeded
Therefore anybody concerned with operation and
maintenance of the centrifuge must read and fol-
low the safety instructions.
In addition, the pertinent regulations for prevention of
accidents must be strictly followed.
This manual is an integral part of the centri-
fuge assembly and must be kept close at
hand at all times.
Proper use
The centrifuge is designed to separate liquid-
suspended materials having different densities and
particle size, respectively. The maximum sample den-
sity is 1.2 g/cm3at maximum speed.
Improper use
During a run, a safety zone of 30 cm around the centri-
fuge must be maintained where neither persons nor
hazardous materials may be stationed.
The centrifuge may cause harm to you or other per-
sons and may damage material goods if you do not
respect the following safety measures:
Centrifuging hazardous materials
• The centrifuge is neither made inert, nor is it explo-
sion-proof. Therefore never use the centrifuge in an
explosion-prone environment.
• Explosive or flammable substances must not be
centrifuged. The same holds for substances prone
to react briskly with each other.

For your safety
4
• Do not centrifuge toxic or radioactive substances or
pathogenic microorganisms unless you have taken
proper precautions.
Such precautions can e.g. consist of biological
seals.
• Should toxins or pathogenic substances enter the
centrifuge or its parts, you must carry out the proper
procedures for disinfection (see "Maintenance and
care – Disinfection").
• Strongly corrosive substances that may cause
damage to materials and impair the mechanical
strength of the rotor may be centrifuged only inside
protective vessels.
Handling
• Never use the centrifuge unless the rotor is properly
mounted.
• Never manually open the lid if the rotor still turns.
• Use only original parts for the centrifuge. The only
exception are common glass or plastic centrifuge
tubes if these are approved for the rotor speed and
RCF values of your rotor, respectively.
• Never use the centrifuge with the lid open.
• Never use the centrifuge if the paneling has been
partially or totally removed.
• Changes in mechanical or electrical components
may be carried out only by persons authorized to
this effect by KENDRO Laboratory Products.
• You may use the centrifuge only with a properly
loaded rotor. You must not overload the rotor.
• If the rotor or the lid shows visible traces of corro-
sion or wear, you must stop using it.
• Strictly follow the rules and regulations for cleaning
and disinfection.

For your safety
5
Conformity to current standards
Heraeus centrifuges are manufactured and tested
according to the following standards and regulations:
for all voltages:
• IEC 1010-1 / EN 61010-1
• IEC 1010-2 / EN 61010-2-020
− Pollution degree 2
− Overvoltage category II
for 120 V only:
• CAN/CSA-C22.2 No. 1010.1-92
• CAN/CSA-C22.2 No. 1010.2.020-94
Safety instructions in this manual
This symbol denotes potential hazards to
persons.
This symbol denotes potential damage to
the centrifuge or parts in its immediate sur-
roundings.
General hints are marked with this symbol.
In addition, you are asked to adhere to the pertinent
regulations, in Germany
• Regulations for prevention of accidents VBG 4
• Regulations for prevention of accidents VBG 5
• Regulations for prevention of accidents VBG 7z
• Regulations for prevention of accidents VBG 20

For your safety
6
for your notes
The Biofuge primo R
7
Biofuge
min
xg
-1
0
The Biofuge primo R
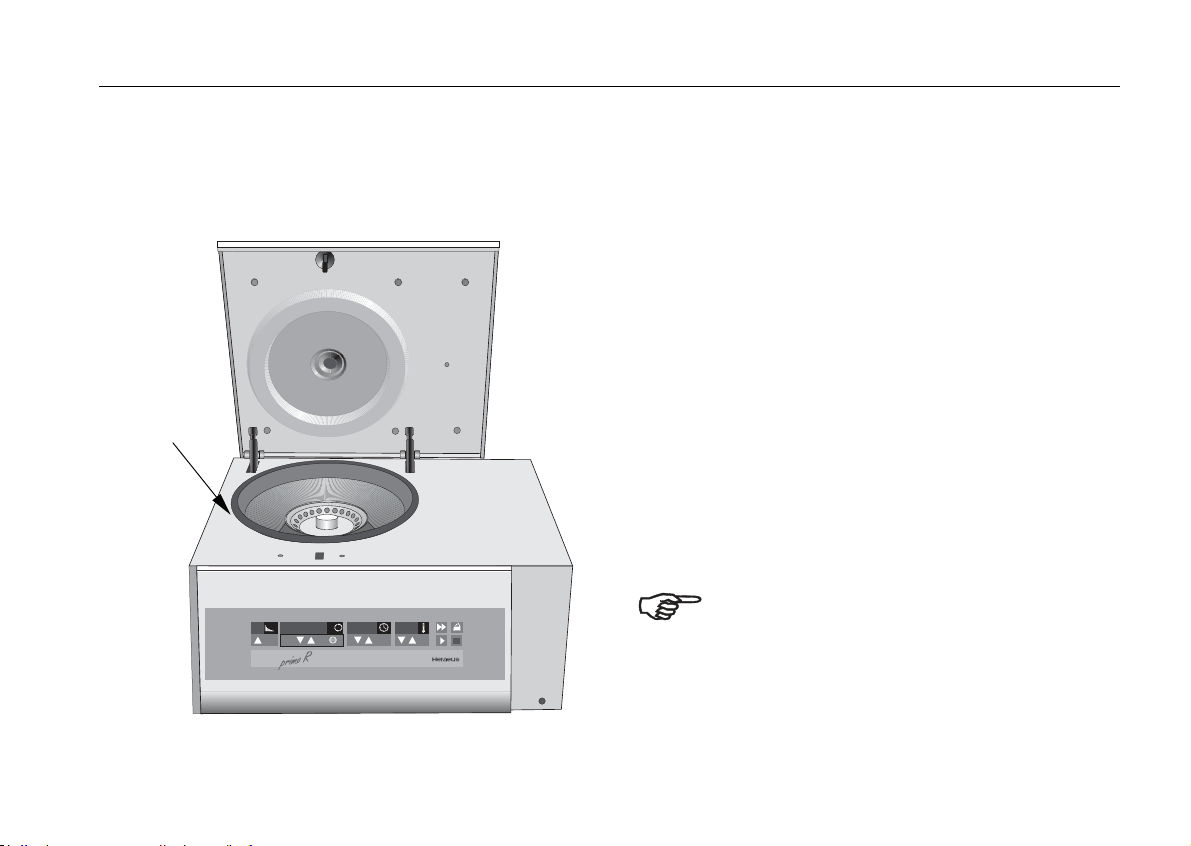
The figure below shows a general view of the Biofuge
primo R with open lid and the rotor put into place.
Safety systems
The Biofuge primo R is equipped with a number of
safety systems:
• Housing and rotor chamber manufactured from
sheet steel; inner armoring made of steel, front
screen made from impact-resistant plastic
• Lid with window and lid lock
You can open the centrifuge lid only when the
power is turned on and the rotor has come to a halt.
You can start the centrifuge only if the lid is properly
locked.
• Rotor identification
• Electronic unbalance detection
• Emergency lid release: only in case of emergency,
e.g. during power failure (see chapter "Trouble-
shooting"
Do not tamper with the safety systems!
mains switch on
the back panel
The Biofuge primo R
8
Properties
The Biofuge primo R is a laboratory centrifuge for use
with a variety of rotors and a large number of commer-
cially available centrifuge tubes.
The preset speed is reached in seconds. The mainte-
nance-free induction motor provides quiet and vibra-
tion-free operation even at high speeds and warrants
an extremely long lifetime.
The user-friendly "Easycontrol" control panel permits
easy preselection of speed, RCF value, run time,
temperature and run profile (acceleration and braking
behavior). You can switch from speed to RCF display
or entry and vice versa.
You can change the set values even during a run.
With the "quick run" key ( ) you can centrifuge a
sample for only a few seconds if that is required for
your particular task.
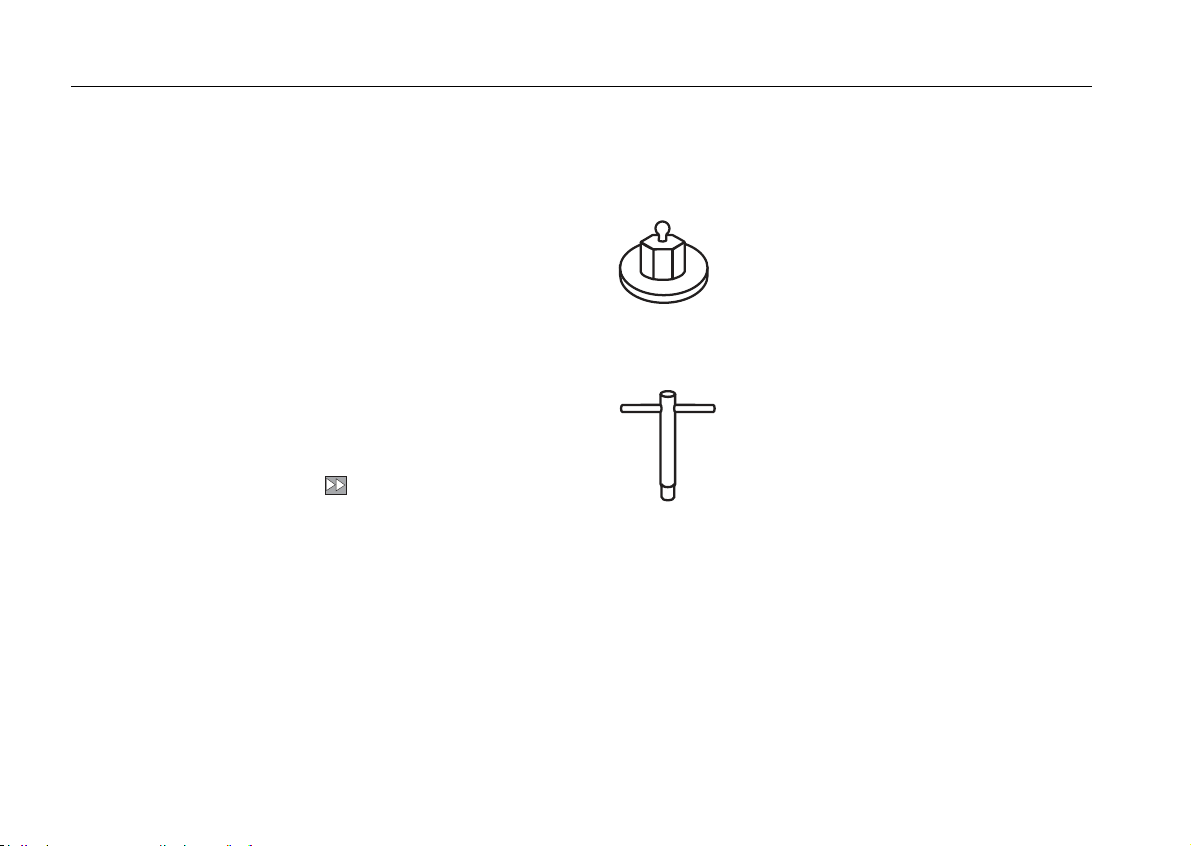
Items delivered
Items delivered with the centrifuge comprise:
− a special cap nut for fixing the rotor
− 10-mm tubular socket wrench for fastening the
cap nut
− power cord
− short operating instructions
The printed documents consist of the delivery notes
and this Manual.
cap nut
order no.
70056208
tubular socket
wrench
order no.
2036 0072

The Biofuge primo R
9
Functions and features
Part / function Description / feature
design / housing galvanized sheet chassis with armored shell
tank stainless steel
drive induction drive without carbon brushes
key and display board key and display elements covered by an easy-care protective foil
control microprocessor-driven by Easycontrol II
main memory the data last entered remain in memory
functions RCF preselection, quick run
acceleration and braking
profiles
2 acceleration and 8 braking profiles
rotor identification automatic
unbalance detection electronic, effective as a function of rotor and speed
lid lock automatic locking following lid closure
The Biofuge primo R
10
The "Easycontrol" user interface
Function Feature
lid opening automatic unlocking via "open lid" key ( )
(unlocking in case of power failure: see chapter "Troubleshooting")
start start key ( )
stop stop key ( )
"quick run" mode pressing the "quick run“ key ( ) actuates maximum acceleration up to the
maximum permissible speed; upon key release centrifuge stops with maxi-
mum braking power
acceleration / braking profiles 1 = slow acceleration and braking curve 2,
2 ... 9 = fast acceleration and various braking curves (2=weak to 9=strong)
speed selection adjustable in steps of 10 min-1 within the range of 300 min-1 to 15000 min-1
RCF selection upon actuating the switchover key, the RCF value can be entered
run time selection adjustable in minutes from 1 min to 9 h 59 min; "hLd" mode: permanent op-
eration
run time display in "quick run" mode between 1 s and 60 s in seconds steps, above in minutes
temperature selection adjustable in 1 K steps from -9°C to +40°C
end of run speed display reads "End"

The Biofuge primo R
11
Function Feature
diagnostic messages • alternating display "rotor"/maximum speed or RCF
(acknowledgment by pressing the start key)
• incorrectly closed lid: display "OPEN"
• general instrument malfunction
(error messages with ERROR codes, see "Troubleshooting"

The Biofuge primo R
12
for your notes

Rotor program and accessories
13
Rotor program and accessories
The Biofuge primo R is delivered without rotor!
You may choose from among a large variety of rotors
available as accessories.
(see Rotor program, Table 1)
In addition, there are sets of adapters and reduction
sleeves for diverse commercially available vessels (see
Adapters, Table 2).
Please consult our sales documentation for a complete
collection of accessories including technical data and
order numbers.
1
2
3
4
5
6
7
8
9
1
0
1
1
1
2
1
3
1
4
1
5
1
6
1
7
1
8
1
9
2
0
2
1
2
2
2
3
2
4
m
a
x
1
3
0
0
0
r
p
m
H
E
R
A
E
U
S
I
N
S
T
R
U
M
E
N
T
S
m
a
x
l
o
a
d
2
4
x
4
g
p
p
1
/
9
6
#
3
3
2
4

Rotor program and accessories
14
Rotor program
Table 1: Rotor program (1)
Rotor designation
fixed-angle rotor
6 x 50 ml Falcon
swinging bucket
rotor 4 x 100
swinging bucket
rotor 12 x 1.5 / 2.0
order no. 7500 7590 7500 7591 7500 7592
buckets and caps see Table 2
maximum permissible load [ g ] 6 x 130 4 x 200 12 x 4
maximum speed nmax [ min-1 ] 8,500 4,000 13,000
maximum RCF value at nmax 10,015 2,525 16,438
radius max./min. [ cm ] 12.4 / 6.0 14.1 / 5.0 8.7 / 4.7
angle [ ° ] 45 90 90
acceleration/braking time [ s ] 55 / 36 26 / 21 42 / 42
min. temperature at nmax [ °C ]*
* relative to room temperature 23°C
- 1 - 9 4
k factor [ S ×h ] 2.545 16.801 3.690
aerosol-tight yes (reduced filling) yes no
permissible temperature range
autoclavable (number of cycles)
–
121 °C; (unlimited)
–
no
–
no

Rotor program and accessories
15
Rotor program
Table 1: Rotor program (2)
Rotor designation microliter rotor
24 x 2 ml aluminum
microliter rotor 24 x
2 ml Polypropylene
drum rotor
order no. 7500 7593 7500 7599 7500 7595
maximum permissible load [ g ] 24 x 4 24 x 4 8 x 80
maximum speed nmax [ min-1 ] 15,000 13,000 12,000
maximum RCF value at nmax 21,882 16,060 14,005
radius max./min. [ cm ] 8.7 / 5.9 8.5 / 5.9 8.7 / 3.8
angle [ ° ] 45 40 90 / 60
acceleration/braking time [ s ] 35 / 22 16 / 20 41 / 33
min. temperature at nmax [ °C ]*
* relative to room temperature 23°C
5 -3 4
k factor [ S ×h ] 437 547 1.457
aerosol-tight yes (reduced filling) yes (reduced filling) no
permissible temperature range
autoclavable (number of cycles)
–
121°C; (unlimited)
-4 °C to +40 °C
121°C; (10 cycles)
–
no

Rotor program and accessories
16
Adapters
Table 2: Adapters (1)
Adapters for fixed-angle rotor
7500 7590
max. vessel size
∅x length
[ mm ]
number
per
adapter
number
per
rotor
color order no.
1.5 ml microvessels 11 x 57 4 24 7600 2905
3.5 ml 11 x 100 4 24 7500 3091
6.5 ml 13 x 113 2 12 7500 3092
12 ml 16 x 95 2 12 7500 3093
16 ml 18 x 122 1 6 7600 2906
38 ml 25 x 112 1 6 7500 3094
50 ml 29 x 122 1 6 7500 3014
15 ml Falcon 16.5 x 120 1 6 7500 3095
50 ml Falcon 30 x 117 1 6 7500 3096
Adapters for microliter rotor
7500 7593 / 7500 7599
max. vessel size
∅x length
[ mm ]
vessel capacity
[ ml ]
number
per set
color order no.
reduction sleeve PCR 6.2 x 20 0.2 24 gray 7600 3750
reduction sleeve 8 x 43.5 0.5 / 0.6 24 turquoise 7600 3758
reduction sleeve 6 x 46 0.25 / 0.4 24 red 7600 3759
Table of contents
Other Heraeus Laboratory Equipment manuals


Popular Laboratory Equipment manuals by other brands

Kinematics
Kinematics 4400/PVC operating instructions

Stereotaxis
Stereotaxis Niobe PM3.1 Installation Verification and Testing

UNAOHM
UNAOHM AP 01 HD user manual

Caframo
Caframo Real Torque Digital Stirrers instruction manual

PASCO
PASCO EM-8662 instruction sheet

Hettich
Hettich ROTOFIX 46 operating instructions


Agilent Technologies
Agilent Technologies Varian 325-MS LC/MS Pre-installation instructions

SI Analytics
SI Analytics TITRONIC 300 operating manual

Buchi
Buchi K-424 Operation manual

SIGNALCORE
SIGNALCORE SC5511A Operating & programming manual

AB Sciex
AB Sciex 4500 Series System user's guide

BioLAB
BioLAB BCFL-203 Operation manual