manuals.online logo
Brands
  1. Home
  2. •
  3. Brands
  4. •
  5. Herd
  6. •
  7. Automobile Accessories
  8. •
  9. Herd Aero User manual

Herd Aero User manual

1
Installation Guide
1-888-543-4373
www.HERD.com
1-888-543-4373
Part No: PB11-LEGACY-IG
Rev: A
Date: 2019-06-06
This Guide is for all Truck Guard
Models, including (where
applicable):
Aero
Defender
Texas
Big Texas
Road Train
Super Road Train
Important
•Herd Truck Guards are vehicle "Make & Model" specific. Use of a Truck Guard on a vehicle other than the
model it was designed for will constitute improper use of the product and may void warranty.
•Unless otherwise specified, Grade 8 or Class 10.9 hardware is to be used. For the purposes of these
instructions, OE hardware means the truck's original factory hardware.
•For further detail of warranty coverage and warranty repair information visit www.HERD.com.
Truck I.D.
Truck Models
PB11
Peterbilt 365 / 367 /
567 - Slopped Hood -
SBA
General Safety
•Take time to fully read the instructions before installing the Herd Truck Guard.
•At all times exercise safe work shop practices, wear steel toe boots and safety glasses during installation.
•Parts and components of the Herd Truck Guard can be heavy, handle with care to avoid injuries.
•Respect power tools and use them as advertised.
For assistance call
1-888-543-4373
www.HERD.com
Thank you for choosing HERD!
HERD North America Inc.
2168 Springfield Road
Box 28, Group 525, RR5
Sunnyside, MB Canada R5R 0J3
Reference this Parts List if your Truck Guard has a CEB (Captive Eye Bolt) Latching System
2
1-888-543-4373
www.HERD.com
1-888-543-4373
Part No: PB11-LEGACY-IG
Rev: A
Date: 2019-06-06
Figure 1 –Captive Eye Bolt Latching System
Table 1: Parts and Hardware Included
Items marked with * are not shown in Figure 1 above
Item No
Part No
Description
Qty
1
BR-PB11-AT (Only with Aero, Road Train, Super Road
Train, Texas, & Big Texas Versions)
or
BR-PB11-FLT (Only with Defender Version)
BRACKET, PETERBILT, 365 / 367 / 567 - Slopped
Hood - SBA
1
2
1MPA027 (Only with Aero, Road Train, Super Road
Train, Texas, & Big Texas Versions)
or
1MPA024 (Only with Defender Version)
ASSY - LEGACY LIFT ASSIST
2
3
7-EYEBOLT KIT
CAPTIVE EYEBOLT ASSEMBLY
2
5
HERD TRUCK GUARD
TRUCK GUARD APPEARANCE MAY VARY BY SKU
1
*6
1-BR-PAC-1PIPEx52
PACKER, 1" PIPE X 52MM LONG
4
*7
500172
NUT-NYLOCK 3/4-10 NC GR8 YZP
2
*8
500211
WASHER-FLAT 3/4 SAE GR8 YZP
2
*9
500214
WASHER-FLAT 5/8 SAE GR8 YZP
8
*10
500206
WASHER-FLAT 1/2 SAE GR8 YZP
8
*11
500142
BOLT-HEX M16X2X100 CL10.9 YZP
4
*12
500182
NUT-NYLOCK M16X2.0 CL10.9 YZP
2
*13
500138
BOLT-HEX M12X1.75X100 CL10.9 YZP
4
5
3
1
2
1
Reference this Parts List if your Truck Guard has a Slam Latch Latching System
3
Part No: PB11-LEGACY-IG
Rev: A
Date: 2019-06-06
1-888-543-4373
www.HERD.com
1-888-543-4373
Figure 2 –Slam Latch Latching System
Table 2: Parts and Hardware Included
Items marked with * are not shown in Figure 2 above
Item No
Part No
Description
Qty
1
BR-PB11-AT-SL (Only with Aero, Road Train, Super Road
Train, Texas, & Big Texas Versions)
or
BR-PB11-FLT-SL (Only with Defender Version)
BRACKET, PETERBILT, 365 / 367 / 567 - Slopped
Hood - SBA
1
2
1MPA027 (Only with Aero, Road Train, Super Road Train,
Texas, & Big Texas Versions)
or
1MPA024 (Only with Defender Version)
ASSY - LEGACY LIFT ASSIST
2
4
4-MC-SLA-A
ASSY- LEGACY SLAM LATCH
1
5
HERD TRUCK GUARD
TRUCK GUARD APPEARANCE MAY VARY BY SKU
1
*6
1-BR-PAC-1PIPEx52
PACKER, 1" PIPE X 52MM LONG
4
*7
500172
NUT-NYLOCK 3/4-10 NC GR8 YZP
2
*8
500211
WASHER-FLAT 3/4 SAE GR8 YZP
2
*9
500214
WASHER-FLAT 5/8 SAE GR8 YZP
8
*10
500206
WASHER-FLAT 1/2 SAE GR8 YZP
8
*11
500142
BOLT-HEX M16X2X100 CL10.9 YZP
4
*12
500182
NUT-NYLOCK M16X2.0 CL10.9 YZP
2
*13
500138
BOLT-HEX M12X1.75X100 CL10.9 YZP
4
5
4
2
1
Installation Procedure
4
Part No: PB11-LEGACY-IG
Rev: A
Date: 2019-06-06
1-888-543-4373
www.HERD.com
1-888-543-4373
1. Remove the 4 OEM bolts on the
front of the OEM bumper and 8
OEM bolts behind the bumper as
shown. Retain factory hardware
for use in mounting bracket.
Remove the OEM bumper. If
factory center tow pin is an
option on the truck, remove it as
well. If the truck has a collision
mitigation radar sensor, unplug
and remove it.
Figure 3 –OEM Bumper Removal Front View.
Figure 4 –OEM Bumper Removal Back View (Passenger Side Shown)
Remove 4 Bolts & Retain for
Mounting Bracket
Remove & Retain 4
Bolts Per Side
Installation Procedure
5
Part No: PB11-LEGACY-IG
Rev: A
Date: 2019-06-06
1-888-543-4373
www.HERD.com
1-888-543-4373
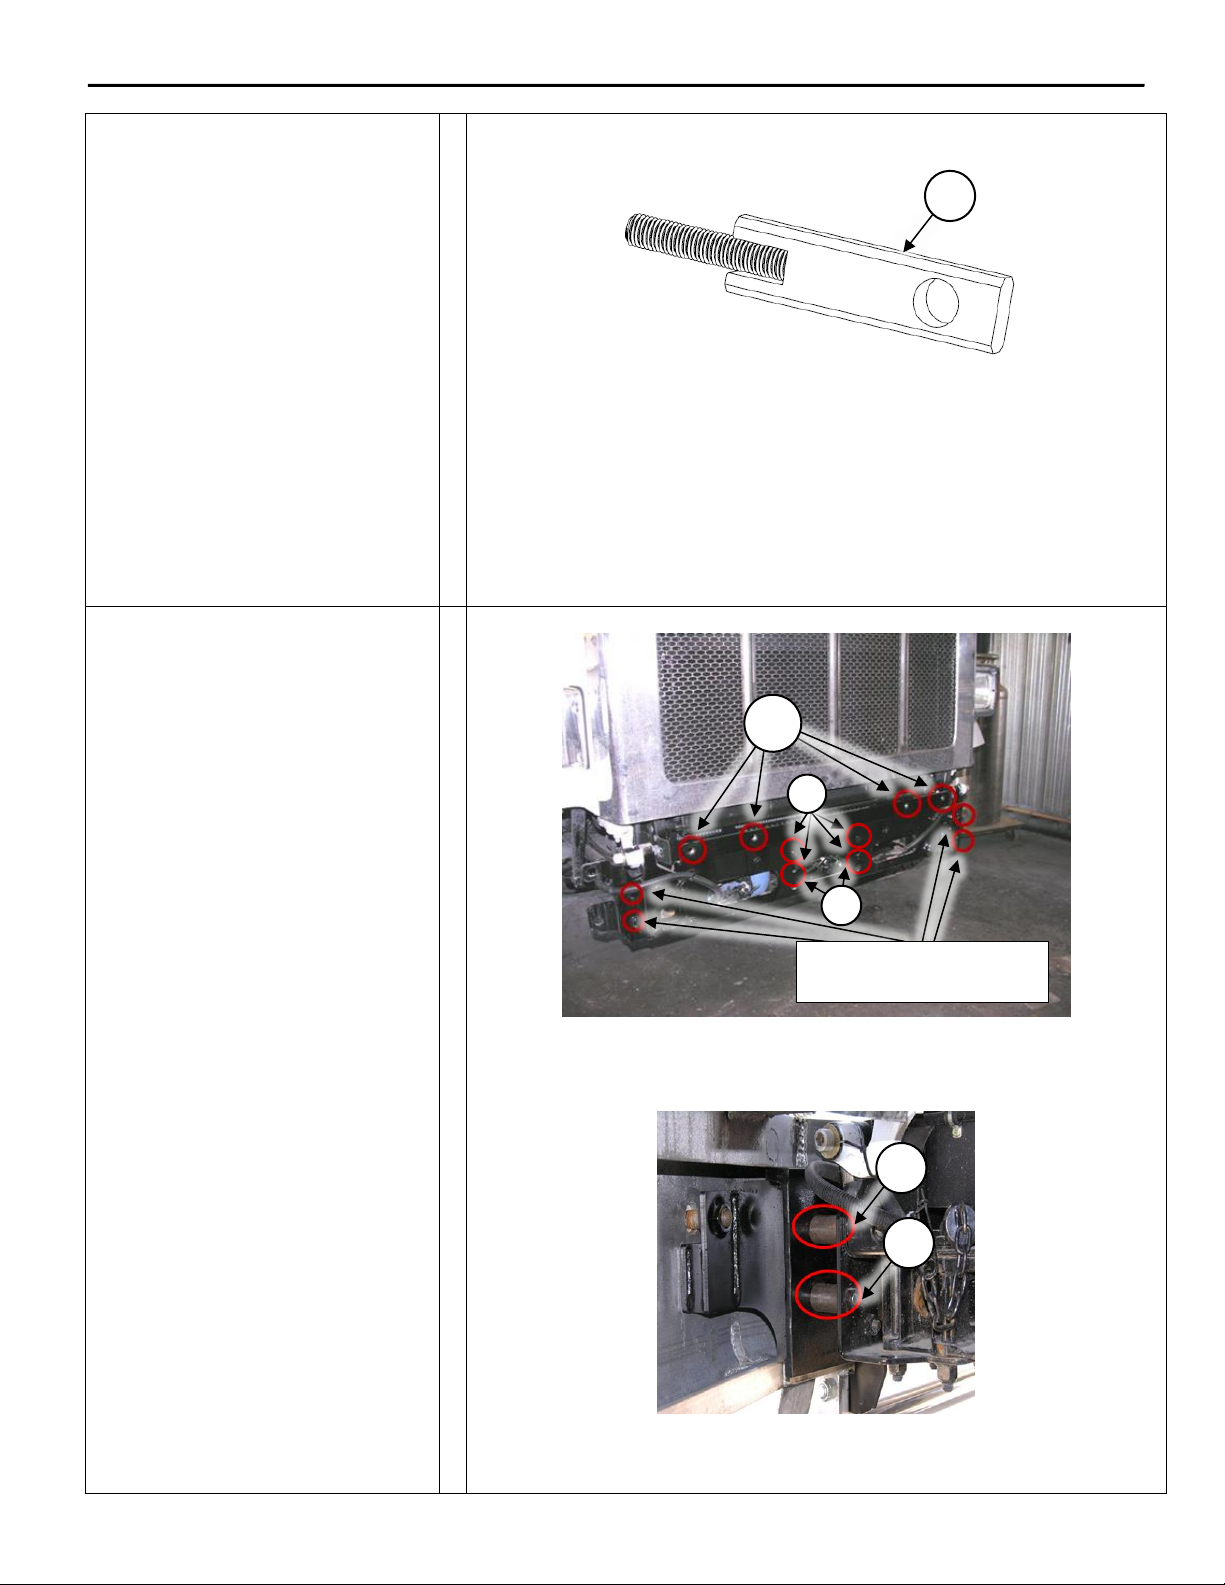
2. Install Tow receiver inserts
(Part of Item 1) supplied with
bracket into OEM tow receivers
and use factory clevis pins to
secure in position. Do this for
both passenger and driver
sides.
Install Herd steel bracket to
truck using the supplied 3/4"
nuts (Item 7) and 3/4" washers
(Item 8). Tighten fasteners to
70-80 ft-lbs. Do not
overtighten.
Figure 5 –Tow Receiver Insert
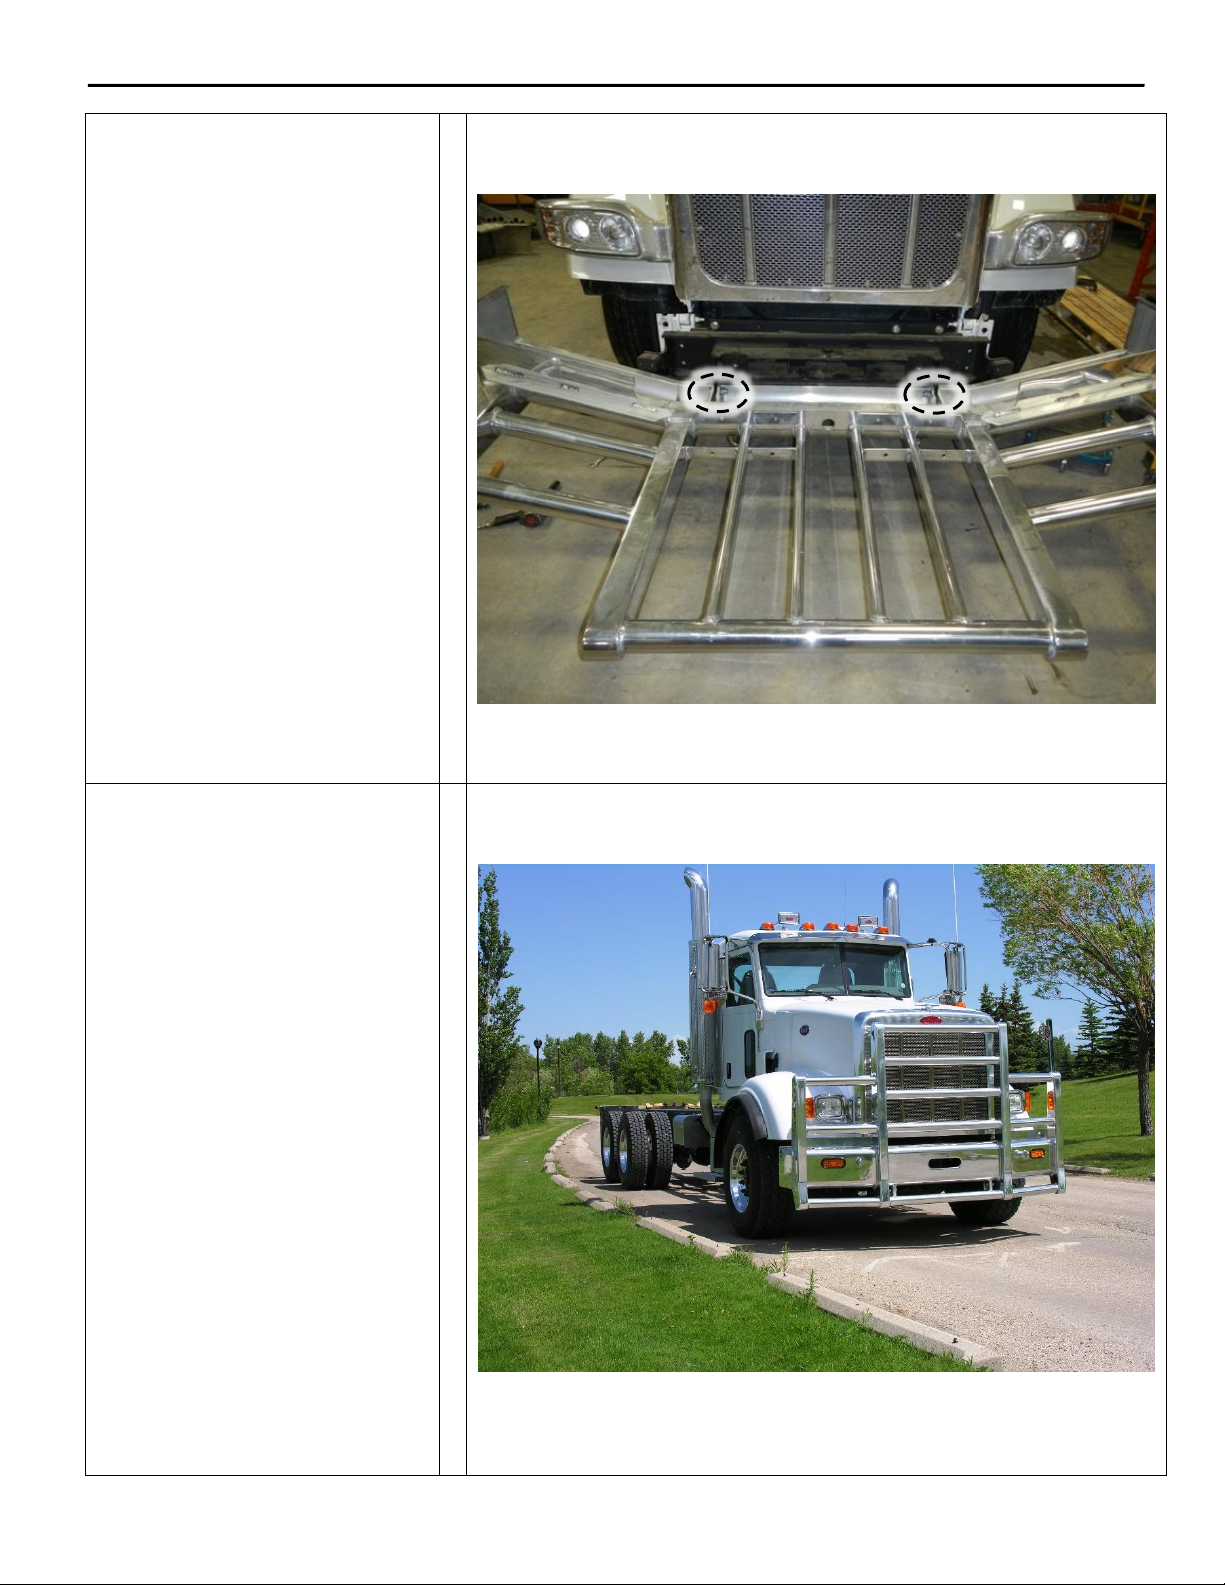
3. If installing the Truck Guard on a
Peterbilt 365or Peterbilt 367
model truck, use the 12 mounting
points as seen in Figure 6. Use
the supplied M12 Bolts (Item 13)
to fasten the top four mounting
points. Use the supplied M16
hardware (Items 11, 12) to fasten
the center four mounting points.
Use the OEM hardware retained
in Step 1 on the outermost
mounting points.
Use the supplied Packers (Item 6)
to space out the outermost
mounting points on both the
passenger and driver sides. See
Figure 7.
Note:
If installer has a crane available,
truck guard can be attached onto
truck with bracket, otherwise
disassemble truck guard from
bracket first. Keep hardware. If
bumper is equipped with lift
assist, the springs must be
removed. Refer to instructions
S004 (Defender bumpers) or S005
(Aero/Texas bumpers) for proper
lift assist disassembly procedure.
Figure 6 –Bracket Installation Front View (PB 365 & PB 367)
Figure 7 –Bracket Installation Side View (PB 365 & PB 367)
1
6
6
13
Reuse Factory Hardware that
was Taken During Step 1
11
12
Installation Procedure
6
Part No: PB11-LEGACY-IG
Rev: A
Date: 2019-06-06
1-888-543-4373
www.HERD.com
1-888-543-4373
4. If installing the Truck Guard on a
Peterbilt 567 model truck, use
the 8 mounting points as seen in
Figure 8. Use the supplied M12
Bolts (Item 13) to fasten the top
four mounting points. Use the
supplied M16 hardware
(Items 11, 12) to fasten the
center four mounting points.
The use of supplied Packers
(Item 6) Is not needed on the PB
567. See Figure 9.
Note:
If installer has a crane available,
truck guard can be attached onto
truck with bracket, otherwise
disassemble truck guard from
bracket first. Keep hardware. If
bumper is equipped with lift
assist, the springs must be
removed. Refer to instructions
S004 (Defender bumpers) or S005
(Aero/Texas bumpers) for proper
lift assist disassembly procedure.
Figure 8 –Bracket Installation Front View (PB 567)
Figure 9 –Bracket Installation Side View (PB 567)
11, 12
11
13
Installation Procedure
7
Part No: PB11-LEGACY-IG
Rev: A
Date: 2019-06-06
1-888-543-4373
www.HERD.com
1-888-543-4373
5. If the Herd Truck Guard was
disassembled from bracket in
step 3 or 4, reinstall Herd Truck
Guard onto bracket using the
hardware kept from step 3 or 4.
For DFLT & Defender models
only: To install the hinge bolts,
the bumper must be in the open
(down) position to allow the
bottom lip to go under and
around the steel hinge.
Figure 10 –View of Bracket Hinge
6. Close the truck guard and check
fitment. Truck guard position can
be adjusted side to side and up or
down as required. Once fitment
is confirmed, tighten all mounting
bolts. Torque 3/4” hardware to
75lb-ft. Torque 1/2” and 5/8”
hardware to 110lb-ft. Torque
M12 hardware to 80 lb-ft. Torque
M16 hardware to 200lb-ft.
Figure 10 –Herd Truck Guard Installed
Installation Procedure
8
Part No: PB11-LEGACY-IG
Rev: A
Date: 2019-06-06
1-888-543-4373
www.HERD.com
1-888-543-4373
Important
•Check mounting points after the first 5000 km and every 3-6 months.
•If this truck guard is equipped with Legacy Herd Slam Latch, periodic adjustment is required.
Refer to Legacy Slam Latch Installation adjustment instructions to properly adjust your Slam Latch.
•The drop-forged eyebolts are an integral part of the strength of Herd Truck Guards. When tightened firmly,
they will minimize vibration and provide superior impact resistance.
•To help maintain the factory finish, avoid acid wash.

Other manuals for Aero

2

This manual suits for next models

5

Other Herd Automobile Accessories manuals

Herd FL33BG User manual

Herd

Herd FL33BG User manual

Herd KW01 User manual

Herd

Herd KW01 User manual

Herd C4 Series User manual

Herd

Herd C4 Series User manual

Herd PB11C4-02 User manual

Herd

Herd PB11C4-02 User manual

Herd Defender Series User manual

Herd

Herd Defender Series User manual

Herd Aero Series User manual

Herd

Herd Aero Series User manual

Herd Aero User manual

Herd

Herd Aero User manual

Herd IN27BG User manual

Herd

Herd IN27BG User manual

Herd MK15C4-02 User manual

Herd

Herd MK15C4-02 User manual

Herd 404006 User manual

Herd

Herd 404006 User manual

Herd AeroPLUS C4-02 Guide

Herd

Herd AeroPLUS C4-02 Guide

Herd KW22C4-02 User manual

Herd

Herd KW22C4-02 User manual

Herd WS30C4-02 Operating and maintenance manual

Herd

Herd WS30C4-02 Operating and maintenance manual

Herd SLAM LATCH Guide

Herd

Herd SLAM LATCH Guide

Herd IN24A2 User manual

Herd

Herd IN24A2 User manual

Herd Aero User manual

Herd

Herd Aero User manual

Popular Automobile Accessories manuals by other brands

Thule 109 Mounting & installation

Thule

Thule 109 Mounting & installation

Thule Rapid 1513 Fitting instructions

Thule

Thule Rapid 1513 Fitting instructions

Yakima K727 instructions

Yakima

Yakima K727 instructions

Inbay 241143-50-1 installation guide

Inbay

Inbay 241143-50-1 installation guide

Safe Fleet Prime Design UXR 003-E Assembly instructions

Safe Fleet

Safe Fleet Prime Design UXR 003-E Assembly instructions

Truma Mover XT4 Operating and installation instructions

Truma

Truma Mover XT4 Operating and installation instructions

Cruz Evo Rack Alu A28-158 Assembly instructions

Cruz

Cruz Evo Rack Alu A28-158 Assembly instructions

Fortin EVO ONE manual

Fortin

Fortin EVO ONE manual

IAG IAG-ACC-F3084 quick start guide

IAG

IAG IAG-ACC-F3084 quick start guide

BrakeBuddy Vantage installation manual

BrakeBuddy

BrakeBuddy Vantage installation manual

Directed DS3+ installation guide

Directed

Directed DS3+ installation guide

Hama Galaxy Operating	 instruction

Hama

Hama Galaxy Operating instruction

Rugged Ridge 11549.42 quick start guide

Rugged Ridge

Rugged Ridge 11549.42 quick start guide

Thule Hull-a-Port XT 848 instructions

Thule

Thule Hull-a-Port XT 848 instructions

Polaris PROSPECTOR PRO user manual

Polaris

Polaris PROSPECTOR PRO user manual

Carefree Slideout Cover Service manual

Carefree

Carefree Slideout Cover Service manual

Virtual Reality VRFM8R owner's manual

Virtual Reality

Virtual Reality VRFM8R owner's manual

Thule 1259 Fitting instructions

Thule

Thule 1259 Fitting instructions

manuals.online logo
manuals.online logoBrands
  • About & Mission
  • Contact us
  • Privacy Policy
  • Terms and Conditions

Copyright 2025 Manuals.Online. All Rights Reserved.