manuals.online logo
Brands
  1. Home
  2. •
  3. Brands
  4. •
  5. Herd
  6. •
  7. Automobile Accessories
  8. •
  9. Herd MK15C4-02 User manual

Herd MK15C4-02 User manual

1
Installation Guide
1-888-543-4373
www.HERD.com
1-888-543-4373
Part No: MK15C4-02-IG
Rev: C
Date: 04-Mar-19
Important
•Herd Bumpers are vehicle "Make & Model" specific. Use of a bumper on a vehicle other than the model it
was designed for will constitute improper use of the product and may void warranty.
•Unless otherwise specified, Grade 8 or Class 10.9 hardware is to be used. For the purposes of these
instructions, OEM hardware means the truck's original factory hardware.
•For further detail of warranty coverage and warranty repair information visit www.HERD.com.
SKU #
Truck Model
MK15C4-02
Mack Anthem
General Safety
•Take time to fully read the instructions before installing the Herd bumper.
•At all times exercise safe work shop practices, wear steel toe boots and safety glasses during installation.
•Parts and components of the Herd bumper can be heavy, handle with care to avoid injuries.
•Respect power tools and use them as advertised.
For assistance call
1-888-543-4373
www.HERD.com
Thank you for
choosing HERD!
HERD North America Inc.
2168 Springfield Road
Box 28, Group 525, RR5
Winnipeg, MB. Canada R2C 2Z2
Parts Referenced in this Installation Guide
2
1-888-543-4373
www.HERD.com
1-888-543-4373
Part No: MK15C4-02-IG
Rev: C
Date: 04-Mar-19
Parts and Hardware Included
Item No
Part No
Description
Qty
1
2M0005
WLDMT-BUMPER MK15C4-02
1
2
100062
ASSY-UNIVERSAL BRACKET
1
3
100027
C4 SLAM LATCH ASSEMBLY
1
4
100054
ASSY-HINGE
1
5
100058
KIT-CHANNEL STRUT
4
6
100046
KIT-CAS BRACKET
1
7
100049
WLDMT-TOW PIN
1
8
1M0005
WLDMT-MOUNT DS MK15
1
9
1M0006
WLDMT-MOUNT PS MK15
1
10
1M0007
BRKT-MOUNT CTR MK15
1
11
400014
KIT-RUMBER 20 MM
2
12
400043
KIT-AIR DEFLECTOR MK15
1
13
2M0017
KIT-LIGHT MK15 DS
1
14
2M0019
KIT-LIGHT MK15 PS
1
15
100021
ASSY-LIFT ASSIST
1
16
500095
BOLT-HEX 1/4-20X1 NC GR5 WZP
28
17
500208
WASHER-FLAT 1/4 SAE GR8 YZP
56
18
500169
NUT-NYLOCK 1/4-20 NC GR8 YZP
28
19
500085
BOLT-HEX 1/2-13X1-3/4 NC GR8 YZP
10
20
500206
WASHER-FLAT 1/2 SAE GR8 YZP
10
21
500167
NUT-NYLOCK 1/2-13 NC GR8 YZP
10
22
500263
WASHER-FLAT 1/2X1-1/2OD 1/4THICK
12
23
500099
BOLT-HEX 1-8X3-1/2 NC GR8 YZP
2
24
500179
NUT-NYLOCK 1-8 NC GR8 YZP
2
25
500210
WASHER-FLAT 1 SAE GR8 YZP
2
26
500310
BOLT-HEX 7/16-14X1-3/4 NC GR8 YZP
4
27
500312
NUT-NYLOCK 7/16-14 NC GR8 YZP
4
28
500311
WASHER-FLAT 7/16 SAE GR8 YZP
8
2
1
3
4
5
6
7
8
9
10
11
12
13
14
15
Installation Procedure
3
Part No: MK15C4-02-IG
Rev: C
Date: 2020-12-10
1-888-543-4373
www.HERD.com
1-888-543-4373
1. Remove factory bumper by
unbolting four bolts per side as
shown in Figure 1.
Note:
if the truck is equipped with
plastic factory bumper, there are
two bolts on top center side of
the bumper which need to be
removed as well (see Figure 1.2)
Figure 1.1 –Remove Factory Bumper (Passenger Side Shown)
Figure 1.2 –Remove center bolts on plastic bumper
Remove 4 bolts per side
Remove 2 bolts on top
Installation Procedure
4
Part No: MK15C4-02-IG
Rev: C
Date: 2020-12-10
1-888-543-4373
www.HERD.com
1-888-543-4373
2. Remove factory two hooks as
shown in Figure 2.
Figure 2 –Factory Tow Hook Uninstall (Passenger Side Shown)
Remove Hair Pin
Tow Mount
Installation Procedure
5
Part No: MK15C4-02-IG
Rev: C
Date: 2020-12-10
1-888-543-4373
www.HERD.com
1-888-543-4373
3. Disconnect wiring harness as
shown in Figure 3.
Figure 3 –Wiring Harness Removal (Passenger Side Shown)
4. If truck is equipped with the
mesh plate in front of its
crossmember, remove the mesh
surface.
Note:
if truck is equipped with Collision
Avoidance System (CAS),
disconnect the wiring of the CAS
from its radar and remove the
CAS radar from the
crossmember. (The radar is
mounted in front of mesh plate –
not shown here)
Figure 4 –Mesh plate Removal (Passenger Side Shown)
Installation Procedure
6
Part No: MK15C4-02-IG
Rev: C
Date: 2020-12-10
1-888-543-4373
www.HERD.com
1-888-543-4373
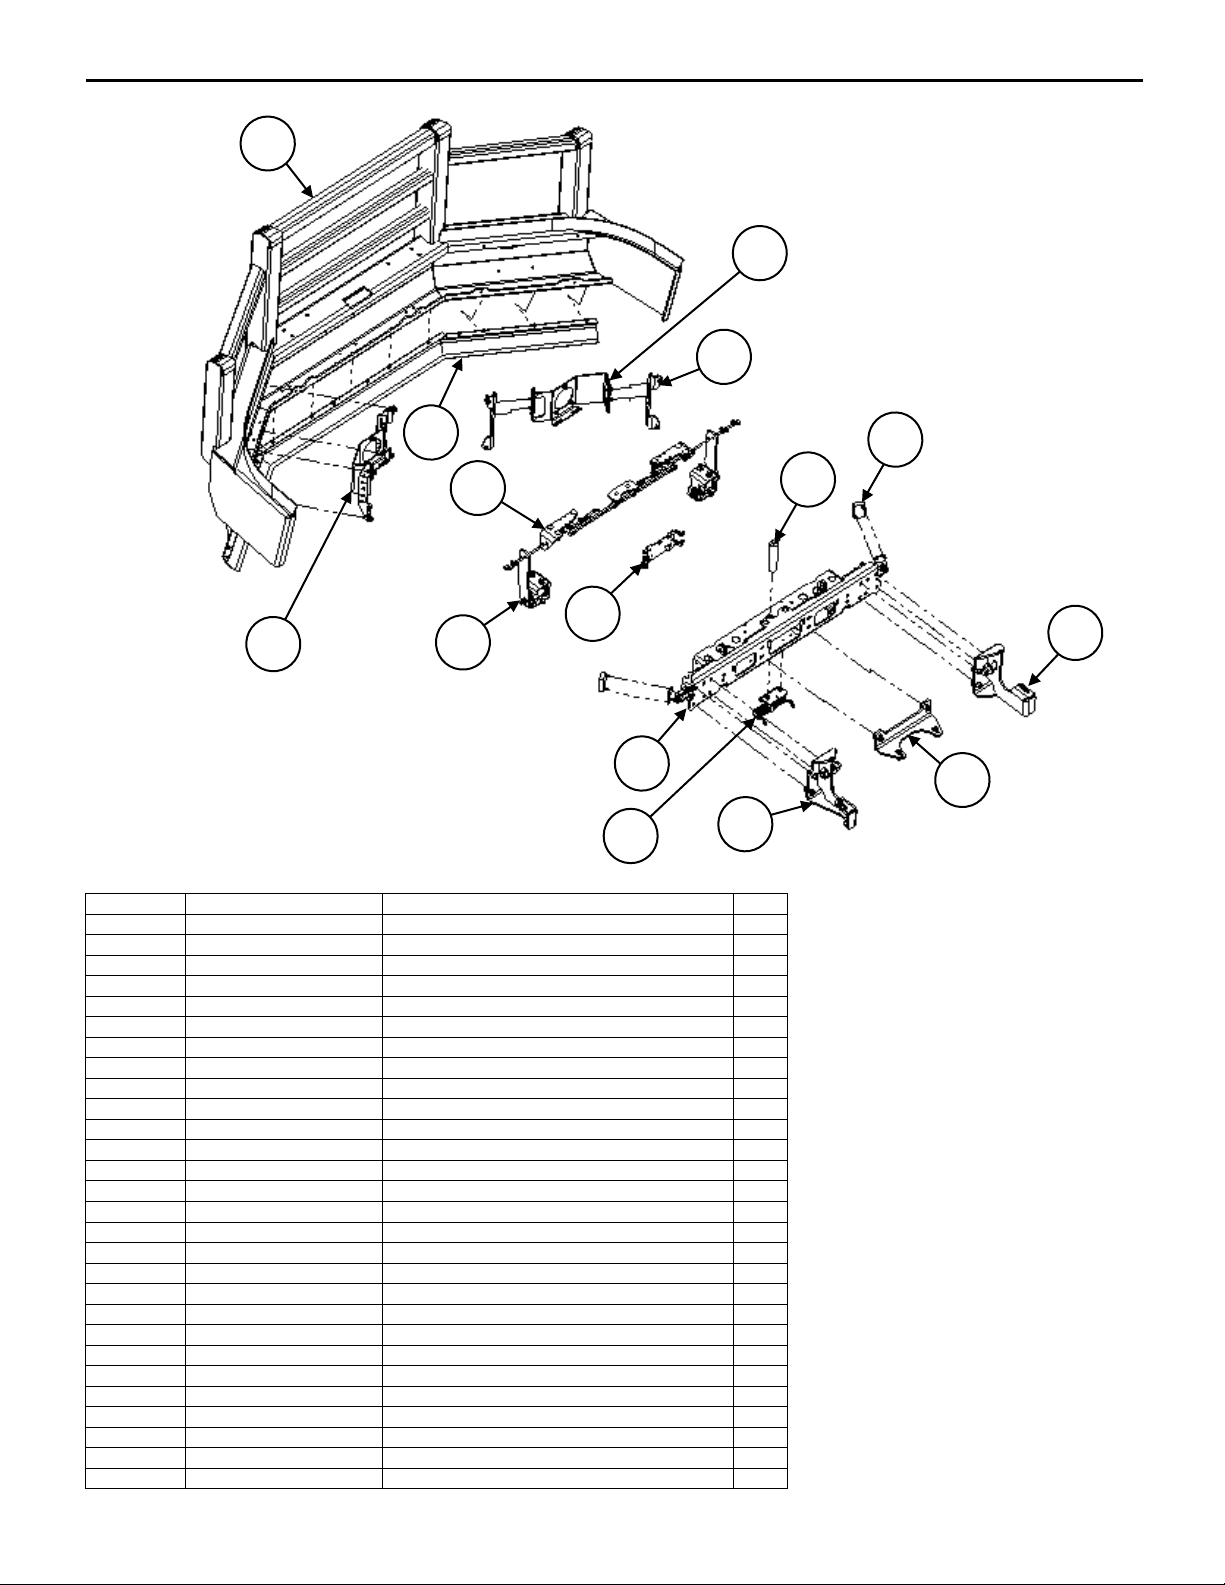
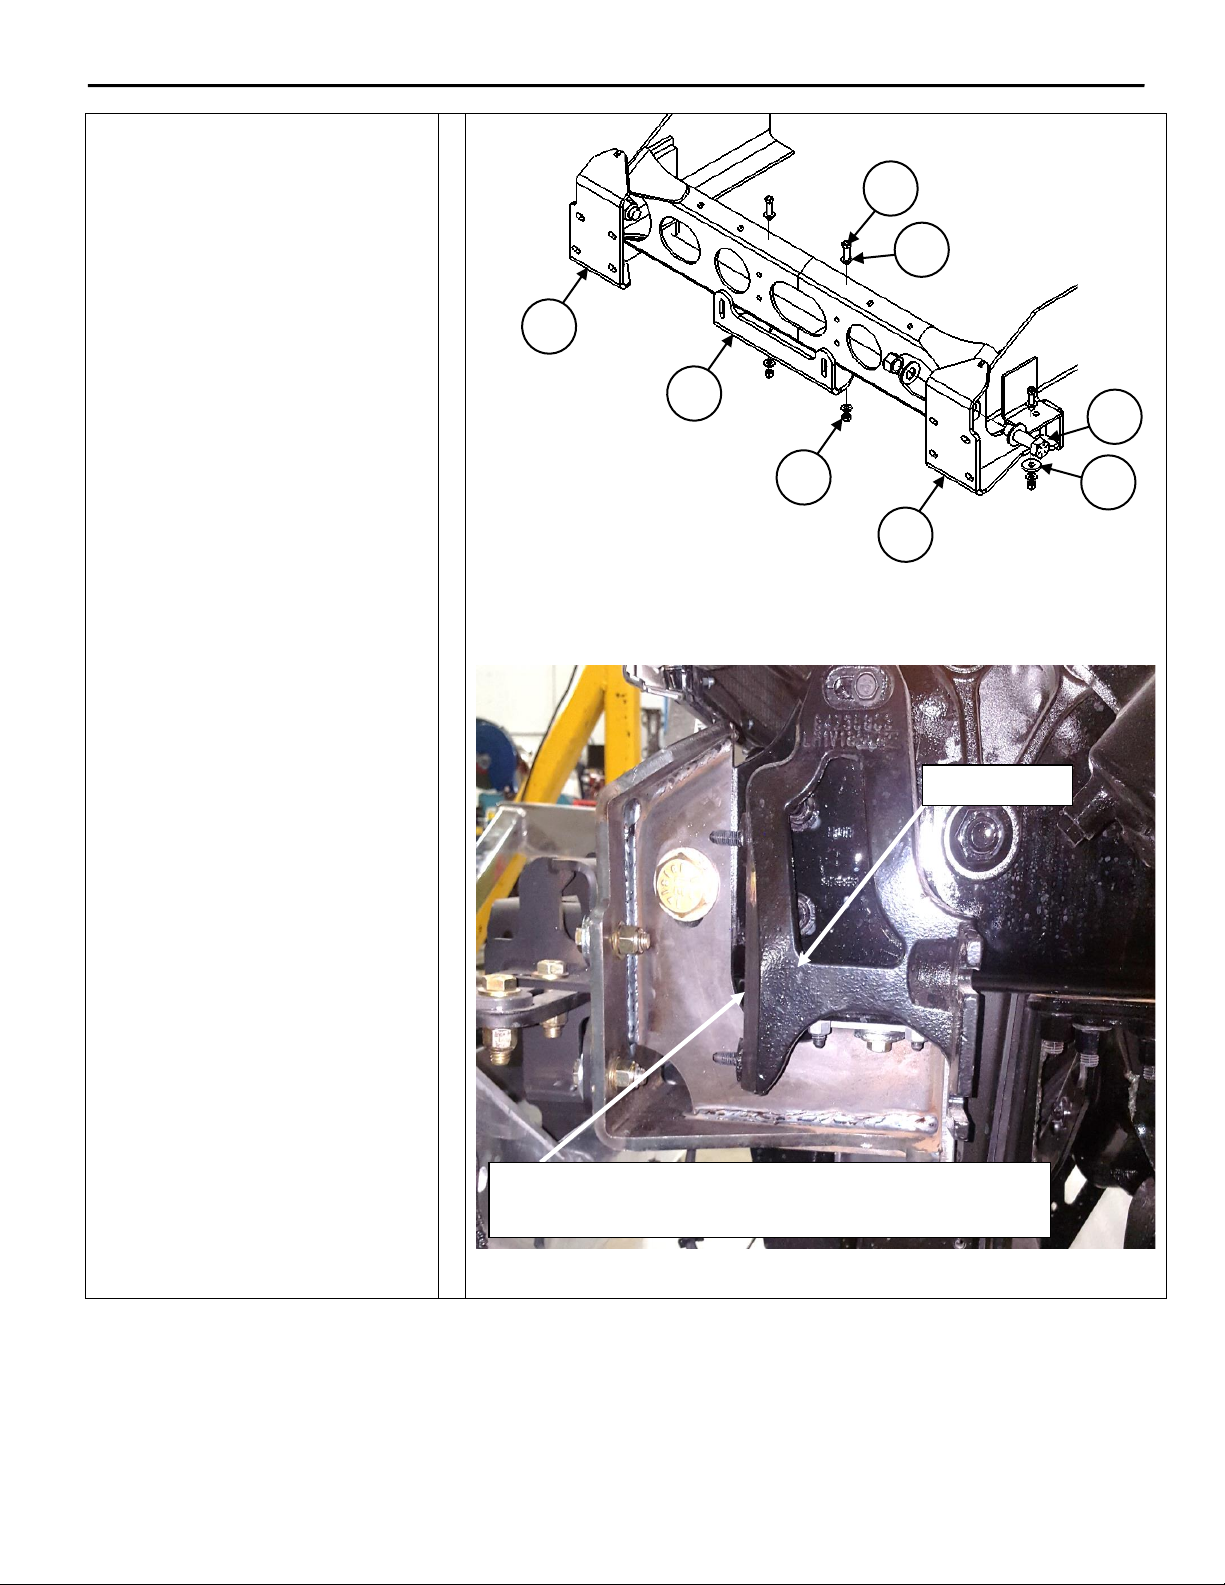
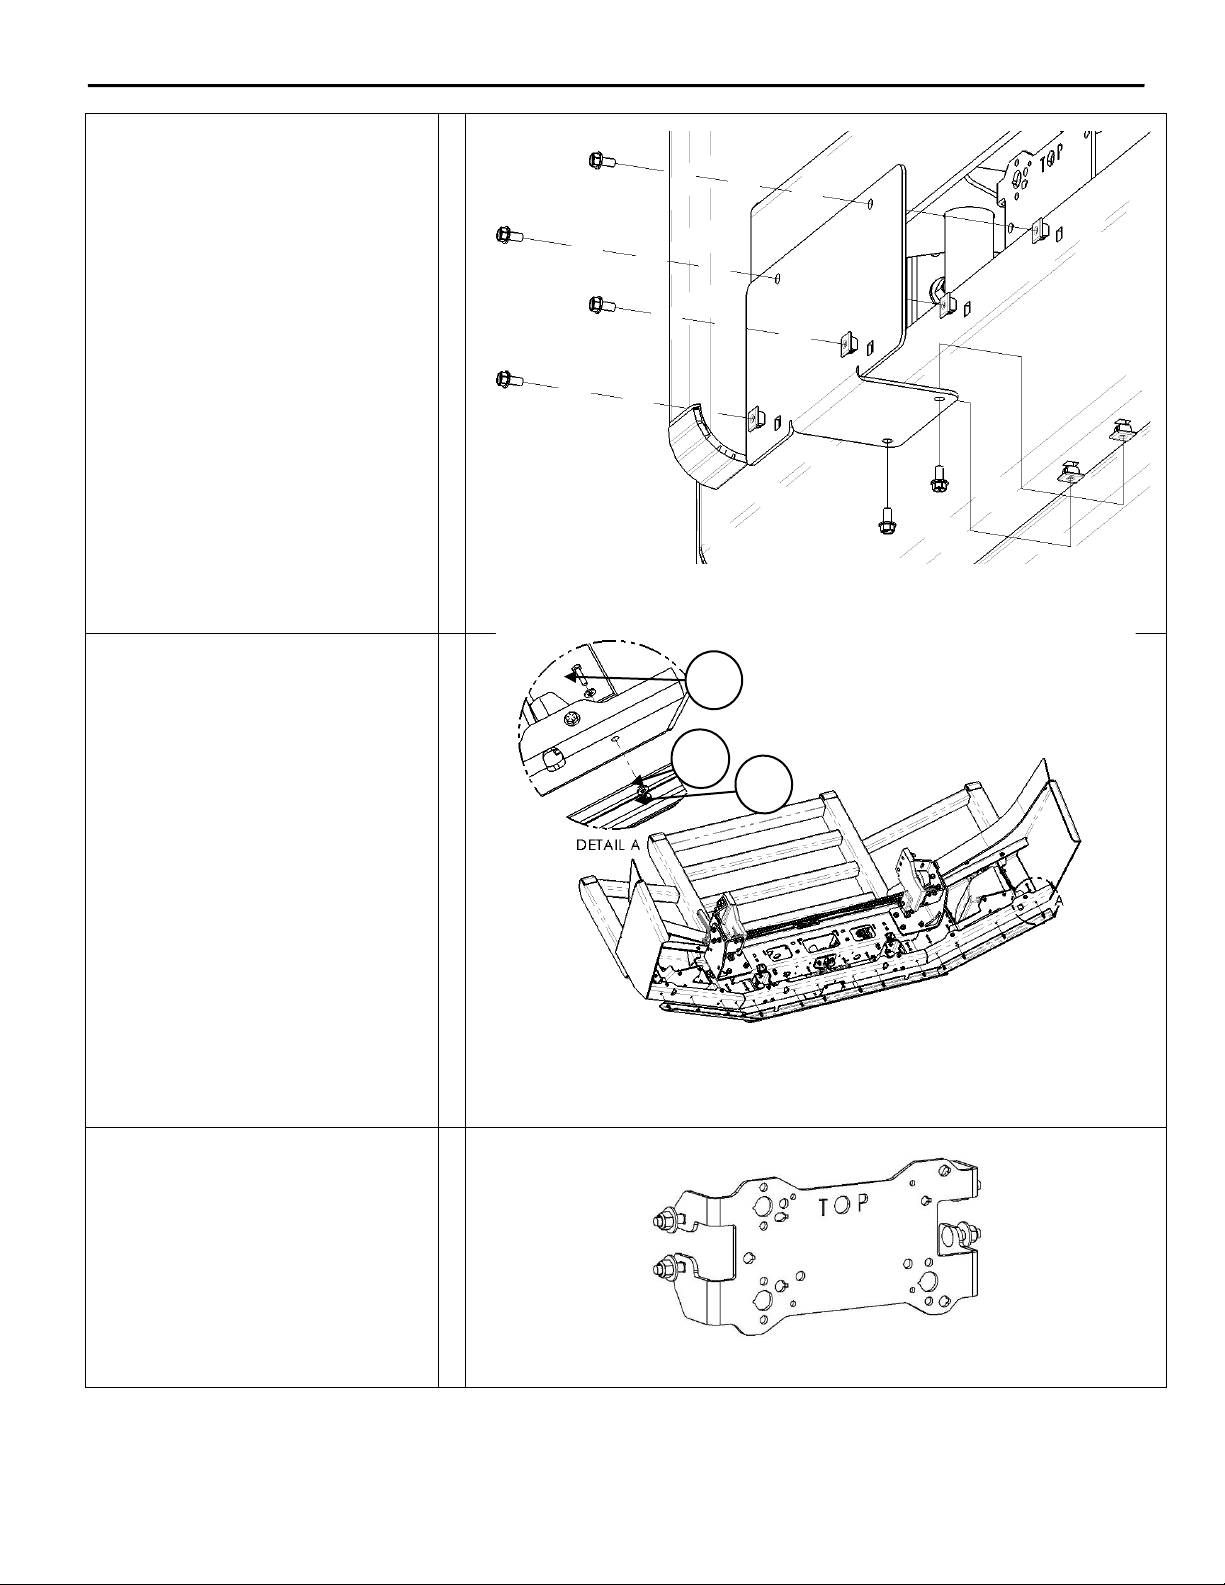
5. Install Herd mounting kit (items
8, 9 and 10) to truck frame. Use
1’’ bolt, nut and washer (items
23, 24 and 25) to attach the
mounting brackets (items 8 and
9) to the tow mounts, torque to
600 lb-ft. Use 7/16’’ bolt, nut and
washer (items 26, 27 and 28) to
attach center mounting bracket
(item 10) to truck frame, torque
to 52 lb-ft.
Note:
Please make sure the mounting
brackets (items 8 and 9) are
mounted from the bottom and
slide in between the truck’s tow
mount and OEM bracket as
shown in Figure 5.2
Figure 5.1 –Herd Mounting Brackets Installation
Figure 5.2 –Herd Mounting Brackets Location (Driver Side Shown)
9
10
8
23
22
27
26
28
OEM bracket
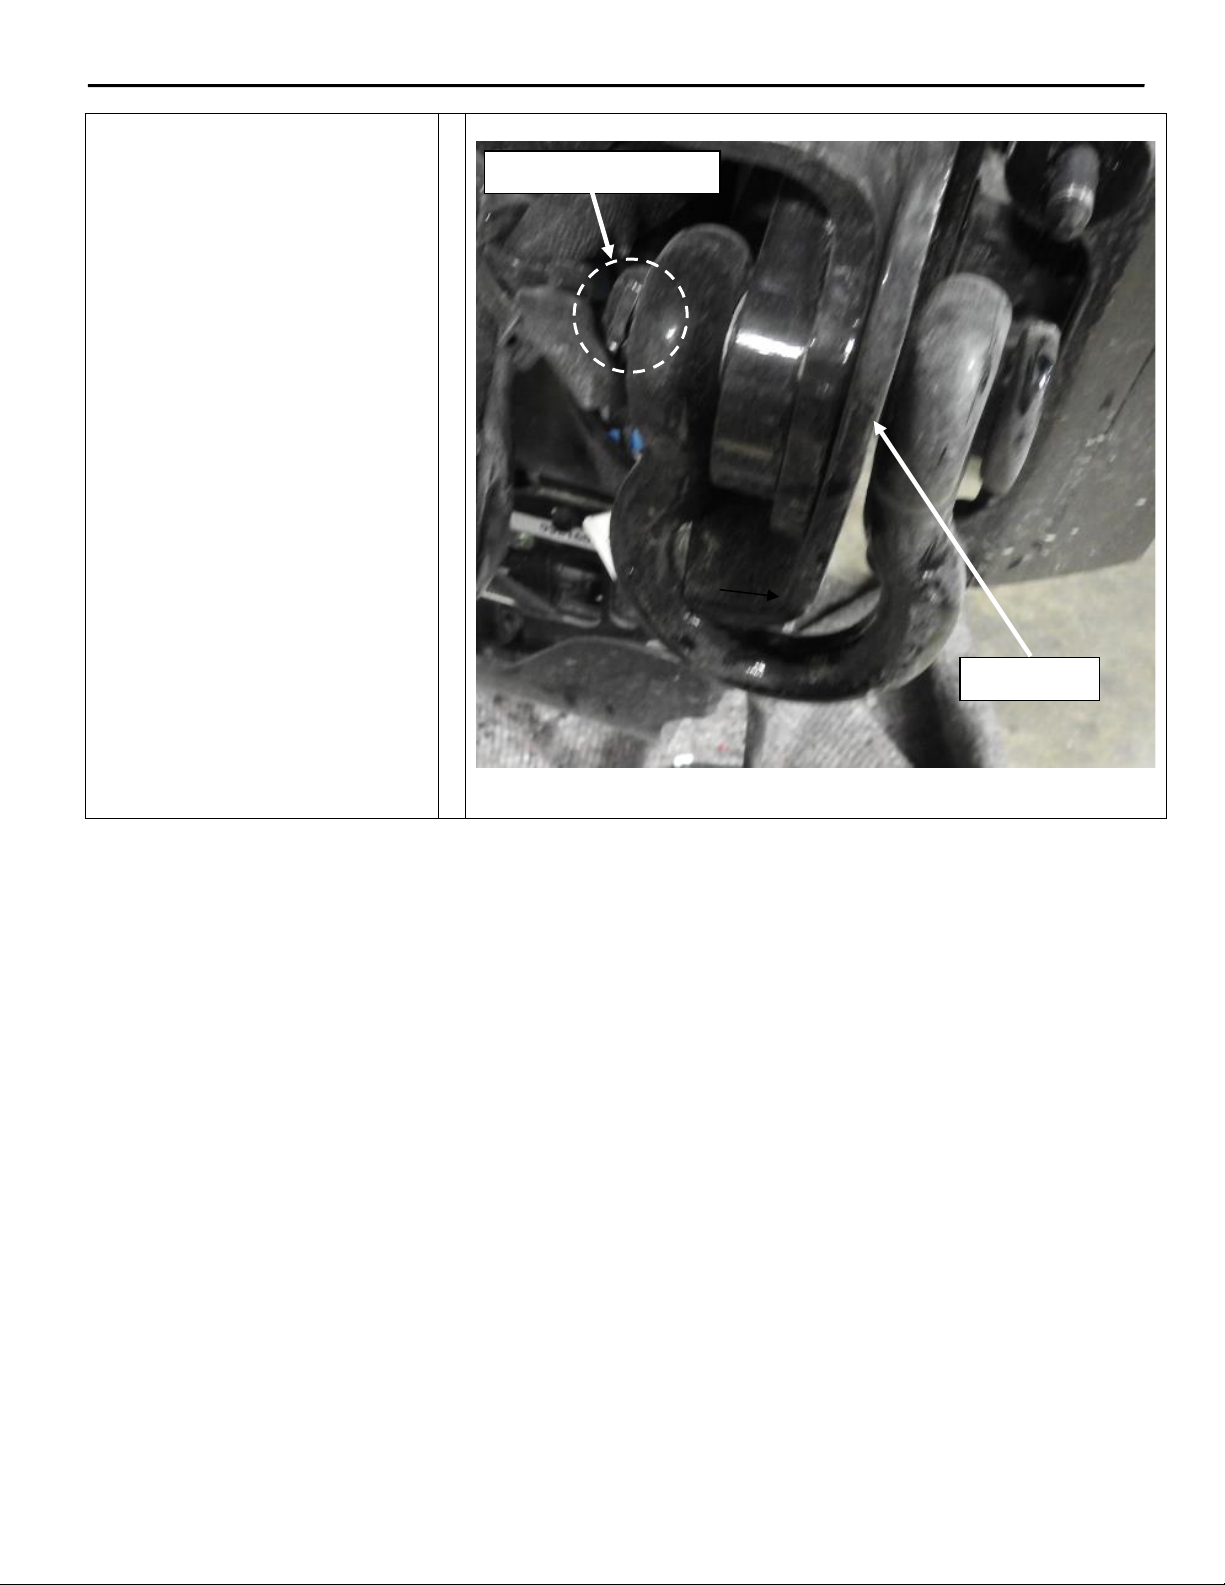
There is a gap between OEM bracket and tow mount for
the supplied mounting brackets (items 8 and 9) to slide in.
Installation Procedure
7
Part No: MK15C4-02-IG
Rev: C
Date: 2020-12-10
1-888-543-4373
www.HERD.com
1-888-543-4373
6. Open bumper by pulling on the
handle. Using a crane, lift the
bumper (Item 1) and universal
bracket (Item 2) and attach to
Herd submounts (items 8, 9 and
10).
Note:
If installer does not have a crane
available, bumper can be
disassembled from the universal
bracket to simplify installation as
shown in step 6, otherwise
proceed to step 7.
Figure 6 –Universal Bracket Installation
7. a) Ensure bumper is closed. From
underneath the bumper, remove
the 3/8” hardware securing the
lift assist springs and slide off
springs from the lift assist (Item
15).
b) Once the springs are removed,
carefully open the bumper using
the slam latch. Remove the 1/2”
hardware securing the bumper to
the universal bracket. Remove
bumper and set aside on
cardboard. Now the bracket is
isolated for mounting without a
crane.
Figure 7.1 –Spring Assist Disassembly
Figure 7.2 –Bracket and Bumper Disassembly (Driver Side Shown)
Lift Assist Spring
Lift Assist Spring
3/8”Hardware
1/2”Hardware
19
20
21
Installation Procedure
8
Part No: MK15C4-02-IG
Rev: C
Date: 2020-12-10
1-888-543-4373
www.HERD.com
1-888-543-4373
8. Install universal bracket (item 2)
to submounts (items 8, 9 and 10)
using the provided hardware
(items 19, 20, 21). Loosely mount
driver, center and passenger
sides. Once fitment is confirmed,
tighten all mounting bolts. Tight
bolts to 110 lb-ft (10 bolts).
Figure 8 –Universal Bracket Submount Installation (Driver Side Shown)
9. If bumper was disconnected
from the universal bracket in
step 6, reverse the procedure to
mount bumper back onto the
bracket.
a) First ensure the bumper
hinges are open.
b) Attach using previously
removed 1/2” bolts until the
hinge just slightly touches the
bracket.
c) Close the bumper and ensure
the latch engages.
d) Open the bumper and tighten
the bolts until they are snug.
c) Close the bumper again to
ensure the latches engage
properly.
Figure 9.1 –Bracket and Hinge Reassembly
19
20
21
Installation Procedure
9
Part No: MK15C4-02-IG
Rev: C
Date: 2020-12-10
1-888-543-4373
www.HERD.com
1-888-543-4373
d) Fully tighten the ½” hardware
to 110 ft⋅lb. Latches may need to
be adjusted, refer to Slam Latch
Adjustment guide (S012).
e) Close the bumper and slide
springs onto the lift assist shaft,
ensuring that spring arms are
inserted into slots of bumper.
Reinsert 3/8” hardware securing
the lift assist springs.
Figure 9.2 –Lift Assist Reassembly
10. If equipped with OEM driving
lights, remove driving lights
from factory bumper and retain
OEM hardware.
Mount OEM driving lights into
the mounting bracket for both
passenger and driver sides
using the provided hardware.
Reinstall driving light brackets
into HERD bumper using the
provided hardware.
Figure 10 –OEM Light Installation (Passenger Side Shown)
Installation Procedure
10
Part No: MK15C4-02-IG
Rev: C
Date: 2020-12-10
1-888-543-4373
www.HERD.com
1-888-543-4373
11. Insert the nylon licence plate
nuts into the square cut-outs in
the bumper and licence plate
bracket. Bolt the bracket into
place using the licence bolts. The
front four bolts can be used to
mount a licence plate as needed
(Optional product - please order
when needed).
Figure 11 –License Plate Installation
12. Install Air Deflector (item 12) to
Herd bumper (item 1) with the
provided hardware (items 16, 17
and 18).
Figure12 –Installation of Air Deflector
13. If the truck was equipped with
a radar sensor, please refer to
the HERD S009 Installation
Guide.
Figure 13 –HERD Radar Sensor Bracket
18
17
16
Installation Procedure
11
Part No: MK15C4-02-IG
Rev: C
Date: 2020-12-10
1-888-543-4373
www.HERD.com
1-888-543-4373
14. If installing surface-mount signal
lamps, 4LMPA001, apply
maximum 85 in-lbs (7ft-lbs,
9.6Nm) to mounting nuts.
Figure 14 –Signal light Installation
Important
•Check mounting points after the first 5000 km and every 3-6 months.
•This bumper is equipped with Herd Slam Latch which requires periodic adjustment. Refer to Slam Latch
Installation adjustment instructions (S001) to properly adjust your Slam Latch.

Other Herd Automobile Accessories manuals

Herd Aero User manual

Herd

Herd Aero User manual

Herd KW01 User manual

Herd

Herd KW01 User manual

Herd KW22C4-02 User manual

Herd

Herd KW22C4-02 User manual

Herd 404006 User manual

Herd

Herd 404006 User manual

Herd Aero Series User manual

Herd

Herd Aero Series User manual

Herd IN24A2 User manual

Herd

Herd IN24A2 User manual

Herd AeroPLUS C4-02 Guide

Herd

Herd AeroPLUS C4-02 Guide

Herd Defender Series User manual

Herd

Herd Defender Series User manual

Herd IN27BG User manual

Herd

Herd IN27BG User manual

Herd SLAM LATCH Guide

Herd

Herd SLAM LATCH Guide

Herd FL33BG User manual

Herd

Herd FL33BG User manual

Herd Aero User manual

Herd

Herd Aero User manual

Herd Aero User manual

Herd

Herd Aero User manual

Herd PB11C4-02 User manual

Herd

Herd PB11C4-02 User manual

Herd C4 Series User manual

Herd

Herd C4 Series User manual

Herd WS30C4-02 Operating and maintenance manual

Herd

Herd WS30C4-02 Operating and maintenance manual

Popular Automobile Accessories manuals by other brands

DK2 BCR590 user manual

DK2

DK2 BCR590 user manual

Geemarc iBT10 manual

Geemarc

Geemarc iBT10 manual

Metra Electronics 99-7308 installation instructions

Metra Electronics

Metra Electronics 99-7308 installation instructions

KFI HK-338 quick start guide

KFI

KFI HK-338 quick start guide

CARPOINT Rolkrik manual

CARPOINT

CARPOINT Rolkrik manual

EUFAB 17522 operating instructions

EUFAB

EUFAB 17522 operating instructions

Lippert Components Jack-It manual

Lippert Components

Lippert Components Jack-It manual

Bosch VCUNM1 manual

Bosch

Bosch VCUNM1 manual

Thule EuroRide 941 manual

Thule

Thule EuroRide 941 manual

Luis T5-Funk Manual instruction

Luis

Luis T5-Funk Manual instruction

HOOKE ROAD BXG.4202 quick start guide

HOOKE ROAD

HOOKE ROAD BXG.4202 quick start guide

Zoombak Car Locator user guide

Zoombak

Zoombak Car Locator user guide

Toyota 2005 Yaris installation instructions

Toyota

Toyota 2005 Yaris installation instructions

Clifford SMARTWINDOWS 2 installation manual

Clifford

Clifford SMARTWINDOWS 2 installation manual

Tundra HD1224 owner's guide

Tundra

Tundra HD1224 owner's guide

Phonocar VM 135 Mounting instructions

Phonocar

Phonocar VM 135 Mounting instructions

Enthuze ENT5089 Assembly and Use

Enthuze

Enthuze ENT5089 Assembly and Use

Leitner ACS ROOF manual

Leitner

Leitner ACS ROOF manual

manuals.online logo
manuals.online logoBrands
  • About & Mission
  • Contact us
  • Privacy Policy
  • Terms and Conditions

Copyright 2025 Manuals.Online. All Rights Reserved.