manuals.online logo
Brands
  1. Home
  2. •
  3. Brands
  4. •
  5. HIK VISION
  6. •
  7. Security Sensor
  8. •
  9. HIK VISION DS-PD2-D10P-W1 User manual

HIK VISION DS-PD2-D10P-W1 User manual

1.Log in to the APP Store and input” Hik-Connect” to search the mobile client.
Download and install Hik-Connect to your phone.
2.Aer installing, tap to run the client.
3.Power on the security control panel.
4.Log in the Hik-Connect and tap the icon“+” at the upper-right coner of the
Hik-Connect page to add the security control panel. You can scan the QR code
on the device rear panel or on the package box, or input the device serial No.
manually to add the device when the device is in the registraon mode.
5.Aer adding the security control panel, tap the alarming status icon on the
right of the security control panel's name to enter the Paron page.
6.Tap the”+” icon on the Paron page to add the peripherals.
DS-PD2-D10P-W/W1
Wireless 10m Pet Immune Dual
Technology Detector
LEDs
HIGH
LOW
LEDs
0.3 - 3m/s
0.3 -3m/s
10m
10m
10m
0m
2.4m
Battery Information
References
ENGLISH
WIRELESS DEVICE CONTROL
REGISTER LOCALLY/ VIA APP
DIAGNOSTICS
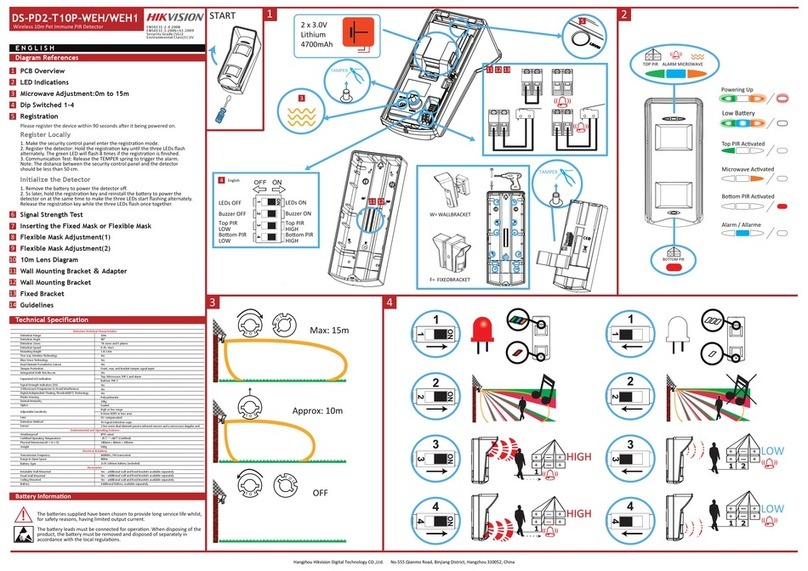
Initialize the Detector
E
O
L
E
O
L
E
O
L
Specification
Register Locally
Hangzhou Hikvision Digital Technology CO.,Ltd. No.555 Qianmo Road,BinjiangDistrict, Hangzhou 310052, China
Register Via APP
1
2
3
Please note: Once registered, the detector will begin a 10 minute mer allowing
walk test of the PIR and microwave. During this me, the detector will not
transmit to the panel and is used to adjust the PIR and microwave sengs.
1.Make the security control panel enter the registraon mode.
2.Register the detector: Hold the registraon key unl the three LEDs flash
alternately. The green LED will flash 8 mes if the registraon is finished.
3.Communicaon Test: Release the TAMPER spring to trigger the alarm.
Note: The distance between the security control panel and the detector should
be less than 50 cm.
Please register the detector within 90 seconds aer it being powered on.
1.Remove the baery to power the detector off.
2.5s later, hold the registraon key and reinstall the baery to power the
detector on at the same me to make the three LEDs start flashing alternately.
Release the registraon key while the three LEDs flash once together.
Lens Characteriscs
Key Features
Electrical & Baery
Environment Features
Accessories
1
The baeries supplied have been chosen to provide long service life whilst, for safety
reasons, having limited output current.
The baery is protected on purchase by a piece of plasc that must be removed for
operaon. When disposing of the product, the baery must be removed and disposed
of separately in accordance with the local regulaons.
This product and - if applicable - the supplied accessories
too are marked with "CE" and comply therefore with the
applicable harmonized European standards listed under
the RE Direcve 2014/53/EU, the RoHS Direcve
2011/65/EU.
For electrical products sold within the European
Community. At the end of the electrical products life, it
should not be disposed of with household waste. Please
recycle where facilies exist. Check with your local
Authority or retailer for recycling advice in your country.
This product operates in a European
non-harmonised frequency band
Dete co n Ra ng e
Detecon Angle
Detecon Zones
Detecon Speed
Mounng Height
Animal Immune
Blue Wave Technology
Automac Sensivity
Digital Temperature Compensaon
Separate Indicaon: Microwave, PIR and Alarm
3 Microwave Frequencies to Avoid Interference
Tamper Protecon
Signal Strength Indicators (SSI)
Microwave Frequency
Transmission Frequency
Range in Open Space
3V Lithium Baery Included
Minimum Baery Life (years)
Operang Temperature
Weight
Dimensions(H x W x D)
Opcs
Geometric Lens Configuraon
Ceiling mounted bracket included
Wall mounted bracket included
10m
85°
56 zones,6 planes
0.3 - 3m/s
1.8-2.4m
Up to 24kg
Yes
Yes
Yes
Orange (Microwave), Blue (Alarm), Green (PIR)
Front, rear, and bracket tamper signal input
Yes
Yes
10.515, 10.525, 10.535 GHz
9.89, 9.90, 9.91 GHz
433MHz, FM transceiver
800m
2x CR123A
2
-10°C to +40°C(Ceried)
135g
117 x 69 x 62mm
Sealed
3D
Yes
Yes
5s
REGISTRATION
>5s
≤300s
23
Hangzhou Hikvision Digital Technology CO.,Ltd. No.555 Qianmo Road,BinjiangDistrict, Hangzhou 310052, China
E S P A Ñ O L
P O RTUGUÊS
FRANÇAISI T A L IAN O
REGISTRAZIONE LOCALE/TRAMITE APP
Registrare il rilevatore entro 90 secondi dopo l'accensione.
Registrazione locale
1. Entrare in modalità di registrazione del pannello di controllo di sicurezza.
2. Registrazione del rilevatore: tenere premuto il tasto di registrazione fino a
che i tre LED non lampeggiano alternavamente. Il LED verde lampeggia 8
volte al termine della registrazione.
3. Test di comunicazione: Rilasciare la molla MANOMISSIONE per avare
l'allarme.
Inizializzazione del rilevatore
Nota: la distanza tra il pannello di controllo di sicurezza e il rilevatore deve
essere meno di 50 cm.
1. Rimuovere la baeria per spegnere il rilevatore.
2. Dopo 5 secondi, premere il tasto di registrazione e reinstallare la baeria
allo stesso tempo per accendere il rilevatore e far lampeggiare alternava-
mente i tre LED. Rilasciare il tasto di registrazione mentre i tre LED
lampeggiano insieme una volta.
Registrazione tramite APP
1. Accedere all'APP Store e inserire “Hik-Connect” per effeuare la ricerca del
client mobile. Scaricare e installare Hik-Connect sul telefono.
2. Dopo l'installazione, toccare per avviare il client.
3. Accendere il pannello di controllo di sicurezza.
4. Accedere a Hik-Connect e toccare l'icona “+” nell'angolo in alto a destra
della pagina di Hik-Connect per aggiungere il pannello di controllo. È
possibile aggiungere il disposivo quando è in modalità di registrazione,
effeuando la scansione del codice QR situato sul pannello posteriore del
disposivo o sulla scatola della confezione, o inserendo manualmente il
numero di serie del disposivo.
5. Dopo aver aggiunto il pannello di controllo di sicurezza, toccare l'icona dello
stato di allarme, situata a destra del nome del pannello di controllo, per
accedere alla pagina Parzioni.
6. Toccare l'icona “+” sulla pagina delle Parzioni per aggiungere le periferiche.
REGISTRAR LOCALMENTE/A TRAVÉS DE LA APLICACIÓN
Registre el detector en un periodo de 90 segundos después de encenderlo.
Registrar localmente
1. Asegúrese de que el panel de control de seguridad acceda al modo de
registro.
2. Registro del detector: Mantenga pulsado el botón de registro hasta que los
tres ledes parpadeen alternavamente. El led verde parpadeará 8 veces una
vez finalizado el registro.
3. Prueba de comunicación: Suelte el muelle de MANIPULACIÓN para disparar
la alarma.
Inicializar el detector
Nota: La distancia entre el panel de control de seguridad y el detector debe ser
menor de 50 cm.
1. Rere la pila para apagar el detector.
2. 5 s después, mantenga pulsado el botón de registro y vuelva a insertar la
pila para encender el detector al mismo empo para que los tres ledes
empiecen a parpadear alternavamente. Suelte el botón de registro cuando
los tres LED parpadeen a la vez.
Registrar a través de la aplicación
1. Inicie sesión en la App Store y escriba “Hik-Connect” para buscar el cliente
móvil. Descargue e instale Hik-Connect en su teléfono.
2. Después de instalarlo, pulse para ejecutar el cliente.
3. Encienda el panel de control de seguridad.
4. Inicie sesión en Hik-Connect y pulse el icono “+” en la esquina superior
derecha de la página de Hik-Connect para añadir el panel de control de
seguridad. Puede escanear el código QR del panel trasero del disposivo o
del embalaje, o introducir manualmente el número de serie del disposivo
para añadirlo en modo de registro.
5. Después de añadir el panel de control de seguridad, toque el icono de
estado de alarma a la derecha del nombre del panel de control de seguridad
para acceder a la página de parción.
6. Pulse el icono “+” de la página de parción para añadir los periféricos.
1
2
3
Références
Spécification
INSCRIPTION LOCALE SUR L’APPLICATION
Veuillez inscrire le détecteur dans un délai de 90 secondes après sa mise en route.
Inscription locale
1. Accéder au mode inscripon sur le panneau de commande de sécurité.
2. Inscripon du détecteur : Maintenez enfoncée la touche d’inscripon
jusqu’à ce que les trois voyants clignotent en alternance. Le voyant vert
clignotera 8 fois si l’inscripon est terminée.
3. Test de communicaon : Relâchez le ressort an-sabotage pour déclencher
l’alarme.
Initialisation du détecteur
Remarque : La distance entre le panneau de commande sécurité et le
détecteur doit être inférieure à 50 cm.
1. Rerez la baerie pour éteindre le détecteur.
2. 5 secondes plus tard, maintenez enfoncée la touche d’inscripon et
réinstallez la baerie pour mere en route le détecteur en même temps
pour que les trois voyants commencent à clignoter en alternance. Relâchez
la touche d’inscripon pendant que les trois voyants clignotent une fois
ensemble.
Inscription sur l’application
1. Connectez-vous à l’App Store et saisissez « Hik-Connect » pour rechercher le
client mobile. Téléchargez et installez Hik-Connect sur votre téléphone.
2. Après l’installaon, appuyez sur pour exécuter le client.
3. Allumez le panneau de commande de sécurité.
4. Connectez-vous à Hik-Connect et appuyez sur l’icône « + » dans le coin
supérieur droit de la page Hik-Connect pour ajouter le panneau de commande
de sécurité. Vous pouvez scanner le code QR sur la paroi arrière de l’appareil ou
sur la boîte de l’appareil, ou saisir manuellement le numéro de série de
l’appareil pour ajouter l’appareil lorsque l’appareil est en mode inscripon.
5. Après avoir ajouté le panneau de commande de sécurité, appuyez sur
l’icône d’état d’alarme à droite du nom du panneau de commande de
sécurité pour accéder à la page Paron.
6. Appuyez sur l’icône « + » dans la page Paron pour ajouter les
périphériques.
CONTRÔLE D’UN DISPOSITIF SANSFIL
Remarque : Une fois inscrit, le détecteur commencera une minuterie de
10 minutes permeant un test de fonconnement du PIR et du capteur à
micro-ondes. Pendant cet intervalle, le détecteur ne transmera pas à la
centrale et servira à ajuster les réglages du PIR et du capteur de micro-ondes.
DIAGNOSTICS
Caractérisques de l’objecf
Portée de détecon : 10 m
Angle de détecon : 85°
Zones de détecon : 56 zones, 6 plans
Vitesse de détecon : 0,3 à 3m/s
Hauteur de fixaon : 1,8-2,4 m
Caractérisques principales
Immunité aux animaux : Jusqu’à 24 kg
Technologie Blue Wave
Sensibilité automaque
Compensaon numérique de la température
Indicaon séparée : Micro-ondes, PIR et alarme ; orange (micro-ondes),
bleu (alarme), vert (PIR)
3 fréquences micro-ondes pour éviter les interférences
Protecon an-sabotage Entrée du signal ansabotage avant, arrière et
support
Indicateurs de puissance du signal (SSI)
Caractérisques électriques et baerie
Fréquence des micro-ondes : 10,515 ; 10,525 ; 10,535 GHz
9,89; 9,90; 9,91 GHz
Fréquence de transmission : Émeeur-récepteur FM (433 MHz)
Portée en espace dégagé : 800 m
Baerie au lithium de 3 V incluse : 2x CR123A
Durée de vie minimale de la baerie (années) : 2
Caractérisques environnementales
Température de fonconnement : -10 °C à +40 °C (cerfiée)
Poids : 135 g
Dimensions (H x l x P) : 117 x 69 x 62 mm
Opques : Scellées
Configuraon géométrique de la lenlle : 3D
Accessoires
Support de montage au plafond inclus
Support de montage mural inclus
1
2
3
Referências
Especificação
REGISTRAR LOCALMENTE OU PELO APP
Registre o detector dentro de 90 segundos depois de ele ser ligado.
Registrar localmente
1. Coloque o painel de controle de segurança no modo de registro.
2. Registre o detector: mantenha pressionada a tecla de registro até que
os três LEDs pisquem alternadamente. O LED verde piscará 8 vezes
quando o registro for concluído.
3. Teste de comunicação: solte a mola de ANTIVIOLAÇÃO para acionar o
alarme.
Inicializar o detector
Observação: a distância entre o painel de controle de segurança e o
detector deve ser menor do que 50 cm.
1. Remova a bateria para desligar o detector.
2. Cinco segundos depois, mantenha pressionada a tecla de registro e,
ao mesmo tempo, reinstale a bateria para ligar o detector, o que fará
com que os três LEDs comecem a piscar alternadamente. Solte a tecla
de registro quando os três LEDs piscarem juntos ao mesmo tempo.
Registrar pelo app
1. Entre na loja de aplicavos e digite “Hik-Connect” para pesquisar o
app para celular. Baixe e instale o Hik-Connect no seu telefone.
2. Após a instalação, toque em para executar o app.
3. Ligue o painel de controle de segurança.
4. Faça o login no Hik-Connect e toque no ícone “+” no canto superior
direito da página do Hik-Connect para adicionar o painel de controle
de segurança. Você pode escanear o código QR no painel traseiro do
disposivo ou na caixa da embalagem, ou inserir o número de série
do disposivo manualmente para adicioná-lo quando ele esver no
modo de registro.
5. Depois de adicionar o painel de controle de segurança, toque no
ícone de status do alarme à direita do nome do painel para entrar na
página Parção.
6. Toque no ícone “+” na página Parção para adicionar os periféricos.
CONTROLE DE DISPOSITIVO SEM FIO
Observe que: Uma vez registrado, o detector iniciará um temporizador de
10 minutos que permirá o teste de caminhada do PIR e do micro-ondas.
Durante esse tempo, o detector não transmirá para o painel e será usado
para ajustar as configurações do PIR e do micro-ondas.
DIAGNÓSTICO
Caracteríscas da lente
Faixa de detecção: 10 m
Ângulo de detecção: 85°
Zonas de detecção: 56 zonas e 6 planos
Velocidade de detecção: 0,3 a 3 m/s
Altura de montagem: 1,8 a 2,4 m
Recursos principais
Imunidade a animais: até 24 kg
Tecnologia Blue Wave
Sensibilidade automáca
Compensação de temperatura digital
Indicação separada: micro-ondas, PIR e alarme; vermelho (micro-ondas),
verde (PIR) e azul (alarme)
Três frequências de micro-ondas para evitar interferências
Proteção anviolação: entrada de sinal de violação frontal, traseira e do
suporte
Indicadores de intensidade de sinal (SSI)
Componentes elétricos e bateria
Frequências de micro-ondas: 10,515, 10,525 e 10,535 GHz
9,89, 9,90 e 9,91 GHz
Frequência de transmissão: 433 MHz, transmissor de FM
Alcance em espaço aberto: 800 m
Bateria de 3 V de lío incluída: 2x CR123A
Duração mínima da bateria (em anos): 2
Recursos ambientais
Temperatura de operação: -10 °C a +40 °C (cerficado)
Peso: 135 g
Dimensões (A x L x P): 117 x 69 x 62 mm
Ópca: selado
Configuração de lente geométrica: 3D
Acessórios
Suporte para montagem no teto incluído
Suporte para montagem na parede incluído
1
2
3
Referencias
Especificación
CONTROL DEL DISPOSITIVO INALÁMBRICO
Tenga en cuenta: Una vez registrado, el detector iniciará un temporizador de
10 minutos que permite probar caminando el PIR y las microondas. Durante
este empo, el detector no transmirá al panel y se usará para ajustar los
ajustes de PIR y microondas.
DIAGNÓSTICO
Caracteríscas de la lente
Campo de detección: 10 m
Ángulo de detección: 85°
Zonas de detección: 56 zonas, 6 planos
Velocidad de detección: 0,3-3 m/s
Altura de montaje: 1,8-2,4 m
Funciones claves
Inmunidad a mascotas: Hasta 24 kg
Tecnología Blue Wave
Sensibilidad automáca
Compensación de temperatura digital
Indicación separada: Microondas, PIR y alarma; naranja (microondas), azul
(alarma), verde (PIR)
3 frecuencias de microondas para evitar interferencias
Protección contra manipulación: Frontal, trasera y entrada de señal de
manipulación de soporte
Indicadores de fuerza de señal (SSI, de sus siglas en inglés)
Electricidad y pila
Frecuencia de microondas: 10,515; 10,525 y 10,535 GHz
9,89; 9,90 y 9,91 GHz
Frecuencia de transmisión: 433 MHz, transmisor FM
Alcance en espacios abiertos: 800 m
Pila de lio de 3 V incluida: 2x CR123A
Duración mínima de la batería (años): 2
Caracteríscas medioambientales
Temperatura de funcionamiento: -10 °C a +40°C (cerficado)
Peso: 135 g
Dimensiones (alto x ancho x profundidad): 117 x 69 x 62 mm
Ópca: Sellada
Configuración de lente geométrica: 3D
Accesorios
Soporte de montaje en techo incluido
Soporte de montaje en pared incluido
1
2
3
Riferimenti
Specifiche
CONTROLLO DISPOSITIVO WIRELESS
Nota: Dopo la registrazione, il rilevatore avvia un mer di 10 minu che
permee un walk test del PIR e dei disposivi a microonde. In questo periodo,
il rilevatore non effeua trasmissioni al pannello, ma può essere ulizzato per
regolare le impostazioni PIR e microonde.
DIAGNOSTICA
Caraerische dell'obievo
Area di copertura: 10 m
Angolo di rilevamento: 85°
Zone di rilevamento: 56 zone, 6 piani
Velocità di rilevamento: 0,3 - 3 m/s
Altezza di montaggio: 1,8-2,4 m
Funzioni principali
Immunità agli animali: fino a 24 kg
Tecnologia Blue Wave
Sensibilità automaca
Compensazione digitale della temperatura
Indicazioni disnte: microonde, PIR e allarme; arancione (microonde), blu
(allarme), verde (PIR)
3 frequenze a microonde per evitare interferenze
Protezione da manomissioni: ingresso segnale di manomissione anteriore,
posteriore e staffa
Indicatore potenza segnale (SSI)
Elericità e baeria
Frequenza microonde: 10,515, 10,525, 10,535 GHz
9,89, 9,90, 9,91 GHz
Frequenza di trasmissione: 433 MHz, ricetrasmetore FM
Portata in spazi aper: 800 m
Baeria al lio da 3 V inclusa: 2x CR123A
Durata minima della baeria (anni): 2
Caraerische ambientali
Temperatura di esercizio: Da -10 °C a +40 °C (cerficata)
Peso: 135 g
Dimensioni (A x L x P): 117 × 69 × 62 mm
Componen oci: sigilla
Configurazione geometrica dell'obievo: 3D
Accessori
Staffa di montaggio a soffio inclusa
Staffa di montaggio a parete inclusa
Hangzhou Hikvision Digital Technology CO.,Ltd. No.555 Qianmo Road,BinjiangDistrict, Hangzhou 310052, China
Р У ССКИЙ
User Manual
COPYRIGHT ©2018 Hangzhou Hikvision Digital Technology Co.,Ltd.
ALL RIGHTS RESERVED.
Any and all informaon, including, among others, wordings, pictures,
graphs are the properes of Hangzhou Hikvision Digital Technology Co.,
Ltd. or its subsidiaries (hereinaer referred to be “Hikvision”). This user
manual (hereinaer referred to be “the Manual”) cannot be reproduced,
changed,translated, or distributed, parally or wholly, by any means,
without the prior wrien permission of Hikvision. Unless otherwise
spulated, Hikvision does not make any warranes, guarantees or
representaons, express or implied, regarding to the Manual.
About this Manual
This manual is applicable to detector.
The Manual includes instrucons for using and managing the product.
Pictures, charts, images and all other informaon hereinaer are for
descripon and explanaon only. The informaon contained in the
Manual is subject to change, without noce, due to firmware updates
or other reasons.
Please find the latest version in the company website
(hp://overseas.hikvision.com/en/).
Please use this user manual under the guidance of professionals.
Trademarks Acknowledgement
and other Hikvision’s trademarks and logos are the
properes of Hikvision in various jurisdicons. Other trademarks and
logos menoned below are the properes of their respecve owners.
Product Information
FCC Information
Please take aenon that changes or modificaon not expressly
approved by the party responsible for compliance could void the user’s
authority to operate the equipment.
FCC compliance: This equipment has been tested and found to comply
with the limits for a Class B digital device, pursuant to part 15 of the FCC
Rules. These limits are designed to provide reasonable protecon against
harmful interference in a residenal installaon. This equipment
generates, uses and can radiate radio frequency energy and, if not
installed and used in accordance with the instrucons, may cause
harmful interference to radio communicaons. However, there is no
guarantee that interference will not occur in a parcular installaon.
If this equipment does cause harmful interference to radio or television
recepon, which can be determined by turning the equipment off and on,
the user is encouraged to try to correct the interference by one or more
of the following measures:
—Reorient or relocate the receiving antenna.
—Increase the separaon between the equipment and receiver.
—Connect the equipment into an outlet on a circuit different from that to
which the receiver is connected.
—Consult the dealer or an experienced radio/TV technician for help.
This equipment should be installed and operated with a minimum
distance 20cm between the radiator and your body.
FCC Condions
This device complies with part 15 of the FCC Rules. Operaon is subject to
the following two condions:
1. This device may not cause harmful interference.
2. This device must accept any interference received, including
interference that may cause undesired operaon.
Polski
1
2
3
Spis treści
Specyfikacje
ZAREJESTRUJ LOKALNIE/ PRZEZ APLIKACJĘ
Detektor należy zarejestrować w ciągu 90 sekund po włączeniu zasilania.
Rejestrowanie lokalnie
1. Przełącz centralę alarmową do trybu rejestracji.
2. Zarejestruj detektor: Naciśnij i przytrzymaj przycisk rejestracji do chwili, gdy
trzy wskaźniki zaczną migać na przemian. Zielony wskaźnik zamiga 8 razy po
zakończeniu rejestracji.
3. Test komunikacji: Zwolnij sprężynę zabezpieczenia antysabotażowego, aby
wyzwolić alarm.
Inicjowanie detektora
Uwaga: Odległość centrali alarmowej od detektora powinna być mniejsza niż
50 cm.
1. Wyjmij baterię, aby wyłączyć zasilanie detektora.
2. Po upływie 5 sekund naciśnij i przytrzymaj przycisk rejestracji, ponownie
zainstaluj baterię, aby włączyć zasilanie detektora, i upewnij się, że trzy
wskaźniki zaczną migać na przemian. Zwolnij przycisk rejestracji, gdy trzy
wskaźniki migną równocześnie.
Rejestracja przy użyciu aplikacji
1. Zaloguj się do witryny APP Store i wprowadź „Hik-Connect”, aby wyszukać
aplikację Mobile Client. Pobierz i zainstaluj aplikację Hik-Connect w
telefonie.
2. Po zainstalowaniu, tapnij , aby włączyć klienta.
3. Włącz zasilanie centrali alarmowej.
4. Zaloguj się do aplikacji Hik-Connect i naciśnij ikonę „+” w prawym górnym
rogu strony aplikacji Hik-Connect, aby dodać centralę alarmową. Można
zeskanować kod QR na tylnym panelu urządzenia lub opakowaniu albo
ręcznie wprowadzić numer seryjny urządzenia, aby dodać je wówczas, gdy
jest przełączone do trybu rejestracji.
5. Po dodaniu panelu sterowania bezpieczeństwem, tapnij ikonę statusu
alarmu na prawo od nazwy panelu sterowania, aby przejść do odpowiedniej
strony.
6. Naciśnij ikonę „+” na stronie Partycja, aby dodać urządzenia zewnętrzne.
STEROWANIE URZĄDZENIEM BEZPRZEWODOWYM
Uwaga: Po rejestracji detektor aktywuje 10-minutowe odliczanie umożliwia-
jące sprawdzenie czujnika PIR i nadajnika-odbiornika mikrofalowego. W tym
czasie czujnik nie będzie transmitował informacji do panelu i można
wyregulować ustawienia czujnika PIR i mikrofal.
DIAGNOSTYKA
Specyfikacje obiektywu
Zasięg detekcji: 10 m
Kąt detekcji: 85°
Strefy detekcji: 56 stref, 6 płaszczyzn
Szybkość detekcji: 0,3–3 m/s
Wysokość montażu: 1,8–2,4 m
Najważniejsze cechy produktu
Niereagowanie na zwierzęta: Maks. 24 kg
Technologia Blue Wave
Automatyczna regulacja czułości
Cyfrowa kompensacja temperatury
Oddzielny wskaźnik: Mikrofale, PIR i Alarm; pomarańczowa (mikrofale),
niebieski (alarm), zielona (PIR)
3 częstotliwości mikrofalowe dla uniknięcia zakłóceń
Zabezpieczenie antysabotażowe: Sygnał wejściowy sabotażu panelu
przedniego i tylnego oraz uchwytu
Wskaźniki siły sygnału (SSI)
Zasilanie elektryczne i baterie
Częstotliwość mikrofalowa: 10,515 GHz, 10,525 GHz, 10,535 GHz
9,89 GHz, 9,90 GHz, 9,91 GHz
Częstotliwość transmisji: 433 MHz, nadajnik-odbiornik FM
Zasięg na otwartej przestrzeni: 800 m
Bateria litowa 3 V w zestawie: CR123A (2 szt.)
Minimalna wydajność baterii (lata): 2
Warunki otoczenia
Temperatura (użytkowanie): Od –10°C do +40°C (certyfikacja)
Waga: 135 g
Wymiary (wys. x szer. x głęb.): 117 x 69 x 62 mm
Układ optyczny: Hermetyczny
Geometryczna konfiguracja soczewek: 3D
Akcesoria
Uchwyt sufitowy w zestawie
Uchwyt ścienny w zestawie
РЕГИСТРАЦИЯ ЛОКАЛЬНО ИЛИ С ПОМОЩЬЮ
ПРИЛОЖЕНИЯ
Зарегистрируйте датчик в течение 90 секунд после включения питания.
Локальная регистрация
1. Включите режим регистрации на панели управления системой
безопасности.
2. Регистрация датчика: Нажмите и удерживайте кнопку регистрации, пока
три светодиода не начнут мигать поочередно. Когда регистрация будет
выполнена, зеленый светодиод мигнет 8 раз.
3. Тестирование связи: Отпустите пружину датчика ВЗЛОМА для активации
сигнала тревоги.
Инициализация датчика
Примечание.Расстояние между панелью управления системой
безопасности и датчиком должно быть менее 50 см.
1. Извлеките батарею для выключения датчика.
2. Через 5 секунд нажмите кнопку регистрации и, удерживая ее, вставьте
батарею на место. После этого три светодиода начнут мигать
поочередно. Отпустите кнопку регистрации, когда все три светодиода
мигнут один раз одновременно.
Регистрация с помощью приложения
1. Откройте App Store и введите "Hik-Connect" для поиска мобильного клиента.
Скачайте приложение Hik-Connect и установите его на свой телефон.
2. После установки нажмите для запуска клиента.
3. Включите панель управления системой безопасности.
4. Чтобы добавить панель управления системой безопасности, войдите в
Hik-Connect и нажмите значок "+" в верхнем правом углу страницы. Когда
устройство находится в режиме регистрации, вы можете отсканировать
QR-код, который указан на задней панели устройства и на упаковочной
коробке, или ввести серийный номер устройства вручную, чтобы
добавить это устройство.
5. После добавления панели управления системой безопасности нажмите
значок состояния сигнализации справа от названия панели, чтобы
открыть страницу распределения.
6. Для добавления периферийных устройств нажмите значок "+" на
странице распределения.
1
2
3
Пояснения
Технические данные
УПРАВЛЕНИЕ БЕСПРОВОДНЫМ УСТРОЙСТВОМ
Обратите внимание. После регистрации активируется 10-минутный таймер,
который позволяет выполнить тест ходьбой для проверки пассивных
инфракрасных и микроволновых датчиков. В течение этого времени датчик
не будет передавать сигналы на панель управления. Этот тест позволяет
настроить параметры пассивных инфракрасных и микроволновых датчиков.
ДИАГНОСТИКА
Характеристики объектива
Диапазон обнаружения: 10 м
Угол обнаружения: 85°
Зоны обнаружения: 56 зон, 6 плоскостей
Скорость обнаружения: 0,3–3 м/с
Монтажная высота: 1,8–2,4 м
Основные функции
Отсутствие ложных срабатываний при обнаружении домашних животных:
до 24 кг
Технология Blue Wave
Автоматическая чувствительность
Цифровая компенсация температуры
Отдельные светодиоды: микроволновый датчик, пассивный ИК-датчик и
сигнал тревоги: оранжевый (микроволновый датчик), синий (сигнал
тревоги), зеленый (пассивный ИК-датчик)
3 частоты микроволнового излучения для предотвращения помех
Защита от взлома: вход сигнала датчиков взлома (переднего, заднего и
кронштейна)
Индикаторы уровня сигнала (SSI)
Электропитание и батарея
Частота микроволнового излучения: 10,515; 10,525; 10,535 ГГц
9,89; 9,90; 9,91 ГГц
Частота передачи: 433 МГц, FM
Дальность действия на открытом пространстве: 800 м
Литиевая батарея, 3 В (прилагается): CR123A, 2 шт.
Минимальный срок службы батареи (годы): 2
Характеристики окружающей среды
Рабочая температура: от -10 до +40 °C (сертифицировано)
Масса: 135 г
Размеры (В x Ш x Г): 117 x 69 x 62 мм
Оптика: герметичная
Геометрическая конфигурация объектива: 3D
Вспомогательное оборудование
Кронштейн для монтажа на потолке прилагается
Кронштейн для монтажа на стене прилагается
Deutsch
1
2
3
Referenzen
Technische Daten
LOKAL/ ÜBER APP REGISTRIEREN
Registrieren Sie den Melder innerhalb von 90 Sekunden nach dem Einschalten.
Lokale Registrierung
1. Rufen Sie an der Alarmzentrale den Registriermodus auf.
2. Den Melder registrieren: Halten Sie die Registrierungstaste gedrückt, bis die
drei LEDs abwechselnd blinken. Die grüne LED blinkt 8-mal, wenn die
Registrierung abgeschlossen ist.
3. Kommunikaonstest: Lösen Sie die SABOTAGE-Feder, um den Alarm auszulösen.
Melder initialisieren
Hinweis: Der Abstand zwischen Alarmzentrale und Melder sollte unter 50 cm
liegen.
1. Nehmen Sie die Baerie heraus, um den Melder abzuschalten.
2. Halten Sie nach 5 Sekunden die Registrierungstaste gedrückt und setzen Sie die
Baerie wieder ein. Damit wird der Melder gleichzeig wieder eingeschaltet
und die drei LEDs blinken abwechselnd. Lassen Sie die Registrierungstaste los,
während die drei LEDs einmal gemeinsam aulinken.
Über APP registrieren
1. Melden Sie sich im App Store an und geben Sie „Hik-Connect“ ein, um den
mobilen Client zu suchen wird. Laden Sie Hik-Connect herunter und
installieren Sie die App auf Ihrem Mobiltelefon.
2. Tippen Sie nach der Installaon auf , um den Client ablaufen zu lassen.
3. Schalten Sie die Alarmzentrale ein.
4. Melden Sie sich bei Hik-Connect an und ppen Sie auf das Symbol „+“ im
rechten oberen Bereich der Hik-Connect-Seite, um die Alarmzentrale
hinzuzufügen. Scannen Sie zum Hinzufügen eines Geräts den QR-Code auf
der Geräterückseite oder auf der Verpackung. Sie können auch die
Geräteseriennummer manuell eingeben, wenn sich das Gerät im
Registriermodus befindet.
5. Nachdem Sie die Alarmzentrale hinzugefügt haben, ppen Sie auf das
Alarmstatussymbol rechts neben dem Namen der Alarmzentrale, um das
Bereichsmenü aufzurufen.
6. Tippen Sie auf das Symbol „+“ auf der Paronsseite, um die Peripheriegeräte
hinzuzufügen.
DRAHTLOSE GERÄTESTEUERUNG
Bie beachten: Nach der Registrierung startet der Melder einen
10-Minuten-Timer, der den Gehtest von PIR und Mikrowelle ermöglicht.
Während dieser Zeit sendet der Melder nicht an die Zentrale und wird zum
Juseren der PIR- und Mikrowelleneinstellungen verwendet.
DIAGNOSE
Objekveigenschaen
Erkennungsbereich: 10 m
Erkennungswinkel: 85°
Erkennungsbereiche: 56 Zonen, 6 Ebenen
Erfassungsgeschwindigkeit: 0,3 – 3 m/s
Befesgungshöhe: 1,8 – 2,4 m
Hauptmerkmale
Tierimmunität: Bis zu 24 kg
Blue-Wave-Technik
Automasche Empfindlichkeit
Digitale Temperaturkompensaon
Getrennte Anzeige: Mikrowelle, PIR und Alarm; Orange (Mikrowelle), Blau
(Alarm), Grün (PIR)
3 Mikrowellenfrequenzen zur Vermeidung von Störungen
Sabotageschutz: Eingang für das Sabotagesignal vorne, hinten und an der
Halterung
Signalstärkeanzeigen (SSI)
Elektrische Spezifikaonen und Baerie
Mikrowellenfrequenz: 10,515 GHz, 10,525 GHz, 10,535 GHz
9,89 GHz, 9,90 GHz, 9,91 GHz
Übertragungsfrequenz: 433 MHz, UKW-Transceiver
Reichweite im freien Gelände: 800 m
Mitgelieferte Lithium-Baerie 3 V: 2 x CR123A
Mindestlaufzeit der Baerie (in Jahren): 2
Umgebungseigenschaen
Betriebstemperatur: -10 °C bis +40 °C (zerfiziert)
Gewicht: 135 g
Maße (H x B x T): 117 x 69 x 62 mm
Opk: Versiegelt
Geometrische Objekvkonfiguraon: 3D
Zubehör
Deckenhalterung mitgeliefert
Wandhalterung mitgeliefert
This manual suits for next models

1

Other HIK VISION Security Sensor manuals

HIK VISION DS-PDC10AM-EG2-WE User manual

HIK VISION

HIK VISION DS-PDC10AM-EG2-WE User manual

HIK VISION DS-PDP18-HM User manual

HIK VISION

HIK VISION DS-PDP18-HM User manual

HIK VISION DS-PDP15P-EG2-WB User manual

HIK VISION

HIK VISION DS-PDP15P-EG2-WB User manual

HIK VISION AX PRO Series User manual

HIK VISION

HIK VISION AX PRO Series User manual

HIK VISION DS-PDBG8-EG2-WE User manual

HIK VISION

HIK VISION DS-PDBG8-EG2-WE User manual

HIK VISION Baseline DS-PDC10AM-EG2-WB User manual

HIK VISION

HIK VISION Baseline DS-PDC10AM-EG2-WB User manual

HIK VISION DS-PDD12P-EG2-WE User manual

HIK VISION

HIK VISION DS-PDD12P-EG2-WE User manual

HIK VISION DS-PDD12-EG2 User manual

HIK VISION

HIK VISION DS-PDD12-EG2 User manual

HIK VISION DS-PD2-T10AME-EH User manual

HIK VISION

HIK VISION DS-PD2-T10AME-EH User manual

HIK VISION DS-PDEB1-EG2-WB User manual

HIK VISION

HIK VISION DS-PDEB1-EG2-WB User manual

HIK VISION DS-PDC10DM-EG2-WB User manual

HIK VISION

HIK VISION DS-PDC10DM-EG2-WB User manual

HIK VISION DS-PDQP15AM-LM-WE User manual

HIK VISION

HIK VISION DS-PDQP15AM-LM-WE User manual

HIK VISION DS-PDC15-EG2-WE User manual

HIK VISION

HIK VISION DS-PDC15-EG2-WE User manual

HIK VISION DS-PDPG12P-EG2-WB User manual

HIK VISION

HIK VISION DS-PDPG12P-EG2-WB User manual

HIK VISION DS-PDC10AM-EG2-WB User manual

HIK VISION

HIK VISION DS-PDC10AM-EG2-WB User manual

HIK VISION DS-PDTT15AM-LM-WB User manual

HIK VISION

HIK VISION DS-PDTT15AM-LM-WB User manual

HIK VISION DS-PDBG8-EG2 User manual

HIK VISION

HIK VISION DS-PDBG8-EG2 User manual

HIK VISION DS-PDMCX-E-WB User manual

HIK VISION

HIK VISION DS-PDMCX-E-WB User manual

HIK VISION DS-PD2-T12P-WEL User manual

HIK VISION

HIK VISION DS-PD2-T12P-WEL User manual

HIK VISION DS-PDPC12P-EG2-WE User manual

HIK VISION

HIK VISION DS-PDPC12P-EG2-WE User manual

HIK VISION DS-PDMCK-EG2-WE User manual

HIK VISION

HIK VISION DS-PDMCK-EG2-WE User manual

HIK VISION Pyronix KX15DT User manual

HIK VISION

HIK VISION Pyronix KX15DT User manual

HIK VISION DS-PDP18-HM-WE User manual

HIK VISION

HIK VISION DS-PDP18-HM-WE User manual

HIK VISION DS-PD2-P15C-W User manual

HIK VISION

HIK VISION DS-PD2-P15C-W User manual

Popular Security Sensor manuals by other brands

Fieldpiece DR58 user manual

Fieldpiece

Fieldpiece DR58 user manual

Ops-Core H-NAPE manual

Ops-Core

Ops-Core H-NAPE manual

Preferred JC-30D Installation and operation manual

Preferred

Preferred JC-30D Installation and operation manual

Adaptive AlphaVision PC Type B Single-Sided Signs Mechanical Installation Guide

Adaptive

Adaptive AlphaVision PC Type B Single-Sided Signs Mechanical Installation Guide

Nokta RS PinPointer quick guide

Nokta

Nokta RS PinPointer quick guide

LOGISTY L3260 manual

LOGISTY

LOGISTY L3260 manual

Camlogic SMD 20/P Installation and Maintenance

Camlogic

Camlogic SMD 20/P Installation and Maintenance

eufy Security eufyCam S330 quick start guide

eufy Security

eufy Security eufyCam S330 quick start guide

Hytronik HIM32 quick start guide

Hytronik

Hytronik HIM32 quick start guide

Helios BWM Installation and operating instructions

Helios

Helios BWM Installation and operating instructions

WABCO OnGuard Maintenance manual

WABCO

WABCO OnGuard Maintenance manual

SImx LHT0142 installation manual

SImx

SImx LHT0142 installation manual

Elvaco Sense 1050080 Quick manual

Elvaco

Elvaco Sense 1050080 Quick manual

Bevent Rasch RCKD quick start guide

Bevent Rasch

Bevent Rasch RCKD quick start guide

NookBox P119018 installation guide

NookBox

NookBox P119018 installation guide

B.E.G. LUXOMAT PD9-M-DALI/DSI-FC Installation and operating instruction

B.E.G. LUXOMAT

B.E.G. LUXOMAT PD9-M-DALI/DSI-FC Installation and operating instruction

RKI Instruments 35-3001A-07 Operator's manual

RKI Instruments

RKI Instruments 35-3001A-07 Operator's manual

Diginet DGEMSR360P2 User and installation guide

Diginet

Diginet DGEMSR360P2 User and installation guide

manuals.online logo
manuals.online logoBrands
  • About & Mission
  • Contact us
  • Privacy Policy
  • Terms and Conditions

Copyright 2025 Manuals.Online. All Rights Reserved.