HIKOKI C 3607DA User manual

C 3607DA
Handling instructions
使用說明書
취급 설명서
Hướng dẫn sửdụng
คูมือการใชงาน
Petunjuk pemakaian
en
zh
ko
vi
th
id
ar
en
zh
ko
vi
th
id
ar
00BookC3607DAAsia.indb100BookC3607DAAsia.indb1 2018/06/1516:23:222018/06/1516:23:22

2
11
!
3
5
7
0
2
#
4
6
8
(
&
%*
$
^
23
4 5
678
00BookC3607DAAsia.indb200BookC3607DAAsia.indb2 2018/06/1516:23:232018/06/1516:23:23

3
910
7
9
2
!
w
)
1
3
q
11
12-a
2
0
(
3
1
1
2
3
!
!
#
0°
45°
30°
15°
12-b
13
1
2
4
3
45° – 55°
1
2
3
09
e
0
@,e
@
00BookC3607DAAsia.indb300BookC3607DAAsia.indb3 2018/06/1516:23:242018/06/1516:23:24

4
14
t
rr
#
#
y
0°
45°
r
t
15
Ϩ
1
1
21
2
1+2=
16 u i 17
o
p
18
a
s
%
19
1
2
3
d
f
4g
00BookC3607DAAsia.indb400BookC3607DAAsia.indb4 2018/06/1516:23:242018/06/1516:23:24

5
20 21
2
1
*
1
2
22
23
12
3
5
6
7
4
7
^
5
&
6
00BookC3607DAAsia.indb500BookC3607DAAsia.indb5 2018/06/1516:23:252018/06/1516:23:25

6
24
1
2
3
5
6
7
4
7
4
7
^
&
6
6
5
5
h
h
00BookC3607DAAsia.indb600BookC3607DAAsia.indb6 2018/06/1516:23:252018/06/1516:23:25

7
25
ab
26
1
2
27
1
2
00BookC3607DAAsia.indb700BookC3607DAAsia.indb7 2018/06/1516:23:252018/06/1516:23:25

8
English
Carrying power tools with your finger on the switch
or energising power tools that have the switch on
invites accidents.
d) Remove any adjusting key or wrench before
turning the power tool on.
A wrench or a key left attached to a rotating part of
the power tool may result in personal injury.
e) Do not overreach. Keep proper footing and
balance at all times.
This enables better control of the power tool in
unexpected situations.
f) Dress properly. Do not wear loose clothing or
jewellery. Keep your hair, clothing and gloves
away from moving parts.
Loose clothes, jewellery or long hair can be caught in
moving parts.
g) If devices are provided for the connection of
dust extraction and collection facilities, ensure
these are connected and properly used.
Use of dust collection can reduce dust-related
hazards.
4) Power tool use and care
a) Do not force the power tool. Use the correct
power tool for your application.
The correct power tool will do the job better and safer
at the rate for which it was designed.
b) Do not use the power tool if the switch does not
turn it on and off.
Any power tool that cannot be controlled with the
switch is dangerous and must be repaired.
c) Disconnect the plug from the power source and/
or the battery pack from the power tool before
making any adjustments, changing accessories,
or storing power tools.
Such preventive safety measures reduce the risk of
starting the power tool accidentally.
d) Store idle power tools out of the reach of
children and do not allow persons unfamiliar
with the power tool or these instructions to
operate the power tool.
Power tools are dangerous in the hands of untrained
users.
e) Maintain power tools. Check for misalignment
or binding of moving parts, breakage of parts
and any other condition that may affect the
power toolʼs operation.
If damaged, have the power tool repaired before
use.
Many accidents are caused by poorly maintained
power tools.
f) Keep cutting tools sharp and clean.
Properly maintained cutting tools with sharp cutting
edges are less likely to bind and are easier to control.
g) Use the power tool, accessories and tool bits
etc. in accordance with these instructions,
taking into account the working conditions and
the work to be performed.
Use of the power tool for operations different from
those intended could result in a hazardous situation.
5) Battery tool use and care
a) Recharge only with the charger specified by the
manufacturer.
A charger that is suitable for one type of battery pack
may create a risk of fire when used with another
battery pack.
b) Use power tools only with specifically
designated battery packs.
Use of any other battery packs may create a risk of
injury and fire.
GENERAL POWER TOOL SAFETY
WARNINGS
WARNING
Read all safety warnings and all instructions.
Failure to follow the warnings and instructions may result in
electric shock, fire and/or serious injury.
Save all warnings and instructions for future reference.
The term “power tool” in the warnings refers to your mains-
operated (corded) power tool or battery-operated (cordless)
power tool.
1) Work area safety
a) Keep work area clean and well lit.
Cluttered or dark areas invite accidents.
b) Do not operate power tools in explosive
atmospheres, such as in the presence of
flammable liquids, gases or dust.
Power tools create sparks which may ignite the dust
or fumes.
c) Keep children and bystanders away while
operating a power tool.
Distractions can cause you to lose control.
2) Electrical safety
a) Power tool plugs must match the outlet.
Never modify the plug in any way.
Do not use any adapter plugs with earthed
(grounded) power tools.
Unmodified plugs and matching outlets will reduce
risk of electric shock.
b) Avoid body contact with earthed or grounded
surfaces, such as pipes, radiators, ranges and
refrigerators.
There is an increased risk of electric shock if your
body is earthed or grounded.
c) Do not expose power tools to rain or wet
conditions.
Water entering a power tool will increase the risk of
electric shock.
d) Do not abuse the cord. Never use the cord for
carrying, pulling or unplugging the power tool.
Keep cord away from heat, oil, sharp edges or
moving parts.
Damaged or entangled cords increase the risk of
electric shock.
e) When operating a power tool outdoors, use an
extension cord suitable for outdoor use.
Use of a cord suitable for outdoor use reduces the
risk of electric shock.
f) If operating a power tool in a damp location
is unavoidable, use a residual current device
(RCD) protected supply.
Use of an RCD reduces the risk of electric shock.
3) Personal safety
a) Stay alert, watch what you are doing and use
common sense when operating a power tool.
Do not use a power tool while you are tired
or under the influence of drugs, alcohol or
medication.
A moment of inattention while operating power tools
may result in serious personal injury.
b) Use personal protective equipment. Always
wear eye protection.
Protective equipment such as dust mask, non-skid
safety shoes, hard hat, or hearing protection used for
appropriate conditions will reduce personal injuries.
c) Prevent unintentional starting. Ensure the
switch is in the offposition before connecting to
power source and/or battery pack, picking up or
carrying the tool.
00BookC3607DAAsia.indb800BookC3607DAAsia.indb8 2018/06/1516:23:252018/06/1516:23:25

9
English
c) When battery pack is not in use, keep it away
from other metal objects, like paper clips, coins,
keys, nails, screws or other small metal objects,
that can make a connection from one terminal to
another.
Shorting the battery terminals together may cause
burns or a fire.
d) Under abusive conditions, liquid may be ejected
from the battery; avoid contact. If contact
accidentally occurs, flush with water. If liquid
contacts eyes, additionally seek medical help.
Liquid ejected from the battery may cause irritation or
burns.
6) Service
a) Have your power tool serviced by a qualified
repair person using only identical replacement
parts.
This will ensure that the safety of the power tool is
maintained.
PRECAUTION
Keep children and infirm persons away.
When not in use, tools should be stored out of reach of
children and infirm persons.
CORDLESS CIRCULAR SAW SAFETY
WARNINGS
Cutting procedures
a) DANGER: Keep hands away from cutting area
and the blade. Keep your second hand on auxiliary
handle, or motor housing.
If both hands are holding the saw, they cannot be cut by
the blade.
b) Do not reach underneath the workpiece.
The guard cannot protect you from the blade below the
workpiece.
c) Adjust the cutting depth to the thickness of the
workpiece.
Less than a full tooth of the blade teeth should be visible
below the workpiece.
d) Never hold piece being cut in your hands or across
your leg. Secure the workpiece to a stable platform.
It is important to support the work properly to minimize
body exposure, blade binding, or loss of control.
e) Hold the power tool by insulated gripping surfaces
only, when performing an operation where the
cutting tool may contact hidden wiring.
Contact with a “live” wire will also make exposed metal
parts of the power tool “live” and could give the operator
an electric shock.
f) When ripping, always use a rip fence or straight
edge guide.
This improves the accuracy of cut and reduces the
chance of blade binding.
g) Always use blades with correct size and shape
(diamond versus round) of arbour holes.
Blades that do not match the mounting hardware of the
saw will run eccentrically, causing loss of control.
h) Never use damaged or incorrect blade washers or
bolt.
The blade washers and bolt were specially designed
for your saw, for optimum performance and safety of
operation.
Kickback causes and related warnings
- kickback is a sudden reaction to a pinched, bound or
misaligned saw blade, causing an uncontrolled saw to
lift up and out of the workpiece toward the operator;
- when the blade is pinched or bound tightly by the kerf
closing down, the blade stalls and the motor reaction
drives the unit rapidly back toward the operator;
- if the blade becomes twisted or misaligned in the cut, the
teeth at the back edge of the blade can dig into the top
surface of the wood causing the blade to climb out of the
kerf and jump back toward the operator.
Kickback is the result of saw misuse and/or incorrect
operating procedures or conditions and can be avoided by
taking proper precautions as given below.
a) Maintain a firm grip with both hands on the saw
and position your arms to resist kickback forces.
Position your body to either side of the blade, but
not in line with the blade.
Kickback could cause the saw to jump backwards, but
kickback forces can be controlled by the operator, if
proper precautions are taken.
b) When blade is binding, or when interrupting a cut
for any reason, release the trigger and hold the saw
motionless in the material until the blade comes to
a complete stop.
Never attempt to remove the saw from the work or
pull the saw backward while the blade is in motion
or kickback may occur.
Investigate and take corrective actions to eliminate the
cause of blade binding.
c) When restarting a saw in the workpiece, centre the
saw blade in the kerf and check that saw teeth are
not engaged into the material.
If saw blade is binding, it may walk up or kickback from
the workpiece as the saw is restarted.
d) Support large panels to minimise the risk of blade
pinching and kickback.
Large panels tend to sag under their own weight.
Supports must be placed under the panel on both sides,
near the line of cut and near the edge of the panel.
e) Do not use dull or damaged blades.
Unsharpened or improperly set blades produce narrow
kerf causing excessive friction, blade binding and
kickback.
f) Blade depth and bevel adjusting locking levers
must be tight and secure before making cut.
If blade adjustment shifts while cutting, it may cause
binding and kickback.
g) Use extra caution when sawing into existing walls
or other blind areas.
The protruding blade may cut objects that can cause
kickback.
Lower guard function
a) Check lower guard for proper closing before each
use. Do not operate the saw if lower guard does not
move freely and close instantly. Never clamp or tie
the lower guard into the open position.
If saw is accidentally dropped, lower guard may be bent.
Raise the lower guard with the retracting handle and
make sure it moves freely and does not touch the blade
or any other part, in all angles and depths of cut.
b) Check the operation of the lower guard spring. If
the guard and the spring are not operating properly,
they must be serviced before use.
Lower guard may operate sluggishly due to damaged
parts, gummy deposits, or a build-up of debris.
c) Lower guard may be retracted manually only for
special cuts such as “plunge cuts” and “compound
cuts”.
Raise lower guard by retracting handle and as soon
as blade enters the material, the lower guard must be
released.
For all other sawing, the lower guard should operate
automatically.
00BookC3607DAAsia.indb900BookC3607DAAsia.indb9 2018/06/1516:23:252018/06/1516:23:25

10
English
d) Always observe that the lower guard is covering the
blade before placing saw down on bench or floor.
An unprotected, coasting blade will cause the saw to
walk backwards, cutting whatever is in its path.
Be aware of the time it takes for the blade to stop after
switch is released.
ADDITIONAL SAFETY WARNINGS
1. Do not allow foreign matter to enter the hole for
connecting the rechargeable battery.
2. Never disassemble the rechargeable battery and
charger.
3. Never short-circuit the rechargeable battery.
Shortcircuiting the battery will cause a great electric
current and overheat. It results in burn or damage to the
battery.
4. Do not dispose of the battery in fire. If the battery is burnt,
it may explode.
5. When using this unit continuously, the unit may overheat,
leading to damage in the motor and switch. Please leave
it without using it for approximately 15 minutes.
6. Do not insert object into the air ventilation slots of the
charger. Inserting metal objects or inflammables into the
charger air ventilation slots will result in electrical shock
hazard or damaged charger.
7. Using an exhausted battery will damage the charger.
8. Bring the battery to the shop from which it was purchased
as soon as the post-charging battery life becomes too
short for practical use. Do not dispose of the exhausted
battery.
9. Wear earplugs to protect your ears during operation.
10. Use only blade diameter specified on the machine.
11. Do not use any abrasive wheel.
12. Do not use saw blades which are deformed or cracked.
13. Do not use saw blades made of high speed steel.
14. Do not use saw blades which do not comply with the
characteristics specified in these instructions.
15. Do not stop the saw blades by lateral pressure on the
disc.
16. Always keep the saw blades sharp.
17. Ensure that the lower guard moves smoothly and freely.
18. Never use the circular saw with its lower guard fixed in
the open position.
19. Ensure that the retraction mechanism of the guard
system operates correctly.
20. Never operate the circular saw with the saw blade turned
upward or to the side.
21. Ensure that the material is free of foreign matters such as
nails.
22. The saw blades range should be from 185 mm to
180 mm.
23. Pull out battery before carrying out any adjustment,
servicing or maintenance.
24. Be careful of brake kickback.
This circular saw features an electric brake that functions
when the switch is released. As there is some kickback
when the brake functions, be sure to hold the main body
securely.
25. Ensure that the power source to be utilized conforms
to the power requirements specified on the product
nameplate.
26. Ensure that the switch is in the OFF position. If the battery
installed to power tool while the switch is in the ON
position, the power tool will start operating immediately,
which could cause a serious accident.
27. When the work area is removed from the power source,
use an extension cord of sufficient thickness and rated
capacity. The extension cord should be kept as short as
practicable.
28. Avoid cutting in the state where the base has floated up
from the material.
When blade is binding, or when interrupting a cut for any
reason, release the trigger and hold the saw motionless
in the material until the blade comes to a complete
stop. Never attempt to remove the saw from the work
or pull the saw backward while the blade is in motion or
KICKBACK may occur. Investigate and take corrective
actions to eliminate the cause of blade binding.
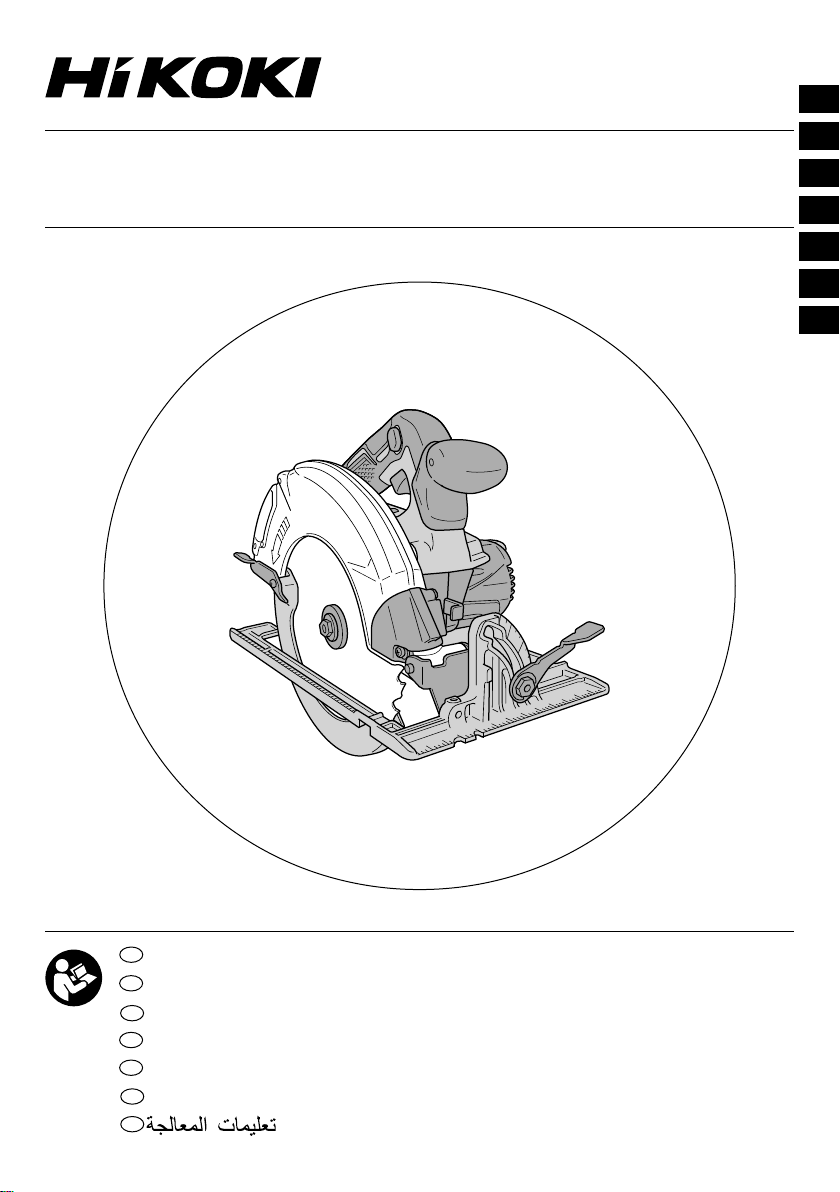
29. Support large panels to minimize the risk of blade
pinching and KICKBACK. Large panels tend to sag
under their own weight (Fig. 3). Supports must be
placed under the panel on both sides, near the line of cut
and near the edge of the panel as shown in Fig. 2.
To minimize the risk of blade pinching and kickback.
When cutting operation requires the resting of the saw
on the work piece, the saw shall be rested on the larger
portion and the smaller piece cut off.
30. Use extra caution when making a “Pocket Cut” into
existing walls or other blind areas. The protruding blade
may cut objects that can cause KICKBACK.
NEVER place your hand or fingers behind the saw
(Fig. 4). If kickback occurs, the saw could easily jump
backwards over your hand, possibly causing severe
injury.
31. WARNING: It is important to support the work piece
properly and to hold the saw firmly to prevent loss
of control which could cause personal injury. Fig. 5
illustrates typical hand support of the saw.
32. Place the wider portion of the saw base on that part
of the work piece which is solidly supported, not on
the section that will fall offwhen the cut is made. As
examples, Fig. 6 illustrates the RIGHT way to cut offthe
end of board, and Fig. 7 the WRONG way. If the work
piece is short or small, clamp is down.
DON’T TRY TO HOLD SHORT PLACES BY HAND!
33. Never attempt to saw with the circular saw held upside
down in a vise. This is extremely dangerous and can
lead to serious accidents (Fig. 8).
34. When using the guide (sold separately), do not attempt
an inclined cut which would allow the cut material to slip
between the saw blade and guide. Doing so could result
in injury. (Fig. 9)
35. Should lever remain loosened, it will create a very
hazardous situation. Always thoroughly clamp it.
(Fig. 11)
36. It is very hazardous to allow lever to remain loosened.
Always thoroughly clamp it. (Fig. 12)
37. Prior to cutting operation, make sure the material you
are going to cut. If the material to be cut is expected to
generate harmful / toxic dusts, make sure the dust bag
or appropriate dust extraction system is connected with
dust outlet tightly.
Wear the dust mask additionally, if available.
○Before starting to saw, confirm that the saw blade
has attained full-speed revolution.
○Should the saw blade stop or make an abnormal
noise while operating, promptly turn OFF the switch.
○Using the circular saw with the saw blade facing
upwards or sideways is very hazardous. Such
uncommon applications should be avoided.
○When cutting materials, always wear protective
glasses.
○When finished with a job, pull out the battery.
38. After having attached the saw blade, reconfirm that the
lock lever is firmly secured in the prescribed position.
39. Do not expose directly your eye to the light by looking
into the light.
If your eye is continuously exposed to the light, your eye
will be hurt.
40. Do not use the product if the tool or the battery terminals
(battery mount) are deformed.
Installing the battery could cause a short circuit that
could result in smoke emission or ignition.
00BookC3607DAAsia.indb1000BookC3607DAAsia.indb10 2018/06/1516:23:252018/06/1516:23:25

11
English
41. Keep the tool’s terminals (battery mount) free of swarf
and dust.
○Prior to use, make sure that swarf and dust have not
collected in the area of the terminals.
○During use, try to avoid swarf or dust on the tool from
falling on the battery.
○When suspending operation or after use, do not leave
the tool in an area where it may be exposed to falling
swarf or dust.
Doing so could cause a short circuit that could result in
smoke emission or ignition.
42. Do not use the tool with only the blower function.
CAUTION ON LITHIUM-ION BATTERY
To extend the lifetime, the lithium-ion battery equips with the
protection function to stop the output.
In the cases of 1 to 3 described below, when using this
product, even if you are pulling the switch, the motor may
stop. This is not the trouble but the result of protection
function.
1. When the battery power remaining runs out, the motor
stops.
In such a case, charge it up immediately.
2. If the tool is overloaded, the motor may stop. In this
case, release the switch of tool and eliminate causes of
overloading. After that, you can use it again.
3. If the battery is overheated under overload work, the
battery power may stop.
In this case, stop using the battery and let the battery
cool. After that, you can use it again.
Furthermore, please heed the following warning and caution.
WARNING
In order to prevent any battery leakage, heat generation,
smoke emission, explosion and ignition beforehand, please
be sure to heed the following precautions.
1. Make sure that swarf and dust do not collect on the
battery.
○During work make sure that swarf and dust do not fall on
the battery.
○Make sure that any swarf and dust falling on the power
tool during work do not collect on the battery.
○Do not store an unused battery in a location exposed to
swarf and dust.
○Before storing a battery, remove any swarf and dust that
may adhere to it and do not store it together with metal
parts (screws, nails, etc.).
2. Do not pierce battery with a sharp object such as a
nail, strike with a hammer, step on, throw or subject the
battery to severe physical shock.
3. Do not use an apparently damaged or deformed battery.
4. Do not use the battery in reverse polarity.
5. Do not connect directly to an electrical outlets or car
cigarette lighter sockets.
6. Do not use the battery for a purpose other than those
specified.
7. If the battery charging fails to complete even when a
specified recharging time has elapsed, immediately stop
further recharging.
8. Do not put or subject the battery to high temperatures or
high pressure such as into a microwave oven, dryer, or
high pressure container.
9. Keep away from fire immediately when leakage or foul
odor are detected.
10. Do not use in a location where strong static electricity
generates.
11. If there is battery leakage, foul odor, heat generated,
discolored or deformed, or in any way appears abnormal
during use, recharging or storage, immediately remove it
from the equipment or battery charger, and stop use.
12. Do not immerse the battery or allow any fluids to flow
inside. Conductive liquid ingress, such as water, can
cause damage resulting in fire or explosion. Store your
battery in a cool, dry place, away from combustible and
flammable items. Corrosive gas atmospheres must be
avoided.
CAUTION
1. If liquid leaking from the battery gets into your eyes,
do not rub your eyes and wash them well with fresh
clean water such as tap water and contact a doctor
immediately.
If left untreated, the liquid may cause eye-problems.
2. If liquid leaks onto your skin or clothes, wash well with
clean water such as tap water immediately.
There is a possibility that this can cause skin irritation.
3. If you find rust, foul odor, overheating, discolor,
deformation, and/or other irregularities when using the
battery for the first time, do not use and return it to your
supplier or vendor.
WARNING
If a conductive foreign matter enters in the terminal of lithium
ion battery, the battery may be shorted, causing fire. When
storing the lithium ion battery, obey surely the rules of
following contents.
○Do not place conductive debris, nail and wires such as
iron wire and copper wire in the storage case.
○To prevent shorting from occurring, load the battery in
the tool or insert securely the battery cover for storing
until the ventilator is not seen.
REGARDING LITHIUM-ION BATTERY
TRANSPORTATION
When transporting a lithium-ion battery, please observe the
following precautions.
WARNING
Notify the transporting company that a package contains a
lithium-ion battery, inform the company of its power output
and follow the instructions of the transportation company
when arranging transport.
○Lithium-ion batteries that exceed a power output of
100Wh are considered to be in the freight classification
of Dangerous Goods and will require special application
procedures.
○For transportation abroad, you must comply with
international law and the rules and regulations of the
destination country.
○If the BSL36B18 (sold separately) is installed in the
power tool, the power output will exceed 100 Wh and the
unit will be classified as Dangerous Goods for freight
classification.
Wh
Power Output
2 to 3 digit number
00BookC3607DAAsia.indb1100BookC3607DAAsia.indb11 2018/06/1516:23:252018/06/1516:23:25

12
English
USB DEVICE CONNECTION
PRECAUTIONS (ONLY WITH
UC18YSL3 CHARGER)
When an unexpected problem occurs, the data in a USB
device connected to this product may be corrupted or lost.
Always make sure to back up any data contained in the USB
device prior to use with this product.
Please be aware that our company accepts absolutely no
responsibility for any data stored in a USB device that is
corrupted or lost, nor for any damage that may occur to a
connected device.
WARNING
○Prior to use, check the connecting USB cable for any
defect or damage.
Using a defective or damaged USB cable can cause
smoke emission or ignition.
○When the product is not being used, cover the USB port
with the rubber cover.
Buildup of dust etc. in the USB port can cause smoke
emission or ignition.
NOTE
○There may be an occasional pause during USB
recharging.
○When a USB device is not being charged, remove the
USB device from the charger.
Failure to do so may not only reduce the battery life
of a USB device, but may also result in unexpected
accidents.
○It may not be possible to charge some USB devices,
depending on the type of device.
NAMES OF PARTS (Fig. 1 – Fig. 27)
1Switch
2Switch lock
3Saw cover
4Lower guard lever
5M7 bolt
6Washer (B)
7Saw blade
8Lower guard
9Guide (sold separately)
0Base
!Inclined lever
@Guide fastener wing-bolt
#Inclined gauge
$Handle
%LED light
^Lock lever
&5 mm Hex. bar wrench
*Battery
(Lever
)Square
qHex. socket set screw
w3 mm Hex. bar wrench
eLock spring
rPremarked line
tFront scale at 45° incline
yFront scale when not inclined
uMode selector switch
iSilent mode indicator lamp
oBattery level indicator switch
pBattery level indicator lamp
aLighting mode switch
sLighting mode indicator lamp
dLever (short type)
fDust collector
gM4 Screw
hWasher (A)
SYMBOLS
WARNING
The following show symbols used for the machine.
Be sure that you understand their meaning before
use.
C3607DA: Cordless Circular Saw
To reduce the risk of injury, user must read
instruction manual.
Always wear eye protection.
Always wear hearing protection.
VRated voltage
n0No-load speed
Switching ON
Switching OFF
Disconnect the battery
Prohibited action
Mode selector switch
Lighting mode switch
Always ON (turn offafter 2 minute)
Light only SW-ON
Always OFF
00BookC3607DAAsia.indb1200BookC3607DAAsia.indb12 2018/06/1516:23:252018/06/1516:23:25

13
English
Remaining battery indicator switch
Blower
Battery
Lights ;
The battery remaining power is over 75%
Lights ;
The battery remaining power is 50% – 75%.
Lights ;
The battery remaining power is 25% – 50%.
Lights ;
The battery remaining power is less than 25%
Blinks ;
The battery remaining power is nearly empty.
Recharge the battery soonest possible.
Blinks ;
Output suspended due to high temperature.
Remove the battery from the tool and allow it to
fully cool down.
Blinks ;
Output suspended due to failure or malfunction.
The problem may be the battery so please
contact your dealer.
NOTE
To prevent the battery power consumption caused by
forgetting to turn offthe LED light, the light goes off
automatically in about 2 minutes.
STANDARD ACCESSORIES
In addition to the main unit (1 unit), the package contains the
accessories listed on page 86.
Standard accessories are subject to change without notice.
APPLICATIONS
Cutting various types of wood.
SPECIFICATIONS
1. Power tool
Model C3607DA
Voltage 36 V
No-Load Speed 4300 /min (Power mode)
2000 /min (Silent mode)
Capacity Cutting
depth
90° 62 mm
45° 47.5 mm
Battery available for this tool* Multi volt battery
Weight 4.2 kg (BSL36A18)
* Existing batteries (BSL3660/3620/3626, BSL18xx series,
etc.) cannot be used with this tool.
NOTE
Due to HiKOKI’s continuing program of research and
development, the specifications herein are subject to
change without prior notice.
Electronic control
○Soft-start
○Overload protection
This protection feature cuts offthe power to the motor
in the event of overloading of motor or a conspicuous
reduction in rotational speed during operation.
When the overload protection feature has been
activated, the motor may stop.
In this case, release the tool switch and eliminate causes
of overloading.
After that you can use it again.
○Overheat protection
This protection feature cuts offthe power to the motor
and stops the power tool in the event of overheating of
motor during operation.
When the overheat protection feature has been
activated, the motor may stop.
In this case, release the tool switch and cool it down in a
few minutes.
After that you can use it again.
○Rotation speed changeover function (Power mode /
Silent mode)
(Power mode / Silent mode switch function)
Each press of the Mode Selector Switch changes the
operating mode. (Fig. 16)
Silent mode reduces maximum motor RPM enabling
efficient work with less noise.
The Silent Mode Indicator Lamp lights in Silent mode.
When the load increases during Silent mode, the tool will
automatically switch to Power mode and revert back to
Silent mode when the load decreases.
In Power mode, no change is made to Silent mode even
when the load decreases.
NOTE
○To enable mode changes, pull the switch once after
installing the battery.
○Do not give a strong shock to the switch panel or break it.
It may lead to a trouble.
2. Battery
Model BSL36A18
Voltage 36 V / 18 V (Automatic Switching*)
Battery capacity 2.5 Ah / 5.0 Ah
(Automatic Switching*)
Available cordless
products** Multi volt series, 18 V product
Available charger Sliding charger for lithium ion
batteries
* The tool itself will automatically switch over.
** Please see our general catalogue for details.
CHARGING
Before using the power tool, charge the battery as follows.
1. Connect the charger’s power cord to the receptacle.
When connecting the plug of the charger to a receptacle,
the charge indicator lamp will blink in red (At 1-second
intervals).
2. Insert the battery into the charger.
Firmly insert the battery into the charger as shown in
Fig. 21 (on page 5).
3. Charging
When inserting a battery in the charger, the charge
indicator lamp will blink in blue.
When the battery becomes fully recharged, the charge
indicator lamp will light up in green. (See Table 1)
(1) Charge indicator lamp indication
The indications of the charge indicator lamp will be as
shown in Table 1, according to the condition of the
charger or the rechargeable battery.
00BookC3607DAAsia.indb1300BookC3607DAAsia.indb13 2018/06/1516:23:262018/06/1516:23:26

14
English
Table 1
Indications of the charge indicator lamp
Charge
indicator
lamp
(RED /
BLUE /
GREEN /
PURPLE)
Before
charging
Blinks
(RED)
Lights for 0.5 seconds. Does not light for
0.5 seconds. (offfor 0.5 seconds) Plugged into power source
While
charging
Blinks
(BLUE)
Lights for 0.5 seconds. Does not light for
1 second. (offfor 1 second) Battery capacity at less than 50%
Blinks
(BLUE)
Lights for 1 second. Does not light
for 0.5 seconds. (offfor 0.5 seconds) Battery capacity at less than 80%
Lights
(BLUE)
Lights continuously Battery capacity at more than 80%
Charging
complete
Lights
(GREEN)
Lights continuously
(Continuous buzzer sound: about 6 seconds)
Overheat
standby
Blinks
(RED)
Lights for 0.3 seconds. Does not light for
0.3 seconds. (offfor 0.3 seconds)
Battery overheated. Unable to
charge. (Charging will commence
when battery cools)
Charging
impossible
Flickers
(PURPLE)
Lights for 0.1 seconds. Does not light for
0.1 seconds. (offfor 0.1 seconds)
(Intermittent buzzer sound: about 2 seconds)
Malfunction in the battery or the
charger
(2) Regarding the temperatures and charging time of the rechargeable battery
The temperatures and charging time will become as shown in Table 2.
Table 2
Charger UC18YSL3
Battery
Type of battery Li-ion
Temperatures at which the
battery can be recharged -10°C – 50°C
Charging voltage V 14.4 18
Charging time,
approx. (At 20°C)
BSL14xx series BSL18xx series Multi volt
series
(4 cells) (8 cells) (5 cells) (10 cells) (10 cells)
min.
BSL1415S
:
15
BSL1415
:
15
BSL1415X
:
15
BSL1420
:
20
BSL1425
:
25
BSL1430C
:
30
BSL1430
:
20
BSL1440
:
26
BSL1450
:
32
BSL1460
:
38
BSL1815S : 15
BSL1815 : 15
BSL1815X : 15
BSL1820 : 20
BSL1825 : 25
BSL1830C : 30
BSL1830 : 20
BSL1840 : 26
BSL1850 : 32
BSL1860 : 38
BSL36A18 : 32
BSL36B18 : 52
USB Charging voltage V 5
Charging current A 2
NOTE
The recharging time may vary according to the ambient temperature and power source voltage.
4. Disconnect the charger’s power cord from the
receptacle.
5. Hold the charger firmly and pull out the battery.
NOTE
Be sure to pull out the battery from the charger after use,
and then keep it.
Regarding electric discharge in case of new batteries,
etc.
As the internal chemical substance of new batteries and
batteries that have not been used for an extended period
is not activated, the electric discharge might be low when
using them the first and second time. This is a temporary
phenomenon, and normal time required for recharging
will be restored by recharging the batteries 2 – 3 times.
How to make the batteries perform longer.
(1) Recharge the batteries before they become completely
exhausted.
When you feel that the power of the tool becomes
weaker, stop using the tool and recharge its battery. If
you continue to use the tool and exhaust the electric
current, the battery may be damaged and its life will
become shorter.
(2) Avoid recharging at high temperatures.
A rechargeable battery will be hot immediately after
use. If such a battery is recharged immediately after
use, its internal chemical substance will deteriorate, and
the battery life will be shortened. Leave the battery and
recharge it after it has cooled for a while.
00BookC3607DAAsia.indb1400BookC3607DAAsia.indb14 2018/06/1516:23:262018/06/1516:23:26

15
English
CAUTION
○If the battery is charged while it is heated because
it has been left for a long time in a location subject to
direct sunlight or because the battery has just been
used, the charge indicator lamp of the charger lights
for 0.3 seconds, does not light for 0.3 seconds (offfor
0.3 seconds). In such a case, first let the battery cool,
then start charging.
○When the charge indicator lamp flickers (at 0.2-second
intervals), check for and take out any foreign objects in
the charger’s battery connector. If there are no foreign
objects, it is probable that the battery or charger is
malfunctioning.Take it to your authorized Service Center.
○Since the built-in micro computer takes about
3 seconds to confirm that the battery being charged with
UC18YSL3 is taken out, wait for a minimum of 3 seconds
before reinserting it to continue charging. If the battery
is reinserted within 3 seconds, the battery may not be
properly charged.
MOUNTING AND OPERATION
Action Figure Page
Inclined cutting using the guide
(+45° direction) (sold separately) 93
Adjusting the base and saw blade to
maintain perpendicularity 10 3
Adjusting the cutting depth 11 3
Adjusting the angle of inclination
(0° – 45°) 12-a3
Adjusting the angle of inclination
(45° – 55°) 12-b3
Regulating the guide (sold separately) 13 3
Cutting line 14 4
Switch operation 15 4
About the mode select function (*1) 16 4
Remaining battery indicator 17 4
Using the LED light 18 4
Mounting the dust collector set 19 4
Removing and inserting the battery 20 5
Charging 21 5
Cutting (Do not use the tool with only
the blower function.) 22 5
Dismounting the saw blade 23 5
Mounting the Saw Blade 24 6
Charging a USB device from a
electrical outlet 25-a7
Charging a USB device and battery
from a electrical outlet 25-b7
How to recharge USB device 26 7
When charging of USB device is
completed 27 7
Selecting accessories ―87
(*1) About the mode select function
Each time the mode selector switch is pushed, the
operation mode changes.
When Silent mode is selected, the Silent mode indicator
lamp lights up.
Silent mode reduces maximum motor RPM enabling
efficient work with less noise.
If the load increases while the motor is operating in
Silent mode, it automatically changes to Power mode.
Additionally, if the load decreases again, it automatically
returns to Silent mode.
In Power mode, no change is made to Silent mode even
when the load decreases.
Mode No-load speed
Power 4300 /min
Silent 2000 /min
NOTE
○The mode will only change after a battery is installed and
the switch is pulled once.
○The current mode will be maintained even if the switch is
on/off, or the battery is removed/reinserted.
LED LIGHT WARNING SIGNALS
(Fig. 28)
This product features functions that are designed to protect
the tool itself as well as the battery. While the switch is
pulled, if any of the safeguard functions are triggered
during operation, the LED light will blink as described in
Table 3. When any of the safeguard functions are triggered,
immediately remove your finger from the switch and follow
the instructions described under corrective action.
Fig. 28
Table 3
Safeguard Function LED Light Display Corrective Action
Overburden Protection On 0.1 second/off0.1 second If the operating with the shift knob set on
HIGH, adjust to LOW and continue operation.
Remove the cause of the overburdening.
Temperature Protection On 0.5 second/off0.5 second Allow the tool and battery to thoroughly cool.
00BookC3607DAAsia.indb1500BookC3607DAAsia.indb15 2018/06/1516:23:262018/06/1516:23:26

16
English
MAINTENANCE AND INSPECTION
1. Inspecting the saw blade
Since use of as dull saw blade will degrade efficiency
and cause possible motor malfunction, sharpen or
replace the saw blade as soon as abrasion is noted.
2. Inspecting the mounting screws
Regularly inspect all mounting screws and ensure that
they are properly tightened. Should any of the screws be
loose, retighten them immediately. Failure to do so could
result in serious hazard.
3. Motor unit maintenance
The motor winding is an important part of this tool. Avoid
damaging and be careful to avoid contact with cleaning
oil or water.
After 50 hours of use, clean the motor by blowing into the
ventilation holes of the motor housing with dry air from an
air gun or other tool (Fig. 29).
Dust or particle accumulation in the motor can result in
damage.
4. Inspecting and maintaining the lower guard
Always make sure that the lower guard moves smoothly.
In the event of any malfunction, immediately repair the
lower guard.
For cleaning and maintenance, use an air gun or other
tool to blow clean the space between the lower guard
and gear cover as well as the rotation part of the lower
guard with dry air (Fig. 29).
Doing so is effective for the emission of chips or other
particles.
Accumulation of chips or other particles around the lower
guard may result in malfunction or damage.
WARNING
To prevent dust inhalation or eye irritation, wear
protective safety goggles and a dust mask when
using an air gun or other tool to clean the lower guard,
ventilation holes or other parts of the product.
Ensure smooth movement
of lower guard
Rotation part of
the lower guard
Housing vent
Space between
lower guard
and gear cover Air gun
Fig. 29
5. Cleaning the inside of the saw cover
Regularly check and clean to make sure that sawdust
and other residue do not collect inside of the saw cover.
Always remove the saw blade when checking and
cleaning.
Washer (A)
Spindle
Saw cover
Fig. 30
6. Inspection of terminals (tool and battery)
Check to make sure that swarf and dust have not
collected on the terminals.
On occasion check prior, during and after operation.
CAUTION
Remove any swarf or dust which may have collected on
the terminals.
Failure to do so may result in malfunction.
7. Cleaning on the outside
When the power tool is stained, wipe with a soft dry cloth
or a cloth moistened with soapy water. Do not use chloric
solvents, gasoline or paint thinner, for they melt plastics.
8. Storage
Storing in a place below 40°C and out of the reach of
children.
NOTE
Storing lithium-ion batteries.
Make sure the lithium-ion batteries have been fully
charged before storing them.
Prolonged storage (3 months or more) of batteries with
a low charge may result in performance deterioration,
significantly reducing battery usage time or rendering
the batteries incapable of holding a charge.
However, significantly reduced battery usage time may
be recovered by repeatedly charging and using the
batteries two to five times.
If the battery usage time is extremely short despite
repeated charging and use, consider the batteries dead
and purchase new batteries.
CAUTION
In the operation and maintenance of power tools, the
safety regulations and standards prescribed in each
country must be observed.
Important notice on the batteries for the HiKOKI
cordless power tools
Please always use one of our designated genuine
batteries. We cannot guarantee the safety and
performance of our cordless power tool when used with
batteries other than these designated by us, or when
the battery is disassembled and modified (such as
disassembly and replacement of cells or other internal
parts).
NOTE
Due to HiKOKI’s continuing program of research and
development, the specifications herein are subject to
change without prior notice.
00BookC3607DAAsia.indb1600BookC3607DAAsia.indb16 2018/06/1516:23:262018/06/1516:23:26

17
English
TROUBLESHOOTING
Use the inspections in the table below if the tool does not operate normally. If this does not remedy the problem, consult your
dealer or the HiKOKI Authorized Service Center.
1. Power tool
Symptom Possible cause Remedy
Tool doesn’t run No remaining battery power Charge the battery.
Battery isn’t fully installed. Push the battery in until you hear a click.
Tool suddenly stopped Tool was overburdened Get rid of the problem causing the
overburden.
Overload protection is in operation.
The battery is overheated. Let the battery cool down.
Cannot be inclined The incline lever (front) and incline wing nut
(rear) are not loosened.
Try inclining after loosening the incline
lever (front) and incline wing nut (rear).
Tighten the loosened parts after making the
necessary adjustments.
Doesn’t cut well The saw blade is worn or missing teeth. Replace with a new saw blade.
The bolt is loose. Firmly tighten the bolt.
The saw blade is installed backwards. Install the saw blade in the proper direction.
Switch can’t be pulled The switch lock is not pushed in enough. Push the switch lock in all the way.
Sawdust discharge is poor Sawdust has accumulated in the saw cover. Remove the sawdust inside the saw cover.
Battery cannot be installed Attempting to install a battery other than that
specified for the tool.
Please install a multi volt type battery.
2. Charger
Symptom Possible cause Remedy
The charge indicator lamp
is rapidly flickers purple,
and battery charging
doesn’t begin.
The battery is not inserted all the way. Insert the battery firmly.
There is foreign matter in the battery
terminal or where the battery is attached.
Remove the foreign matter.
The charge indicator lamp
blinks red, and battery
charging doesn’t begin.
The battery is not inserted all the way. Insert the battery firmly.
The battery is overheated. If left alone, the battery will automatically
begin charging if its temperature decreases,
but this may reduce battery life. It is
recommended that the battery be cooled in
a well-ventilated location away from direct
sunlight before charging it.
Battery usage time is short
even though the battery is
fully charged.
The battery’s life is depleted. Replace the battery with a new one.
The battery takes a long
time to charge.
The temperature of the battery, the charger,
or the surrounding environment is extremely
low.
Charge the battery indoors or in another
warmer environment.
The charger’s vents are blocked, causing its
internal components to overheat.
Avoid blocking the vents.
The cooling fan is not running. Contact a HiKOKI Authorized Service
Center for repairs.
The USB power lamp
has switched offand the
USB device has stopped
charging.
The battery’s capacity has become low. Replace the battery with one that has
capacity remaining.
Plug the charger’s power plug into an
electric socket.
USB power lamp does not
switch offeven though the
USB device has finished
charging.
The USB power lamp lights up green to
indicate that USB charging is possible.
This is not a malfunction.
00BookC3607DAAsia.indb1700BookC3607DAAsia.indb17 2018/06/1516:23:262018/06/1516:23:26

18
English
Symptom Possible cause Remedy
It is unclear what the
charging status of a USB
device is, or whether its
charging is complete.
The USB power lamp does not switch off
even when charging is complete.
Examine the USB device that is charging to
confirm its charging status.
Charging of a USB device
pauses midway.
The charger was plugged into an electrical
socket while the USB device was being
charged using the battery as the power
source.
This is not a malfunction.
The charger pauses USB charging for about
5 seconds when it is differentiating between
power sources.
A battery was inserted into the charger while
the USB device was being charged using a
power socket as the power source.
Charging of the USB device
pauses midway when the
battery and the USB device
are being charged at the
same time.
The battery has become fully charged. This is not a malfunction.
The charger pauses USB charging for
about 5 seconds while it checks whether
the battery has successfully completed
charging.
Charging of the USB
device doesn’t start when
the battery and the USB
device are being charged
at the same time.
The remaining battery capacity is extremely
low.
This is not a malfunction.
When the battery capacity reaches a certain
level, USB charging automatically begins.
00BookC3607DAAsia.indb1800BookC3607DAAsia.indb18 2018/06/1516:23:262018/06/1516:23:26

19
中國語
b) 使用個人防護裝備,經常配戴安全眼鏡。
配戴防塵口罩、防滑安全鞋、硬帽等防護裝
備,或在適當情況下使用聽覺防護,可減少人
員傷害。
c) 防止意外啟動。在連接電源及或電池組、拿
起或攜帶工具前,請確認開關是在「off」(關
閉)的位置。
以手指放在開關握持電動工具,或在電動工具
的開關於“on”的狀況下插上插頭,都會導致
意外發生。
d) 在將電動工具啟動前,先卸下任何調整用鑰匙
或扳手。
扳手或鑰匙遺留在電動工具的轉動部位時,可
能導致人員傷害。
e) 身體勿過度伸張,任何時間要保持站穩及平
衡。
以便在不預期的狀態下,能對電動工具有較好
的控制。
f) 衣著要合宜,別穿太鬆的衣服或戴首飾。
保持你的頭髮、衣服及手套遠離轉動部位。
寬鬆的衣服、手飾及長髮會被捲入轉動部位。
g) 如果裝置要用於粉塵抽取及集塵設施,要確保
其連接及正當使用。
使用集塵裝置可減少與灰塵相關的危險。
4) 電動工具之使用及注意事項
a) 勿強力使用電動工具,使用正確之電動工具為
你所需。
正確使用電動工具會依其設計條件使工作做得
更好更安全。
b) 如果開關不能轉至開及關的位置,勿使用電動
工具。
任何電動工具不能被開關所控制是危險的,必
須要修理。
c) 進行任何調整、更換配件或收存電動工具時,
必須將插頭與電源分開,且或將電池組從電
動工具中取出。
此種預防安全措施可減少意外開啟電動機之危
險。
d) 收存停用之電動工具,遠離兒童,且不容許不
熟悉電動工具或未瞭解操作電動工具說明書的
人操作電動工具。
在未受過訓練的人手裡,電動工具極為危險。
e) 保養電動工具,檢核是否有可動零件錯誤的結
合或卡住、零件破裂及可能影響電動工具操作
的任何其他情形。
電動工具如果損壞,在使用前要修好。
許多意外皆肇因於不良的保養。
f) 保持切割工具銳利清潔。
適當的保養切割工具,保持銳利之切削鋒口,
可減少卡住並容易控制。
一般安全規則
警告
閱讀所有安全警告說明
未遵守警告與說明可能導致電擊、火災及或其他
嚴重傷害。
請妥善保存所有警告與說明,以供未來參考之用。
「電動工具」一詞在警告中,係指電源操作(有線)
之電動工具或電池操作(無線)之電動工具。
1) 工作場所安全
a) 保持工作場所清潔及明亮。
雜亂或昏暗的區域容易發生意外。
b) 勿在易產生爆炸之環境中操作,譬如有易燃液
體、瓦斯或粉塵存在之處。
電動工具產生火花會引燃粉塵或煙氣。
c) 當操作電動工具時,保持兒童及過往人員遠
離。
分神會讓你失去控制。
2) 電氣安全
a) 電動工具插頭必須與插座配合,絕不可以任何
方法修改插頭,且不得使用任何轉接插頭於有
接地之電動工具。
不修改插頭及所結合之插座可減少電擊。
b) 避免身體接觸到接地面諸如管子、散熱器、爐
灶及冰箱。
如果你的身體接地或搭地,會增加電擊的危
險。
c) 勿讓電動工具淋雨或曝露在潮濕的環境下。
電動工具進水會增加電繫的危險。
d) 勿濫用電源線。絕勿使用電源線去纏繞、拖拉
電動工具或拔插頭,保持電源線遠離熱氣、油
氣、尖角或可動零件。
損壞或纏繞的電源線會增加電繫之危險。
e) 電動工具在室外操作時要使用一適合室外用的
延長線。
使用合適之室外用延長線會減少電擊的危險。
f) 若無法避免在潮濕地區操作電動工具,請使用
以殘餘電流裝置 (RCD) 保護的電源。
使用 RCD 可降低觸電危險。
3) 人員安全
a) 保持機警,注意你正在做什麼,並運用普通常
識操作電動工具。
當你感到疲勞或受藥品、酒精或醫療影響時,
勿操作電動工具。
操作中瞬間的不注意可能造成人員嚴重的傷
害。
00BookC3607DAAsia.indb1900BookC3607DAAsia.indb19 2018/06/1516:23:262018/06/1516:23:26

20
中國語
g) 按照說明書使用電動工具、配件及刀具時,必
須考量工作條件及所執行之工作。
若未依照這些使用說明操作電動工具時,可能
造成相關之危害情況。
5) 電池式工具的使用及注意事項
a) 需再充電時,僅能使用製造商指定的充電器。
因充電器僅適合同一型式的電池組,若使用任
何其它電池組時,將導致起火的危險。
b) 使用電動工具時,僅能使用按照其特性設計的
電池組。
因使用其它任何電池組時,將導致人員傷害及
起火的危險。
c) 當電池組不在使用時,需保存遠離其它的金屬
物件,例如:迴紋針、錢幣、鑰匙、圖釘、螺
釘,或類似能造成端子與端子間連接的其它較
小金屬物件。
因電池組端子間短路時,將導致燃燒或起火的
危險。
d) 在誤用情況下,電解液可能自電池中噴出;請
避免接觸。當發生意外接觸時,請用清水沖
洗。若電解液觸及眼睛時,請儘速尋求醫療協
助。
因自電池中噴出的電解液,將導致灼傷或刺激
皮膚。
6) 維修
a) 讓你的電動工具由合格修理人員僅使用相同的
維修零件更換。
如此可確保電動工具的安全得以維持。
注意事項
不可讓孩童和體弱人士靠近工作場所。
應將不使用的工具存放在孩童和體弱人士伸手不及
的地方。
充電式手提電動圓鋸之安全
說明
鋸割步驟
a) 危險:手部必須遠離鋸片與切割區域。另一
手須握持輔助把手或馬達外殼。
如果雙手皆握住圓鋸機,雙手便可免於鋸片所傷。
b) 不可碰觸下方的工件。
否則保護罩無法保護您免於鋸片所傷。
c) 調整工件厚度的相對鋸切深度。
在工件下方應可看到小於鋸片全齒深之深度。
d) 切勿用手握持工件或用腿橫跨工件。必須將工件
固定於平穩的工作台。
減少身體的暴露、鋸片卡住或失控,是正確的完
成工作的重要憑藉。
e) 在鋸切工具可能接觸到隱藏線路之情況下進行操
作時,僅握住電動工具的絕緣握持面。
接觸到「通電」的電線將使電動工具的金屬零件
「通電」,而造成操作人員觸電。
f) 進行鋸切時應使用鋸切護罩或直線導向器。
此舉可改善鋸切的精確度並減少發生鋸片卡住的
機會。
g) 使用正確的軸孔尺寸與形狀 ( 菱形端或圓端 ) 的
鋸片。
若鋸片與鋸機的安裝硬體不相配,鋸片在運作時
會偏離中心,並導致失控。
h) 不可使用已損壞或不正確的鋸片墊圈或螺栓。
鋸片墊圈與螺栓是特別專為圓鋸機所設計以提供
最佳的性能表現與最安全的操作。
反衝原因和相關警告
- 反衝是因鋸片被夾住、卡住或未對準,而導致鋸
機失控抬起或脫離工件,並朝向操作人員的作用
力;
- 當鋸片被切口緊緊地夾住或卡住時,會造成鋸片
動彈不得,電動機失衡之下會帶動本工具迅速反
撲向操作人員;
- 鋸切時鋸片扭曲或不正,鋸片後緣的齒部便會戳
入木材的上表面而造成鋸片脫離切口並回彈朝向
操作員。
反衝作用是圓鋸機誤用與 / 或操作程序或條件不正確
所造成的結果,以下所列的正確防範措施可以避免
此類問題的發生。
a) 兩手保持緊握圓鋸機並且將手臂置於適當的位置
以抵抗反衝作用力。
身體須位於鋸片的任一側,身體與鋸片不可成一
直線。
反衝作用力會導致圓鋸向後彈跳,但如果有採取
適當的預防措施,反衝作用力是可以被操作者所
控制。
b) 當鋸片被夾住時或者由於某些原因中斷時,請鬆
開扳機並且保持圓鋸機不動,直到鋸片作動完全
停止。
當鋸片在運行中或者有可能發生反衝作用力時,
決不可試圖從工件上移開圓鋸機或者將圓鋸機向
後拉。
須進行研究並且採取矯正措施以消除鋸片夾住的
原因。
c) 重新啟動鋸切工件時,須將鋸片定位在切口中央,
確認鋸齒不與材料嚙合。
如果鋸片有夾入,重新啟動鋸機時,鋸機可能會
從工件向上移動或產生反衝。
d) 採用大面板支撐座,使鋸片受夾住或產生反衝作
用力的風險降到最低。
由於其自身重力,大面板支撐座趨於下陷。
支撐座必須置於面板兩側的下方,靠近鋸切路徑
與面板邊緣。
00BookC3607DAAsia.indb2000BookC3607DAAsia.indb20 2018/06/1516:23:262018/06/1516:23:26
Other manuals for C 3607DA
3
Table of contents
Languages:
Other HIKOKI Saw manuals

HIKOKI
HIKOKI CR 13VC User manual

HIKOKI
HIKOKI C 7SS User manual

HIKOKI
HIKOKI CD 3605DA User manual

HIKOKI
HIKOKI C 12RSH2 User manual

HIKOKI
HIKOKI C 3606DB User manual

HIKOKI
HIKOKI C 1806DA User manual

HIKOKI
HIKOKI C 7ST User manual

HIKOKI
HIKOKI CD 3605DA User manual

HIKOKI
HIKOKI C 3605DA User manual

HIKOKI
HIKOKI C8FSHE User manual

HIKOKI
HIKOKI C 8FSHG User manual

HIKOKI
HIKOKI C 6MEY2 User manual

HIKOKI
HIKOKI C 7SS User manual

HIKOKI
HIKOKI CR 13VC User manual

HIKOKI
HIKOKI CR 14DSL CR User manual

HIKOKI
HIKOKI C 7MFA User manual

HIKOKI
HIKOKI C 3607DWA User manual

HIKOKI
HIKOKI C 8FSE User manual

HIKOKI
HIKOKI C18DSL User manual

HIKOKI
HIKOKI C 3612DRA User manual