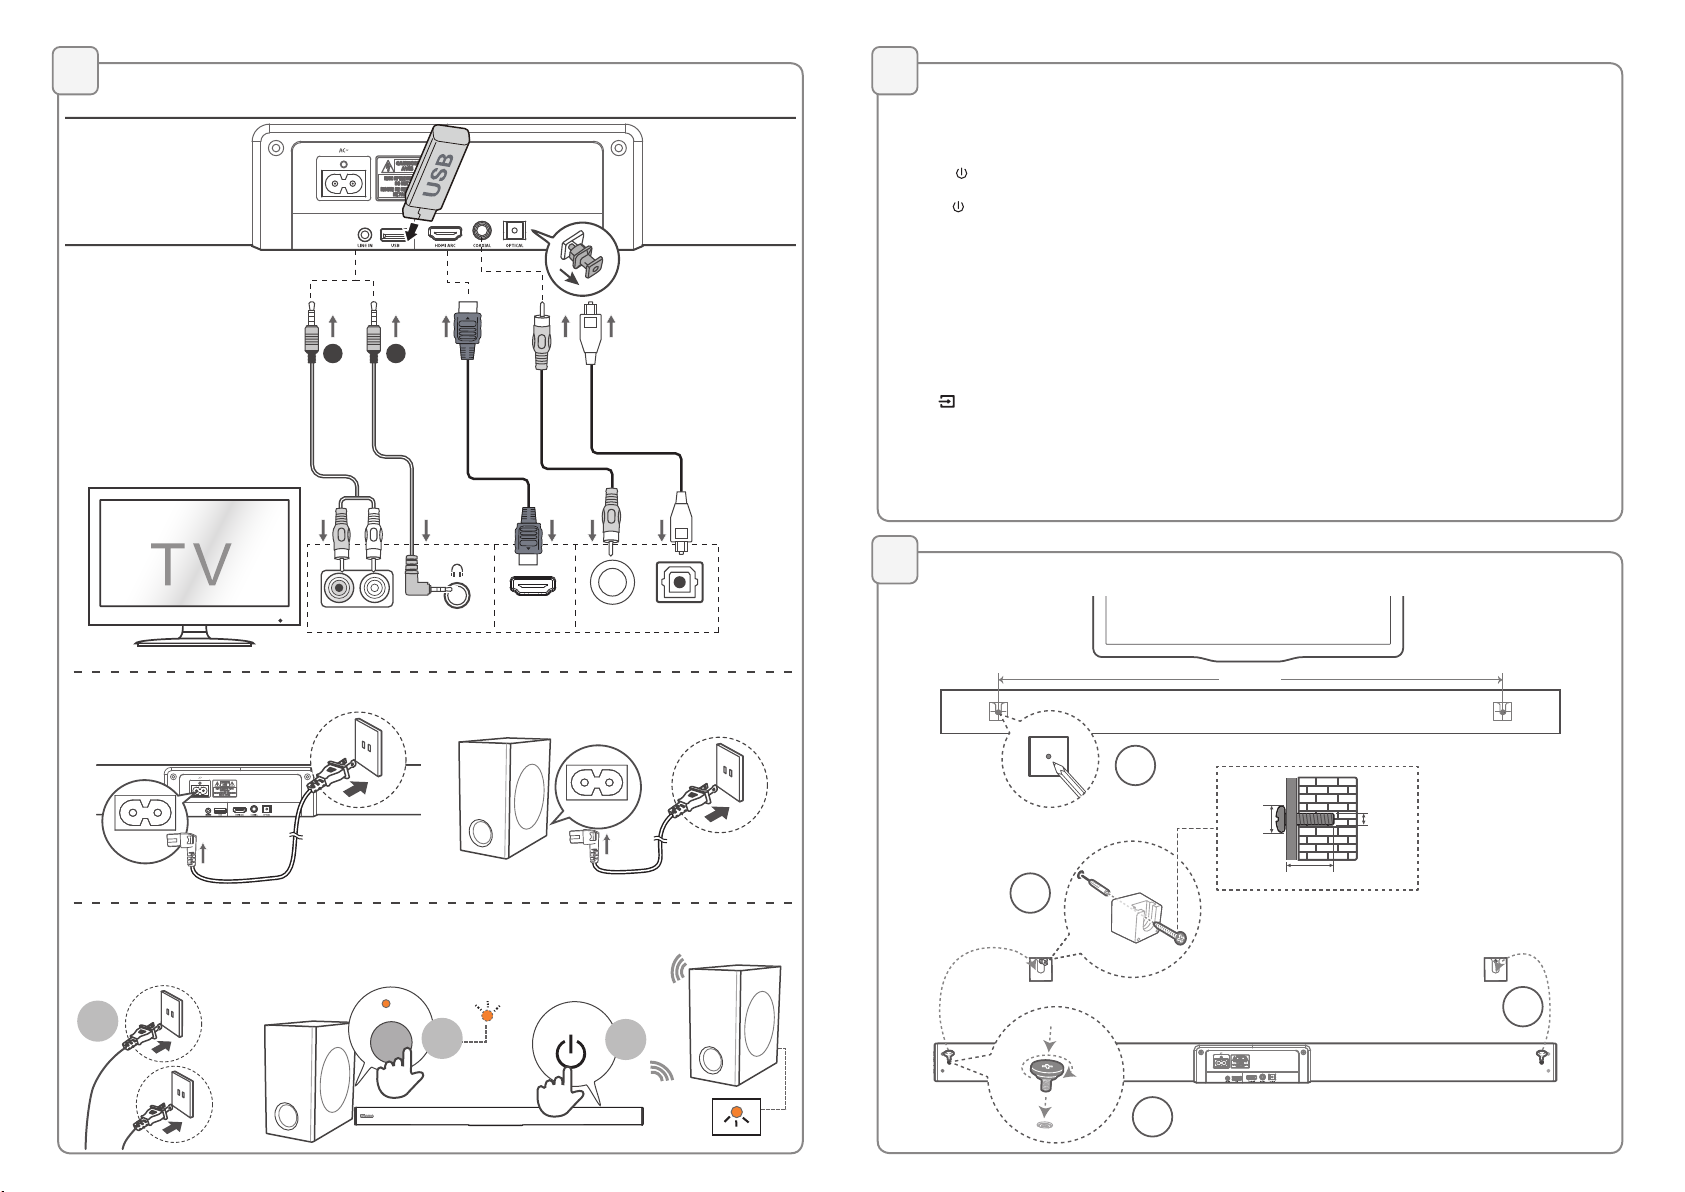
EnglishDeutsch
 logo
Brands
  1. Home
  2. •
  3. Brands
  4. •
  5. Hisense
  6. •
  7. Speakers System
  8. •
  9. Hisense HS218 User manual

Hisense HS218 User manual

Other manuals for HS218

6

Other Hisense Speakers System manuals

Hisense AX3125H User manual

Hisense

Hisense AX3125H User manual

Hisense AX5125H User manual

Hisense

Hisense AX5125H User manual

Hisense U5120G User manual

Hisense

Hisense U5120G User manual

Hisense U5120GW+ User manual

Hisense

Hisense U5120GW+ User manual

Hisense HS312 User manual

Hisense

Hisense HS312 User manual

Hisense HS212 User manual

Hisense

Hisense HS212 User manual

Hisense AX5100G User manual

Hisense

Hisense AX5100G User manual

Hisense U5120GW User manual

Hisense

Hisense U5120GW User manual

Hisense HS218 User manual

Hisense

Hisense HS218 User manual

Hisense AX5125H User manual

Hisense

Hisense AX5125H User manual

Hisense HS216FW User manual

Hisense

Hisense HS216FW User manual

Hisense AX5100G User manual

Hisense

Hisense AX5100G User manual

Hisense HS2100 User manual

Hisense

Hisense HS2100 User manual

Hisense HS214 User manual

Hisense

Hisense HS214 User manual

Hisense AX5100G User manual

Hisense

Hisense AX5100G User manual

Hisense HS218 User manual

Hisense

Hisense HS218 User manual

Hisense AX2106G User manual

Hisense

Hisense AX2106G User manual

Hisense HS512 User manual

Hisense

Hisense HS512 User manual

Hisense HS212F User manual

Hisense

Hisense HS212F User manual

Hisense HS205 User manual

Hisense

Hisense HS205 User manual

Hisense AX3120G User manual

Hisense

Hisense AX3120G User manual

Hisense HS218 User manual

Hisense

Hisense HS218 User manual

Hisense AX3100G User manual

Hisense

Hisense AX3100G User manual

Hisense U5120GW User manual

Hisense

Hisense U5120GW User manual

Popular Speakers System manuals by other brands

JVC MX-KA3 - Mini Shelf System null

JVC

JVC MX-KA3 - Mini Shelf System null

JVC CA-MXK5R instructions

JVC

JVC CA-MXK5R instructions

LG NB4532B owner's manual

LG

LG NB4532B owner's manual

JVC CA-FSH100 instructions

JVC

JVC CA-FSH100 instructions

5Core Pro Series Operation manual

5Core

5Core Pro Series Operation manual

EAW MQV1394e Specifications

EAW

EAW MQV1394e Specifications

Lynx GXR-LA10A user manual

Lynx

Lynx GXR-LA10A user manual

iLive ITB066B user guide

iLive

iLive ITB066B user guide

RDX QuickStation 4 product manual

RDX

RDX QuickStation 4 product manual

Electro-Voice S-122 Specifications

Electro-Voice

Electro-Voice S-122 Specifications

Sven SPS-619 GOLD Operation manual

Sven

Sven SPS-619 GOLD Operation manual

Pioneer CS-7070 instruction manual

Pioneer

Pioneer CS-7070 instruction manual

EAW UB82e Technical specifications

EAW

EAW UB82e Technical specifications

Sondpex Active Speaker System and Digital Music... User manual and installation instructions

Sondpex

Sondpex Active Speaker System and Digital Music... User manual and installation instructions

JVC NX-PN7 instructions

JVC

JVC NX-PN7 instructions

Yamaha NX-A01 - Speaker Sys Product bulletin

Yamaha

Yamaha NX-A01 - Speaker Sys Product bulletin

SE Audiotechnik I-LINE manual

SE Audiotechnik

SE Audiotechnik I-LINE manual

Gemini WRX-843 Series user manual

Gemini

Gemini WRX-843 Series user manual

https://manuals.online logo
https://manuals.online logoBrands
  • About & Mission
  • Contact us
  • Privacy Policy
  • Terms and Conditions

Copyright 2026 Manuals.Online. All Rights Reserved.

Quick Start Guide
2.1CH Soundbar with Wireless Subwoofer
Model: HS218
1
2
Remote control
What’s in the Box
Main Unit Remote Control /
AAA Batteries x 2 Wireless Subwoofer
Bracket(x2) / Wall Plug(x2) / screw(x2) / bracket screw(x2) AC Power Cord x2 User Manual/Quick Start Guide/
Wall Mount Guide
1 Switch the unit between ON and
STANDBY mode.
2 (MUTE) Mute or resume the sound.
3 SOURCE Select the play function.
4 (BT) Select the Bluetooth mode.
5 VOL+/VOL- Increase/decrease the volume level.
6 /Skip to previous/next track in
Bluetooth/USB mode.
7 /PAIR Play/pause/resume playback in
Bluetooth/USB mode.
Press and hold to activate the
pairing function in Bluetooth mode
or disconnect the existing paired
Bluetooth device.
8 EQ Select a preset sound eect.
9 SURR Adjust the surround ON/OFF.
10 DIMMER+/- Adjust display brightness.
11 BASS Press to activate the bass setup.
12 TREBLE Press to activate the treble setup.
Replace the Remote Control Battery
1 Press and slide the back cover to
open the battery compartment of
the remote control.
2 Insert two AAA size batteries
(included). Make sure the (+) and (–)
ends of the batteries match the (+)
and (–) ends indicated in the battery
compartment.
3 Close the battery compartment cover.
Optical Cable HDMI Cable
- Do not mix old and new batteries;
-Do not mix alkaline, standard (Carbon-Zinc) or
rechargeable (Ni-Cd, Ni- MH, etc.) batteries.
Identifying the Parts
6
4
5
6
1 2 3
71089 11 12
3
ARC
12
Identifying the Parts
Main Unit
1Remote Control Sensor
Receive signal from the remote control.
2 Display Window
Show the current status.
3Screws
Remove the screws then install the wall
mounting screws into the back of the unit.
4(ON/OFF) Button
Switch the unit between ON and Standby mode.
5 +/- (Vol+/Vol-) Buttons
Increase/decrease the volume level.
6 (SOURCE) Button
Select the play function.
7AC~ Socket
Connect to the power supply.
8LINE IN Socket
Connect to an external audio device.
9 USB Socket
Insert the USB device to play music.
10 HDMI ARC Socket
Connect to a TV via HDMI cable.
11 COAXIAL Socket
Connect to a coaxial audio output on the TV.
12 OPTICALSocket
Connect to an optical audio output on the TV.
Wireless Subwoofer
1 AC~ Socket
Connect to power supply.
2 PAIR Button
Press activate the pairing function between
the main unit and the subwoofer.
3 PAIR Indicator
Light up solidly when the pairing succeed.












Connections
3
5Wall Mounting
4
◎Pair up with the subwoofer
HDMI ARC OPTICALCOAXIALAUDIO OUT Headphone
A
B
●Before connecting the AC power cord, ensure you have completed all other connections.
13
PAIR
3s
2
Basic Operation
◎ Standby/ON
When you rst connect the main unit to the mains socket, the main
unit will be in Standby mode.
• Press the button on the unit or on the remote control to
switch the unit ON.
• Press the button again to switch the unit back to STANDBY mode.
• Disconnect the mains plug from the mains socket if you want to
switch the unit OFF completely.
Auto Wake
If a TV or an external device is connected (LINE IN / OPTICAL /
COAXIAL / HDMI ARC), the unit will switch on automatically when
the TV or the external device is switched on.
Automatic Power O Function
The unit automatically turns to Standby mode after about 15
minutes if the TV or the external unit is disconnected, switched o.
◎Select Modes
Press the (SOURCE) button repeatedly on the unit or the SOURCE
button on the remote control to select the LINE IN, OPTICAL, COAXIAL,
HDMI ARC, USB and BT (Bluetooth) mode. The selected mode will
show on the display.
◎Adjust the Bass/Treble Level
• Press TREBLE then press VOL+/- button to increase or decrease
the treble. (TREBLE+5 / TREBLE–5)
• Press BASS then press VOL+/- button to increase or decrease the
bass. (BASS+5 / BASS–5)
• After about 5 seconds, the unit will exit from bass/treble setting.
The display will show the current selected mode. You may now
press the VOL+ / - buttons to adjust volume.
◎Turn the Surround Sound ON/OFF
Press the SURR button on the remote control to turn on the surround
sound. Press this button again to turn o the surround sound.
◎Adjust the Volume
Press the VOL+ / VOL- buttons on the unit or on the remote control
to adjust the volume.
If you wish to turn the sound o, press the MUTE button on the remote
control. Press the MUTE button again or press the VOL+ / VOL- buttons
on the unit or on the remote control to resume normal listening.
◎Adjust the Brightness
Press the DIMMER +/- buttons on the remote control to select
brightness level.
◎Select a Preset Sound Eect
While playing, press the EQ button on the remote control to select
desired preset equalizers: MOVIE, MUSIC, NEWS.
1
2
≤8 mm/
0.31"
4mm/
0.16"
≥35 mm/1.4"
4
3
900 mm
The subwoofer and the soundbar will be paired automatically when both are powered on.
If no audio from the wireless subwoofer can be heard, manually pair up the subwoofer.
Roku TV Ready and the Roku TV Ready logo are trademarks of Roku, Inc.