HJM RFCS User manual

HJM_RFCS_ENG_Rev.1_30-11-2017
Made in Spain
1/21
ORIGINAL OPERATING INSTRUCTIONS
Read carefully and retain for future reference
Ceramic Heater
Reference
RFCS

HJM_RFCS_ENG_Rev.1_30-11-2017
Made in Spain
2/21
IMPORTANT WARNINGS
Dear Customer:
Thank you for your confidence in us by purchasing this radiator.
These appliances are extremely safe, silent and easy to install.
They do not require special maintenance. They are made of extruded
aluminum, a material of high durability respectful to the environment.
Before starting it for the first time, carefully read these instructions.
Retain them for future references.
GENERAL SAFETY INSTRUCTIONS
1. Please read carefully these instructions before starting the device
for the first time.Keep these instructions, as well as the
guarantee, your invoice and if possible, the complete packing with
all the elements inside.
2. The guarantee will cease to be valid in the case of not
following the recommendations of this manual.
3. Before connecting the appliance, make sure the mains voltage is
the 230 Volts, and correspond to the marked on the nameplate of
the appliance.
4. Check that the power is sufficient to supply the appliances. The
total draw of the radiators' currents must not exceed the capacity
of the circuit breaker that protects them.
5. This radiator cannot be used in rooms with presence of gases or
other flammable products (glues, etc...).
6. WARNING: To prevent overheating, do not cover the device. Do
not use the device to dry clothes.
7. Make sure the power cable or other objects do not come into
contact with the radiator surface while in operation.
8. If the power cable becomes damaged it must be replaced by the
manufacturer or a suitably qualified trades person. Failure to
comply may danger your safety and voids your warranty.
9. Check the device and the supply cord regularly. Do not turn the
device on if it is damaged.
10. PRECAUTION: Some parts of this product can reach very
high temperatures and cause burns. Pay special attention
when children or vulnerable people are around.
11. Do not place the device straight under a power socket.

HJM_RFCS_ENG_Rev.1_30-11-2017
Made in Spain
3/21
12. Children under the age of three should not be allowed to touch or
play with the radiator and should be supervised at all times.
13. This device can be used by children under 8 years of age, as well
as by people with reduced physical, sensory or mental
capabilities when suitably supervised and only when they have
been provided the instructions regarding the use of the device
and have understood the risks that could derive from it. Cleaning
must only be carried out by an appropriate adult.
14. Children between3 and 8 years should not turn on or off the
device, unless this is installed or placed in a normal position and
that children are under proper supervision or have received
instructions regarding the use of the device as security and they
have perfectly understood the potential dangers. Children
between 3 and 8 years old should not connect, adjust or clean the
appliance or perform any maintenance measure.
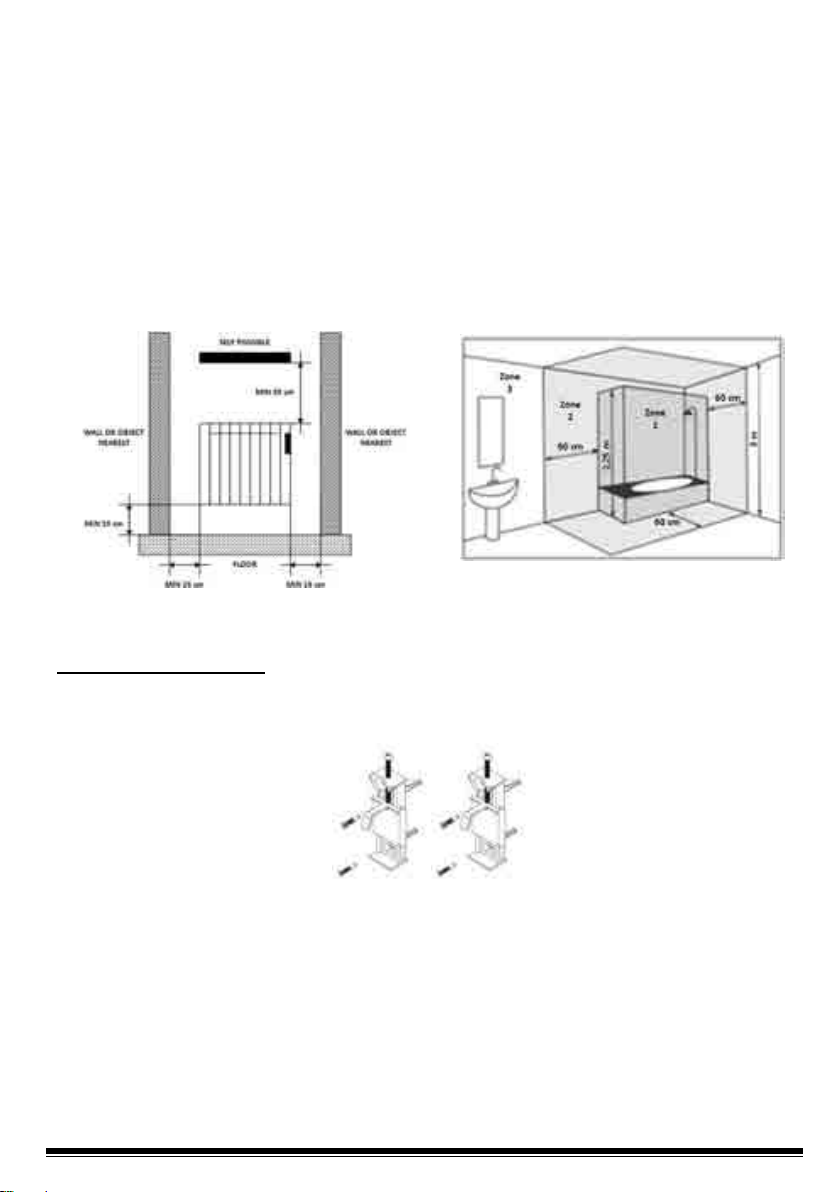
15. Warning: Do not use this heater near baths, showers or
swimming pools. It should not be possible to access the device's
controls from the bath, shower or any other surface that is in
contact with water.(Its use in zones 0 or 1 in bathrooms is totally
prohibited: seek advice from a qualified electrician).
16. For greater safety, this appliance is provided with a device that
interrupts its operation in the case of overheating.
17. This radiator has been designed exclusively to be fixed to the
wall. For further information on the fixing systems, consult the
section "INSTALLATION AND WALL MOUNTING" of this manual.
18. Do not use accessories that have not been recommended by the
manufacturer, as they could entail a potential risk to the user, and
damage the device. Use only original accessories.
19. Keep all the packaging elements (plastic bags, cardboard and
polyethylene)out of the reach of children, as they can cause
potentially dangerous situations.
20. Use this device only for domestic / light commercial use and the
tasks for which it has been designed. This device has not been
designed for industrial use. It must not be used outdoors, in
greenhouses or for animal husbandry. Keep it away from heat,
direct sunlight, humidity and cutting tools. Do not under any
circumstances immerse in water or use this device with wet
hands. In the case of humidity or water in the device, immediately
disconnect the power supply and do not touch the wet parts.

HJM_RFCS_ENG_Rev.1_30-11-2017
Made in Spain
4/21
21. Do not attempt to service the device yourself. Contact a qualified
technician.
22. To disconnect the transmitter from the mains pull the plug, never
of the supply cord.
23. Respect the "SPECIFIC SAFETY INSTRUCTIONS FOR THIS
APPLIANCE" listed below
SPECIFIC SAFETY INSTRUCTIONS FOR THIS DEVICE
The appliance must remain in a vertical position.
Make sure the appliance is secured at all times. Please adhere to
the installation distances indicated in this guide.
Do not hang any object in front or on top of the device.
Always ensure that the inlet and outlet air are not obstructed.
Always install the device so that it cannot enter into contact with
any combustible material such as curtains or towels (take into
account the gusts of wind).
To clean the device, consult the instructions in the
"MAINTENANCE" section, because if water enters the air grilles it
could seriously damage the device.
Do not insert any object through the grille or inside the device.
This radiator is designed to be connected by plug to the electric
installation and fixed to the wall installation. Follow the
instructions in "INSTALLATION".
The guarantee will not apply if these instructions have not
been observed.
INSTALLATION
During the first use and for a few minutes, could occur smells and noise due to
the dilatation of some internal parts. This is normal, so you must provide
adequate ventilation. The smells are momentary and quickly will dissipate.
For greater efficiency, make sure to calculate the power or the number of
elements of the apparatus according to the surface of the room. We
recommend contacting your dealer performing this calculation.
Fix the radiator to a firm wall and make sure it is well-levelled, in a room with
no furniture and no objects avoiding around.
Avoid installing the appliance in corners.
We advise against installing the appliance under the windows, because it is
favoring the heat loss.
The radiator must be away, at a minimum distanceof15cmfrom any
combustible material, curtains, furniture, chairs, etc.(Fig. 1).

HJM_RFCS_ENG_Rev.1_30-11-2017
Made in Spain
5/21
Allow for a minimum distance of 1 m, from the front of the unit to any obstacles
(furniture, walls, curtains, for example) that could hinder its operation.
Also keep a minimum distance of 15 cm between the appliance and the side
walls and any other obstacles (walls, for example) that may affect its function.
Also keep a minimum distance of 35 cm on top the appliance free of obstacles
and a minimum distance of 15 cm from the floor.
WARNING: If this appliance is installed in a bathroom, it must be installed only
within Zones 2 or Outside Zones (Zone3), according BS 7671 Requirements
for Electrical Installations, Section 701. The installation of this appliance within
Zones 0 or 1 of a bathroom is totally prohibited. The figure 2 bellow is only for
information purposes, we suggest you contact a professional electrician.
- Minimum Distances -
Fig.1
Zone 1: Appliances supplied to Safety Extra Low Voltage (SELV).
Zone 2: Electrical Appliances Class II – IP X4
Zone 3: Electrical Appliances protected by RCD 30mA
Fig.2
WALL-MOUNTING
The appliance is equipped with the following:
- 2 radiator's suspension supports..
1. Place the template on the floor and against the wall where you will place the
radiator.
2. Mark on the wall the location of the four holes.
3. Drill four holes for inserting the 8 mm plugs.
4. Fix the supports (as shown in the Figure) using the 4 screws and 8 mm plugs .
5. Hang the radiator in the supports fixed on the wall and, finally , completely screw
up the two security pieces of
the supports.

HJM_RFCS_ENG_Rev.1_30-11-2017
Made in Spain
6/21
ELECTRIC SUPPLY CONNECTION
This appliance is equipped with a supply cord H05V2V2-F 2x1.0mm² and bipolar
plug without earthing.
Connect the plug to the base outlet.
Check the condition of your electrical installation and connection cables.
This appliance doesn't require earthing connection, due it has double electrical
insulation.
Contact a licensed electrician for assistance.
TECHNICAL CHARACTERISTICS
Marca
Model
RFCS500HJM
RFCS1000HJM
RFCS1500HJM
RFCS2000HJM
Rated Voltage
230 V~
230 V~
230 V~
230 V~
Rated Frequency
50 Hz
50 Hz
50 Hz
50 Hz
Rated Power Input
500 W
1000 W
1500 W
2000 W
Class of Protection
II
II
II
II
Degree of Protection IP
IP24
IP24
IP24
IP24
Dimensions (LxHxD) (mm)
410x585x105
540x585x105
670x585x105
800x585x105
Weight (kg)
5.7
7.9
11,3
13.7

HJM_RFCS_ENG_Rev.1_30-11-2017
Made in Spain
7/21
PROGRAMMABLE DIGITAL THERMOSTAT
This radiator is equipped with various functions and operating modes that the user can
select using the “MODE” button.
The operating modes are: Pilot Wire, Comfort, Economy, Anti-Frost, Holidays, Timer,
Turbo, Eco and Off (Stand-by). These are their related icons:
Pilot Wire Mode: The thermostat’s functions are controlled through a signal
received from the “Pilot Wire” unit. FOR USE IN FRANCE ONLY
Comfort Mode: The thermostat keeps the room temperature at the value
established by the user.
Economy Mode: The thermostat keeps the room temperature below the
configured Comfort value.
Anti-Frost Mode: The thermostat keeps the room temperature above 7 ° C.
Holiday Mode: The radiator enters the “Anti-frost” mode for the period of
time established by the user.
Timer Mode: The thermostat operates as per a daily/weekly programme
defined by the user.
Turbo/boost Mode: The thermostat continuously feeds the resistance
during the period that is adjustable by the user, the maximum is 2 hours. After the
period of time, the device returns to the previous operating mode. For safety
reasons, the room temperature is automatically controlled in order not to exceed
32 ° C.
Economy Mode set at 17⁰C: The device keeps the room temperature stable
at 17 ° C
Off (Stand-by) Mode: In this mode the electric resistance is not being fed and
the light at the back of the screen goes off. However, the thermostat is operating.

HJM_RFCS_ENG_Rev.1_30-11-2017
Made in Spain
8/21
Other thermostat functions are:
• Other functions and icons
Open window detection: This function allows us to detect that a window is
open due to a sudden drop in room temperature. In this case, the device stops
feeding the resistance for a maximum of 30 minutes or until an abrupt increase in
room temperature shows that the window has been closed.
Adaptive temperature control (ASC): This function anticipates radiator’s
operating start time regarding the programmed value (only for Timer mode).
Safety for children: This function reduces the radiator’s surface
temperature.
Power level indicator: Instantaneous consumption visualisation.
Blocked: Function to prevent accidental or improper use.
Consumption meter: This function lets us know the consumption data for
different periods, in kWh.
Consumption indicator: To see if the device is consuming at the moment or
not.

HJM_RFCS_ENG_Rev.1_30-11-2017
Made in Spain
9/21
SCREEN
1. ON / OFF (STAND-BY)
Press the On/Off (Stand-by) button to turn the radiator on or to set the off/stand-by
mode.
If the off/stand-by mode is activated, the corresponding icon will appear on the screen
and there will be two 0.5 second bleeps and the time will be shown.
When the device is turned on, there will be a one second bleep and the icon will
disappear.

HJM_RFCS_ENG_Rev.1_30-11-2017
Made in Spain
10/21
2. MAIN FUNCTIONS
PILOT WIRE Mode: (FOR USE IN FRANCE ONLY). In this mode, the radiator is
controlled by a unit with this type of system.
In order to activate it, follow these steps:
1. Press the “Mode" button several times until the icon appears on the
screen. From this moment onwards, the radiator’s operating mode is the one
determined by the unit.
COMFORT Mode: This is the radiator’s standard operating mode to maintain the
user’s desired temperature.
In order to activate it, follow these steps:
1. Press the “Mode" button several times until the icon appears on the
screen.
2. Select the desired temperature using the and buttons. The minimum
value that can be programmed is equal to the value of the temperature
programmed in economy mode plus 0.5°C. The maximum value is 32°C.
ECONOMY Mode: Selecting this mode, the radiator maintains the room temperature at
the one selected for it.
In order to activate it, follow these steps:
1. Press the “Mode" button several times until the icon appears on the
screen.
2. Select the desired temperature using the and buttons. The maximum
value that can be programmed is equal to the value of the COMFORT temperature
less 0.5°C. The minimum value is 7°C.
NOTE: The COMFORT and ECONOMY temperatures are the programme’s determining
values. It is not possible to select a temperature value for the ECONOMY mode
superior to the COMFORT temperature, as the electronic thermostat does not allow

HJM_RFCS_ENG_Rev.1_30-11-2017
Made in Spain
11/21
it. When operating, it is possible to change the temperature easily by pressing the
and buttons.
ANTI-FROST MODE: Selecting this mode, the room temperature is set at 7°C. In order
to activate it, press the “Mode" button several times until the icon appears
on the screen.
HOLIDAY MODE: Selecting this mode, the radiator enters the ANTI-FROST mode for the
period of time established by the user.
In order to activate it, follow these steps:
1. Press the “Mode" button several times until the icon appears on the
screen.
2. Using the and buttons it is possible to select the holiday period duration,
from 12 hours to 40 days, with an increase of one hour 12 to 24 and with an
increase of one day from 24 hours.
TIMER MODE: In this mode, the room temperature is maintained at the COMFORT or
ECONOMY temperature depending on the programmes established for the different
time intervals during the day (P1, P2 or P3).
In order to activate it, follow these steps:
1. Press the “Mode" button several times until the icon appears on the
screen.
2. Press the TIMER button to select one of the pre-established factory
programmes (P1 and P2 ) or the programme that is configurable by the
user (P3 ).
For configurable programming P3, please look at section “4. PROGRAMMING” in this
manual.
The pre-established P1 and P2 programmes are:

HJM_RFCS_ENG_Rev.1_30-11-2017
Made in Spain
12/21
TURBO/BOOST MODE: This mode can be used when we need to heat the room
quickly.
In order to activate it, follow these steps:
1. Press the “Mode" button several times until the icon appears on the
screen.
2. Pressing the and buttons it is possible to select the TURBO/BOOST period
duration from 5 to 120 minutes. When this function is activated, the radiator
operates at its maximum power, ensuring that the room temperature does not
exceed 32°C. When the programmed time (indicated by the countdown on the
screen) finishes, the radiator returns to the previously established mode.
ECONOMY MODE 17⁰C: Activating this mode the radiator operates at a pre-
established, unchangeable temperature of 17°C. This function allows for lower
consumption when, for example, the room or the house is empty for an indefinite
period of time.

HJM_RFCS_ENG_Rev.1_30-11-2017
Made in Spain
13/21
To select this mode, press the “Mode" button several times until the icon
appears on the screen.
3. OTHER FUNCTIONS AND ICONS
OPEN WINDOW DETECTION: The radiator is able to detect if a window has been
opened through a sudden drop in temperature (5°C in a maximum of 30 minutes). If
this happens, the device disconnects for 30 minutes so as to, later on, operate again
at the previously established mode if it detects continuous increases in temperature
of one degree (because, for example, the window has been closed). If this is not the
case, the device will remain disconnected for an additional period of 30 minutes.
When the open window detection is activated, the corresponding symbol will appear
intermittently on the screen (except in off/stand-by mode). When it is deactivated,
the symbol disappears.
In order to activate this function, please look at section “4. PROGRAMMING”.
CHILD PROTECTION: When this function is activated, the temperature on the front
part of the radiator is lowered so that it is safe when children are present. Moreover,
this function means that the same radiator can be used in rooms smaller than the one
it is installed in without significant changes in room temperature.
When this function is activated, the power level that the radiator operates at is the one
established by the user (40% - 50% - 60%).
In order to activate this function, please look at section “4. PROGRAMMING”.
ASC (ADAPTIVE TEMPERATURE CONTROL): When this function is activated, the
device connects before the time established in the programming (maximum 2 hours
beforehand) to ensure that the room is at the programmed temperature at the
established time.
When this function is activated, the corresponding icon appears on the screen
(except in off/stand-by mode).
In order to activate this function, please look at section “4. PROGRAMMING”.

HJM_RFCS_ENG_Rev.1_30-11-2017
Made in Spain
14/21
POWER LEVEL INDICATOR: This appears on the left-hand side of the screen and it
depends on the programmed temperature level. The higher the programmed
temperature is, the greater the number of bars shown on the icon. This is
instantaneous consumption visualisation as, the higher the programmed temperature
is, the higher the energy consumption is.
BLOCK FUNCTION: It is possible to block the radiator to prevent children from using it
improperly or, for example, in a public space.
In order to block/unblock the buttons, press the “Mode” button and keep in pressed
down for 3 seconds, until the icon appears (blocked) or disappears (unblocked).
CONSUMPTION METER FUNCTION: This function allows us to read the radiator’s
consumption expressed in kWh. In order to do so, the power of the emitter must be
previously adjusted, following these steps:
1. Unplug the device from the electricity supply.
2. Simultaneously press buttons and .
3. Without releasing the buttons, plug the device into the electricity supply for at
least 5 seconds until you can see the power adjustment function, as shown in this
image:
4. Use the and buttons to select your radiator’s power in Watts.
5. Confirm the selection with the button.
This operation only needs to be done the first time and then it will stay saved; it is not
necessary to repeat it every time you wish to consult consumption.
Now you can read the consumption for various periods of time in the following way:
1. Turn the radiator to off/stand-by mode.

HJM_RFCS_ENG_Rev.1_30-11-2017
Made in Spain
15/21
2. Press the button for more than 3 seconds until the consumption data is
shown on the screen.
3. Using the and buttons, we can scroll the consumption menu.
4. The icons will appear on the right-hand side of the screen. Each one shows the
consumed kWh during the corresponding period of time, as shown here:
= current day
= previous day
= current week
= previous week
= current month
= previous month
= current year
+ = previous year
+ = total
+ = radiator power indicator
CONSUMPTION INDICATOR: When the room temperature falls below the configured
temperature, the radiator’s thermostat feeds the resistance and the symbol
lights upon the screen, with which it is consuming energy. As soon as the room
temperature reaches the selected temperature, the thermostat stops feeding the
resistance and the icon disappears from the screen, as it is no longer consuming
energy.
IMPORTANT NOTE: If “ALL” appears on the screen then the temperature sensor is broken
or damaged and the radiator does not work. Please contact our technical service.

HJM_RFCS_ENG_Rev.1_30-11-2017
Made in Spain
16/21
4. PROGRAMMING
DAY AND TIME PROGRAMMING
1. Turn the radiator to off/stand-by mode. The icon will be shown.
2. Press the button for more than 3 seconds until the functions can be seen.
Using the button you can scroll through the following options: “ted”(hour and
date), “prog”(programming) and “ofst”(calibration of the temperature sensor).
3. Select the “ted” option and confirm with the button.
4. Enter the current year (15-99) using the and buttons. Press the button
to confirm the selection.
5. Enter the current month (1-12) using the and buttons. Press the
button to confirm the selection.
6. Enter the current date (1-31) using the and buttons. Press the button
to confirm the selection.
7. Enter the day of the week (1=Monday, 2=Tuesday, 3=Wednesday, 4=Thursday,
5=Friday, 6=Saturday, 7=Sunday) using the and buttons. Press the
button to confirm the selection.
8. The current hour should then appear on the screen with the digits intermittently
lighting up. The hour can be modified using the and buttons. Press the
button to confirm the selection.
9. The digits indicating the minutes light up intermittently on the screen. The
minutes can be set using the and buttons. Press the button to
confirm the selection.
CONFIGURATION OF THE P3 PROGRAMME
You can configure your own operating programme (P3) for each day of the week by
following these steps:
1. Turn the radiator to off/stand-by mode. The will be shown.
2. Press the button for more than 3 seconds. Using the button you can see
the following options: “ted”(hour and date), “prog”(programming) and
“ofst”(calibration of the temperature sensor).
3. Select the “Prog” option and confirm with the button.
4. The programme will start on the first day of the week (1=Monday), and at 0 hours.
The day is divided into intervals of one hour each.

HJM_RFCS_ENG_Rev.1_30-11-2017
Made in Spain
17/21
5. Pressing the button we select the COMFORT mode in this time interval (the
whole interval will be highlighted). Pressing the button we select the
ECONOMY mode for this time interval (half an interval will be highlighted). And so
on until completing the 24 hours of day 1=Monday. Confirm the programming
with the button.
6. Automatically, the programming goes on to day 2=Tuesday, maintaining the
programming established for Monday. If you wish to maintain it, press directly on
the button to confirm and go to the next day. Otherwise, you can change
using the and buttons to programme as you wish.
7. Follow the same steps for each day of the week until reaching day 7=Sunday.
CALIBRATION OF THE TEMPERATURE SENSOR
If the radiator is not installed in the optimum location to suitably detect the room
temperature (for example: it is installed on a cold wall or there are draughts…) the
measured room temperature may be different from the real temperature. In order to
achieve maximum efficiency, it is recommendable to eliminate this temperature
difference.
To do so, follow these steps:
1. Turn the radiator to off/stand-by mode. The icon will be shown.
2. Press the button for more than 3 seconds. Using the button we can see
the following options: “ted”(hour and date), “prog”(programming) and
“ofst”(calibration of the temperature sensor).
3. Select the “ofst” option and confirm with the button.

HJM_RFCS_ENG_Rev.1_30-11-2017
Made in Spain
18/21
4. With the and , buttons establish the temperature difference between the
room temperature (measured with a thermometer) and the temperature
detected by the radiator. This difference can be adjusted between -5°C and +5°C.
5. Press the button to confirm the selection.
ACTIVATING OTHER FUNCTIONS
OPEN WINDOW DETECTION
1. Turn the radiator to off/stand-by mode. The will be shown.
2. Press the button for more than three seconds, until you can see the icon.
3. Press the button again to activate or deactivate the open window detection
function (ON=activate; OFF=deactivate).
4. Press the button to confirm the selection and go to the next function:
ASC (ADAPTIVE TEMPERATURE CONTROL)
1. Press the button to activate or deactivate the ASC function (ON=activate;
OFF=deactivate).
2. Press the button to confirm and go to the next function:
CHILD PROTECTION
1. Press the button to activate or deactivate the child protection function
(ON=activate; OFF=deactivate).
2. Press the button to confirm the selection. If you have selected to deactivate it
(OFF), the radiator will automatically go to off/stand-by mode. If, on the other
hand, you have selected to activate it (ON), you can programme the percentage of
power desired between the following values: 40% / 50% / 60%. Using the
button you select one or another.
3. Confirm the desired percentage with the button. In this way, all the changes
made to the anterior functions will be saved and the radiator will return to its
off/stand-by state .

HJM_RFCS_ENG_Rev.1_30-11-2017
Made in Spain
19/21
THERMAL SAFETY
In the case of overheating, a safety device automatically cuts the radiators
operation. After cooling the radiator will automatically reset.
MAINTENANCE
Your radiator requires no regular maintenance, however, to ensure its good
operation:
Always disconnect the device from the mains before performing any cleaning or
maintenance operation.
Let it cool down before cleaning.
To avoid any risk of electrical shock, clean the unit with a soft, damp cloth to wipe
the outside of the radiator and remove dust and dirt cloth.
Do not use detergent, solvent, abrasive products or any other chemical product to
clean the radiator.
NEVER immerse the device in water or any other liquids.
You can use a vacuum or flexible brush to clean the air grilles. This maintenance
must be carried out regularly to ensure optimum performance. Ensure the radiator
is totally dry before turning it back on.

HJM_RFCS_ENG_Rev.1_30-11-2017
Made in Spain
20/21
EU Declaration of Conformity
Product:
Ceramic Heater
Trademark:
Models:
RFCS
Types:
RFCS1000 (230V 50Hz; 1000W; IP24; Class II)
RFCS1500 (230V 50Hz; 1500W; IP24; Class II)
RFCS2000 (230V 50Hz; 2000W; IP24; Class II)
Batch & Serial No.:
Mx- YYDDD-XXX (1)
(1) Explanation of code "Lot & Serial No.": Lot = Mx - YYDDD;where: Mx = Production Line No.; YY = year
(15,16,17...99) and DDD = jour corrélative (001,..., 365).
Serial No. = XXX (001,..., 999).
We:
HERMANOS JULIÁN M., S.L.
Head Office: Esposos Curie,44 / Factory: Gutenberg,91-93
Polígono Industrial “Los Villares” . 37184 Villares de la Reina . Salamanca . España
Tf.+34 923 222 277 +34 923 222 282 . Fax +34 923 223 397
http://www.calorhjm.es
Hereby declare, that the following equipment complies with all the essential requirements for health and safety of
European Directives.
2014/30/UE EMC DIRECTIVE 2014/35/UE LV DIRECTIVE
2011/65/UE RoHS DIRECTIVE 2009/125/EC (ErP Directive)
With reference to the application of the followinf standards:
2014/30/UE EMC DIRECTIVE
EN 55014-1:2006 +A1:2009 +A2:2011
EN 61000-3-2:2014
EN 61000-3-3:2013
EN 55014-2:1997 +AC: 1997 +A1:2001 +A2:2008
EN 61000-4-2:2009
EN 61000-4-3:2006 +A1:2008 +A2:2010
EN 61000-4-4:2012
EN 61000-4-5:2006
EN 61000-4-6:2013
EN 61000-4-11:2004
2014/35/UE LV DIRECTIVE
EN 60335-2-30:2009 + CORR:2010 +A11:2012
EN 60335-1:2012 +AC:2014 +A11:2014
EN 62233:2008 +CORR:2008
2011/65/UE RoHS DIRECTIVE
EN 62321-1:2013
2009/125/EC (ErP Directive)
(2005/32/EC)
EN 50564:2011
This manual suits for next models
4
Table of contents
Other HJM Heater manuals
Popular Heater manuals by other brands

Cadet
Cadet CEH-003M owner's guide

Ilsintech
Ilsintech SWIFT K11 user manual

Brentwood
Brentwood H-C1602BK Operating and safety instructions

DAY Useful Everyday
DAY Useful Everyday 73454 instruction manual

Beurer
Beurer HD 75 Cosy Taupe Instructions for use

VOLTOMAT HEATING
VOLTOMAT HEATING FH-109947.1 instruction manual