Hoonved CR Series User manual

Instructions for user
SERIE C-CR-CD-CRD
SPR - SPRD
SP - SPD
SPB
Ed. 05/2004
START
0I
ENG

2
DICHIARAZIONE DI CONFORMITA’ - DECLARATION OF CONFORMITY
DECLARATION DE CONFORMITE - KONFORMITÄTS ERKLÄRUNG
Noi - The undersigned- Nous soussignés - Die Unterzeichnete Fa:
HOONVED S.r.L.
via Ugo Foscolo, 1 - 21040 Venegono Superiore - (VA- ITALIA)
dichiariamo sotto la nostra esclusiva responsabilità che il prodotto
hereby declares under full responsability that the following product
attestons sous notre entière responsabilité que le produit suivant
erklärt unter eigener Verantwortung, dass folgende Produkte
al quale questa dichiarazione si riferisce è conforme alle seguenti norme:
auquel se référé cette dèclaration, est conforme aux normes suivantes:
to which this declaration refers, is conform with the following standards:
auf welche sich diese Erklärung bezieht, folgendem Standard entsprechen:
in base a quanto prescritto dalle Direttive:
selon ce qui est prevu par les Directives:
on the basis of what is foreseen by the Directives:
aufgrund der vorgesehenen Richtlinien:
Decliniamo ogni responsabilità per sinistri a persone o a cose derivanti da manomissioni da parte di terzi o da carenze di manutenzione o riparazione.
Nous déclinons toute responsabilité pour sinistres à personnes ou à objet qui derivent de l’invention de la part de tiers non specialistes ou de
carences de manutention ou reparation.
We decline any responsability for injuries or damage derived from machine misuse, abuse by others or improper machine maintenance or repairs.
Wir lehnen jegliche Verantwortung für Schäden an Personen oder Dingen ab, die auf fehlerhaftes Eingreifen Dritter oder auf mängelhafte Wartung
oder Reparation zurückzuführen sind.
- Data emissione -
2004
- Date d’ emission -
- date of issue -
- Ausgabedatum -
Joakim Granfors
Consigliere D’Amministrazione
73/23/CEE, 93/68/CEE - 98/37/CE - 89/336, 92/31, 93/68/CEE
EN 60335-1, EN 60335-2-58, EN 61000-3-2, EN 61000-3-3, EN 55014-1, EN 55014-2
LAVASTOVIGLIE - DISHWASHING MACHINE - LAVE - VAISSELLE - GESCHIRRSPÜLER
LAVA LOUÇAS
C 35 - CR 43 - CR 43 D - C 43 - C 48 - C 48 D - C 53 - C 53 D - C 60 - C 60 D
C81 - C 6 - C 6 D - SPB 35 - SPR 36 - SPR 36 D - SP 35 - SP 40 - SP 40 D
SP45 - SP 45 D - SP 50 - SP 50 D - SP 81 - SP 5 - SP5 D

3
DISHWASHING MACHINE
○○○○○○○○○○○○○○○○○○○○○○○○○○○○○○○○○○○○○○○
○○○○○○○○○○○○○○○○○○○○○○○○○○○○○○○○○○○○○○○
The illustrations concerning these instructions are on the inside of the back cover
33967
Mod.
SERIE C-CR-CD-CRD
SPR - SPRD
SP - SPD
SPB

4
ENG IMPORTANT
Becomethoroughlyfamiliarwiththecontentsofthimanualbeforeinstalling,settingup,adjustingandservicingdiswashermachine
Mod. C-CR-CD-CRD-SPR-SPRD-SP-SPD-SPB.
Only contact an authorized technical center or HOONVED in the event of breakdowns or faulty machine operation.
Themanufacturerreserves therightto modifytheproductswhenever necessary,withoutaffecting theirmain
features.

5
INDICE - INDEX
Avvertenza. ......................................................... pag. 4
Important .............................................................. pag. 4
Hinweis.................................................................Seite 4
Advertencias ........................................................ pág. 4
Dimensioni d'ingombro..................................... pag. 6/8
Overall dimensions ..............................................pag. 6
/8
Dimensions d'encombrement...............................pag. 6/8
Platzbedarfmasse ................................................ Seite.6/8
Dimensiones máximas .........................................pág. 6/8
Dati tecnici.......................................................... pag. 6/9
Technical data...................................................... pag. 6/9
Données techniques ............................................ pag. 6/9
Technischen daten............................................... Seite 6/9
Datos técnicos ..................................................... pág. 6/9
Descrizione comandi......................................... pag. 10
Decription of the controls ..................................... pag. 10
Description des commandes................................ pag. 10
Beschreibung der Bedienvorrichtungen ............... pag. 10
Descripción de los mandos .................................. pag. 10
ITALIANO........................................................ Pagina 12
ENGLISH......................................................... Page 18
FRANÇAIS....................................................... Page 24
DEUTSCH........................................................ Seite 30
ESPAÑOL........................................................ Página 36

6
Cons. acqua x ciclo
Water cons. per c.le
Cons. d’eau par c.le
Wass. pro Zyklus
Con. agua por ciclo
DIMENSIONI DI INGOMBRO - OVERALL DIMENSIONS - DIMENSIONS D'ENCOMBREMENT
PLATZBEDARFSMASSE - DIMENSIÓNES
E
C
B-D
A
L
55 55
L
G
7 : 20
I
7 : 20
K
F
H
55 : 68
Allacciamenti - Connections -
Raccordement- Anschlusse
AScarico vasche - Tanks drain - Vidange cuves - Tankablauf
B Entrata acqua - Water inlet - Arrivee eau - Wasserzulauf
C Allacciamento elettrico - Electric supply- Raccor.éléctrique - Stromversorsung
D Entrata Brill.- Entreé du Brillant - Rinside Deter. inlet tube-Nachspuleintrittr.
DATI TECNICI - TECHNICAL DATA - DONNÈE TECHNIQUES
TECHNISCHE DATEN - DATOS TECNICOS
Modello E F G H I K L
Model
C 43 -SP 35 430 510 644 280 260 825 160
C 48 -SP 40 480 540 660 280 260 870 185
C 53 -SP 45 530 600 745 280 333 930 210
C 60 -SP 50 600 605 800 320 352 985 245
C 6 - SP 5 600 605 800 320 352 985 245
CR 43 - SPR 36 430 492 590 230 260 757 160
C 35-SPB 35 430 510 569 235 260 783 160
Resistenza vasca
Tank heating element
Résistance cuve
Wannenheizwiderstand
Resistencia tina
Produzione cestelli/ora
Output in baskets/hour
Débit paniers/h
Produktion korbe/stunde
Producción canastos/hora
Potenza totale
Total power
Puissance totale
Gesamtleistung
Enlace total
Resistenza boiler
Boiler heating element
Résistance chauffe-eau
Boilerheizwiderstand
Resistencia hervidor
Pompa lavaggio
Wash pump
Pompe de lavage
Spülpumpe
Bomba de lavado
Allacciamento elettrico
Electrical connection
Raccordement électrique
Stromversorgung
Alimentacion electrica
35 - 43 - 36 30 220/240V ~ 50/60Hz 3200 W 3000 W 2000 W 220 W
48 - 40 30 230V ~ 50/60Hz 3200 W 3000 W 2000 W 220 W
53 - 45 30 400V3N~50/60Hz 4550 W 4000 W 2000 W 550 W
230V~50Hz 3000 W 2400 W 2000 W 550 W
230V~50Hz 4550 W 4000 W 2000 W 550 W
60 - 50 30 230V3~50Hz 4750 W 4000 W 2000 W 750 W
230V~50Hz 4750 W 4000 W 2000 W 750 W
400V3N~50Hz 4750 W 4000 W 2000 W 750 W
115V~60Hz 4750 W 4000 W 2000 W 750 W(60 Hz )
C 6 -SP 5 20 230V~50Hz 3550 W 3000 W 2000 W 550 W
Capacità vasca
Tank capacity
Capacité de la cuve
Wannenkapazität
Capacidad tina
Alimentazione idrica
Water supply
Alimentation en eau
Wasseranschluß
Alimentacíon idrica
Durata ciclo
Cycle length
Durée du cycle
Zyklusdauer
Duracíon del ciclo
Capacità boiler
Boiler capacity
Cap. du chauffe-eau
Boilerkapazität
Capacidad hervidor
Raccordo di scarico
Drain pipe fitting
Raccord de vidange
Abwasseranschluß
Enlace de descarga
35 - 43 - 36 8,5 l 3,8 l 200÷400 kPa Ø 3/4"G. 2 l 120 s Ø 28 mm
48 - 40 12 l 3,8 l 200÷400 kPa Ø 3/4"G. 2 l 120 s Ø 28 mm
53 - 45 16,5 l 7,5 l 200÷400 kPa Ø 3/4"G. 3,5 l 120 s Ø 31 mm
60 - 50 23,5 l 7,5 l 200÷400 kPa Ø 3/4"G. 3,5 l 120 s Ø 31 mm
C 6 - SP 5 23,5 l 7,5 l 200÷400 kPa Ø 3/4"G. 3,5 l 180 s Ø 31 mm

7
C 35-C 43-SPB 35-SP 35 350 x 350 mm 32 kg 38 kg
C 48 - SP 40 400 x 400 mm 39 kg 46 kg
C 53 - SP 45 450 x 450 mm 47 kg 58 kg
C 60 - SP 50 - C 6 - SP 5 500 x 500 mm 57 kg 70 kg
C 48 D - SP 40 D 400 x 400 mm 42 kg 49 kg
C 53 D - SP 45 D 450 x 450 mm 51 kg 61 kg
C 60 D - SP 50 D 500 x 500 mm 60 kg 73 kg
C 6 D - SP 5 D 500 x 500 mm 60 kg 73 kg
CR 43 - SPR 36 Ø 360 mm 32 kg 38 kg
CR 43 D - SPR 36 D Ø 360 mm 35 kg 41 kg
Peso macchina imballata
Weight of packed machine
Poids de la machine emballée
Gewicht der verpackten Maschine
Peso de la maquina embalada
Peso netto
Net weight
Poids net
Reingewicht
Peso netto
Dimensioni cestello
Basket dimensions
Dimensions du panier
Korbgröße
Dimensiones cubeta
35 - 43 - 36 5°÷40°C 20 ÷90 % 50°÷60°C80°÷90°C50°C < 70 dB (A)
48 - 40 5°÷40°C 20 ÷90 % 50°÷60°C80°÷90°C50°C < 70 dB (A)
53 - 45 5°÷40°C 20 ÷90 % 50°÷60°C80°÷90°C50°C < 70 dB (A)
60 - 50 5°÷40°C 20 ÷90 % 50°÷60°C80°÷90°C50°C < 70 dB (A)
C 6 - SP 5 5°÷40°C 20 ÷90 % 50°÷60°C80°÷90°C50°C < 70 dB (A)
Umidità relativa
Relative humidity
Humidité relative
Relative Feuchte
Humedad relativa
Temperatura di funzionamento e stoccaggio
Operating and storage temperature
Température de fonctionnement et stockage
Betriebs- und Lagertemperatur
Temperatura de funzionamento
Temperatura lavaggio
Wash temperature
Température de lavage
Spültemperatur
Temperatura de lavado
Temperatura risciacquo
Rinse temperature
Température de rinçage
Klarspültemperatur
Temperatura de aclarado
Temperatura massima entrata acqua
Water inlet max. temperature
Temperature max. entree eau.
Max. Temperatur-Wasserseingang
Temperatura màxima entrada agua
Livello pressione acustica
Noise level
Niveau de pression sonore
Schalldruckpegel
Nivel de presion acustica

8
Allacciamenti - Connections -
Raccordement- Anschlusse
A Entrata acqua - Water inlet - Arrivee eau - Wasserzulauf
BScarico vasche - Tanks drain - Vidange cuves - Tankablauf
C Allacc. elettrico - Electric supply- Raccor.éléctrique - Stromversorsung
Modello D E F G H I K L M N
Model
SP 50 - 440V~ 50 Hz 830 600 635 605 320 365÷380 983 245 552 518
SP 50 - 400V3~ 50 Hz 830 600 635 605 320 365÷380 983 245 552 518
F
A
D
15
÷
30
B
12.5
82
12.557
A
B
A
B
C
12.557
K
12.5
G
60
÷
75
E
H
L
82
4x
Ø 10
N
M
L
=
=
I
DIMENSIONI DI INGOMBRO - OVERALL DIMENSIONS - DIMENSIONS D'ENCOMBREMENT
PLATZBEDARFSMASSE - DIMENSIÓNES
Versione Nave
Marine Version
Version Naval
Schiffsversion
Version Naval

9
Cons. acqua x ciclo
Water cons. per c.le
Cons. d’eau par c.le
Wass. pro Zyklus
Con. agua por ciclo
C 60 - SP 50 23,5 l 7,5 l 200÷400 kPa Ø 3/4"G. 3,5 l 120 s Ø 31 mm
Capacità vasca
Tank capacity
Capacité de la cuve
Wannenkapazität
Capacidad tina
Alimentazione idrica
Water supply
Alimentation en eau
Wasseranschluß
Alimentacíon idrica
Durata ciclo
Cycle length
Durée du cycle
Zyklusdauer
Duracíon del ciclo
Capacità boiler
Boiler capacity
Cap. du chauffe-eau
Boilerkapazität
Capacidad hervidor
Raccordo di scarico
Drain pipe fitting
Raccord de vidange
Abwasseranschluß
Enlace de descarga
Allacciamento elettrico
Electrical connection
Raccordement électrique
Stromversorgung
Alimentacion electrica
Produzione cestelli/ora
Output in baskets/hour
Débit paniers/h
Produktion korbe/stunde
Producción canastos/hora
Potenza totale
Total power
Puissance totale
Gesamtleistung
Enlace total
Resistenza boiler
Boiler heating element
Résistance chauffe-eau
Boilerheizwiderstand
Resistencia hervidor
Resistenza vasca
Tank heating element
Résistance cuve
Wannenheizwiderstand
Resistencia tina
Pompa lavaggio
Wash pump
Pompe de lavage
Spülpumpe
Bomba de lavado
C 60 - SP 50 30 400V3~50Hz 6550 W 5800 W 2000 W 750 W
440V3~60 Hz 6550 W 5800 W 2000 W 750 W(60 Hz )
C 60 - SP 50 500 x 500 mm 57 kg 70 kg
C 60 D - SP 50 D 500 x 500 mm 60 kg 73 kg
Peso macchina imballata
Weight of packed machine
Poids de la machine emballée
Gewicht der verpackten Maschine
Peso de la maquina embalada
Peso netto
Net weight
Poids net
Reingewicht
Peso netto
Dimensioni cestello
Basket dimensions
Dimensions du panier
Korbgröße
Dimensiones cubeta
C 60 - SP 50 5°÷40°C 20 ÷90 % 50°÷60°C80°÷90°C50°C < 70 dB (A)
Umidità relativa
Relative humidity
Humidité relative
Relative Feuchte
Humedad relativa
Temperatura di funzionamento e stoccaggio
Operating and storage temperature
Température de fonctionnement et stockage
Betriebs- und Lagertemperatur
Temperatura de funzionamento
Temperatura lavaggio
Wash temperature
Température de lavage
Spültemperatur
Temperatura de lavado
Temperatura risciacquo
Rinse temperature
Température de rinçage
Klarspültemperatur
Temperatura de aclarado
Temperatura massima entrata acqua
Water inlet max. temperature
Temperature max. entree eau.
Max. Temperatur-Wasserseingang
Temperatura màxima entrada agua
Livello pressione acustica
Noise level
Niveau de pression sonore
Schalldruckpegel
Nivel de presion acustica
DATI TECNICI - TECHNICAL DATA - DONNÈE TECHNIQUES
TECHNISCHE DATEN - DATOS TECNICOS

10
DESCRIPTION OF THE CONTROLS
•Line button (1)
Whensettoposition“1”ON,thisbuttonenablesnormal
machine operation. Set to position “0” OFF, it disables
all machine functions.
•Regeneration button (2) (only for mod. CD-CRD-
SPD-SPRD)
Whenpressedwhilethemachineisoff,thisregenerates
the resins of the built-in decalcifier.
•Start button (3)
When pressed, this activates the normal washing
cycle. The light (5) goes out once the cycle has
terminated.
Draining condition (line off)
(on machines with drain pump only)
Press the button to manually drain the dishwasher.
•Tank level indicator (4)
Thiscomesonwhenthetankwaterreachesthepreset
level.
•Cycle indicator (5)
When on, this indicates that the cycle is in progress.
•Boiler temperature light (6)
Thiscomesonwhen theheatingelementfor the water
in the rinsing Boiler comes on and goes out once the
preset temperature has been reached.
• Cold rinse button (7) (only for C35 - SPB 35)
If pressed at the end of the washing, it allows the
cooling of the glasses.
ENG
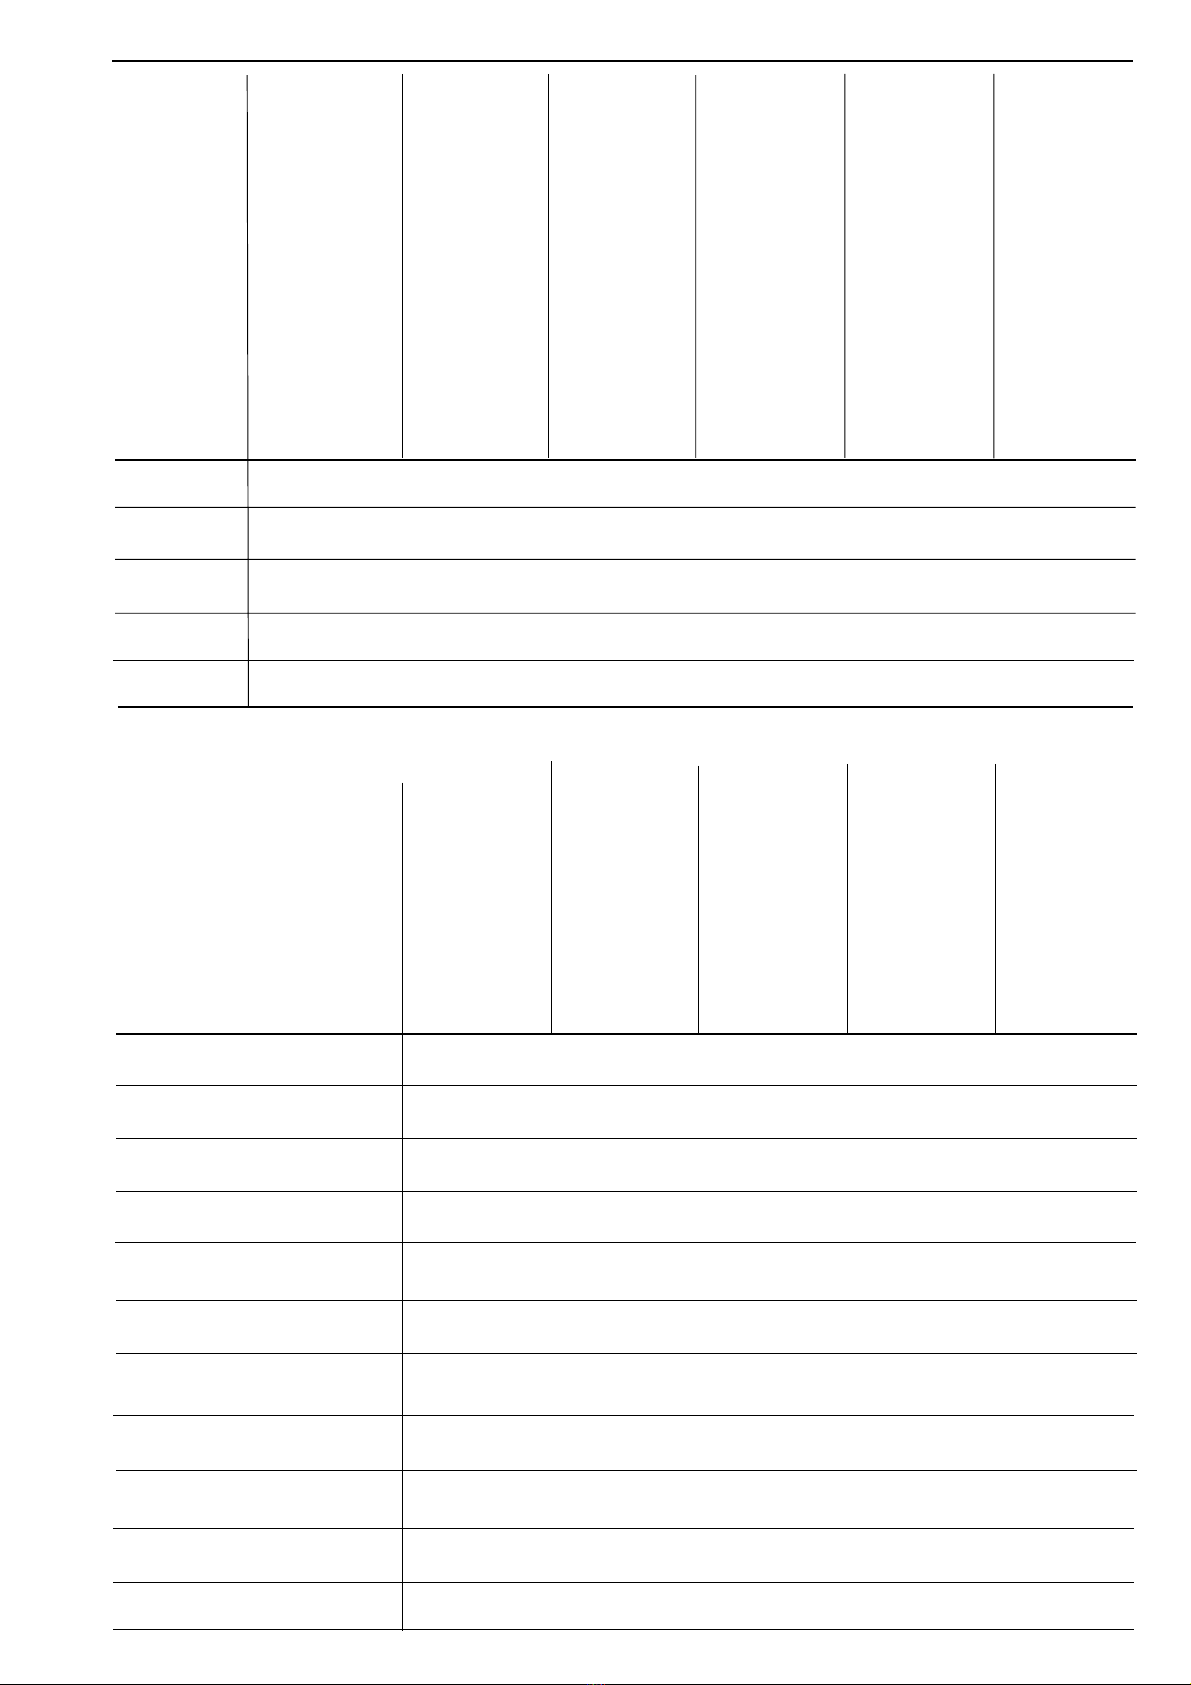
CRUSCOTTO COMANDI - CONTROL PANEL - PANNEAU DES COMMANDES
SCHALTBLENDE - PANEL DE MANDOS
LEGENDA
1) Pulsante di linea
2) Pulsante rigenera (Optional)
3) Pulsante di START
Pulsante Scarico (Optional)
4) Lampada livello vasca
5) Lampada ciclo
6) Lampada Boiler
7) Pulsante risciacquo a freddo
(Optional) solo per C 35-SPB 35
LEGEND
1) Line button
2) Regeneration button (Optional)
3) START button
Drain button (Optional)
4) Tank level indicator light
5) Cycle indicator
6) Boiler light
7) Cold rinse button (Optional) only
for C 35 - SPB 35
LEGENDE
1) Bouton de ligne
2) Bouton de régénération (In option)
3) Bouton de MARCHE
Buoton de Vidange (In option)
4) Lampe de niveau de la cuve
5) Lampe de cycle
6) Lampe du chauffe-eau
7) Bouton de rinçage a froid (In
option) seulement pour C 35 - SPB 35
ZEICHENERKLÄRUNG
1) Ein-/Austaste
2) Taste für regenerierung (extra)
3) Start - Taste
Ablauf - Taste (extra)
4) KontrolleuchtefürWasserstandimTank
5) Kontrolleuchte Zyklus
6) Kontrolleuchte Boiler
7) Taste für Klarspülen mit
Kaltwasser(Extra) nur bei C 35 - SPB 35.
START
0I
123456
LEYENDA
1) Tecla de línea
2) Botón regeneración (Opcional)
3) Tecla START
Tecla de Descarga (Opcional)
4) Lámpara nivel tanque
5) Lámpara ciclo
6) Lámpara calentador de agua
7) Botón enjuague frío (Opcional)
solo para C 35 - SPB 35.
C-CD-CR-CRD
SP-SPD-SPR
SPRD
START
0
I
17345
6
C 35
SPB 35

18
PARTICULAR RECOMMENDATIONS
FOR THE OPERATOR
-Do not operate the machine without having become fully
familiar with the contents of this manual and without having
acquired a comprehensive knowledge of the specific
techniques and machine controls.
-Checkthat thearea in whichthe machineis to beinstalled is
compatible with the dimensions of the machine itself before
installing this latter.
-Only use lifting and handling means that are suited to the
weightofthemachinewhenthismustbeinstalledorremoved
either completely or in part.
-Never allow unauthorized or unqualified personnel to start,
adjust, operate or repair the machine. Always refer to this
manual for the necessary operations.
-The mechanical parts and electrical/electronic components
situated inside the machine are protected by entirely closed
panels.
-Always ensure that the main switch has been set to the
“OFF”positionbeforecleaningand/orservicingthemachine.
This will disconnect the power source during the operator’s
intervention.
-The electrical powering system must be equipped with an
automatic release system prior to the main machine switch
and with a suitable grounding system that complies with all
the requisites established by industrial provisions for the
prevention of accidents.
-Always disconnect the power source if work must be carried
out on the main switch or in its vicinity.
-Allinspectionsandmaintenanceoperationsrequiringremoval
of the safety guards are carried out under the complete
responsibility of the users.
These operations should therefore only be carried out by
specialized and authorized technical personnel.
-Make sure that none of the accident preventing safety
devices(barriers,guards,casings,microswitches,etc.)have
been tampered with and that they are all perfectly functional
before operating. These devices should be repaired if this is
not the case.
-Never remove the safety devices.
-To prevent personal risks, only use power tools that are
correctlyconnectedtothegroundingtapandthat conform to
the national safety regulations.
-Neverevertamperwiththeelectricalsystemorwithanyother
mechanism.
-Never ever use the hands or unsuitable instruments to
locateleaks frompipes.Air, fluidsunderpressure orirritants
couldcauseseriousdamagetobothpersonsand/orproperty.
-Neverusethehandsinsteadofadequatetoolswhenoperating
the machine.
-Never use the hands or other objects to stop moving parts.
- PAY THE UTMOST ATTENTION TO THE DATA PLATES
AFFIXED TO THE MACHINE WHENEVER WORKING ON
THIS OR IN THEIR NEAR VICINITY.
-Theuser isobliged to keepall thedata plates andstickers in
a legible condition.
-Never climb on to the door or on to the top of the machine.
-It is essential for the user to replace all data plates and
stickersthatmayhavedeterioratedforanyreasonorthatare
not clearly visible, ordering new ones from the Spares
Service of HOONVED.
-Contact the person in charge of maintenance in the event of
malfunctionsordamagetothemachinecomponentswithout
proceeding with further repairs.
-It is absolutely forbidden for anyone to use the machine for
purposes other than those explicitly established and
documented.Themachinemustalwaysbeusedintheways,
times and places dictated by common sense and the laws in
force in each country, even when there are no specific
provisions to govern the sector in the particular country of
use.
- HOONVED declines all responsibility for accidents or
damage to either persons or property as may arise
followingfailuretocomplywitheithertherelativesafety
provisions or the instructions herein.
-These instructions, together with the provisions
governing machine installation and electrical
connections form an integral part of the Accident
Preventing Industrial regulations in force in each
individual country.
-THESESAFETYPROVISIONSINTEGRATEANDDONOT
SUBSTITUTE THE SAFETY PROVISIONS LOCALLY IN
FORCE.
-NEVER ever make hurried or inaccurate repairs that
could jeopardize the correct operation of the machine.
-ALWAYS ASK FOR HELP FROM SPECIALIZED
PERSONNEL IN CASE OF DOUBT.
-ANY TAMPERING BY THE USER RELIEVES THE
MANUFACTURER FROM ALL LIABILITY, THE USER
BEINGINTHISCASESOLELYRESPONSIBLETOWARDS
THE COMPETENT ACCIDENT PREVENTION
AUTHORITIES.
ENGLISH

19
1.1 GENERAL DESCRIPTION
Single-walled construction in 18/10 stainless steel with
fine satin finish.
All controls and electrical parts can be easily accessed.
The feet are adjustable in height and the rinsing agent
dispenser is built into the machine.
There is a built-in decalficier for CD-CRD-SPD-SPRD
models.Thewashingrodsandfilterscanbeeasilyremoved
for maintenance and routine cleaning.
All models are equipped with a safety microswitch on the
door.Theheating elementsaremade of rustproofincoloy
steel.
All models are supplied with an adequate number of
baskets.
Optimumloadingcapacitywith280mmopeningformodel
C 43 and up to 320 mm for model C 60.
1.2 TYPE OF USE AND IMPROPER USE
These machines have been designed and built to wash
crockery placed in special baskets and using detergent
and rinsing agent.
•Permitted crockery: glasses, teacups, coffee cups,
saucers, cutlery made of materials suitable for
dishwashersandofasizeabletofitintothebasketand
machine.
•Use of specific detergents and rinsing agents for
industrial purposes normally available in the shops is
permitted.
ATTENTION
Anyimproperuseofthemachinerelievesthemanufacturer
from all and every responsibility for accidents or damage
to persons and property, also voiding all conditions of
guarantee.
1.3 TRANSPORT, SHIPMENT AND
STORAGE (Fig. 2)
-The machine is normally shipped in a cardboard box
closed by straps.
-Whentransportingthepackedmachine,usealifttruck
ortranspallet,positioning the box ontherelative forks.
ATTENTION
The machine must be sheltered from the weather when
shipped and stored.
1.4 INSPECTIONS ON ARRIVAL
When the machine arrives, check that the packaging is in
a perfect condition and that there is no visible damage.
If everything is in order, remove the packaging (unless
other instructions have been received from the
manufacturer) and check that the machine is free from
damage caused by transport.
Now check whether there has been any damage to the
structure, crushing or breakages.
If damage or imperfections are discovered:
1 - Immediately notify the haulage contractor both by
phone and in writing by registered letter with return
receipt attached;
2 - Informthemanufacturerbyregisteredletter(withreturn
receipt attached).
IMPORTANT
Notificationofdamageorfaultsmustbeimmediate,inany
casewithin 3daysfromthedateonwhichthemachineis
received.
1.5 UNPACKING (Figs 2-3-4)
Proceed in the following way in order to remove the
packing:
1. Cut the straps (7) that hold the cardboard in place.
2. Remove the box (8) by lifting it upwards.
3. Remove the protective film from the machine.
4. Removethemachinefromthebasebyliftingitfromthe
lower part of the casing (Fig. 4).
5. Allpackingmustbecollectedandnotleftwithinchildren’s
reach since it could become a source of danger. The
packing can be disposed of in the same way as solid
urban waste.
ATTENTION
Once the machine has been unpacked, NEVER ever use
the box containing the electrical components for lifting
purposes.
Lift the machine by raising it from the lower part of the
casing. Set it on the forks of a truck when transporting.
1.6 MACHINE IDENTIFICATION (Fig. 5)
-The serial number and machine data are stamped on
thedataplate(9)affixedtotherearpartofthemachine
itself.
IMPORTANT
Alwaysstatethemodeland serial number of the machine
when requesting technical assistance or ordering spare
parts.
1.7 DESCRIPTION OF THE SAFETY
DEVICES
•ModelsC-CR-CD-CRD-SP-SPD-SPB-SPR-SPRD are
equipped with a safety microswitch that blocks the
washing pump if the tub access door is accidentally
opened.
•The electrical parts are enclosed by panels locked by
screws.
•The machine is fitted with an equipotential ground
conductor.
•Safety overflow to prevent water from spilling.
1.8 REFERENCE STANDARD
•The machine and its safety devices has been built in
compliance with the following standards:
•EssentialsafetyrequisitesestablishedbyDirective73/
23 EEC Annex 1 modified by Directive 93/68 EEC,
directive 89/336 EEC.
ENGLISH

20
3.1 DETERGENT DISPENSER (Optional)
(Fig. 8)
The machine is equipped with an automatic detergent
dispenser.
•Insert the red supply tube (16) into the canister (17).
ATTENTION
Always wash the hands under running water if they come
into contact with detergent, or comply with the specific
indications pertaining to the utilized type of detergent
itself.
•Proceed with a few no-load cycles until the intake and
delivery tubes have filled.
To adjust the dispenser, refer to the relative enclosed
manual and to the utilized type of detergent.
3.2 FILLING THE RINSING AGENT
DISPENSER (Fig. 8)
•Insert the transparent tube (18) into the canister (19)
containing rinsing agent.
•Start the machine as described in paragraph 3.3. The
dispenser will suck about 3 cm of liquid from the
canister.
•Fill during the cycle by opening (slightly) and closing
the door until the tube has completely filled.
3.2.a Adjusting the dose (Fig. 8)
•Start the machine as described in paragraph 3.3 and
hold a glass up to the light at the end of the cycle.
•Thedropsofwaterontheglasswillindicateinsufficient
dosage while streaks will indicate that dosage is
excessive either in relation to density or quantity.
•Regulate by means of the plug (20), turning clockwise
todecreasethequantityoranticlockwisetoincreaseit.
IMPORTANT
These data are indicative and not binding since they may
vary according to the hardness of the water or the utilized
type of detergent and rinsing agent.
ATTENTION
If the utilized product (detergent or rinsing agent) is
changed,itisadvisabletoflushoutthedosingsystemwith
water and to then proceed by filling the dispensers.
3.3 PREPARING THE MACHINE AND THE
WASHING OPERATIONS
3.3.a Preparing the machine (Fig. 9)
1. Turn on the main power switch prior to the machine.
2. Turn on the cold water cock.
3. Make sure that the canisters of detergent (Optional)
and rinsing agent contain sufficient product for daily
needs.
Part 3:
For the operator
ENGLISH

21
4. Press the button (1) to automatically begin filling the
washingtank.Light(4)will comeononcethelevel has
been reached. The water inside the boiler (see light 6)
and the water in the washing tank will automatically
start heating.
5. Open the door and pour the quantity of detergent
indicatedbythemanufacturerdirectlyintothetub.This
operationneed notbecarriedoutwhenthemachineis
equipped with the optional dispenser.
6. After warning light (6) has gone out, wait about 20
minutes to allow the water in the washing tub to reach
the programmed operating temperature.
3.3.b Washing operation (Figs 9-10)
1. Loadthedirtycrockeryintothebasketaccordingtothe
configuration of the machine.
2. Openthedoor and fitthebasket into thetub,thenshut
the door again.
3. Press “START” button (3). Light (5) will come on to
indicate that the cycle has started.
4. Light (5) will go out to indicate that the cycle has
terminated.Nowopenthedoorandremovethebasket.
5. Add a spoonful of detergent after every 5/6 washes.
This operation need not be carried out if the machine
is equipped with the optional dispenser.
The doses are indicative and not binding since they
varyaccordingtothehardnessofthewaterandutilized
type of detergent.
Cold rinse - Optional - (only for C 35 -SPB 35 Mod.)
Thecooltheglasses,attheendofthecycle,pressforafew
seconds the cold rinse button (7) Fig. 1/9.
IMPORTANT
Thehotwatersupply(50°÷60°C)doesnotallowamanual
cold rinse to be obtained.
IMPORTANT
Keep the tub door closed between one cycle and the next
to prevent the water in the tub from cooling.
ATTENTION
Dooropeningduringthecyclewillblockmachineoperation
in the same way as an EMERGENCY device.
To interrupt the cycle, open the tub door in the following
way:
•Slightly open the tub door. Wait a few seconds for the
water pressure in the rods to drop, then completely
open the door.
•This operation is very important since it prevents the
operator from being wetted or scalded as during the
rinsing phase, the water reaches a temperature of
90°C.
•Close the door and the cycle will continue from where
it was interrupted.
3.3.c Changing the water (Fig. 10)
Thisoperationmustbecarriedoutafterevery10cyclesor
so, depending on the amount of accumulated dirt.
1. Switchoffthemachineasindicatedinparagraph3.3.d,
thenlifttheoverflow(21)andallowthetubtocompletely
drain.
2. Fit the overflow (21) back into its housing and repeat
the machine preparation operations as indicated in
paragraph 3.3.a.
3.3.d Daily regenerating operations (for mod. CD-
CRD-SPD-SPRD only)(Fig. 10)
The regenerating operations must be carried out once
work has terminated.
1. Removetheoverflow(21)andresetthelinebutton(1).
2. Keepbutton(2)depressedforafewseconds.Warning
light (5) will come on to indicate the beginning of the
regenerating cycle, which lasts about 20 minutes.
ATTENTION
Remember to keep the door closed during the
regenerating phase.
3.3.e Manual drain (Fig. 1)
(on machine with drain pump only)
To manually empty the water from the tub, switch off the
line button (1) Fig. 1 and push the START/DRAIN button
(3).
3.3.f Switch-off (Fig. 9)
Attheendoftheworkday,setthelineswitch(1)toposition
“0” OFF, disconnect the main switch installed prior to the
machine and turn off the water delivery cock.
ATTENTION
Disconnect the main circuit-breaker prior to the machine
and turn off the water delivery cocks if the dishwasher is
faulty or operates badly.
Onlyallowtechniciansfromthemanufacturer’sauthorized
after-sales service center to make repairs.
4. CLEANING (Fig. 10)
4.1 General information
Strictcompliancewiththemaintenanceinstructionsinthis
sectionwillkeepyourmachineinagoodworkingcondition
and will notably reduce the need for repairs.
ATTENTION
Ifanymachinecomponentbecomesfaulty,FIRSTCHECK
that all the instructions given in the previous paragraphs
have been complied with during use.
Repairs must be carried out immediately, as soon as the
fault occurs. This will prevent the trouble from becoming
worse and damaging other parts.
ENGLISH

22
ENGLISH
4.2 Daily cleaning (Fig. 10)
ATTENTION
Daily operations to carry out when work has ended, with
the machine off, the main circuit-breaker disconnected,
the water cocks off and the washing tub empty.
1. Thoroughly clean the inside parts of the machine.
2. Remove the filter (22) from the bottom of the machine
by releasing the overflow (21).
3. Remove the suction protection (23) (only for model C
43-48-53/SP 35-40-45).
4. Wash the filters under running water and fit them
correctly back in their housings.
ATTENTION
The filter (36) extraction and cleaning
can be also done with full tank .
ATTENTION
Frequently check and clean the spraying units, removing
them from their housings and eliminating any dirt and
fouling. The frequency with which this operation must be
carried out depends on the quantity of dirt or on the
unsatisfactory washing results. Never use corrosive
productslikesodiumhypochlorite(bleach)orhydrochloric
acid, wire wool or steel brushes to clean either the inside
or outside parts of the machine.
5. PREVENTION MAINTENANCE (Fig. 10)
ATTENTION
The preventive maintenance operations must be carried
out with the machine off, the main circuit-breaker
disconnected,thewaterdeliverycocksoffandthewashing
tub empty.
5.1 Checking and cleaning the spray arms and
nozzles (Fig. 10)
Periodically check to make sure that the lower washing
arm(24)andrinsingarm(25)andtheirrelativenozzlesare
not clogged.
Cleaning the lower unit (for models 35-43-48 C-CD
SPB 35 - 35-40 - SP- SPD):
1. Unscrew the ring nut (26) and lift the arm (24).
2. Wash the washing and rinsing rods.
If the nozzles (27) are clogged, unscrew them to
demountandclean,takingcaretopreventtheshapeof
the nozzle from being deformed. After cleaning, fit the
nozzles exactly back in their original positions.
3. Remount all parts by complying with the above
instructions in reverse.
Cleaning the lower unit (for models 53-60 C-CD
45-50 SP-SPD):
1. Unscrew the central pin (28) removing rod (25) and
unscrew the ring nut (29) and rod (24).
2. Wash the washing and rinsing rods.
If there are clogged nozzles (30), demount them (only
therinsingrods)andcleanthemwithasteelrod,taking
care to prevent the nozzles themselves from being
deformed. Now fit them back in place in exactly their
original positions.
3. Remount all parts, proceeding in reverse.
Cleaning the lower unit (for models 43-48 CR-CRD
36-41 SPR SPRD-C 6-SP 5-C 6 D-SP 5 D):
1. Unscrew the plug (31) and then remove the water
baffle plate (32) and clean it.
2. Clean the washing (33) and rinsing nozzles (34).
3. Fit all parts back in place proceeding in reverse. Take
particular care to fit the water baffle plate back in the
correct direction (32).
5.2 Weekly regenerating operations
(for mod. CD-CRD-SP-SPD-C 6 D-SP 5 D only) (Fig.
10)
1. Switch off the machine and proceed with daily
maintenance as indicated in the relative section.
2. Unscrew the plug (35) from the salt reservoir and pour
in 1 Kg of coarse kitchen salt.
3. Fully retighten the plug (35) to make sure that the
reservoir is hermetically sealed.
6. TEMPORARY INACTIVITY
If the machine is to remain inactive for a certain period of
time, disconnect the electrical power source and turn off
the water delivery cocks. Leave the tub door open.
•Drain off the water from the boiler by placing a vessel
under it and unscrewing the relative drain screw.
Waituntiltheboilerhasemptied,thenfitthescrewback
in place.
7. DEMOLITION
Whenthemachinemustbescrapped,firstdrainthewater
from the tub and boiler as indicated in the previous points
anddisconnectthemachinefrom thewaterandelectricity
mains. Now dispose of the components as prescribed by
the current laws in force.
The instructions, drawings, tables and everything
else in this manual are of a confidential technical
nature. For this reason, none of the information may
beeithercompletelyorpartiallyduplicatedordisclosed
to third parties without prior written authorization
from HOONVEDs.r.l. whichis thesole proprietorand
whichreservestherighttomakeanymodificationsas
may be considered necessary without advance
warning.

23
TROUBLESHOOTING
PROBLEMS CAUSES SOLUTIONS
The machine fails to
come on.
The machine does not fill
with water
Insufficient washing
Insufficient rinsing.
Main switch disconnected.
Water cock shut.
Fill pipe filter dirty.
Rinsing nozzles clogged.
Overflow pipe incorrectly inserted.
Washing filter dirty.
Washing nozzles clogged.
Washing rod clogged.
Insufficient or no detergent.
Machine temperature not reached.
Water baffle plate incorrectly inserted.
Washing conditions insufficient.
Rinsing nozzles clogged.
Boiler clogged with scaling.
Low mains pressure (less than 200 kPa).
Temperature insufficient.
Incorrectly positioned nozzles or
nozzles deformed.
Turn on the switch.
Turn on the cock.
Detach the fill pipe (12 Fig. 6) and clean the filter (13).
Unscrewandcleanthenozzles(30-34Fig.10)underrunning
water.
Make sure that the overflow pipe (21 Fig. 10) has been
correctly inserted.
Clean the filter (22 Fig. 10).
Demount and clean the washing nozzles under running
water.
Demount and clean the rod (24 Fig. 10).
Top up the detergent in the canister and check its
concentration.
Wait until the tank water has reached the right temperature
(50°C).
Unscrew the plug (31 Fig. 10) and make sure that the baffle
plate (34) has been inserted in the right direction.
Make sure that the washing phase takes place correctly.
Unscrew the nozzles (30-34 Fig. 10) and clean them under
running water.
Contact the after-sales service.
Waituntilthepressurereturnsorpurchaseapressurepump.
Contact the after-sales service.
Make sure that the nozzles are in their correct positions.
Replace any damaged ones.
ENGLISH

Fig. 5
Fig. 6 Fig. 7
11
10
12
16
15
R
HOONVED s.r.l.
Via U.Foscolo, 21040Venegono Sup.re (VA-ITALIA)
Matr.
Max.
M
IP
9
13 12 14

a53
27 26
27
23
24
Fig. 10
25
24
CR-CRD 43
SPR-SPRD 36
21
22
35
35
25
35
30
22
23 25
21
C-CD 60
SP-SPD 50
28
29
C-CD 43-48-53
SP-SPD 35-40-45
21
C-CD 35-43-48
SP-SPD 35-40
SPB 35
21
C 35
SPB 35
C-CD 53- 60
SP-SPD 45-50
35
30 22
START
0
I
START
0I
1
2
3
4
5
6
C-CD-CR-CRD
SP-SPD-SPR-SPRD
C 35
SPB 35
1
7
3
4
5
6
Fig. 9
22
24
32
C 6 - SP 5
C 6 D - SP 5 D
21 22
32
31
31
33
33
34
34

HOONVED S.r.l.
Via U. Foscolo, 1 - 21040 - Venegono Sup.re (VA) - ITALY
Tel. 0331/856111 - Fax. 0331/865223 - www.hoonved.com
33967
This manual suits for next models
34
Table of contents
Other Hoonved Dishwasher manuals

Hoonved
Hoonved 53 BT Instruction Manual

Hoonved
Hoonved CAP 10 E Specification sheet

Hoonved
Hoonved ST 43 E Instruction Manual

Hoonved
Hoonved C81 Instruction Manual

Hoonved
Hoonved C 81 E Instruction Manual

Hoonved
Hoonved AP43E Series Operating and installation instructions

Hoonved
Hoonved AP 43 E Instruction Manual

Hoonved
Hoonved APS 43 Instruction Manual

Hoonved
Hoonved ED 650 E User manual

Hoonved
Hoonved C 43 E Instruction Manual