manuals.online logo
Brands
  1. Home
  2. •
  3. Brands
  4. •
  5. Horizont Agrar
  6. •
  7. Power Supply
  8. •
  9. Horizont Agrar farmer A1000 User manual

Horizont Agrar farmer A1000 User manual

85183C - 02/11
LEBEN MIT DEM TIER
horizont group gmbh
Division agrartechnik
Postfach 13 29
34483 Korbach
Homberger Weg 4-6
34497 Korbach
GERMANY
Telefon: +49 (0) 56 31 / 5 65-1 00
Telefax: +49 (0) 56 31 / 5 65-1 20
[email protected]
www.horizont.com
BETRIEBSANWEISUNG
Elektrozaungerät
de
OPERATING INSTRUCTION
Electric Fencer
en
MODE D‘EMPLOI
Électrificateur de Clôture
fr
MANUAL DE INSTRUÇÕES
Cerca Eléctrica
pt
Istruzioni d’uso
Recinto Elettrico
it
farmer A1000
Type 10721
12V DC
2
3
98735
94581
91816
83761
90463
60147
83237
60266
60220
90150
90676U
91812
60491
93100
93099
60151
97543
90764
94581
91818
93225
93046
81716
98736 / 81739
90764
83761
90463
60147
60151
97543
60220
93099
93100
60266
81045 98676
noir rouge
black red
schwarz rot
83237
84719 84718 90443
98676
rot
rouge
red
81045
schwarz
noir
black
80054
60266
Akku 12V / 26Ah
Art.-Nr. 12025
4
5
Betriebsanweisung für Elektrozaungeräte ranger "farmer A1000"
in Verbindung mit den Errichtungs- und Sicherheitshinweisen für Elektrozaungeräte
SECURA ANIMAL oder SECURA SECURITY ( www.horizont.com)
Aufstellung und Anschluss: Das Gerät wird an einer möglichst feuchten Stelle am Zaun auf den
Boden gestellt und einen 1m langen Erdungspfahl (Art.-Nr. 14041) neben dem Gerät möglichst tief in
den Boden getrieben. Eine gute Erdung (Fig.1) ist äußerst wichtig für den einwandfreien Betrieb und
die optimale Leistung des Gerätes, siehe auch SECURA. Erd- und Zaunkabel werden gemäß der
Skizze angeschlossen.
Das Gerät kann 12V-Akkus bis zu einer Größe von 250mm x 192mm x 225mm aufnehmen. Größere
12V-Akkus müssen (geschützt, gesichert und belüftet) außerhalb des Gerätes aufgestellt werden.
Inbetriebnahme und Kontrolle (Fig.2): Schalter
0
1in Stellung > 1 < drücken, nach einigen Sekunden
hört man ein gleichmäßiges Ticken und das Gerät gibt Spannung an den Zaun ab. Die Funktionskon-
trollampe leuchtet im Rhythmus der elektrischen Impulse auf. Den Regler in die gewünschte Position
bringen (Fig. 2a).
Vorschriften: Das Gerät entspricht den Sicherheitsvorschriften.
Akkuwechsel (Einbau): Gerät gemäß Skizze (Fig.3) öffnen und Akkuwechsel vornehmen.
Solarversorgung (Fig. 4): Auf Wunsch kann ein Solarpanel geliefert werden, das auf das Gerät mon-
tiert und mit diesem zusammen nach Süden ausgerichtet wird. (Fig. 4)
Ein Solarpanel 12V / 5W muss immer an einen Akku 12V mit min. 25Ah angeschlossen werden (alter-
nativ bei 10W mit min. 35Ah und 15W mit min. 45Ah und 20W mit min. 60Ah)
Service: Reparaturen dürfen nur von qualifizierten Personen durchgeführt werden.
Es sind nur die vom Hersteller vorgeschriebenen Ersatzbauteile zu verwenden.
TECHNISCHE ÄNDERUNGEN VORBEHALTEN !
Fig. 2
Fig. 4
Solarversorgung
Solar operation
Solarisation
Operação solar
Alimentazione solare
die angegebenen Werte sind
von der Zaunlast abhängig
The values depend on the fence load
Les valeurs dépendre de l‘état de la clôture
Os valores dependem da carga do cercado
I valori riportati dipendono
dal carico del recinto.
Fig. 3
de
en
Erdanschluss
ground terminal
cable de raccordement terre
terminal de terra
Attacco per messa a terra
Zaunanschluss
fence terminal
cable de raccordement ligne
terminal do cercado
Attacco recinto
Fig. 2a
Regler
regulator
le régulateur
Regulador
Regolatore
Schalter
switch
l‘interrupteur
Interruptor
Interruttore
0
1
14041
Fig.1
max. 9200
V
max. 6500
V
max. 7500
V
max. 4000
V
max. 5000
V
Operating instruction for electric fence controllers "farmer A1000"
in connection with SECURA ANIMAL or SECURA SECURITY safety hints (www.horizont.com)
Installation and connection: Install the unit in a rather moisty place of the fence on the ground.
Drive one earth stake (1 metre), ref. 14041, as much as possible into the ground. A good grounding
(fig.1) is very important for the trouble free operation and the ideal performance of the fencer, see also
SECURA. Earth and line cables are connected according to the illustration.
The energizer housing can take 12V-batteries with following dimensions: max. 250mm x 192mm x
225mm.
Operation and control: (fig.2) Press switch
0
1in position >1<. After a few seconds you will hear a
regular tic tac. The energizer is supplying voltage onto the fence. The control lamp flashes with the
pulses. Press the regulator into desired position (Fig. 2a).
Requirements: The energizer corresponds to the safety standards.
Change of battery: Open the unit according to (fig.3) and change or insert battery.
Solar operation: (Fig. 4), On request a solar panel is available that can be mounted on top of the en-
ergizer and be directed with this one towards the south.
A solarpanel 12V / 5W must be always connected to a 12V-battery with minimum 25Ah (alternativly
10W with minimum 35Ah und 15W with minimum 45Ah and 20W with minimum 60Ah).
Service: Servicing is only to be made by qualified service personell.
Only by the manufacturer commanded replacement parts must be used.
TECHNICAL CHANGES RESERVED !
6
7
Instructions de mise en route de l’électrificateurs "farmer A1000"
en relation avec les conseils de sécurité SECURA ANIMAL ou SECURA SECURITY
(www.horizont.com)
Installation et branchement: Connecter le piquet de terre avec le fil de terre. Enfoncer profondément le
piquet de terre (1m), ref. 14041, dans un endroit humide, à proximité de l’électrificateur. Une bonne prise de
terre (Fig.1) est une condition préalable et nécessaire pour l’installation dans de bonnes conditions. Se con-
former ici à SECURA.
Les câbles de terre et de ligne doivent être raccordés suivant l’illustration. La boite de l’électrificateur peut
contenir les accus suivants: 12V, dimensions max. pour l’accu 250 x 192 x 225 mm.
Mise en route et contrôle: Appuyer sur l’interrupteur
0
1en le positionnant sur >1<. Après quelques se-
condes, on entend un léger tic-tac. L’électrificateur donne du voltage à la ligne. La lampe témoin de la clôture
clignote à la cadence des impulsions électriques.
Mettre le régulateur dans la position désirée la puissance (Fig. 2a).
Standards: l’électrificateur correspond au normes de sécurité.
Changement du type d´alimentation (accumulateur): Ouvrir l’électrificateur selon Fig. 3 et opérér le chan-
gement. Les câbles de connexion nécessaires sont fournis.
Solarisation: Sur demande, un panneau solaire peut être fourni. Une fois monté, il doit être orienté vers le sud
(Fig. 4). Un panneau solaire 12V / 5W est connecter de l‘accumulateur 12V avec 25Ah minimum (alternative
10W avec 35Ah ou 15W avec 45Ah et 20W avec 60Ah)
Service: Les réparations ne doivent être faites que par des personnes qualifiées.
Utiliser uniquement les pièces détachées et composants du fabricant.
SOUS RÉSERVE DE MODIFICATIONS TECHNIQUES !
Manual de instruções da cercas eléctrica "farmer A1000"
em ligação com os conselhos de segurança SECURA ANIMAL ou SECURA SECURITY
(www.horizont.com)
Instalação e ligação: instale o aparelho num local húmido junto ao cercado.Recomenda-se a utilização de
1 estacas de terra de 1 metro (Ref.: 14041). Uma boa terra (fig. 1) é muito importante para um bom desem-
penho do cercado. A terra e os cabos de ligação devem ser ligados conforme a ilustração. O compartimento
para a bateria pode armazenar uma bateria de 12V com as seguintes dimensões: máximo 250mm x 192mm
x 225mm.
Operação e controlo (fig. 2): Pressione o interruptor
0
1na posição >1<. Após alguns segundos ouvirá um
tic-tac regular. O aparelho está a fornecer voltagem ao cercado. A lâmpada de controlo pisca na sequência
dos impulsos. Coloque o regulador de potência na posição desejada (Fig. 2a).
Requisitos: Esta unidade foi concebida em conformidade com os standards respectivos.
Mudança da bateria: abra o aparelho conforme ilustrado na fig. 3, e mude – ou coloque – a bateria.
Operação solar: Como opção está disponível um módulo solar que pode ser fixado no topo do aparelho
(fig. 4). O módulo solar de 12V / 5W deve ser sempre ligado a uma bateria húmida de 12V com um mínimo
de 25Ah (em alternativa o módulo solar de 10W a uma bateria húmida de 12V com um mínimo de 35AH, e o
módulo solar de 15W a uma bateria húmida de 12V com um mínimo de 45Ah e o módulo solar de 20W a uma
bateria húmida de 12V com um mínimo de 60Ah)
Serviço: Os serviços de reparo devem ser realizados por pessoas certificadas.
Devem-se utilizar apenas peças de reposição do fabricante.
RESERVAMO-NOS O DIREITO DE FAZER ALTERAÇÕES TÉCNICAS !
fr pt
Istruzioni per l’uso per la centralina da recinto elettrico "farmer A1000"
Rispondente alle norme costruttive e di sicurezza per gli apparecchi elettrificatori di recinzioni
SECURA ANIMAL o SECURA SECURITY (www.horizont.com)
Montaggio e collegamento: L’apparecchio viene posizionato per terra in un punto possibilmente umido del
recinto ed accanto all’apparecchio conficcato in profondità un palo per la messa a terra (N. art. 14041) lungo
1m. Una buona messa a terra (Fig. 1) è estremamente importante per il funzionamento a regola d’arte e la
potenza ottimale dell’apparecchio, vedere anche SECURA. Il cavo per la messa a terra e del recinto devono
essere collegati come illustrato nello schema. L’apparecchio può essere alimentato con delle batterie da 12 V
fino ad una grandezza di 250mm x 192mm x 225mm. Le batterie da 12 V più grandi devono essere posizio-
nate all’esterno dell’apparecchio (protette, bloccate ed aerate).
Messa in funzione e controllo: (Fig.2) Premere l’interruttore
0
1in posizione >1<, dopo qualche secondo si
sente un ticchettio regolare e l’apparecchio alimenta il recinto con della tensione. La lampada spia s´accende
al ritmo degli impulsi elettrici. Spostare il regolatore nella posizione desiderata (Fig. 2a)
Normative: L’apparecchio corrisponde alle norme di sicurezza pertinenti.
Sostituzione batterie (Montaggio): Aprire l’apparecchio come da schema (Fig. 3) e sostituire le batterie.
Alimentazione solare (Fig. 4): A richiesta è possibile richiedere un pannello solare. Il pannello viene montato
sull’apparecchio ed orientato insieme a questo verso sud.
Il pannello solare 12V/5W deve essere sempre su una batteria 12V collegato con almeno 25Ah (in alternativa
a 10W con almeno 35Ah e 15W con almeno 45Ah e 20W con almeno 60Ah)
Assistenza: Gli interventi di riparazione possono essere eseguiti solo da personale qualificato. De-
vono essere impiegati solo pezzi di ricambio prescritti dalla casa costruttrice.
MODIFICHE TECNICHE RISERVATE !
it
Gewicht (ohne Akku) - weigh (without accu) - poids (sans accu) - peso (s/bateria) ~ 3,6 kg
Technische Daten
technical data - données techniques - datos tecnicos - data tecnici
farmer A1000, Type 10721 / 12V DC
CEE:
max. Zaunlänge
max. fence line length
longueur électrifée
máximo comprimento do cercado
lunghezza massima recinzione
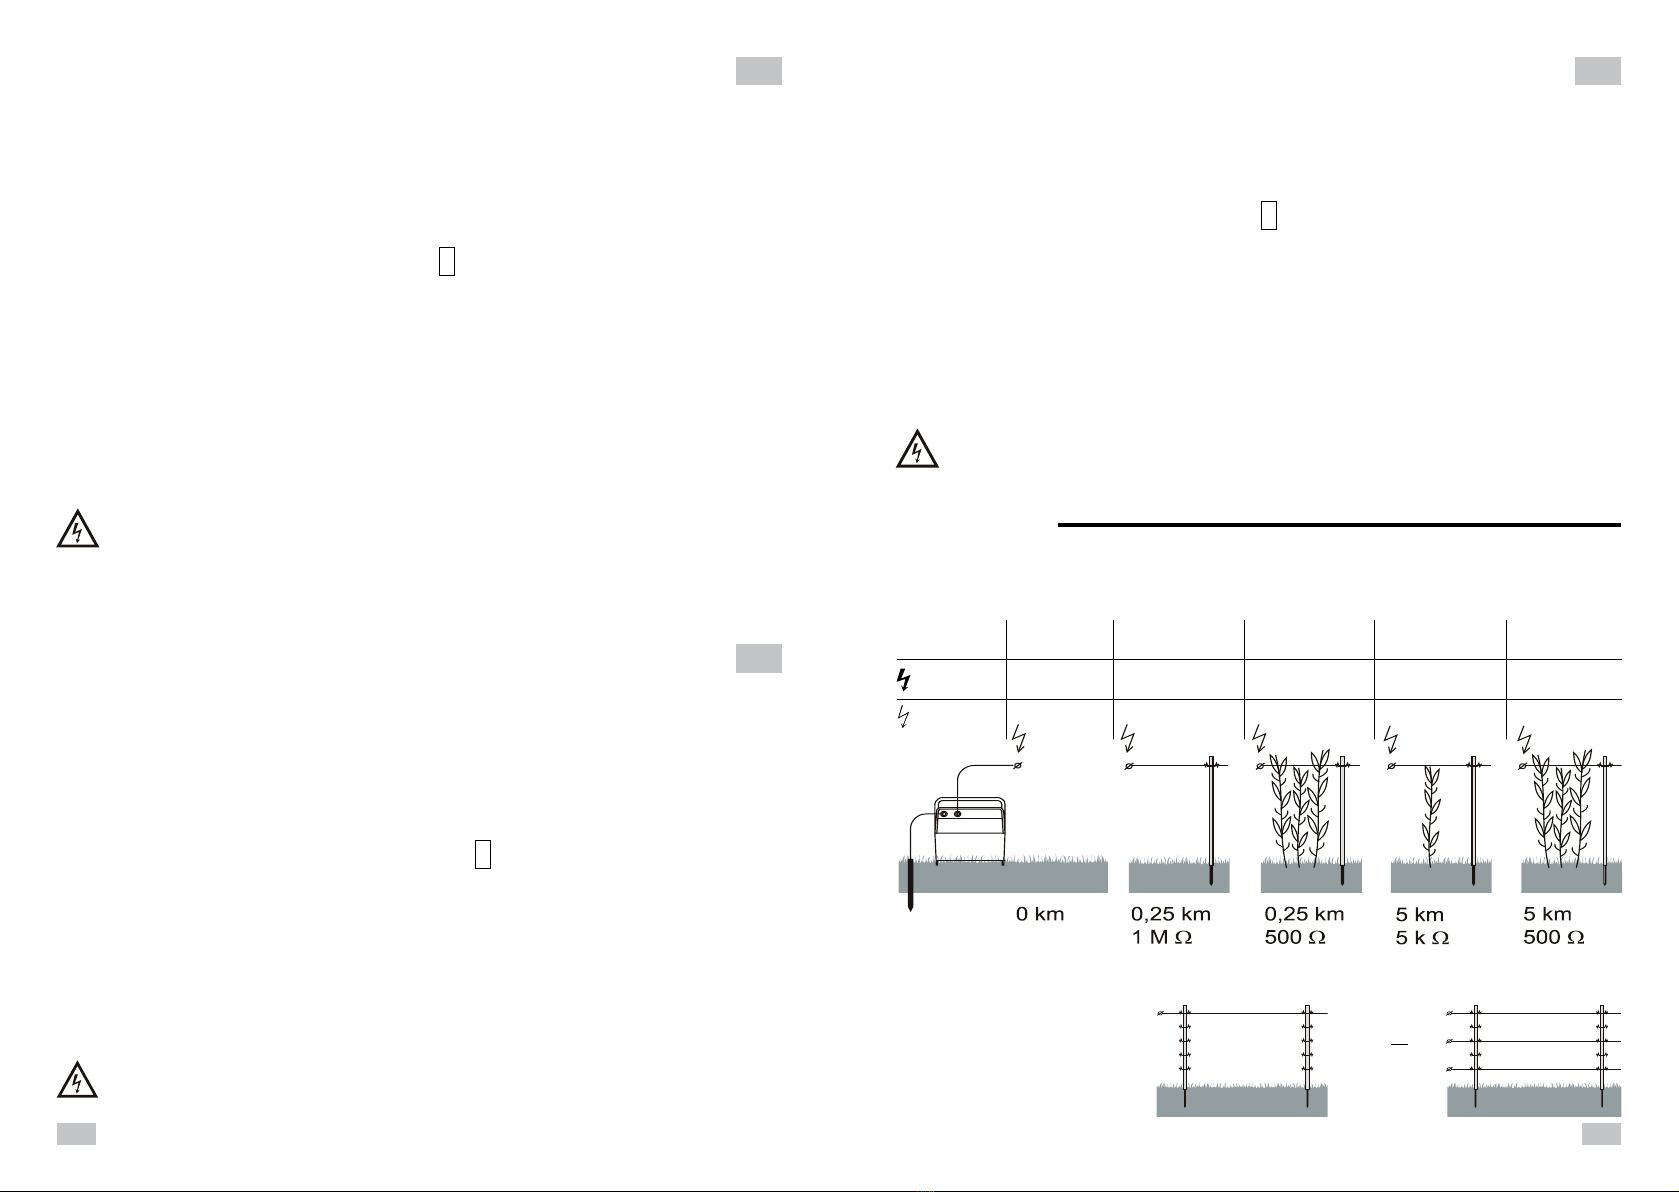
max. 30 km max. 30 km
3
0 km 0,25 km
1 M Ω 0,25 km
500 Ω 5 km
5 k Ω 5 km
500 Ω
1,0 J
~ 120 mA max. 9200 V ~ 9500 V ~ 3000 V ~ 6500 V ~ 2800 V
0,2 J
~ 30 mA max. 4000 V ~ 4100 V ~ 1500 V ~ 3200 V ~ 1500 V
8

Other Horizont Agrar Power Supply manuals

Horizont Agrar turbostar B User manual

Horizont Agrar

Horizont Agrar turbostar B User manual

Horizont Agrar ranger B User manual

Horizont Agrar

Horizont Agrar ranger B User manual

Horizont Agrar intelliSTOP N15 User manual

Horizont Agrar

Horizont Agrar intelliSTOP N15 User manual

Horizont Agrar farmer A1000 solar User manual

Horizont Agrar

Horizont Agrar farmer A1000 solar User manual

Horizont Agrar farmer N15 User manual

Horizont Agrar

Horizont Agrar farmer N15 User manual

Horizont Agrar ranger B4 User manual

Horizont Agrar

Horizont Agrar ranger B4 User manual

Horizont Agrar EQUISTOP B2 User manual

Horizont Agrar

Horizont Agrar EQUISTOP B2 User manual

Horizont Agrar EQUISTOP B2 User manual

Horizont Agrar

Horizont Agrar EQUISTOP B2 User manual

Horizont Agrar hotSHOCK A15 User manual

Horizont Agrar

Horizont Agrar hotSHOCK A15 User manual

Horizont Agrar ranger solar AS30 User manual

Horizont Agrar

Horizont Agrar ranger solar AS30 User manual

Horizont Agrar EQUISTOP A2 User manual

Horizont Agrar

Horizont Agrar EQUISTOP A2 User manual

Horizont Agrar hobbygard N 104271 User manual

Horizont Agrar

Horizont Agrar hobbygard N 104271 User manual

Horizont Agrar FARMER N25 User manual

Horizont Agrar

Horizont Agrar FARMER N25 User manual

Popular Power Supply manuals by other brands

elsner elektronik KNX PS640+ Technical specifications and installation instructions

elsner elektronik

elsner elektronik KNX PS640+ Technical specifications and installation instructions

SilverStone ST50NF user manual

SilverStone

SilverStone ST50NF user manual

NewMar Phase Three PT-CE Series Installation & operation manual

NewMar

NewMar Phase Three PT-CE Series Installation & operation manual

LITELINE LED-HWB-24V-100W quick start guide

LITELINE

LITELINE LED-HWB-24V-100W quick start guide

Beckhoff PS1061-2410-0000 installation manual

Beckhoff

Beckhoff PS1061-2410-0000 installation manual

Allied Telesis AT-WDRPS-10 installation guide

Allied Telesis

Allied Telesis AT-WDRPS-10 installation guide

SFC Energy EFOY Pro Series Hints & Tips

SFC Energy

SFC Energy EFOY Pro Series Hints & Tips

Rosslare PS-14 installation instructions

Rosslare

Rosslare PS-14 installation instructions

Aktakom APS-3103L user manual

Aktakom

Aktakom APS-3103L user manual

Triamec TP150 Hardware manual

Triamec

Triamec TP150 Hardware manual

TDK-Lambda CN-A110 Series instruction manual

TDK-Lambda

TDK-Lambda CN-A110 Series instruction manual

AMI 227 Operation manual

AMI

AMI 227 Operation manual

Pulsar PSU-U-24V/AC-4A/4/FTA/PTC-TR-MC manual

Pulsar

Pulsar PSU-U-24V/AC-4A/4/FTA/PTC-TR-MC manual

Pulsar EN54-7A17 manual

Pulsar

Pulsar EN54-7A17 manual

Spellman uX SERIES instruction manual

Spellman

Spellman uX SERIES instruction manual

PeakTech P 1525 Operation manual

PeakTech

PeakTech P 1525 Operation manual

Sungrow MVS6400-LV System manual

Sungrow

Sungrow MVS6400-LV System manual

Pulsar PSACH 01246 instruction manual

Pulsar

Pulsar PSACH 01246 instruction manual

manuals.online logo
manuals.online logoBrands
  • About & Mission
  • Contact us
  • Privacy Policy
  • Terms and Conditions

Copyright 2025 Manuals.Online. All Rights Reserved.