67
Instructions de mise en route de l’électrificateur "farmer A1000 solar"
en accord avec la notice SECURA pour les renseignenents pour l’installation
et la sécurité des électrificateurs (www.horizont.com)
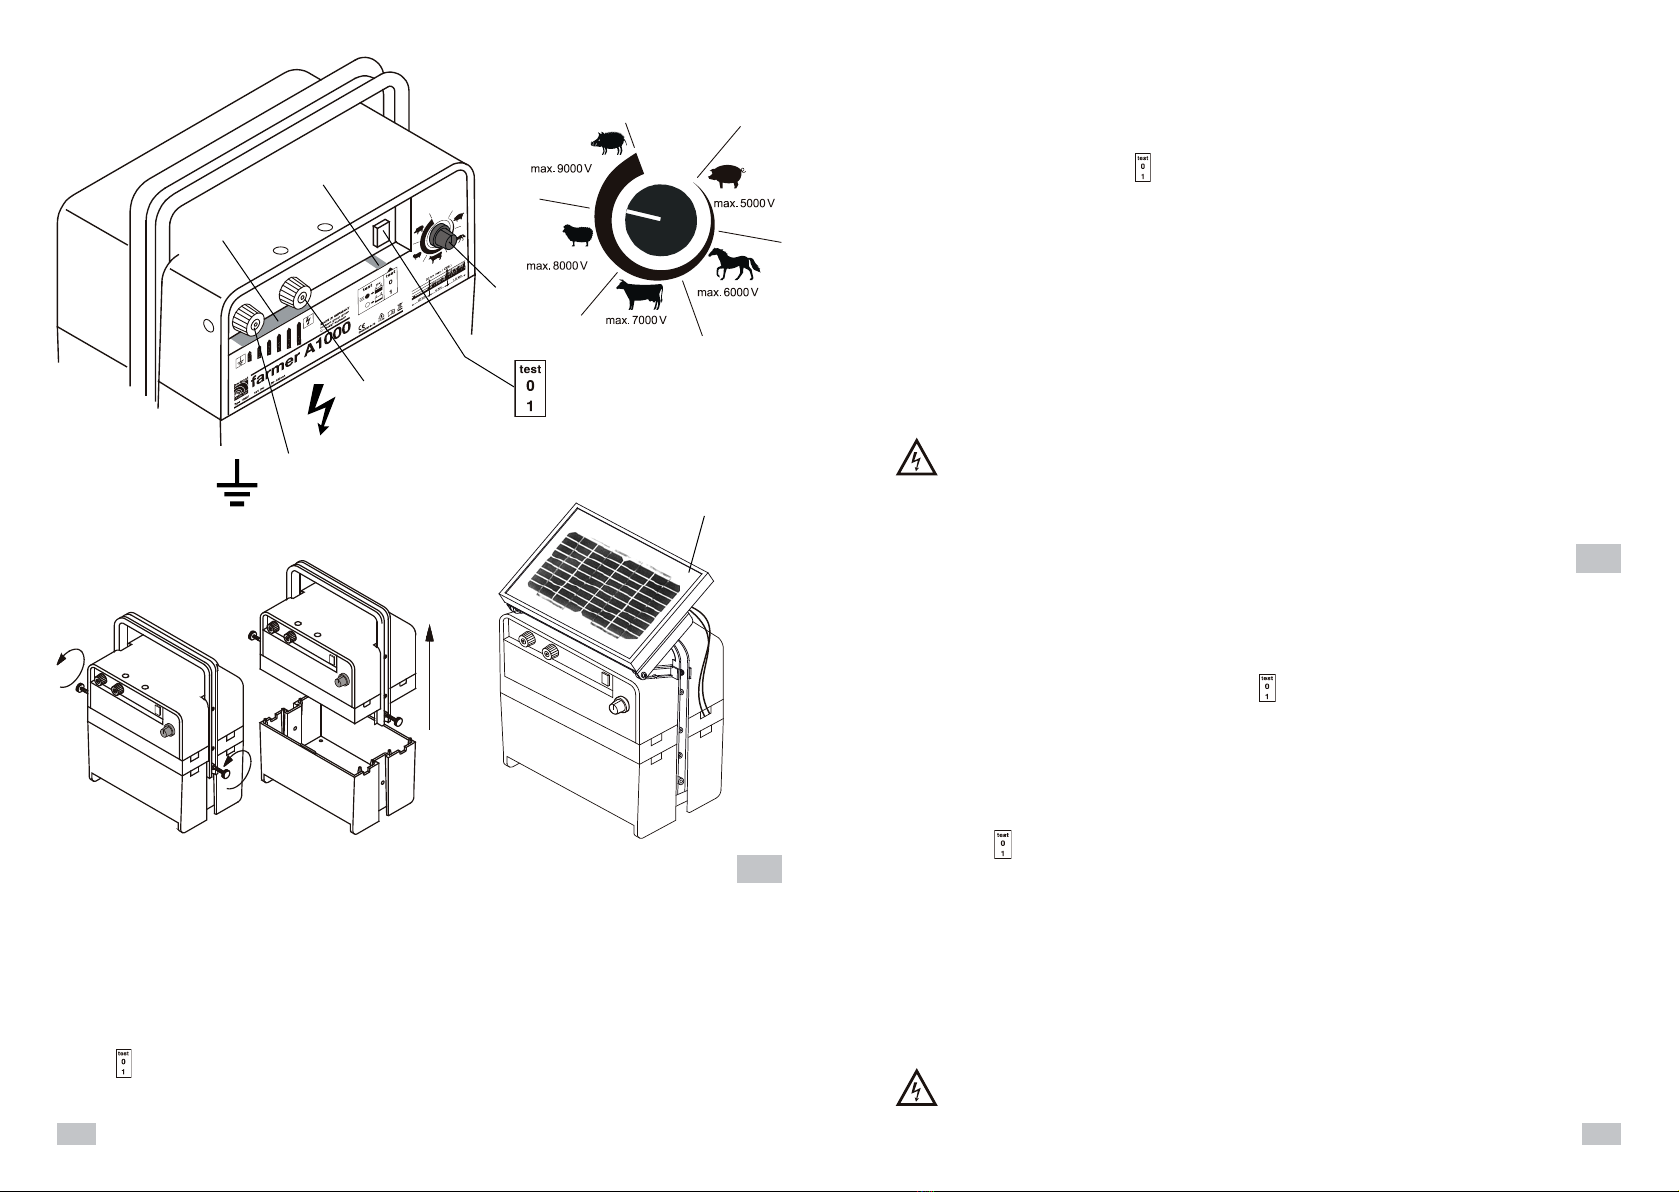
Installation et branchement: Connecter le piquet de terre avec le fil de terre. Enfoncer profondément le piquet
de terre (1m), ref. 14041, dans un endroit humide, à proximité de l’électrificateur. Une bonne prise de terre (Fig.1)
est une condition préalable et nécessaire pour l’installation dans de bonnes conditions. Se conformer ici à
SECURA. Les câbles de terre et de ligne doivent être raccordés suivant l’illustration. La boite de l’électrificateur
peut contenir les accus suivants: 12V, dimensions max. pour l’accu 250 x 192 x 225 mm.
Mise en route et contrôle: Appuyer sur l’interrupteur en le positionnant sur >1<. Après quelques secondes,
on entend un léger tic-tac. L’électrificateur donne du voltage à la ligne. La lampe témoin de la clôture clignote à
la cadence des impulsions électriques. Mettre le régulateur dans la position désirée la puissance (Fig. 2a): Les
6 lampes de contrôle de la clôture ( a ) Fig. 2 montrent la tension sur la ligne. La tension est indiquée par tranche
de 1000V. Si moins de 3 lampes (3000 Volts) s’allument il faut contrôler la ligne et l’appareil.
Causes possibles: Avec clôture:Végétation trop abondante ou court-circuit de la clôture sur un piquet métallique.
Sans clôture: L‘appareil est défectueux, voir service.
Contrôle de l’accumulateur: Dans la position > test < vous pouvez en même temps contrôler
l’état du déchargement de l’accumulateur. Si la charge de l’accu est encore suffisante vous allez voir de la
lumière permanente (b) Fig. 2, si la charge ne suffit plus, la lumière s’arrête.
Après avoir testé l’accu il faut remettre l’interrupteur sur la position >1<.
Changement du type d´alimentation (accumulateur): Ouvrir l’électrificateur selon Fig.3 et opérér le change-
ment. Les câbles de connexion nécessaires sont fournis
Solarisation: Un panneau solaire de 12V / 5W + support (ref. 15192) peut être fourni. Une fois monté, il doit être
orienté vers le sud. Le panneau n‘est pas en mesure d‘assurer la recharge complète de la batterie notamment
lorsque l‘appareil est sur la position „forte“. La solarisation peut seulement allonger le temps d‘utilisation d‘un
cycle complet de recharge, ceci dépendant de lintensité solaire.
Un panneau solaire 12V / 5W est connecter de l‘accumulateur 12V avec 25Ah minimum (alternative 10W avec
35Ah ou 15W avec 45Ah et 20W avec 60Ah)
Prescriptions: L‘électrificateur est construit d‘après les normes de sécurité.
Service: Les réparations ne doivent être faites que par des personnes qualifiées.
Utiliser uniquement les pièces détachées et composants du fabricant.
SOUS RÉSERVE DE MODIFICATIONS TECHNIQUES !
Manual de instruções da cerca eléctrica "farmer A1000 solar"
em ligação com as observações de segurança SECURA (www.horizont.com)
Instalação e ligação: instale o aparelho num local húmido junto ao cercado.Recomenda-se a utilização de 1
estacas de terra de 1 metro (Ref.: 14041). Uma boa terra (página 3 / fig. 1) é muito importante para um bom
desempenho do cercado. A terra e os cabos de ligação devem ser ligados conforme a ilustração.
O compartimento para a bateria pode armazenar uma bateria de 12V com as seguintes dimensões: máximo
250mm x 192mm x 225mm.
Operação e controlo (página 4, fig. 2): Pressione o interruptor na posição >1<. Após alguns segundos
ouvirá um tic-tac regular. O aparelho está a fornecer voltagem ao cercado. A lâmpada de controlo pisca na se-
quência dos impulsos. Coloque o regulador de potência na posição desejada (Fig. 2a): As 6 luzes de controlo
(a) indicam a voltagem do cercado em passos de 1000V. Pelo menos 3 luzes (3000V) devem estar acesas para
assegurar uma voltagem suficiente no cercado. Em caso de baixa voltagem existem várias possíveis razões:
com o aparelho ligado ao cercado: forte vegetação, mau isolamento ou cercado demasiado longo
sem o aparelho ligado ao cercado: defeito no aparelho
Teste de bateria: na posição >test< poderá verificar o estado de descarga da bateria. Se a carga da ba-
teria ainda estiver OK verá uma luz permanente ( b ) Fig. 2. Se o nível de carga for insuficiente a luz deixará de
estar visível. Após testar a bateria deverá colocar o interruptor n posição >1<.
Mudança da bateria: abra o aparelho conforme ilustrado na página 4, fig. 3, e mude – ou coloque – a bate-
ria.
Operação solar: O painel solar pode ser instalado por cima da cerca, com o painel solar 12V / 5W + suporte
ref. 15192. A cerca não pode funcionar apenas com o sistema de painel solar mas este prolonga o funcio-
namento da bateria. O módulo solar de 12V / 5W deve ser sempre ligado a uma bateria húmida de 12V com
um mínimo de 25Ah (em alternativa o módulo solar de 10W a uma bateria húmida de 12V com um mínimo de
35AH, e o módulo solar de 15W a uma bateria húmida de 12V com um mínimo de 45Ah e o módulo solar de
20W a uma bateria húmida de 12V com um mínimo de 60Ah)
Requisitos: O aparelho está concebido de acordo com as normas internacionais.
Serviço: Os serviços de reparo devem ser realizados por pessoas certificadas.
Devem-se utilizar apenas peças de reposição do fabricante.
RESERVAMO-NOS O DIREITO DE FAZER ALTERAÇÕES TÉCNICAS !
fr
pt
Istruzioni per l’uso per la centralina da recinto elettrico "farmer A1000 solar"
Rispondente alle norme costruttive e di sicurezza per gli apparecchi
elettrificatori di recinzioni SECURA ANIMAL (www.horizont.com)
Montaggio e collegamento: L’apparecchio viene posizionato per terra in un punto possibilmente umido del
recinto ed accanto all’apparecchio conficcato in profondità un palo per la messa a terra (N. art. 14041) lungo
1m. Una buona messa a terra (Pagina 4 / Fig. 1) è estremamente importante per il funzionamento a regola
d’arte e la potenza ottimale dell’apparecchio, vedere anche SECURA. Il cavo per la messa a terra e del recinto
devono essere collegati come illustrato nello schema. L’apparecchio può essere alimentato con delle batterie
da 12 V fino ad una grandezza di 250mm x 192mm x 225mm. Le batterie da 12 V più grandi devono essere
posizionate all’esterno dell’apparecchio (protette, bloccate ed aerate).
Messa in funzione e controllo: (Pagina 4 / Fig.2)
Premere l’interruttore in posizione >1<, dopo qualche secondo si sente un ticchettio regolare e l’apparecchio
alimenta il recinto con della tensione. La lampada spia s´accende al ritmo degli impulsi elettrici. Spostare il
regolatore nella posizione desiderata (Fig. 2a) Le 6 spie di controllo ( a ) indicano la tensione del recinto in
livelli di 1000 V. Per sicurezza è necessario che siano accesi min. 3 spie (3000 V), altrimenti la tensione è troppo
bassa. Possibili cause: con recinto: forte vegetazione vicino al recinto, isolatori scarsi,
corto circuito dei pali di metallo o recinto troppo lungo.
senza recinto: l’apparecchio è difettoso, vedere Assistenza.
Controllo dello stato delle batterie: (Pagina 4 / Fig.2)
In posizione > test < viene controllato lo stato di carica delle batterie.
La spia di controllo (b) mostra luce fissa = carica sufficiente
luce spenta = La batteria deve essere caricata immediatamente
Dopo aver controllato la batteria è necessario che il selettore venga portato nuovamente in posizione >1<.
Sostituzione batterie (Montaggio): Aprire l’apparecchio come da schema (Pagina 4 / Fig. 3) e sostituire le batterie.
Alimentazione solare: Nell’esecuzione ad alimentazione solare viene fornito anche un pannello solare da
12V/5W + supporto (articolo 15192) che viene montato sull’apparecchio ed orientato con questo verso sud.
Tuttavia il pannello non è in grado di assicurare la ricarica della batteria - in particolare nella posizione più
forte. L’alimentazione solare, in base ai raggi solari, può prolungare o ridurre il tempo di funzionamento con
una batteria. Il pannello solare 12V/5W deve essere sempre su una batteria 12V collegato con almeno 25Ah (in
alternativa a 10W con almeno 35Ah e 15W con almeno 45Ah e 20W con almeno 60Ah)
Normative: L’apparecchio corrisponde alle norme di sicurezza pertinenti.
Assistenza: Gli interventi di riparazione possono essere eseguiti solo da personale qualificato. Devo-
no essere impiegati solo pezzi di ricambio prescritti dalla casa costruttrice.
MODIFICHE TECNICHE RISERVATE !
it
Technische Daten
technical data - données techniques - datos tecnicos - data tecnici
farmer A1000 solar, Type 106071 / 12V DC
CEE:
max. Zaunlänge
max. fence line length
longueur électrifée
máximo comprimento do cercado
lunghezza massima recinzione
max. 30 km max. 30 km
3
0 km 0,25 km
1 M Ω 0,25 km
500 Ω 5 km
5 k Ω 5 km
500 Ω
1,0 J
~ 120 mA
max.
9000 V ~ 9500 V ~ 3000 V ~ 6500 V ~ 2800 V
0,2 J
~ 30 mA
max.
4000 V ~ 4100 V ~ 1500 V ~ 3200 V ~ 1500 V
0 km 0,25 km 0,25 km 5 km 5 km
1 M Ω 500 Ω 5 k Ω 500 Ω