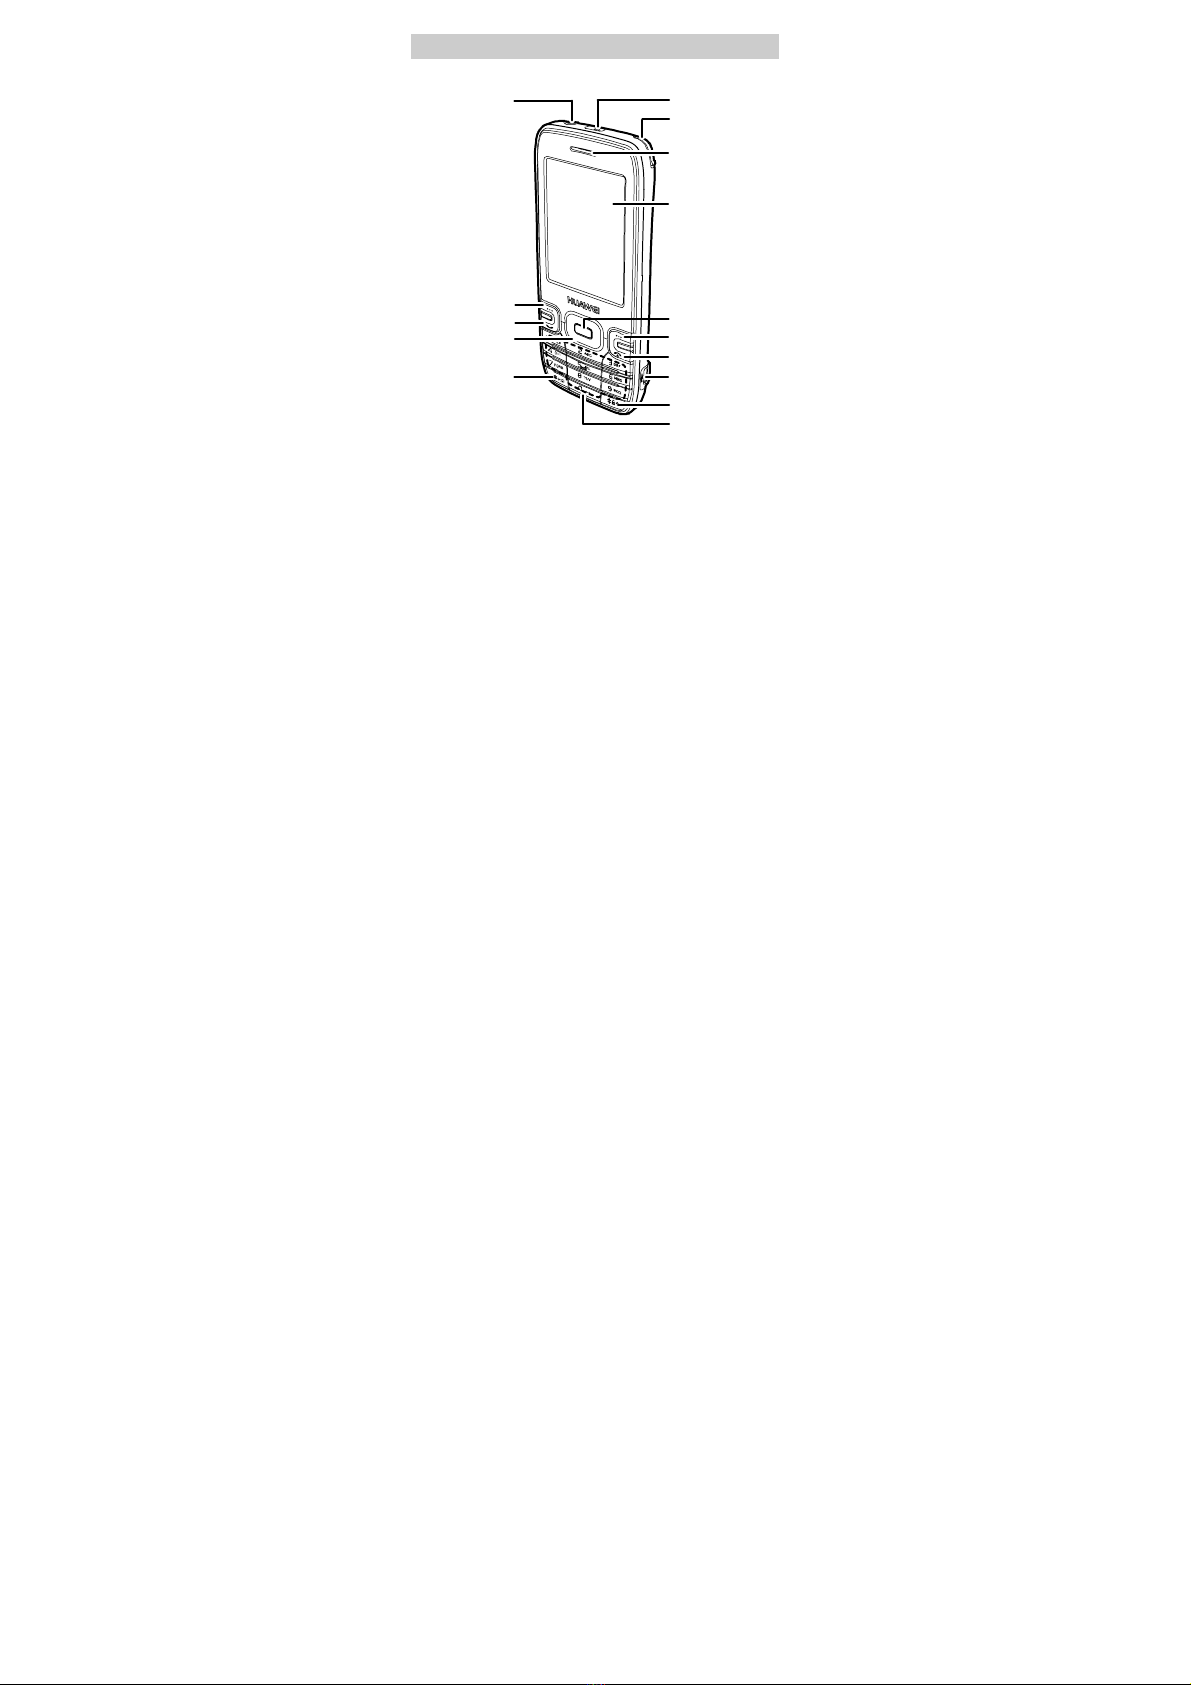
Huawei C7101 User manual

i
C7101
USER GUIDE

ii
Copyright © Huawei Technologies Co., Ltd. 2009.
All rights reserved.
No part of this document may be reproduced or transmitted in any
form or by any means without prior written consent of Huawei
Technologies Co., Ltd.
The product described in this manual may include copyrighted
software of Huawei Technologies Co., Ltd and possible licensors.
Customers shall not in any manner reproduce, distribute, modify,
decompile, disassemble, decrypt, extract, reverse engineer, lease,
assign, or sublicense the said software, unless such restrictions are
prohibited by applicable laws or such actions are approved by
respective copyright holders under licenses.
Trademarks and Permissions
, , and
are trademarks or registered
trademarks of Huawei Technologies Co., Ltd.
Other trademarks, product, service and company names mentioned
are the property of their respective owners.
Notice
Some features of the product and its accessories described herein rely
on the software installed, capacities and settings of local network,
and may not be activated or may be limited by local network
operators or network service providers. Thus the descriptions herein
may not exactly match the product or its accessories you purchase.
Huawei Technologies Co., Ltd reserves the right to change or modify
any information or specifications contained in this manual without
prior notice or obligation.

iii
NO WARRANTY
THE CONTENTS OF THIS MANUAL ARE PROVIDED "AS IS".
EXCEPT AS REQUIRED BYAPPLICABLE LAWS, NO
WARRANTIES OF ANY KIND, EITHER EXPRESS OR IMPLIED,
INCLUDING BUT NOT LIMITED TO, THE IMPLIED
WARRANTIES OF MERCHANTABILITYAND FITNESS FOR A
PARTICULAR PURPOSE, ARE MADE IN RELATION TO THE
ACCURACY, RELIABILITY OR CONTENTS OF THIS
MANUAL.
TO THE MAXIMUM EXTENT PERMITTED BY APPLICABLE
LAW, IN NO CASE SHALL HUAWEI TECHNOLOGIES CO., LTD
BE LIABLE FOR ANY SPECIAL, INCIDENTAL, INDIRECT, OR
CONSEQUENTIAL DAMAGES, OR LOST PROFITS, BUSINESS,
REVENUE, DATA, GOODWILL ORANTICIPATED SAVINGS.
Import and Export Regulations
Customers shall comply with all applicable export or import laws and
regulations and will obtain all necessary governmental permits and
licenses in order to export, re-export or import the product mentioned
in this manual including the software and technical data therein.

iv
Table of Contents
1Phone Appearance.........................................................................1
2Keys and Functions........................................................................2
3Screen Icons....................................................................................5
4Menu Tree ......................................................................................6
5Installing the UIM Card and the Battery....................................7
6Charging the Battery.....................................................................7
7Using the Stylus..............................................................................8
8Using the Function Menu..............................................................8
9Making a Call.................................................................................9
10 Answering a Call........................................................................10
11 Creating and Sending a Text Message.....................................11
12 Creating and Sending a Multimedia Message ........................11
13 Receiving a Multimedia Message.............................................12
14 Viewing a Multimedia Message................................................12
15 Recording an Audio Clip ..........................................................13
16 Listening to the Radio ...............................................................14
17 Phone Lock.................................................................................14
18 PIN and PUK .............................................................................15
19 Locking the Keypad...................................................................15
20 Changing the Text Input Mode................................................16
21 Handwriting Text Input............................................................16
22 Entering English (En)................................................................17
23 Entering English (Abc)..............................................................17
24 Entering Numbers .....................................................................17
25 Entering Symbols.......................................................................18

v
26 Warnings and Precautions........................................................19

1
1 Phone Appearance
Handset Jack
Left Soft Key
Talk/Send Key
Stylus
Earpiece
Screen
Strap hole
Right Soft Key
End/Power Key
Charger/Data
cable interface
Number Keys
#Key
*Key
OK Key
Navigation Key

2
2 Keys and Functions
Press … To …
zMake a call.
zAnswer an incoming call.
zView the call log in standby mode.
zPower on or off the phone (by pressing and
holding it).
zEnd a call or reject an incoming call.
zReturn to the home screen.
zTurn on or off the screen backlight in standby
mode.
zDisplay the Menu screen in standby mode.
zSelect the option displayed in the lower left
corner of the screen.
zDisplay the Contacts screen in standby mode
zSelect the option displayed in the lower right
corner of the screen.
zDisplay the Menu screen in standby mode.
zConfirm a selection.

3
Press … To …
zDisplay the Profiles screen ( ), the
Messages screen ( ), the Create Message
screen (by pressing and holding ), the
Brew screen ( ), and the WAP screen
() in standby mode.
zIncrease the volume ( or ) or
decrease the volume ( or )
during a call.
–
zEnter numbers, letters, and symbols.
zCall the voicemail in standby mode (by
pressing and holding the 1key).
zSpeed-dial phone numbers in standby mode (by
pressing and holding the keys 2–9).
zSelect a submenu labeled with the
corresponding number.
zEnter *.
zActivate or deactivate the meeting profile (by
pressing and holding it).
zAccess different functions based on the phone
features being used.

4
Press … To …
zEnter #.
zLock the keypad in standby mode (by pressing
and holding it).
zProvide different functions based on the phone
features being used.

5
3 Screen Icons
Icon Description Icon Description
Network signal strength Battery power level
No network signal Low battery power
Data service General profile
Domestic roaming Silence profile
Overseas roaming Meeting profile
Calling Outdoor profile
Unread text message(s) My profile profile
The memory for storing
text messages is full. An alarm clock is
activated.
Unread voicemail
message(s) Unread urgent
message(s)
Unread multimedia
message(s)
The memory for storing
multimedia messages is
full.
The headset is
connected. - -

6
4 Menu Tree
1 All Calls
2 Missed Calls
3 Received Calls
4 Dialed Calls
Messages
1 Search
2 Search By Location
3 Add New
4 Groups
6 My Number
7 Management
Radio
Contacts
Settings
My Files
Brew
Call Log
1 Homepage
2 History
3 Bookmarks
4 Go to URL
5 Saved Pages
6 Push Messages
WAP
Tools
1 Profiles
2 Display Settings
3 Date & Time
4 Call Settings
5 Phone Settings
1 SMS
2 MMS
1 Recorder
2 Alarms
3 Scheduler
4 Calculator
5 Call Memo
6 Stopwatch
1 Switch Off
2 Speaker On
3 Start Record
4 Tuning
5 Delete Channel
6 Rename Channel
1 Pictures
2 Musics
3 Others
4 Memory Status
5 Speed Dial
7 Help
7 Settings
8 Exit Browser
6 Security Settings
7 Restore Factory
Settings 7 World Clock
8 Collapse
Brew Services.
Consult your service
provider for more
information about
this function.

7
5 Installing the UIM Card and the
Battery
Contact the network operator for whether a User Identity Module
(UIM) card is needed.
Ensure that the golden contact area on the UIM card is facing
downwards and the beveled edge is correctly aligned with the card
holder.
6 Charging the Battery
1. Connect the charger to the charger interface at the lower position
of the right side of your phone.
2. Connect the charger to an alternating current (AC) power socket.
3. When the battery is being charged, the charging icon is displayed
in the animated status. When the charging icon becomes static, it
indicates that the battery is fully charged.
4. Disconnect the charger from the AC power socket.
5. Disconnect the charger from the phone.

8
7 Using the Stylus
1. A stylus can be used to tap and drag:
zTap: to select an item or display a menu by touching the stylus to
the screen.
zDrag: to select several characters by touching the stylus to the
screen and then moving the stylus.
2. When you use the phone for the first time, calibrate the phone
screen as follows:
zSelect Menu >Settings >Display settings >Screen
Calibration.
zCalibrate the screen by tapping the cross marks (+) displayed on
the screen in sequence according to the on-screen instructions.
Note zDuring the calibration, tap the center of +accurately,
to ensure that the phone can respond to your tap and
text entry on the screen correctly after the
calibration.
zWhen you edit a text message or other text contents,
if the phone does not respond to your handwriting,
switch the text input mode to the handwriting mode
first.
8 Using the Function Menu
1. In standby mode, press or to display the Menu
screen.
2. Press to scroll to a menu item.
3. Press (Select) or to display the menu.
4. Perform one of the following operations to display a submenu:

9
zPress to scroll to a submenu, and then press
(Select) or to display the submenu.
zPress the number key corresponding to the number of a submenu
to display the submenu.
5. Press (Back) to return to the previous menu or exit the
function menu.
6. Press to return to the home screen.
9 Making a Call
1. In standby mode, you can
zTap to access the on-screen numeric keypad.
zPress a number key to access the on-screen numeric keypad.
2. Press the number keys on the keypad or tap the number keys on
the on-screen numeric keypad to enter the phone number.
3. Press or tap to dial the number.
4. Press to end the call.

10
Note zIn standby mode, press twice to enter +,
three times to enter P, and four times to enter T.
zWhen the phone is locked, enter the phone lock code
to unlock the phone first; otherwise, you can only
dial emergency numbers and answer calls.
zIn standby mode, press to access All Calls.
Then select a record and press to dial the
number.
zSelect a contact from the phonebook and then press
to call the contact.
zSelect a message from the inbox and then press
to call the message sender.
10 Answering a Call
When there is an incoming call, press , (Answer), or
to answer it; press to reject it.
zWhen there is an incoming call, you can press (Silence)
to mute the speaker and then press (Reject) again to
reject it. If the phone is in the Silent mode, you can just press
(Reject) to reject it.
zIf the any-key answer function is enabled, press any key (except
and ) to answer the call.
zIf the headset auto-answer function is enabled and the headset is
connected to the phone, the phone answers the call automatically.
zIf the headset is connected to the phone, you can press the button
on the headset cable to answer or end the call.

11
11 Creating and Sending a Text
Message
1. Select Menu > Messages > SMS > Create Message.
2. Enter the text contents.
3. Add the message recipient(s).
4. Press to send the message.
Note zYour phone supports sending and receiving of long
text messages beyond the character limit for a single
message. The duration of receiving a complete long
message depends on the network condition. When a
long message cannot be completely displayed, select
and open the long message again until it is
completely received.
zLong text messages can be saved only in the phone
memory.
zYour phone can receive delivery reports. If you
select Menu > Messages > SMS > Settings > Send
Settings > Delivery Report > Activate, after a
message is sent successfully, your phone will receive
a delivery report. To deactivate this function, select
Menu > Messages > SMS > Settings > Send
Settings > Delivery Report > Deactivate.
12 Creating and Sending a
Multimedia Message
1. Select Menu > Messages > MMS > Create MMS.
2. Edit the message by adding contents to the following fields:

12
zRecipient: to add the recipient(s) of the message. Up to 20
recipients can be added.
zSubject: to enter the subject of the message.
zSlides: to insert pictures, audio files, video files, and text into a
message.
3. After you edit the message, select Options > Send to send the
message.
Note The MMS function is network dependent. If you cannot
send or receive multimedia messages, contact your
network operator.
13 Receiving a Multimedia Message
After you select Menu >Messages > MMS > Settings >Receive
options >Download timing >Manual, you will receive a message
notification in the inbox first. In this case, you need to press to
read the message notification and then select Options > Receive to
receive the multimedia message.
After you select Menu >Messages > MMS >Settings >Receive
options >Download timing >Automatic, the phone automatically
downloads a multimedia message to the inbox.
14 Viewing a Multimedia Message
Inbox stores the received multimedia messages. To view a
multimedia message in the inbox, do as follows:
1. Select Menu > Messages > MMS > Inbox.
2. Press to scroll to the desired message.
3. Press to view the contents of the message.
4. Select Options for the following options:

13
zOpen: to open the message.
zAnswer: to access the screen for editing a multimedia message
and then edit a new multimedia message to reply to the message
sender.
zReply All: to edit a new multimedia message to reply to the
message sender and all other message recipients.
zForward: to forward the message.
zMove: to move the message to My folders under MMS.
zDelete: to delete the message.
zDelete All: to delete all the messages in the inbox.
zSort: to sort the messages in the inbox according to Date or
Address.
zFilter View: to list the messages meeting the specified condition
that can be Show All, Read, Unread, MMS, Notification, High
Priority.
15 Recording an Audio Clip
1. In standby mode, select Menu > Tools >Recorder.
2. Press , or tap or to start recording.
3. Press (Stop) or , or tap or to stop
recording.
4. Press , or tap or to play the audio clip.
Press to adjust the volume.
5. All the audio clips are saved in the recorder folder under Menu >
My Files > Musics.

14
16 Listening to the Radio
1. In standby mode, tap or select Menu > Radio.
2. Select Tuning > Automatic Tuning.
3. Press to switch between channels.
Press to adjust the volume.
Note zAfter connecting the headset to the phone, you can
listen to radio programs through either the headset or
the loudspeaker.
zThe headset also functions as the antenna. Therefore,
during the search for channels, it must be connected
to the phone to ensure that channels are found
successfully and correctly.
zIn the area covered with strong signals, even if the
headset is not connected to the phone, you can also
listen to radio programs. If you pull part of the stylus
out of the phone in this case, the program reception
can be better.
zWhen listening to the radio, you can tap Hide to hide
the radio screen and play the radio in the
background. Then the radio status bar indicating the
channel frequency appears on the standby screen.
You can tap the status bar to access the radio screen
again or tap to switch off the radio.
17 Phone Lock
The phone lock protects your phone from unauthorized use. The
default phone lock code is 1234. You can change the code to a string
of one to eight digits.

15
If the phone lock is enabled, you need to enter the correct phone lock
code when powering on the phone.
18 PIN and PUK
Contact the network operator for whether a UIM card is needed.
The personal identification number (PIN) protects your UIM card
from unauthorized use. The PIN unlocking key (PUK) is used to
unblock the blocked PIN. Both PIN and PUK are delivered with the
UIM card. For details, contact your network operator.
If you enter wrong PINs for a specified number of times
consecutively, you need to enter the PUK code to unblock the PIN.
If you enter wrong PUKs for a specified number of times
consecutively, the UIM card is invalidated permanently. In this case,
contact your network operator for a new card.
19 Locking the Keypad
In standby mode, press and hold , or tap to lock the
keypad. When the keypad is locked, you can press to answer
incoming calls or make emergency calls. (When the phone enters the
power-saving mode with the screen backlight off, press or
to turn on the screen backlight.)
zYou can press and then to unlock the keypad.
zYou can also tap Unlock and then to unlock the keypad.
If the auto-keyguard function is enabled, after the phone is idle for a
preset period of time, the keypad is locked automatically.
Table of contents
Other Huawei Cell Phone manuals

Huawei
Huawei G2800 User manual

Huawei
Huawei P10 LITE User manual

Huawei
Huawei P8 Lite 2017 User manual

Huawei
Huawei Mate 20 Pro User manual

Huawei
Huawei C8800 User manual

Huawei
Huawei P40 Lite User manual

Huawei
Huawei Ascend P7 User manual

Huawei
Huawei P10 LITE User manual

Huawei
Huawei U2800A Instruction manual

Huawei
Huawei SnapTo User manual

Huawei
Huawei NOVA Y91 User manual

Huawei
Huawei NOVA 2 PLUS User manual

Huawei
Huawei Ascend P7 mini User manual

Huawei
Huawei U3307q User manual

Huawei
Huawei EVE-LX3 User manual

Huawei
Huawei G5500 User manual

Huawei
Huawei IDEOS X5 User manual

Huawei
Huawei STG-LX2 User manual

Huawei
Huawei MRD-LX1N User manual

Huawei
Huawei G750-U10 General instructions