Huawei G7005 User manual

Copyright©HuaweiTechnologiesCo.,Ltd.2011.Allrights
reserved.
TrademarksandPermissions
,and aretrademarksorregistered
trademarksofHuaweiTechnologiesCo.,Ltd.
Othertrademarks,product,serviceandcompanynames
mentionedarethepropertyoftheirrespectiveowners.
NOWARRANTY
THECONTENTSOFTHISMANUALAREPROVIDED“ASIS”.
EXCEPTASREQUIREDBYAPPLICABLELAWS,NOWARRANTIES
OFANYKIND,EITHEREXPRESSORIMPLIED,INCLUDINGBUT
NOTLIMITEDTO,THEIMPLIEDWARRANTIESOF
MERCHANTABILITYANDFITNESSFORAPARTICULARPURPOSE,
AREMADEINRELATIONTOTHEACCURACY,RELIABILITYOR
CONTENTSOFTHISMANUAL.
TOTHEMAXIMUMEXTENTPERMITTEDBYAPPLICABLELAW,IN
NOCASESHALLHUAWEITECHNOLOGIESCO.,LT D BELIABLE
FORANYSPECIAL,INCIDENTAL,INDIRECT,ORCONSEQUENTIAL
DAMAGES,ORLOSTPROFITS,BUSINESS,REVENUE,DATA,
GOODWILLORANTICIPATEDSAVINGS.

i
Contents
1GettingtoKnowYourPhone...............................................1
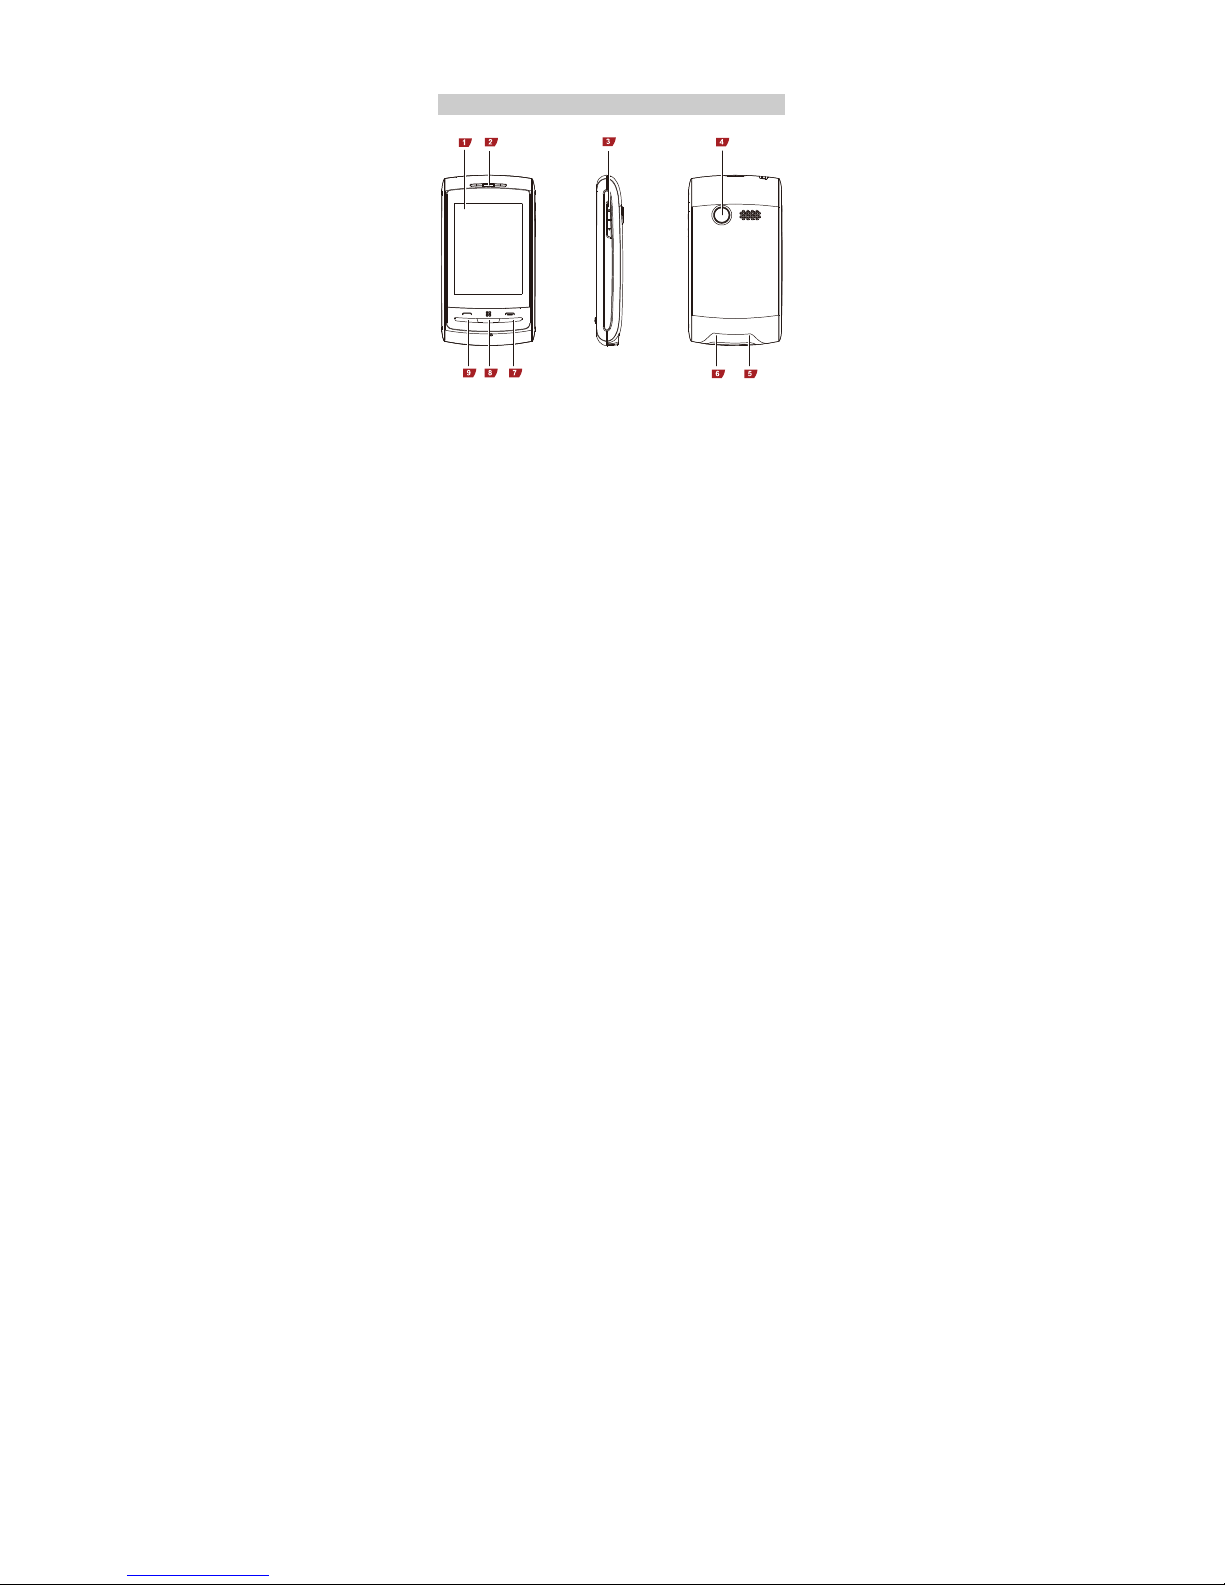
YourPhone..........................................................................1
KeysandFunctions..............................................................2
ScreenIcons........................................................................2
2GettingStarted..................................................................4
InstallingtheSIMCardsandtheBattery..............................4
RemovingtheBatteryandtheSIMCards.............................4
InstallingandRemovingamicroSDCard..............................5
ChargingtheBattery...........................................................5
UsingYourFinger.................................................................5
Calibrat ingtheScreen.........................................................6
USB.....................................................................................6
PhoneLock..........................................................................7
PINandPUK........................................................................7
LockingandUnlockingtheKeypad......................................8
3VoicesServices..................................................................9
MakingaCall.......................................................................9
AnsweringaCall..................................................................9
4TextInput........................................................................10
ChangingtheTextInputMode...........................................10
TextInputScreen...............................................................10
EnteringaWord.................................................................12
EnteringNumbers.............................................................13
EnteringSymbols..............................................................13

ii
5Messaging........................................................................13
SendingaTextMessage.....................................................13
SendingaMultimediaMessage.........................................14
6Phonebook.......................................................................15
CreatingaContact.............................................................15
SearchingforaContact......................................................16
Sett ingthePreferredStorage............................................16
7Camera............................................................................16
8VideoCamera...................................................................17
9SoundRecorder................................................................18
10MediaPlayer...................................................................20
CreatingaPlaylist.............................................................20
AddinganAudioorVideoCliptoaPlaylist.........................20
PlayinganAudioorVideoClip...........................................20
11FMRadio........................................................................21
12WAPBrowser..................................................................22
13STK................................................................................24
14Bluetooth.......................................................................24
TransferringData...............................................................24
ConnectingaBluetoothHeadsettoYo urPhone.................25
15WarningsandPrecautions................................................25

1
1GettingtoKnowYourPhone
YourPhone
Thefollowingfigureshowstheappearanceofyourphone.
1Screen6Charger/Universalserialbus
(USB)port
2Earpiece7End/Powerkey
3Volume/Scrollkey
8
Menu
key
4Camera9Call/Answerkey
5Headsetjack

2
KeysandFunctions
Press...To…
Makeacall.
Answeracall.
Viewcalllogsinstandbymode.
Accessthemainmenu.
Endacall.
Lockthekeypad.
Returntostandbymode.
Powerthephoneonoroff.
Scrollupanddownthroughmenuoptions.
Adjustthevolumeinstandbymode,duringacall
ormediaplayback,orwhilelisteningtotheradio.
ScreenIcons
IconIndicates…
Batterylevel.

3
IconIndicates…
Keypadlocked.
Headsetconnected.
Newtextmessages.
Missedcalls.
Alarmsenabled.
Bluetoothturnedon.
Generalprofileactivated.
Meetingprofileactivated.
Outdoorprofileactivated.
Silentprofileactivated.
Myprofileactivated.

4
2GettingStarted
InstallingtheSIMCardsandtheBattery
Youcaninstalluptotwosubscriberidentitymodule(SIM)cardsin
thephoneatthesametime.
WheninstallingaSIMcard,ensurethatthegoldcontactareafaces
down,andthatthebevelededgeoftheSIMcardalignswiththatof
theSIMcardslot.
Toenabledual‐SIMmode,poweronthephone,press to
accessthemainmenu,andtapSettings>DualSIMsettings>
DualSIMopen.
RemovingtheBatteryandtheSIMCards
BeforeremovingthebatteryandtheSIMcards,ensurethatyour
phoneispoweredoff.

5
InstallingandRemovingamicroSDCard
BeforeinstallingorremovingamicroSDcard,powerthe
phoneoff.Whenthephoneispoweredbackon,itindicates
whetherthemicroSDcardhasbeeninstalledcorrectly.
Youcanexpandyourphone'smemorycapacitybyinstallinga
microSDcard.WheninstallingamicroSDcard,ensurethatthegold
contactareafacesdown.
ChargingtheBattery
1. ConnectthesmallendoftheUSBcabletothephone'scharger
jackandthelargeendtothecharger.
2. Connectthechargertoapowersocket.
3. Waituntilthebatteryisfullycharged.
Whilethebatteryischarging,thechargingiconblinks.Whenthe
chargingiconstopsblinking,thebatteryisfullycharged.
4. UnplugthechargerfromthepowersocketandtheUSBcable
fromthephone.
UsingYourFinger
Youcanperformvariousoperationsbytappingyourfingeronor
draggingitacrossthetouchscreen.

6
Tap:Useyourfingertotouchthescreenoncetoaccessamenu
orselectanitem.
Drag:Touchandholdanicononthemainmenu,andthenmove
theiconbymovingyourfingeracrossthescreen.Youcanalso
scrollthroughamenu,textdocument,orwebpageusingthe
same'touchandmove'action.
CalibratingtheScreen
Oncecalibrated,thephonerespondsmoreaccuratelytoyourtouch
onthescreen.
1. Instandbymode,presstoaccessthemainmenu,and
tapSett ings>Pencalibration.
Duringthecalibration,aseriesoficonsaredisplayedon
thescreen.
2. Tapeachicontocompletethecalibration.
Duringthecalibration,tapeachiconinanormalwayto
ensurethatthephonewillrespondaccuratelytoyour
touch.
USB
WhenyouhaveconnectedyourphonetoacomputerusingtheUSB
cable,aseriesofoptions,includingMassstorage,aredisplayedon
thephonescreen.
TapMassstoragetomanagethefilesstoredinthephone
memoryoronthemicroSDcardusingthecomputer'sfile
managerapplication.

7
PhoneLock
Thephonelockprotectsyourphonefromunauthorizeduse.The
presetphoneunlockcodeis1234.Bydefault,thephonelockis
disabled.Oncethephonelockisenabled,youmustenterthephone
unlockcodeeachtimeyoupoweronthephone.
Toenablethephonelock:
1. PresstoaccessthemainmenuandtapSettings>
Securitysettings>Phonesecurity>Phonelock.
2. Tapthetextboxtoaccesstheon‐screenkeypad.
3. Enterthephoneunlockcode,andtapOK.
Tochangethepresetphoneunlockcode:
1. PresstoaccessthemainmenuandtapSettings>
Securitysett ings>Phonesecurity>Changepassword.
2. Tapthetextboxtoaccesstheon‐screenkeypad.
3. Enterthepresetphoneunlockcode,andtapOK.
4. Enteranewphoneunlockcode,andtapOK.
Thephoneunlockcodemustbeanumericstringbetweenfour
andeightdigits.
5. Enterthenewphoneunlockcodeagaintoconfirmit.
Ifyouforgetthephoneunlockcode,contacttheserviceprovider.
PINandPUK
Thepersonalidentificationnumber(PIN)protectsyourSIMcard
fromunauthorizeduse.ThePINunblockingkey(PUK)unlocksa
blockedPIN.BoththePINandthePUKareprovidedwiththeSIM
card.Fordetails,contactyourserviceprovider.
ThePINlockmustbeconfiguredforeachSIMcardseparately.

8
ToenablethePINlock:
1. PresstoaccessthemainmenuandtapSettings>
Securitysettings>SIM1orSIM2security>PINlock.
2. Tapthetextboxtoaccesstheon‐screenkeypad.
3. EnterthePIN,andtapOK.
IfyouentertheincorrectPINaspecifiednumberoftimes,the
phonepromptsyoutoenterthePUK.IfyouentertheincorrectPUK
aspecifiednumberoftimes,theSIMcardwillbecomepermanently
invalid.Ifthisoccurs,contactyourserviceproviderforanewSIM
card.
LockingandUnlockingtheKeypad
Tolockthekeypad,press.Tounlockthekeypad,slide
fromlefttoright.
IftheAutokeypadlockfunctionisenabled,thephonewilllockthe
keypadautomaticallyafterbeingidleinstandbymodefora
pre‐definedperiod.
ToenabletheAutokeypadlockfunction,presstoaccess
themainmenu,tapSett ings>Securitysettings>Autokeypad
lock,andtapadesiredduration(5sec,30sec,1min,or5min).
IfyoutapOff,theAutokeypadlockfunctionwillbedisabled.
Whenthekeypadislocked,youcanpressto
answeracall.

9
3VoicesServices
MakingaCall
1. Instandbymode,tap atthebottomofthescreentoaccess
theon‐screenkeypad.
2. Enteraphonenumber.
Tomakeaninternationalcall,tapthe*keytwicetoenterthe
plussign(+).Thenenterthecountryorregioncode,areacode,
andphonenumber.
Tocallanextensionnumber,enterthephonenumber,tapthe*
keythreetimestoenterP, andentertheextensionnumber.
3. Pressortap todialthenumber.
4. Presstoendthecall.
YoucanalsomakeacallfromtheCalllog,Contacts,and
Messagingscreen.
AnsweringaCall
Whenthereisanincomingcall:
Press toanswerthecall.
Press torejectthecall.

10
4TextInput
ChangingtheTextInputMode
Thecurrenttextinputmodeindicatorisdisplayedintheupperleft
cornerofthescreen.TapontheQWERTYoralphanumeric
inputscreentoswitchbetweentextinputmodes.
IndicatorTextInputMode
ABC
and
abcMulti‐tap
inputmodes
sABC
and
sabc
Predictive
inputmodes
123Number
inputmode
TextInputScreen
OntheQWERTYinputscreen:

11
Tap oncetodeletethelastcharacterentered,ortapand
holdtodeleteallthecharacters.
Tap tostartanewparagraph.
Tap tohidethekeypad.
Tap toswitchfromtheQWERTYinputscreentothe
alphanumericinputscreen.
Tap toaccessthesymbol/numberkeypad.
Tap toswitchbetweentextinputmodes.
Tap toswitchbetweenuppercaseandlowercase.
Onthealphanumericinputscreen:
Tap oncetodeletethelastcharacterentered,ortap
andholdtodeleteallthecharacters.

12
Tap toaccessthenumberkeypad.
Tap toswitchbetweenuppercaseandlowercase.
Tap toswitchfromthealphanumericinputscreento
theQWERTYinputscreen.
Tap tohidethekeypad.
Tap toswitchbetweentextinputmodes.
Tap toaccessthesymbolkeypad.
EnteringaWord
ToenterawordontheQWERTYinputscreen,tapthekeys
labeledwiththelettersthatspelltheword.
Toenterawordonthealphanumericinputscreeninmult i‐tap
inputmode,repeatedlytapthekeyslabeledwiththelettersthat
spellthewordunt ilthedesiredlettersareentered.
Toenterawordonthealphanumericinputscreeninpredict ive
inputmode:
1. Tapeachkeyonceaccordingtothespellingsequenceofthe
desiredword.
2. Thephonedisplayswordsassociatedwiththesequence
entered.
3. Tapor toscrolltothedesiredword.
4. Tapthedesiredword.

13
EnteringNumbers
OntheQWERTYinputscreen,tap toaccessthe
number/symbolkeypad,andenterthedesirednumbers.
Onthealphanumericinputscreen,tap toaccessthe
numberkeypad,andenterthedesirednumbers.
Innumberinputmode,tapthedesirednumberkeys.
EnteringSymbols
OntheQWERTYinputscreen,tap toaccessthe
symbol/numberkeypadtodisplaycommonlyusedsymbols.If
thesymbolyouwantisnotshown,taptoaccessthe
completesymbolkeypadtodisplayallavailablesymbols.
Onthealphanumericinputscreen,tap toaccessthe
symbolkeypad,tapor toscrolltothedesired
symbol,andtapthedesiredsymbol.
5Messaging
SendingaTextMessage
1. Instandbymode,tap atthebottomofthescreento
accesstheMessagingscreen.
2. TapWritemessage.
3. Tapandentertherecipient'sphonenumber;ortap
toaddarecipientfromthephonebook.
Repeatthissteptoaddmult iplerecipients.

14
4. Writethemessage.
5. TaptosendthemessagefromSIMcard1orSIMcard
2.
SendingaMultimediaMessage
1. Instandbymode,tap atthebottomofthescreento
accesstheMessagingscreen.
2. TapWritemessage.
3. TapOptions>SwitchtoMMS.
IfyoutapAddpicture,Addsound,Addvideo,Headinfo,Cc,
Bcc,orSubject,themessageautomaticallychangesfromatext
messagetoamultimediamessage.
4. Tapandentertherecipient'sphonenumber;ortap
toaddarecipientfromthephonebook.
Repeatthissteptoaddmult iplerecipients.
5. Tocopyorblindcopythemessagetoarecipient,tapCcorBcc,
entertherecipient'sphonenumber;ortaptoadda
recipientfromthephonebook.
Repeatthissteptoaddmult iplerecipients.
6. TapSubjectifyouwanttoenterasubjectforthemessage.
7. Editthemessage.
Taptoaddpictures,audioclips,videoclips,text
templates,attachments,orbookmarkstothemessage.
8. TaptosendthemessagefromSIMcard1orSIMcard
2.

15
6Phonebook
CreatingaContact
ToaddacontacttoyourSIMcard:
1. Instandbymode,tapatthebottomofthescreentoaccess
theContactsscreen.
Allthecontactsstoredinthepreferredstoragearedisplayed.
Bydefault,thecontactsarestoredinthephonememory.Ifyou
havesetPreferredstoragetoSIM1orSIM2,thecontactsstored
onSIMcard1orSIMcard2aredisplayed.Ifyouhaveset
PreferredstoragetoAll,thecontactsstoredinthephone
memoryandonthetwoSIMcardsaredisplayed.
2. TapAddnewcontact.
3. Enterthenameandnumberofthecontact.
4. TapOptions>Save>Yes.
Toaddacontacttoyourphone:
1. Instandbymode,tapatthebottomofthescreentoaccess
theContactsscreen.
AllthecontactsstoredinyourphonememoryoronyourSIM
cardaredisplayed.
2. TapAddnewcontact.
3. EnterthecontactinformationsuchasName,Number,Email
address,Callerpicture,andCallerringtone.
4. TapOptions>Save>Yes.

16
SearchingforaContact
1. Instandbymode,tap atthebottomofthescreentoaccess
theContactsscreen.
2. Enterthefirstletterofthecontactnameinthesearchbar.
Contactswhohavenamesthatstartwiththisletterwillbe
displayed.
3. Taptohidethekeypad,andlookforthedesiredcontact.
SettingthePreferredStorage
1. Instandbymode,tap atthebottomofthescreentoaccess
theContactsscreen.
2. TapOptions>Phonebooksettings>Preferredstorage.
3. TapSIM1,SIM2,Phone,orAll.
7Camera
Totakeapicture:
1. Instandbymode,presstoaccessthemainmenu.
2. TapCamera.
3. Ontheviewfinderscreen:
Tap toaccesstheOptionsscreentoviewpicturesor
configurethecamerasettings.
Tap toadjusttheexposurevalue.
Tap tozoominorzoomout.

17
Tap tosetthepictureresolut ion.
Tap tosetthepicturequality.
Tap toapplyaneffecttothepicture.
Tap toadjustthewhitebalance.
Tap toselectthescenemode.
Tap tosettheself‐timer.
Tap tosetcont inuousshooting.
Tap toexitthecamera.
4. Framethepictureyouwanttotakeontheviewfinderscreenand
taptotakeapicture.
8VideoCamera
Torecordavideoclip:
1. Instandbymode,presstoaccessthemainmenu.
2. TapVideocamera.
3. Ontheviewfinderscreen:
Tap toaccesstheOptionsscreentoconfigurethevideo
camerasettings.
Tap toadjusttheexposurevalue.
Tap tozoominorzoomout.
Table of contents
Other Huawei Cell Phone manuals

Huawei
Huawei Y5p User manual

Huawei
Huawei Y3 lite-UXX User manual

Huawei
Huawei Nova Plus User manual

Huawei
Huawei metroPCS User manual

Huawei
Huawei U8180 Dimensions

Huawei
Huawei G700-U20 Installation guide

Huawei
Huawei Ascend P1 User manual

Huawei
Huawei U3900 Installation guide

Huawei
Huawei Y625 User manual

Huawei
Huawei G535-L11 Dimensions

Huawei
Huawei AMN-LX1 User manual

Huawei
Huawei Ascend G7 User manual

Huawei
Huawei Ascend Y 101 User manual

Huawei
Huawei Ascend II M865C User manual

Huawei
Huawei P6-U06 Installation guide

Huawei
Huawei Mate 50 Pro User manual

Huawei
Huawei G7210 User manual

Huawei
Huawei Aero User manual

Huawei
Huawei U8815N User manual

Huawei
Huawei Ascend D2 User manual