Hughes BGAN 9201 Reference guide

BGan Help Guide

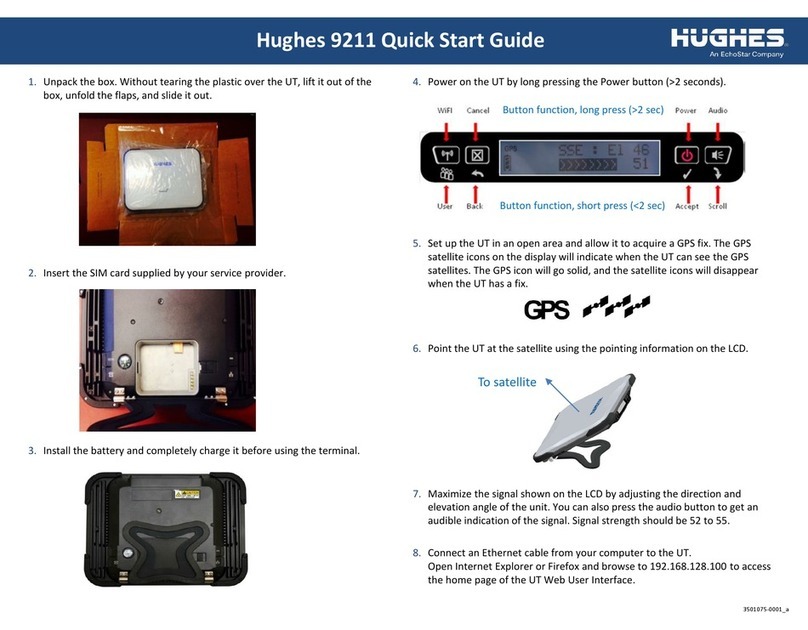
Installing the SIM card and battery
To prepare the terminal for connection:
a. Position the terminal so that the battery door is facing you.
b. Open the battery door. (If you have already installed the battery, release and then remove it.)
c. Push the button on the left-hand side of the SIM card holder. This releases the holder from its
compartment.
d. Remove the holder from its compartment.
e. Install the SIM card in the card holder making sure it snaps into place.
f. With the card in the holder, orient the holder with the card’s gold contacts facing down. Place the
holder back in its slot in the BGAN terminal.
g. Put the battery into its slot in the BGAN terminal and lock it in place. Close the battery door
securely.

Powering on and charging the battery
a. Insert the power adapter output connector into the DC power input jack on the back of the terminal.
b. Insert the plug end into any AC outlet between 100 and 240 VAC.
Note The battery charges automatically whenever the terminal is connected to a power source.
Obtaining a GPS fix
The BGAN network requires a valid GPS fix to successfully register your BGAN terminal.
To obtain a GPS fix:
a. Take the Hughes 9201 outside and place the terminal on a flat surface, facing upwards and with an
open view of the sky. Ensure that the GPS antenna in the terminal is pointing in the direction of the
satellite.
b. Press the Power button. The GPS LED starts to flash green indicating that the terminal is acquiring a
GPS fix.
Leave the terminal to acquire a GPS fix. This may take a few minutes. Once the GPS fix has been
acquired the GPS LED turns solid green.

Use this information to further adjust the antenna position to obtain maximum signal strength.
In addition, you can use the terminal’s indicator lights and audio buzzer to assist in pointing the
terminal:
•Note the Pointing indicator lights as you adjust the compass and graduated scale. The light on
the right of the scale lights first. The others then light from right to left as the signal
improves. If all lights are on, the signal is at its strongest.
•To assist in pointing, you can also use the audio button to turn the buzzer on. The higher the
pitch and the shorter the interval between the tones, the stronger the signal.
Note If the signal strength is not sufficient, registration may not be possible and the terminal may
not be able to open a data connection.
When you have positioned the terminal to obtain the maximum signal strength, you are ready to
register with the network. Click on Register with Network now.
By default, BGAN LaunchPad opens a standard IP data connection after successful registration. The
status zone reads Standard Data Connection Open. Ready for Phone, Text and Data.
Connecting the terminal to your computer
When you first connect the terminal to your computer, Inmarsat recommends that you use either
Ethernet or USB.
Note USB can operate over a distance of up to 5m with standard cables. Ethernet can operate over a
distance of up to 100m with standard cables.
Connecting over Ethernet
Note For the Ethernet interface to work without any further setup, your computer must be configured
to obtain an IP address and a DNS server address automatically. To check that these settings are
configured on your computer, refer to the documentation for your operating system.
Note: When you install BGAN LaunchPad, the USB driver for the terminal is also installed. When you
plug in the USB cable for the first time, your computer’s operating system uses this driver to connect to
the terminal.
Note: USB drivers are provided with your BGAN terminal. You can also download the latest USB drivers
from the Inmarsat Web site. Go to www.inmarsat.com/bgan-updates and follow the on-screen
instructions.


Register with the BGAN network.
Open and close data connections using a simple point and click interface.
Monitor the logs of received, dialed and missed calls.
Send and receive text messages (SMS).
Manage your contacts list.
Check for and download software updates.
Access diagnostic reports and log files, and view service provider support information.
Perform management functions such as setting up new data connections and managing the
Interface between LaunchPad and the terminal.

Double-click on the desktop icon:
If this is the first time you have connected to the terminal, the following screen displays:

Select the correct terminal type and interface from the drop down lists, and click on Search.
When LaunchPad finds the terminal, the following panel displays on the main screen:
•Ensure to set your IP settings before attempting your first connection:
•At the top of the Launchpad application click on Terminal and then select IP configuration.
•In the opening fields enter 212.165.108.67 at the top.
•And 212.165.108.70 at the bottom.
•Click ok and then continue.

Establishing a connection and registering successfully with the network requires the careful orientation
of the BGAN terminal towards the satellite, a process called pointing. Accurate and precise pointing is
important, because a badly-pointed antenna can reduce the data rate achievable over the network.
If you have not yet registered the terminal with the network, you can use BGAN LaunchPad to help you
point the terminal and register. To do this:
a. In BGAN LaunchPad, click on Help me setup BGAN. The first page of an on-screen wizard displays.
b. Follow the instructions given, and move through the steps of the wizard. Monitor the signal strength
on the right of the status bar as you point the terminal

When you have obtained the maximum possible signal strength, click on Register with network now.
The BGAN terminal now tries to register with the BGAN network. When the terminal has registered
successfully, the following screen displays:

By default, LaunchPad does not automatically open a standard IP data connection. Therefore, you must
manually open a connection before you can use data services.
Click on the Data icon in LaunchPad:
A screen similar to the below displays:
Click on Connect Standard.
In addition, the Status message will
read “Standard Data connection
open. Ready for Phone, Text
and Data.”
You are now ready to open a web
browser, check and send emails
and perform other basic data
functions.

Streaming IP data connections are optimized for use with time-critical applications such as audio and
video.
Note: The streaming IP data connections are normally charged by the length of time they are open
rather than the amount of data transferred. Therefore only use this connection type when needed for
audio or video data transfer.
Streaming connections are available at one of the following guaranteed data rates:
• 32 kbps (shown as Connect 32 Streaming).
• 64 kbps (shown as Connect 64 Streaming)
• 128 kbps (shown as Connect 128 Streaming). This connection is not available on all terminals.
• 256 kbps (.shown as Connect 256 Streaming). This connection is not available on all terminals.

To open a streaming connection:
From the Connection control window, simply click on the required streaming IP data connection.
For example, click on
Connect 64 Streaming to
open the 64kbps
streaming connection.
A message displays,
informing you that the
connection will be
charged by time rather
than
volume. Click on OK.

From the LaunchPad main menu, select BGAN services > LaunchPad Automatic Connection. The BGAN
LaunchPad automatic connection dialog box displays:
Check the Automatically open a standard Data connection after network registration check box to
enable automatic connection (or uncheck the check box to enable automatic connection).
Click on OK to save the settings, or Cancel to exit without saving.
The next time you open LaunchPad, the standard IP connection opens automatically, without you
needing to click on Connect.

To close an individual connection, simply click on the
individual data icon that you want to close.
There are a number of ways to close all open IP data
connections. The simplest is to click on
the BGAN services > Close all data connections
option in BGAN LaunchPad main menu.
The following screen displays:
You can either:
• Close all Data connections for all users and click
OK, which will close every open data
connection on the terminal.
• Close all my Data connections and click OK, which
only closes the connections that you
opened.

To close BGAN LaunchPad, select File > Exit BGAN LaunchPad from the BGAN LaunchPad main menu.
You are prompted to confirm the close down.
If you have any data connections open when you try to exit LaunchPad, a screen similar to the following
displays:
In this screen you can do the following:
• Click on Close all IP Data connections
and Exit to close all the listed data
connections, and
exit LaunchPad.
• Click on the Disconnect button
alongside a particular data connection
to close that particular
connection, but leave other connections
open.
• Click on Exit and leave IP Data
connections open to exit LaunchPad, but
leave all the listed
data connections open.
Other manuals for BGAN 9201
1
Table of contents
Other Hughes Marine GPS System manuals

Hughes
Hughes 9211 User manual

Hughes
Hughes BGAN 9201 User manual

Hughes
Hughes 9450 Series User manual

Hughes
Hughes 9250 User manual

Hughes
Hughes 9502 User manual

Hughes
Hughes 9502 User manual

Hughes
Hughes 9300 Series User manual

Hughes
Hughes Thuraya IP Voyager User manual

Hughes
Hughes 9201 User manual

Hughes
Hughes 9202M User manual