Hytera PD79 Ex Series User manual

Z04313 H05658
8 1 3 PD7 9 0 0 0 4 0 0
2015
Hytera Communications Corporation Limited.
深圳 市南 山区 北环 大道9108号
是海能达通信股 份有限公 司的注册商标或商标
2015 海 能达 通信股 份有 限公 司。 版权所 有
OWNER’S MANUAL
PD79X Ex
DIGITAL TRUNKING PORTABLE RADIO

Preface
Thanks for your favor in our product. This manual is helpful for you to quickly know how to use the
product. For detailed features and operations, please refer to the Feature Description and Opera-
tion Manual along with the product.
To avoid body injury or property loss caused by misoperation, please read the Safety Information
Booklet carefully before use.
This manual is applicable to the following product:
PD79X Ex Digital Portable Radio (X may represent 2, 5, 6 or 8)
English

Icon Conventions
: indicates functions that are available on digital
channel only.
: indicates functions that are available on analog
channel only.
Functions marked with neither the above icons are
available on both analog and digital channels.
Disclaimer
Hytera Communications Corporation Limited (the
Company) endeavors to achieve the accuracy and
completeness of this manual, but no warranty of
accuracy or reliability is given. All the specifications
and designs are subject to change without notice due
to continuous technology development. No part of
this manual may be copied, modified, translated, or
distributed in any manner without the express written
permission of us.
We do not guarantee, for any particular purpose,
the accuracy, validity, timeliness, legitimacy or
completeness of the Third Party products and
contents involved in this manual.
If you have any suggestions or would like to learn
more details, please visit our website at: http://www.
hytera.com.
RF Radiation Information
This product must be restricted to operations in an
occupational/controlled RF exposure environment.
Users must be fully aware of the hazards of the
exposure and able to exercise control over their RF
exposure to qualify for the higher exposure limits.
RF Radiation Prole
Radio Frequency (RF) is a frequency of
electromagnetic radiation in the range at which radio
signals are transmitted. RF technology is widely used
in communication, medicine, food processing and
other elds. It may generate radiation during use.
RF Radiation Safety
In order to ensure user health, experts from relevant
industries including science, engineering, medicine
and health work with international organizations to
develop standards for safe exposure to RF radiation.
These standards consist of:
●United States Federal Communications
Commission, Code of Federal Regulations; 47CFR
part 2 sub-part J;
●American National Standards Institute (ANSI)/
Institute of Electrical and Electronic Engineers
(IEEE) C95. 1-1992;
●Institute of Electrical and Electronic Engineers
(IEEE) C95. 1 – 1999;
●International Commission on Non-Ionizing Radiation
Protection (ICNIRP) 1998;
FCC Regulations
Federal Communication Commission (FCC) requires
that all radio communication products should meet the
requirements set forth in the above standards before
they can be marketed in the U.S, and the manufacturer
shall post a RF label on the product to inform users
of operational instructions, so as to enhance their
occupational health against exposure to RF energy.
Operational Instructions and Training
Guidelines
To ensure optimal performance and compliance with
the occupational/controlled environment RF energy
exposure limits in the above standards and guidelines,
users should transmit no more than 50% of the time
and always adhere to the following procedures:
●RF energy will be generated only when the radio is
transmitting.
●The radio must be 2.5 centimeters away from
human body when transmitting.
EU Regulatory Conformance
As certified by the qualified laboratory, the product
is in compliance with the essential requirements and
other relevant provisions of the Directive 1999/5/EC.
Please note that the above information is applicable to
EU countries only.

1
Contents
Intrinsically Safe Radio Information ---------------------------------------------- 2
Equipment marking ----------------------------------------------------------------- 2
No Misoperations-------------------------------------------------------------------- 2
Safety Instructions ------------------------------------------------------------------ 2
Compliance Standards ------------------------------------------------------------ 2
Items in the Package------------------------------------------------------------------- 3
Product Overview ----------------------------------------------------------------------- 3
Product Controls--------------------------------------------------------------------- 3
Programmable Keys---------------------------------------------------------------- 4
LCD Icon ------------------------------------------------------------------------------ 4
LED Indicator------------------------------------------------------------------------- 4
Before Use--------------------------------------------------------------------------------- 4
Attaching the Battery --------------------------------------------------------------- 4
Attaching the Antenna ------------------------------------------------------------- 5
Attaching the Belt Clip ------------------------------------------------------------ 5
Attaching the Accessories -------------------------------------------------------- 5
Charging the Battery --------------------------------------------------------------- 5
Checking the Battery Power------------------------------------------------------ 5
Basic Operation-------------------------------------------------------------------------- 6
Turning the Radio On/Off --------------------------------------------------------- 6
Adjusting the Volume--------------------------------------------------------------- 6
Selecting a Zone -------------------------------------------------------------------- 6
Selecting a Channel ---------------------------------------------------------------- 6
Inputting via Keypad---------------------------------------------------------------- 6
Locking and Unlocking the Keypad -------------------------------------------- 6
Managing the Contact ------------------------------------------------------------- 6
Call Services------------------------------------------------------------------------------ 7
Private Call --------------------------------------------------------------------- 7
Group Call ---------------------------------------------------------------------- 8
Calls on Analog Channel (No Signaling) -------------------------------- 8
Emergency Call---------------------------------------------------------------------- 8
Message Services ---------------------------------------------------------------- 8
Available Features ---------------------------------------------------------------------- 9
Troubleshooting ------------------------------------------------------------------------- 10
Care and Cleaning ---------------------------------------------------------------------- 11
Optional Accessories ------------------------------------------------------------------ 11
Specications ---------------------------------------------------------------------------- 12

2
Intrinsically Safe Radio Information
Equipment marking
FM/CAN
●Class I, Zone 1 AEx/Ex ib IIC T4 Gb
●Class II, III Div 1, Group E, F, G T120℃
ATEX
●II 2G Ex ib IIC T4
●II 2D Ex ib IIIC T120℃IP5X
●I M2 Ex ib
IECEx
●Ex ib IIC T4
●Ex ib IIIC T120℃IP5X
●Ex ib I
Certicate Number
●FM13ATEX0023X
●FMG 13.0010X
No Misoperations
Stop operating this product and leave the explosive
atmosphere immediately when the safety or integrity
of the product is endangered, and deliver it to your
local dealer for examination.
These items may endanger the product’s safety or
integrity:
●The radio is stored improperly;
●The radio is faulty;
●The radio works with overload;
●The radio’s operational error or threshold value is
out of allowed range.
●The radio is damaged during transportation;
●The radio’s housing is obviously damaged or
cracked;
●The radio logo or model is hard to be recognized;
Safety Instructions
Caution: To protect you against any
property loss, bodily injury or even death,
be sure to observe the following safety
instructions:
●Use only the Ex-battery BL1807-Ex specied by the
Company. The use of other batteries may result in
Ex-protection (intrinsic safety) failure.
●Charge the battery in a non-hazardous area only
with the designated charger.
●Do not remove the battery from the radio in a
hazardous area.
●Do not carry any standby battery into a hazardous
area.
●Use the accessories specified by the Company
only. Do not replace the accessories in a hazardous
area.
●Do not use a damaged antenna. If a damaged
antenna comes into contact with your skin, a minor
burn may result.
●Do not expose the radio to direct sunlight for a long
time, nor place it close to a heating source.
●Hold the radio upright and keep its microphone 2.5
to 5 centimeters away from your mouth during use.
●If you wear a radio on your body, ensure its antenna
is at least 2.5 centimeters away from your body
during transmission.
●Do not carry the radio into Zone 0 and 20.
Please do not use the radio out of the operating
temperature range specication of this product.
●Do not attempt to repair and service the radio,
batteries and its accessories. Please contact your
dealer for repair and servicing.
●Do not dissemble or redo the radio. Unauthorized
modication of the radio may result in termination of
Ex-protection (intrinsic safety) of the radio.
●Improper usage of the product other than it is
intended to be used for will impair safety of the
product, yourself and surrounding environment.
Compliance Standards
Standard Issue Date
FM
FM Class 3600 2011
FM Class 3611 2004
FM Class 3810 2005
ANSI/IEC-60529(Ed. 4.0) 2004
ANSI/ISA-60079-0(12.00.01) 2009
ANSI/ISA-60079-11(12.02.01) 2012
ANSI/ISA-60079-31(12.10.03) 2009
ANSI/ISA-61010-1(82.02.01) 2004
CAN
CAN/CSA-C22.2 No.0-M91 2006
CAN/CSA-C22.2 No.142-M1987 2009
CAN/CSA-C22.2 No.213-M1987 2008
CAN/CSA-C22.2 No.60079-0 (Ed. 5.0) 2011
CAN/CSA-C22.2 No.60079-11 (Ed. 5.0) 2011
CAN/CSA-C22.2 No.60079-31 (Ed.1.0) 2012
CAN/CSA-C22.2 No.60529 (Ed. 5.0) 2005
CAN/CSA-C22.2 No.61010-1 (Ed. 2.0) 2009
ATEX
EN 60079-0 (Ed. 5.0) 2009
EN 60079-11 (Ed. 6.0) 2012
EN 60079-31 (Ed. 1.0) 2009
EN 60529+A1 (Ed. 2.0) 1992
IECEx
IEC-60079-0 (Ed. 6.0) 2011
IEC-60079-11 (Ed. 6.0) 2011
IEC-60079-31 (Ed. 1.0) 2008

3
Items in the Package
Please unpack carefully and check that all items listed
below are received. If any item is missing or damaged,
please contact your dealer.
Note: The frequency band is marked on the
label of the antenna; if not, please refer to
the label on the radio for frequency band
information.
Battery
ChargerAntenna
Strap
Belt Clip
Power Adapter
Radio
Documentation Kit
Product Overview
Product Controls
No. Part Name No. Part Name No. Part Name No. Part Name
1SK1 (Side Key 1) 6Microphone 11 LED Indicator 16 Up Key
2 PTT (Push-to-Talk) Key 7LCD Display 12 Antenna 17 Down Key
3SK2 (Side Key 2) 8OK/Menu Key 13 Power On-Off/Volume
Control Knob 18 Battery Latch
4TK (Top Key) 9Speaker 14 Accessory Connector 19 Belt Clip
5Channel Selector Knob 10 Numeric Keypad 15 Back Key 20 Battery
OWNER'S MANUAL

4
Programmable Keys
For enhanced convenience, you may request your
dealer to program the SK1, SK2, and TK ( ) as
shortcuts to certain functions. Please refer to the
corresponding Feature Book for more details.
Caution: The TK is programmed with
emergency feature by default (short press:
Emergency On; long press: Emergency
Off). It is programmable by your
dealer.
LCD Icon
Icon Name Icon Radio Status
DTMF
Keypad Icon
The DTMF keypad is
active.
GPS Icon
The GPS feature is
enabled, and valid
GPS data is received.
The GPS feature is
enabled, but no valid
GPS data is received.
Battery
Power Icon
More bars indicate
more battery power.
TX Power
Icon
Low TX power for the
current channel.
High TX power for the
current channel.
Accessory
Icon
An accessory is
connected.
Work Order
Icon
One or more new work
orders are received.
Operation
Mode Icon
DM
Direct Mode
Operation: Under
this mode, radios can
communicate with
each other directly.
RM
Repeater Mode
Operation: Under
this mode, radios
communicate with each
other via a repeater.
Monitor Icon The Monitor feature is
active.
Icon Name Icon Radio Status
Emergency
Icon
The radio is in
emergency state
(except for silent
emergency type) or
an emergency call is
received.
Roam Icon The radio is roaming.
Scrambler/
Encrypt Icon
The Scrambler/Encrypt
feature is active.
Scan Icon
The radio is scanning.
The radio stays on a
non-priority channel.
The radio stays on
Priority Channel 1.
The radio stays on
Priority Channel 2.
VOX Icon The VOX feature is
enabled.
Missed Call
Icon Missed call(s).
Message
Icon
New message/unread
message.
Inbox is full.
RSSI Icon
No signal.
More bars indicate
better signal strength.
Speaker
Icon
The speaker is
unmuted.
LQO Icon The LQO feature is
active.
Call/Contact
Icon
●Indicates a private
call in progress.
●Indicates a private
contact in the
contact list.
●Indicates a group
call in progress.
●Indicates a group
contact in the
contact list.
●Indicates an all call
in progress.
●Indicates an all
call contact in the
contact list.
LED Indicator
LED Indication Radio Status
The LED indicator
ashes green. Powering on
The LED indicator
glows green. Receiving
The LED indicator
glows red. Transmitting
The LED indicator
ashes orange slowly. Scanning or roaming
The LED indicator
ashes orange rapidly. Emergency
The LED indicator
glows orange.
Call hung. During a call,
you can hold down the
PTT key to talk to the other
party before the call hang
time expires.
Before Use
Attaching the Battery
1. Align the battery slots with the guide rails on the
radio as ① shows, and push the battery as ②
shows.
2. Open the battery latch and hold it down until the
metal lock goes into the battery housing completely
as ③shows.

5
3. Push the battery until it is fully tted into the slot,
and then release the battery latch as ④shows.
Note: To remove the battery, please power
off the radio first. Then open the battery
latch, and slide the battery out while
holding down the battery latch.
Attaching the Antenna
Caution: Do not hold the radio by its
antenna, otherwise the performance and
lifespan of the antenna will be reduced.
Attaching the Belt Clip
1. Loosen the screws from the back of the radio.
2. Align the screw holes on the belt clip with those on
the radio’s back, and then tighten the screws.
Attaching the Accessories
1. Open the accessory connector cover as shown
below.
2. Align the accessory (such as an audio accessory,
or a programming cable) plug with the accessory
connector.
Caution:Do not scrape the silicone rubber
surrounding the accessory connector screw
hole, in order to ensure the waterproof
performance of the radio.
3. Tighten the screw on the accessory plug.
√× ×
Charging the Battery
Caution:
●Use the charger specified by the
Company to charge the battery.
●Make sure the radio is powered off
before charging. Read the Safety
Information Booklet in advance to get
necessary safety information.
●Charge a new battery for at least 5 hours
before initial use for best performance.
Charging Status Indication (on charger):
LED Indication Charging Status
The LED Indicator flashes red
slowly. Standby (no load)
The LED Indicator glows red. Charging
The LED Indicator glows
orange. 90% charged
The LED Indicator glows green. Fully charged
The LED Indicator flashes red
rapidly. Charging failed
Checking the Battery Power
You can check the current battery power by holding
down the programmed Battery Power Indicator key
preset by your dealer. And release the key to exit.
Battery power indications and alert tone are listed
below:
Charge the Radio
(with battery attached)
Charge the Battery

6
LED Indication/Tone Icon
The LED Indicator glows
green.
The LED Indicator glows
orange.
The LED Indicator glows
red.
The LED Indicator glows
red and an alert tone
sounds.
The battery runs low.
Please recharge or
replace the battery for
proper radio operation
Basic Operation
Turning the Radio On/Off
Adjusting the Volume
You can adjust the volume of output voice, alert tone
and channel notication tone by rotating the Volume
Control Knob. For other tones, the volume will be
congured by the dealer.
Selecting a Zone
A zone is a group of channels with the same property,
which can facilitate convenient management over
the channels. The radio supports 64 zones, each of
which consists of up to 16 channels. Your dealer can
program the zone for your specic needs.
You can select a zone through any of the following
ways:
●Menu: Go to “Menu -> Zone”, press the Up/Down
key to select an appropriate zone, and then press
the OK key to switch to the selected zone.
●Shortcut key: You can toggle to the appropriate
zone by pressing the programmed Zone Up or
Zone Down key preset by your dealer.
Selecting a Channel
Note: If the Channel Notify feature is
enabled by your dealer, the radio will
announce the channel number upon
channel switching.
Inputting via Keypad
You can input alias, call numbers and messages via
the keypad of the radio. In the editing mode, you may
do as follows.
●Press to switch the text input methods
between alphabetic mode and numeric mode
●In the alphabetic mode, press to input the
special characters. But in the numeric mode,
pressing will input the numeric digit 1
●In the alphabetic mode, press to input the
space. But in the numeric mode, pressing will
input the special characters
Locking and Unlocking the Keypad
When the keypad is not in use, you can lock the
keypad to prevent accidental keypad operation. The
following methods are available for you to lock or
unlock the keypad:
●Key Combination: Press “OK+ ” to lock or
unlock the keypad.
●Shortcut key: Press the programmed Keypad Lock
key to lock or unlock the keypad.
●Menu: Go to “Menu -> Settings -> Radio Set ->
Keypad Lock” and then select “Enable” or “Disable”.
»Enable: The keypad will be locked automatically
if no operation is made within the preset time
period. After the “Enable” option is selected, you
can press the Up/Down key to set the Keypad
Auto Lock Delay Time.
»Disable: The keypad will not be locked
automatically.
Note: All keys on the front panel except
for P1 ( ) and P2 ( ) will be locked by
default. Moreover, you can go to “Settings
-> Radio Settings -> Select Button Lock”
to configure the following lockable keys or
knobs: TK, Channel Selector Knob, P1( )、
P2( ), SK1, SK2 and Volume Control Knob.
Managing the Contact
Contact management allows you to view, edit, delete
or add contacts.
Contact List
The contact list is used to save private call contact,

7
group call contact, and all call contact information
such as call alias, call type and call ID.
●Go to the “Menu -> Contact -> Contact List” menu
to access the contact list.
●Press the programmed Contact List key to access
the contact list.
In the “Contact List” menu, you can view, edit or delete
the private contact. You can send to a private call
contact the following commands: Alert Call, Radio
Check, Remote Monitor, Radio Enable or Radio
Disable. Please refer to the Feature Description and
Operation Manual along with the product for details.
Favorite Contact
Favorite Contact is used to save the frequently used
contacts.
●Go to the “Menu -> Contact -> Favorite Contact”
menu to access the favorite contact list.
●Press the programmed Favorite Contact List key
to access the favorite contact list.
In the favorite contact list, you can view, edit or delete
the favorite contacts. You can send to a favorite
contact the following commands: Alert Call, Radio
Check, Remote Monitor, Radio Enable or Radio
Disable. Please refer to the Feature Description and
Operation Manual along with the product for details.
New Contact
New Contact is used to add a new contact to the
contact list.
Go to the “Menu -> Contact -> New Contact” menu
to access the relevant screen. Input the number and
alias of a new contact and save it to the private contact
list.
Note:
●The number and alias of a new contact
must be unique.
●You can also save the numbers from the
Call Logs into the contact list.
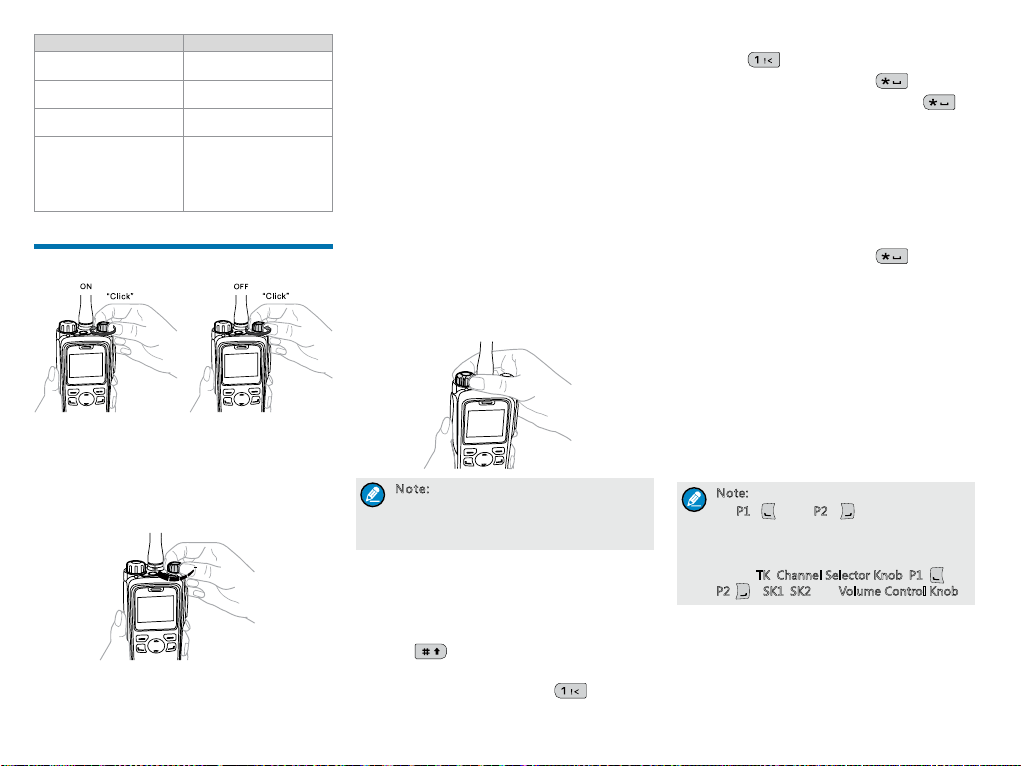
Call Services
After the radio is powered on, you can make and
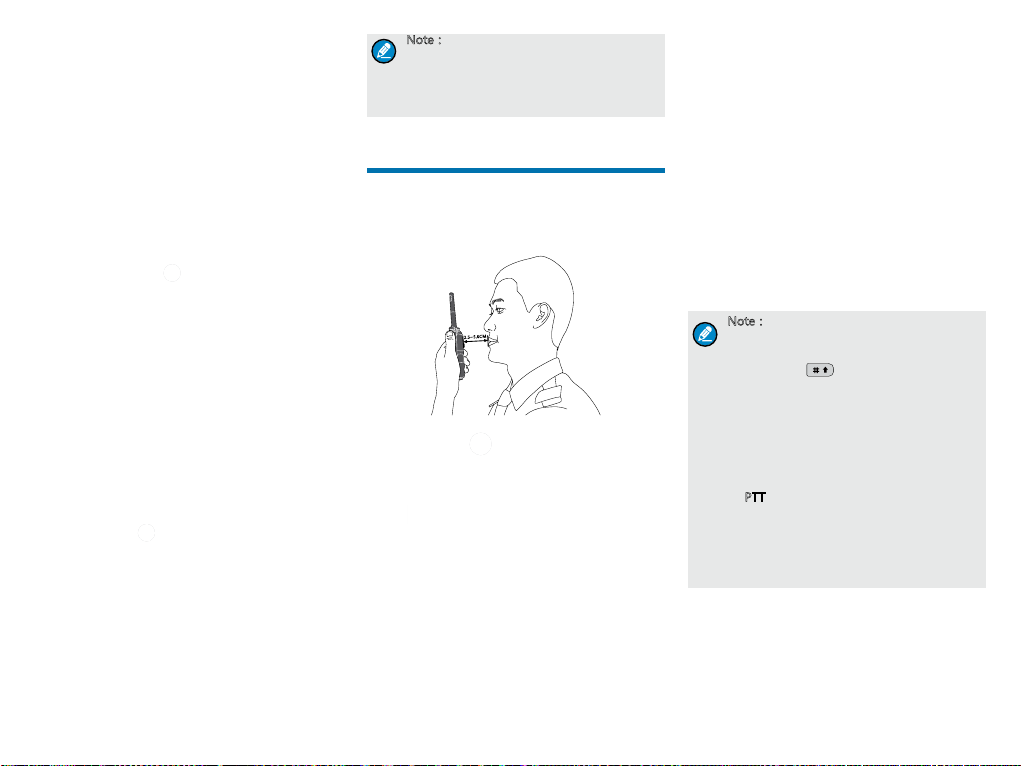
receive calls. To ensure optimal volume of the
receiving radio, keep the microphone about 2.5 to 5
centimeters away from your mouth when transmitting.
Private Call
Initiating a Private Call
When initiating a private call, the radio will display the
icon . You can make a private call through the
following ways:
Preset Contact
You may request your dealer to preset a regular
private call contact for each digital channel.
In the home screen, hold down the PTT key to initiate
a private call to the private contact preset for the
current channel.
Contact List
2.5~5.0CM
1. Go to “Menu -> Contact -> Contact List”.
2. Use the Up/Down key to select an appropriate
contact.
3. Hold down the PTT key to initiate a private call.
Call Logs
1. Go to “Menu -> Call Logs -> Outgoing/Incoming/
Missed”.
2. Use the Up/Down key to select an appropriate
contact.
3. Hold down the PTT key to initiate a private call.
Manual Dial
1. Go to “Menu -> Contact -> Manual Dial”.
2. Input the private call number using the numeric
keypad.
3. Hold down the PTT key to initiate a private call.
Note:
●If both the Private Call Manual Dial and
Group Call Manual Dial are available, you
can press to switch between the
two dialing methods, and the radio will
display the call type (Private ID/ Group
ID).
●If the Default Numeric Key Selection
feature is enabled by your dealer, you
can enter a private call number in the
home screen, and then hold down the
PTT key to initiate a private call. However,
if the DTMF keypad is enabled, the
number entered in the home screen is a
phone number. You can dial the private
call number through the “Manual Dial”
menu only.
Receiving and Responding to a Private Call
When you receive a private call, the radio will display
the icon , then you can listen without any
operation.

8
You can hold down the PTT key to call back within the
preset time. If you do not respond to it, the radio will
display appropriate indications.
Group Call
Initiating a Group Call
When initiating a group call, the radio will display the
icon . You can make a group call through the
following ways. The operation is similar to initiating a
private call.
Preset Contact
In the home screen, hold down the PTT key to initiate
a group call to the group call contact preset for the
current channel.
Contact List
1. Go to “Menu -> Contact -> Contact List”.
2. Use the Up/Down key to select an appropriate
contact.
3. Hold down the PTT key to initiate a group call.
Manual Dial
The operation is the same as initiating a private call.
Receiving and Responding to a Group Call
When you receive a group call, the radio will display
the icon on the LCD. You can hold down the PTT
key to call back within the preset time.
Call on Analog Channel without
Signaling
To transmit on an analog channel, hold down the PTT
and speak into the microphone. To receive, release
the PTT key.
Please refer to the Feature Description and Operation
Manual along with the product for operation
description on how to make and receive calls on the
analog channel with signaling.
Emergency Call
In case of emergency, you can use Emergency Call to
ask for help from your companion or the control center.
Emergency Call needs to be congured and enabled
by your dealer. Please refer to the Feature Description
and Operation Manual along with the product for
details.
Message Services
Message Services allow you to edit and send a new
message, to directly send a quick text message and to
forward the messages saved in the InBox, OutBox and
Drafts.
Text Message
1. Go to “Menu -> Message -> New Msg” to enter the
relevant screen.
2. Type the text and press the OK key. You can save
the text message to Drafts, or send it to a private
call contact or a group call contact directly.
3. Select the contact or input the contact number
manually.
4. Press the OK key to send the message. When the
message is sent successfully, the radio will display
the prompt “Send Success!”.
Quick Text
Quick Text is the frequently used message preset by
your dealer. You can send the quick text directly or edit
this text before sending it.
InBox
The Inbox saves the received messages and marks
each message with a corresponding icon to indicate
its status.
●: Read message
●: Unread message
When the Inbox is full, the radio will display the icon
, and the earliest message will be overwritten by
the latest one automatically.
Outbox
The radio saves the sent messages into the Outbox
and marks every message with a corresponding icon
to indicate its status.
●: The message is sent successfully.
●:The message is not sent successfully. In this
case, you can resend it.
When the OutBox is full, the earliest message will be
overwritten by the latest one automatically.
Drafts
The Drafts saves the edited messages. When the
Drafts is full, the earliest message will be overwritten
by the latest one automatically.
After the message in the Drafts is sent successfully, it
will be removed from the Drafts and be saved into the
OutBox. If not sent successfully, the message will be
saved into the Drafts and the OutBox.

9
Available Features
Available features of this radio are listed below. Please
refer to the Feature Description and Operation Manual
for detailed feature descriptions.
Feature Type Detailed Feature
Basic Setting
●Password
●Language
●Indication: Backlight, Brightness,
LED, Tone, Vibration
●Audio: Mic AGC, Treble
Boost, LQO, Audio Feedback
Suppression
●Scanning: Scan On, Scan Off,
Scan List
●Managing the Contacts: Contact
List, Favorite Contact, New
Contact
●Other Features: Device
Information, Power Level, VOX,
One Touch Call/Menu, Renting,
Programming, User Assignment
ID, Covert Mode
Digital Features
●Voice Services: Group Call,
Private Call, All Call, Phone Call
●Message Services: New Msg,
Quick Text, InBox, OutBox,
Drafts
●Control Services: Alert Call,
Radio Check, Remote Monitor,
Radio Enable, Radio Disable,
Priority Interrupt, Time-out Timer
(TOT)
●Personal Security Services:
Emergency Alarm, Man Down,
Lone Worker
●Encrypt
●Network: Talk Around, Roam
●Other Features: Pseudo
Trunking
Analog
Features
●Voice Services: Call without
Signaling, Call with Signaling,
Phone Call
●Control Services: Compandor,
Time-out Timer (TOT), Squelch
Off, Squelch Level Adjustment,
CTCSS/CDCSS
●Personal Security Services:
Emergency Alarm, Man Down,
Lone Worker
●Scrambler
●Talk Around
Accessory-
related
Features
●BT
●Positioning Service: GPS On/
Off, Position View, GPS Msg,
Time Zone, Query Location
API Features
●GPS Report
●Radio Registration Service
●Telemetry
●Work Order

10
Troubleshooting
Phenomena Analysis Solution
The radio fails to power on.
The battery may be improperly installed. Remove the battery and then reattach it.
The battery power may run out. Recharge or replace the battery.
The battery may suffer from poor contact caused by
dirtied or damaged battery contacts. Clean the battery contacts.
During receiving, the voice is weak,
discontinuous or totally inactive.
The battery voltage may be low. Recharge or replace the battery.
The volume level may be low. Increase the volume by rotating the Volume Control Knob.
The antenna may get loose or may be improperly
installed. Turn off the radio and reattach the antenna.
The speaker may be blocked or damaged. Clean the surface of the speaker.
You cannot communicate with
other members.
The frequency or signaling may be inconsistent with that
of other members.
Set your TX/RX frequency and signaling to the same as that of other
members.
The channel type (digital and analog) may be set
inconsistently. Make sure all members are on the same digital or analog channel.
You may be too far away from the group members. Move towards other members.
Irrelevant communication or noise
is heard on the channel.
You may be interrupted by radios using the same
frequency. Change the frequency, or adjust the squelch level.
The radio may be set with no signaling. Set signaling for all member radios to avoid interference at the same
frequency.
The noise is too loud.
You may be too far away from other members. Move towards other members.
You may locate in an unfavorable position. For example,
your communication may be blocked by high buildings or
frustrated in the underground areas.
Move to an open and at area, and restart the radio to try again.
You may suffer from external disturbance (such as
electromagnetic interference). Stay away from equipment that may cause interference.
The GPS cannot locate your
position.
GPS signals may not be received due to unfavorable
position. Move to an open and at area, and try again.
You cannot use the keys. The keypad may fail to function temporarily. Restart the radio.
The LCD does not display any
information. The LCD may fail to function temporarily. Restart the radio.
If the above solutions cannot x your problems, or you may have some other queries, please contact us or your local dealer for more technical support.

11
Optional Accessories
The following items are the main optional accessories
for the product, and please consult your local dealer
for more other accessories.
Caution: Use the accessories specified by
the Company only. If not, the Company shall
not be liable for any loss or damage arising
out of use of unauthorized accessories.
Type Model Name
Power Supply
CH10A06
Dual Pocket MCU
Charger Kit (for Li-ion/Ni-
MH Batteries)
MCA05 Battery Optimizing
System
MCA08
MCU Multi-unit Rapid-
rate Charger (for thick
battery)
POA38 Li-ion/Ni-MH Battery
Adapter
POA59 Multi-unit charger battery
adapter
Audio
Accessories
EBN10-Ex
Intrinsically Safe Bone
Conduction Headset
(IP57)
EBN11-E x
Intrinsically Safe Bone
Conduction Headset
(IP57)
EBN12-Ex
Intrinsically Safe Bone
Conduction Headset
(IP57)
ECN20-Ex Intrinsically Safe Noise-
cancelling Headset (IP57)
ECN21-Ex Intrinsically Safe Noise-
cancelling Headset (IP57)
Audio
Accessories
ECN22-Ex Intrinsically Safe Noise-
cancelling Headset (IP57)
EHN12-Ex Ex earset with On-Mic
PTT
ELN09-Ex Intrinsically Safe Throat-
vibrating Earpiece (IP57)
ELN10-Ex Intrinsically Safe Throat-
vibrating Earpiece (IP57)
ELN11- E x Intrinsically Safe Throat-
vibrating Earpiece (IP57)
SM18N4-
Ex
Intrinsically Safe Remote
Speaker Microphone
(IP57)
SM24N1-
Ex
Ex Multi-functional
Remote Speaker
Microphone (IP57)
SM24N2-
Ex
Ex Multi-functional
Remote Speaker
Microphone (IP57)
POA63-Ex Ex Large PTT (IP57)
Cable PC38 Programming Cable (USB
port)
Carrying
Accessories LCY005 Carrying Case with
Leather (swivel)
Care and Cleaning
To guarantee optimal performance as well as a long
service life of the product, please follow the tips below.
Product Care
●Do not pierce or scrape the product.
●Keep the product far away from corrosive
environments.
●Do not hold the product by its antenna or earpiece
cable directly.
●Attach the accessory connector cover when the
accessory is not in use.
Product Cleaning
Caution: Turn off the product and remove
the battery before cleaning.
●Clean up the dust and ne particles on the product
surface and charging piece with a clean and dry lint-
free cloth or a brush regularly.
●Use neutral cleanser and a non-woven fabric to
clean the keys, control knobs and front case after
long-time use. Do not use chemical preparations
such as stain removers, alcohol, sprays or oil
preparations, so as to avoid surface case damage.
●Make sure the product is completely dry before use.

12
Specications
Item Specications
Rated Operating Voltage D C 7.4V
Max. Operating Voltage DC 8.4V
Max. Operating Current 1.5A
Weight (with standard
antenna & battery) About 495g
Sensitivity 0.3μV
RF Power Output 1W
Rated Audio Power
Output 0.5W
Audio Distortion 3%
Ambient Temperature -20℃to +50℃
Storage Temperature -40℃to +85℃
Charging Temperature 0℃to +40℃
Battery Ex-battery BL1807-Ex
(1800mAh)
Battery Life About 13 hours (5-5-90
duty cycle)
Charging Time About 4 hours

Preface
Thanks for your favor in our product. This manual is helpful for you to quickly know how to use the
product. For detailed features and operations, please refer to the Feature Description and Operation
Manual along with the product.
To avoid body injury or property loss caused by misoperation, please read the Safety Information Booklet
carefully before use.
This manual is applicable to the following product:
PD79X Ex Digital Trunking Portable Radio (X may represent 2, 5, 6 or 8)
Trunking English

Disclaimer
Hytera Communications Corporation Limited (the
Company) endeavors to achieve the accuracy and
completeness of this manual, but no warranty of
accuracy or reliability is given. All the specifications
and designs are subject to change without notice due
to continuous technology development. No part of
this manual may be copied, modified, translated, or
distributed in any manner without the express written
permission of us.
We do not guarantee, for any particular purpose, the
accuracy, validity, timeliness, legitimacy or completeness
of the Third Party products and contents involved in this
manual.
If you have any suggestions or would like to learn more
details, please visit our website at: http://www.hytera.
com.
RF Radiation Information
This product must be restricted to operations in an
occupational/controlled RF exposure environment.
Users must be fully aware of the hazards of the
exposure and able to exercise control over their RF
exposure to qualify for the higher exposure limits.
RF Radiation Prole
Radio Frequency (RF) is a frequency of electromagnetic
radiation in the range at which radio signals are
transmitted. RF technology is widely used in
communication, medicine, food processing and other
elds. It may generate radiation during use.
RF Radiation Safety
In order to ensure user health, experts from relevant
industries including science, engineering, medicine and
health work with international organizations to develop
standards for safe exposure to RF radiation. These
standards consist of:
●United States Federal Communications
Commission, Code of Federal Regulations; 47CFR
part 2 sub-part J;
●American National Standards Institute (ANSI)/
Institute of Electrical and Electronic Engineers
(IEEE) C95. 1-1992;
●Institute of Electrical and Electronic Engineers
(IEEE) C95.1-1999;
●International Commission on Non-Ionizing
Radiation Protection (ICNIRP) 1998;
FCC Regulations
Federal Communication Commission (FCC) requires
that all radio communication products should meet the
requirements set forth in the above standards before
they can be marketed in the U.S, and the manufacturer
shall post a RF label on the product to inform users
of operational instructions, so as to enhance their
occupational health against exposure to RF energy.
Operational Instructions and Training
Guidelines
To ensure optimal performance and compliance with
the occupational/controlled environment RF energy
exposure limits in the above standards and guidelines,
users should transmit not more than 50% of the time
and always adhere to the following procedures:
●RF energy will be generated only when the radio
is transmitting.
●The radio must be at least 2.5 centimeters away
from human body when transmitting.
EU Regulatory Conformance
As certied by the qualied laboratory, the product is in
compliance with the essential requirements and other
relevant provisions of the Directive 1999/5/EC.
Please note that the above information is applicable to
EU countries only.

1
Contents
Intrinsically Safe Radio Information -----------------------------------------------2
Equipment marking-----------------------------------------------------------------2
No Misoperations -------------------------------------------------------------------2
Safety Instructions------------------------------------------------------------------2
Compliance Standards ------------------------------------------------------------2
Items in the Package--------------------------------------------------------------------3
Product Overview ------------------------------------------------------------------------3
Product Controls --------------------------------------------------------------------3
Programmable Keys ---------------------------------------------------------------4
LCD Icon ------------------------------------------------------------------------------4
LED Indicator ------------------------------------------------------------------------4
Before Use----------------------------------------------------------------------------------4
Attaching the Battery---------------------------------------------------------------4
Attaching the Antenna -------------------------------------------------------------5
Attaching the Belt Clip ------------------------------------------------------------5
Attaching the Accessories --------------------------------------------------------5
Charging the Battery ---------------------------------------------------------------5
Checking the Battery Power -----------------------------------------------------5
Basic Operation---------------------------------------------------------------------------6
Turning the Radio On/Off ---------------------------------------------------------6
Initial Registration-------------------------------------------------------------------6
Adjusting the Volume --------------------------------------------------------------6
Inputting via Keypad ---------------------------------------------------------------6
Locking and Unlocking the Keypad -------------------------------------------6
Selecting a Subgroup -------------------------------------------------------------7
Selecting a Group Contact ------------------------------------------------------7
Managing the Contact -------------------------------------------------------------7
Call Services-------------------------------------------------------------------------------7
Private Call ---------------------------------------------------------------------7
Group Call ----------------------------------------------------------------------------8
Emergency Call ---------------------------------------------------------------------9
Message Services -----------------------------------------------------------------------9
Available Features -----------------------------------------------------------------------10
Troubleshooting --------------------------------------------------------------------------11
Care and Cleaning -----------------------------------------------------------------------12
Optional Accessories -------------------------------------------------------------------12
Specications -----------------------------------------------------------------------------13

2
●The radio logo or model is hard to be recognized;
Safety Instructions
Caution: To protect you against any
property loss, bodily injury or even death,
be sure to observe the following safety
instructions:
●Use only the Ex-battery BL1807-Ex specied by
the Company. The use of other batteries may
result in Ex-protection (intrinsic safety) failure.
●Charge the battery in a non-hazardous area only
with the designated charger.
●Do not remove the battery from the radio in a
hazardous area.
●Do not carry any standby battery into a hazardous
area.
●Use the accessories specified by the Company
only. Do not replace the accessories in a
hazardous area.
●Do not use a damaged antenna. If a damaged
antenna comes into contact with your skin, a minor
burn may result.
●Do not expose the radio to direct sunlight for a
long time, nor place it close to a heating source.
●Hold the radio upright and keep its microphone
2.5 to 5 centimeters away from your mouth during
use.
●If you wear a radio on your body, ensure its
antenna is at least 2.5 centimeters away from your
body during transmission.
●Do not carry the radio into Zone 0 and 20.
Please do not use the radio out of the operating
temperature range specication of this product.
●Do not attempt to repair and service the radio,
batteries and its accessories. Please contact your
dealer for repair and servicing.
●Do not dissemble or redo the radio. Unauthorized
modication of the radio may result in termination
of Ex-protection (intrinsic safety) of the radio.
●Improper usage of the product other than it is
intended to be used for will impair safety of the
product, yourself and surrounding environment.
Compliance Standards
Standard Issue Date
FM
FM Class 3600 2011
FM Class 3611 2004
FM Class 3810 2005
ANSI/IEC-60529(Ed. 4.0) 2004
ANSI/ISA-60079-0(12.00.01) 2009
ANSI/ISA-60079-11(12.02.01) 2012
ANSI/ISA-60079-31(12.10.03) 2009
ANSI/ISA-61010-1(82.02.01) 2004
CAN
CAN/CSA-C22.2 No.0-M91 2006
CAN/CSA-C22.2 No.142-M1987 2009
CAN/CSA-C22.2 No.213-M1987 2008
CAN/CSA-C22.2 No.60079-0 (Ed.
5.0) 2011
CAN/CSA-C22.2 No.60079-11 (Ed.
5.0) 2011
CAN/CSA-C22.2 No.60079-31
(Ed.1.0) 2012
CAN/CSA-C22.2 No.60529 (Ed. 5.0) 2005
Intrinsically Safe Radio
Information
Equipment marking
FM/CAN
●Class I, Zone 1 AEx/Ex ib IIC T4 Gb
●Class II, III Div 1, Group E, F, G T120oC
ATEX
●II 2G Ex ib IIC T4
●II 2D Ex ib IIIC T120oC IP5X
●I M2 Ex ib
IECEx
●Ex ib IIC T4
●Ex ib IIIC T120oC IP5X
●Ex ib I
Certicate Number
●FM13ATEX0023X
●FMG 13.0010X
No Misoperations
Stop operating this product and leave the explosive
atmosphere immediately when the safety or integrity of
the product is endangered, and deliver it to your local
dealer for examination.
These items may endanger the product’s safety or
integrity:
●The radio is stored improperly;
●The radio is faulty;
●The radio works with overload;
●The radio’s operational error or threshold value is
out of allowed range.
●The radio is damaged during transportation;
●The radio’s housing is obviously damaged or
cracked;

3
Standard Issue Date
CAN/CSA-C22.2 No.61010-1 (Ed.
2.0) 2009
ATEX
EN 60079-0 (Ed. 5.0) 2009
EN 60079-11 (Ed. 6.0) 2012
EN 60079-31 (Ed. 1.0) 2009
EN 60529+A1 (Ed. 2.0) 1992
IECEx
IEC-60079-0 (Ed. 6.0) 2011
IEC-60079-11 (Ed. 6.0) 2011
IEC-60079-31 (Ed. 1.0) 2008
Items in the Package
Please unpack carefully and check that all items listed
below are received. If any item is missing or damaged,
please contact your dealer.
Note: The frequency band is marked on
the label of antenna; if not, please refer to
the label on the radio for frequency band
information.
Product Overview
Product Controls
No. Part Name No. Part Name
1SK1 (Side Key 1) 11 LED Indicator
2 PTT (Push-to-
Talk) Key 12 Antenna
3SK2 (Side Key 2) 13
Power On/
Off/ Volume
Control Knob
4 TK (Top Key) 14 Accessory
Connector
5Group Call
Selector Knob 15 Back/
Subgroup key
6 Microphone 16 Up Key
7 LCD Display 17 Down Key
8 OK/Menu Key 18 Battery Latch
9 Speaker 19 Belt Clip
10 Numeric Keypad 20 Battery
Radio Battery Charger Antenna
Belt Clip Power Adapter Strap Documentation Kit
Owner’sManual
This manual suits for next models
4
Table of contents
Other Hytera Portable Radio manuals

Hytera
Hytera HP70X User manual

Hytera
Hytera TC-780 User manual

Hytera
Hytera PD75X User manual

Hytera
Hytera BP36X User manual

Hytera
Hytera HP68X User manual

Hytera
Hytera PD68 Series User manual

Hytera
Hytera PD35X User manual

Hytera
Hytera PD355LF User manual

Hytera
Hytera PD602 User manual

Hytera
Hytera PD56X R5.6 User manual

Hytera
Hytera PD60X User manual

Hytera
Hytera TF-512 User manual

Hytera
Hytera PD362i User manual

Hytera
Hytera PD502 User manual

Hytera
Hytera PD782i User manual

Hytera
Hytera PD482i User manual

Hytera
Hytera TF-412 User manual

Hytera
Hytera BD302i User manual

Hytera
Hytera PD46 Series User manual

Hytera
Hytera AR482Gi User manual