Hytera TF-515 User manual

Preface
Welcome to the world of Hytera and thank you for purchasing this product. This manual includes a description of
the functions and step-by-step procedures for use. To avoid bodily injury or property loss caused by incorrect
operation, please carefully read the Safety Information Booklet before use.
This manual is applicable to the following product:
TF-51X Portable Radio (X may represent 2 or 5).

Copyright Information
Hytera is the trademark or registered trademark of Hytera Communications Corporation Limited (the Company)
in the People's Republic of China (PRC) and/or other countries or areas. The Company retains the ownership of its
trademarks and product names. All other trademarks and/or product names that may be used in this manual are
properties of their respective owners.
The product described in this manual may include the Company's computer programs stored in memory or other
media. Laws in PRC and/or other countries or areas protect the exclusive rights of the Company with respect to its
computer programs. The purchase of this product shall not be deemed to grant, either directly or by implication,
any rights to the purchaser regarding the Company's computer programs. The Company's computer programs may
not be copied, modified, distributed, decompiled, or reverse-engineered in any manner without the prior written
consent of the Company.
Disclaimer
The Company endeavors to achieve the accuracy and completeness of this manual, but no warranty of accuracy or
reliability is given. All the specifications and designs are subject to change without notice due to continuous
technological development. No part of this manual may be copied, modified, translated, or distributed in any
manner without the prior written consent of the Company.
We do not guarantee, for any particular purpose, the accuracy, validity, timeliness, legitimacy or completeness of
the third-party products and contents involved in this manual.
If you have any suggestions or would like to receive more information, please visit our website at:
http://www.hytera.com.
FCC Statement
This equipment has been tested and found to comply with the limits for a Class B digital device, pursuant to part
15 of FCC Rules. These limits are designed to provide reasonable protection against harmful interference in a
residential installation. This equipment generates and can radiate radio frequency energy. If not installed and used
in accordance with the instructions, it may cause harmful interference to radio communications. However, there is
no guarantee that interference will not occur in a particular installation. Verification of harmful interference by
this equipment to radio or television reception can be determined by turning it off and then on. The user is
encouraged to try to correct the interference by one or more of the following measures:
Reorient or relocate the receiving antenna. Increase the separation between the equipment and receiver.
Connect the equipment into an outlet on a different circuit to that of the receiver's outlet.
Consult the dealer or an experienced radio/TV technician for help.

Operation is subject to the following two conditions:
This device may not cause harmful interference.
This device must accept any interference received, including interference that may cause undesired operation.
Note: Changes or modifications to this unit not expressly approved by the party responsible for compliance could
void the user's authority to operate the equipment.
Compliance with RF Exposure Standards
Hytera's radio complies with the following RF energy exposure standards and guidelines:
United States Federal Communications Commission, Code of Federal Regulations; 47 CFR § 1.1307, 1.1310 and
2.1093
American National Standards Institute (ANSI) / Institute of Electrical and Electronic Engineers (IEEE) C95.
1:2005; Canada RSS102 Issue 5 March 2015
Institute of Electrical and Electronic Engineers (IEEE) C95.1:2005 Edition
RF Exposure Compliance and Control Guidelines and
Operating Instructions
To control your exposure and ensure compliance with the occupational/controlled environmental exposure limits,
always adhere to the following procedures.
Guidelines:
Do not remove the RF Exposure Label from the device.
User awareness instructions should accompany device when transferred to other users.
Do not use this device if the operational requirements described herein are not met.
Operating Instructions:
Transmit no more than the rated duty factor of 50% of the time. To transmit (talk), push the Push-To-Talk (PTT)
key. To receive calls, release the PTT key. Transmitting 50% of the time, or less, is important because the radio
generates measurable RF energy only when transmitting (in terms of measuring for standards compliance).
Keep the radio unit at least 2.5 cm away from the face. Keeping the radio at the proper distance is important as RF
exposure decreases with distance from the antenna. The antenna should be kept away from the face and eyes.
When worn on the body, always place the radio in a Hytera-approved holder, holster, case, or body harness or by
use of the correct clip for this product. Use of non-approved accessories may result in exposure levels which
exceed the FCC's occupational/controlled environmental RF exposure limits.

Use of non-approved antennas, batteries, and accessories causes the radio to exceed the FCC RF exposure
guidelines.
Contact your local dealer for the optional accessories of the product.
IC Statement
The device has been tested and complies with SAR limits, users can obtain Canadian information on RF exposure
and compliance.
Après examen de ce matériel aux conformité aux limites DAS et/ou aux limites d’intensité de champ RF, les
utilisateurs peuvent sur l’exposition aux radiofréquences et la conformité and compliance d’acquérir les
informations correspondantes
This device complies with Industry Canada license-exempt RSS standard(s). Operation is subject to the following
two conditions:
This device may not cause harmful interference.
This device must accept any interference received, including interference that may cause undesired operation.
Le présent appareil est conforme aux CNR d'Industrie Canada applicables aux appareils radio exempts de licence.
L'exploitation est autorisée aux deux conditions suivantes: (1) l'appareil ne doit pas produire de brouillage, et (2)
l'utilisateur de l'appareil doit accepter tout brouillage radioélectrique subi, même si le brouillage est susceptible
d'en compromettre le fonctionnement
EU Regulatory Conformance
As certified by the qualified laboratory, the product is in compliance with the essential requirements and other
relevant provisions of the following directives: 1999/5/EC or 2014/53/EU, 2006/66/EC, 2011/65/EU, and
2012/19/EU.
Please note that the above information is applicable to EU countries only.

Contents
1. Packing List.......................................................................................................................................................... 1
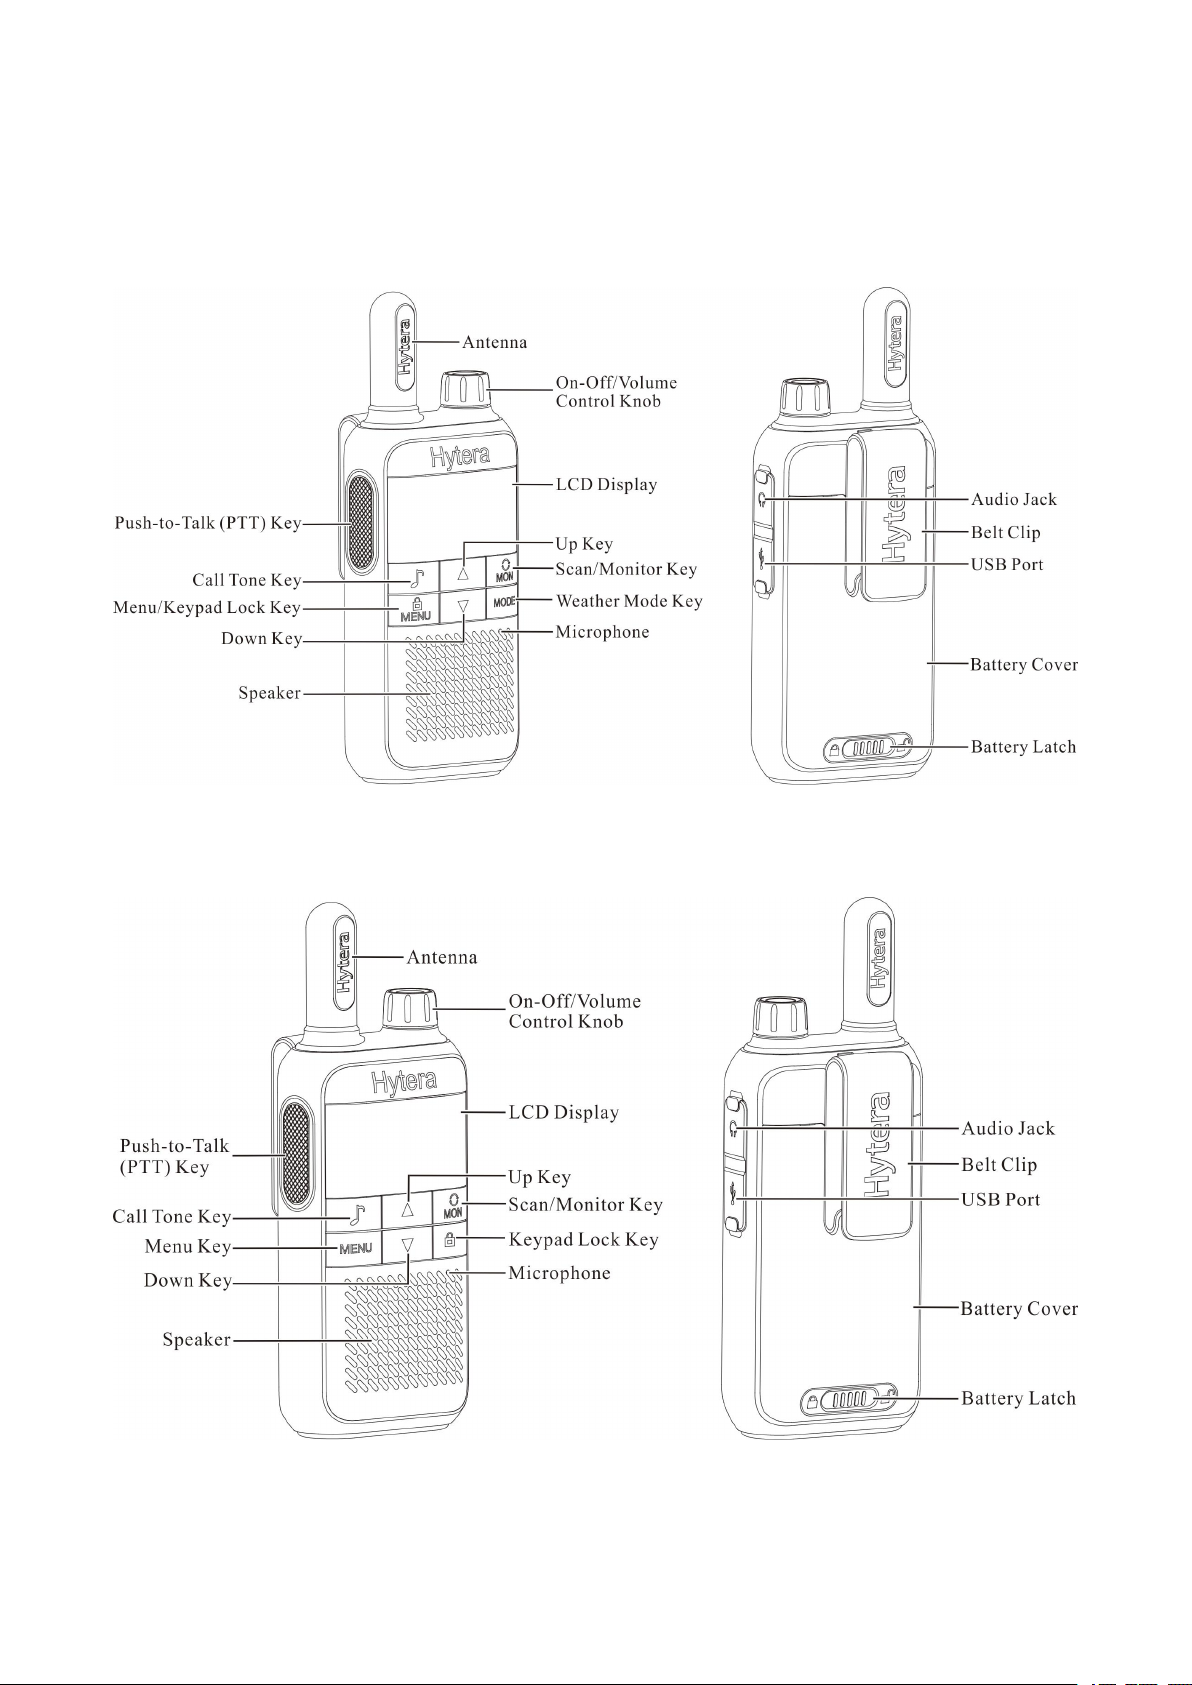
2. Product Controls.................................................................................................................................................2
3. Before Use.............................................................................................................................................................3
3.1 Inserting Batteries........................................................................................................................................... 3
3.2 Charging the Ni-MH Battery.......................................................................................................................... 3
3.3 Attaching the Belt Clip....................................................................................................................................3
4. Basic Operations.................................................................................................................................................4
4.1 Turning the Radio On/Off...............................................................................................................................4
4.2 Adjusting the Volume..................................................................................................................................... 4
4.3 Selecting a Channel........................................................................................................................................4
4.4 Selecting a CTCSS/CDCSS Code...............................................................................................................4
5. LCD Icons..............................................................................................................................................................5
6. Call Services.........................................................................................................................................................6
6.1 Initiating a Call................................................................................................................................................. 6
6.2 Receiving a Call.............................................................................................................................................. 6
7. Supplementary Features...................................................................................................................................7
7.1 Keypad Lock.................................................................................................................................................... 7
7.2 Scan.................................................................................................................................................................. 7
7.3 Monitor.............................................................................................................................................................. 7
7.4 Power Level (TF-512 only)............................................................................................................................ 7
7.5 Call Tone.......................................................................................................................................................... 8
7.6 Talk End Tone................................................................................................................................................. 8
7.7 Voice Operated Transmit (VOX).................................................................................................................. 9
7.8 Silent Mode...................................................................................................................................................... 9
7.9 Keypad Tone................................................................................................................................................. 10
7.10 Room Monitor..............................................................................................................................................10
7.11 Sleep Level.................................................................................................................................................. 10
7.12 Stopwatch and Timer................................................................................................. 错误!未定义书签。
7.13 Weather Mode (TF-512 only)................................................................................................................... 11
7.14 Battery Save................................................................................................................................................ 12
7.15 Low Battery Alert........................................................................................................................................ 13
7.16 Time-out Timer (TOT)................................................................................................................................13
7.17 Auto Squelch............................................................................................................................................... 13
8. Troubleshooting................................................................................................................................................14
9. Optional Accessories...................................................................................................................................... 16
Channels and Frequencies.................................................................................................................................17

1
1. Packing List
Please unpack carefully and check if all items listed below are received. If any item is missing or damaged, please
contact your local dealer.
Item
Quantity (PCS)
Item
Quantity (PCS)
Radio
2
Charger
1
Battery
2
Power Adapter
1
Belt Clip
2
Documentation Kit
1
Lanyard
2
/
/

2
2. Product Controls
TF-512
TF-515

3
3. Before Use
3.1 Inserting Batteries
You can use the Ni-MH battery provided by us or three AA alkaline batteries prepared by yourself.
To insert batteries, do as follows:
1. Slide the battery latch to the unlock position and then remove the battery cover.
2. Insert the Ni-MH battery or three AA alkaline batteries following the polarity indicated in the battery
compartment and the instruction on the batteries.
3. Put the battery cover into space and then slide the battery latch to the lock position.
3.2 Charging the Ni-MH Battery
Use the specified power adapter to charge the battery.
Read the Safety Information Booklet before charging.
Before initial use, fully charge the battery.
To charge the battery, do as follows:
1. Insert the USB plug of the power adapter into the USB port of the radio.
2. Plug the power adapter to a power outlet.
3.3 Attaching the Belt Clip
To attach the belt clip, do as follows:
1. Align the rails on the belt clip with the groove on the battery.
2. Press the belt clip downwards into place.

4
4. Basic Operations
4.1 Turning the Radio On/Off
To turn the radio on or off, rotate the On-Off knob clockwise or counter-clockwise until you hear a click.
4.2 Adjusting the Volume
To increase or decrease the volume, rotate the Volume Control knob clockwise or counter-clockwise after
turning on the radio.
4.3 Selecting a Channel
To communicate with other users through these radios, you need to select the same channel as others.
To select a channel, do as follows:
1. Press the Menu key.
The channel number flashes.
2. Press the Up key or Down key to select a channel.
3. Press the PTT key to confirm your selection.
4.4 Selecting a CTCSS/CDCSS Code
The Continuous Tone Coded Squelch System (CTCSS) or Continuous Digital Controlled Squelch System
(CDCSS) code allows you to prevent unwanted calls on the same channel. If a CTCSS/CDCSS code is set on a
channel, you receive calls from radios with matching CTCSS/CDCSS code only.
To set a CTCSS/CDCSS code for your selected channel, do as follows:
1. Press the Menu key for two consecutive times.
The code number flashes.
2. Press the Up key or Down key to select a code.
Code 0 means no CTCSS/CDCSS code is selected. To communicate with radios which do not
have CTCSS/CDCSS code, select code 0.
3. Press the PTT key to confirm your selection.

5
5. LCD Icons
Icon
Description
Icon
Description
Battery
Room Monitor
Radio Mode
Battery Save
Weather Mode (TF-512 only)
Talk End Tone
Weather Alert (TF-512 only)
Call Tone
Silent Mode
Transmit
Keypad Tone
Receive
Keypad Lock
High Power (TF-512 only)
Scan
Low Power (TF-512 only)
VOX
/
/

6
6. Call Services
6.1 Initiating a Call
You can initiate calls to other radios on the same channel and CTCSS/CDCSS code as yours.
To initiate a call, do as follows:
1. Select a channel and a CTCSS/CDCSS code.
2. Hold the radio vertically 2.5 to 5 cm from your mouth.
3. Press and hold the PTT key, and then speak into the microphone.
When transmitting, the radio displays .
4. When you finish your talking, release the PTT key.
6.2 Receiving a Call
When receiving a call, you can listen to the call without any operation. If you need to speak, wait until the person
who is speaking release his/her PTT key, and then press and hold your PTT key to speak into the microphone.

7
7. Supplementary Features
7.1 Keypad Lock
The Keypad Lock feature allows you to lock the keypad to avoid accidental operations when the radio is not in
use. In the keypad lock mode, you can initiate calls and turn the radio on or off.
To lock or unlock the keypad, press and hold the Keypad Lock key until appears or disappears on the
screen.
7.2 Scan
The Scan feature allows you to find someone in your team who has accidentally changed the channel, and can
quickly find unused channels for your own use.
To turn on this feature, press the Scan key. The radio displays and begins to scan channels. When detecting
activities on a channel, the radio stays on the channel to receive signals. Two seconds after the signal disappears,
the radio continues to scan channels.
To turn off this feature, press the Scan key again.
7.3 Monitor
The Monitor feature allows the radio to receive weak signals on the current channel.
To turn on this feature, press and hold the Monitor key. The radio displays and begins to monitor the
channel and receive signals.
To turn off this feature, release the Monitor key.
7.4 Power Level (TF-512 only)
The Power Level feature allows you to adjust the power level for the selected channel.
To adjust the power level, do as follows:
1. Press the Menu key for three consecutive times.
The current setting flashes.
2. Press the Up or Down key to select one of the following:
HI: enables communication with distant radios but consumes more battery power.

8
LO: enables communication with close radios and saves battery power.
You cannot change the power level from low to high for channel 8 to channel 14.
3. Press the PTT key to confirm your selection.
7.5 Call Tone
The Call Tone feature allows you to transmit a tone to notify others that you want to talk.
To transmit a call tone, do as follows:
1. Select a call tone.
a. Do the following until the radio displays :
For TF-512, press the Menu key for four consecutive times.
For TF-515, press the Menu key for three consecutive times.
b. Press the Up or Down key to select a call tone.
Setting the call tone to OFF turns off the Call Tone feature.
c. Press the PTT key to confirm your selection.
2. Press the Call Tone key to transmit the call tone.
7.6 Talk End Tone
The Talk End Tone feature allows you to send a tone when you release the PTT key. This tone notifies others that
you have finished your talk.
To turn on or off the feature, do as follows:
1. Do the following until the radio displays :
For TF-512, press the Menu key for six consecutive times.
For TF-515, press the Menu key for five consecutive times.
2. Press the Up or Down key to select ON or OFF.
3. Press the PTT key to confirm your selection.

9
7.7 Voice Operated Transmit (VOX)
The VOX feature allows the radio to transmit voice automatically with or without an earpiece when the voice
volume reaches the preset level.
To turn on or off this feature, do as follows:
1. Do the following until the radio displays :
For TF-512, press the Menu key for five consecutive times.
For TF-515, press the Menu key for four consecutive times.
2. Press the Up or Down key to select L1,L2, or L3 to turn on the feature, or select OFF to turn off the feature.
L1,L2, and L3 mean different sensitivity levels, as shown below:
L1: low sensitivity applicable to noisy environments
L2: medium sensitivity applicable to common environments
L3: high sensitivity applicable to quiet environments
3. Press the PTT key to confirm your selection.
A short delay occurs from the time you start talking till the time the radio starts transmitting.
7.8 Silent Mode
The Silent Mode feature allows you to avoid disturbance of received calls by muting the speaker of the radio. In
this mode, the backlight of the radio is turned on and on the screen flashes when the radio receives calls.
When the call disappears, the backlight becomes off and the icon still flashes indicating missed calls.
To turn on or off this feature, do as follows:
1. Do the following until the radio displays :
For TF-512, press the Menu key for seven consecutive times.
For TF-515, press the Menu key for six consecutive times.
2. Press the Up or Down key to select ON or OFF.
3. Press the PTT key to confirm your selection.

10
7.9 Keypad Tone
The Keypad Tone feature allows you to hear the key tone when you press a key.
To turn on or off the feature, do as follows:
1. Do the following until the radio displays :
For TF-512, press the Menu key for eight consecutive times.
For TF-515, press the Menu key for seven consecutive times.
2. Press the Up or Down key to select ON or OFF.
3. Press the PTT key to confirm your selection.
7.10 Room Monitor
The Room Monitor feature allows the radio to transmit voice automatically when the voice volume reaches the
preset level. When you are out, you can use this feature to monitor your room.
In the room monitor mode, the radio cannot receive signals.
To turn on or off this feature, do as follows:
1. Do the following until the radio displays :
For TF-512, press the Menu key for nine consecutive times.
For TF-515, press the Menu key for eight consecutive times.
2. Press the Up or Down key to select L1,L2, or L3 to turn on the feature, or select OFF to turn off the feature.
L1,L2, and L3 mean different sensitivity levels, as shown below:
L1: low sensitivity applicable to noisy environments
L2: medium sensitivity applicable to common environments
L3: high sensitivity applicable to quiet environments
3. Press the PTT key to confirm your selection.
7.11 Sleep Level
The Sleep Level feature allows the radio to enter the sleep mode for the selected duration if no call is received or
no key is pressed at the specified interval. It saves the battery power.

11
To turn on or off this feature, do as follows:
1. Do the following until the radio displays :
For TF-512, press the Menu key for ten consecutive times.
For TF-515, press the Menu key for nine consecutive times.
2. Press the Up or Down key to select L1,L2, or L3 to turn on the feature, or select OFF to turn off the feature.
L1,L2, and L3 mean that the radio is in sleep mode for one second, two seconds, and three seconds,
respectively.
3. Press the PTT key to confirm your selection.
In the sleep mode, the radio does not receive or send any signal. Therefore, when you must respond to
emergencies, do not enable the Sleep Level feature.
The Stopwatch feature allows the radio to count upwards from zero for measuring elapsed time. The Timer
feature allows the radio to counts down from the 59 minutes and 59 seconds.
To use the stopwatch or the timer, do as follows:
1. Do the following until the radio displays :
For TF-512, press the Menu key for eleven consecutive times.
For TF-515, press the Menu key for ten consecutive times.
2. To turn on the Stopwatch feature or the Timer feature, do the following:
For the Stopwatch feature, press the Up key.
For the Timer feature, press the Down key.
The stopwatch or the timer begins to count.
3. To pause the stopwatch or the timer, press the Call Tone key.
4. Optional: To resume the stopwatch or timer, press the Call Tone key again.
5. To reset the stopwatch or the timer, press the Scan/Monitor key.
6. To turn off the feature, press the PTT key or the Menu key.
7.12 Weather Mode (TF-512 only)
The Weather Mode feature allows you to listen to weather reports and set the radio to alert you to extreme weather
broadcasted by the United States National Oceanic and Atmospheric Administration (NOAA) Weather Radio.

12
In the weather mode, the radio cannot receive or send calls. It is recommended not to enter the weather
mode when you must respond to emergencies.
7.12.1 Entering/Exiting the Weather Mode
To enter the weather mode, press the Weather Mode key. The radio displays .
To exit the weather mode, press the Weather Mode key again.
7.12.2 Selecting a Weather Channel
To select a weather channel, do as follows:
1. In the weather mode, press the Menu key.
The current weather channel flashes.
2. Press the Up or Down key to select a weather channel with good reception in your area.
3. Press the PTT key to confirm your selection.
7.12.3 Turning the Weather Alert On/Off
With the Weather Alert feature on, when receiving NOAA Weather Radio emergency messages, the radio rings an
alert tone and changes to the selected weather channel to inform you of weather alert information.
To turn the Weather Alert feature on or off, do as follows:
1. In the weather mode, press the Menu key twice.
The radio displays and the current setting flashes.
2. Press the Up or Down key to select ON or OFF.
3. Press the PTT key to confirm your selection.
7.13 Battery Save
The Battery Save feature allows the radio to get maximum operational life on a single battery charge. When the
radio does not detect any activity or operation for three seconds, it enters the battery save mode.

13
7.14 Low Battery Alert
When the radio is low on power, flashes on the screen and an alert tone rings when you press the PTT key,
indicating that the radio enters the low battery alert mode. In this mode, you are not allowed to send a call tone or
initiate a call.
To exit this mode, charge or replace the battery.
7.15 Time-out Timer (TOT)
The purpose of TOT is to prevent any user from occupying a channel for more than 60 seconds. After 60 seconds,
the radio stops transmitting and keeps beeping. To stop beeping, release the PTT key.
7.16 Auto Squelch
The Auto Squelch feature allows the radio to improve voice clarity during the call by automatically removing
background noise.

14
8. Troubleshooting
Phenomena
Analysis
Solution
The radio cannot be
turned on.
The battery may be installed
improperly.
Remove and reattach the battery.
The battery power may run out.
Recharge or replace the battery.
The battery may suffer from poor
contact caused by dirtied or
damaged battery contacts.
Clean the battery contacts or replace the battery.
During receiving, the
voice is weak,
discontinuous or
totally inactive.
The battery voltage may be low.
Recharge or replace the battery.
The volume level may be low.
Increase the volume.
The speaker may be blocked.
Clean the surface of the speaker.
You cannot
communicate with
other members.
The channel or CTCSS/CDCSS
code may be inconsistent with that
of other members.
Set your channel and CTCSS/CDCSS code to the
same as those of other members.
You may be too far away from
other members.
Move towards other members.
You hear unknown
voices or noise.
You may be interrupted by radios
using the same channel and/or
CTCSS/CDCSS code.
Change the channel and/or the CTCSS/CDCSS
code.
The radio may be set with no
CTCSS/CDCSS code.
Set a CTCSS/CDCSS code for all radios in your
team to avoid interference.
You are unable to
hear anyone because
of too much noise and
hiss.
You may be too far away from
other members.
Move towards other members.
You may locate in an unfavorable
position. For example, your
communication may be blocked by
high buildings or frustrated in the
Move to an open and flat area, restart the radio, and
try it again.

15
Phenomena
Analysis
Solution
underground areas.
It could be the result of external
disturbance (such as
electromagnetic interference).
Stay away from equipment that may cause
interference.
You cannot use the
keys.
The keypad may fail to function
temporarily.
Restart the radio.
The LCD does not
display any
information.
The LCD may fail to work
temporarily.
Restart the radio.
If the above solutions cannot fix your problems, or you may have some other queries, please contact us or your
local point of purchase for more technical support.
This manual suits for next models
1
Table of contents
Other Hytera Portable Radio manuals

Hytera
Hytera PD985i User manual

Hytera
Hytera HP60X User manual

Hytera
Hytera PD662i User manual

Hytera
Hytera MD62X User manual

Hytera
Hytera BD61 Series User manual

Hytera
Hytera PD78X Series User manual

Hytera
Hytera HP78X User manual

Hytera
Hytera HP70X User manual

Hytera
Hytera TETRA PT580H User manual

Hytera
Hytera PD46 Series User manual

Hytera
Hytera PD68X UL913 User manual

Hytera
Hytera PD795EX User manual

Hytera
Hytera POWER446 User manual

Hytera
Hytera PD36X User manual

Hytera
Hytera PD412 User manual

Hytera
Hytera PD502 User manual

Hytera
Hytera PD362i User manual

Hytera
Hytera PD982 User manual

Hytera
Hytera PD78X Series User guide

Hytera
Hytera HP56 Series User manual