icetro ISI-273SH3S User manual

Soft & Yogurt ice cream maker
User manual
ISI-273SH3S (air-cooling)
ISI-273SHW3S (water-cooling)
* Read this manual carefully before using the product.
Keep the booklet in a safe place after reading.
* The product is to be used indoors. Be sure to install it inside a building.
* Appearances, design, color, or parts may be changed without prior notice for the
most effective manufacturing process.
SOFT ICE CREAM
SPASTEURIZE STAND-BY
STAND-BYSPASTEURIZE WASH
STOPDEFROSTA UTO
SPASTEURIZE STAND-BY
STAND-BYSPASTEURIZE WASH
STOPDEFROSTA UTO
SETDEC.
L/R
INC.
SELECT

32
This soft & yogurt ice cream maker has the following benefits:
2. Minimal noise level and pleasant cooling system
1. Sophisticated design
3. MICOM control system
4. Pasteurization function
5. Defrosting function
6. Color LED Lighting
7. Control is easier
8. Convenient washing system
9. Inverter system
- The high-efficiency, low-noise motor provides minimal noise and pleasant
cooling system.
- Elegant design is applied by adopting simple & modern image.
- The product boasts of an intelligent, optimal control system.
- Soft ice cream in the cylinder can be defrosted into liquid.
- The Color LED lamp improves the effectiveness of display and lighting to maximize
sales efficiency.
- Push button is employed for easier control. Adopting self-control function enables auto
discharging of ice cream with just one button. The machine senses a cup automatically
when a user places it on the cup holder (the feeder).
- Water supply can be connected directly; the model with pasteurization function can boil water
for the easy cleaning of the cylinder and water storage bucket.
- Easy cleaning of DRAIN BOX is possible by making it as in
a removable insertion type.
- The mix hopper fully welded with the top cover panel could
prevent contamination of ingredient by other foreign substance.
- The speed of making and supplying ice cream can
be customized to ensure optimal ice cream quality.
- Low-temperature pasteurization at 68℃ for 30 minutes ensures clean, safe ice cream
with no ingredient getting stale.

32
Thank you for purchasing this Soft & Yogurt Ice Cream Maker from Icetro Corp. Be sure to read this user manual for
the correct usage and maintenance of the product. If you encounter any problem while using the product, refer to this
manual for troubleshooting. Keep this manual in a safe place since it contains the warranty certificate.
The product must be installed by a qualified engineer. Icetro will not be liable for any quality or functionality issue
resulting from using a part or a component other than that authorized or supplied by Icetro or any part or component
authorized or supplied by Icetro but modified in any way.(Functions or specifications published on the Icetro website
or this manual may be changed at the discretion of Icetro without prior notice.)
Be sure to visit http://www.icetro.com for the latest specifications.
Contents
Dear customer,
Safety Cautions ............................................................................................................... 4~8
How to unpack and install the ice cream maker ............................................................ 9
How to install .................................................................................................................. 10
Description of parts (air-cooling, water-cooling model) ................................................ 11~14
Specifications ................................................................................................................. 15
What to check before using the product ........................................................................ 16
Button display description and functions ....................................................................... 17
Detailed description of each mode ................................................................................. 18~22
Button description .......................................................................................................... 23~29
Making ice cream ........................................................................................................... 30
How to pasteurize ice cream .......................................................................................... 31
To get the desired texture of ice cream (Regeneration) ................................................. 32
How to adjust the carburetor .......................................................................................... 33
How to clean .................................................................................................................... 34~37
Assembling the dasher and dasher cover ..................................................................... 38
How to install the stopper and oil refuel method ............................................................. 39
How to update the software ............................................................................................ 40
How to use the USB downloader .................................................................................... 41~43
Circuit diagram ............................................................................................................... 44~45
Cooling distribution diagram ........................................................................................... 46~47
What to watch out for ..................................................................................................... 48
Before requesting for customer service .......................................................................... 49~50
Replacement cycle per part ............................................................................................ 50
Error code type .............................................................................................................. 51~52
Warranty ......................................................................................................................... 53

54
To prevent any safety-related accident and to ensure convenient usage of this product with
better understanding, cautions and warnings are accompanied by symbols and figures.
Make sure you understand the symbols and figures below before proceeding.
※ Injury includes wound or burn that requires long-term outpatient treatment.
※ Property damage means damage or loss of one's house or furniture.
※ Label: If the caution label is corrupted, or its text is not legible enough, contact
the customer service center or the store where the product was purchased.
Using the product without taking careful note of this symbol may cause
death or serious injury to the user or fire.
Using the product without taking careful note of this symbol may cause
death or serious injury to the user or fire.
Using the product without taking careful note of this symbol may cause
injury to the user or property damage.
Danger
Warning
Caution
Each figure has the following meaning:
General prohibition
Contact not allowed
The power cord must be disconnected from the outlet.
Must be grounded
Disassembly not allowed
Danger of electric shock
Must be followed
Safety Cautions

54
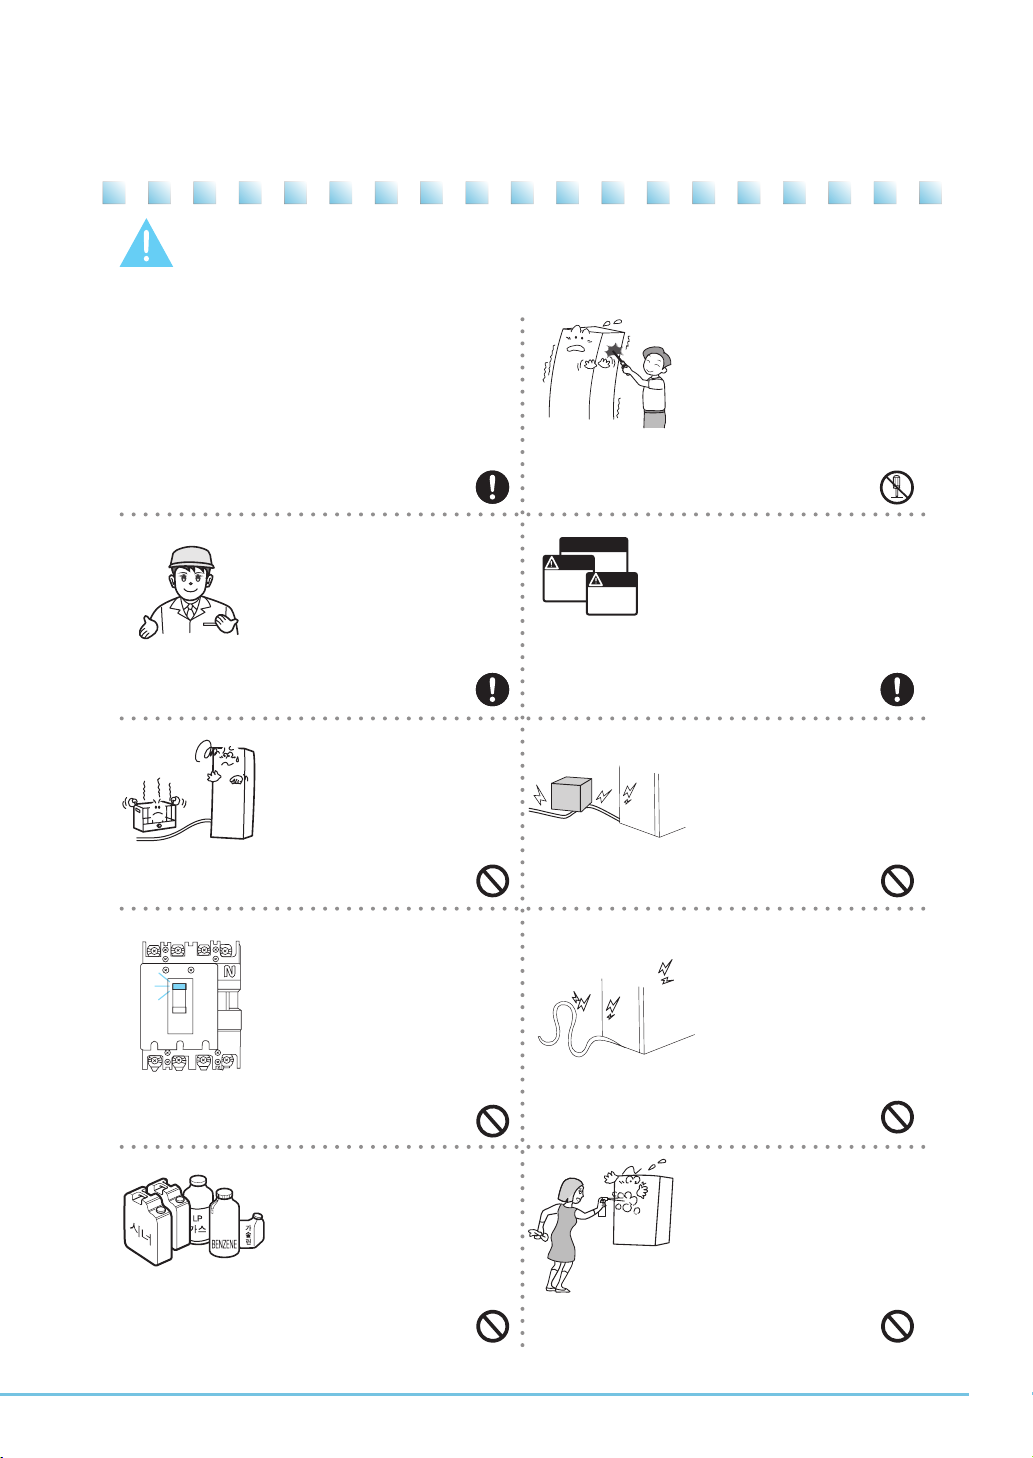
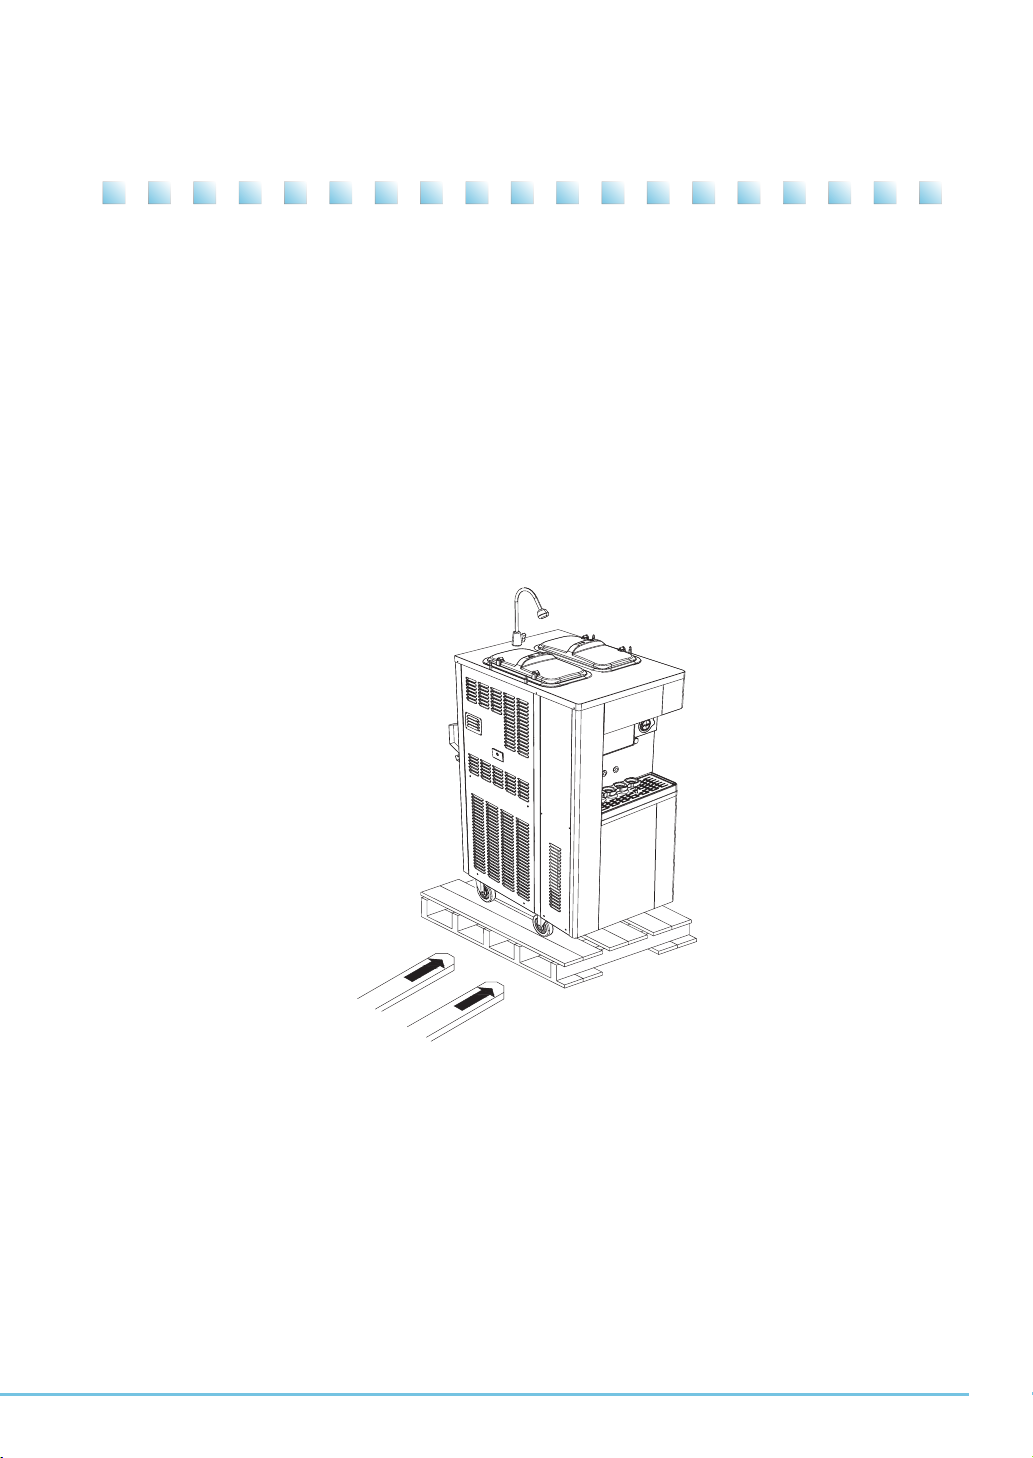
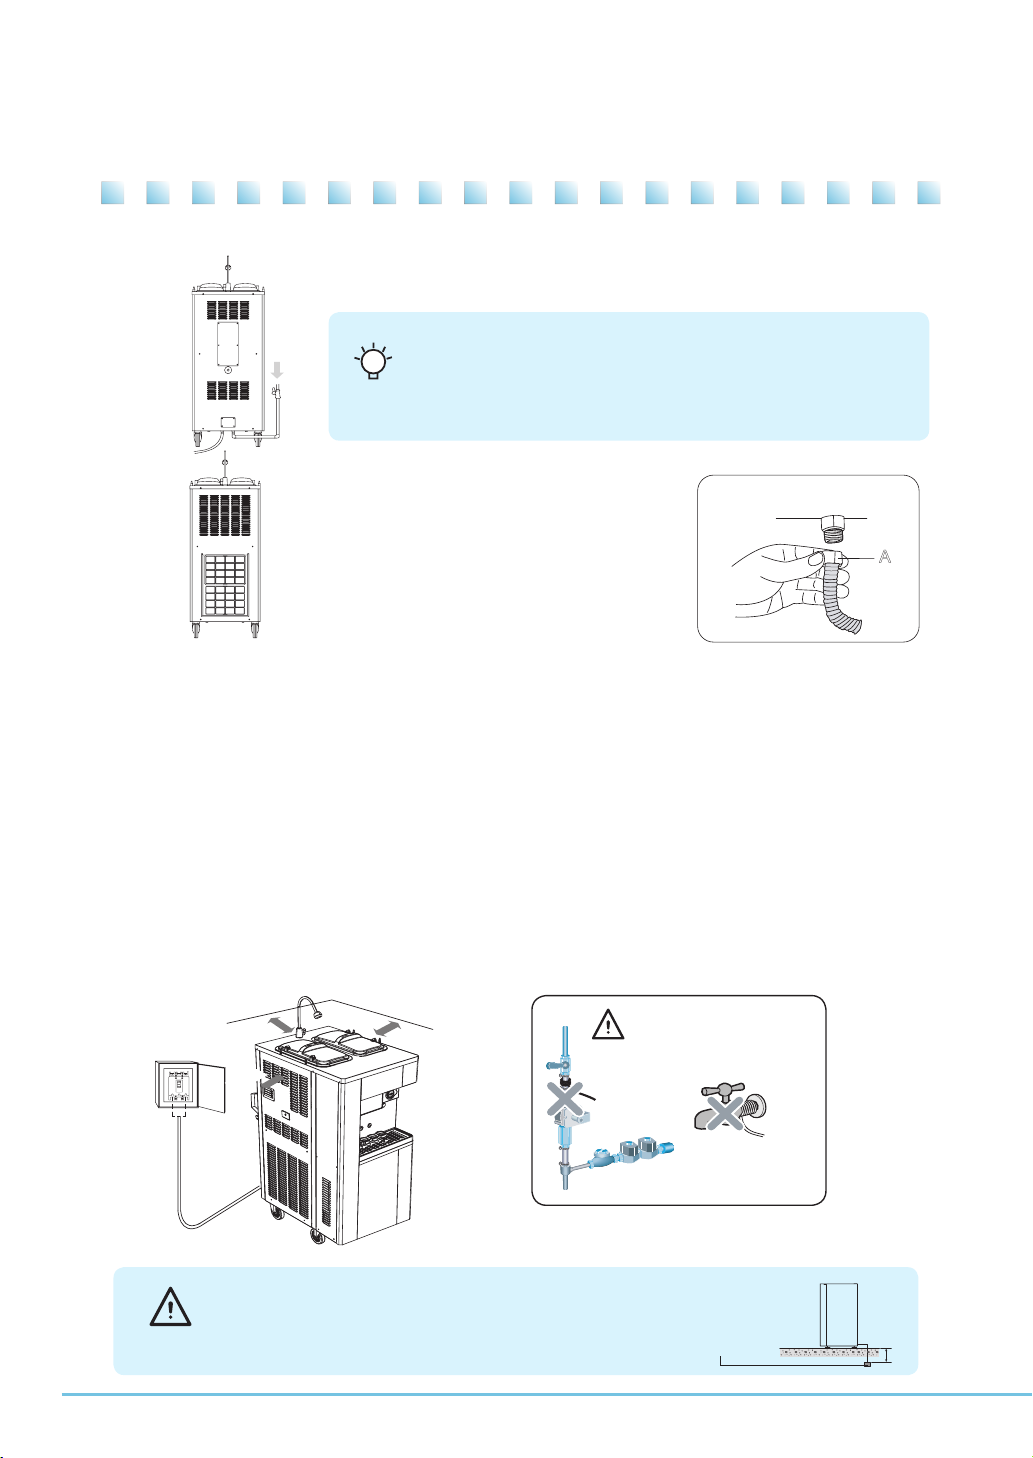
Contact a professional service supplier (※) to install
or move the product.
Incorrect installation may cause damage due to
electric conduction.
Installation requires construction work in accordance
with related standards or laws including, but not
limited to, KS, road traffic act, fire service act, food
sanitation act, etc.
Improper installation may cause accidents.
※: Please contact the agent where the product was
purchased.
Avoid putting any object on
the power cord and make
sure that the cord does not
get tangled or tied.
It may cause fire or electric
shock.
Oh! NO
Do not disassemble or
modify the product.
It may cause electric
shock, fire, or injury.
Stop using the product if the
power cord is damaged.
It may cause fire or
electric shock.
Oh! NO
Do not use combustible gas
or flammable material
(benzene, gasoline, thin-
ner, LP gas, etc.) near the
product.
It may explode or cause fire
or injury.
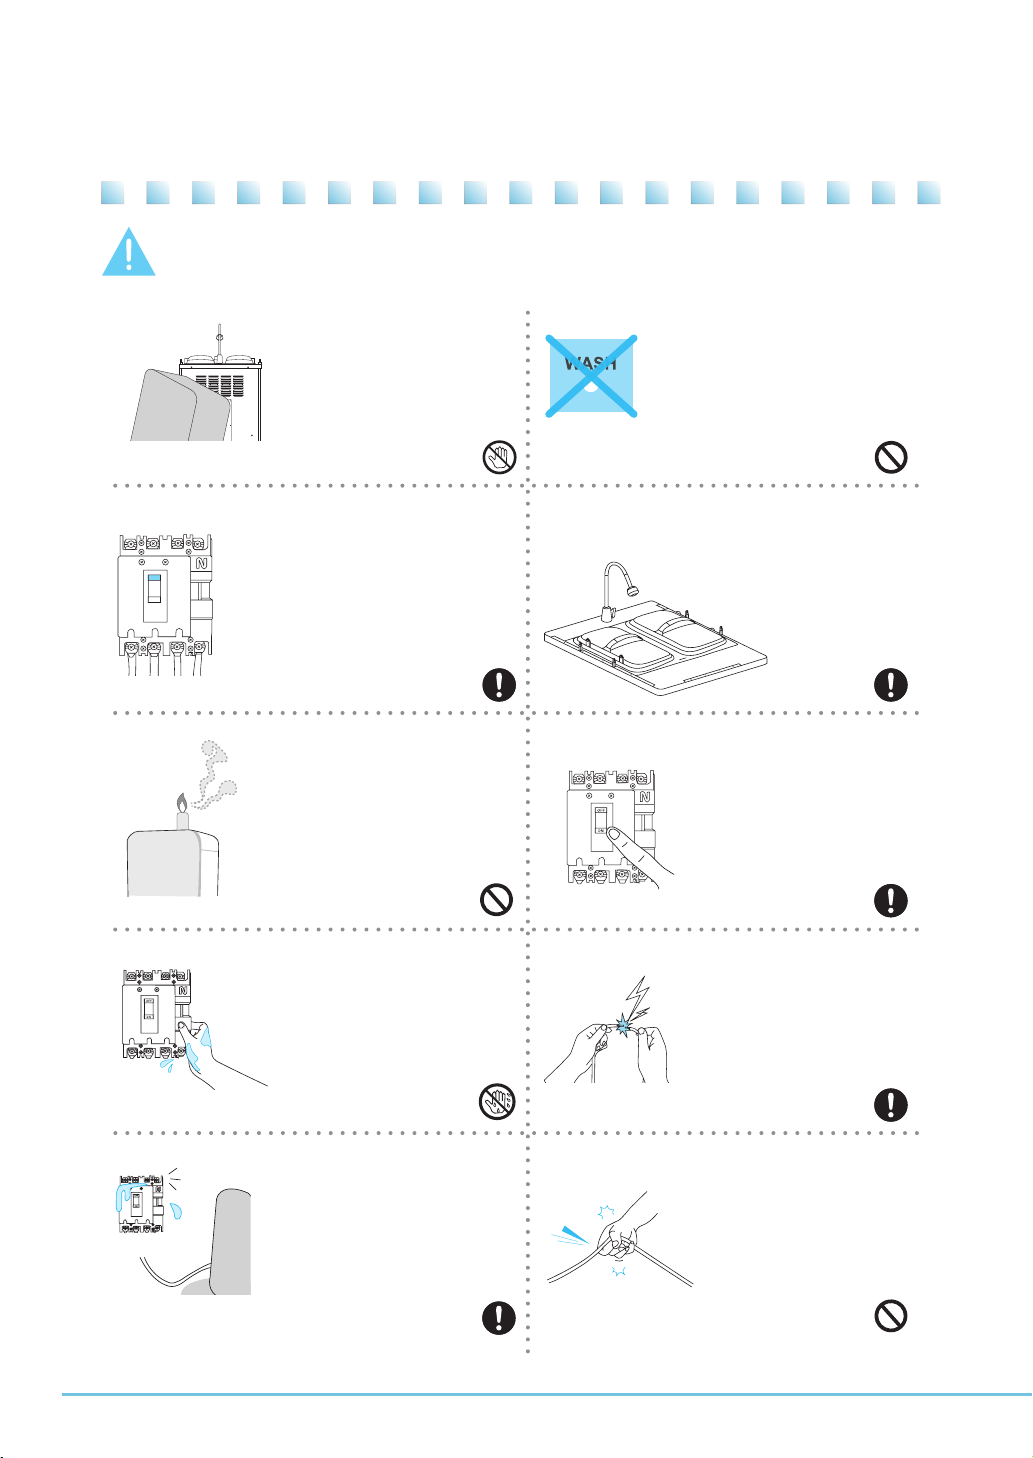
If the earth leak circuit breaker is
set to 「OFF」automatically, do
not turn it 「ON」by force.
Turning the circuit breaker「ON」
by force while the product is out
of order may cause fire or electric
shock.
Please contact the customer
service center.
ON
OFF
Contact a professional
service supplier to repair
the product.
Incomplete repair may cause
electric shock, fire, or injury.
※ : Contact the customer service
center if the product appears
to be defective or acts abnormally.
Be sure to clean the warning or
caution labels so that the text
on them is legible enough.
If an important part of the text
is not legible enough, accidents
may occur due to misuse.
Keep away any heating
appliance from the power cord.
It may melt the coating of the
cord, causing fire or electric
shock.
Combustible gas or flammable
material (benzene, gasoline,
thinner, LP gas, etc.) must be
kept away from the product
and should never be put on the
product.
It may explode or cause fire or
injury.
Contact the customer service center.
Please comply with related laws.
Check the labels.
Prohibited
Prohibited
Prohibited
Prohibited
Prohibited
Prohibited
Disassembly not allowed
LABEL
Warning
Caution

76
Do not touch any moving part.
Do not touch any moving part inside the
product.
It may cause injury.
Do not put any object on
the product.
It may cause electric
conduction or injury.
Turn off the circuit breaker if
strange noise, smell, or smoke
is emitted from the product.
Failure to do so may cause fire
or electric shock.
Do not touch any electrical
component or the power
cord with wet hands.
It may cause electric shock.
Do not ride on, shake, or
tilt the product.
It may cause electric
conduction or malfunction.
Make sure no rain or snow
comes into contact with any
electric part inside the product
when refilling the product with
ingredient.
It may cause short circuit or
electric shock.
Contact a professional
disposal service provider
when disposing of the
product.
Failure to dispose of the
product properly may result
in accidents.
Make sure no water comes into
contact with any electric part or inside
the product.
If the product has been immersed in
water due to causes such as flood, be
sure to contact the customer service
center. Otherwise, the product may
short circuit and cause fire or electric
shock.
Be sure to provide this user
manual when selling or
loaning the product.
The absence of a user
manual will lead to misuse of
the product and may cause
accidents.
Contact not allowed Contact not allowed
Prohibited
Prohibited
MANUAL

76
Contact not allowed
Prohibited
When cleaning the inside of the
product, remove the power cord
from the outlet and wear protective
gear such as rubber gloves.
Failure to do so may cause electric
shock or injury.
Be sure not to operate the
outlet lever during
pasteurization or defrosting.
Hot ingredient may come
out and cause burn.
Do not install the product
on a tilted surface.
It may cause injury to the
user or damage to the
product.
Do not apply excessive
force or shock to the product.
It may damage the product.
Do not install the product at a
place where moisture or dust
gathers easily or where rain or
water spatters.
It may cause electric shock
or fire.
Do not allow a child or a
person without proper training
on using the product to use
the product.
It may cause injury to the user
or damage to the product.
To make quality ice cream,
pasteurization on a daily basis is
recommended.
The ingredient may go bad.
If pasteurization is not done,
at least clean the product on
a daily basis.
Do not put container with water,
medicine, food stuff, small
metallic object, or flammable
material on the product.
If such object gets inside the
product, it may cause electric
shock or fire or damage the
product.
The product provides optimal
functions in an atmosphere of
10~30℃.
Please do not put strength
on the cup holder (the feeder)
or touch the load.
It may cause damage of the
product or an electric shock.
Prohibited
Everyday

98
Do not block the area
around the vent.
It may cause the degradation
of functionality.
Keep the upper cover completely
closed while the product is in
operation.
Bugs or foreign object may get inside.
Do not pull the power cord.
Failure to do so may cause
electric shock or fire.
Do not turn on and off
the circuit breaker
repeatedly.
Failure to do so may cause
electric shock or fire.
If water got inside the power
components, immediately
unplug the cord and
completely dry the product
before using it.
Failure to do so may cause
electric shock or fire.
Do not alter the power cord
or arbitrarily modify it to
connect to an unauthorized
power source.
Failure to do so may cause
electric shock or fire.
Do not touch the earth leak
breaker with wet hands.
It may cause electric shock
or fire.
Do not put a candle or a lit
cigarette on the product.
Otherwise, there is danger
of fire.
Do not plug too many appliances
into one outlet; only one appliance
per outlet is recommended.
Otherwise, there is danger of fire.
ON
OFF
Do not press the “WASH”
button in no-load state (no
ingredient or water).Lack of
lubrication wears out the bearing
drum.
The product may fail to operate.
Contact not allowed
Prohibited
Prohibited
Prohibited

98
How to unpack and install the ice cream maker
This soft & yogurt ice cream maker has been inspected at the factory prior to shipping out.
Remove the wooden or other packaging; if the product is found to be damaged during
transport, contact the local agent or manufacturer.
Check the serial number both outside and inside the product, since it is required when inquiring
about the product or requesting for customer service. Contact the local agent or a professional
service supplier to install or move the product.
1. Remove the wooden packaging, taking care not to damage the exterior
of the ice cream maker.
2. Remove the protective tapes and check the parts.
※Caution: Watch out for electric conduction when tilting or moving the product.
● Where to install/Cautions
1. Do not install the product on any tilted or uneven surface.
- Otherwise, there will be danger of electric conduction or malfunction of the product.
2. Install the product in an indoor place with minimal direct sunlight, wind, or rain.
- Water from the ice cream-making process or rainwater may cause short circuit, fire,
or electric shock.
3. Install the product in a place without the direct influence of sea air or toxic gas.
- It may give rise to complaints from customers selling ice cream from this maker.

1110
1. The water pressure must be in the range of 1~3kgf/㎠.
▶ Too much pressure will cause leak from the connected part.
2. If the product is installed where the temperature drops below 10℃, be sure to prepare a
freeze protection measure for the product.
▶ Otherwise, leak or product malfunction may occur.
3. The water supply must have a valve so that it can be closed in case of malfunction of the tap
on the top of the product.
※ The following must be checked when connecting the water supply!
Water
valve
※ The water supply valve may have different shapes depending
on the installation condition.
1. Insert the o-ring into the nut of the
wrinkled pipe and tighten the nut on
the water supply connector on the
lower back of the product with a tool.
2. Make sure that “A” is not damaged
in the process.
- To guarantee the optimal operation of the product, please consult our
technician on how to install the product.(Contact our authorized technician
in case of moving the product after the initial installation.)
- Avoid uneven surface or place with direct sunlight, too much dust,
or spattering water.
- If the product is to be used for an extended period of time,
reset the current time.
● Connecting power
● Follow this process!
● Connecting the water supply
1. Use only a distribution box that supports specifications of 3-phase, 380V, and 60Hz.
2. Connect the earth leak breaker (higher than 30A) to the distribution box.
3. Ground the product for safety.
4.
The distance between the right side and the back of the product must be longer
than 50cm, and that between the right side and the wall must be longer than 20cm.
5. Install the rubber feet correctly to prevent slippage.
Deeper
than 30cm
Copper bar
or pipe electrode
Caution
If there is no grounding equipment at the installation area, be sure
to ground the product.
- Bury a copper bar or a pipe electrode deeper than 30cm
from the surface.
- Lack of proper grounding may cause electric shock due to leak.
Do not ground to the gas
pipe or water main.
There is danger
of accident.
Caution
50cm
20cm
50cm
For Your
Information
How to install
SOFTICE CREAM
PUSH
SPASTEURIZE STAND-BY
STAND-BYSPASTEURIZE WASH
STOPDEFROST AUTO
SPASTEURIZE STAND-BY
STAND-BYSPASTEURIZE WASH
STOPDEFROST AUTO
SETDEC.
L/R
INC.
SELECT
A
Water
-
cooling
Air
-
cooling

1110
Description of parts (air-cooling, water-cooling model)
FRONT
ISI-273SH3S ISI-273SHW3S
Water tap
Air-cooling Water-cooling
Ingredient
inlet cover
Upper cover
Dasher cover
Cup holder bolt
Water supply
Drain
Cup holder
Cup detection
sensor
Ice cream delivery
button
Dasher cover bolt
Power switch
Cleaning / Eject button
Control value display
Display control button
Wheels
Button for
pasteurization, stop,
and operation
668
751440
SOFT ICE CREAM
SPASTEURIZE STAND-BY
STAND-BYSPASTEURIZE WASH
STOPDEFROSTA UTO
SPASTEURIZE STAND-BY
STAND-BYSPASTEURIZE WASH
STOPDEFROSTA UTO
SETDEC.
L/R
INC.
SELECT
SOFT ICE CREAM
SPASTEURIZE STAND-BY
STAND-BYSPASTEURIZE WASH
STOPDEFROSTA UTO
SPASTEURIZE STAND-BY
STAND-BYSPASTEURIZE WASH
STOPDEFROSTA UTO
SETDEC.
L/R
INC.
SELECT

1312
LEFT SIDE
RIGHT SIDE
Description of parts
900
ISI-273SH3S ISI-273SHW3S
Drain slug
Air-cooling Water-cooling

1312
BACK
Description of parts
ISI-273SH3S ISI-273SHW3S
Pressure
gauge
Air-cooling Water-cooling

1514
Included accessories
Description of parts
User manual
1EA
Brush drum
1EA
Brush cover
1EA
Brush carburetor in
1EA
Brush carburetor out
1EA
Packing dasher cover
2EA
O-ring lever shaft
1EA
Edible grease
1EA
Carburetor packing
4EA
O-ring
2EA
Packing piston top
7EA
Nipple
Air-cooling 1EA
Water-cooling 1EA
※ 적용 모델: ISI-273SH(W)3S
Partition footing
2EA
Hose
Carburetor
2 EA
Drain joint hose
1 EA
Drain Hose
1 EA
Vessel
1EA
Air-cooling 1EA
Water-cooling 1EA
Stopper
2 EA
Oil
1 EA

1514
Category
Specification
Air-cooling / Water-cooling
Product Soft ice cream self maker
Model ISI-273SH3S 273SHW3S
Voltage and frequency rating
3Φ, 220V, 60Hz 3Φ, 380V, 50Hz 3Φ, 380V, 60Hz
Power consumption 220V, 12A, 4000W 380V, 8.5A, 4300W 380V, 9.0A, 4400W
Dimensions
(including
wheels)
Horizontal(W) 670mm
Height(H) 1515mm
Depth(D) 900mm
Cylinder capacity
(Maximum capacity of hopper)
2.7L / (19.5L)
Uninterrupted sales volume
Over 20 cups (Each hole / Ambient temperature : 27 ℃
/ 16 seconds interval)
Refrigeration temperature Can manage lower than 5℃
Compressor Completely enclosed compressor
Pasteurization Average weight ± 25g (Rated voltage standard)
Ice cream weight 100g
With filter Backside (air cooling)
Refrigerant amount 950g 900g 800g
Refrigerant type R-404A
Weight (without packaging) 290kg
Specifications

1716
[ The following must be checked before using the product! ]
Please connect independently to an earth leakage circuit breaker that is over 20[A]
and do the outside grounding.
(Consult a qualified electrical engineer regarding the installation of the product.)
The power cord must be connected to operate the product.
The inlet and outlet of air must be smooth to ensure proper cooling operation.
Do not skip filter cleaning to ensure good-quality ice cream.
The daily cleaning of the cylinder, carburetor, hopper, churner, dasher, piston, and other
parts is recommended.
The condenser has to be cleaned more than once a month. (ISI-273SH3S model.)
Parts that come into contact with soft ice cream or ingredients - such as cylinder, hopper,
churner, dasher, and piston - need to be cleaned on a daily basis.
Clean the product and turn off the earth leak breaker if the product is not to be used
for an extended period of time.
● Do not block the area around the vent.
● Regular filter cleaning (at least once a week) - Air-cooling model only (ISI-273SH3S)
● The condenser has to be cleaned once a month.
● Pasteurize the product more than once a day.
For Your
Information
This product is exclusive for ISI-273SH3S (3PH 220V, 60Hz, 3PH 380V, 50Hz)
/ ISI-273SHW3S (3PH, 380V, 60Hz).
What to check before using the product

1716
Button display description and functions
(Heating, Heat)
(‘DEFROST’+‘AUTO’)
DEC.
L/R
SET INC.
SELECT
‘STOP’
‘WASH’
‘STAND-BY’
‘PASTEURIZE’
‘BOILING’
(‘DEFROST’+‘WASH’)
‘DEFROST’
‘REGENERATION’
‘MIX-LOW’
‘SELECT’
‘SET’
‘L/R’
‘AUTO’
● For washing
● For pasteurizing soft ice
cream and ingredient in
the hopper
● For boiling water to
clean the product
● For the cold storage of
ingredient in the cylinder
and hopper
● To defrost soft ice
cream
● Press this if the ice cream
is too watery or thin
● Press this to make soft ice
cream
● To stop all functions
● Blinks if there is not enough
ingredient in the hopper
● Blinks if there is no ingredient in
the hopper
● To change the setup, press
and hold down the "DEC" and
"INC" buttons simultaneously to
lock or unlock the touch screen.
● Displays values for the left and
right sides (Applied to the
※273 model only).
● Displays the temperature
(‘DEFROST’+‘AUTO’)
[ A u t o ] I c e c r e a m L e v e l
6 0 % / 6 0 %
M i d d l e
1 . 5
[ A ]
B r e a k T i m e
8 . 0 m i n / 8 . 0 m i n
‘ DISPLAY WINDOW ’
● Shows the relevant information

1918
The level of soft ice cream is set to default by the manufacturer, but you need to
change the level suitable to the type of ingredient and wear of the blade.
The ingredient value should stay at the manufacturer’s default value; if change of the
value is needed, please consult an expert.
For Your
Information
Detailed description of each mode
② “Press “SELECT” to see the current level, target level,
and no-load level in turn.
Hold down SET for about 3 seconds to change
the configured values.
(Refer to the “Checking the configured values”section
of this manual for details.).
[ A u t o ] I c e c r e a m L e v e l
[ A u t o ]
[ T e m p e r a t u r e ]
N o w L o a d : 1 . 20 A / 1 . 20 A
S e t L o a d : 1 . 50 A / 1 . 50 A
N o L o a d : 1 . 00 A / 1 . 00 A
H o p p e r : 8 . 2 °C / 8 . 2 °C
D r u m : - 6 . 2 °C / - 6 . 2 °C
8 . 0 m i n / 8 . 0 m i n
②
Put ingredient into the hopper and press “DEC.” The display
shows the information presented in the figure on the right.
Soft ice cream is being made in“AUTO”mode.
“For checking the configured values of“AUTO”mode
“For checking the ingredient information in“AUTO”mode
“After making soft ice cream in “AUTO” mode
① Shows the current level of soft ice cream
To check the ingredient information in the hopper, press
“SET” to change the display to that shown in the figure
on the right.
③ Shows information including the temperature of the hopper
and cylinder.Press and hold down the “SET” button for 3
seconds to change the temperature setting of the hopper.
(Refer to the “Checking the configured values” section
of this manual for details.)
④ The time (in minutes) required to reactivate the compressor
is displayed.(If the temperature of the room is high enough,
the compressor may get reactivated earlier than the minutes
displayed.)
⑤ Shows the current level of soft ice cream. (The level goes
down after reaching 100%; the speed of decrease will be
higher if the temperature of the room is high.)
After making soft ice cream, the compressor goes into
hibernation for a certain period with the display window
shown in the figure on the right.
④
⑤
③
【 】
[ A u t o ] I c e c r e a m L e v e l
6 0 % / 6 0 %
M i d d l e
1 . 5
[ A ]
B r e a k T i m e
8 . 0 m i n / 8 . 0 m i n
①
6 0 % / 6 0 %
M i d d l e
1 . 5
[ A ]
B r e a k T i m e

1918
Detailed description of each mode
[ R e g n r . ] C y l i n d e r
[ D e f r o s t ] C y l i n d e r
[ W a s h i n g ]
[ B o i l i n g ] C y l i n d e r
N o w : - 6 . 2 °C / - 6 . 2 °C
S e t : 8 . 0 °C / 8 . 0 °C
R e m a i n : 1 m i n / 1 m i n
N o w : - 6 . 2 °C / - 6 . 2 °C
S e t : 8 . 0 °C / 8 . 0 °C
R e m a i n : 1 m i n / 1 m i n
N o w : 0 . 50 A / 0 . 50 A
H o p p e r : 8 . 0 °C / 7 . 0 °C
D r u m : - 5 . 0 °C / - 4 . 0 °C
N o w : - 6 . 2 °C / - 6 . 2 °C
S e t : 60 . 0 °C / 60 . 0 °C
R e m a i n : 1 0 m i n / 1 0 m i n
②
③
⑤
⑥
⑦
④
①
If the maker is not used to make soft ice cream for an extended
period of time, the texture of ice cream made with the maker may
not be satisfactory. The “REGENERATION” function can improve
the texture. Press and hold down “DEFROST” and “AUTO”
simultaneously for about 2 seconds to change the display to
that shown in the figure on the right.
※Caution:“REGENERATION”is available in“AUTO”mode only.
① Shows the current temperature of soft ice cream.
② Shows the configured temperature of the cylinder.
③ Displays the duration (in minutes) when the current
temperature (①) stays at the target value (②)
When the duration (③) expires after the current temperature (①) reaches the target value (②),
“AUTO” mode is activated automatically to make soft ice cream.
The“REGENERATION”function melts soft ice cream in the cylinder and subsequently
remakes it into ice cream; it gets activated in "AUTO" mode only and takes
about 20~30 minutes.
For Your
Information
The “DEFROST” function is for melting soft ice cream
in the cylinder.
“WASH” mode is used to activate the dasher motor of
the cylinder and churner in the hopper as well as to drain
the liquid ingredient or soft ice cream to clean the maker.
④ Shows the current value of the dasher motor.
Heats water in the hopper and cylinder to the configured
temperature if you want to clean the maker with hot water.
Holding down the “DEFROST” and “WASH” buttons
simultaneously for more than 1 second will turn the display
into that shown in the figure on the right.
⑤ Shows the configured temperature of the cylinder.
⑥ Shows the current temperature of soft ice cream .
⑦ Displays the duration (in minutes) when the current
temperature (⑥) stays at the target value (⑤)
The maker “stops” when the duration (⑦) expires after
the current temperature reaches (⑥) the target value (⑤).
“REGENERATION”mode
“
DEFROST
”mode
“
WASH
”mode
“
BOILING
”mode
【 】

2120
Detailed description of each mode
[ H e a t S t a n d b y ] D r u m
Cold preservation of cylinder after completing “PASTEURIZE”
N o w : 66 . 2 °C / 66 . 2 °C
S e t : 6 . 0 °C / 6 . 0 °C
[ H e a t ] S e t t i n g T e m p
For checking the configured temperature in“PASTEURIZE”mode
& : /
H o p p e r : 70 . 0 °C / 70 . 0 °C
D r u m : 68 . 0 °C / 68 . 0 °C
Even though the ingredients are kept at a temperature
lower than 5℃, they may go bad after 2~3 days.
To prevent the spoiling of ingredients and maintain the
freshness of ice cream, heating at 68~70℃ for more
than 30 minutes is required.
This is called low-temperature pasteurization, which
is activated by the “PASTEURIZE” function as in the
figure on the left. (Heat=PASTEURIZE)
The current temperature and duration of pasteurizing
(in minutes) are displayed as in the figure on the
upper right side.
Press “SELECT” to show the managed temperature
of the hopper and cylinder.
The step to maintain the coldness of the ingredient in the hopper
and cylinder after pasteurization is completed.
Cold preservation is first done for the hopper, and then
for the cylinder, as in the figure on the right.
For the simultaneous cold preservation of both hopper
and cylinder by configuration, the temperatures of both
hopper and cylinder are displayed as in the figure on
the lower right.
Take caution since the covers of the dasher and hopper are very hot during
“PASTEURIZE.” Never disassemble or modify the dasher and hopper.
Hot ingredient may cause burn.
For Your
Information
If “PASTEURIZE” is not activated, be sure to remove any remaining ingredient or ice
cream from the hopper and clean it.
[ H e a t S t a n d b y ] H o p p e r
N o w : 36 . 2 °C / 36 . 2 °C
S e t : 5 . 0 °C / 5 . 0 °C
R e m a i n : 6 0 m i n / 6 0 m i n
“Cold preservation of the hopper after completing “PASTEURIZE”
[ H e a t S t a n d b y ] A t O n c e
H o p p e r : 56 . 2 °C / 56 . 2 °C
D r u m : 56 . 2 °C / 56 . 2 °C
Simultaneous cold preservation of both hopper
and cylinder after completing “PASTEURIZE”
[ H e a t ] H o p p e r T e m p
3 0 / 3 0 : 56 . 2 °C / 56 . 2 °C
R e m a i n : C y l i n d e r T e m p
30 / 3 0 : 65 . 2 °C / 65 . 2 °C
“
PASTEURIZE
”mode
【 】
This manual suits for next models
1
Table of contents
Other icetro Ice Cream Maker manuals

icetro
icetro ISI-271THS User manual

icetro
icetro SSI-300T User manual

icetro
icetro ISI-321TA User manual

icetro
icetro ISI-271SHSN User manual

icetro
icetro SSI-143S User manual

icetro
icetro ISI-271THN User manual

icetro
icetro ISI-161TH User manual

icetro
icetro SSI-303SN User manual

icetro
icetro SSI-141TG User manual

icetro
icetro ISI-163TT User manual