icetro ISI-321TA User manual

Soft Ice Cream Maker
User Manual
* Read this manual carefully before using the product.
Keep the booklet in a safe place after reading.
* The product is to be used indoors.
Be sure to install it inside a building.
* Appearances, design, color, or parts may be changed
without prior notice for the most effective manufacturing process.
ISI-321TA
ISI-300TA

2
This Soft Ice Cream Maker has the following benefits:
1. Minimum noise and refreshing cooling system
2. MICOM control method
3. Body sensing button
4. Large mixing tank
5. Independent cooling system
With a high efficiency and low noise motor, we can achieve minimal noise from the
refreshing cooling system
Use of an artificial intelligence control type achieves an optimal cooling system.
The touch button provides a smoother operation.
Additional 19.5 liter space can store more ingredients.
Separate systems are used for freezing and storage to give
more convenience.

3
Thank you for purchasing this Soft & Yogurt Ice Cream Maker from Icetro Corp. Be sure to read this user manual for the
correct usage and maintenance of the product. If you encounter any problem while using the product,
refer to this manual for troubleshooting. Keep this manual in a safe place since it contains the warranty certificate.
The product must be installed by a qualified engineer. Icetro will not be liable for any quality or functionality issue resulting
from using a part or a component other than that authorized or supplied by Icetro or any part or component authorized
or supplied by Icetro but modified in any way.
(Functions or specifications published on the Icetro website or this manual may be changed at the discretion of Icetro
without prior notice.) Be sure to visit http://www.icetro.com for the latest specifications.
Safety Cautions .................................................................................................................................................... 4~7
How to unpack and install the ice cream maker ............................................................................................... 8
How to install ........................................................................................................................................................ 9
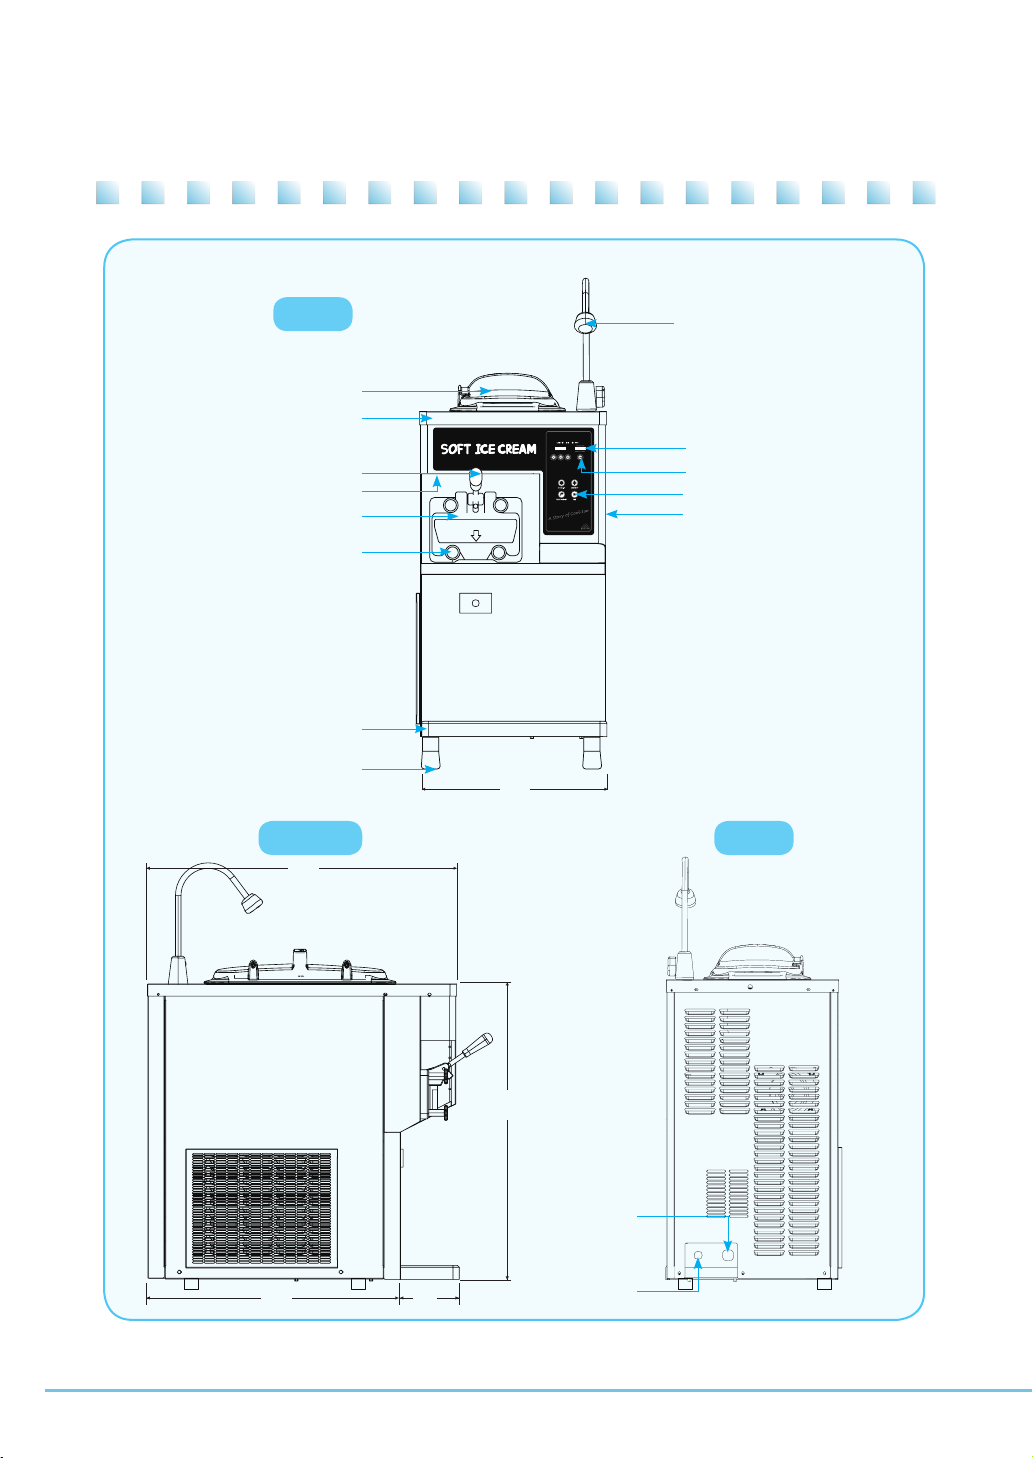
Description of parts and dimensions .................................................................................................................. 10~11
Specifications ....................................................................................................................................................... 12
What to check before using the product ............................................................................................................ 13
Button display description and functions ........................................................................................................... 14
Detailed description of each mode ..................................................................................................................... 15~23
Making ice cream ................................................................................................................................................ 24
Controlling the speed of making ice cream ....................................................................................................... 25
How to adjust the carburetor ............................................................................................................................... 26
How to clean ........................................................................................................................................................ 27~31
Assembling the dasher and dasher cover ......................................................................................................... 32
Before requesting for customer service .............................................................................................................. 33
Replacement cycle of consumable parts ........................................................................................................... 34
Error code type and corrective actions .............................................................................................................. 35
Circuit diagram ..................................................................................................................................................... 36
What to watch out for .......................................................................................................................................... 37
Warranty ............................................................................................................................................................... 38
Contents
Dear customer,

4
Safety Cautions
The caution/warning details for safety are intended to prevent accident or danger through
safe and proper use. Therefore please follow the details accordingly. The precaution details
are categorized into warning and caution, and the respective meanings are as follows.
※ Personal Injury: Minor cuts, burns (high or low temperature) or electric shocks that
do not need hospitalization or long-term hospital visiting.
※ Property Loss: The loss on houses, household goods, livestock, bedding, and such.
This means that it can cause death or major injury
when the details are violated.
If you neglect this symbol and wrongly use the product,
it may cause a fire, serious injury or death.
Warning
Danger
Caution This means that it can cause injury or house/
property damage when the details are violated.
[Each symbol has the following meanings]
This symbol means that it can be dangerous in specific conditions.
This symbol means never to do the described action.
This symbol means not to touch specific parts with bear hands.
This symbol means to unplug the power from the outlet.
Must be grounded.
This symbol means not to disassemble the product.
This symbol means to be careful because there is a possibility of
electric shock.

5
Warning
Call a service center
Observe the regulations Check your labels
Label
Warning
Caution
For relocation of the product, call an expert. Keep your warning and caution
labels clean for easy legibility.
The product may cause such hazards as
falling down unless properly installed.
It should be installed in accordance with related
regulations such as KS standards, the road and
traffic act. The fire fighting act and the food sani-
tation act. ※ Call your distributor.
If the user misunderstands
the content of such a label,
an accident may occur.
Call an expert for repair.
Imperfect repair may cause fire,
electric shock or injury.
If you think the product
needs repairing, call
your distributor.
When you dispose of the
product, consult a disposal
expert.
An accident may result unless
it is properly disposed of.
※ Call your distributor.
Caution
Caution
If the power cable
needs replacement or
repair, call a service
center or an expert.
Caution
Do not place any obstacle at
the entrance of the air vent.
The side and rear of the product
should be maintained at least
20cm from the wall. If no t so,
the performance will be degraded
When you replenish ice cream
raw materials do not allow rain
or snow to get into any interior
electric part.
Defective operation may occur. Electric shock or injury may
result.
Before you clean the inside
of the product, unplug
the earth leakage breaker
wearing rubber gloves.
Caution
Caution
Caution
Otherwise, the ingredients
can deday.
If sterilization is not done
every day, you are recommen
ded towash it every day.
To have good soft icecream,
it is recommended
topasteurize or cleanit
everyday.
EVERYDAY
Caution
It can cause damages to
the product.
Do not use or store
inflammablegas or material
near the product.

6
Warning
User’s
Manual
It can cause electrical
shocks or fires.
without the manual,
an accident may occur
because of erroneous
handing or operation.
Do not install it near dust,
moisture or rainwater(water)
popping.
It can cause physical injury
or product damages.
It can cause damages to
the product.
Do not install it on a tilt.
Do not apply excessive force
orimpact to the product.
This product shows
the Optimal performance
at temperature of
10~30°C.
Do not operate the product
while all panels are not well
fastened enough.
Caution Caution
Caution
Caution
Caution
Caution
While operating the product,
please close the upper cap
completely.
Do not turn the power
ON/OFF with the circuit
breaker continuously.
Do not arbitrarily connect
the power cord or process
it for use.
Do not connect manyelec-
trical products to the earth
leakage circuit breaker.
Use it individually.
Bugs or alien substances
can enterthe product.
It can cause electrical
shocks or fire. It can cause fires.
It can cause fires.
Caution Caution
ON
OFF
Caution Prohibited
Prohibited
Do not put anything on the
product.
Injury may occur if it falls over.
Fire or electric shock
may occur.
Oh! NO
Prohibited
If you sell or hand over
the product, make sure
to hand over the
user’s
manual with it.
Do not put anything on
the power cable.
Make sure that
the power cable is not
twisted or knotted.

7
Warning
Prohibited
Prohibited
Prohibited
Prohibited
If the earth leakage breaker
is in the ‘OFF’ position,
do not turn it to the ‘ON’
position by force.
Do not spray with
an insecticide,
flammable spray or
perfume near
the product.
Do not climb onto
the product or
shake or tilt it.
Do not inject inflammable
material such as benzene,
gasoline, paint thinner or
LP gas into the product
otto keep it close to
product
Make sure that no electric part
has come into contact with water.
If you turn it ‘on’ while the
machine is defective, fire
or electric shock may occur.
If the product was
immersed in water by a flood,
call a service center for
a check. Otherwise,
fire or electric shock due to
electric leakage may occur.
Explosion, fire or injury
may occur.
Fire or electric shock
may occur.
The product may fall down
or develop a problem.
Prohibited
Stop using the machine,
if you find the power cable,
or any other cable to be
defective.
Fire or electric shock
may occur.
Oh! NO
Prohibited
Do not place water containers,
medicine, foods, small metal
parts or inflammable material
on top of the product.
If they go inside the product,
it cancause electrical shocks,
fire anddamages.
Prohibited
Keep a heating device away
from the power cable.
A heating device may melt
down the coating of the
power core, resulting
in fire or electric shock.
Prohibited
Prohibited
Prohibited
Do not place candle lights
or cigarettes light on top of
theproduct.
Do not put anything on the
product.
It can cause fires.
Injury may occur
if it falls over.
Do not touch any moving part inside the
product.
You may get injured.
Prohibited
Thinner
Gas
Ga
sol
ine

8
How to Unpack and Install the Ice Cream maker
This soft & yogurt ice cream maker has been inspected at the factory prior to shipping out.
Remove the wooden or other packaging; if the product is found to be damaged during
transport, contact the local agent or manufacturer.
Check the serial number both outside and inside the product, since it is required when inquiring
about the product or requesting for customer service. Contact the local agent or a professional
service supplier to install or move the product.
1. Remove the wooden packaging, taking care not to damage the exterior of
the ice cream maker.
2. Remove the protective tapes and check the parts.
※Caution : Watch out for electric conduction when tilting or moving the product.
● Where to Install/Cautions
1. Do not install the product on any tilted or uneven surface.
- Otherwise, there will be danger of electric conduction or malfunction of the product.
2. Install the product in an indoor place with minimal direct sunlight, wind, or rain.
- Water from the ice cream-making process or rainwater may cause short circuit, fire,
or electric shock.
3. Install the product in a place without the direct influence of sea air or toxic gas.
- It may give rise to complaints from customers selling ice cream from this maker.

9
Do not ground to the
gas pipe or water main.
There is danger of accident.
Caution
※ The following must be checked when connecting the water supply!
1. The water pressure must be in the range of 1~3kgf/㎠.
▶ Too much pressure will cause leak from the connected part.
2. If the product is installed where the temperature drops below 10℃, be sure to prepare a freeze protection
measure for the product.
▶ Otherwise, leak or product malfunction may occur.
3. The water supply must have a valve so that it can be closed in case of malfunction of the tap on the top
of the product.
Water
Valve
●
The water supply valve may have different shapes depending
on the installation condition.
● Follow this process!
1. Insert the o-ring into the nut of the wrinkled pipe
and tighten the nut on the water supply connecto
on the lower back of the product with a tool.
2. Make sure that “A” is not damaged
in the process.
● Connecting the water supply
● Connecting power
1. Be sure to connect to a single-phase power outlet with 230V and 50Hz; connect
only one product per outlet.
2. Connect the earth leak breaker (higher than 20A) to the distribution box.
3. Ground the product for safety.
4.
The distance between the right side and the back of the product must be longer than 20cm,
and that between the right side and the wall must be longer than 20cm.
5. Install the rubber feet correctly to prevent slippage.
Deeper than
30cm
Copper bar
or pipe electrode
Caution
If there is no grounding equipment at the installation area, be sure to ground
the product.
- Bury a copper bar or a pipe electrode deeper than 30cm from the surface.
- Lack of proper grounding may cause electric shock due to leak.
A
For Your
Information
How to Install
20cm
20cm
20cm
● To guarantee the optimal operation of the product, please consult
our technician on how to install the product.
(Contact our authorized technician in case of moving the product
after the initial installation.)
● Avoid uneven surface or place with direct sunlight, too much dust,
or spattering water.
● If the product is to be used for an extended period of time,
reset the current time.

10
Description of Parts and Dimensions
Front
BackLeft side
Power input
Water supply part
Ingredient inlet cover
Upper cover
Power switch
Dasher cover
Joint bolt
Drain box
Rubber feet
Water tap
Setup button
Right control box
Adjusting button
460
688
850
160
840
Display
Outlet lever

11
Brush drum
Brush cover
Brush 3
Brush carburetor out
Union 1/2
Included accessories
Description of Parts and Dimensions
Carburetor tube
body, tube
1EA, 1EA
Manual
1EA
1EA
1EA
1EA
1EA
1EA
Hose
1EA
O-ring
2EA
Hines
1EA
Packing down 141
1EA
Dasher lug foam
2EA
Packing dasher shaft
Dasher bearing
2EA
1EA
Packing dasher cover
1EA

12
Category Specification
Product Soft ice cream maker
Model ISI-321TA ISI-300TA
Voltage and frequency rating 1 Ph, 230 V, 50 Hz 1 Ph, 220 V, 60 Hz
Power consumption 2070 W 2500 W
Rated Current 10.1 A 12 A
Dimensions
(including
wheels)
Horizontal(W) 462 mm
Depth(D) 840 mm
Height(H) 850mm(Including rubber feet, excluding cover)
Cylinder capacity 3 . 2 ℓ
Maximum capacity of hopper 17.9 ℓ
Consecutive selling
(At interval of 30 seconds)
※Caution (for making 100g of ice cream at 27℃)
20~24 cups
Initial cooldown time 7~10 minutes
Refrigeration temperature Can manage lower than -5℃
Compressor Completely enclosed compressor
FILTER Install to the left (for the air-cooling model)
Refrigerant amount(Freeze/refrigeration)
1180 g / 160 g 1000 g / 180 g
Refrigerant kind(Freeze/refrigeration)
R-404A / R-134A
Panel type FND screen
Weight (without packaging) 140 kg
Specifications

13
Plug the power cord into an available outlet.
(Consult a qualified electrical engineer regarding the installation of the product.)
The power cord must be connected to operate the product.
The inlet and outlet of air must be smooth to ensure proper cooling operation.
Do not skip filter cleaning to ensure good-quality ice cream.
The daily cleaning of the cylinder, carburetor, hopper, agitator, dasher, piston,
and other parts is recommended.
The condenser has to be cleaned more than once a month.
Clean the product and turn off the earth leak breaker if the product is not to be used
for an extended period of time.
● Do not block the area around the vent.
● Regular filter cleaning (at least once a week)
● The condenser has to be cleaned once a month.
For Your
Information
Be sure to connect to a single-phase power outlet with 230V and 50Hz.
What to check before using the product
【 The following must be checked before using the product! 】

14
Button display description and functions
Buttons sense the touch of people(electric capacity), so press them slightly.
Also, buttons are placed narrowly each other. So when you press a button,
the adjacent button can be pressed.
If you press the buttons hard, internal malfunction can occur,
or the buttons won't function.
For Your
Information

15
The soft cream level is set for the ingredients (vanilla) designated by the maker.
Depending on the ingredients, you will need to adjust it properly. Please follow the
instructions from our company when changing the level for the ingredients.
For Your
Information
Detailed description of each mode
If you press the "Set" button lightly, you can
enter the mode to check the setting as below.
Use the“▼”and“▲”buttons to see the settings.
1-1: Check ice cream level settings
You can check the current setting for the ice cream. If the
displayed value is higher than the no-load current (1-2),
the ice cream becomes harder and if lower,
the ice cream becomes softer.
1-2: Check the ice cream default level
It is the no-load current of the dasher motor.
It is the current consumed by the dasher motor when the
ingredients are in the liquid status.
1-3 : Check the currently supplied voltage.
It is the power supplied to the machine.
If the voltage is not correct after installation,
call for service.
1-4 : Check the storage temperature in the mixing tank.
You can check the temperature inside the mixing tank.
1-5 : Check the voice announcement
You can check whether a voice announcement is available.
1-6 : Check the program version
You can check the versions of the main
PCB and the display PCB.
"n" is for the main PCB and "d" is
for the display PCB.
Change the setting

16
If 2-3 is too high, an error may occur.
This error is caused by poor environmental conditions
(clearance, cleaning, ventilation, etc.).
You should install the machine according to the manufacturer's recommendation.
For Your
Information
Detailed description of each mode
Press the "Select" button to check the different temperaturesettings
mentioned below. The item number and the temperature
will be displayed in turns.
2-1 : Temperature of the mixing tank
2-2 : Temperature of the mixing tank sensor
2-3 : Condenser suction temperature (neighboring temperature)
2-1 : Temperature of the mixing tank
The sensor located at the bottom of the mixing tank
to measure the temperature of ingredients may display
temperatures different from the actual ones if there is
no ingredient in the mixing tank or mixer.
2-2 : Temperature of the cylinder
The sensor located at the bottom front of the cylinder
may display temperatures different from those of
the ingredients or the ice cream.
2-3 : Ambient temperature of the condenser
The sensor located in front of the condenser can measure
the temperature of the ambient air entering the condenser
and the recommended installation conditions as well.
Check the temperature and the record

17
The ice cream level (3-1) may vary according to ingredients or sugar content. If it is
high, the machine operates too much unnecessarily to make the ice cream
soft. Also, if the machine stays in the auto mode for two or three hours
without discharging any ice cream, this may make the ice cream softer
depending on the ingredients.
For Your
Information
Detailed description of each mode
Press the "Set" button for three seconds to enter the setting
change mode as follows.
Use the“▼”and“▲”to enter the password and use the "Set"
button to move to each item. When the display blinks, use "▼”
and“▲”to change the value and use the "Set" button
to leave the item. Press and hold the "Set" button for three
seconds to leave the value change mode.
3-1 : Adjust the soft cream level
This item is used to adjust the target current of the soft cream.
If the value is lower, the ice cream becomes softer. If the level is
too high, the quantity of produced ice creams may drop, it may
not be discharged or other malfunctions may occur. Consult an
engineer.
3-4 : Set the mixing tank temperature
This item is used to adjust the cooling temperature of the
ingredients in the mixing tank. The larger the number is,
the higher the storage temperature is. The smaller the number
is, the lower the storage temperature is.
If the temperature is too low, the ingredients may freeze.
If too high, they may spoil.
3-5 : Select a voice announcement option
You can turn on/off the voice announcement.
Change the setting

18
The categories that determine the compressor rest time during operation are 4-1 and
4-2. When one is satisfied with these two categories, the compressor rest time ends.
Model selection: Only experts that have been designated by the main office or by those who received
professional education and received approval from the main office shall adjust this category.
A service charge will be applied if problems occur due to unapproved alterations.
For Your
Information
Detailed description of each mode
4-0 : This is the category that can be selected according
to the characteristic and model of the product and
that has a meaning that is different from the model
name of the product. When the model is changed
in this category, the content in Category 4 is reset
to the default setting.
Press "set" + "select" buttons or 3 seconds to enter the stage of
inputting the password.
Password has 4 digits and input begins from the left to the left
and the relevant digit blinks.
Select the number by "-" and "+" buttons and press "set"
buttons to move to the next digit.
Input the 4 digit password in this way.
Do not let anyone without professional education know the 4 digit
password under any circumstances.
4-1 : Rest time setting
This is the function to allow the compressor to rest for
a certain period of time by minute after the soft freezer
is made. Adjust this category carefully as it can make
the soft freezer melt quickly.
4-2 : Set the compressor to restart
This remembers the temperature at the time of making
soft freezer. When the temperature rises above the temperature
that was set in this category, the compressor is restarted.
The rest time of the compressor can be extended
when the temperature in this category is increased.
4-3 : Hopper management temperature setting
This sets the management temperature to refrigerate
the raw material inthe hopper. The temperature set
in this category is managed as the value added
from the value in Categories 3-4. For example, if 3-4 is
2℃ and 4-3 is 2℃, the management temperature of the hopper
is maintained at 2-4℃.

19
Detailed description of each mode
4-4 : Standby off temperature setting
This sets the cylinder's raw material storage temperature
in the standby mode. When the temperature of this category
is too low, the raw material inside the cylinder freezer
and soft freezer can become like porridge.
4-5 : Standby management temperature setting
This sets the management temperature to refrigerate the raw
material in the hopper. The temperature set in this category is
managed the value added from the value in Categories 3-4.
For example, if 3-4 is 2℃ and 4-3 is 2℃, the management
temperature of the hopper is maintained at 6-8℃.
4-6 : Standby reset time setting
This sets the motor's operation cycle to the standby mode.
When one is satisfied with the temperature value of 4-4 plus
4-5 and the time of this category, the motor and compressor
are operated.
4-7 : 1℃ rise level calculation (The left digit)
When the soft freezer is made, 100% is displayed on the green
FND window and the percentage value is deducted from the
compressor rest time.At this time, when 1℃ is added to the
temperature at which the soft freezer is made, the value set for
this category is deducted from the percentage and is then displayed.
4-7 : 30 seconds pass level calculation (The right number)
When the soft freezer is made, 100% is displayed on the green
FND window and the percentage value is deducted from the
compressor rest time. At this time, the value set for this category is
deduced from the percentage every 30 seconds after the making
of the soft freezer and displayed.
4-8 : Upper limit current setting
This category sets the maximum value when adjusting
the hardness of the soft freezer in Category 3-1.
This category's value needs to be set within the range, in which
excessive current does not flow on the motor.
4-9 : Maximum pasteurization time setting
It is set to stop pasteurization when gas leaks or when
problems occur in the pasteurization device. If pasteurization
continues until the time set for this category
4-10 : Select between Celsius and Fahrenheit
Select between Celsius (
℃) and
Fahrenheit(℉)

20
Detailed description of each mode
4-11: Environmental temperature detect function setting
The function to detect the environmental temperature
can be turned ON/OFF. Environmental temperature is the
temperature of the air coming into the compressor.
Therefore, the temperature for this category can be high and
a warning message can be given if the place of installation
is small and has no ventilation.
Then the installation environment must be improved.
4-12 : No load detection function setting
The no load detection function can be turned ON/OFF.
"No load" means the raw material inside the cylinder exists
in a liquid condition. The motor current is then called
"no load current."
If this function is set to on, power is allowed to the product
and the no load current is remembered when the temperature
of the cylinder is higher than 5
℃.
4-13 : Voltage standard value setting
Measure the voltage at the place of installation and
enter the standard value. This product guarantees ±10%
of the supply power. When it is outside of the range
a warning sound is given.
If used continually, the product can have problems.
4-14 : Button sensitivity setting
This sets button sensitivity.
Asmaller number means more sensitivity and a larger
number means less sensitivity.
4-15 : Voice language selection
The language set in this category gives voice guidance,
and a total 2 languages are embedded.
: Korean, : English
4-16 : Set motor current value correction
This is the function for performing overall compensation
when the measured motor current is different
from the actual measurement value.
4-17 : Air pump selection
If the model has an air pump, this category can be turned
on to control the operation of the air pump.
1: Operation time setting during the initial operation
Set the operation time of the air pump when beginning
initial operation.
This manual suits for next models
1
Table of contents
Other icetro Ice Cream Maker manuals

icetro
icetro ISI-161TH User manual

icetro
icetro ISI-273SH3S User manual

icetro
icetro ISI-271SHSN User manual

icetro
icetro SSI-300T User manual

icetro
icetro ISI-271THN User manual

icetro
icetro ISI-163TT User manual

icetro
icetro SSI-141TG User manual

icetro
icetro ISI-271THS User manual

icetro
icetro SSI-143S User manual

icetro
icetro SSI-303SN User manual
Popular Ice Cream Maker manuals by other brands

ENKHO
ENKHO MD 17512 user manual

Cuisinart
Cuisinart ICE-100 Instruction/recipe booklet

Cuisinart
Cuisinart ICE-70C series Instruction and recipe book

Cuisinart
Cuisinart Pure Indulgence ICE-30BC Series user manual

Perlick
Perlick 8000B Installation and operation instructions

SEVERIN
SEVERIN EZ 7407 Instructions for use