icetro SSI-303SN User manual

SSI(ISI)-303SN
SSI(ISI)-203S,SN,SNP
ⷅThis product is for indoors, so do not use it outdoors.
ⷅ
Before using the product, be fully familiar with the contents in the manual.
Please store this manual in a place where you can reach it easily for
future reference.
ⷅThis user manual contains a product warranty.

2
Our soft ice cream freezer offers the following advantages.
1. Minimum noise and refreshing cooling system
With a high efficiency and low noise motor, we can achieve minimal
noise from the refreshing cooling system.
2. MICOM control method
Use of an artificial intelligence control type achieves an
optimal cooling system.
3. Body sensing button
The touch button provides a smoother operation.
4. Large mixing tank(SSI(ISI)-303)
5. Independent cooling system
Additional 19.5 liter space can store more ingredients.
Separate systems are used for freezing and storage to give
more convenience.

3
Dear customers;
$POUFOUT
"DLOPXMFEHNFOU
$MFBOJOH.FUIPE
.FUIPEPG6TF
&5$
Cautions for your safety
-Power supply related items
-Installation related items
-During use
Part names and controller
04
04
05
05
06~07
08
09
10~12
19
20
21
13~18
31~33
34~36
37
38
39
40~42
43
44
45~51
22~24
25
26
27
27
28
28
29
29
30
30
Check prior to use
Button display names and functions
Functional description of the buttons
Explanation of the function button
(set by an expert)
How to make soft ice cream
Soft ice cream out-speed control
Caburator control
Cleaning Method
-Wash mode
-Washing of each parts
How to upgrade the program
-Download kit Product
-Pc Download kit
Installation method
%QPFGPUGTCPFſNVGTENGCPKPIOGVJQF
Dasher and dasher cover assembly method
Dasher cover assembly method
‘Icetro’ air Pump ‘A’
Pump cleaning
-Disassembling the pump
-Pump cleaning
Starting the machine
Disassembling Mix Pump
Reassembling the mix pump
Priming the mix pump
Troubleshoot guide
Before requesting service
Error code types
Circuit diagram
2TQFWEVURGEKſECVKQP
Product warranty
Part list
Thank you very much for purchasing a soft ice cream maker made by ICETRO. For correct use of the
product and its maintenance, please read this manual carefully. If a problem occurs while using the
product, you can refer to this manual for troubleshooting. This manual contains a product warranty, so
MGGRKVUCHGN[HQTHWVWTGTGHGTGPEG6JKURTQFWEVECPDGKPUVCNNGFQPN[D[UQOGQPGSWCNKſGFHQTKPUVCNNCVKQP
If use of parts and accessories not provided or approved by ICETRO or any part or accessories made by
+%'641DWVTGOQFGNGFD[QVJGTRGTUQPECWUGUCRTQDNGOYGCTGPQVTGURQPUKDNGHQTKVſPCPEKCNN[
6JGHWPEVKQPUCPFURGEKſECVKQPUUJQYPKPVJKUOCPWCNCPFQPVJGYGDUKVGCTGUWDLGEVVQEJCPIGYKVJQWV
PQVKEG2NGCUGXKUKVQWTYGDUKVGCVJVVRYYYKEGVTQEQOVQQDVCKPVJGNCVGUVURGEKſECVKQPU

4
Cautions for your safety
These are safety related items. So, comply with them at all times!
They are meant to protect the safety of users and prevent property damages.
Please, read the cautionary items carefully for correct use.
Danger
If violated, it can cause death
or severe injury.
Install it independently with an
earth leakage circuit breaker
with more than 50[A].
It can cause electrical shocks or fire.
Warning
If violated, it can cause sever
physical injury or property
damages.
Caution
If violated, it can cause
slight physical injury or
property damages.
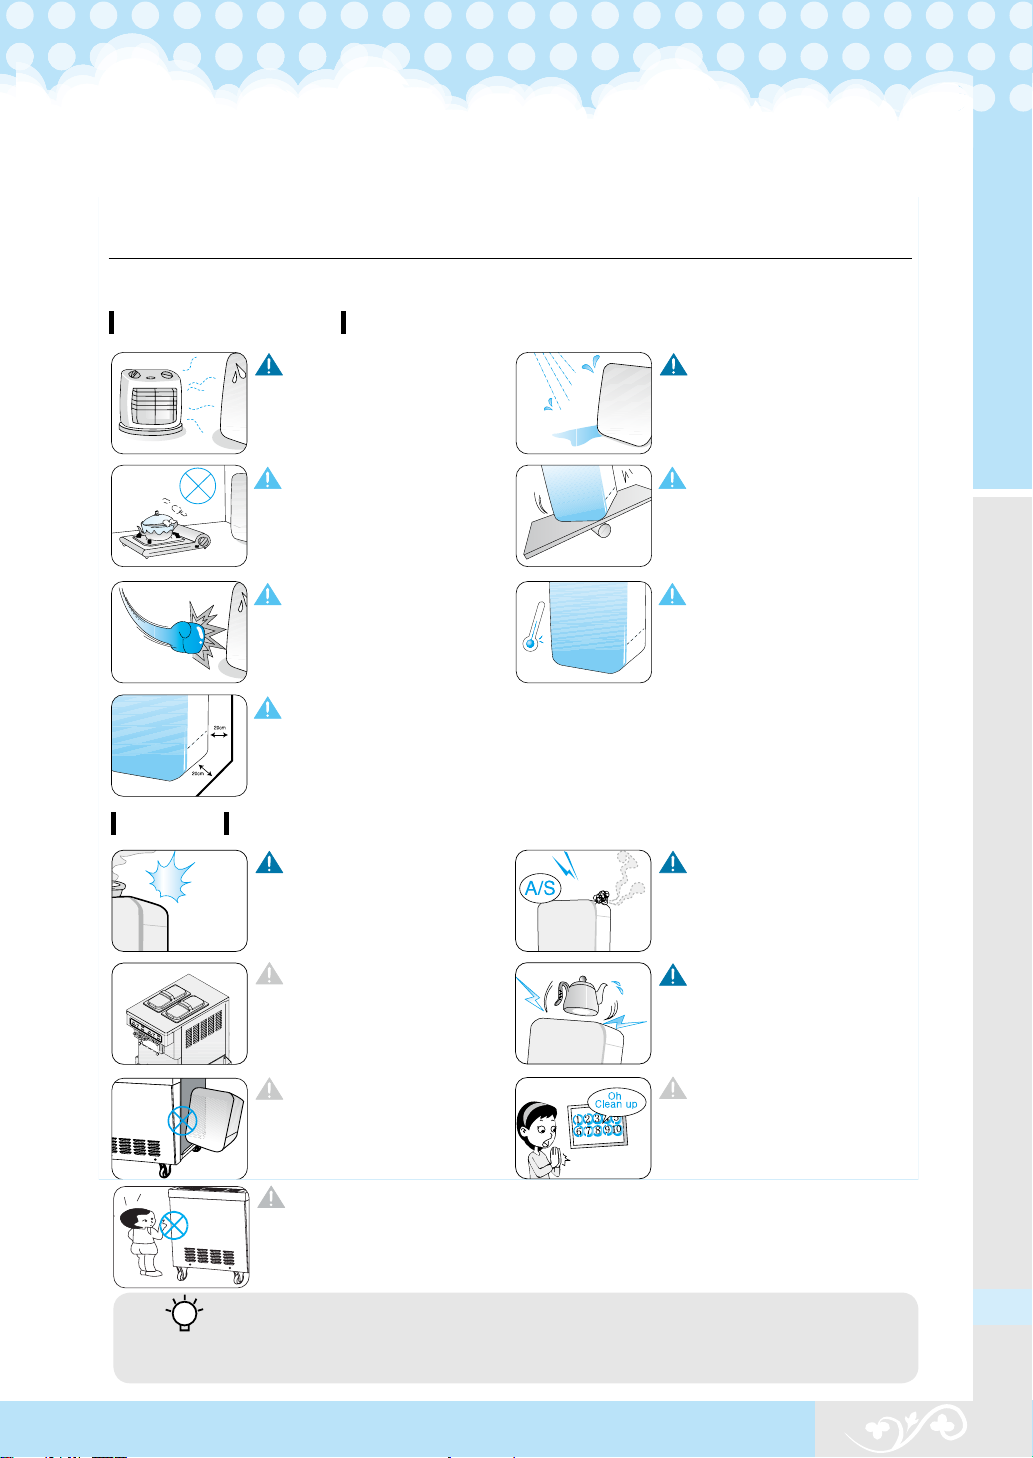
Do not move the product by
pulling on the power cord.
It can cause electrical shocks or fires.
Do not bend the power cord too
much or cause damages or
deformation by pressing it under
a heavy object.
It can cause electrical shocks or fires.
If there is water inside the
power supply, turn off the
earth leakage circuit breaker
and dry it before use.
It can cause electrical shocks or
fires.
Do not touch the earth leakage
circuit breaker with your wet
hands.
It can cause electrical shocks or fires.
Do not turn the power on/off with
the circuit breaker continuously.
It can cause electrical shocks or fires.
When you repair or inspect the
product or replace any parts, turn
off the earth leakage circuit
breaker.
It can cause electrical shocks or fires.
Power supply related items
Do not pull on the power cord.
It can cause electrical shocks or fires.
Do not connect many electrical
products to the earth leakage
circuit breaker. Use it individually.
It can cause fires.
If you want to leave it unused for
a long time, then close the water
supply valve and turn off the
earth leakage circuit breaker.
It can cause electrical shocks or fires.
Do not arbitrarily connect the
power cord or process it for use.
It can cause fires.
If the power cable is damaged,
then do not replace it on your
own. Call the service center for
cable replacement.
It can cause electrical shocks or fires.
Use a power cable larger than
4mm9.
The outer box for the product
should be grounded.
It can cause electrical shocks or fires.

5
information
For your
%NGCPVJGſNVGTRGTKQFKECNN[1VJGTYKUGVJGEQQNKPIRGTHQTOCPEGYKNNFGITCFG
Don’t let a person who was not educated the product or a child touch
- Comply with the user guideline suggested by the maker.
Otherwise, it can cause malfunctions
or operate the machine
- Comply with the user guideline suggested by the maker.
Otherwise, it can cause malfunctions.Don't let a person who was not educated
Cautions for your safety
Do not install it near a heating
device.
It can cause fires.
Do not install it near dust, moisture
or rainwater (water) popping.
It can cause electrical shocks or fires.
Do not use or store inflammable
gas or material near the product.
It can cause electrical shocks or fires.
Do not install it on a tilt.
It can cause physical injury or product
damages.
Do not apply excessive force or
impact to the product.
It can cause damages to the product.
This product shows the best
performance at temperature of
10~30!C.
The side and rear of the product
should be maintained at least 20cm
from the wall.
Installation related items
During use
Do not place candle lights or
cigarettes light on top of the
product.
It can cause fires.
While operating the product,
please completely close the
upper cap.
Bugs or alien substances can enter
the product.
Do not obstruct the entrance of
the air vent.
If so, the performance will be degraded.
If the product has weird sounds or
burning smell or smoke, turn off the
earth leakage circuit breaker
immediately and call the service
center.
It can cause electrical shocks or fires.
Do not place water containers,
medicine, foods, small metal parts
or inflammable material on top of
the product.
If they go inside the product, it can cause
electrical shocks, fire and damages.
To have good quality soft cream, it
is recommended to clean it every
day.
Otherwise, the ingredients can decay.

6
Part names and controller
'SPOUWJFX
COVER
FOOD FAN
FILTER
CONDENSOR
DRAINBOX UP
DRAIN BOX
FRONT PANEL
BUTTON DISPLAY
LEVER
DASHER
COVER
POWER
SWITCH
<> <>

7
Part names and controller
4JEFWJFX
<44/4/1> <>
1BSU
(168)
(1510)
SLUG
DASER
COVER
BOLT
DRAIN

8
ⷧMake sure to check them prior to use. ⷨ
Install it independently with an earth leakage circuit breaker with more than 50A and
provide anexternal grounding.
$VNDTXDOL¿HGHOHFWULFDOWHFKQLFLDQIRUWKHLQVWDOODWLRQ
7KHSRZHUFDEOHVKRXOGEHFRQQHFWHGEHIRUHWKHSURGXFWFDQRSHUDWHQRUPDOO\
203 : 130A, 320A More than
303 : 150A, 330A More than
,I\RXLQWHQGWROHDYHLWXQXVHGIRUDORQJWLPHZDVKLWDQGWXUQRIIWKHZDWHUVXSSO\
YDOYHDQGWXUQRIIWKHHDUWKOHDNDJHFLUFXLWEUHDNHU
7KHDLUVXFWLRQDQGGLVFKDUJHVKRXOGEHIDFLOLWDWHGVRWKDWWKHFRROLQJ
SHUIRUPDQFHFDQEHRSWLPL]HG
,I\RXOHDYHLWRSHQEXJVRUFRQWDPLQDQWVPD\HQWHUWKHPL[LQJWDQN
It is recommended to clean the cylinder, the mixing tank, the impeller, the
dasher, and the piston every day. Clean the condenser at least once a month or
PRUHRIWHQ
The cylinder, mix tank, impeller, dasher, and piston inside the product make
contact with the ingredients, so you should clean them once every day.
3OHDVHFKHFNWKHUDWLQJRIWKHSURGXFWEHIRUHVWDUWLQJLQVWDOODWLRQ
ⷅDo not block the air vent.
ⷅClose the mixing tank.
ⷅClean the condenser once a month.
ⷅClean it at least once a day.
Check prior to use
information
For your

9
Button display names and functions
"Left Status Display Window"
AUTO: Displays the operational status.
Defrost: Display the defrost condition.
Revive: Displays the revival condition.
Sterilization: Displays the sterilization status.
'and &Buttons
The 'and &buttons are used to
change the setting in the upper status
display window.
Press the 'and &buttons at the
same time for five seconds to lock or
unlock the touch buttons.
"Select" button
It is used to check the temperature
in the lower status display window.
"Right Status Display Window"
Displays the percentage of soft cream formation in operation.
2-1: Displays the soft cream temperature in the storage tank.
2-2: Displays the ingredient temperature inside the cylinder.
2-3: Displays the condenser suction temperature.
"Stand-by" button
It is used to stand by with ingredients
stored in the cylinder and hopper.
"No Ingredient" lamp
It blinks when there is no ingredient.
"Insufficient Ingredients" lamp
It blinks when there are insufficient
ingredients.
"Auto" button
It is used to produce soft cream.
"Ref" button
It is used to store ingredients.
"Wash" button
It is used to wash the machine.
For your
information
Buttons sense the touch of people(electric capacity), so press them slightly.
Also, buttons are placed narrowly each other. So when you press a button, the adjacent button can
be pressed.
If you press the buttons hard, internal malfunction can occur, or the buttons won't function.

10
Functional description of the buttons
Change the setting
If you press the "Set" button lightly, you can
enter the mode to check the setting as below.
Use the "'" and "&" buttons to see the
settings.
1-1: Check ice cream level settings
You can check the current setting for the ice cream. If the
displayed value is higher than the no-load current (1-2),
the ice cream becomes harder and if lower, the ice cream
becomes softer.
1-2: Check the ice cream default level
It is the no-load current of the dasher motor.
It is the current consumed by the dasher motor when the
ingredients are in the liquid status.
1-3: Check the currently supplied voltage.
It is the power supplied to the machine.
If the voltage is not correct after installation,
call for service.
1-4: Check the storage temperature in the mixing tank.
You can check the temperature inside the mixing tank.
For your
information
The soft cream level is set for the ingredients (vanilla) designated by the maker.
Depending on the ingredients, you will need to adjust it properly. Please follow the
instructions from our company when changing the level for the ingredients.
1-5 : Check the voice announcement
You can check whether a voice announcement is available.
1-6 : Check the program version
You can check the versions of the main PCB
and the display PCB.
"n" is for the main PCB and "d" is for
the display PCB.

11
Functional description of the buttons
For your
information
If 2-3 is too high, an error may occur.
This error is caused by poor environmental conditions (clearance, cleaning, ventilation, etc.).
You should install the machine according to the manufacturer's recommendation.
Check the temperature and the record
Press the "Select" button to check the different temperature
settings mentioned below. The item number and the temperature
will be displayed in turns.
2-1: Temperature of the mixing tank
2-2: Temperature of the mixing tank sensor
2-3: Condenser suction temperature (neighboring temperature)
2-1: Temperature of the mixing tank
The sensor located at the bottom of the mixing tank to measure
the temperature of ingredients may display temperatures
different from the actual ones if there is no
ingredient in the mixing tank or mixer.
2-2: Temperature of the cylinder
The sensor located at the bottom front of the cylinder may
display temperatures different from those of the ingredients
or the ice cream.
2-3: Ambient temperature of the condenser
The sensor located in front of the condenser can measure the
temperature of the ambient air entering the condenser and the
recommended installation conditions as well.

12
Functional description of the buttons
Change the setting
Press the "Set" button for three seconds to enter the setting change
mode as follows.
Use the "'" and "&" to enter the password and use the "Set" button
to move to each item. When the display blinks, use "'" and "&"to
change the value and use the "Set" button to leave the item. Press
and hold the "Set" button for three seconds to leave the value change
mode.
3-1: Adjust the soft cream level
This item is used to adjust the target current of the soft cream.
If the value is lower, the ice cream becomes softer. If the level is
too high, the quantity of produced ice creams may drop, it may
not be discharged or other malfunctions may occur. Consult an
engineer.
3-4 : Set the mixing tank temperature
This item is used to adjust the cooling temperature of the
ingredients in the mixing tank. The larger the number is, the
higher the storage temperature is. The smaller the number is,
the lower the storage temperature is.
If the temperature is too low, the ingredients may freeze.
If too high, they may spoil.
3-5-1: Select a voice announcement option
You can turn on/off the voice announcement.
For your
information
The ice cream level (3-1) may vary according to ingredients or sugar content. If it is high, the
machine operates too much unnecessarily to make the ice cream soft. Also, if the machine
stays in the auto mode for two or three hours without discharging any ice cream, this may
make the ice cream softer depending on the ingredients.

13
Explanation of the function button (set by an expert)
4-0. This is the category that can be selected according to the characteristic and
model of the product and that has a meaning that is different from the
model name of the product. When the model is changed in this category,
the content in Category 4 is reset to the default setting.
4-1: Rest time setting
This is the function to allow the compressor to rest for a certain period
of time by minute after the soft freezer is made. Adjust this category
carefully as it can make the soft freezer melt quickly.
4-2: Set the compressor to restart
This remembers the temperature at the time of making soft freezer.
When the temperature rises above the temperature that was set in
this category, the compressor is restarted. The rest time of the
compressor can be extended when the temperature in this category
is increased.
4-3: Hopper management temperature setting
This sets the management temperature to refrigerate the raw material
in the hopper. The temperature set in this category is managed as the
value added from the value in Categories 3-4. For example, if 3-4 is
2"and 4-3 is 2", the management temperature of the hopper
is maintained at 2-4".
Important
matters
The categories that determine the compressor rest time during operation are 4-1 and 4-2. When one
is satisfied with these two categories, the compressor rest time ends.
Model selection: Only experts that have been designated by the main office or by those who received professional
education and received approval from the main office shall adjust this category. A service charge will be applied if
problems occur due to unapproved alterations.
Pressset+selectbuttons for 3 seconds to enter the stage of
inputting the password.
Password has 4 digits and input begins from the left to the left and the
relevant digit blinks.
Select the number by-and+buttons and presssetbutton to move
to the next digit.
Input the 4 digit password in this way.
Do not let anyone without professional education know the 4 digit
password under any circumstances.

14
4-4: Standby off temperature setting
This sets the cylinder’s raw material storage temperature in the
standby mode. When the temperature of this category is too low, the
raw material inside the cylinder freezer and soft freezer can become
like porridge
4-5: Standby management temperature setting
This sets the management temperature to refrigerate the raw
material in the hopper. The temperature set in this category is
managed the value added from the value in Categories 3-4. For
example, if 3-4 is 2"and 4-3 is 2", the management temperature
of the hopper is maintained at 6-8".
4-6: Standby reset time setting
This sets the motor’s operation cycle to the standby mode.
When one is satisfied with the temperature value of 4-4 plus 4-5 and
the time of this category, the motor and compressor are operated.
4-7: 1"rise level calculation (The left digit)
When the soft freezer is made, 100% is displayed on the green
FND window and the percentage value is deducted from the
compressor rest time.At this time, when 1"is added to the
temperature at which the soft freezer is made, the value set for this
category is deducted from the percentage and is then displayed.
4-7: 30 seconds pass level calculation (The right number)
When the soft freezer is made, 100% is displayed on the green
FND window and the percentage value is deducted from the
compressor rest time. At this time, the value set for this category is
deduced from the percentage every 30 seconds after the making
of the soft freezer and displayed.
4-8: Upper limit current setting
This category sets the maximum value when adjusting the hardness
of the soft freezer in Category 3-1.
This categorys value needs to be set within the range, in which
excessive current does not flow on the motor.
4-9: Maximum pasteurization time setting
It is set to stop pasteurization when gas leaks or when problems
occur in the pasteurization device. If pasteurization continues until
the time set for this category
4-10: Select between Celsius and Fahrenheit
Select between Celsius (Ⳅ) and Fahrenheit (ⳅ).
Explanation of the function button (set by an expert)

15
Explanation of the function button (set by an expert)
4-13: Voltage standard value setting
Measure the voltage at the place of installation and enter the
standard value. This product guarantees 10% of the supply
power. When it is outside of the range a warning sound is given.
If used continually, the product can have problems.
4-14: Button sensitivity setting
This sets button sensitivity.
A smaller number means more sensitivity and a larger number
means less sensitivity.
4-11: Environmental temperature detect function setting
The function to detect the environmental temperature can be turned
ON/OFF. Environmental temperature is the temperature of the air
coming into the compressor. Therefore, the temperature for this
category can be high and a warning message can be given if the
place of installation is small and has no ventilation.
Then the installation environment must be improved.
4-12: No load detection function setting
The no load detection function can be turned ON/OFF.
"No load" means the raw material inside the cylinder exists in a liquid
condition. The motor current is then called "no load current."
If this function is set to on, power is allowed to the product and the no
load current is remembered when the temperature of the cylinder is
higher than 5)C.
4-15: Voice language selection
The language set in this category gives voice guidance, and a total
2 languages are embedded.
:Korean, :English
4-16: Set motor current value correction
This is the function for performing overall compensation when the
measured motor current is different from the actual measurement
value.
4-17: Air pump selection
If the model has an air pump, this category can be turned on to
control the operation of the air pump.
1: Operation time setting during the initial operation
Set the operation time of the air pump when beginning initial
operation.

16
Explanation of the function button (set by an expert)
2: Operation time setting after sales
Set the operation delay time of the air pump sales. After the motor
operation is stopped, the air pump is additionally operated
according to the time set for this category.
3: Operation time set after button input
Set the time that the air pump operates every time the button is
pushed.
4-18: Select the use of pasteurization.
4-19: Button lock function setting
By activating this category, the buttons (refers to the work mode
buttons on the right such as auto, wash, heating, stand-by, refresh,
refrigeration, and so forth) can be locked. Press both the "
-
" button
and the "+" button for 5 seconds, in order to lock the buttons and do
the same in order to unlock the buttons.
4-20: Voltage corresponding current compensation setting
This is the function for compensating the current value when the
voltage is easily changed during the making of soft freezer.
This product consumes a lot of power. Therefore, install and make
sure it has a supply of enough stable power.
4-21: Dasher motor delay time setting
Sets the motors operation delay time after making soft freezer.
4-22: Compressor delay time setting
This sets the compressors operation delay time after making soft
freezer. If this category is given much time, soft freezer can be frozen
too much and problems can occur to the product.
4-25: Operation temperature selection
This detects the temperature at the time set in Category 4-24 and
sets the temperature at which the compressor can be operated.
The compressor is operated for duration stipulated in Item 4-23
when the temperature reaches the temperature that was set for this
category
4-23: Selection of the compressor forced operation
This is the function for forcibly operating the compressor during rest
time when the compressor is not operating. The following categories
appear when the compressor operation time is set in this category.
4-24: Temperature detection time setting after stop
This chooses the time to determine the temperature during the
rest time. In case "4n" is chosen, it means, "detecting temperature
4 minutes after rest." It sets the temperature for operating the
compressor.

17
5RGEKſECVKQPQHYJGVJGTUWTTQWPFKPIVGORGTCVWTG
compensation will be used
This category is used to compensate for the surrounding
temperature (located at the suction side of the compressor)
1: Temperature compensation value setting for 10 Ⳅor lower
This sets the temperature compensation value of the ambient
temperature to the environmental temperature of 10 Ⳅor lower.
2: Temperature compensation value setting for 20Ⳅor lower
This sets the temperature compensation value of the ambient
temperature to the environmental temperature of 20Ⳅor lower.
3: Temperature compensation value setting for 30Ⳅor lower
This sets the temperature compensation value of the ambient
temperature to the environmental temperature of 30Ⳅor lower.
4: Temperature compensation value setting for 40Ⳅor lower
This sets the temperature compensation value of the ambient
temperature to the environmental temperature of 40Ⳅor lower.
5: Temperature compensation value setting for 41Ⳅor higher
This sets the temperature compensation value of the ambient
temperature to the environmental temperature of 41Ⳅor higher.
5CNGNGXGTPQTGVWTPLWFIOGPVVKOGUGVVKPI
When the lever does not return to the original position after the
GLGEVKQPQHVJGUQHVHTGG\GTCPCNCTOKUUGVQHHCHVGTVJGVKOGVJCV
was set for this category.
4-28: Hopper temperature compensation function setting
The temperature sensor on the bottom of the hopper detects
the temperature of the raw material in the hopper.
Models with an impeller almost have the same temperature,
but a temperature difference can appear in the models that don't
have an impeller. Therefore, it is the category to compensate
this temperature difference.
Explanation of the function button (set by an expert)

18
4-30: MIX OUT function selection
When this category is activated, all operations are stopped in case
there is no raw material.
4-31: MIX LOW function selection
4-32: Frequency standard value setting
Setthe frequency standard of the supply power. When the
standard value of this category is wrongly selected, the present
supply voltage of 1~3 can be displayed differently.
Explanation of the function button (set by an expert)

19
How to make soft ice cream
How to make soft cream
For your
information
The smaller the caburator hole is, the higher the overrun (air content) is. Instead, in case of
continuous sales, the ingredients supply gets slower and the soft cream is let out slowly.
1. Pour 2.0 +of ingredients in the mixing tank.
The raw material must has been stored in a cooler at
a temperature 10"or below.
The caburator hole can get clogged, so check it and wash it periodically during use.
2. Plug in the caburator and block the hole.
3. Pour 2.0 +of ingredients in the mixing tank.
(See if the insufficient ingredient lamp is turned off.)
4.
Close the cap.
5. Press the "Operate(AUTO)" button.
When the soft ice cream is formed, open the
caburator of the tank.

20
Soft ice cream out-speed control
+H[QWTGNGCUGVJG5ETGY#FLWUVVQKPETGCUGVJGQWVURGGFQHVJGUQHVKEGETGCOVJGPVJG
ingredients in the mixing tank will be supplied to the cylinder relatively slowly. Suddenly,
VJGUQHVKEGETGCOOC[PQNQPIGTEQOGQWV6JGTGHQTG[QWCTGTGEQOOGPFGFVQCFLWUV
the vending speed for one cup every 6 to 8 seconds.
information
For your
$[CFLWUVKPI5ETGY#FLWUV CV VJGDQVVQOQHVJGNGXGTQWVNGXGT
[QWECPCFLWUVVJGQWVURGGFQHVJGUQHVKEGETGCO#UUJQYPKP
VJGſIWTGQPVJGNGHVTGNGCUGVJG5ETGY#FLWUVVQKPETGCUG
the out-speed of the soft ice cream.
#UUJQYPKPVJGſIWTGQPVJGTKIJVHCUVGPVJG5ETGY#FLWUVVQ
reduce the out-speed of the soft ice cream.
5ETGY#FLWUV
'a'
Ⲽ#HVGTUGVVKPIWRVJGCFLWUVOGPVDQNVRQUKVKQPVKIJVGPVJGUGVPWVŎCŏVQſZVJG5ETGY#FLWUV
position and maintain constant dispensing volume.
This manual suits for next models
7
Table of contents
Other icetro Ice Cream Maker manuals

icetro
icetro SSI-141TG User manual

icetro
icetro ISI-161TH User manual

icetro
icetro ISI-271THN User manual

icetro
icetro ISI-321TA User manual

icetro
icetro ISI-271SHSN User manual

icetro
icetro ISI-273SH3S User manual

icetro
icetro SSI-300T User manual

icetro
icetro SSI-143S User manual

icetro
icetro ISI-271THS User manual

icetro
icetro ISI-303SNA User manual