ICON AIRFORM Series Setup guide

ICON® IS A REGISTERED TRADEMARK. ALL RIGHTS RESERVED. COPYRIGHT© 2018 LEMANS CORPORATION.
REPLACEMENT PARTS AND SPECIFICATIONS SUBJECT TO CHANGE WITHOUT NOTICE. PRINTED IN VIETNAM.
J-TECH CORP. Made in Vietnam ECE/DOT/PSC
OWNERS INSTRUCTION MANUAL
SAFETY WARNING: FOR YOUR SAFETY, IT IS IMPORTANT THAT YOU COMPLETELY READ THIS OWNER’S MANUAL AND ALL
WARNING LABELS ON AND INSIDE THE HELMET.
The instructions in this manual are designed to help you select the right helmet, wear it properly, take care of it and know when
to replace it. Failure to follow these instructions may increase your risk of serious injury or death in an accident. In order to get
the most protection possible from your helmet, you should always do the following – Wear your helmet when you ride, Handle
your helmet carefully to avoid accidental damage and ride safe. Do not take risks because you are wearing a helmet.
DISTRIBUTED IN THE U.S. BY:
DISTRIBUÉ AUX U.S.A. PAR:
VERTRIEBEN IN DEN U.S.A. DURCH:
DISTRIBUITO NEGLI USA DA:
DISTRIBUIDO EN LOS EE.UU. POR:
DISTRIBUTEUR IN DE VS:
DISTRIBUÍDO NOS E.U.A. POR:
РАСПРОСТРАНЯЮТСЯ В США:
アメリカ:
PARTS UNLIMITED®
DISTRIBUTED IN EUROPE BY:
DISTRIBUÉ EN EUROPE PAR:
VERTRIEBEN IN EUROPA DURCH:
DISTRIBUITO IN EUROPA DA:
DISTRIBUIDO EN EUROPA POR:
DISTRIBUTEUR IN EUROPA:
DISTRIBUÍDO NA EUROPA POR:
РАСПРОСТРАНЯЮТСЯ В ЕВРОПЕ:
ヨーロッパ:
PARTS EUROPE GMBH
CONRAD-ROENTGEN-STR. 2., 54332
WASSERLIESCH, GERMANY
DISTRIBUTED IN CANADA BY:
DISTRIBUÉ AU CANADA PAR:
VERTRIEBEN IN KANADA DURCH:
DISTRIBUITO IN CANADA DA:
DISTRIBUIDO EN CANADÁ POR:
DISTRIBUTEUR IN CANADA:
DISTRIBUÍDO NO CANADÁ POR:
РАСПРОСТРАНЯЮТСЯ В КАНАДЕ:
カナダ:
PARTS CANADA®
NOT TO BE REMOVED EXCEPT BY CONSUMER

CONTENTS
01 02
USE INSTRUCTIONS AND WARNINGS: Before using this helmet, be sure to read this instruction manual and retain it after
reading. It contains valuable information that will help you maximize the performance and life of the helmet.
SAFETY WARNING: Riding a motorcycle is a dangerous activity. No helmet can protect a wearer against all possible impacts.
When riding, always wear a helmet, eye protection, protective clothing, gloves and boots. There is no assurance that serious
injury or death can be avoided even if you wear the helmet shown in this manual. Take all precautions to avoid every risk when
riding a motorcycle. This helmet is not meant for use as a fire retardant product and does not contain any fire retardant
materials. Please ensure that your ICON®products fit properly. Improperly fitting products can impair your ability to control your
motorcycle.
Leaders of the modern helmet game, ICON Motosports is always
pushing the envelope of street style design and the Airform is no
exception. Its base level price delivers pro level features including
an interchangeable DropShieldTM, a sculpted neck roll to avoid
jacket or suit interference, and integrated speaker pockets for
a bluetooth communication device. The 4 intake vents, 1 exhaust
port, and air channeling in the EPS provide you engineered
air flow for all day riding comfort.
Design-Develop-Deploy: We’re setting the new asphault tech
standards with the ICON AirformTM helmet.
// CONSTRUCTION 03
// SHELL & EPS 04
// CHOOSING THE CORRECT HELMET SIZE 05
// PROPER FITTING 06
// CHINSTRAP 07
// USING YOUR HELMET CORRECTLY 08
// INSPECTING YOUR HELMET 08
// AIRFORM FACE SHIELDS 09
// ICON OPTICS CHANGE AND REMOVAL 11
// DROPSHIELD CHANGE AND REMOVAL 12
// COMFORT LINER REMOVAL AND REASSEMBLY 13
// VENTING SYSTEM 14
// CARE AND CLEANING 15
// ADVISORY 16
*
01

03 04
SHELL & EPSCONSTRUCTION
The ICON®AIRFORM™ is engineered to the ICON WORLD STANDARD, which meets DOT FMVSS 218 (US), ECE 22.05
(EUROPE), & PSC (JAPAN) Helmet Safety Standards. Over 50 countries officially recognize these extensive head protection
standards. Refer to the diagram below to familiarize yourself with specific names and terms used on the AIRFORM™ helmet
before attempting to repair or replace parts on the helmet.
MAKE NO MODIFICATIONS. To maintain the full effectiveness of this helmet, there should be no alteration to the structure of
this helmet or its component parts. Paints and adhesives may damage and render your helmet ineffective, without the damage
being visible to the user.
The injection-molded polycarbonate PC-ABS
shell of the ICON®AIRFORM™ helmet is
manufactured under some of the most stringent
quality control standards available on the market
today.
The ICON®AIRFORM’s dual-density
Expanded-Polystyrene liners are engineered
to offer impact absorption and
force dissipation.
Additionally, both liners are channeled with
an extensive series of directional air ducts to
distribute airflow from the outer ventilation
system.
1 // FOREHEAD VENTS
2 // SHIELD RELEASE SYSTEM
3 // EYEPORT GASKET
4 // ICON OPTICS™ SHIELD
5 // DROPSHIELD™
6 // BREATH DEFLECTOR
7 // MOUTH VENT
8 // CHIN INTAKE VENTS
9 // OUTER SHELL
10 // REAR SPOILER
11 // EXHAUST VENTS
12 // DUAL DENSITY EPS
13 // DROPSHIELD™ SWITCH
14 // SIDEPLATE
15 // COMFORT LINER
16 // BASE GASKET
4 //
3 //
1 //
5 //
2 //
6 //
7 //
8 //
// 10
// 9
// 11
// 13
// 15
// 12
// 16
1 // POLYCARBONATE SHELL
2 // EPS DENSITY 2
3 // EPS DENSITY 1
3 //
1 //
2 //
// 14

1. Position the helmet on your head so that it sits low on your forehead. If you can’t see the edge of the brim at the extreme
upper range of your vision, the helmet is probably out of place. Adjust the retention system so that, when in use, it will hold
the helmet firmly in place. Always make sure you can see well enough to safely operate your motorcycle.
2. With the chinstrap still fastened as tightly as possible, take hold of the helmet with both hands. Without moving your head,
try to move the helmet up and down, and from side to side. You should feel the skin of your head and face being pulled as
you try to move the helmet. If you can move the helmet around easily, it is too big. Try a smaller size.
3. Now, with the chinstrap secured, put your hands flat on the back of the helmet and try to pull the helmet off by rotating it
forward. Then, put your hands on the front of the helmet, and try to push the helmet off by rotating it toward the rear. If the
helmet starts to come off in either direction, the helmet is either too large, or the chinstrap is not fastened tightly enough.
If helmet comes off, try another size or another model.
To check and ensure a proper fit, please follow the steps below:
1. Wrap flexible tape measure approximately one inch above eyebrows and ears.
2. Use this measurement to find your “inches” or “centimeters” head size in our
helmet sizing chart.
05 06
CHOOSING THE CORRECT HELMET SIZE
Helmet fit is critical to helmet protective performance. Different helmets fit
differently due to differences in design and construction. The correct helmet size
can only be checked and confirmed by physically fitting the helmet to the user.
Always try the helmet on in a store, before purchasing it, to be sure you are
purchasing the correct sized helmet for you.
PROPER FITTING
No helmet can protect the user against all foreseeable impacts. For your safety, please choose a helmet in the correct size for
your head (refer to the helmet size chart previous page). For maximum head protection, your helmet must also fit properly and
the retention system must be securely fastened under the chin.
SAFETY WARNING: Never buy a used helmet or borrow someone else’s helmet.
Over time the protective foam in helmets will adjust to the contours of a user’s
head. A used or borrowed helmet may not offer as much protection as a new
helmet. Wearing the wrong size helmet can increase your risk of serious
injury or death in an accident. A helmet that is too large for your head may be
dislodged or knocked off in an accident. To select the right size helmet for your
head, follow these instructions.
SAFETY WARNING: The helmet size chart is only for reference. Always try the helmet on and follow this manual’s instruction for
proper fitting. If you are unable to find a size of this helmet style that fits you properly, please try another certified helmet style.
WARNING: For adequate protection, this
helmet must fit snugly and be securely
attached.
Please note that the face shield is adjustable. Try the helmet with the face shield in all positions, prior to purchase, to make sure
that the helmets meets your requirements and that the face shield does not interfere with your vision when in the open position.
These steps should be repeated until you are able to find the right size helmet for you.
1 2 3

In order for your helmet to function properly, the chinstrap must always be securely fastened while in use. With the chinstrap
fastened, it should not be possible to remove the helmet from your head by pulling up at the center rear. Check periodically to
see that the vibration has not caused the chinstrap to loosen. Just give a little tug to make sure it is still tight.
To securely fasten the D-ring retention system, thread the end of the chinstrap through the D-rings only as shown in the
diagram below. Pull on the loose end of the strap until the chinstrap is tight under your chin. Fasten the female snap of the
chinstrap to the male snap to secure the loose end of the chinstrap after the chinstrap is securely fastened and tightened. The
only function of the snap fastener on the end of the chinstrap is to keep it from flapping in the air stream. It is not part of the
retention system and should not be used independently without passing the chinstrap through the D-rings and then tightening
the chinstrap as illustrated below.
To release the D-ring retention system, unsnap the loose end of the chinstrap from its fastener. Then pull on the red flag
attached to the end of the lower D-ring to loosen the strap. Once loose, feed the end of the strap back through the D-rings to
fully release the chinstrap.
PLEASE MAKE SURE THAT THE CHINSTRAP IS FASTENED AS INSTRUCTED ABOVE. FAILURE TO DO SO MAY RESULT IN FATAL INJURY.
CHINSTRAP
SAFETY WARNING: Do not rely on the snap to secure the helmet. The snap is provided only to prevent the strap from flapping in
the air. Fasten the retention system only as shown in this illustration.
07 08
[SAFETY WARNING]: To reduce the risk of serious injury or death, always use your helmet correctly.
• Never adjust your helmet or helmet accessories while riding – Only make helmet adjustments when stopped.
• Never drop your helmet – Dropping your helmet may crack the shell or damage the protective foam. The damage may not
be visible. Your helmet is only designed for ONE impact. Refer to “REPLACEMENT RECOMMENDATION” for more information.
• Never wear anything between your head and your helmet – This may reduce the effectiveness of your helmet.
• Never hang or hook your helmet on anything including mirror stalks, handlebars, or sissy bars – Doing so may cause damage
to the helmet protective foam or liner.
• Never use insect repellent on or around your helmet – Insect repellant may damage your helmet’s visor, shell, protective
foam, or other components.
• Never expose helmet to gasoline or gasoline fumes – Gasoline may damage your helmet’s visor, shell, protective foam, or
other components.
USING YOUR HELMET CORRECTLY
[SAFETY WARNING]: To reduce the risk of serious injury or death and to help prevent damage to your helmet:
• Check the shield and shield ratchet – retighten shield ratchet screws if necessary. Be sure not to over- tighten any screws.
Plastic base plate screws can break and aluminum screws can strip the screw sleeves if over-tightened.
• Check for helmet damage. If your helmet is damaged or cracked, stop using it immediately. See “REPLACEMENT
RECOMMENDATION” section for further information. If your helmet has been dropped, you may not be able to
see the damage.
• Check for worn or damaged parts. Plastic components may wear out over time. If you find worn or damaged parts, replace
them or purchase a new helmet. For a complete listing of helmet replacement parts and accessories including liners, cheek-
pads, side-plates, breath deflectors, etc. visit us at WWW.RIDEICON.COM
• Make sure that the liner and cheek pads are properly in place and that the chinstrap system is secured.
INSPECTING YOUR HELMET BEFORE EVERY USE

09
FACESHIELDS
SAFETY WARNING: Your AIRFORM™ is originally supplied with a Clear ICON OPTICS™ shield and tinted DropShield™.
Under no circumstances should a rider use a tinted DropShield™ while a tinted ICON OPTICS™ is attached. Duplicated
tinted face shields will limit your vision.
The ICON AIRFORM™ is equipped with a clear ICON
OPTICSTM face shield, providing you with a clear and
distortion-free line of sight.
The clear ICON OPTICSTM shield supplied with this
helmet meets Regulation VESC-8. Accessory shields
with the marking indicating ”daytime use only” are not
suitable for use during the hours of darkness or in
conditions of poor visibility. Make sure the face shield
is always in perfect condition.
Instead of carrying extra ICON OPTICSTM for changing
light conditions, with the flip of a switch, engage the
tinted DropShield™ hidden within the helmet.
Tinted DropShields™ should not be used during
hours of low light; instead swap out for a Yellow face
shield or just use the Clear ICON OPTICSTM shield. The
DropShield™ must only be used while the main face
shield is in the fully closed position.
To order replacement face shields in a variety of
colors, visit your local dealer or www.rideicon.com.

12
REMOVAL:
1. Open the ICON OPTICS™ shield and lower the Drop-Shield™
2. While firmly holding the helmet, pull the Drop-Shield™ forward
and down until two clicks are heard and the shield is free from both
side clips.
INSTALLATION:
1. Begin by placing the Drop-Shield™ Switch in the DOWN Position.
2. Start with the SWITCH side of the Drop-Shield™. Align the tabs with
the clips for the internal mechanism and push firmly on the lens until
you hear a “CLICK” sound.
3. Repeat the process with the opposite side of the Drop-Shield™.
4. Once installed, operate the Drop-Shield™ Switch to ensure proper
installation, and clean the Drop-ShieldT™ with an ICON Lens wipe or
microfiber cloth.
Some users may find it easier to change the Drop-Shield™ with the ICON
OPTICS™ shield and Breath Deflector removed. If the ICON OPTICS™
shield was removed for Drop-Shield™ replacement, ensure the ICON
OPTICS™ shield has been re-installed correctly before riding. The Drop-
Shield™ is not designed to be used without the ICON OPTICS™ shield.
SAFETY WARNING: Incorrect installation of the Drop-Shield™ may
adversly affect its performance and may affect the riders vision and
ability to control the motorcycle.
11 12
ICONOPTICSTM SHIELD CHANGE AND REMOVAL DROPSHIELDTM CHANGE & REMOVAL
SAFETY WARNING: Do not ride without the sideplates attached. If the shield is opened during riding use without sideplates the
force of air against the open shield may cause the shield to disengage from the helmet.
This helmet is unsuitable for use with goggles.
1. To remove the shield, open the shield completely.
2. Push both locking levers to the open position towards
the rear of the helmet and remove the shield from the
gear plates.
3. Once removed, brace the shield with one hand, and use
the other hand to pull the side plates from the straight,
long edge (the front of the side plates).
4. Pull each side plate until they pop free from the shield.
5. To replace shield, align the tabs on the shield with holes
on the gear plates and press in until secure.
6. To replace the side plates, align tabs on side plate with
holes in shield, and snap it into place. Repeat for
adjacent side plate.
7. Test out the opening and closing function of your shield
before riding.
21
4
6
33
EE5

14
1. With the helmet upside down and with the chin bar facing away from you release each cheekpad from the
helmet by pulling inward, freeing it from the snap and velcro system.
2. Turn the helmet until the chin bar faces toward you then pull each cheekpad towards you, removing the
cheekpads from the helmet. Note how the chin straps thread through the cheekpads and how the cheekpad
plate slips between the helmet shell and EPS liner for reassembly.
3. Remove your comfort liner by releasing it from the two snap sytem on the back of the helmet. Then
remove the crown comfort liner attachment point, taking note of how the crown plate attachment slips
into place between the shell and EPS liner.
4. Reverse these steps to reinstall the comfort liner and cheekpads.
How to remove your interior for cleaning or replacement:
13 14
COMFORT LINER REMOVAL AND REASSEMBLY
SAFETY WARNING: The liner is essential to the intended performance of the helmet, it must be properly installed when using
the helmet.
14
To activate the forehead vents, slide the
vents open by pushing them towards the
rear.
VENTING SYSTEM
COOL AIR IN WARM AIR OUT

Let’s face it, Icon®helmets look cool and you want to keep them that way. We’ve found the following methods work really well
to keep our helmets looking sharp and ready to roll. Remember, never use gas, pre-mix, carb cleaner, brake cleaner or any
other random unlabeled spray can lying around the garage. Chemicals and harsh solvents can break down the materials in your
helmet; it’s like using brake cleaner to polish your plastics—don’t do it!
EXTERIOR POLISHING
1. For gloss helmet finishes, use spray automotive wax that is
specifically designed for cars with a clear coat.
(Available at any automotive store.)
2. For matte finishes, you know better than to polish a matte
finish don’t you?
STORAGE
It is a good idea to protect your helmet if it is stored for a
period of time. Store your helmet inside the helmet bag we
have provided in a secure, dry place out of direct exposure
to sunlight.
INTERIOR CLEANING
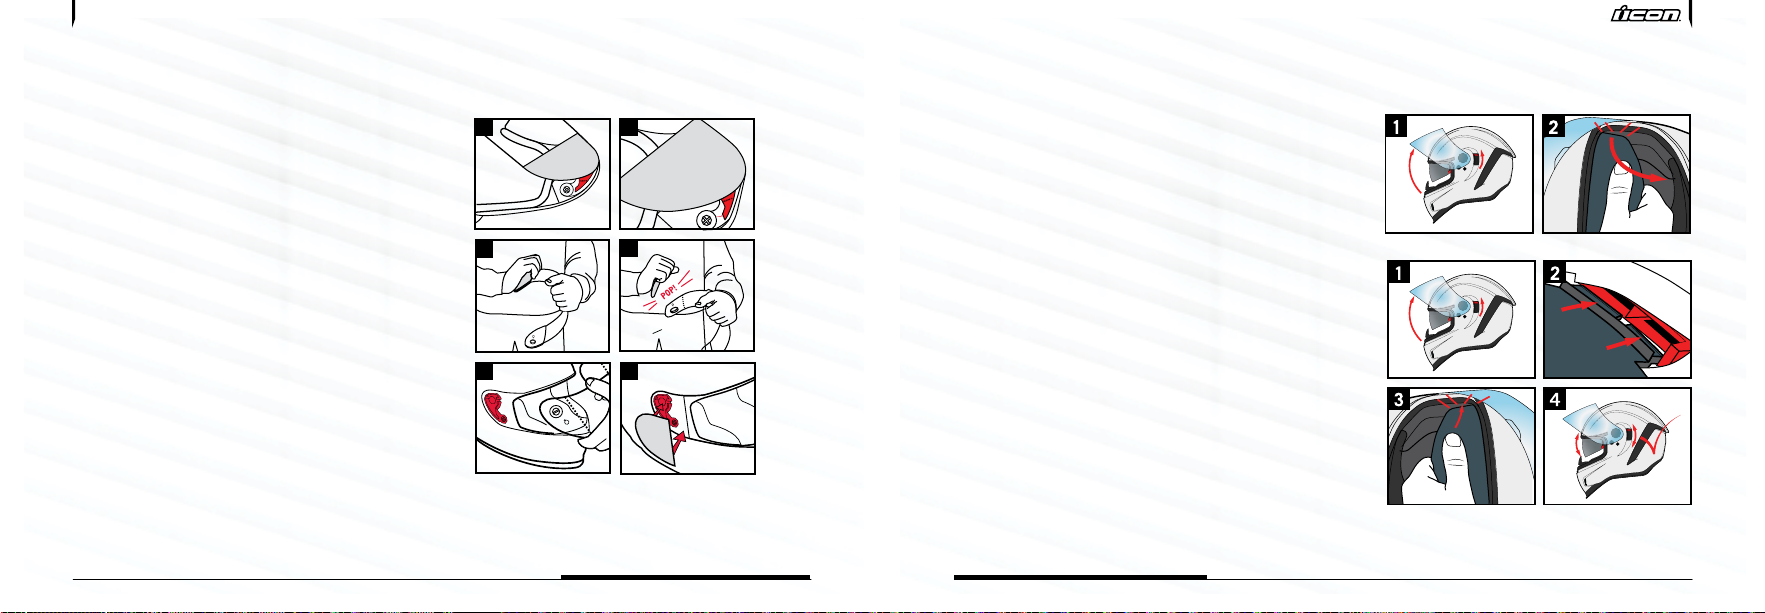
1. Remove interior lining as shown in the section of this
info notice titled “Comfort Liner Removal and
Reassembly”.
2. Soak your interior in a mild solution of baby shampoo.
3. Rinse in clean water several times until all soap is gone.
4. Let interior air dry and replace accordingly.
* Never machine wash or dry your helmet interior.
ONE IMPACT RULE - ANY HELMET THAT HAS SUSTAINEDAN IMPACT SHOULD BE REPLACED.:Helmets are designed to
absorb only one impact. The helmet is designed to absorb some shock by partial destruction of the shell and liner. After your
helmet has endured any impact, the impact absorption liner portion of your helmet will have dispersed the energy from that
impact, thus rendering the liner compacted and, therefore, compromised. This damage may not be visible. Even if there is no
VISIBLE damage to the shell, the helmet’s usefulness is expired after one impact. A helmet that has experienced an impact
should be destroyed and replaced, even if it is apparently undamaged.
HEARING: Wearing any helmet reduces the wearer’s ability to hear. A wearer needs to be aware of this audible reduction and
their surroundings. Not being aware this audible reduction may lead to an accident that could result in injury or death.
OBSOLESENCE AND HELMET DISPOSAL: A helmet has a limited lifespan in use and should be replaced when it shows obvious
signs of wear, e.g. change of fit, cracks, rust or fraying or other signs of normal “wear and tear” that can contribute to helmet
degradation.
REPLACEMENT RECOMMENDATION:The five-year helmet replacement recommendation is based on a consensus of the
majority of helmet manufacturers. Glues, resins and other materials used in helmet production can affect liner materials over
time. Hair oils, body fluids and cosmetics, as well as normal “wear and tear” also contribute to helmet liner degradation.
Additionally, petroleum-based products present in cleaners, paints, fuels, and other commonly encountered materials may
break down materials used in the construction of many helmets, possibly compromising performance. Experience indicates
that helmet standards are revised every five years. This, coupled with advances in materials, designs and production methods
suggest that it is in the rider’s best interest to replace his/her every five years at a minimum. If you buy a new helmet, destroy
the old one to ensure it cannot be reused. Do not sell or give away your old helmet, even if it has not been damaged. Over time,
the protective layer in the helmet will adjust to the contours of your head. If someone else uses this helmet it will not provide
him or her with as much protection.
WAIVER AND RELEASE BY OWNER: No personal protective equipment is able to safeguard against all injuries in the event
of an accident or fall from a motorcycle. No personal protective equipment can offer complete protection against impact or
abrasion as a result of an accident or fall from a motorcycle. Motorcycling is inherently dangerous in nature and use of this
helmet cannot prevent injury or death. Even a low speed accident may result in serious injury or death. When using this helmet,
the user assumes all risk associated with this activity, which may cause injury or death. The user hereby waives all claims
against Icon® Motosports (a division of Lemans Corporation), Lemans Corporation and J-TECH Corp. for death or injury to his
or her person and hereby covenants to not sue for any claims arising as a result of injury or death while using Icon Motosports
products.
EXTERIOR CLEANING (GLOSS HELMETS)
1. Lay a warm, wet, cloth towel on the exterior of the helmet
for at least 5 minutes to soften dried on bugs. (Don’t skip
this step!)
2. Using a fresh, wet, clean cloth and mild dish soap wipe
down the exterior to get rid of road grime and softened
bug guts.
3. Use another fresh dry cloth towel to dry the helmet and get
rid of any water spots.
SHIELD CLEANING
Your helmet is equipped with a scratch resistant fog free
shield. Common household cleaners such as glass cleaners,
surface cleaners, and furniture polishes, can leave behind
unwanted residues, or in some extreme cases damage the
shield itself. Use no cleaners or detergents on the inside
of your shield. Using anything other than a clean soft cloth,
micro fiber cloth, or the bag supplied with your helmet, will
ruin or reduce the effectiveness of the fog free coating.
It is our recommendation the same steps outlined for
cleaning the exterior of your helmet should be applied to
cleaning the exterior of your shield.
EXTERIOR CLEANING (RUBATONE™ HELMETS)
1. Lay a warm, wet, cloth towel on the exterior of the helmet for
at least 5 minutes to soften dried on bugs.
2. Remove the now softened bugs and road grime with a light
blotting action. For this use the soft part of your helmet bag
provided or a clean microfiber cloth.
* Never rub aggressively with anything on the Rubatone™ or you can
ruin the finish.
15 16
15 16
CARE AND CLEANING ADVISORY

This manual suits for next models
7
Table of contents
Other ICON Motorcycle Accessories manuals