manuals.online logo
Brands
  1. Home
  2. •
  3. Brands
  4. •
  5. Ideal-Standard
  6. •
  7. Plumbing Product
  8. •
  9. Ideal-Standard SOTTINI TALENT User manual

Ideal-Standard SOTTINI TALENT User manual

1
23
4
6
7
8
10
9
11
15
24
25
17
18
19
20
35
22
23
26
27
30
29
28
X
12
1a
3a
5
7
33
34
21
14
13
16
31
32
31
31
33
Ersatzteil - Regelung / Ordering spares / Pièces de rechange / Parti di ricambio
8
Auswechseln Metallschlauch ( Pos. 33 )
Fitting a new metal hose ( item 33 )
Changement du tuyau métallique flexible ( 33 )
Sostituzione del flessibile ( Pos. 33 )
Typ / Type / Tipo N 9356 ..
Montage- und Bedienungsanleitung
Installation Instructions
Instructions de montage
Istruzioni di montaggio
A 960 733 XX
A 960 732 XX
A 963 033 NU
A 961 640 NU
A 963 258 XX
A 961 817 NU ( 5x )
A 963 049 NU
A 961 783 XX
A 963 276 NU
A 961 808 XX
A 961 807 NU A 961 132 XX
A 961 810 NU
A 961 811 NU
A 961 814 NU A 963 258 XX
A 961 816 NU
A 961 809 NU
A 961 817 NU ( 5x )
A 961 819 NU
A 961 817 NU ( 5x )
A 961 820 NU
A 961 820 NU
A 961 821 XX
165 - 300
227
300 max.
SW 21 SW 19
38 max.
R 3/4"
M28x1,5
M30x1,5
R 1/2" Ø16
SW 23
SW 30
R 1/2"
38 max.
206
R 1/2"
230
114
Dem Benutzer der Armatur aushändigen.
Please hand over to the user of the fitting.
S.V.P., remettre à l'utilisateur de la robinetterie.
Si prega di voler consegnare le presenti
istruzioni l'utilizzatore della rubinetteria.
TDA 680 / 1000 / 965 272
Ihr Installateur / Your plumber / Votre installateur / L'installatore
9
■ Handbrause abschrauben. Hülse 34X lösen
und Metallschlauch 33 soweit herausziehen,
daßdieSchraubverbindungderSchlauchleitung
32 freiliegt.
Wichtig! Schlauchleitung32festhalten.Darf
keinesfalls ohne Metallschlauch 33 zurück-
geschoben werden.
Metallschlauch 33 austauschen. Die Hülse 34X
muß übergeschoben sein. Metallschlauch mit
der Schlauchleitung verbinden. Schraub-
verbindungzurückschieben und Hülse 34Xwie-
der befestigen. Handbrause montieren.
Funktion und Dichtigkeit überprüfen.
■ Dévisser la douchette. Deserrer le manchon
34X et retirer le tuyau métallique flexible jusqu'à
ce que le raccord à vis de la conduite en tuyaux
souples 32 soit dégagé.
Important! Retenir la conduite en tuyaux
souples32quinedoitjamaisêtrerepoussée
sans le tuyau métallique flexible.
Remplacer le tuyau métallique flexible 33. Le
manchon 34X doit être relevé. Brancher le
tuyau métallique flexible sur la conduite en
tuyaux souples, repousser le raccord à vis et
refixer le manchon 34X. Monter la douchette.
Vérifier le bon fonctionnement et l'étanchéité.
■ Screw off spray attachment. Undo sleeve
34X and pull out metal hose 33 far enough so
that the screw connection of the connector hose
32 is accessible.
Important! Keep hold of connector hose 32
all the time. It must not be pushed back in
without metal hose 33 attached.
Fit sleeve 34X over the new metal hose 33.
Connectmetal hose toconnector hose 32.Push
the screw connection back in and retighten
sleeve 34X. Fit the spray attachment.
Check that the fitting functions correctly and
does not leak.
■ Svitare la doccia. Svitare la bussola 34X e
sfilare il flessibile 33 fino a far uscire il raccordo
del tubo 32.
Importante ! Tener fermo il tubo 32, il quale
nondeveesserereinseritosenzailflessibile
33 montato.
Sostituire il flessibile 33 infilandoci la bussola
34X. Collegareilflessibileal tubo 32 e reinserirlo
nelforo.Quindi fissare la bussola34X e montare
la doccia. Verificare tenuta e funzionamento.
4-Loch Badebatterie für Wannenrand-Montage
Four piece combination rim mounted bath filler
Mélangeur de bain à 4 trous pour montage au
bord de la baignoire
Gruppo ad incasso per montaggio a bordo vasca
SOTTINI TALENT
A 963 274 XX
A 963 275 XX A 963 047 NU
(2x)
A 963 196 NU
A 963 278 NU
A 961
798 NU
A 961 809 NU
A 963 279 NU
A 963 280 XX
A 963 277 XX
■ Bestellnummern für Ersatzteile siehe Zeichnung
auf dieser Seite. Bei Bestellung der Teile für XX die
Oberflächen-Kennung einsetzen (z.B: bei chrom statt
XX = AA einsetzen).
Oberflächen-Kennung siehe Ersatzteilbuch.
■Les numéros de commande des pièces de
rechange sont indiqués dans le schéma. Pour
commander des pièces inscrire les suffixes
correspondants (par example: pour chrome indiquer
les suffixes AA au lieu de XX).
Les suffixes sont indiqués dans le catalogue des
piéces de rechange.
■I codici di ordinazione dei ricambi sono riportati sul
disegno a lato. Per l'ordinazione di ricambi indicare il
relativo suffisso codice (per esempio: per cromato
indicareAAinvecediXX).I suffissi codici sonoriportati
nel catalogo ricambi.
■ Spare part numbers are shown in diagram on this
page. When ordering parts add the appropriate suffix.
(for example: for chrome use AA instead of XX)
See Spare part catalogue for suffixes.
Hersteller:
Ideal Standard
Pro-Service
Am Probsthof 15
53121 Bonn
Tel.: 0228-521580
Fax: 0228-521589
II
I
IV
III
I
III II
IV
V
VI
VII
VIII
IX
X
Vor Beginn der Montage bitte sorgfältig durchlesen.
Please read these instructions carefully before commencing installation.
Prière de lire attentivement cette notice avant de procéder àl'installation.
Prima di iniziare il montaggio leggare attentamente le seguenti istruzione.
15
Montage nur durch Fachmann / Assembly only bei qualified expert /
Ne confier le montage qu'àun personnel spécialisé/
Far eseguire i lavori solo da un installatore
2
max: 1 MPa ( 10 bar / 145 psi )
opt. : 0,1 MPa- 0,5 MPa (1 - 5 bar / 14,5-72,5 psi )
min: 0,1 MPa ( 1 bar / 14,5 psi )
> 0,5 MPa ( 5 bar / 72,5 psi ) ➜
Warm
hot
chaud
calda
Kalt
cold
froid
fredda
Bedienung / Operation / Utilisation / Istruzioni per l'uso
4
Pflege und Wartung / Maintenance / Entretien / Pulizia del miscelatore
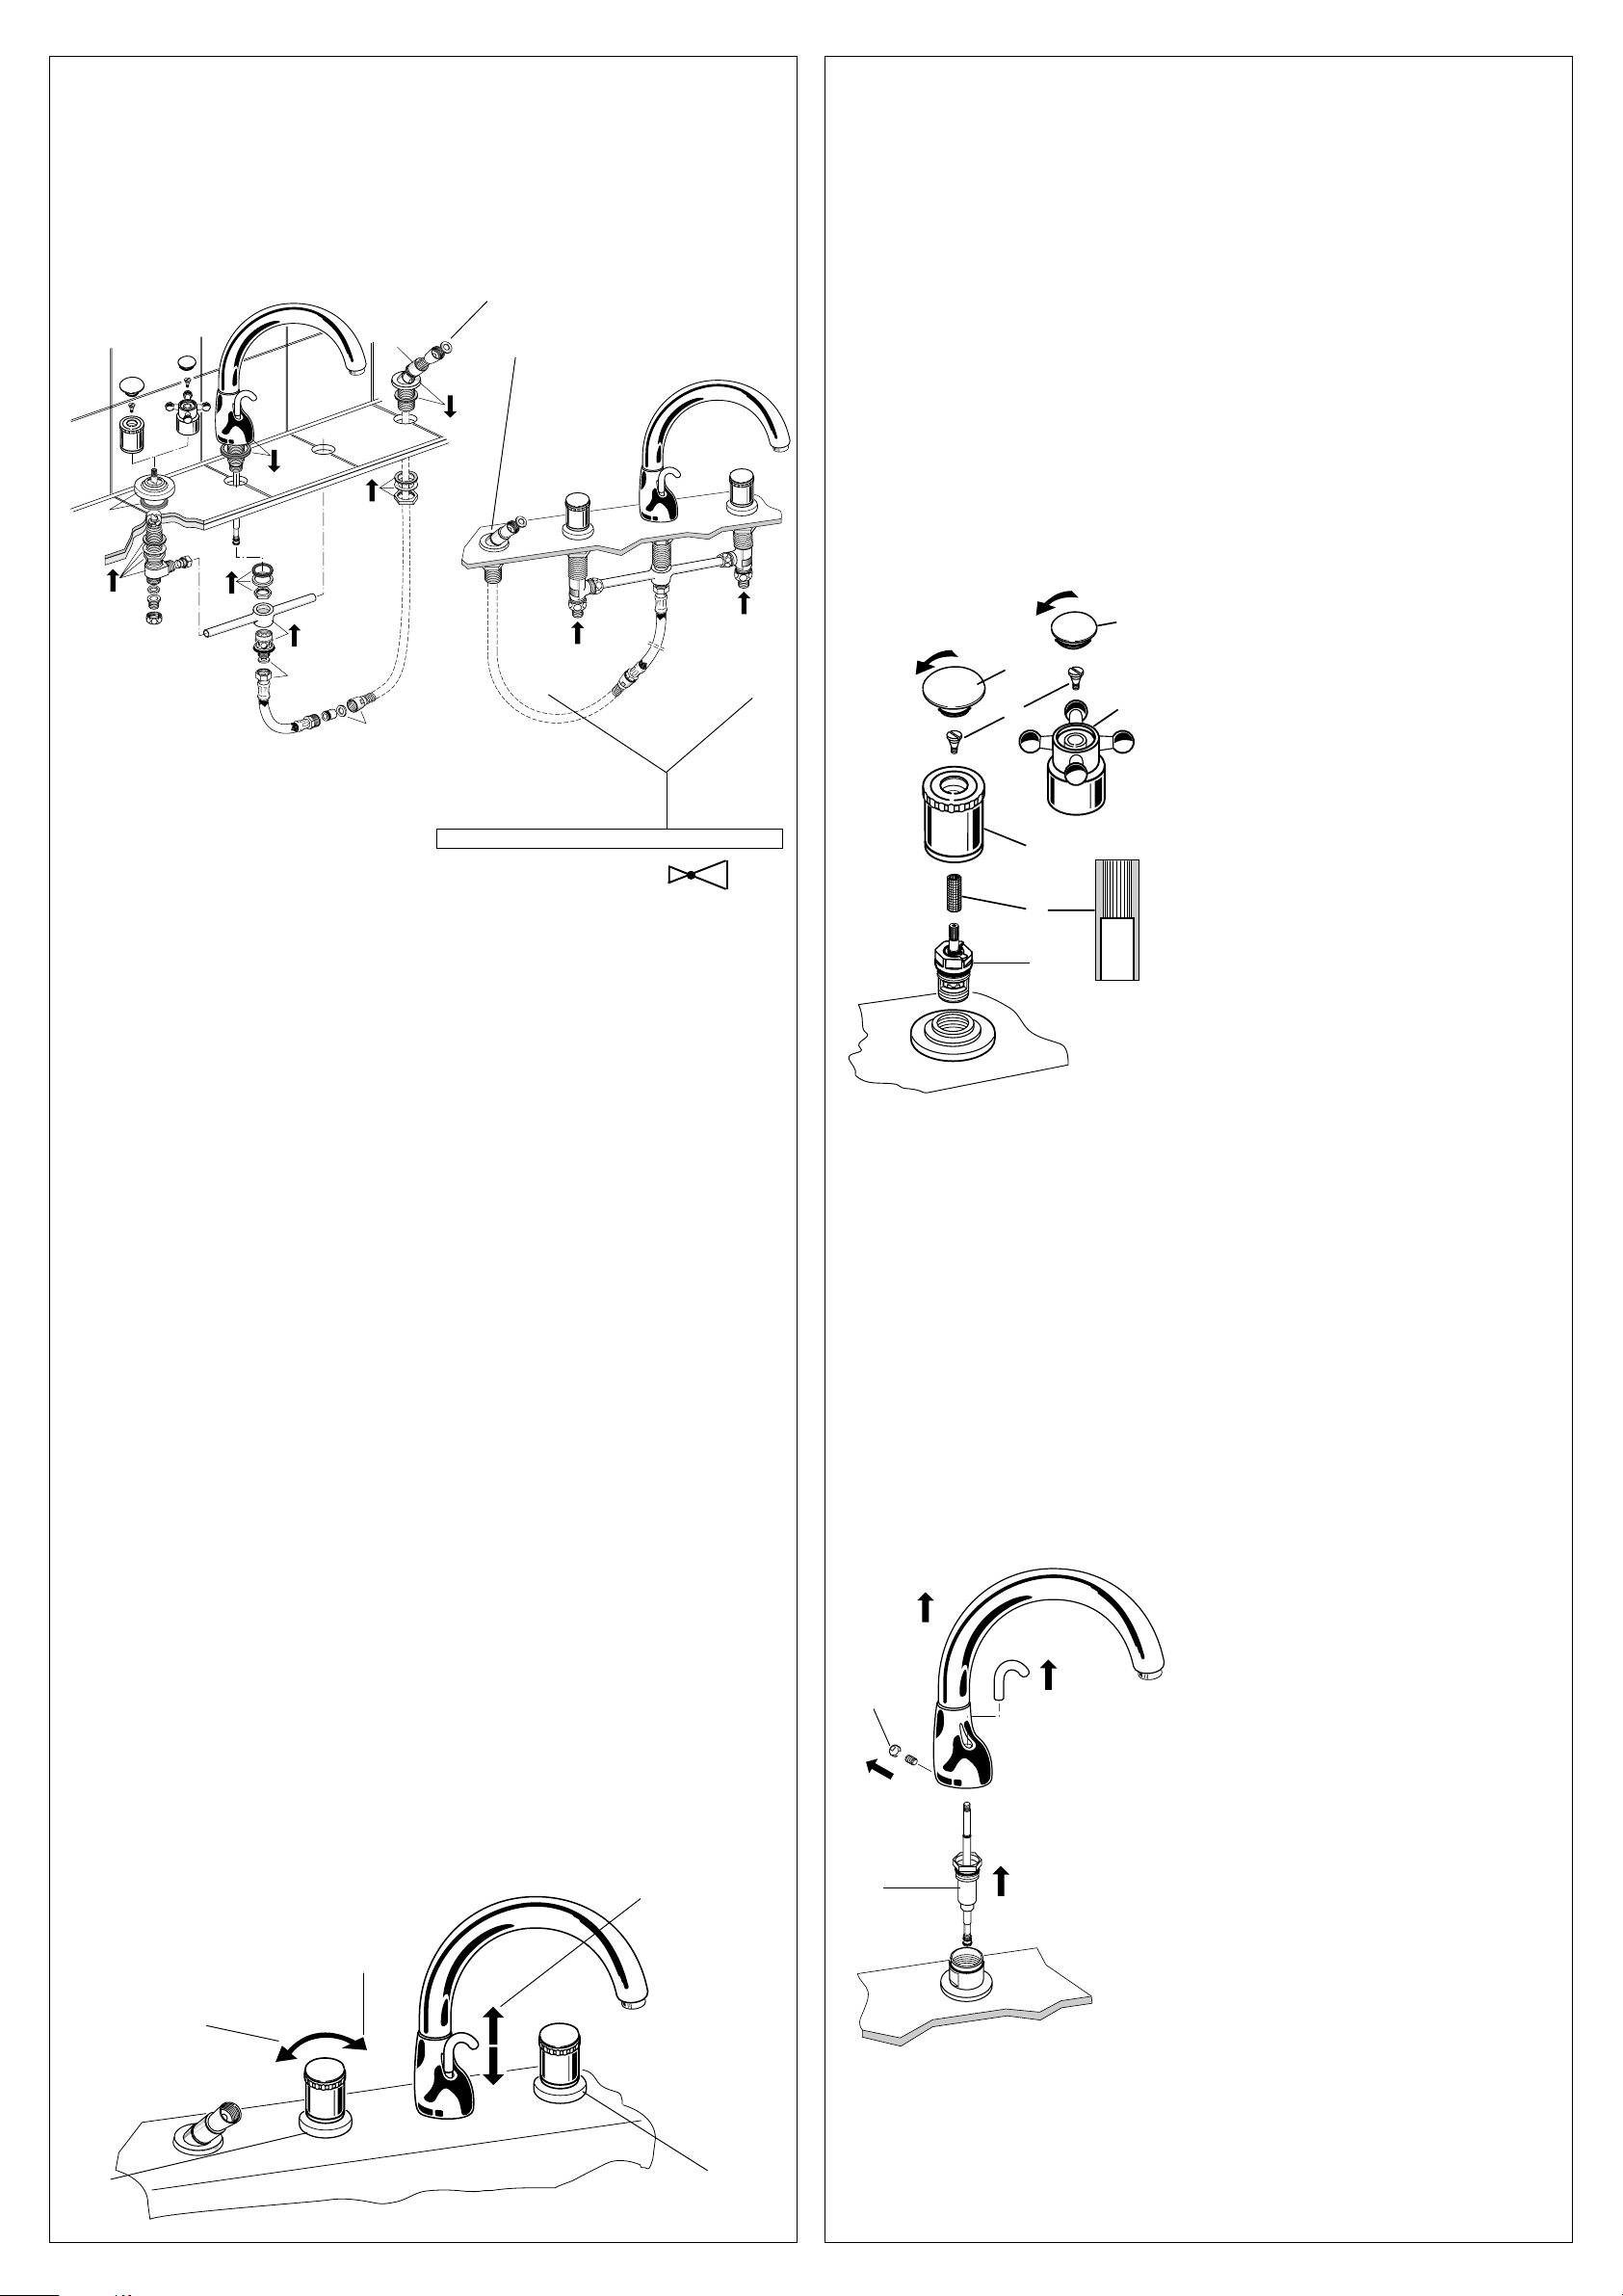
■ Zugknopf abschrauben. Stopfen "Y" vor-
sichtig heraushebeln. Gewindestift lösen. Aus-
lauf nach oben abziehen. Teil "Z" heraus-
schrauben. Umschaltspindel nach oben abneh-
men. O-Ringe austauschen und einfetten.
Zusammenbau in umgekehrter Reihenfolge
vornehmen.
Funktion und Dichtigkeit überprüfen.
auf
on
ouverture
aprire
zu
off
fermeture
chiudere
ziehen - Brause
pull - shower
tirer - douche
tirare - doccia
kalt
cold
froid
fredda
links o. rechts montierbar
Can be fitted left or right
Montage possible a droite ou a gauche
Montaggio possibile a destra o a sinistra
■ Zulaufleitungen gut durchspülen, um
Schmutzreste zu entfernen. Auslauf, Seiten-
ventile und Handbrausehalterung nach Zeich-
nung montieren.
Metallschlauch von oben durch die Brause-
halterung schieben. Dazu muß die Hülse X
abgeschraubtund nacheinschieben des Metall-
schlauch wieder befestigt werden.
Verbindung IX herstellen ( siehe Kap. 9 ).
Handbrause ( mit eingebautem Rückflußver-
hinderer ) einschrauben.
Griffe montieren ( siehe Kapitel 6 ).
Funktion und Dichtigkeit überprüfen.
■Bien rincer les conduites d 'arrivée d'eau
pour éliminer les restes de saleté. Monter la
sortie, les robinets latéraux et le support de la
douchette en se conformant au schéma.
Introduire le tuyau métallique de haut en bas par
le support de la douchette. Dévisser pour cela la
douille X et la refixer après avoir introduit le
tuyau métallique.
Etablir le raccord IX ( voir chapitre 9 ).
Visser la douchette.
Monter les robinets ( voir chapitre 6 ).
Vérifier le bon fonctionnement et l'étanchéité.
■Flush through the supply pipes thoroughly to
remove any remaining dirt. Install spout, side
valves and spray mount as shown in the dia-
gram. Push metal hose through the spray
mount from above. For this purpose the sleeve
X must be screwed off and screwed back in
place after inserting the hose.
Make connection IX ( see Chapter 9 ).
Screw in spray attachment.
Fit the handles ( see Chapter 6 ).
Check that the fitting functions correctly and
does not leak.
■Risciacquare bene i tubi di mandata al fine
di togliere eventuale sporco e/o incrostazioni.
Effettuare il montaggio della bocca, dei rubinetti
laterali e del portadoccia come da disegno.
Infilare il flessibile dall'alto attraverso il porta-
doccia. Per poter fare questa operazione è
necessario togliere prima la bussola X che verrà
riapplicata dopo aver infilato il flessibile.
Collegare il flessibile ( raccordo IX ) al tubo
proveniente dal gruppo ( vedi punto 9 ).
Avvitare la doccia ( con valvola di ritegno incor-
porata ). Montare le manopole ( vedi punto 6 ).
Verificare tenuta e funzionamento.
3Technische Daten / Technical data
Caractéristiques techniques / Dati tecnici
Prüfdruck:
Test pressure:
Pression d'essai:
Pressione massima di prova:
1,6 MPa ( 16 bar / 232 psi ) max.
Betriebstemperatur:
Temperature:
Température
d'utilisation:
Temperatura
d'esercizio:
90 C max.
Durchflußleistung:
Flow rate:
Débit sous:
Portata:
0,3 MPa ( 3 bar / 43,5 psi )
= 27 l/min
warm
hot
chaud
calda
■ Sollevare con cautela il cappuccio decorativo
1o 1a. Svitare la vite 2 e togliere la manopola 3
o 3a, facendo attenzione che l'inserto 4 non
rimanga infilato sulla cartuccia. Eventualmente
toglierlo dalla cartuccia e reinfilarlo nella
manopola dalla parte della zigrinatura interna.
Chiudere l'alimentazione dell'acqua.
Svitarelacartuccia5(filettodestrorso)(apertura
di chiave 22 ).
Ingrassare la nuova cartuccia ( guarnizione O -
Ring ) ed avvitarla. Rimontare le restanti parti e
verificare tenuta e funzionamento.
■Retirer l'enjoliveur 1 ou 1a avec précaution
à l'aide d'un tournevis. Retirer la vis 2 du robinet
et la tête de robinet 3 ou 3a. Veiller à ce que la
douille 4 du robinet ne reste pas bloquée sur la
cartouche de tête. Si nécessaire la retirer et la
remettre dans le robinet, les cannelures
intérieures vers l'avant.
Boucher les conduites d'arrivée d'eau.
Dévisser la cartouche de tête 5 en la tournant
vers la gauche ( surplat 22 ).
Graisser la nouvelle cartouche ( joint torique ) et
la visser. Remonter les autres pièces.
Vérifier le bon fonctionnement et l'étanchéité.
■ Svitare la lavetta a testa sferica del
deviatore.Togliere il dischetto coprivite " Y "
facendo attenzione a non danneggiarlo.
Svitare il grano filettato. Sfilare la bocca verso
l'alto. Svitare il pezzo " Z ". Sfilare verso l'alto lo
stelodel deviatore, quindi sostituire le guarnizioni
O - Ring e ingrassare.
Effettuare il montaggio eseguendo le stesse
operazioni in ordine inverso.
Verificare tenuta e funzionamento.
■ Dévisser le bouton à tirer. Enlever avec
précautionlebouchon " Y " à l'aide d'un tournevis.
Dévisser la vis sans tête. Retirer la sortie vers le
haut. Dévisser la pièce " Z ". Retirer la broche
d'inverseur vers le haut. Remplacer les joints
toriques et les graisser.
Pour l'assemblage, procéder dans l'ordre inver-
se.
Vérifier le bon fonctionnement et l'étanchéité.
■ Screw off the pull knob. Carrefully lever out
stopper " Y ". Undo threaded pin. Remove spout
by pulling upwards. Unscrew and remove part "
Z ". Remove diverter spindle by pulling
upwards. Fit new O-rings and apply grease.
Reassemble in reverse sequence.
Check that the fitting functions correctly and
does not leak.
Y
Z
■Carefully lever out the cap 1 or 1a. Undo
handle screw 2 and pull off the handle 3 or 3a.
When so doing, make sure that the handle insert
4 does not remain on the cartridge. If necessary,
pull off the insert and fit the end with internal
ribbing back into the handle.
Shut off supply pipes.
Unscrew and remove cartridge 5 by turning anti
- clockwise ( Spanner size 22mm ).
Grease the new cartridge ( O-ring ) and screw in.
Refit the remaining parts. Check that the fitting
functions correctly and does not leak.
6Demontage Griff / Auswechseln der Oberteil - Kartusche 5
Handle disassembly / Changing the cartridge 5
Démontage du croisillon / Remplacement de la cartouche 5
Smontaggio della manopola / Cambio della cartuccia 5
3
5
1
1a
23a
4
■Dekorplatte 1 bzw. 1a vorsichtig von Hand
entfernen. Griffschraube 2 lösen und Griff 3
bzw. 3a abziehen. Hierbei darauf achten, daß
das Griff-Insert 4 nicht auf der Oberteil-Kartu-
sche stecken bleibt. Wenn erforderlich abzie-
hen und mit der Innenriffelung voran in den Griff
zurückstecken. Montage in umgekehrter Rei-
henfolge vornehmen.
Zulaufleitungen absperren.
Oberteil - Kartusche 5 durch Linksdrehung her-
ausschrauben ( SW 22 ).
Neue Kartusche einfetten ( O-Ring ) und ein-
schrauben. Restliche Teile wieder montieren.
Funktion und Dichtigkeit überprüfen.
7Demontage Auslauf / Spout disassembly /
Démontage du bec / Smontaggio della bocca
■ Zur Reinigung der Armatur sollten nur seifenhal-
tige Reinigungsmittel verwendet werden. Keinesfalls
kratzende, scheuernde, alkohol-, ammoniak-,
salzsäure-, phosphorsäure- oder essigsäurehaltige
Reinigungs- oder Desinfektionsmittel benutzen.
■Per la pulizia del miscelatore si consiglia di usare
solamente detergenti a base di sapone. Non impie-
gare in nessun caso detergenti o disinfettanti abra-
sivi o contenenti alcool, ammoniaca, acido cloridrico
o acido fosforico.
■When cleaning the fitting, only use saponaceous
( i. e. soap - based ) agents. Never use abrasive or
scouring powders, cleaning agents containing alco-
hol, ammonia, nitric acid or phosphoric acid, or des-
infectants.
■Pour le nettoyage de la robinetterie, employer
seulement des produits contenant du savon. Jamais
de nettoyants ou des désinfectants qui grattent,
rayent, contiennent de l'alcool, de l'ammoniac, de
l'acide chlorhydrique ou phosphorique.

Other Ideal-Standard Plumbing Product manuals

Ideal-Standard W3718 Series User manual

Ideal-Standard

Ideal-Standard W3718 Series User manual

Ideal-Standard ULTRA FLAT NEW T449001 User manual

Ideal-Standard

Ideal-Standard ULTRA FLAT NEW T449001 User manual

Ideal-Standard Ceratherm T50 User manual

Ideal-Standard

Ideal-Standard Ceratherm T50 User manual

Ideal-Standard TONIC User manual

Ideal-Standard

Ideal-Standard TONIC User manual

Ideal-Standard A 5195 Series User manual

Ideal-Standard

Ideal-Standard A 5195 Series User manual

Ideal-Standard CERAMIX A 1100 Series User manual

Ideal-Standard

Ideal-Standard CERAMIX A 1100 Series User manual

Ideal-Standard Ceratherm C100 A7537AA User manual

Ideal-Standard

Ideal-Standard Ceratherm C100 A7537AA User manual

Ideal-Standard W3710 User manual

Ideal-Standard

Ideal-Standard W3710 User manual

Ideal-Standard HYGIENE PLUS Instruction manual

Ideal-Standard

Ideal-Standard HYGIENE PLUS Instruction manual

Ideal-Standard SEPTA PRO U1 User manual

Ideal-Standard

Ideal-Standard SEPTA PRO U1 User manual

Ideal-Standard CERAFLEX B C144 Series User manual

Ideal-Standard

Ideal-Standard CERAFLEX B C144 Series User manual

Ideal-Standard ULTRA FLAT NEW T4491 User manual

Ideal-Standard

Ideal-Standard ULTRA FLAT NEW T4491 User manual

Ideal-Standard K7061 Series User manual

Ideal-Standard

Ideal-Standard K7061 Series User manual

Ideal-Standard B 6928 AA Use and care manual

Ideal-Standard

Ideal-Standard B 6928 AA Use and care manual

Ideal-Standard Ceratherm T25 User manual

Ideal-Standard

Ideal-Standard Ceratherm T25 User manual

Ideal-Standard PROSYS Comfort R0145 User manual

Ideal-Standard

Ideal-Standard PROSYS Comfort R0145 User manual

Ideal-Standard iLife T4875EO Instruction manual

Ideal-Standard

Ideal-Standard iLife T4875EO Instruction manual

Ideal-Standard E206567 Installation instructions

Ideal-Standard

Ideal-Standard E206567 Installation instructions

Ideal-Standard Contour 21 S3257 User manual

Ideal-Standard

Ideal-Standard Contour 21 S3257 User manual

Ideal-Standard iLife 2 T4887EO Instruction manual

Ideal-Standard

Ideal-Standard iLife 2 T4887EO Instruction manual

Ideal-Standard IDEALTHERM A 5809 User manual

Ideal-Standard

Ideal-Standard IDEALTHERM A 5809 User manual

Ideal-Standard iLife T4870EO Instruction manual

Ideal-Standard

Ideal-Standard iLife T4870EO Instruction manual

Ideal-Standard ALCOVE Instruction manual

Ideal-Standard

Ideal-Standard ALCOVE Instruction manual

Ideal-Standard ULTRA FLAT S BESPOKE User manual

Ideal-Standard

Ideal-Standard ULTRA FLAT S BESPOKE User manual

Popular Plumbing Product manuals by other brands

Elkay EZOTL Series Installation and use manual

Elkay

Elkay EZOTL Series Installation and use manual

Pioneer 2DM300 Installation guides

Pioneer

Pioneer 2DM300 Installation guides

Grohe Euroeco Special 32 767 manual

Grohe

Grohe Euroeco Special 32 767 manual

BELLOSTA romina 0301/40/26/C installation instructions

BELLOSTA

BELLOSTA romina 0301/40/26/C installation instructions

Mustee VECTOR 25 installation instructions

Mustee

Mustee VECTOR 25 installation instructions

Helvex Clasica 100 installation guide

Helvex

Helvex Clasica 100 installation guide

Yoshitake SY-40 Series product manual

Yoshitake

Yoshitake SY-40 Series product manual

Franke CMPX504 Installation and operating instructions

Franke

Franke CMPX504 Installation and operating instructions

Vanico Maronyx DUO installation guide

Vanico Maronyx

Vanico Maronyx DUO installation guide

Luxart Poydras PO341 installation manual

Luxart

Luxart Poydras PO341 installation manual

Hans Grohe Axor Citterio 39927 1 Series Installation instructions / warranty

Hans Grohe

Hans Grohe Axor Citterio 39927 1 Series Installation instructions / warranty

Graff G-9970 installation instructions

Graff

Graff G-9970 installation instructions

Spectrum Brands Pfister Kedzie F-529-7KZ Quick installation guide

Spectrum Brands

Spectrum Brands Pfister Kedzie F-529-7KZ Quick installation guide

Glacier bay HD65878-0004 Installation and care guide

Glacier bay

Glacier bay HD65878-0004 Installation and care guide

American Standard NEO Traditional 6008S parts list

American Standard

American Standard NEO Traditional 6008S parts list

KitchenAid Sinks  8534966 installation instructions

KitchenAid

KitchenAid Sinks 8534966 installation instructions

Toto TTMR201MFK quick start guide

Toto

Toto TTMR201MFK quick start guide

Hans Grohe Croma Showerpipe 27169 1 Series Installation/User Instructions/Warranty

Hans Grohe

Hans Grohe Croma Showerpipe 27169 1 Series Installation/User Instructions/Warranty

manuals.online logo
manuals.online logoBrands
  • About & Mission
  • Contact us
  • Privacy Policy
  • Terms and Conditions

Copyright 2025 Manuals.Online. All Rights Reserved.