iNels RFTC-10/G User manual

RFTC-10/G
Simple wireless temperature controller
EN
02-56/2015 Rev.3
Made in Czech Republic
Characteristics /
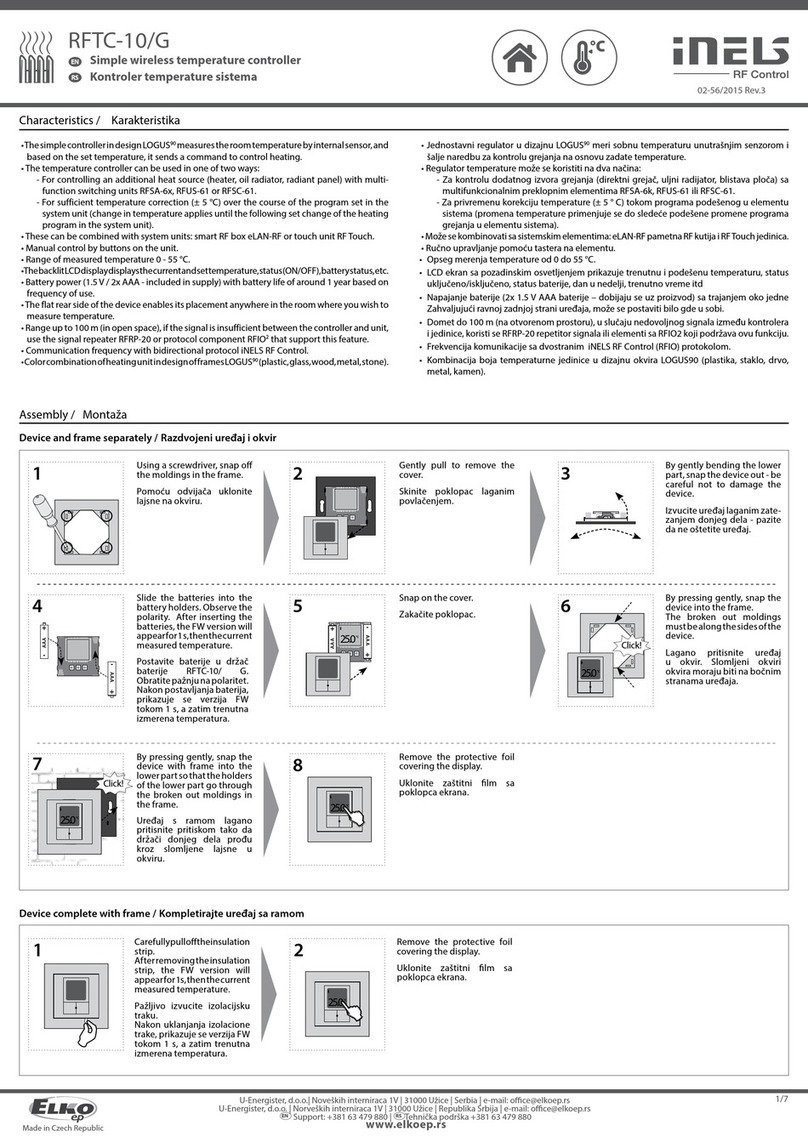
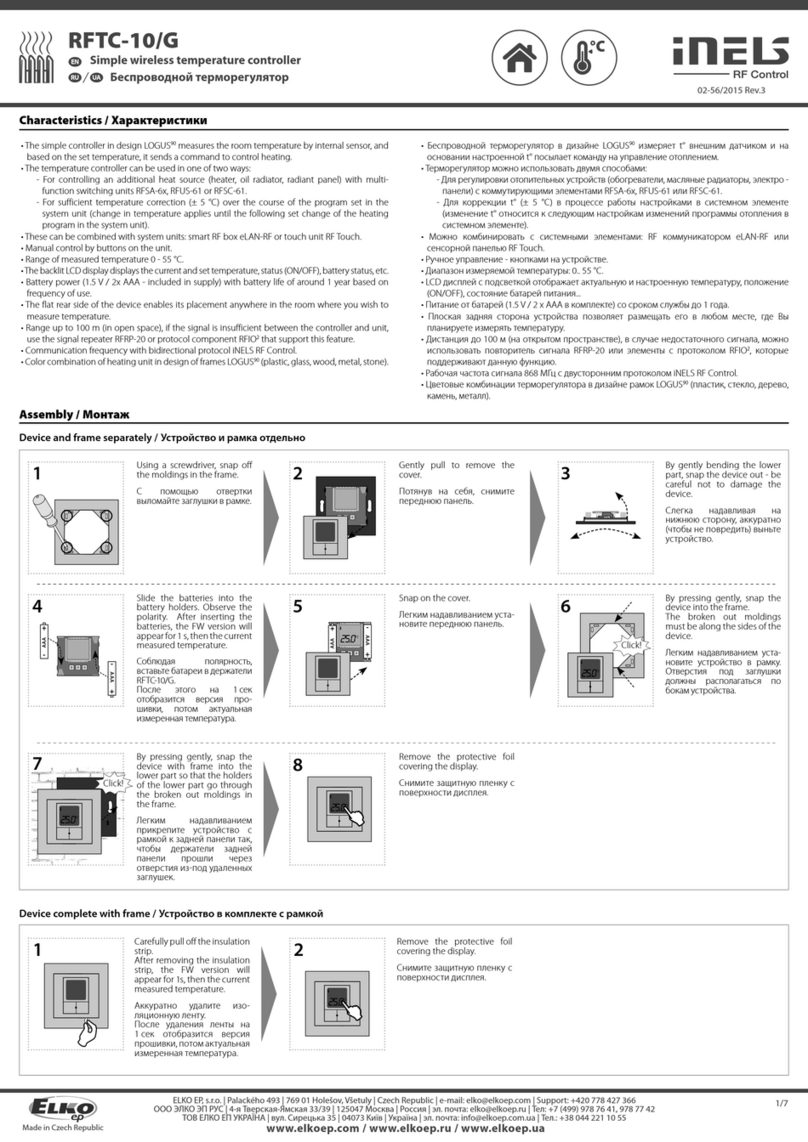
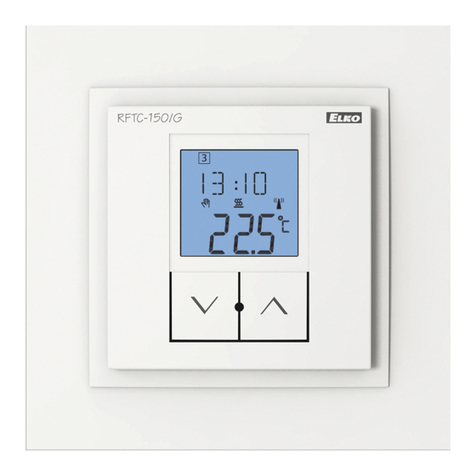
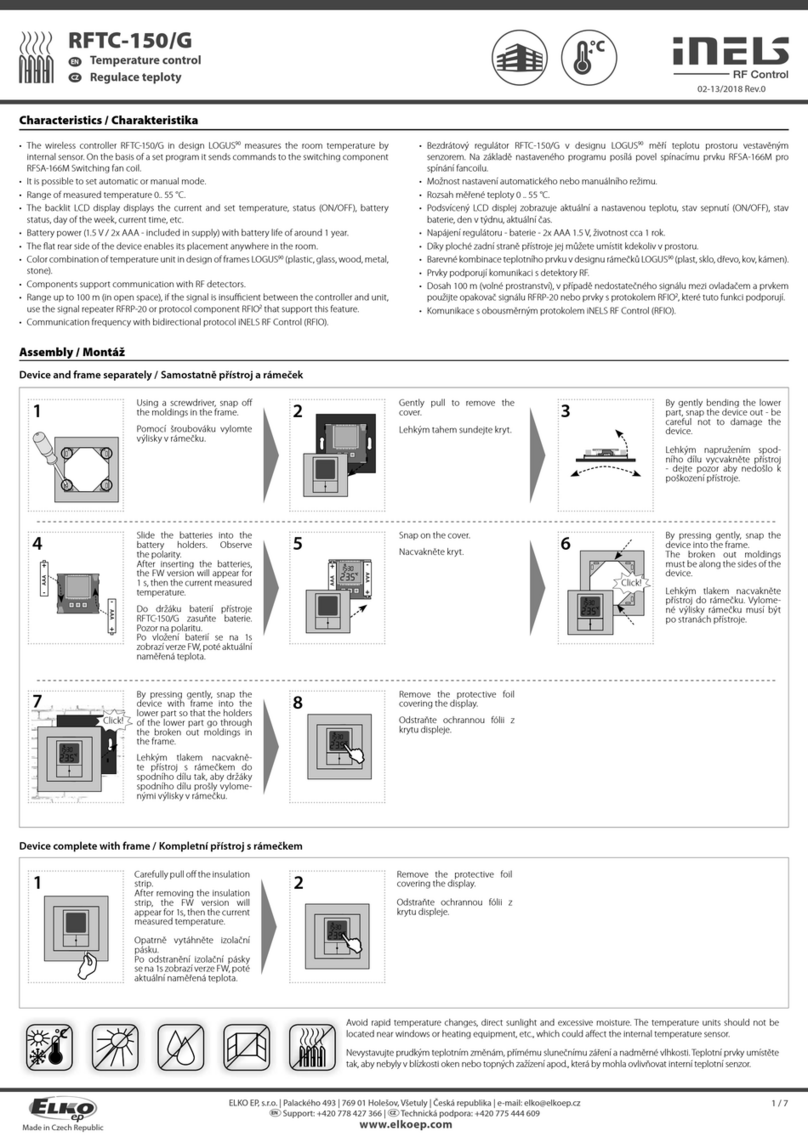
• The simple controller in design LOGUS90 measures the room temperature by internal sensor, and
based on the set temperature, it sends a command to control heating.
• The temperature controller can be used in one of two ways:
- For controlling an additional heat source (heater, oil radiator, radiant panel) with multi-
function switching units RFSA-6x, RFUS-61 or RFSC-61.
- For sufficient temperature correction (± 5 °C) over the course of the program set in the
system unit (change in temperature applies until the following set change of the heating
program in the system unit).
• These can be combined with system units: smart RF box eLAN-RF or touch unit RF Touch.
• Manual control by buttons on the unit.
• Range of measured temperature 0 - 55 °C.
• The backlit LCD display displays the current and set temperature, status (ON/OFF), battery status, etc.
• Battery power (1.5 V / 2x AAA - included in supply) with battery life of around 1 year based on
frequency of use.
• The flat rear side of the device enables its placement anywhere in the room where you wish to
measure temperature.
• Range up to 100 m (in open space), if the signal is insufficient between the controller and unit,
use the signal repeater RFRP-20 or protocol component RFIO2that support this feature.
• Communication frequency with bidirectional protocol iNELS RF Control.
• Color combination of heating unit in design of frames LOGUS90 (plastic, glass, wood, metal, stone).
1/7
12
Using a screwdriver, snap off
the moldings in the frame.
Gently pull to remove the
cover. 3By gently bending the lower
part, snap the device out - be
careful not to damage the
device.
Assembly /
Device and frame separately /
Device complete with frame /
45
Slide the batteries into the
battery holders. Observe the
polarity. After inserting the
batteries, the FW version will
appear for 1 s, then the current
measured temperature.
Snap on the cover. By pressing gently, snap the
device into the frame.
The broken out moldings
must be along the sides of the
device.
+
-
AAA
+
-
AAA
+
-
AAA
+
-
AAA
°C
25.0
By pressing gently, snap the
device with frame into the
lower part so that the holders
of the lower part go through
the broken out moldings in
the frame.
8Remove the protective foil
covering the display.
°C
25.0
6
°C
25.0
Click!
°C
25.0
7
Click!
1Carefully pull off the insulation
strip.
After removing the insulation
strip, the FW version will
appear for 1s, then the current
measured temperature.
2Remove the protective foil
covering the display.
°C
25.0
Prosty bezprzewodowy regulator temperatury
PL
ELKO EP, s.r.o. | Palackého 493 | 769 01 Holešov, Všetuly | Czech Republic | e-mail: [email protected] | Support: +420 778 427 366
ELKO EP Poland, sp. z o. o. | ul. Motelowa 21 | 43-400 Cieszyn | Polska | e-mail: [email protected] | GSM: +48 785 431 024
www.elkoep.com / www.elkoep.pl
Charakterystyka
• Prosty regulator temperatury we wzornictwie LOGUS90 za pomocą wewnętrznego czujnika
dokonuje pomiaru temperatury w pomieszczeniu i na podstawie ustawień nadaje polecenie do
sterowania ogrzewaniem.
• Regulatora temperatury można użyć na dwa sposoby:
- do regulacji dodatkowego źródła ogrzewania (grzejnik elektryczny, grzejnik olejowy, panel
grzewczy) poprzez wielofunkcyjne urządzenia przełączające RFSA-6x, RFUS-61 lub RFSC-61.
- do tymczasowej korekcji temperatury (± 5 ˚C) w trakcie trwania trybu ustawionego w
urządzeniu systemowym (zmiana temperatury jest ważna do następnej ustawionej zmiany
trybu grzewczego).
• Może współpracować z urządzeniami systemowymi: inteligentną centralką eLAN-RF oraz dotykowym
panelem sterującym RF Touch.
• Sterowanie ręczne przyciskami urządzenia.
• Zakres mierzonej temperatury: 0 .. 55 ˚C.
• Podświetlony wyświetlacz LCD pokazuje aktualną oraz ustawioną temperaturę, stan przełączenia
(ON/OFF), stan baterii.
• Zasilanie bateriowe (1.5V / 2 x AAA - w zestawie) o trwałości ok. 1 roku, zależnej od częstotliwości używania.
• Płaska tylna część obudowy pozwala na umieszczenie urządzenia w dowolnym miejscu w
pomieszczeniu, w którym chcesz mierzyć temperaturę.
• Zasięg do 100 m (w wolnej przestrzeni), w przypadku niewystarczającego sygnału pomiędzy
sterownikiem oraz urządzeniem użyj wzmacniacza sygnału (repeatera) RFRP-20 lub urządzenia s
protokołem RFIO2, wspierającego tę funkcję.
• Częstotliwość komunikacji z dwukierunkowym protokołem iNELS RF Control.
• Różna kolorystyka elementu termicznego - wzornictwo LOGUS90 (plastik, szkło, drewno, metal, kamień).
Montaż
Oddzielnie urządzenie oraz ramka
Za pomocą śrubokręta wyłam
kształtki w ramce.
Lekkim pociągnięciem zdejmij
pokrywę.
Po lekkim wygięciu dolnej
części wyjmij urządzenie -
uważaj, aby nie uszkodzić
urządzenia.
Włóż baterie do uchwytu
baterii w urządzeniu RFTC-10/G.
Zwróć uwagę na polaryzację.
Na wyświetlaczu pojawi się na
1s wersja FW, później zmierzona
temperatura.
Zatrzaśnij pokrywę.
Lekko naciskając zatrzaśnij
urządzenie w ramce.
Wyłamane kształtki muszą się
znajdować po bokach.
Lekko naciskając osadź
urządzenie z ramką w dolnej
części urządzenia, tak aby
uchwyty dolnej części weszły
w otwory w ramce.
Usuń folię ochroną wyświetlacza.
Urządzenie w komplecie z ramką
Ostrożnie usuń taśmę izolacyjną,
na 1s na wyświetlaczu
pojawi się wersja FW, później
zmierzona temperatura.
Usuń folię ochroną wyświetlacza.

RFTC-10/G
Simple wireless temperature controller
EN
02-56/2015 Rev.3
Made in Czech Republic
Display /
1.
2.
3.
4.
5.
6.
7.
9.
1. Signal strength - (1 bar - weak signal, 3 bars - strong
signal) the symbol does not display if the controller
is not programmed or it is not possible to establish a
connection with the programmed switching unit or
system unit.
2. Circuit temperature measured.
3. Circuit temperature set.
4. Circuit status indicator.
5. Temperature / time indication.
6. Battery status indicator - only displays in case of low
battery power - indicates that the power is insufficient to
provide reliable communication with the programmed
switching unit or system unit.
7. Locked for adjustment.
8. Confirmation of temporary temperature adjustment.
9. Temperature measured in °C / °F.
control buttons v /
display /
control buttons ^ /
hidden buttons PROG /
v ^
• Hidden button PROG - pressing the hidden button
is performed by the programming tool (part of the
packaging) or a long thin object without a sharp point.
• Control is performed the control button v/^.
^
pressing control button > 2s
- unlocking for adjustment - longer than 2 seconds,
the symbol goes off and the displayed value
starts flashing
- after making adjustments pressing the button
^
the setting is confirmed - the set value stops
flashing and symbol is displayed
^
pressing control button < 2s
- moving upwards / setting higher value
^pressing control button > 2s
- return to the original value
^pressing control button < 2s
- moving downwards / setting lower value
2/7
Control /
8.
Radio frequency signal penetration through various construction materials /
programming tool /
☺
☺
☺
☺
RFRP-20
☺
60 - 90 % 80 - 95 % 20 - 60 % 0 - 10 % 80- 90 %
brick walls wooden structures
with plaster boards
reinforced
concrete metal partitions common glass
Avoid rapid temperature changes, direct sunlight and excessive moisture. The temperature units should not be
located near windows or heating equipment, etc., which could affect the internal temperature sensor.
°C
Prosty bezprzewodowy regulator temperatury
PL
ELKO EP, s.r.o. | Palackého 493 | 769 01 Holešov, Všetuly | Czech Republic | e-mail: [email protected] | Support: +420 778 427 366
ELKO EP Poland, sp. z o. o. | ul. Motelowa 21 | 43-400 Cieszyn | Polska | e-mail: [email protected] | GSM: +48 785 431 024
www.elkoep.com / www.elkoep.pl
Przenikanie fal radiowych przez różnego rodzaju materiały budowlane
Sterowanie
przycisk sterujący v
wyświetlacz
ukryty przycisk PROG
przycisk sterujący ^
narzędzie do programowania
• Ukryty przycisk PROG - naciskaj używając narzędzia do
programowania (w zestawie) lub innego nieprzewodnego
długiego cienkiego przedmiotu, który nie ma ostrego
kolca.
• Steruj przyciskami v/^.
^
naciśnięcie na > 2s
- odblokowane w celu ustawienia - gaśnie symbol ,
wyświetlona wartość zaczyna migać.
- po wprowadzeniu zmiany naciśnij
^
w celu
potwierdzenia ustawień, ustawiona wartość przestaje
migać, pojawi się symbol .
^
naciśnięcie na < 2s
- ruch do góry / ustawienie wyższej wartości
^naciśnięcie na > 2s
- powrót do wcześniejszego ustawienia
^naciśnięcie na < 2s
- ruch w dół / ustawienie niższej wartości
Wyświetlacz
1. Siła sygnału - (1 kreska-słaby, 3 kreski - silny sygnał) symbol
nie pojawi się o ile regulator nie został zaprogramowany
albo nie może nawiązać połączenia z zaprogramowanym
przełącznikiem lub z RF Touch / eLAN-RF.
2. Zmierzona temperatura obwodu.
3. Ustawiona temperatura obwodu.
4. Sygnalizacja stanu obwodu.
5. Sygnalizacja temperatury / czasu - czas wyświetlany jest
tylko przy współpracy z RF Touch.
6. Sygnalizacja stanu baterii - wyświetlana jest tylko w
przypadku niskiego napięcia baterii - sygnalizuje, że
napięcie jest za niskie i nie pozwala na niezawodną
komunikację z zaprogramowanym przełącznikiem lub z
RF Touch / eLAN-RF.
7. Zablokowane dla zmiany ustawień.
8. Potwierdzenie tymczasowej korekcji temperatury.
9. Jednostki temperatury ˚C / ˚F.
Nie narażaj czujnika temperatury na nagłe zmiany temperatury, bezpośrednie działanie promieni słonecznych i
nadmierną wilgotność. Elementy termiczne umieść tak, by nie znajdowały się w pobliżu okien, urządzeń grzewczych,
które mogłyby mieć wpływ na wewnętrzny czujnik temperatury.
ściana z cegły
konstrukcje drewniane
z płytami gipsowo-
kartonowymi
ściana
żelbetowa
ścianki
metalowe zwykłe szkło

RFTC-10/G
Simple wireless temperature controller
EN
02-56/2015 Rev.3
Made in Czech Republic
Programming and control of RF switching actuators /
°F
°C
^^
°C°C
^
^
Unlock RFTC-10/G for modification by pressing ^. Set DEV
- RFSA by pressing
^
. Confirm settings by pressing ^.
Programming /
>2s
1 x
Press the hidden button Prog
of the RFTC-10/G for 2s to get
to the Settings Menu.
1
°C
25.0
By pressing
^
, you will move
in Menu to TMP - display of
measured temperature value.
Unlock the modifications
menu by pressing ^. By
pressing
^
^
, select °C or °F.
Press ^to confirm settings.
By pressing
^
, you will move
in Menu to 000000 - address.
By pressing ^, unlock the
modifications menu. Set
the address of the required
switching unit by pressing
^
^
(address is a six-digit
code provided on each unit).
Confirm settings by pressing
^.
34
^
^
^ ^
By pressing
^
, you will move
in Menu to OFS - offset of
temperature sensor. By pressing
^, unlock the modifications
menu. By pressing
^
^
, set
the offset based on individual
requirement in the range of
-5...+5°C (-10...+10°F). Press ^to
confirm settings.
By pressing
^
, you will
move in Menu to HYS -
switching hysteresis. Unlock
the modifications menu by
pressing ^. By pressing
^
^
, set the hysteresis based
on individual requirement in
the range of 0.5...5°C (1...10°F).
Press ^to confirm settings.
°C
°C
^
°C°C
^
^
^
5
°C
°C
^
°C°C
^
^
^
6
3/7
By pressing
^
, you will move in
Menu to BLT - display brightness
(backlighting). Unlock the
modificationsmenu by pressing
^. By pressing
^
^
, set the
display brightness based on
individual requirement in the
range of 10% - 100%. Press ^
to confirm settings.
Press the hidden button Prog to exit the Settings Menu.
Note: Actuator returns from the setup menu to the basic display
automatically 30s after the last pressing of the button.
7
^
%
%
%
^
%
^
^
< 2s
1 x
8
°C
25.0
2
^^
^
^
Prosty bezprzewodowy regulator temperatury
PL
ELKO EP, s.r.o. | Palackého 493 | 769 01 Holešov, Všetuly | Czech Republic | e-mail: [email protected] | Support: +420 778 427 366
ELKO EP Poland, sp. z o. o. | ul. Motelowa 21 | 43-400 Cieszyn | Polska | e-mail: [email protected] | GSM: +48 785 431 024
www.elkoep.com / www.elkoep.pl
Programowanie oraz sterowanie z regulatora
Programowanie
Po naciśnięciu ukrytego
przycisku PROG na > 2s,
RFTC-10/G wchodzi w Menu
ustawienia.
Naciśnięcie przycisku ^odblokuje RFTC-10/G w celu
wprowadzenia zmian w ustawieniach. Naciskając
^
wybieraszDEV - RFSA. Naciśnięcie ^potwierdza ustawienie.
Naciśnięcie
^
spowoduje
przesunięcie w Menu do
000000 - adres. Naciśnij ^,
aby odblokować Menu w
celu wprowadzenia zmian.
Przyciskami
^
^
ustaw adres
wymaganego przełącznika
(adres to 6-znakowy kod podany
na każdym urządzeniu RF). ^
potwierdzisz ustawienia.
Naciśnięcie
^
spowoduje
przesunięcie w Menu do
pozycji TMP - jednostki
mierzonej temperatury. Naciśnij
^, aby odblokować Menu
w celu wprowadzenia zmian.
Przyciskami
^
^
wybierz
˚C lub ˚F. ^potwierdzisz
ustawienia.
Naciśnięcie
^
spowoduje
przesunięcie w Menudo pozycji
HYS histereza - przełączanie.
Naciśnij ^, aby odblokować
Menu w celu wprowadzenia
zmian. Przyciskami
^
^
ustawisz histerezę zgodnie z
indywidualnym wymogiem w
zakresie 0.5...5˚C (1...10˚F). ^
potwierdzisz ustawienia.
Naciśnięcie
^
spowoduje
przesunięcie w Menu do
pozycji OFS - offset czujnika
temperatury. Naciśnij ^,
aby odblokować Menu w
celu wprowadzenia zmian.
Przyciskami
^
^
ustawisz
offset zgodnie z indywidualnym
wymogiem w zakresie -5...+5˚C
(-10...+10˚F). ^potwierdzisz
ustawienia.
Naciśnięcie
^
spowoduje
przesunięcie w Menu do pozycji
BLT - natężenie podświetlenia
wyświetlacza. Naciśnij ^,
aby odblokować Menu w
celu wprowadzenia zmian.
Przyciskami
^
^
ustawisz
natężenie podświetlenia
zgodnie z indywidualnym
wymogiem w zakresie 10...100%.
^potwierdzisz ustawienia.
Naciśnięcie ukrytego przycisku PROG spowoduje wyjście z
Menu ustawienia.
Uwaga: po 30s od ostatniego naciśnięcia przycisku sterującego,
urządzenie wraca automatycznie do trybu roboczego.

RFTC-10/G
Simple wireless temperature controller
EN
02-56/2015 Rev.3
Made in Czech Republic
Switch to displaying the set
temperature by pressing
^
or
^
(if the display backlighting
is activated, the first press
illuminates the backlighting
and the second press switches
the display). The displayed
value flashes. Press
^
^
to
set the required temperature.
The display shows
continuously the current
measured temperature.
Control - temperature change /
5 seconds after the last
pressing of the button, the
display of the set temperature
switches back to the current
temperature - the value is
saved in the memory.
on / off - indicates the
switching actuator contact
switching status.
31 2
°C
20.0
OFF
°C
22.0 °C
20.0
On
Programming and controlling with RF Touch / eLAN-RF /
Programming with RF Touch /
Unlock RFTC-10/G for modification by pressing ^.
Set DEV - RFt by pressing
^
. Confirm settings by pressing ^.
On the control unit, enter the
address of RFTC-10/G (see
manual of control unit).
6
xxxxxx
address /
An address listed on the back of of the actuator is used for programming
and controlling the temperature actuator by RF Touch / eLAN-RF.
%
Press the hidden button Prog
the RFTC-10/G for 2 s to get to
the Settings Menu.
By pressing
^
, you will move
in Menu to xxxxxx - address.
The displayed address RFTC-
10/G is fixed and cannot be
changed (corresponds to
address provided on rear of
unit).
3
^
^
By more presses of
^
, you
will move in Menu to:
• TMP - displaying the
measured temperature
value.
• OFS - offset of temperature
sensor.
• BLT - backlight intensity of
display.
Can be set individually
according to steps 4, 6 and 7
see programming.
4
xxxx
xx °C
°C
< 2s
1 x
Press the hidden button Prog
to exit the Settings Menu.
Note: RFTC-10/G returns from
the setup menu to the basic
display automatically 30s
after the last pressing of the
button.
5
°C
25.0
>2s
1 x
1
°C
25.0
2
^^
^
^
Programming /
4/7
Prosty bezprzewodowy regulator temperatury
PL
ELKO EP, s.r.o. | Palackého 493 | 769 01 Holešov, Všetuly | Czech Republic | e-mail: [email protected] | Support: +420 778 427 366
ELKO EP Poland, sp. z o. o. | ul. Motelowa 21 | 43-400 Cieszyn | Polska | e-mail: [email protected] | GSM: +48 785 431 024
www.elkoep.com / www.elkoep.pl
Sterowanie - zmiana temperatury
Wyświetlacz pokazuje aktualnie
zmierzoną temperaturę.
Naciśnięcie
^
lub
^
wyświetli
ustawioną temperaturę (o
ile jest aktywne ustawienie
podświetlenia, to pierwsze
naciśnięcie podświetli
wyświetlacz, drugie pokaże
ustawioną temperaturę).
Wartość miga. Naciskając
^
^
ustawisz wymaganą
temperaturę.
Po 5s od ostatniego
naciśnięcia regulator wraca
do wyświetlenia aktualnie
zmierzonej temperatury -
przez to dojdzie do zapisania
ustawionej temperatury.
on / off - stan styków
przełącznika.
Programowanie oraz sterowanie z RF Touch / eLAN-RF
adres
Do zaprogramowania oraz sterowania elementem termicznym RFTC-10/G z
urządzenia systemowego RF Touch / eLAN-RF, służy adres podany na przed-
niej stronie urządzenia.
Programowanie z RF Touch
Po naciśnięcie ukrytego
przycisku PROG na > 2s,
RFTC-10/G wchodzi w Menu
ustawienia.
Naciśnięcie przycisku ^odblokuje RFTC-10/G w celu
wprowadzenia zmian w ustawieniach. Naciskając
^
wybierasz DEV - RFt. Naciśnięcie ^potwierdza ustawienie.
Naciśnięcie
^
spowoduje
przesunięcie w Menu do
xxxxxx - adres. Wyświetlony
adres RFTC-10/G jest stały
bez możliwości zmiany (jest
zgodny z adresem podanym
na tylnej części urządzenia).
Kolejnymi naciśnięciami
^
przechodzisz w Menu do:
• TMP - wyświetla jednostki
mierzonej temperatury.
• OFS - offset czujnika
temperatury.
•BLT - natężenie podświetlenia
wyświetlacza.
Ustawić można indywidualnie
zgodnie z krokami 4, 6 i 7 w
programowaniu regulatora.
Naciśnięcie ukrytego przycisku
PROG spowoduje wyjście z
Menu ustawienia.
Uwaga: po 30s od ostat-
niego naciśnięcia przycisku
sterującego, urządzenie au-
tomatycznie wróci do trybu
roboczego.
W urządzeniu systemowym
wpisz adres RFTC-10/G (patrz
instrukcja obsługi urządzenia
systemowego).
Programowanie

RFTC-10/G
Simple wireless temperature controller
EN
02-56/2015 Rev.3
Made in Czech Republic
Press the button
^
or
^
to
display the set temperature
(if the display backlighting
is activated, the first press of
the button illuminates the
backlighting and the second
press switches the display).
The displayed value flashes.
Press
^
^
to set the
required temperature.
The display continuously
shows the current measured
temperature and signal
strength.
Control - temporary temperature adjustment /
5 seconds after the last
pressing of the button, the
display of the set temperature
switches back to the current
temperature - the value is
saved in the memory.
After pressing
^
, a symbol is displayed for 1s on the display of
RFTC-10/G - this confirms the temporary temperature correction.
A change in the heating program set in the system unit
terminates temporary temperature correction.
4
°C
22.0
The time format (12h/24h) is
displayed based on settings in
the system element. The display
switches back to the current
value when
^
^
is pressed
or automatically after 10s.
The time display can be acti-
vated in the basic temperature
display by pressing ^.
Control - time display /
If the connection with the
RF Touch is not available, the
time is not displayed --:--.
31 2
°C
22.0 02:56 --:--
1
°C
22.0
2
°C
20.0
3
°C
22.0
Programming with eLAN-RF /
Unlock RFTC-10/G for modification by pressing ^. Set DEV
- elan by pressing
^
. Confirm settings by pressing ^.
Press the hidden button Prog
the RFTC-10/G for 2 s to get to
the Settings Menu.
>2s
1 x
1
°C
25.0
2
^^
^
^
Programming /
5/7
Prosty bezprzewodowy regulator temperatury
PL
ELKO EP, s.r.o. | Palackého 493 | 769 01 Holešov, Všetuly | Czech Republic | e-mail: [email protected] | Support: +420 778 427 366
ELKO EP Poland, sp. z o. o. | ul. Motelowa 21 | 43-400 Cieszyn | Polska | e-mail: [email protected] | GSM: +48 785 431 024
www.elkoep.com / www.elkoep.pl
Sterowanie - tymczasowa korekcja temperatury
Wyświetlacz pokazuje na
stałe aktualnie zmierzoną
temperaturę oraz siłę sygnału.
Naciśnięcie
^
lub
^
wyświetli ustawioną
temperaturę (o ile jest aktywne
ustawienie podświetlenia, to
pierwsze naciśnięcie podświetli
wyświetlacz, drugie pokaże
ustawioną temperaturę).
Wartość miga. Naciskając
^
^
ustawisz wymaganą
temperaturę.
Po 5s od ostatniego
naciśnięcia regulator wraca
do wyświetlenia aktualnie
zmierzonej temperatury -
przez to dojdzie do zapisania
ustawionej temperatury.
Po naciśnięciu
^
na wyświetlaczu pojawi się na 1 s symbol
- oznacza to, że tymczasowa korekcja temperatury została
potwierdzona.
Zmiana trybu grzewczego ustawiona w RF Touch zakończy
tymczasową korekcję temperatury.
Sterowanie - wyświetlenie czasu
Po naciśnięciu przycisku ^
w podstawowym ekranie z
temperaturą, wyświetli się
czas. Format czasu (12h/24h)
zależny jest od ustawień w RF
Touch. Po naciśnięciu
^
^
lub po 10s urządzenie wróci
do ekranu podstawowego z
temperaturą.
O ile nie ma połączenia z RF
Touch, to wyświetli się tylko
--:--.
Programowanie
Programowanie z eLAN-RF
Po naciśnięcie ukrytego
przycisku PROG na > 2s,
RFTC-10/G wchodzi w Menu
ustawienia.
Naciśnięcie przycisku ^odblokuje RFTC-10/G w celu
wprowadzenia zmian w ustawieniach. Naciskając
^
wybierasz DEV - elan. Naciśnięcie ^potwierdza ustawienie.

RFTC-10/G
Simple wireless temperature controller
EN
02-56/2015 Rev.3
Made in Czech Republic
6/7
Replacement of a battery /
Using a screwdriver, remove
the lower part.
Using a screwdriver, carefully
pry off the molding and snap
out the device from the frame.
3Using a screwdriver, gently
slide the device out from
the cover - be careful not to
damage the device.
45
Remove the original dead
batteries. Slide new batteries
into the battery holder.
Observe the polarity.
After inserting the batteries,
the FW version will appear for
1s, then the current measured
temperature.
Snap on the cover. By pressing gently, snap the
device into the frame.
The broken out moldings
must be along the sides of the
device.
+
-
AAA
+
-
AAA
+
-
AAA
+
-
AAA
°C
25.0
°C
25.0
12
6
°C
25.0
Click!
On the control unit, enter
the address of RFTC-10/G (by
means of the application iHC
- see manual of control unit).
6
%
By pressing
^
, you will move
in Menu to xxxxxx - address.
The displayed address RFTC-
10/G is fixed and cannot be
changed (corresponds to
address provided on rear of
unit).
3
^
^
By more presses of
^
, you
will move in Menu to:
• BLT - backlight intensity of
display.
Can be set individually
according to step 7 see
programming.
4
xxxx
xx
< 2s
1 x
Press the hidden button Prog
to exit the Settings Menu.
Note: RFTC-10/G returns from
the setup menu to the basic
display automatically 30s
after the last pressing of the
button.
5
°C
25.0
Press the button
^
or
^
to
display the set temperature
(if the display backlighting
is activated, the first press of
the button illuminates the
backlighting and the second
press switches the display).
The displayed value flashes.
Press
^
^
to set the
required temperature.
The display continuously
shows the current measured
temperature and signal
strength.
Control - temporary temperature adjustment /
5 seconds after the last
pressing of the button, the
display of the set temperature
switches back to the current
temperature - the value is
saved in the memory.
1
°C
22.0
3
°C
22.0
2
°C
20.0
6
Prosty bezprzewodowy regulator temperatury
PL
ELKO EP, s.r.o. | Palackého 493 | 769 01 Holešov, Všetuly | Czech Republic | e-mail: [email protected] | Support: +420 778 427 366
ELKO EP Poland, sp. z o. o. | ul. Motelowa 21 | 43-400 Cieszyn | Polska | e-mail: [email protected] | GSM: +48 785 431 024
www.elkoep.com / www.elkoep.pl
Wymiana baterii
Za pomocą śrubokręta
zdejmij dolną część. Za pomocą śrubokręta
ostrożnie podważ kształtki i
wyjmij urządzenie z ramki.
Używając śrubokręta delikatnie
wysuń urządzenie z obudowy
- należy uważać, aby nie
uszkodzić urządzenia.
Wyjmij oryginalne rozładowane
baterie. Do uchwytu baterii
włóż baterie nowe. Zwróć
uwagę na polaryzację.
Po włożeniu baterii na
wyświetlaczu pojawi się na 1s
wersja FW, później aktualnie
zmierzona temperatura.
Zatrzaśnij pokrywę.
Lekko naciskając zatrzaśnij
urządzenie w ramce. Wyłamane
kształtki muszą się znajdować
po bokach.
Naciśnięcie
^
spowoduje
przesunięcie w Menu do
xxxxxx - adres. Wyświetlony
adres RFTC-10/G jest stały
bez możliwości zmiany (jest
zgodny z adresem podanym
na tylnej części urządzenia).
Kolejnymi naciśnięciami
^
przechodzisz w Menu do:
•BLT - natężenie podświetlenia
wyświetlacza.
Ustawić można indywidualnie
zgodnie z krokiem 7 w
programowaniu regulatora.
Naciśnięcie ukrytego przycisku
PROG spowoduje wyjście z
Menu ustawienia.
Uwaga: po 30s od ostat-
niego naciśnięcia przycisku
sterującego, urządzenie au-
tomatycznie wróci do trybu
roboczego.
W urządzeniu systemowym
wpisz adres RFTC-10/G (za
pośrednictwem aplikacji iHC -
patrz instrukcja obsługi urząd-
zenia systemowego).
Sterowanie - tymczasowa korekcja temperatury
Wyświetlacz pokazuje na
stałe aktualnie zmierzoną
temperaturę oraz siłę sygnału.
Naciśnięcie
^
lub
^
wyświetli ustawioną
temperaturę (o ile jest aktywne
ustawienie podświetlenia, to
pierwsze naciśnięcie podświetli
wyświetlacz, drugie pokaże
ustawioną temperaturę).
Wartość miga. Naciskając
^
^
ustawisz wymaganą
temperaturę.
Po 5s od ostatniego
naciśnięcia regulator wraca
do wyświetlenia aktualnie
zmierzonej temperatury -
przez to dojdzie do zapisania
ustawionej temperatury.

RFTC-10/G
Simple wireless temperature controller
EN
02-56/2015 Rev.3
Made in Czech Republic
By pressing gently, seat the
device into the lower part so
that the holders of the lower
part go through the broken
out moldings in the frame.
Technical parameters /
Instruction manual is designated for mounting and also for user of the device. It is always a part of its packing.
Installation and connection can be carried out only by a person with adequate professional qualification upon
understanding this instruction manual and functions of the device, and while observing all valid regulations.
Trouble-free function of the device also depends on transportation, storing and handling. In case you notice any
sign of damage, deformation, malfunction or missing part, do not install this device and return it to its seller. It
is necessary to treat this product and its parts as electronic waste after its lifetime is terminated. Before starting
installation, make sure that all wires, connected parts or terminals are de-energized. While mounting and servicing
observe safety regulations, norms, directives and professional, and export regulations for working with electrical
devices. Do not touch parts of the device that are energized – life threat. Due to transmissivity of RF signal, observe
correct location of RF components in a building where the installation is taking place. RF Control is designated only
for mounting in interiors. Devices are not designated for installation into exteriors and humid spaces. The must not
be installed into metal switchboards and into plastic switchboards with metal door – transmissivity of RF signal is
then impossible. RF Control is not recommended for pulleys etc. – radiofrequency signal can be shielded by an
obstruction, interfered, battery of the transceiver can get flat etc. and thus disable remote control.
Warning
Safe handling /
7/7
°C
25.0
7
Click!
When handling a device unboxed it is important to avoid contact with liquids. Never
place the device on the conductive pads or objects, avoid unnecessary contact with the
components of the device.
Supply voltage:
Battery life:
Temperature oset:
Oset:
Display:
Backlight:
Transmission / function indicator:
Temperature measurement input:
Temp. meas. range and accuracy:
Control
Transmission frequency:
Signal transmission method:
Minimum control distance:
Range in open area:
Other data
Operating temperature:
Operating position:
Mounting:
Protection:
Electromagnetic radiation degree:
Dimensions: frame - plastic
Frame - metal, glass, wood, grate
Weight:
Related standards:
Attention:
When you instal iNELS RF Control system, you have to keep minimal distance 1 cm between each units.
Between the individual commands must be an interval of at least 1s.
Prosty bezprzewodowy regulator temperatury
PL
ELKO EP, s.r.o. | Palackého 493 | 769 01 Holešov, Všetuly | Czech Republic | e-mail: [email protected] | Support: +420 778 427 366
ELKO EP Poland, sp. z o. o. | ul. Motelowa 21 | 43-400 Cieszyn | Polska | e-mail: [email protected] | GSM: +48 785 431 024
www.elkoep.com / www.elkoep.pl
Lekko naciskając osadź
urządzenie z ramką w dolnej
części urządzenia, tak aby
uchwyty dolnej części weszły
w otwory w ramce.
Bezpieczna manipulacja urządzeniem
Nie pozwól na kontakt z cieczami w trakcie korzystania z urządzenia bez obudowy. Nie
należy umieszczać urządzenia na powierzchniach przewodnych. Nie dotykaj części
wewnątrz urządzenia.
Dane techniczne
2 x 1.5V battery / bateria AAA
1 year / rok
2 buttons / przyciski / ^
± 5 °C
LCD, characters / znakowy
YES, active-blue / TAK, aktywne-niebieskie
symbols / symbole
1x internal sensor / czujnik wewnętrzny
0..+55°C; 0.3°C of the range / zakresu
866 MHz, 868 MHz, 916 MHz
bidirectionally addressed message / dwukierunkowo skierowana wiadomość
20 mm
up to / do 100 m
0..+55 °C
wall-mounted / naścienna
gluing/screwing / klejenie, przyśrubowanie
IP30
2
85 x 85 x 20 mm
94 x 94 x 20 mm
66 g (without batteries / bez baterii)
EN 60669, EN 300 220, EN 301 489 Directives / dyrektywa RTTE,
NVč.426/2000Sb (Directive / dyrektywa 1999/ES)
Napięcie zasilania:
Trwałość baterii:
Korekcja temperatury:
Oset:
Wyświetlacz:
Podświetlenie:
Sygnalizacja nadawania / funkcja:
Wejście do pomiaru temperatury:
Zakres oraz dokładność pomiaru temp.:
Sterowanie
Częstotliwość:
Metoda nadawania sygnału:
Minimalna odległość do sterowania:
Zasięg w wolnej przestrzeni:
Pozostałe dane
Temperatura robocza:
Pozycja robocza:
Umocowanie:
Szczelność:
Stopień zanieczyszczenia:
Wymiary: Ramka - plastik
Ramka - metal, szkło, drewno, kamień
Waga:
Normy:
Ostrzeżenie
Instrukcja obsługi służy do celów montażu oraz dla użytkowników urządzeń. Instrukcja obsługi zawsze wchodzi w skład
opakowania urządzenia. Montaż oraz podłączenie mogą wykonywać wyłącznie osoby z odpowiednimi kwalifikacjami
zawodowymi, zgodnie z obowiązującymi przepisami, które w odpowiedni sposób zapoznały się z instrukcją obsługi
oraz działaniem urządzeń. Bezproblemowe działanie urządzeń jest również zależne od wcześniejszego sposobu
transportu, magazynowania oraz manipulacji. W przypadku wykrycia jakichkolwiek oznak uszkodzenia, odkształcenia,
awarii lub brakujących elementów, prosimy o nieinstalowanie urządzenia oraz zwrócenie się do sprzedawcy. Urządzenie
lub jego części muszą być potraktowane po końcu okresu używania jako odpad elektroniczny. Przed rozpoczęciem
instalacji należy upewnić się, że wszystkie przewody, podłączone części lub terminale nie są pod napięciem. W trakcie
montażu lub konserwacji koniecznym jest dotrzymanie przepisów bezpieczeństwa, norm, dyrektyw oraz przepisów
branżowych, dotyczących pracy z urządzeniami elektrycznymi. Nie należy dotykać części urządzeń pod napięciem
- ryzyko zagrożenia życia. Ze względu na właściwe przenikanie fal radiowych RF, pamiętaj o właściwym umieszczeniu
urządzeń w budynku, w którym są instalowane. Urządzenia RF Control są przeznaczone wyłącznie do montażu wewnątrz
budynków. Urządzenia nie mogą być instalowane na zewnątrz lub w pomieszczeniach wilgotnych, dalej nie mogą być
instalowane w metalowych szafach rozdzielczych lub plastikowych szafach rozdzielczych z metalowymi drzwiami -
uniemożliwi prawidłowe przenikanie fal radiowych. Urządzeń RF Control nie należy używać do sterowania urządzeniami
o podwyższonym ryzyku, takimi jak pompy, el. urządzenia grzewcze bez termostatu, windy, dźwigi, itp. - przepływ fal
radiowych może być przerwany, naruszony przez przeszkodę, bateria nadajnika może być rozładowana itp. Z wyżej
wymienionych powodów może dojść do zakłócenia lub uniemożliwienia sterowania.
Uwaga:
Podczas instalacji systemu iNELS RF Control koniecznym jest dotrzymanie minimalnej odległości
1 cm pomiędzy elementami.
Wymagany jest odstęp min. 1s pomiędzy kolejnymi poleceniami.
Table of contents
Other iNels Temperature Controllers manuals
Popular Temperature Controllers manuals by other brands

Delta
Delta DTE10P Series instruction sheet

Ink Bird
Ink Bird ITC-100 manual

Water Furnace
Water Furnace SPECTRA SX Series installation guide

HYDACELECTRONIC
HYDACELECTRONIC ETS 4100S Operation manual

Lily Tech
Lily Tech ZL-6 0A Series instruction manual

Kieback&Peter
Kieback&Peter RPW301-FTL quick start guide