Innotech SpitFIRE III User manual

Version 1.0 Preliminary1
Universal Infrared Remote Control
From any PC!
SpitFIRE III
USB and Serial Port Interface IR Engine
SpitFIRE III 6-in-1 Learning Remote Control
Remote Control

Version 1.0 Preliminary2
SpitFIRE III
Serial Port Interface IR Engine
FEATURES
•Infrared remote control from a PC
•Internal Infrared Code Library supports all common TV, VCR, Cable, Satellite, Home Theater
and DVD Players
•“Learns” additional codes from your existing remote control
•USB and Serial port interface
•Powered by USB port or optional 9V DC power cube
•Includes “cloning” capability for one-step replication of your setup and configuration from one
Spitfire to another
•PC-upgradeable library
•Punch-Through Operation
•Macros
•Smart Source™
•IR Learning
oLearns up to 112 button codes dynamically distributed over six sources
oLearns all common IR protocols
oLearns IR frequencies up to 75 kHz
•Application software included
oStandard application permits easily customized on-screen display of “virtual remote
control”
oUse the included Visual Basic source code to create your own applications
•Button mapping files are provided for internal and external library’s
•IR Output
oFront panel IR emitter LED
oTwo front panel IR blaster jacks accept standard 1/8" (3.5mm) mono mini-plug
•Multiple Spitfires can be connected to a PC at a time.
•Dimension: 3.3" W x 1.2" H x 5.25" L
•Options include IR receiver
•Ideal for
–Home Automation
–Home Theater
–Industrial Control

Version 1.0 Preliminary3
INTRODUCTION
Congratulations on purchasing your SpitFIRE Serial Port Infrared Remote Control.
The Innotech Systems’ SpitFIREturns an ordinary PC into a powerful state-of-the-art home entertainment
control system!
The SpitFIRE controls all popular entertainment devices directly from a PC. The SpitFIRE converts data
from your computer’s serial or USB port into infrared remote control signals.
The Innotech Systems SpitFIRE III turns an ordinary PC into a powerful State-of-the-art entertainment
control system! The SpitFIRE III controls IR remote control compatible entertainment devices directly from
a PC.
The SpitFIRE III Learning SpitFIRE includes a built-in library of entertainment remote control codes that
covers a wide variety of consumer products. In addition, the SpitFIRE III can learn new IR codes so that
your control system is never out-dated. The learned codes can be added to an entertainment device that
already exists in the library or it can add completely new devices to the library. Learned codes are stored in
non-volatile memory for permanent storage, even with the power removed.
The SpitFIRE III includes a convenient front panel mounted infrared diode and two (3.5mm) jacks which
permit the use of mini stick-on IR emitters for maximum flexibility.
Front panel status light provides feedback for programming the SpitFIRE. Status information is also sent
back to the PC via the serial or USB connection.
The small (3¼" x 5¼") SpitFIRE may be situated behind or near the PC, and is connected via a
conventional serial cable or USB to the PC. The SpitFIRE is controlled via a standard serial interface. The
host PC controls the SpitFIRE by sending simulated button presses. The SpitFIRE will respond by returning
status information for every command.
The SpitFIRE includes sample Visual Basic application software. The software displays a “virtual” remote
control on screen and responds to “virtual button presses” to illustrate the operation of the device and for
you to use as the basis for your own software applications.

Version 1.0 Preliminary4
SpitFIRE --- Front Panel
IR Sensor & Transmitter Infrared Output (3.5mm) mono mini-plug
Optional Receiver
Program Status LED
SpitFIRE --- Back Panel
USB Port RS-232 Serial Input Power Supply Jack
Interface Select Switch
USB Powered or 9V DC power cube

Version 1.0 Preliminary5
Installing SpitFIRE USB Drivers
Windows XP, Windows 98 drivers and instillation guides are supplied on the Spitfire software and
documentation CD. For all other drivers http://www.ftdichip.com/Drivers/VCP.htm
Developers-Note1: The USB drivers act as virtual COM-ports, this means that they look and act as COM-
ports to the end user and to the supplied software. If you are a developer of software, this is not the only
way to access the spitfire. This virtual comport method was chosen to maintain backwards compatibility
with previous versions of the Spitfire. All the drivers can be found at…
http://www.ftdichip.com/Drivers/D2XX.htm D2XX drivers allow direct access to the USB device
through a DLL. Application software can access the USB device through a series of DLL function
calls.
Installing SpitFIRE On-Screen Control Software
1. It is recommended that you close all running software applications before you install the SpitFIRE On-
Screen Control Software.
2. Insert the provided spitfire installation and documentation CD into your CD disk drive.
3. To install, go to the installation directory and run SETUP.EXE
(drive):\Installation\SETUP.EXE.
4. Follow the setup prompts as they appear on your screen. The installation program will default to
installing the software in C:\Program files\Spitfire. You may change this to another directory if you wish.
5. Connect the SpitFIRE to the desired USB or COM port.
6. To begin using on-screen control click on the SpitFIRE icon in the Start menu.
SpitfireIII.LNK
In order for the PC to communicate with the SpitFIRE, the communication
settings must be properly set. The remote control application software can
auto-detect the proper communication port and settings.
If the auto-detect method does not work and you know the COM port number,
then you can manually select the COM port using Com-1 to Com-6. The USB
drivers are designed to act as virtual serial ports and they will appear to the PC
and the user as a regular com port.
The auto-detect feature will attempt to find the correct com port or virtual com port by searching for the
connected spitfire one port at a time COM 10, 9, 8, 7... If multiple spitfires are connected to the PC then
auto-detect will find them in descending number order.

Version 1.0 Preliminary6
Using the SpitFIRE virtual remote control application
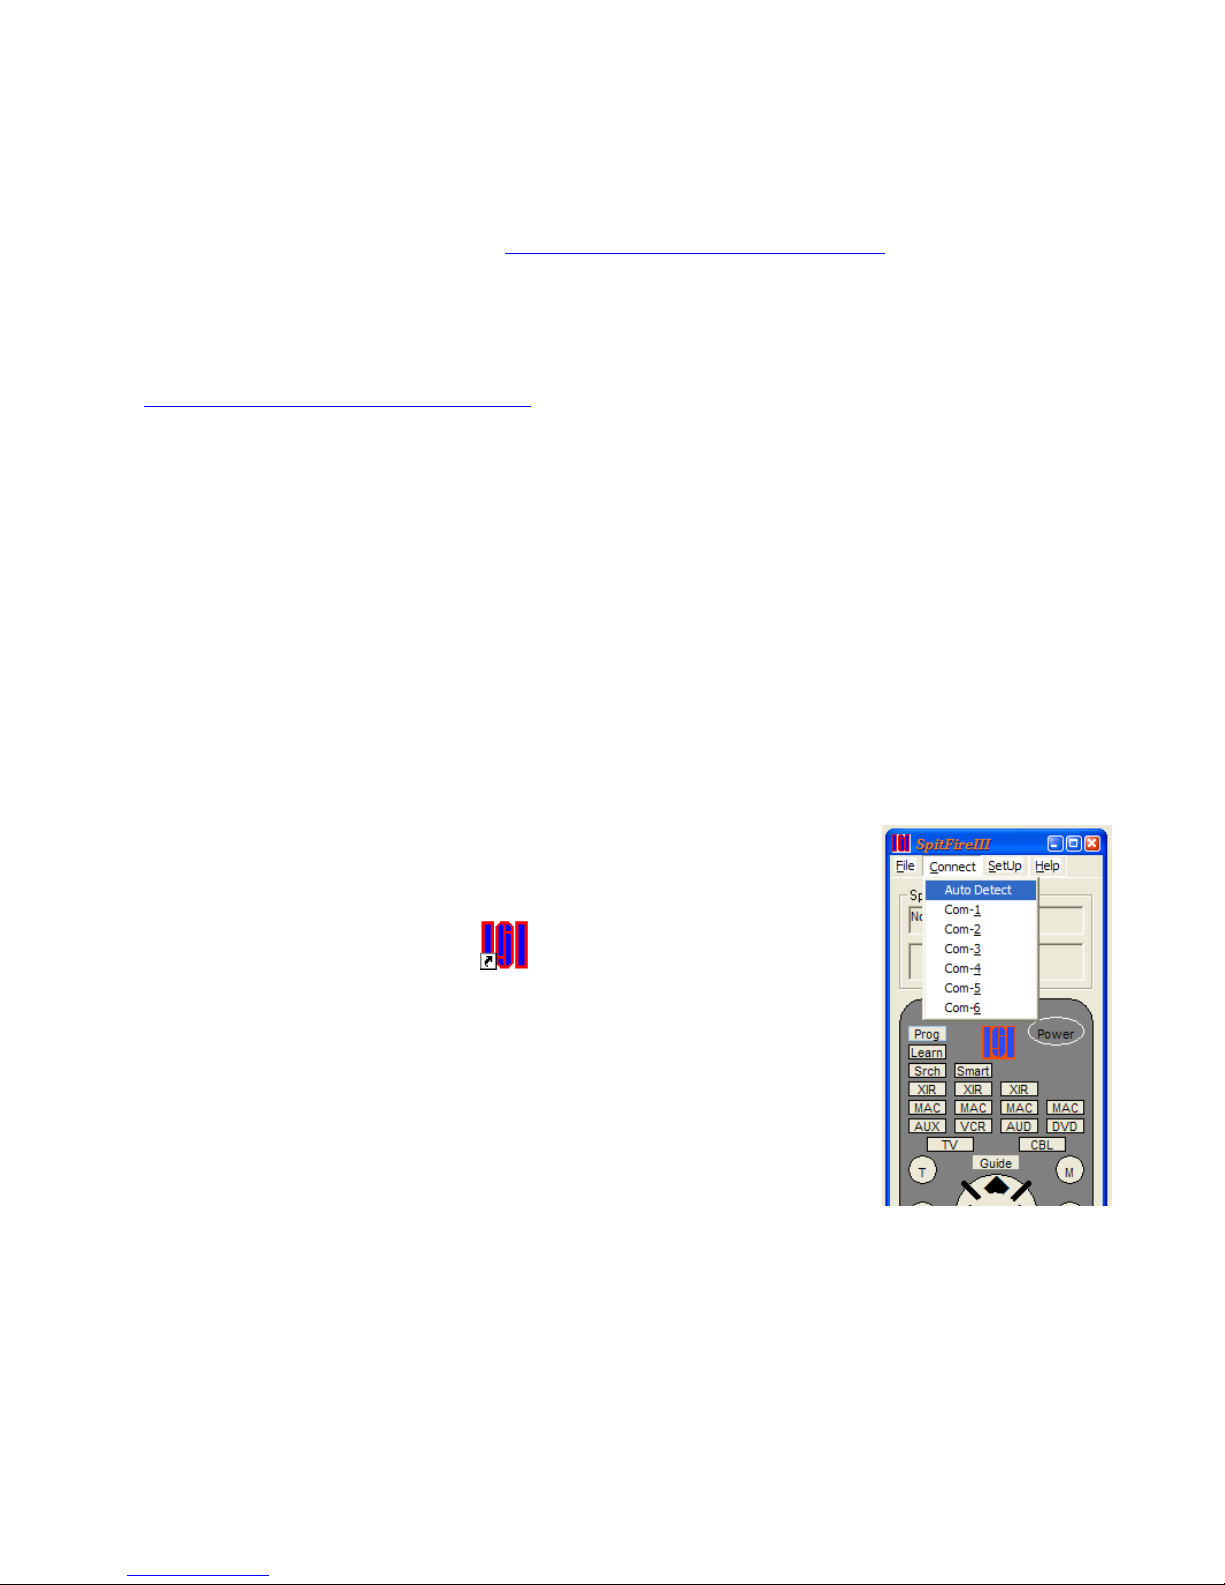
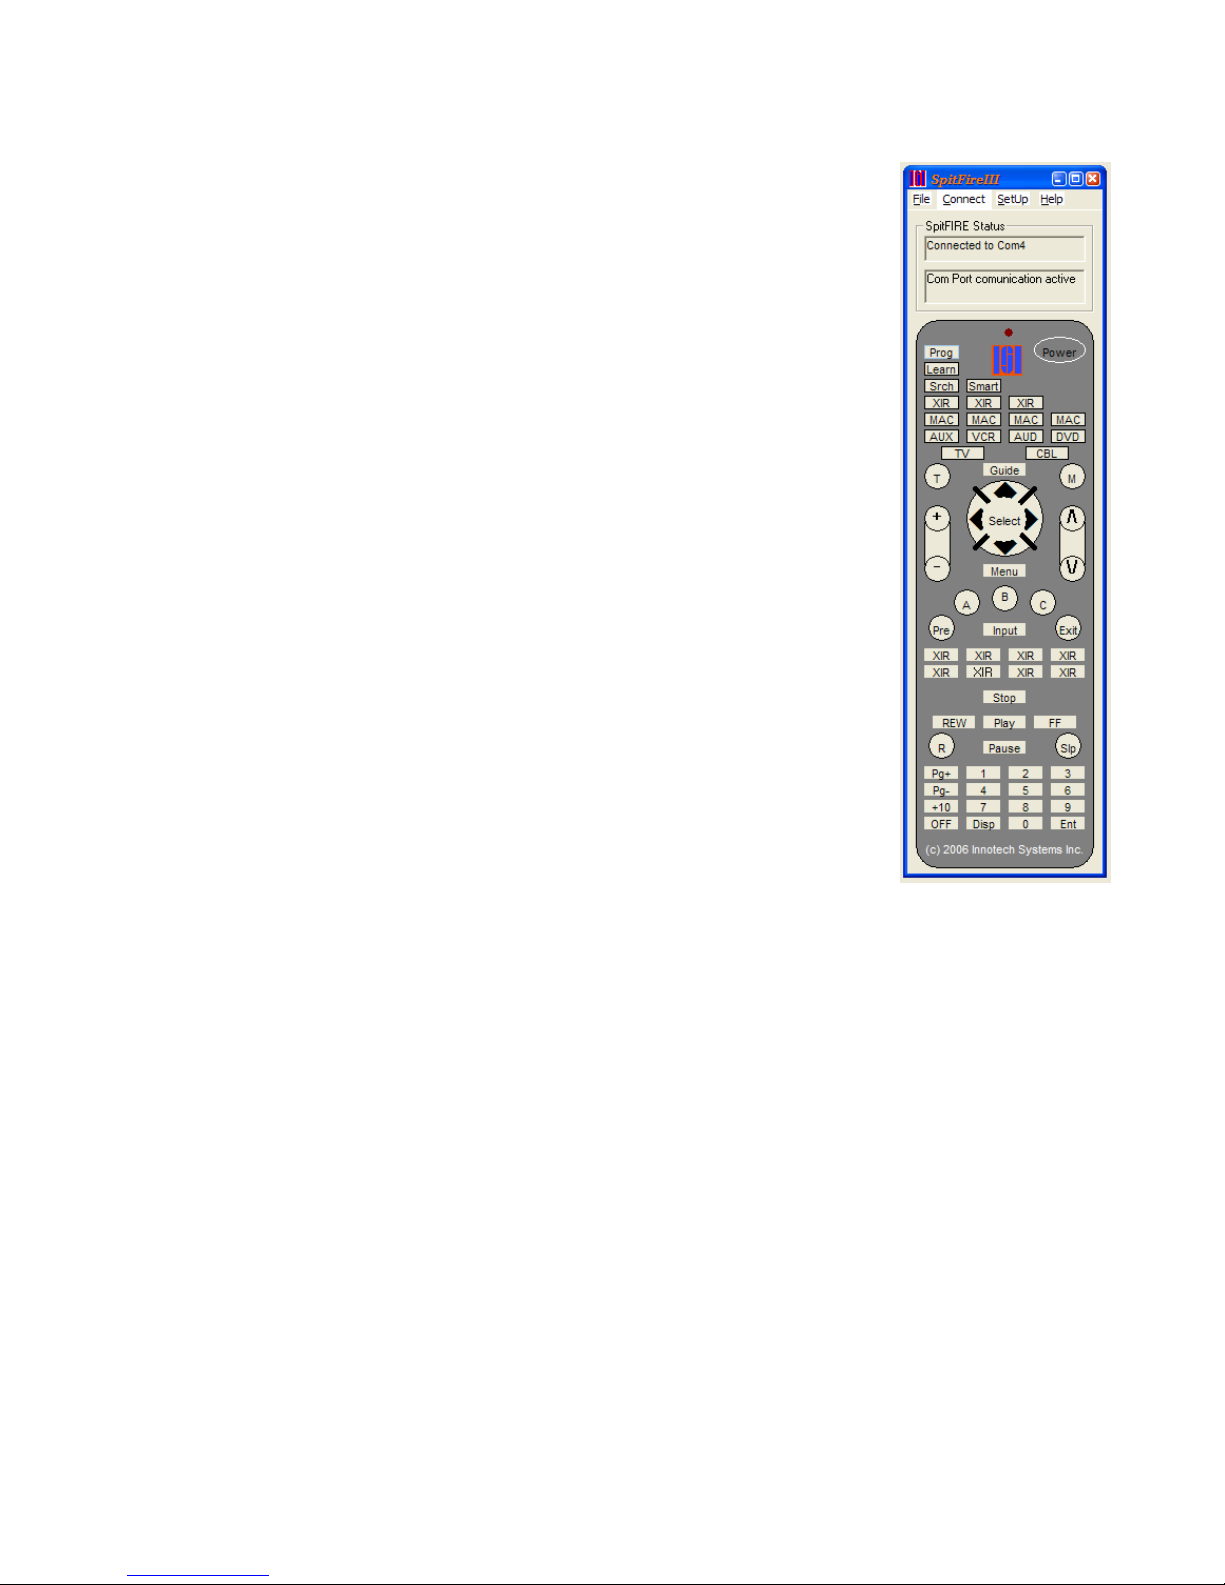
The remote control application software, will display an image of a remote control.
Clicking on any button with the mouse will press that button. The Spitfire comes
preprogrammed to control a typical Sony TV. The CBL/SAT, DVD, VCR, AUD,
and AUX slots are empty. The on-screen LED will flash appropriately and a status
box will interpret and display messages received back from the SpitFIRE.
Customizing the Display
The appearance of the remote control is determined by the file buttons.txt, which
is installed in the SpitFIRE directory. During startup, the program reads the
contents of buttons.txt. This file contains information about the button label, button
scancode, and appearance of each button on the remote. Buttons.txt can be
modified with any text editor, so the user can customize the look and function of
the remote to suit their needs.
Buttons.txt is organized into 64 text lines, for each of 64 possible buttons, starting
from the top left of the remote and reading across. Each line consists of 3 fields
separated by commas.
1. Field one is the button label which appears as text on the button.
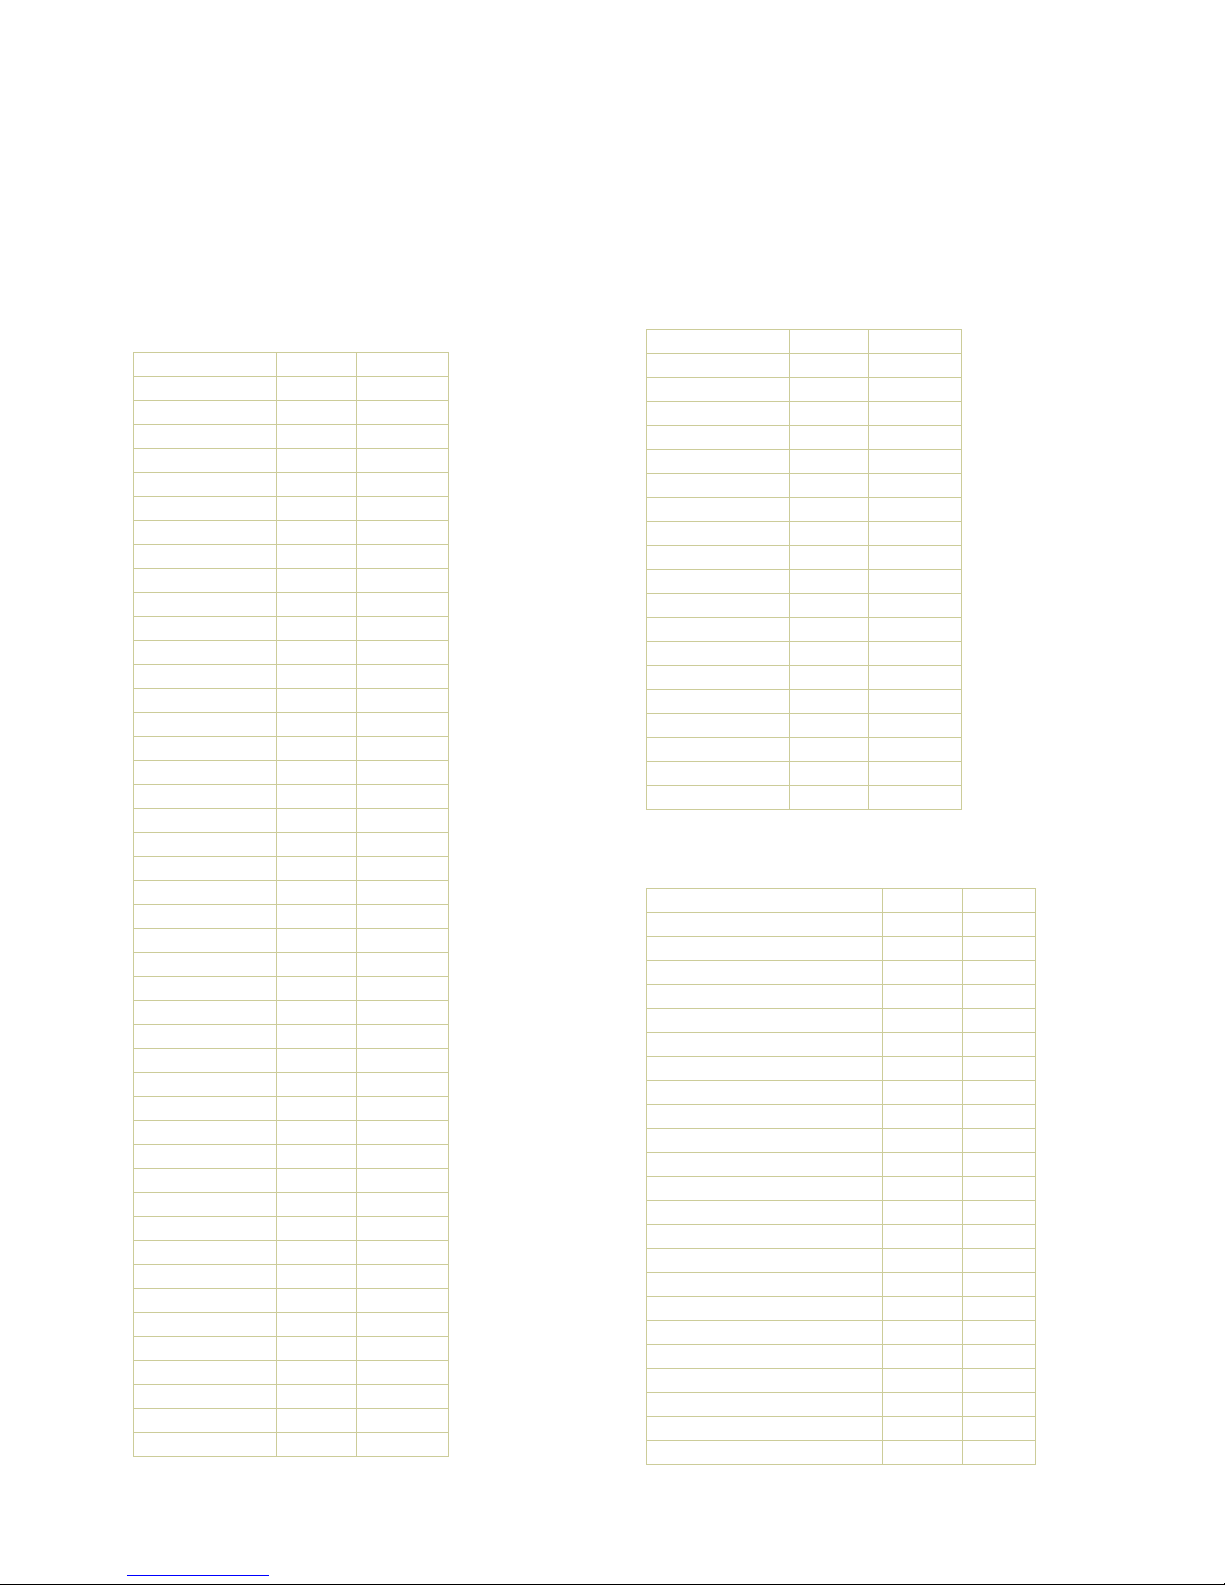
2. Field two is the 1-byte scancode, The scancode represents a specific button
in the IR library. (see the button mapping table)
3. Field three is a visibility tag, either 1 (visible) or 0 (invisible) allowing
unused buttons may be hidden.
The included "buttons.bak" file can be renamed to "buttons.txt" to show all
the buttons available on the remote. However, depending on the device being controlled, not all buttons
may be functional.
Developers-Note2:
Communications between the SpitFIRE and the program is simple. When the user presses a button
on screen, the program first finds that button’s associated scancode from an array. This array is
constructed at startup as the program reads the contents of the "buttons.txt" file. Each scancode is
represented by an integer. The program then converts that integer to a byte, sets the button down bit,(data
bit 7) and sends that to the SpitFIRE hardware through the serial port.
The ActiveX control MSComm is used, making it easy to write routines that transmit data to and
from the serial ports. The SpitFIRE communicates at 2400 baud, 8 data bits, 1 stop bit, no parity. After the
SpitFIRE hardware receives a scancode from the serial port, it returns a status byte. The program receives
and acts based upon the type of status byte, which may indicate the number of times to flash the visible
LED, the success or failure of a programming operation, etc. This is accomplished through IF-ELSE and
CASE statements. As the source code demonstrates, Visual Basic's tools simplify the task of writing fully
functional programs to control the SpitFIRE. Feel free to examine the included source files for Visual Basic
5.0:
CONTROL.BAS, CONTROL.FRM, CONTROL.FRX, CONTROL.VBP, CONTROL.VBW
To load the entire project into Visual Basic, open the “SpitFIRE control.vbp” file.

Version 1.0 Preliminary7
VIRTUAL BUTTON MAPPING
Developers-Note3: The Most Significant Bit (data bit 7) is functionally defined as the button press
bit and is set by the VRC prior to transmission of the scancode to the spitfire. To avoid any
confusion this table along with the buttons.txt and ISI###.dat files all do not have the MSB set, but
when the code is transmitted the MSB is always set. If you do not set the MSB the spitfire will not
respond to the command or will misinterpret the command.
Buttons that Transmit IR
Function CODE Class
000h channel
101h channel
202h channel
303h channel
404h channel
505h channel
606h channel
707h channel
808h channel
909h channel
Enter 0Ah channel
Mute 0Bh volume
Volume up 0Ch volume
Volume down 0Dh volume
Channel up 0Eh channel
Channel down 0Fh channel
Rewind 10h transport
Play 11h transport
Fast Forward 12h transport
Record 13h transport
Stop 14h transport
Pause 15h transport
Power 16h power
Previous 17h channel
Input 18h PIP
Display 19h setup
Menu 1Ah setup
Select 1Bh Setup
Navigate up 1Ch Setup
Navigate down 1Dh Setup
Navigate left 1Eh setup
Navigate Right 1Fh setup
Exit 20h setup
Guide 21h setup
10+ 22h channel
TITLE 23h
Sleep 24h power
Yellow Square 25h channel
Blue Circle 26h channel
Red Triangle 27h Channel
PIP 28h PIP
PIP Ch+ 29h PIP
PIP CH-2Ah PIP
PIP move 2Bh PIP
PIP swap 2Ch PIP
Function CODE Class
Page up 2Dh channel
Page down 2Eh channel
Power off 2Fh power
XIR48 30h none
XIR49 31h none
XIR50 32h none
XIR51 33h none
XIR52 34h none
XIR53 35h none
XIR54 36h none
XIR55 37h none
XIR56 38h none
XIR57 39h none
XIR58 3Ah none
XIR59 3Bh none
XIR60 3Ch none
XIR61 3Dh none
XIR62 3Eh none
XIR63 3Fh none
Control Buttons
Function CODE Type
Program 40h Setup
AUX 41h Slot
TV 42h Slot
VCR 43h Slot
DVD 44h Slot
Audio 45h Slot
CBL/SAT 46h Slot
Search 47h Setup
Learn 48h Setup
F1 49h Macro
F2 4Ah Macro
F3 4Bh Macro
F4 4Ch Macro
Smart Source ON 4Dh Setup
Smart Source Off 4Eh Setup
Toggle Smart Source 4Fh Setup
IR repeat 0 50h Setup
IR repeat 1 51h Setup
IR repeat 2 52h Setup
IR repeat 3 53h Setup
IR repeat 4 54h Setup
IR repeat 5 55h Setup
IR repeat 6 56h Setup

Version 1.0 Preliminary8
Function CODE Type
IR repeat 7 57h Setup
Erase Learned button 58h Setup
Write EEPROM 59h Setup
Read EEPROM 5Ah Setup
Clear EEPROM 5Bh Setup
Revision number 5Ch Setup
Device number 5Dh Setup
Number of learned buttons 5Eh Setup
Erase Selected Device 5Fh Setup
Enable Punch-Thru 60h Setup
Disable Punch-Thru 61h Setup
Size EEPROM 62h Setup
Status Byte from Spitfire to Host
Response byte CODE
Invalid Scan Code 31h
Invalid Device Code 32h
Search Exhausted 33h
Slot Empty 34h
Program Abort 35h
IR Xmit complete 36h
Invalid IR type 37h
Power-On-Reset 38h
Auto Search 39h
No Learn button specified 3Ah
No Learn IR detected 3Bh
Learn Started 3Ch
Brand Search 3Dh
Non-Learnable button 3Eh
Learn analysis Error 3Fh
Send Start Address Lo 11h
Response byte CODE
Send Start Address Hi 12h
Send End Address Lo 13h
Send End Address Hi 14h
Read Complete 15h
Write Complete 16h
Start Write 17h
Read/Write Error 18h
Memory Full 19h
EEPROM NG 1Ah
EEPROM SIZE 128 1Bh
EEPROM SIZE 64 1Ch
Erase Complete 1Dh
Search Exhausted 1Eh
Abort Learn 2Ah
IR Xmit from AUX slot 40h
IR Xmit from TV Slot 41h
IR Xmit from VCR slot 42h
IR Xmit from DVD slot 43h
IR Xmit from AUD slot 44h
IR Xmit from CBL/SAT slot 45h
IR Xmit Macro End-Of-String 10h
IR Xmit Macro End Of Macro 1Fh
Xmit Macro Delay 46h
Indicator Flash 0 A0h
Indicator Flash 1 A1h
Indicator Flash 2 A2h
Indicator Flash 3 A3h
Indicator Flash 4 A4h
Indicator Flash 5 A5h
Indicator Flash 6 A6h
Indicator Flash 7 A7h
Indicator Flash 8 A8h
Indicator Flash 9 A9h

OPERATING YOUR SPITFIRE
Programming the Spitfire
Many of the Spitfire parameters can be setup using the following model..
Host sends one of the 6 slot commands to the Spitfire (TV, DVD CBL/SAT, AUDIO, VCR, AUX)
Receive 1 LED flash status. This marks the slot as active until changed.
Host sends the PROGRAM command
Receive 2 LED flashes status response
Host sends 1 numeric digit to set some user preference.
-or-send 2 digits to prepare to do a brand auto-search.
-or-send 3 digits to program a device from the internal library.
-or-send 4 digits to program a device from the extended (downloadable) library
Receive 1 LED flash for each digit
Host sends PROGRAM (or SEARCH) to complete to operation.
Response varies depending on the operation.
Slots
Before the Spitfire can transmit an IR signal, one or more devices must be programmed from the
library database or one or more buttons must be learned. The Spitfire is a 6-in-1 remote control
meaning that 6 independent slots can be setup. These 6 slots can be programmed for any
combination of device category. The 6 default categories are AUX, TV, VCR, DVD, AUD, and
CBL/SAT, however there is no restriction on what device category gets programmed into what
slot. For example all 6 slots can be programmed to be a different TV and the name displayed on
the virtual remote can be changed by editing the buttons.txt file.
Programming a slot from the library
Slots are programmed either by directly entering a 3 or 4 digit device code for a selected slot or
by using one of the auto-search modes. 3 digit device codes are built into the Spitfire. 4 digit
device codes are for extra devices that can be uploaded into the extended non-volatile memory.
Direct Device Code Programming
Like any universal remote control, the SpitFIRE can be programmed by directly entering a
3 or 4 digit device code from the device list. The button sequence to program a slot from the
device list is as follows….
Button Host sends
MSB set Status returned Spitfire sends
Send one of the six slot buttons C1h –C6h 1 indicator LED flash A1h
Send PROGRAM C0h 2 LED flashes A2h
Send #0 -#9 hundreds digit of device
code 80h – 89h 1 LED flash A1h
Send #0 -#9 tens digit of device code 80h – 89h 1 LED flash A1h
Send #0 -#9 ones digit of device code 80h – 89h 1 LED flash A1h
Send PROGRAM C0h 3 LED flashes if device
exists in the library. A3h

Version 1.0 Preliminary10
Direct Device Code Programming example to program TV code 122.
Button Host sends
MSB set Status returned Virtual Remote Spitfire sends
TV C2h 1 indicator LED flash Flash 1 A1h
Prog C0h 2 LED flashes Flash 2 A2h
1 81h 1 LED flash Flash 1 A1h
2 82h 1 LED flash Flash 1 A1h
Prog C0h 3 LED flashes. If code exists Flash 3 A3h
Transmitting IR codes from the library
Once a slot is programmed, the appropriate IR code is transmitted by
“pressing” any virtual button that is implemented for the device that
was programmed. The IR code will be transmitted a minimum of 3
times. This default repeat count can be adjusted by sending an
IR_repeat_N command with the MSB set (Dh –D7h). The repeat
transmit count is one of the features that you should keep in mind
when assigning macros. If the device works when you are in
continuous transmission mode but does not work when you assign a
macro simply increase the transmission repeat counter.
The Spitfire defaults to Continuous Transmit mode. In this mode the
Request-To-Send (RTS) signal is lowered for as long as a button is
held down. In response the IR code will repeat as long as the
“button” is held unless the code is designated as a non-repeat type or
until it is transmitted 256 times.
Punch-Through
Library devices generally implement some subset of all the possible
buttons that exist. For example it is unlikely that a TV in the library
will implement the PLAY button (unless it’s a combo). If a button
is not implemented, the Spitfire will check the other slots for
programmed devices that have the requested button implemented in
a logical order depending on the class of button. Punch-Through can
be handy for most remote control operation however there may be
applications where punch-through is not desired. Punch-Through
mode can be turned on or off by sending the PunchOn or PunchOff
commands.
Function Status response
Enable Punch Through 2 indicator LED flashes
Disable Punch Through
1 indicator LED flash

Version 1.0 Preliminary11
Smart Source (patented)
The Spitfire can be programmed to pre-select specific slots when certain classes of buttons are
transmitted. Button classes are defined in the following table.
Class Buttons
POWER POWER, PWR_OFF, SLEEP
VOLUME VOL+, VOL-, MUTE
CHANNEL 0-9, Enter, CH+, CH-, PREVIOUS
TRANSPORT
PLAY, STOP, FF, REW, PAUSE, RECORD
SETUP UP, DOWN, LEFT, RIGHT, MENU, EXIT, GUIDE, DISPLAY
PIP INPUT, PIP, PIP swap PIP Ch+ PIP Ch-PIP move
To setup smart source send the following button sequence for each class that you want to
program.
Button Status
returned
Send one of the six slot buttons TV, DVD, etc) Flash 1
Send PROGRAM Flash 2
Send any button from the desired class Flash 3
NOTE: To program the channel class you cannot use the numbers (0-9) because they are used for
device setup. Instead use another button from the channel class such as CH+. Programming a
class automatically enables smart-source mode. Smart source can be temporarily disabled by
sending the SMART button.
Smart Source can be handy for most remote control operation
however there may be applications where Smart Source is not
desired. Smart Source mode can be turned on or off by sending
the SmartOn or SmartOff commands.
Function Status response
Enable Smart Source Flash 2
Disable Smart Source Flash 1
Smart-Source example:
•If you want the TV to turn on and off when the POWER
button is sent, independent of what slot was selected
previously, you send; TV PROG POWER.
•If you want to select the TV whenever you adjust the
volume. Send TV PROG VOL+
•If you want to select your cable box whenever you change
the channel. Send CBL PROG CH+
•To automatically select the DVD slot whenever you send a transport button, Send DVD
PROG PLAY.
Once smart source is setup, you may never need to send a slot button. However there are times
when you may need to circumvent the automatic slot selection that smart source provides. For
example, if you need to control the channel function on your VCR but smart-source forces the

Version 1.0 Preliminary12
channel button to control your cable box, you can temporarily disable smart-source. When smart
source is turned off, you can use the slot buttons to determine what device the numbers control.
Once the VCR is set to the proper channel, you can turn smart source back on and resume the
automatic slot selection you programmed.
Auto-Search
Auto-Search mode causes the Spitfire to transmit a button from each device in the library, wait 3
seconds, and then move to the next device until told to stop. There are two auto-search modes in
the Spitfire, Category and Brand Auto-search.
Category auto-search will search through an entire category (TV, DVD, VCR, etc) of devices
from the database. The currently active slot determines the category of the search. For example,
selecting the TV slot will only search for TVs. Selecting the AUX slot will search through the
entire library without regard to category. The button sequence to start a category auto-search is...
Function Status returned
Send a Slot button
Flash 1
Send PROGRAM Flash 2
Send SEARCH AutoSearch
The Spitfire will start its search from the currently programmed device code in the currently
active slot. It will transmit the POWER button, and then pause 3 seconds to give the user time to
respond. Before each IR message is sent, the IC8205A returns an IR Xmit Start status byte.
When the IR transmission is done, it sends a IR Xmit Complete status byte.
The Spitfire will stop searching when one of the following happens:
Function Status returned
Send PROGRAM code
Code is saved in the currently active slot Flash 3
Send one of the 6 slot codes
Code is saved in the selected slot Flash 3
Send any other button
Search is aborted. No code saved
Search will stop automatically when all of the pertinent codes have been sent.

Version 1.0 Preliminary13
Brand Auto-Search
The Spitfire can filter its auto-search by category and brand. For example, it can be told to search
only for Sony TVs. This reduces the time it takes to find the desired code. To start a brand
search the following button sequence is sent…
Function Status returned
Send a Slot button 1 indicator LED flash
Send PROGRAM 2 LED flashes
Send brand code tens digit 1 LED flash
Send brand code ones digit
1 LED flash
Send SEARCH AutoSearch
See the brand code list in appendix B.
Brand auto-search is stopped the same way as the category auto-search. Send the PROGRAM
button or one of the 6 slot buttons to save the code, or any other button to abort.
Learning from another remote
The Spitfire can learn IR codes from other remote controls. These learned codes can be
programmed on existing buttons or they can be learned onto unused buttons. If a learned code is
programmed on top of an existing library button, the learned code has precedence. Up to 112
learned codes can be programmed into the Spitfire distributed in any way amongst the 6 source
slots. Note that re-programming a device from the library will erase all the learned codes for that
device slot. The button sequence to learn an IR code is..
Function Status returned
Send a Slot button 1 indicator LED flash
Send LEARN Learn Started
Not a learnable button
Memory Full
No button specified
Send any learnable button code
Learn Started 1 flash
No IR detected
No IR detected
Learn analysis error
Memory Full
Holding the teaching remote about 2 inches from the
IR/LEARN LED on the front of the spitfire. Press the
button that you want to learn on the teaching remote for
about 2 seconds or until one of the following status
messages is received. Learn Complete (2 flashes)
You can only learn IR codes onto the 64 buttons that send IR. You cannot learn IR codes onto
the following buttons that are used for device programming purposes.
•The 6 slot buttons. (TV, DVD CBL/SAT, AUDIO, VCR, AUX)
•PROGRAM
•LEARN
•F1 –F4 (MAC buttons)
•SMART-SOURCE
•SEARCH

Version 1.0 Preliminary14
Un-Learn
The Spitfire has three methods to un-learn IR codes. Un-learning can be accomplished one button
at a time, one device at a time, or all learned buttons at one time.
Manually Erase A Learned Button
oPress a Slot button (TV, AUX1, AUX2) (1 flash)
oPress LEARN (2 flashes)
oPress PROGRAM (2 flashes)
oPress any learned button that you want to un-learn (4 flashes) -or -
oAny button with no learned code (2 flashes)
Erase a Learned Button Send Erase 2 Flash
Button to be erased
Erase_Complete
Manually Erase a Device
oPress a Slot button (TV, AUX1, AUX2) (1 flash)
oPress LEARN (2 flashes)
oPress PROGRAM (2 flashes)
oPress any Slot button (TV, AUX1, AUX2) which you want to un-learn (4 flashes)
Note that re-programming a device from the library also erases all learned codes for that device
slot.
Erase a Device slot command
Send ErDevSelected Erase_Complete
Manually Erase All Learned Buttons
oPress a Slot button (TV, AUX1, AUX2) (1 flash)
oPress LEARN (2 flashes)
oPress PROGRAM (2 flashes)
oPress PROGRAM (4 flashes)
Erase All Learned Buttons command
Send ClearEEPROM
Erase_Complete

Version 1.0 Preliminary15
Learn Count
You can send a command to check how many learned buttons there are in the spitfire memory.
Send NumLearnedBut 0-112
Macros
There are 4 macro buttons in the Spitfire (F1 –F4). These buttons can be programmed to
transmit a series of up to 24 button codes each. The macro buttons can be setup to send a series
of favorite channels or to turn all your equipment on or off. To program a macro Send the
following buttons…
Function Status returned
Send the Learn command
2 indicator LED flash
Send F1 –F4 2 LED flashes
Send button sequence IR Xmit Start then
IR Xmit complete
for each button sent
End of String (Learn) 2 Flashes
End of Macro (Program) 3 Flashes
Multi String Macros
You can program a macro button to send out a sequence of buttons that is different each time the
macro button is sent. For example, if you want to program macro 1 to go to each of your favorite
sports channels.
oPress CBL (1 flash)
oPress LEARN (2 flashes)
oPress the F1 (2 flashes)
oPress #1
oPress #9
oPress LEARN (end of 1st macro string for channel 19) (2 flashes)
oPress #2
oPress #8
oPress LEARN (end of 2nd macro string for channel 28) (2 flashes)
oPress #4
oPress #5
oPress PROGRAM (end of 3rd macro string for channel 45 and end of the macro) (3 flashes)

Version 1.0 Preliminary16
The first time you Send F1 the TV will go to channel 19, the 2nd Send will show channel 28 and
the 3rd will go to channel 45. After that the sequence begins at channel 19 again. Another macro
button can be programmed to go to you favorite movie channels.
Long Delay Macro
You can program a long delay in a macro by pressing SMART while programming the macro.
For example, if you want to program macro 3 to have a long delay between Power on and the
input command.
oPress TV (1 flash)
oPress LEARN (2 flashes)
oPress the F3 (2 flashes)
oPress POWER
oPress SMART (delay 1 second) (1 flash)
oPress INPUT
oSend PROGRAM (end of macro) (3 flashes)
Manually Read back the programmed device code
To read back the 3 or 4 digit library device codes enter the following button sequence…
Button Status returned
Send the slot code that you want to read 1 indicator LED flash
Send PROGRAM 2 LED flashes
Send #1 1 LED flash
Send PROGRAM Flash hundreds digit
Send the slot code that you want to read 1 indicator LED flash
Send PROGRAM 2 LED flashes
Send #2 1 LED flash
Send PROGRAM Flash tens digit
Send the slot code that you want to read 1 indicator LED flash
Send PROGRAM 2 LED flashes
Send #3 1 LED flash
Send PROGRAM Flash ones digit
Send the slot code that you want to read 1 indicator LED flash
Send PROGRAM 2 LED flashes
Send #4 1 LED flash
Send PROGRAM Flash thousands digit

Version 1.0 Preliminary17
Read the programmed device code
To read back the 3 or 4 digit library device codes enter the following command…
Send ISINumber 2 bytes HighByte--LowByte
Manually Read the firmware revision levels…
Button Status returned
To read firmware major send AUX
To read firmware minor send TV
To read library major send VCR
To read library minor send DVD
1 indicator LED flash
Send PROGRAM 2 LED flashes
Send #0 1 LED flash
Send PROGRAM Flash digit
Read the firmware revision levels…
To read back the entire 4 digit revision number enter the following command…
Send REVNumber 4 bytes Rev_maj-Rev_min-Lib_maj-Lib_min

Version 1.0 Preliminary18
Resetting the SpitFIRE to factory default settings.
This sequence will erase all user device codes, learned buttons, preference settings, smart-source
programming, and macros.
Button Status returned
Send one of the six slot
buttons 1 indicator LED flash
Send PROGRAM 2 LED flashes
Send #9 1 LED flash
Send PROGRAM After a delay of several seconds,
Erase Compete
The Spitfire comes bundled with a DAT file for every file in both the internal and
external library. A DAT file is a text file that contains all the button mapping
information. For example you can refer to the DAT file to see what buttons are available
and where they are mapped for each device.
The default TV is a Sony device # 347 .\Library\On Chip Library\DAT\
Scan Code, Name of Button
0,0
1,1
2,2
3,3
4,4
5,5
6,6
7,7
8,8
9,9
10,ENTER
11,MUTE
12,VOL_UP
13,VOL_DOWN
14,CH_UP
15,CH_DOWN
22,POWER
23,RECALL
24,INPUT
25,DISPLAY
26,MENU
27,EXECUTE
28,UP
29,DOWN
30,LEFT
31,RIGHT
32,Exit
33,MTS/GUIDE
36,SLEEP
40,PIP_ON/OFF
41,PIP_CH+
42,PIP_CH-
43,PIP_MOVE
44,PIP_SWAP

Version 1.0 Preliminary19
Upgrading the Library
You can add codes to the SpitFIRE by down loading a BIN
file into the non-volatile memory of the Spitfire. There are
eight downloadable file locations. The Spitfire is shipped
with an Internal Library consisting of 577 IR codes, and
another 398 downloadable files. \\Library \Down Load
Library\Bin.
The procedure to download a Library upgrade file is ..
Click on the File menu option, and then select Upgrade
Library.
This will open the “Down Load External Library to Spitfire” window.
Set the path to the file, and click on one of the eight locations that you want to down load
the file to.

Version 1.0 Preliminary20
Click OK and the Spitfire will count down the file transfer, and display Eeprom Write
Completed. The user can do this for all eight locations. To assign a down loaded file to a
source the user must manually program the slot with the corresponding device number.
Table of contents
Other Innotech Remote Control manuals

Innotech
Innotech IC4201 Operating instructions

Innotech
Innotech IC8001 Operating instructions

Innotech
Innotech IC4001 User manual

Innotech
Innotech SurfBoard User manual

Innotech
Innotech SpitFIRE I User manual

Innotech
Innotech Accenda Administrator guide

Innotech
Innotech SpitFIRE II Manual

Innotech
Innotech Accenda User manual

Innotech
Innotech SpitFIRE I User manual

Innotech
Innotech SpitFIRE I User manual