insize ISHB-D200 User manual

MN-ISHB-D200-E
ISHB-D200
AUTOMATIC DIGITAL BRINELL
HARDNESS TESTER
OPERATION MANUAL
www insize com. .
V0

1 2
Please don’t rotate lift handwheel during dwelling.
Please fix the lever and stage as factory default before moving the
machine, also recover the package and protection when transport
the machine.
The power socket for this apparatus shall be of a one-way 3-pins
type, the earth terminal shall meet the specified requirements of
grounding protection.
Attention
1
2
3
Brief introduction:
This Model Digital Brinell Hardness Tester is a new and high-tech
product combining the optical, mechanical and electronic
techniques.
The instrument is adopted such technology as computer making
programs with software and photoelectric sensor, etc. Inputting by
keys, the tester has such functions as select the test method and
hardness exchange scales, storage, etc. And all test data such as
the test method, the test force value, the test indentation length,
the hardness value, the dwell time of test force, test force and
hardness measuring range, test numbers can be showed on its
large LCD screen, besides it can be inputted year, month and date
by keys, test the result, handle data and output information with
print.
The Brinell hardness test is suitable for to test hardness value of
the cast iron, steel, non-ferrous metal and soft alloy materials,
besides, it is also fit for testing hardness value for some non-metal
materials such as hard plastic and Bakelite, etc. therefore the
instrument is widely used in the factory, workshop, laboratories,
universities and the scientific research institutes.
Description
1
Main technical specifications:
Measuring range: 8 ~ 650HBW
Reading method: digital
Test forcr: 62.5, 100, 125, 187.5, 250, 500,
750, 1000, 1500, 3000kgf
Max. workpiece height: 200mm
Max. workpiece depth: 135mm
Load control: automatic (load/dwell/unload)
Load dwell time: 5 ~ 60s
Measuring microscope:20X, the resolution is 0.625µm
Power supply: 220V, 50/60Hz
Dimension: 550×210×750mm
Weight: 90kg
2

34
Accuracy and repeatablility:
3
Standard value Accuracy Repeatability
≤125HBW
125 HBW< ≤250
>250HBW
±3%H
±2.5%H
±2%H
H— d—diameter of indentationStandard value of test block
3%d
2.5%d
2%d
Structure:
4
1. Printer 2. Main body 3. Lift handwheel 4. Thread rod 5.Stage 6. Indenter
7. Locking screw 8. Eyepiece sleeve 9. Eyepiece (Measuring microscope)
10.Eye-mask 11. Top cover 12. Back cover 13.Power 14. Objective 15.
Scale moving handwheel 16.Eyepiece connection port 17. Fine adjustment
18. Measuring button 19.Turret
Unpacking and installation
1
2
Open the wooden box, take out the protection bubbles and
accessary box.
Open the hardness packaging bag, take out dust cover and
operation manual etc.
Remove two M10 screws on the base board as picture 1, to move
the hardness tester.
The hardness tester should be put on a stable stage after
unpacking, and take the base when moving. And the levelness of
the stage should be no more than 1mm/m.
Use 8mm allen wrench to remove two bolts on the button of
wooden box.
Note: Please wear gloves to prevent injury during process.
3A hole shall be drilled at an appropriate location on the stage to
enable the thread rod to go down and get the maximum measuring
height.
3Open the top cover and remove the fixing material as following.

5
6
4Press the front lever and make fit blades into the V groove of
the frame. Please note the blades both
up and down.
should be properly fitted
frame with V groove
blade
blade
5Re-mount the top cover.
6Turn down the stage and remove the protection foam, also the
move down the cover of the thread rod and then put on the stage.
Note The thread rod should be oiled for rust protection.:
7Insert the eyepiece into the sleeve and connect the cable to the
port on the side of machine.
8Connect the power cable and turn on the machine.
Note: The eyepiece should be completely inserted in to the
sleeve, otherwise, the measurement will be not accurate.
Operation
Key function:
1
hardness value
conversion
diameter of indenter diameter indentation
dwell time
finished test times
test force
PRINT: Print the test data (the first indentation is not included).
DISPLAY
CLR-F: Set Zero to Initial Test Force.
: Display test data (the first indentation is not included),
the screen will return back to operating page after press OK key.

7 8
DELETE: Delete the present test data, the value of Test No. will
deduct 1 after every time pressing this key.
SELECT: Enter the operating menu on the screen.
CLEAR: Set zero for scale of microscope during measurement,
only needs to set zero one time after power on the machine.
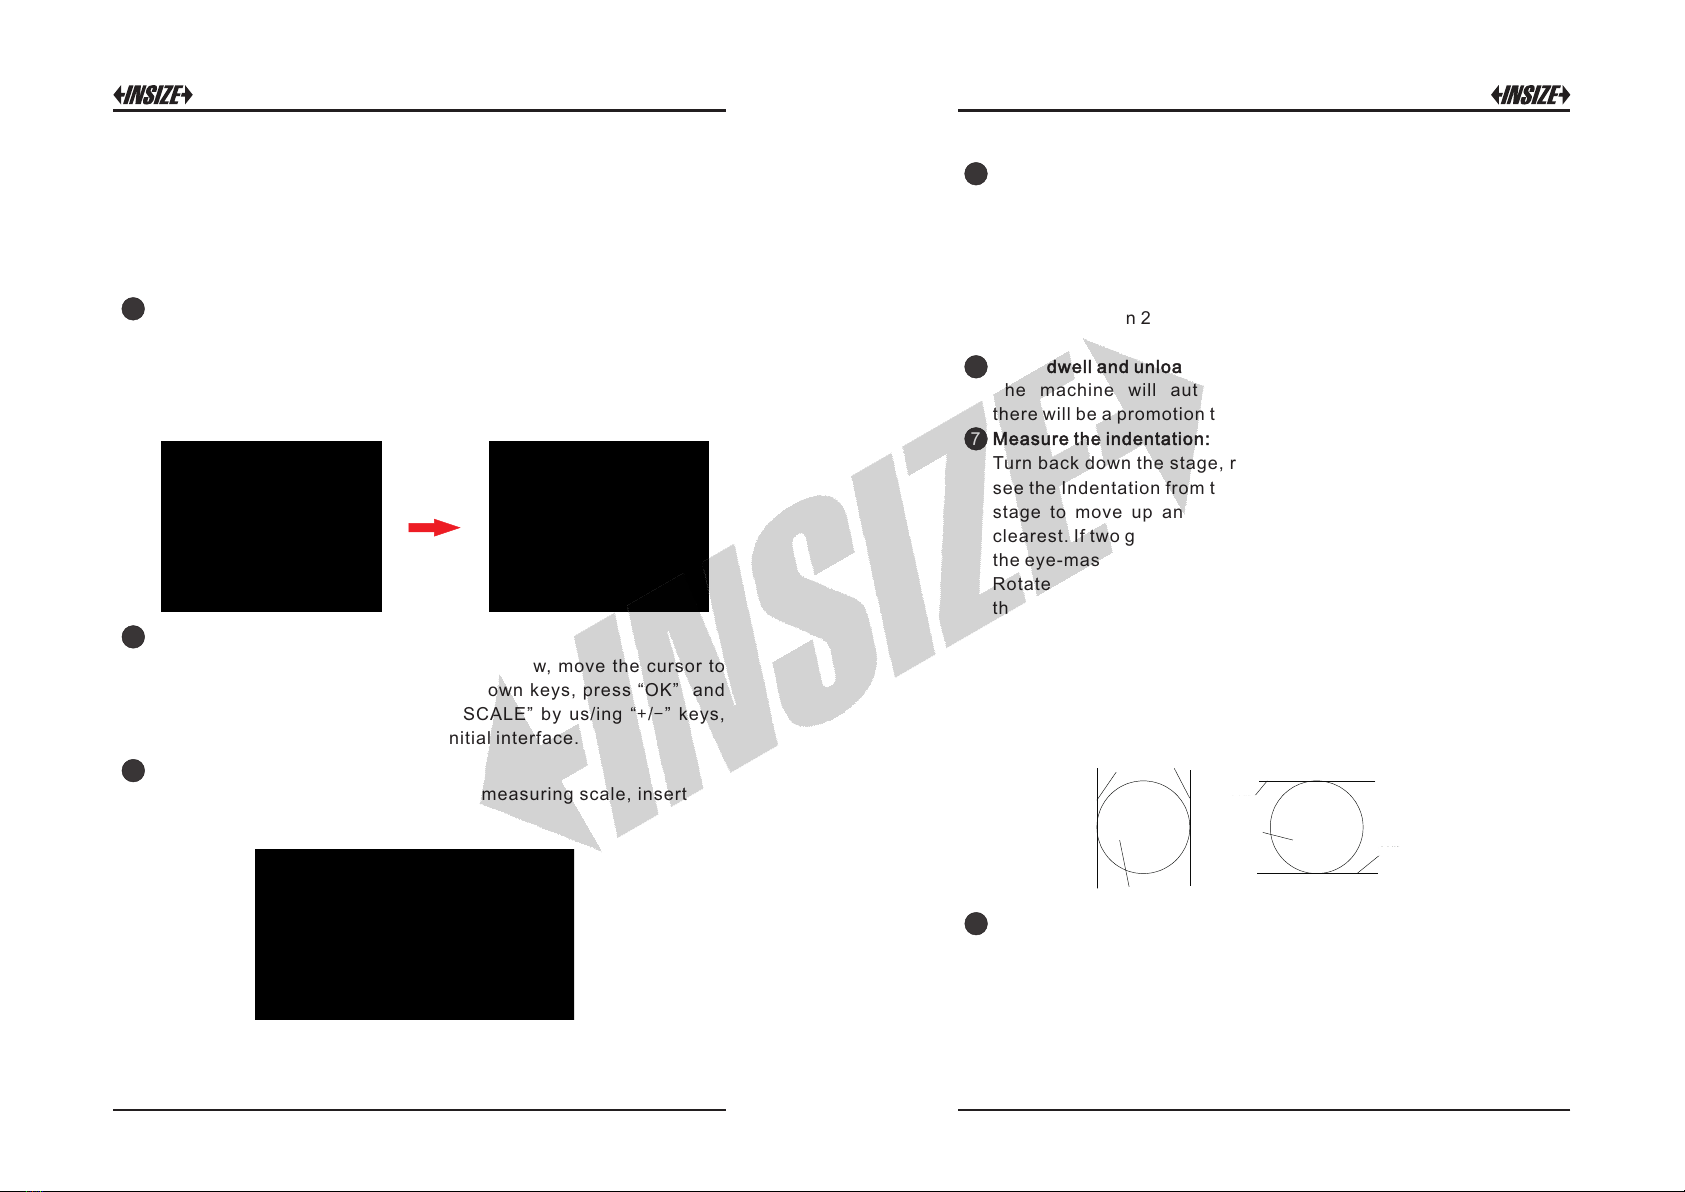
Select the test scale:
2
Press “
“MEASURING SCALE” by using up and down keys, press “OK”
and
SELECT” to enter the menu as below, move the cursor to
move the cursor to “MEASURING SCALE” by using up and
down keys, press “OK” to confirm and back to initial interface.
Set dwell time:
3
Press “SELECT” to enter the menu as below, move the cursor to
“DWELLING TIME” by using up and down keys, press “OK” and
move the cursor to “MEASURING SCALE” by us/ing “+/-” keys,
press “OK” to confirm and back to initial interface.
Install the indenter:
4
Select right indenter according to the measuring scale, insert it to
the mount hole and lock the screw.
Start to test:
5
Turn the turret and make the indenter in front with a click sound,
make the workpiece stable. Press “CLR-F” to zero the test force,
slowly lift the stage and the test force on screen keep changing
until there is a promotion tone, now the test force is about 27kgf
(when test force less than or equal to 250kgf) or 90kgf
, the machine will start to loading the main
test force.
(when test
force larger than 250kgf)
Load, dwell and unload:
6
The machine will automatically loading, dwell and unloading,
there will be a promotion tone after unload.
Measure the indentation:
7
Read the hardness value:
6
The hardness value will be shown on screen after two times
measurements, press “PRINT” key to print the results.
8
Note: The first measurement will not be counted, normally we test
5 times to get the average value for a workpiece.
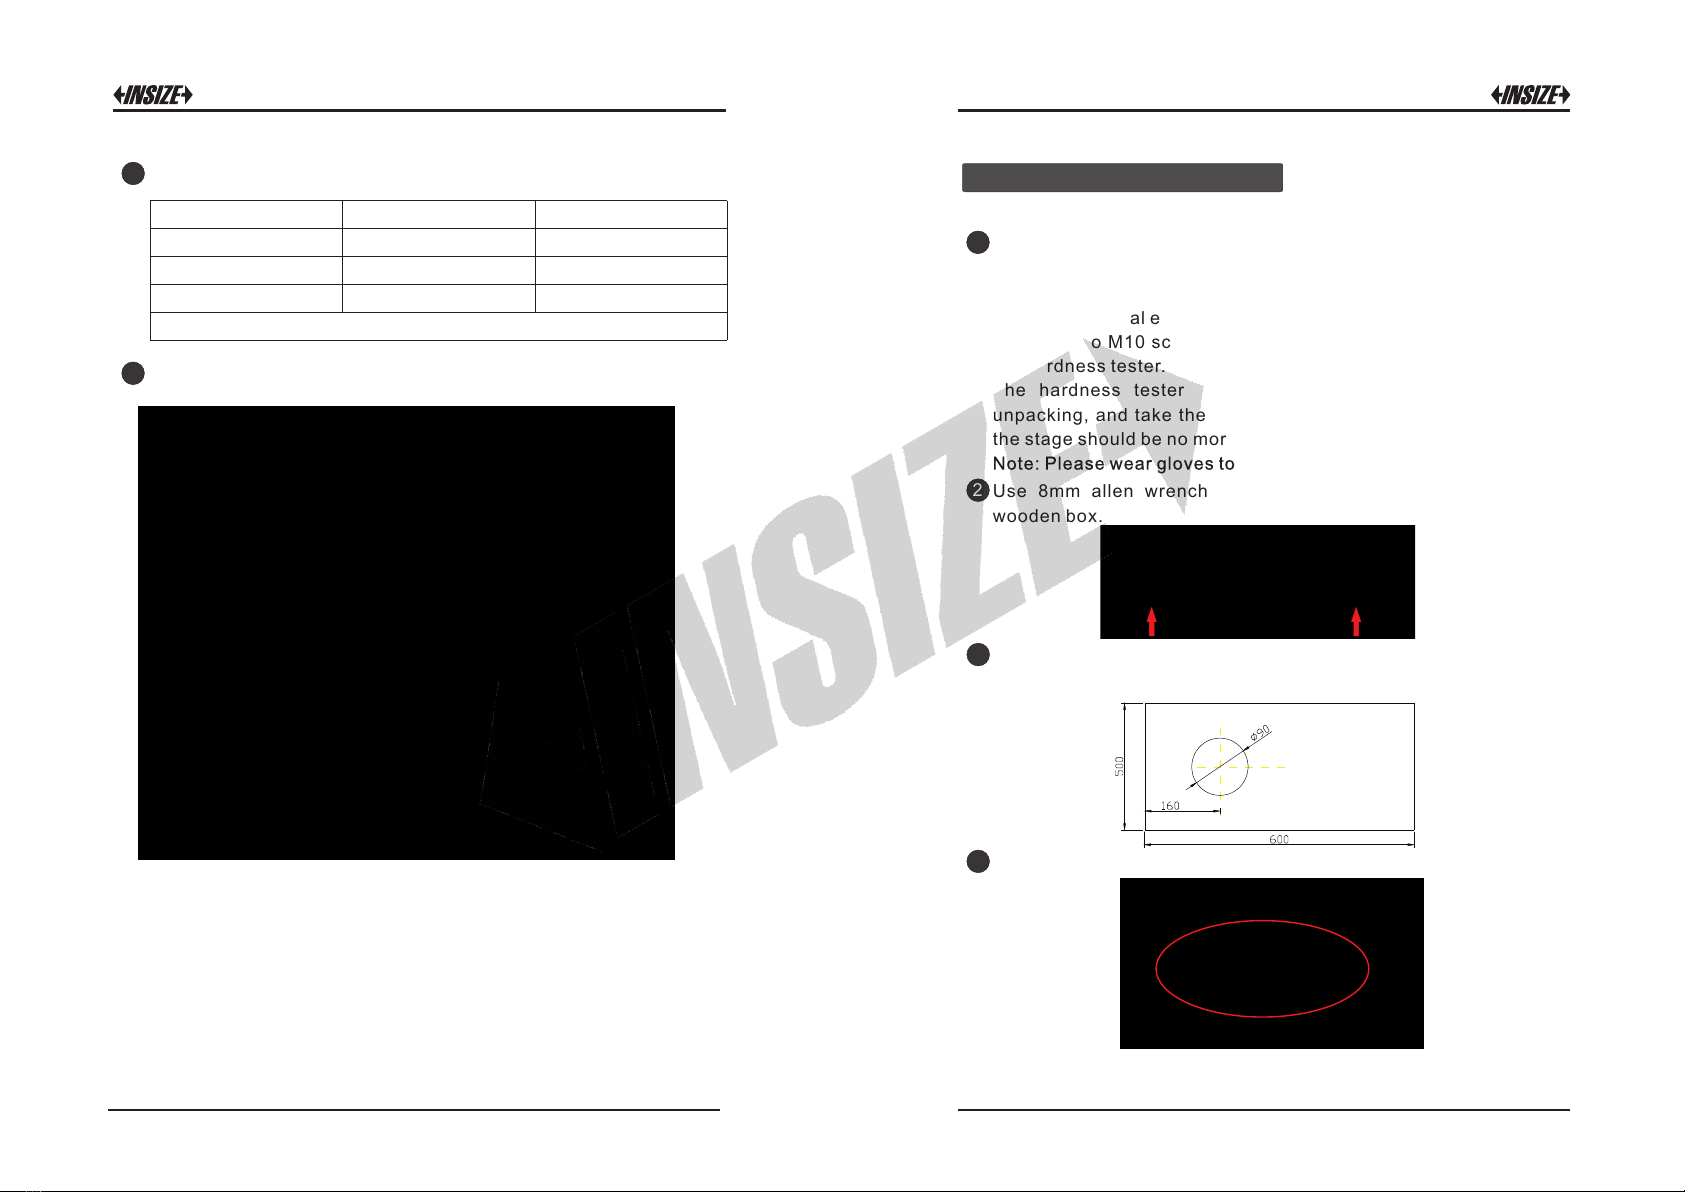
Turn back down the stage, rotate the objective to front direction to
see the Indentation from the vision field of the eyepiece. Adjust the
stage to move up and down till the image of the Indentation is
clearest. If two graduated lines seem vague in the eyepiece, adjust
the eye-mask till the graduated lines are clearest.
Rotate the f to move
the graduated line of eyepiece, enable two graduated lines
closely. When the two lines are align, press “CLEAR” Key, at this
time, the value on the main screen is zero
Now separate the two lines in two side of the indentation and press
measuring button to get the first diameter, then turn the eyepiece
90° to measure the diameter again
ine adjustment and scale moving handwheel
.
.
左刻线 右刻线
压痕
压痕
左刻线
右刻线
left line right line
indentation
left line
right line
indentation

9
Maintenance
1
2
3
4
5
6
It is necessary to read carefully the usage instruction manual
before the operation of the present instrument, in order to know
the operational procedures and the precautions so as to avoid the
damages to the instrument caused by the incorrect operation.
The power source of present instrument should be equipped with
a voltage-regulator and a reliable grounded device. It is prohibited
to dismount and alternate without permission all the electric
component parts, the switches and the sockets as well as their
fixed positions; otherwise the instrument will be error and caused
unsafe accidents.
When turn the turret, the position must be accurate and correct.
During the loading and unloading of test force, the instrument will
produce a slight sound, it means that the instrument is regulating
the structure automatically, and it is working in order.
If the instrument is at malfunction during loading of test force,
please shut down the instrument immediately, and turn back down
the test table, then switch on the instrument, the instrument will
regulate automatically.
It is necessary to oil and lubricate periodically the moving surface
on such parts as the thread rod, etc.
The instrument should be disconnected with the power source
after it has finished the measurement completely.
The instrument should be kept clean. It should be covered with
Anti-Dust Bag after test. The Standard Test Blocks and Ball
Indenters should be coated rust protecting oil to avoid rusting.
7
8
Table of contents
Other insize Test Equipment manuals

insize
insize ISH-MRD200 User manual

insize
insize ISHW User manual

insize
insize ISR-S300 User manual

insize
insize ISH-MR150 User manual

insize
insize IST-TT Series User manual

insize
insize ISHR-P151 User manual

insize
insize ISH-BRV User manual

insize
insize ISH-RD200 User manual

insize
insize ISR-C300 User manual

insize
insize ISF-MT1K User manual