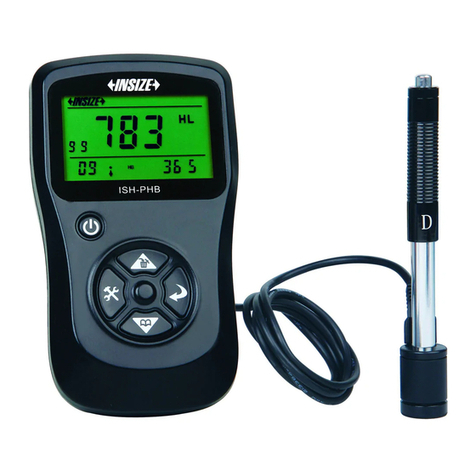
insize ISH-PHA User manual

www.insize.com
MN-ISH-PHA-E
OPERATION MANUAL
ISH-PHA
PORTABLE HARDNESS TESTER

1 2
Attention
Don’t impact without measurement and calibration, otherwise the
impact device may be damaged.
Please reading the operation manual careful before using, make
sure the weight, thickness, surface roughness of the workpiece
are meeting the requirement.
Please do calibration when use the device first time or interval for
a long time.
Clean up the rusty, oil on the surface before measure.
The distance between any two impact position should be ≥3mm. the
distance between impact position and the edge of the sample should
be ≥3mm.
Make the support ring stick to and
keep the impact direction perpendicular to
the surface of the workpiece
the surface.
Keep workpiece and impact device steady during
measurement.
operator,
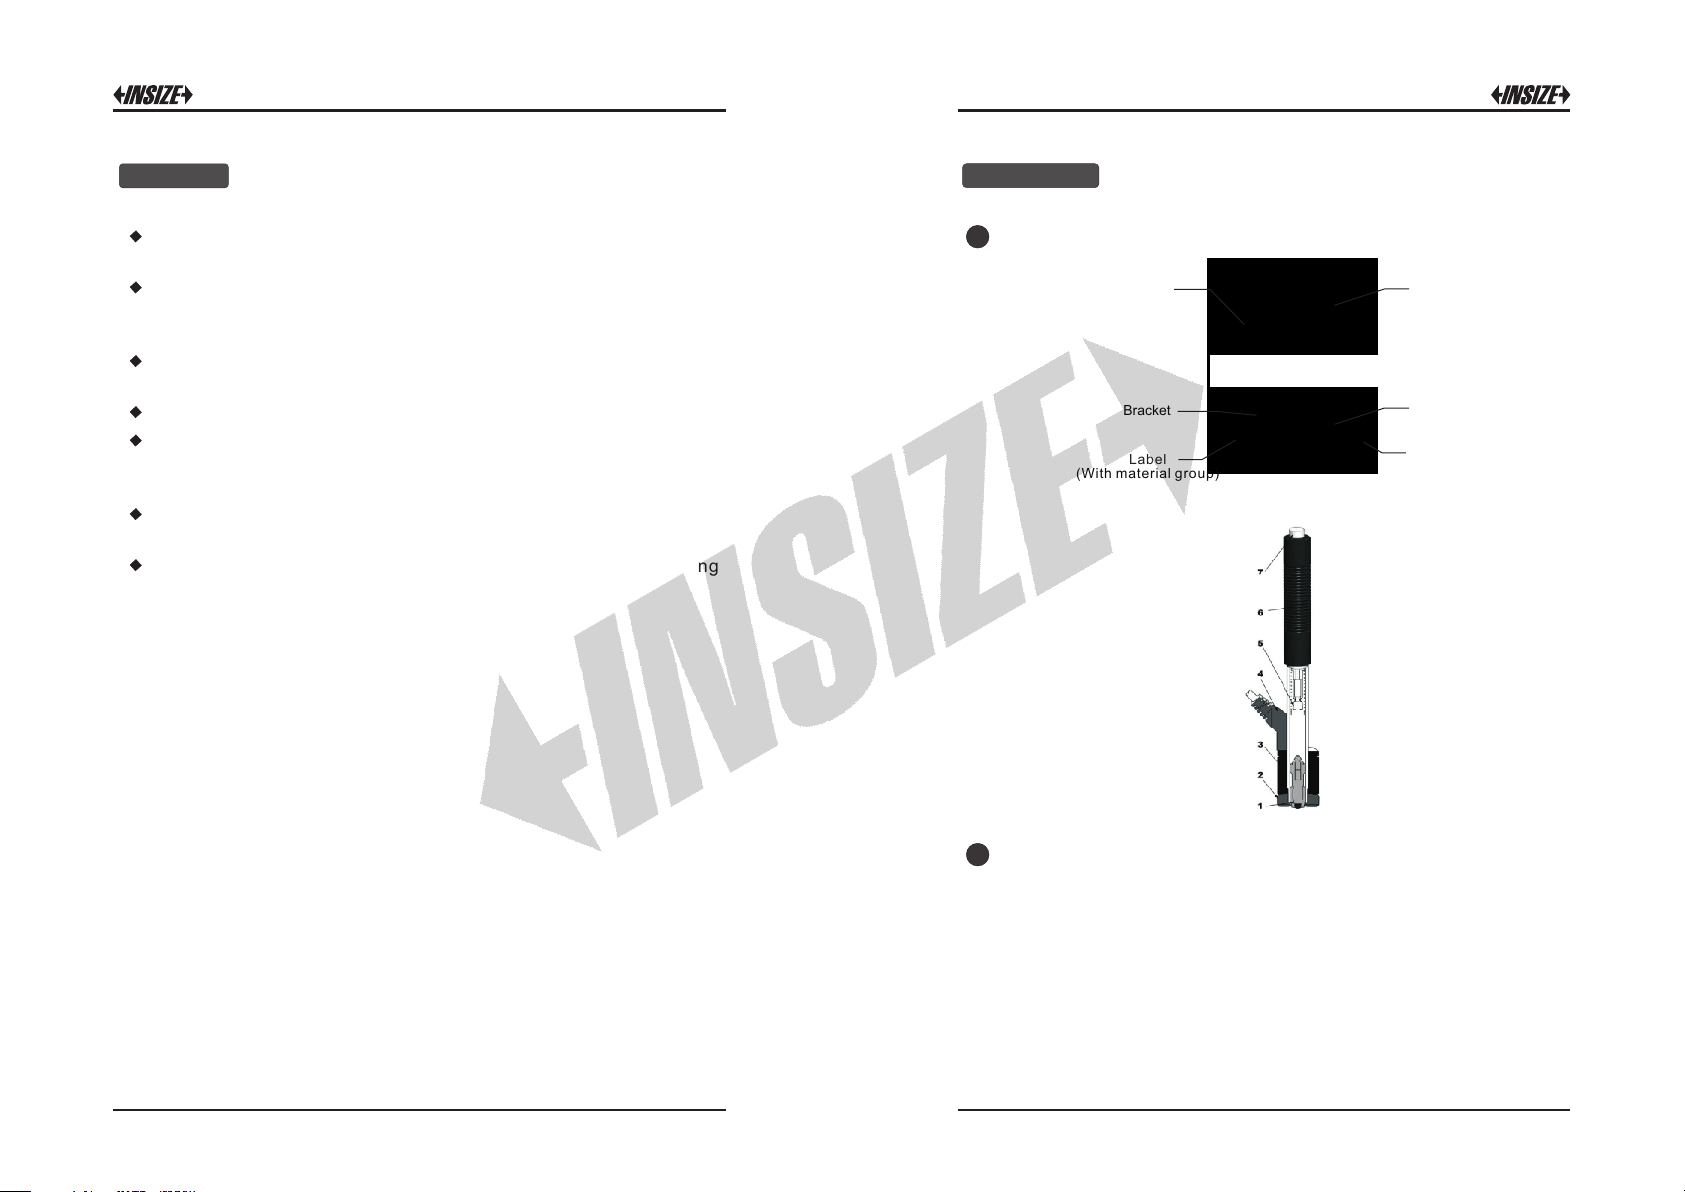
Structure:
Description
1
Impact device
Main unit
1.
2.
3.
4.
5.
6.
7.
Impact body
Support ring
Coil
Cable
Catch chuck
Loading tube
Release button
LCD Display
Bracket
Label
(With material group)
Cell Cover
Signal Cable
Button
Working principle:
2
Push down the loading tube before measurement, the catch
chuck catch up the impact body. Make the support ring stick to the
surface of the workpiece and keep the impact direction
perpendicular to the surface. Then press the release button, the
impact body will impact the surface. The coil collect the velocity
signal and the cable transmit the dada to the main unit.

3 4
9. “Imp.” button:
in measurement mode. It also use as the up direction button.
Press the button to setup the impact direction
Clock
Material Code
Conversion Averaged Value
Conversion Scale Conversion Value
HLD Averaged Value
HLD Value
Impact Direction
Imp act Times
Specification:
3
Display range: 0 999HLD~
Accuracy: ±6HLD(when HLD=800)
Resolution: HV, HB, HRB, HRC, HV, HS, MPa
repeatability: 6HLD±
Impact direction: 0°, °, 180°, °, °±90 ±45 ±135
Key function:
4
2
1
9
8
7
6
5
4
3
1.On/Off button: Turn it on/off by pressing and holding the
button.
2. Backlight button: Press the button to turn on/off the
backlight.
3. “Back/Print” button:
①In measurement mode, press and hold the button to erase
measured data, at the same time, if the mini-printer is linked
with the mian unit, it will print out those data then erase
measured data.
②In other mode, press “Back/Print” button to complete setup
and save the parameters that you set and return to the
measurement mode.
4. “Browse” button: Browse the memory data.
5. “Date/Time” button: Adjust the clock and calendar.
6. “Del.” button: Press and hold the button to delete current
data in measurement mode or browse mode. It also use as the
left direction button.
7. “Convert” button: Press the button to setup the conversion
scale in measurement mode. It also use as the down direction
button.
8. “Mat’l” button: In measurement mode, press the button to
select the material that you will impact. It also use as the right
direction button.
LCD display:
5
Calibration
Please do calibration when use the device first time or interval for a
long time.
Press and hold the “Back/Print” button to erase measured data.
Then select number 01 material and set impact direction is down.
Measure 5 times on the surface of standard block(you should
delete the value which deviation is large).
1
Press “Back/ Print” button back to the measurement interface.
3
Press and hold the “Date/Time” button about 2 seconds to enter
the calibration interface. Use the left and right direction buttons to
move the flicker. Use the up and down direction buttons to adjust
until the display value is same to the standard value of the block.
2
Note: The distance between any two impact position should be ≥3mm.
the distance between impact position and the edge of the sample
should be ≥3mm.
Measurement
Preparation before measuring:
1
Select the material:
Press the “Mat’l” button to select the material code according
to the back label.

5 6
Hardness Tensile strength (MPa)
01.Steel and Cast Steel 11. Low Carbon Steel
02. Alloy Tool Steel 12. Hi Carbon Steel
03. Stainless Steel 13. Chrome Steel
04. Grey Cast Iron 14. Cr-V Steel
05. Ductile Iron 15. Cr-Ni Steel
06. Cast Al Alloys 16. Cr-Mo Steel
07. Cu-Zn Alloys 17. Cr-Ni-Mo Steel
08. Cu-Sn Alloys 18. Cr-Mn-Si Steel
09. Copper 19. Hi Strength Steel
10. Forging Steel 20. Stainless Steel
Note: The value can only convert to “Mpa” When select the
material code 11~20.
Impact Direction:
Ideal Leeb Hardness Testing is a downward straight testing
method. As a result of gravity, the test should be amended when
measuring other directions in order to measuring correct
hardness value of material. As long as you correctly choose the
impact direction, ISH-PHA Hardness Tester can automatically be
amended.
On measurement mode, press “Imp. ”button to select the impact
direction.
Convert scale:
ISH-PHA Hardness Tester can automatically convert HLD values
to other hardness scales HRC, HRB, HB, HV, HSD or tensile
strength (MPa) according to a particular material group (e.g.
steel, aluminum etc.)
In measurement mode, press “Convert” button to convert to all
common hardness scales or tensile strength: Press the button
continuously, the scale according to following sequence: HRC→
HRB→HB→HV→HSD→MPa→ HRC…
Sample Preparation:
4. When you change the hardness scales, the current impact
time's counter of measuring interface will be clear to “0”.
5. Default setting for the conversion is “HRC”.
Inappropriate sample will cause a great measurement error.
Therefore, users should make the necessary handling and
preparation under the original conditions of sample.
Preparation of the sample and the surface of test should be
coincident with the following basic requirements:
1) During the process of sample surface preparation, users
should avoid the impacts of cold processing and thermal
processing.
2) The sample surface is plane for better, the test surface
should be with a metallic sheen, and not involve oxide layer
orother stains.
3) Roughness of the test surface Ra ≤ 1.6
4) Sample must be of sufficient quality and rigidity. If it's lack
of quality and rigidity, it may cause displacement or shaking in
the process of testing impact, which can lead to large errors.
Generally speaking, if the sample quality is more than 5kg can
be directly tested; if the sample quality is 2~5kgs, the sample
should be taken in fixation test by means of appropriate
clamping; if the sample quality is 0.1~2kgs, the sample
should be conducted coupling before the test; if the sample
qu a lit y is les s tha n 0.1 k g, t hi s har dne s s t e ste r is
inappropriate to use.
Coupling method: Testing sample's back should be prepared
to make a plane as a supporting surface with a smooth
formation. Filling with a little coupling substance (Industry
Vaseline can be used), users can now press to the surface of
the supporting object (The weight of supporting object should
be more than 5 kg, and it can be replaced by test block) to
stick into integration.
5) Samples should be thick enough and with sufficient surface
absorption layered. If users use D-type impact device, the
thickness of sample should not be less than 5mm, and surface
absorption layer (or surface-hardening layer) should not be
less than 0.8mm. To accurately measure the hardness of the
material, the best way is to remove the surface-hardening
Note
1. The conversion value is “---” indicated the conversion is out of
range.
2. When you set the conversion from hardness scale to tensile
strength or from tensile strength to hardness scale, you must be
reset the material group.
3. Conversion value only supplies the general reference, which
may result in some offset. Precisely conversion generally needs
related comparative tests.
:
7 8
material, the best way is to remove the surface-hardening
layer by processing.
6) When testing sample surface is not horizontal, the
curvature radius of testing and nearby surface should be
larger than 30mm. And appropriate supporting ring should be
elected and installed.
7) A sample should not be with magnetic. The signal of the
impact device would be seriously interfered in the work by the
magnetic, which may cause inaccurate test results.
2Measuring Steps:
Loading: Simply load the impact device by sliding the loading
tube forward.
Place: Then place and hold the impact device on the surface
of the test piece at the desired test point. Impact indirection
should be vertical with the test of surface.
Burst impact (Measure): Trigger the impact by pressing the
release button. The hardness value will be instantaneously
displayed.
Read off the test result from LCD. For example:
Sample material: steel and cast iron;
Impact direction: downwards;
Date: 3rd, Dec;
The current hardness value: 786HLD;
The current measurement is the third point;
The current mean value: 785HLD
Conversions to HRC: 58.6HRC
The mean value of HRC: 58.5HRC
Repeating the above steps, users can carry out tests in more
points.
Note: Generally, each measurement location of sample is
conducted for the five tests. The “S” (difference of maximum
value and minimum value) values must be less than 15HL.
The distance between any two impact position should be ≥3
mm ; the distance between impact position and the edge of the
sample should be ≥3 mm.
Memory and print:
3
The data group (such as test result, conversion result, sample
material and impact direction) automatically save in memory after
one individual measurement. ISH-PHA hardness tester can store
nine sets of data, when measuring times more than nine, the last
group of data will store the 9th position and the first group of data
will be erased. The second group of data will be moved into the
2th position, simultaneously the position of other group of data,
will be moved into lower position.
Press and hold “Back/Print” button to end the measurement and
print out the memory data (when connected to printer) in test.
Completing print, the original data will be erased automatically.
Highlight LED backlight is used for poor light conditions. Users
can turn on or turn off the backlight by pressing the button (it will
automatically save this model while shutdown). If there is no
measure, and no key operation in 10 seconds, the backlight will
4Backlight and auto-power off:

9 10
be turning off automatically, and the display unit will be shut off in
3 minutes.
If the display unit isn't working properly or halt, users can press
the “Reset” button by insert a slender rod into the reset hole at the
backside of display unit, and then the display unit will be
shutdown. Press the button to reboot the system.
5System reset :
After using 1000-2000 times, users should clean the catheter of
impact device and impact body with nylon brush, and screw off
the supporting ring before clean the catheter, and then take out
the impact body, rotate the nylon brush into the tube in an anti-
clockwise direction, and pull out when touching the bottom. So
repeatedly, and then load up the impact body and supporting ring;
Users should release the impact body after use. And the lubricant
is banned.
In calibration of the hardness tester, if finding that error is larger
than 6HLD, users must be renew the steel ball or impact body,
because the reason may be that the steel ball or impact body is
wore out to lead to failure in operation.
Maintenance
1
2
Impact Device Maintenance:
Normal Maintenance Procedures:
energy. Accordingly, the roughness of sample testing points on the
surface Ra≤ 1.6.
2) The shape of sample surface
Leeb testing principle demands the velocity of rebound and impact
are on the same line, because the impact body is moving in a metal
tube. Even if the velocity of rebound and impact are not on the same
line, it also can show hardness for sure, but the impact body would
collide with tube wall when it rebounds, which will affect the velocity
of rebound. Therefore, a greater error is on test accuracy. When the
radius of curvature of the testing sample surface is smaller, the
solution is the use of suitable variant supporting circle. If users
require special supporting circle, we can contribute to design and
process.
3) The weight of the sample
If the sample weight must be larger than or equal to 5kg, and not
easily sway. If the sample weight were less, the sample would need
proper treatment (It is necessary to increase the supporting or
mounting through coupling compress on larger weight testing stand),
and the testing results can be achieved in accuracy. There should be
a certain area at the testing points (the area required to meet a set of
testing points) and no vibration or shaking. If the weight is not
enough, users must be as much as possible reduce the jitter and
sloshing by the methods of increasing supporting, coupling and
compressing. And supporting device should avoid shock.
4) The sample stability
Any effective tests need to minimize possible interference from
outside; it's more important to dynamic measure such as Leeb
hardness test. Therefore, measuring only allowed in stable hardness
testing system. If it's likely to lead to sample movement in the tests,
users should fix it before testing.
Factors Affection Accuracy
Incorrect operation or improper testing conditions would have
serious impact on testing accuracy. Following is several common
factors effect the accuracy of testing for the use of reference:
1) Roughness of sample surface
When the impact body impact on the sample, a small pit would arise
on the sample surface, so at the same time, should finish the surface
of the sample. The more roughness, the less consumption of impact
energy whereas the less roughness, the more consumption of impact

11
Materials HLD
HV HRC HRB HS
Tensile
strength(Mpa)
Steel & cast steel 300-900
81-955 20-68 38 -100
Tool steel 20-67
Stainless steel 85-802 47-101
Cast iron
Cast aluminum alloy
Brass
Bronze
Copper
300-840
300-800
360-650
170-570
200-550
300-700
200-960
80-898
HB
81-654
85-655
93-334
19-164
85-655
93-334
19-164
40-173
60-290
45-315
23-84
13-95
32 -100 375 -2639
Measuring And Conversion Range
Main unit
Impact device D
Printer
Hardness test block
Small support ring
Cleaning brush
AC/DC adapter
1pc
1pc
1pc
1pc
1pc
1pc
1pc
Support rings refer to our catalogue
Standard Delivery
Optional Accessory
Table of contents
Other insize Test Equipment manuals

insize
insize ISR-S300 User manual

insize
insize IST-TT Series User manual

insize
insize ISH-MR150 User manual

insize
insize ISHR-P151 User manual

insize
insize ISH-MRD200 User manual

insize
insize ISH-PHB User manual

insize
insize ISHW User manual

insize
insize ISH-BRV User manual

insize
insize IST-TT Series User manual

insize
insize ISR-C300 User manual