insize ISH-RD200 User manual

MN-ISH-RD200-E
www.insize.com
V0
ISH-RD200
MANUAL DIGITAL
ROCKWELL HARDNESS TESTER
OPERATION MANUAL

1 2
1 产品介绍
ISH-RD200 is supplied with manual load/unload test force part
and is suitable for measuring Rockness hardness of carbide
steel, carbon steel, alloy steel, cast iron and nonferrous metal
etc.
1 . Do not touch the test force dial when loading.
2 . It is necessary to use one-way three-core plug to supply
power, and should follow the rules of local protection.
3. Take off the weight ,indenter and fix the lever inside before
move the hardness tester. And remember to restore the original
packaging and safeguard procedures before long-distance
transport.
Attention Introduction
Structure
1 产品介绍
Installation
2.1 Unpacking and installation:
a. open the wooden box, take out the protection bubbles and
accessary box.
b. open the hardness packaging bag, take out dust cover and
operation manual etc.
c. remove two M10 screws on the base board as picture 1, to
move the hardness tester.
d. the hardness tester should be put on a stable stage after
unpacking, and take the base when moving. And the levelness of
the stage should be no more than 1mm/m.
1.up cover back cover operational panel lock screw of indenter
case of lifting screw test force dial 7.lifting handwheel
8.load/unload handle 9.stage 10.indenter
2. 3. 4.
5. 6.
1
2
3
4
5
6
7
8
9
10

34
Picture 2
f Install the weight:
Attention: Do no connect to power when installing the weight.
1) Take out the weights from the accessary box(There is A, B,
C marked on the weights)
2) Rotate the test force dial to 588N, then take out the derrick
and remove the nut.
Picture1
100
490
150
Ø70~80
Attention:
If test sample height over 40mm, it is necessary to make a
circular hole with 70~80mm diameter to make the the lifting screw
move up and down smoothly. The limited position of the screw
going down is 220mm below the stage, and nothing in this area.
The place of the hole is against the base as per picture 2 shows.
e. open the up cover and back cover after fixed the hardness
tester, remove the galloon and bungee which used to fix the
tester. And loosen the case of lifting screw, rotate the lifting
handwheel to make screw go down, then take out the shockproof
pads, and put on the stage.
fix lifting handwheel fix the header bar fix the farmar derrick
fix the lever
3) Put the weight A to the derrick, then tight the nut and put the
derrick to the original place
4) Put weight B and C to the corresponding position.
5) Change the loading and observe if the weights put in to the
grooves, it is working well when weights move smoothly.
16. lever
17. derrick hole
18. derrick
19. outrigger
20. weight C
21. Bweight
22. Aweight
23. nut
16
17
18
19
20
21
22
23

5
6
scale indenter test force(N)
HRA
HRB
HRC
diamond taper indenter
(cone angle )120°
ball indenter
(ball dia.=1.5875mm)
diamond taper indenter
(cone angle120°)
588
980
1471
HRD
HRF
HRG
diamond taper indenter
(cone angle120°)
ball indenter
(ball dia.=1.5875mm) 588
1471
980
ball indenter
(ball dia.=1.5875mm)
e. The measuring surface of the test material should be clear
and without greasy dirt, oxide skin, grooves or clear
machining traces, and the roughness of the measuring
surface no more than 0.8µm is proposed.
scale, test force and weight application form
test force(N)
588
980
1471
scale
HRA/HRF
HRB/HRD
HRC/HRG
g after installation, put the up cover and back cover on.
weight
derrick + weight A
derrick + weight A + weight B
derrick + weight A + weight B + weight C
Usage
3.1 Preparation before use
a. Choose the right stage according to the shape and size of
the test sample.
b. Choose indenters and forces according to the material and
hardness scale(as below table shows).
Material(example)
carbide steel, surface
carburizing and
quenching steel
mild steel, aluminum alloy,
copper alloy, malleable
iron, annealed steel
annealed steel,
tempering steel,
alloy steel, stainless steel
sheet steel,
case-hardening steel
magal, mild cast iron,
thin mild steel plate,
annealed copper alloy
phosphor bronze,
beryllium bronze,
malleable iron
c. Install indenters: put the indenter to spindle hole, ensure
the spindle hole, end face, end handle of indenter and shaft
shoulder clear with nothing. Tighten the lock screw at the end
handle of indenter.
Attention: take the indenter tip with fingertip when
installation to avoid the indenter falling down and cause
indenter tip damaged.
d. Rotate the test force dial to choose test force.
Attention: choose test force should go on under unload state.
7 8
3.2 Hardness Test
a. Switch on the power, turn on the tester, light on to turn on
the digital display screen.
b. Choose the right scale, quantity and conversion value.
c. Put the test material on the stage, and rotate the lifting
handwheel along the pointer to move up the stage.
Attention: Rotate the handwheel lightly and equably to avoid
the test material hit the indenter heavily and cause the
indenter damaged.
d. When the indenter touches the test sample, the figures on
the display would increase, and the spline fit on the left would
also move. When the circle at the end of the spline fit become
solid, the test force finishes loading, and the header would
automatic clear.
e. Rotate the handle to load position and hold about 5
seconds, then return back to unload position, and the result
could be read because the test force has been removed.
Attention: The first measurement or change indenter, stage,
test sample, the first or second measuring result would not be
as a reference. And the distance of adjacent indentation
center would not be less than 2mm, the distance of any
indentation center and the test material margin could not be
less than 1mm.
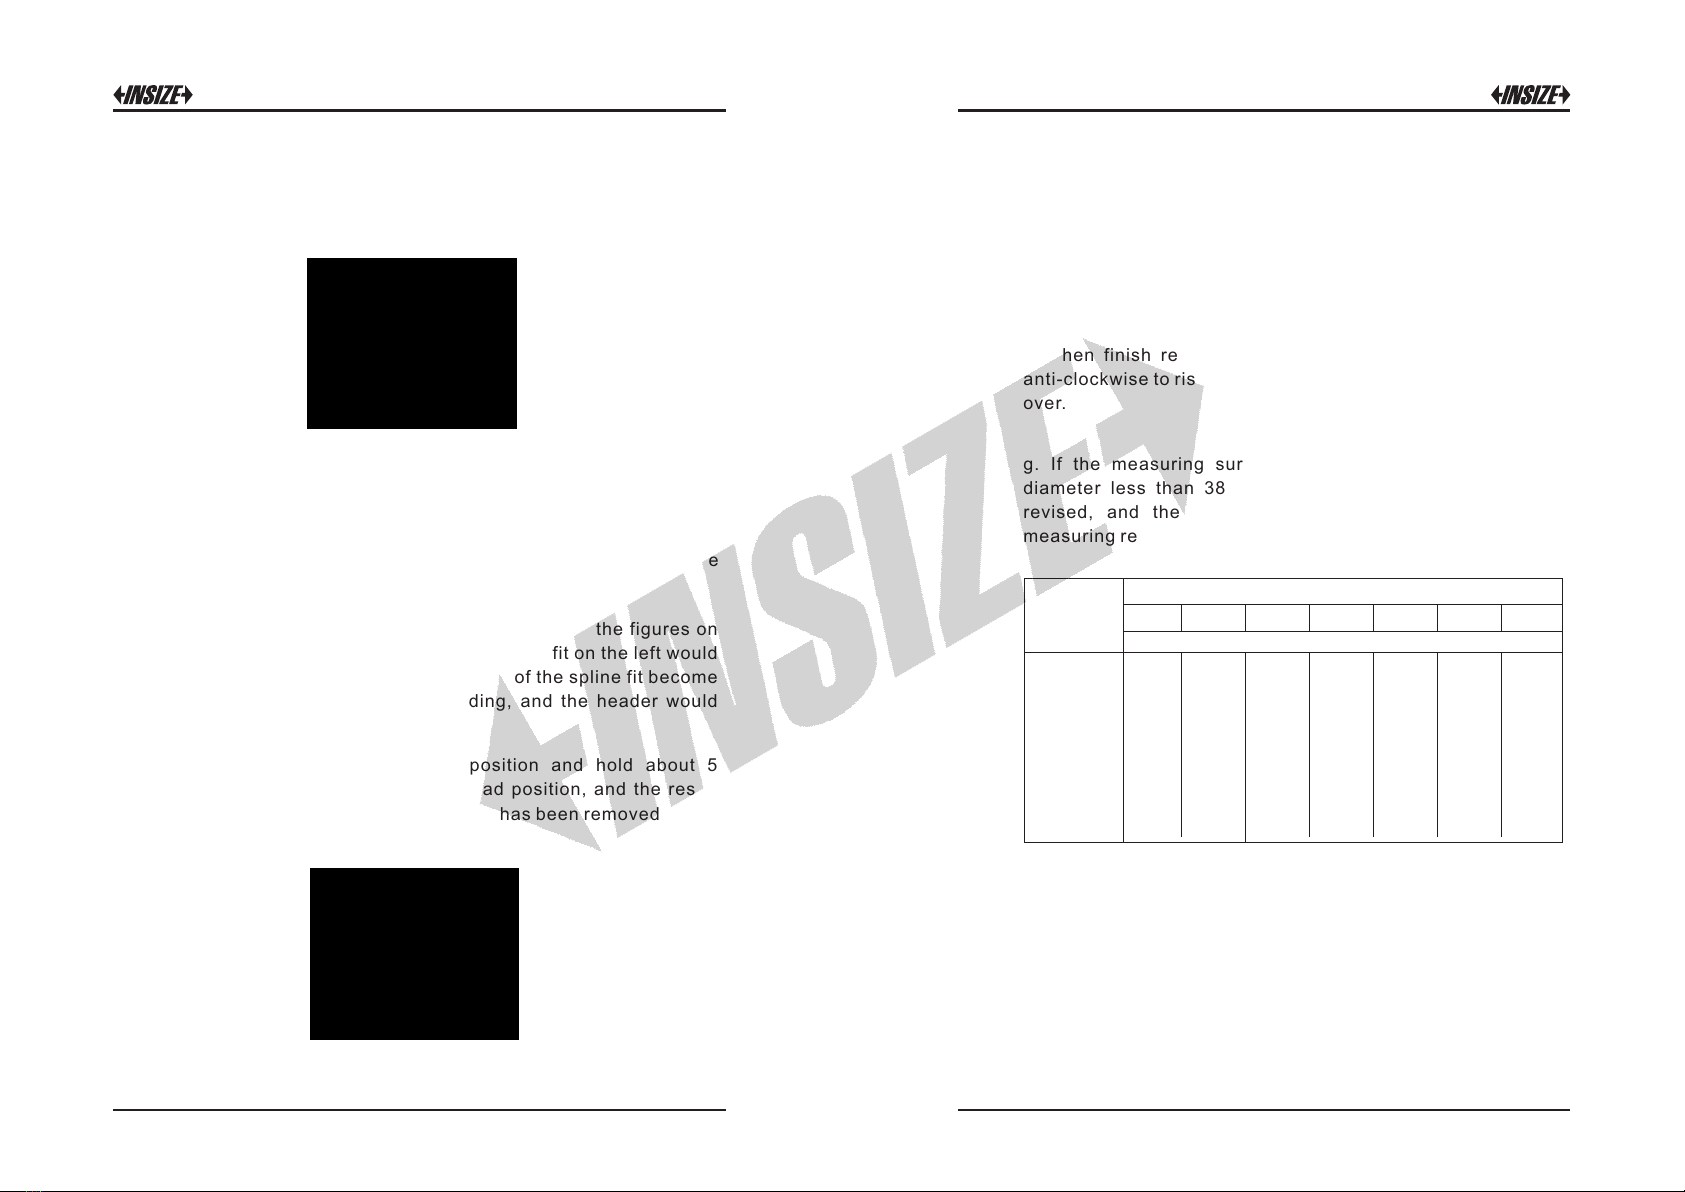
f. When finish reading results, rotate the lifting handwheel
anti-clockwise to rise down the stage, and the measurement is
over.
g. If the measuring surface is an cylindrical surface with
diameter less than 38mm, the measuring result should be
revised, and the actual hardness value is equal to the
measuring result plus the correction.
Hardness
value (HRB)
Diameter of cylindrical surface(mm)
6 10 13 16 19 22 25
Correction of Rockwell B scale
20
30
40
50
60
70
80
90
100
5.0
4.0
3.5
5.0
4.0
3.5
3.0
2.5
5.0
4.5
4.0
3.5
3.0
2.5
2.0
1.5
4.5
4.5
4.0
3.5
3.0
2.5
2.0
1.5
1.5
4.0
3.5
3.0
3.0
2.5
2.0
1.5
1.5
1.0
3.5
3.0
2.5
2.5
2.0
2.0
1.5
1.5
1.0
3.0
2.5
2.5
2.0
2.0
1.5
1.5
1.0
0.5

9 10
required indentation error and repeatability
scale
HRA
HRB
HRC
hardness range
20~75HRA
75~88HRA
20~45HRB
45~80HRB
80~100HRB
20~70HRC
indentation error repeatability
±2HRA
±1.5HRA
±4HRB
±3HRB
±2HRB
±1.5HRC
≤1.5HRA
≤1.5HRB
≤1.5HRC
4.6 If something unusual happens to the hardness tester, do not
disassemble or adjust any structure, please contact us to solve
this problem.
6 10 13 16 19 22 25 32 38
20
25
30
35
40
45
50
55
60
65
70
75
80
85
90
3.0
2.5
2.0
1.5
1.5
1.0
1.0
0.5
0.5
0.5
3.0
2.5
2.0
2.0
1.5
1.0
1.0
1.0
0.5
0.5
0.5
0
3.0
2.5
2.0
2.0
1.5
1.5
1.0
1.0
1.0
0.5
0.5
0.5
0.5
0
2.5
2.5
2.0
1.5
1.5
1.0
1.0
1.0
0.5
0.5
0.5
0.5
0.5
0
0
2.0
2.0
1.5
1.5
1.0
1.0
1.0
0.5
0.5
0.5
0.5
0.5
0.5
0
0
1.5
1.5
1.5
1.0
1.0
1.0
0.5
0.5
0.5
0.5
0.5
0.5
0
0
0
1.5
1.0
1.0
1.0
1.0
0.5
0.5
0.5
0.5
0.5
0.5
0
0
0
0
1.0
1.0
1.0
0.5
0.5
0.5
0.5
0.5
0
0
0
0
0
0
0
1.0
1.0
0.5
0.5
0.5
0.5
0.5
0
0
0
0
0
0
0
0
Hardness
value (HRC)
(HRA)
Diameter of cylindrical surface(mm)
Correction of Rockwell A/C scale
Attention: If the diameter is not included above, interpolation
method is proposed.
For example:
If the measuring surface is an 8mm cylindrical surface, the
correction can be worked out when the measuring hardness
value is 60HRC.
It is easy to find when the hardness value is 60HRC, the
correction of 6mm and 10mm is 1.5 and 1.0, so 1.25 could be
recognized as the correction pf 8mm cylindrical surface.
g. The minimum of the test sample thickness should be more
than ten times of the depth of indentation. After test, the back
of the test material should has no visible deformation traces.
And the relationship of the test sample minimum thickness
and hardness value could be found as per below form:
Maintenance
4.1 Keep clean and away from dust, corrosion and rust in daily
work or after using the hardness tester.
4.2 Be careful when install or take off the indenter, and grease is
also needed if not used for a long time, keep it well.
4.3 The stage and the hardness standard block should be clean,
flat, or any no scratch, paint some antirust grease before store.
4.4 The lifting screw should be lubricated regularly. The detail
operation: take off the stage and the case of screw, paint some
antirust grease on the screw, then rotate the lifting handwheel to
lift the screw up and down, so the grease could be uniform. At this
moment, you can put the case and stage back.
4.5 Check the indentation error and repeatability with hardness
standard block regularly. If the value out of range, need to check
if any wrong with the hardness tester.
Attention: The surface with words marked on the hardness
standard block is the measuring surface.
HRA
HRB
HRC
Hardness value
Mini-thickness
20 30 40 50 60 70 80 90
20 30 40 50 60 70
20 30 40 50 60 70 80 90
1.6 1.4 1.2 1.0 0.8 0.6 0.4 0.2
1.6 1.4 1.2 1.0 0.8 0.6
100
3.3 3.0 2.7 2.4 2.1 1.8 1.5 1.2 0.9
Remark: the unit of mini-thickness is mm.
Hardness value
Mini-thickness
Hardness value
Mini-thickness
Table of contents
Other insize Test Equipment manuals

insize
insize ISH-MR150 User manual

insize
insize ISH-PHB User manual

insize
insize ISH-PHA User manual

insize
insize ISHB-D200 User manual

insize
insize ISR-S300 User manual

insize
insize ISHR-P151 User manual

insize
insize ISHR-D121 User manual

insize
insize ISH-BRV User manual

insize
insize IST-DCT Series User manual

insize
insize ISF-MT1K User manual


