manuals.online logo
Brands
  1. Home
  2. •
  3. Brands
  4. •
  5. Interlogix
  6. •
  7. Security System
  8. •
  9. Interlogix ZeroWire Instruction manual

Interlogix ZeroWire Instruction manual

ZeroWire Quick User Guide 1 / 4 P/N 466-2920 • REV B • ISS 21APR17
ZeroWire Quick User Guide
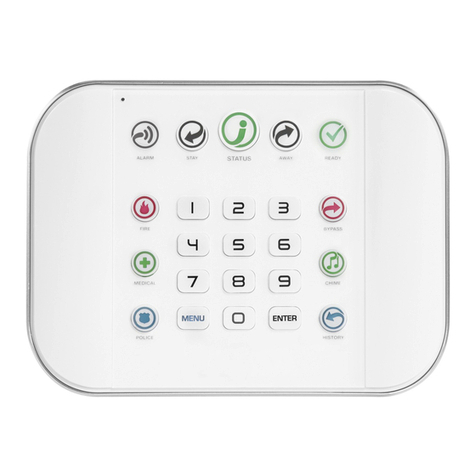
Key Colour Description

ALARM
Red System is in alarm. Enter your PIN
code then ENTER to turn off the
alarm. Press STATUS key for more
info.

STAY
Not lit System is disarmed if Away is also
not lit.
Green System is armed in the “STAY”
mode.

STATUS
Green System is ready to be armed.
Yellow System message present.
Red (steady) System trouble message present.
Touch the STATUS key to hear system messages. If
you are unable to fix the issue, contact your service
provider for help.

AWAY
Not lit System is disarmed if Stay is also
not lit.
Red System is armed in the “AWAY”
mode.

Not lit System cannot be armed, press
STATUS key for more info
Key Colour Description
READY
Green
(steady)
Your system is ready to arm in Away
or Stay mode.
Green
(flashing)
Zones are currently unsealed but
system is force-armable. If these
zones are not sealed by the end of
the exit time the system will go into
alarm.

BYPASS
Touch the BYPASS key to access the bypass menu
where you can bypass or un-bypass zones.

CHIME
Touch the CHIME key to access the chime menu
where you can select zones to make a chime sound
on the ZeroWire when they are tripped.

HISTORY
Press the HISTORY key to listen for alarm and event
history.
2 / 4 ZeroWire Quick User Guide
Displaying Status in a PD6662 system
In a PD6662 system the Status key behaviour has been
modified for greater security. It will be off or red, and not
announce system status when pressed.
To check system status and unlock the screen saver,
enter your PIN code followed by enter:
Enter your user PIN
code.
1.
STATUS
Select Status.
This action unlocks the
screen saver.
Arming in Away Mode
READY STATUS
Check ready key is
green.
Check status key is
green.
1.
AWAY
Select the Away Mode.
2.
3.
Leave the premises in
30 to 60 seconds (as
set by the installer).
4. Close the Final Set
Door.
Arming in Stay Mode
1.
STATUS
Check status key is
green. Close all
protected doors and
windows. If you have
motion detectors
outside your “stay
mode”, have everyone
leave those areas.
2.
STAY
Select the Stay Mode.
3.
4.
Stay within the
protected areas.
Arming in Instant Stay Mode
1.
STATUS
Green Flashing Green
Check status key is
green. Close all
protected doors and
windows. If you have
motion detectors outside
your “stay mode”, have
everyone leave those
areas.
2.
STAY
STAY
Select the Stay Mode
twice.
Or, press Stay button
once when system is
already in Stay Mode. In
this case, you will not be
asked second time for a
PIN code.
3.
4. Stay within the
protected areas.
5.
Final door becomes an
instant alarm zone.
Arming in Night Mode
1.
STATUS
Check status key is
green. Close all
protected doors and
windows. If you have
motion detectors outside
your “stay mode”, have
everyone leave those
areas.
2.
STAY
STAY
STAY
Select the Stay Mode
three times.
Or, press Stay button
once when system is
already in Instant Stay
Mode.
3.
4. Stay within the
protected areas.
5. Final door becomes an instant alarm zone.
Note: Subsequent presses of the Stay button loop through the
three Stay Mode states:
Stay Mode Stay Instant Mode Night Mode
STAY
STAY
STAY
Note: The 3
rd
Stay option will be available only if Engineer
configures Night mode.
USER PIN CODE
ENTER
USER PIN CODE
ENTER
EXIT DELAY BEEPS
USER PIN CODE
ENTER
EXIT DELAY BEEPS
USER PIN CODE
ENTER
EXIT DELAY BEEPS
USER PIN CODE
ENTER
EXIT DELAY BEEPS
ZeroWire Quick User Guide 3 / 4 P/N 466-2920 • REV B • ISS 21APR17
Disarming
1. Enter the premises through a designated entry/exit door.
2.
Approach the
ZeroWire. When you
are detected, the
entry warning timer
will begin and then
the ZeroWire will
beep.
3.
Enter your PIN code
before the entry
delay expires.
4. All zones are now disarmed, any bypassed zones are
restored to normal operation.
PD6662 Disarming
1. Enter the premises through a designated entry/exit door
2.
3.
OR
4.
All zones are now disarmed, any bypassed zones are
restored to normal operation.
A user shall use the Fob or the App to disarm the system.
Bypassing a Zone
1.
BYPASS
Select Bypass Menu.
2.
Enter PIN code with authority
to bypass.
3.;
Select a zone to bypass.
4.
Toggle between un-
bypassed to bypassed state.
5. Exit from Bypass Menu.
Displaying Status in a PD6662 System
In a PD6662 system, the behavior of indicators has been
modified for greater security. The ‘status’ key will be off or red
and will not announce system status when pressed.
To conform to PD6662 the system should have been installed
by the engineer as a ONE Area configuration.
1.
Enter a valid user PIN.
2.
STATUS
Select Status Key.
3.
Status condition(s) are
announced.
Acknowledging Alarms
1.
STATUS
Select Status Key.
2.
Status condition(s) are
announced.
3.
Enter a valid master
PIN.
4.
STATUS
Status Key will change
to green if no other
conditions are
present.
Note: Once a confirmed alarm has occurred, it requires an
Engineer to reset the system before it can be armed again.
Event History
1.
HISTORY
Select History Menu.
2.
Enter a valid master PIN.
3. Listen to history events.
4.
Touch ENTER for next
event.
Touch 0 for previous event.
5. Exit from History Menu.
Emergency Keys
ZeroWire has three (3) emergency keys: Medical, Police
(duress) and Fire.
In a PD6662 system, the emergency keys are disabled to
conform to the policy. They can however be used for other
purposes such as activation of scenes.
To cancel an emergency activation:
1.
Enter you code after an
emergency key has been
activated.
ENTRY DELAY BEEPS
USER PIN CODE ENTER
ENTRY DELAY BEEPS
USER FOB TO DISARM
USER APP TO DISARM
USER PIN CODE
ENTER
ZONE NUMBER
ENTER
0
MENU
USER PIN CODE
ENTER
STATUS ANNOUNCED
STATUS ANNOUNCED
USER PIN CODE
ENTER
USER PIN CODE
ENTER
2
MENU
MASTER PIN CODE
ENTER
4 / 4 ZeroWire Quick User Guide
Permitting Engineer access
1.
Enter PIN code.
2.; Press the Menu key.
3.
or
Select the option 8 or 9.
4.
Enter the Engineer code.
The Engineer can then program from the panel, and also has
access to connect via the smartphone/tablet app.
Changing a User PIN
1.
Selects User Configuration
menu.
2.
3. Selects configure user PIN.
4.
Select user number.
5.
Set user PIN code (e.g.
12345)
6.
Exits from Advanced system
configuration.
Note: Users must have unique PIN codes. If the new PIN code
you enter is the same as another user’s PIN code your
ZeroWire will announce "PIN code is occupied, select a new
user PIN code."
Main Menu
Touching the [MENU] key will give you access to main menu.
The Personal Voice Guide will prompt you through each menu
and announce what options are available.
There are 9 main features used for customizing your security
system. Some menus require a Master User PIN code to
access.
1. Volume Level
2. Backlight Level
3. User Configuration
4. System Test
5. Zone Configuration
6. Voice Message Recording
7. Detector Reset
8. Basic System Configuration
9. Advanced System Configuration
Using the UltraSync+ app
The first screen that will appear once you connect is
Arm/Disarm. Using the menu bar located along the bottom of
the app, you can program other ZeroWire settings −zones,
cameras, rooms (Z-Wave devices).
Master users will have access to the full Users menu for
creating and managing users.
When you login with the installer account, you will also have
access to additional menus for setting up and programming the
ZeroWire −Settings and Advanced.
Engineer Reset
Engineer reset required after confirmed Alarm or Panic.
To perform Engineer Reset:
• With screen saver on:
Customer Code> Enter followed by Engineer Code >
Enter.
• To perform a reset via the app:
Engineer logs into the UltraSync+ app then just presses the
Disarmed key on display.
Contact information
www.utcfireandsecurity.com
For customer support, see www.utcfssecurityproducts.eu
MASTER PIN CODE
ENTER
MENU
8
9
MASTER PIN CODE
ENTER
MENU 3
MASTER PIN CODE
ENTER
1
USER NUMBER
ENTER
1 2 3
4 5
ENTER
MENU MENU
MENU

Other manuals for ZeroWire

4

Other Interlogix Security System manuals
Interlogix Simon XT User manual

Interlogix

Interlogix Simon XT User manual

Interlogix Simon XT User manual

Interlogix

Interlogix Simon XT User manual

Interlogix AS502 Assembly instructions

Interlogix

Interlogix AS502 Assembly instructions

Interlogix Caddx User manual

Interlogix

Interlogix Caddx User manual

Interlogix Learn Mode Water Resistant Pendant Panic... User manual

Interlogix

Interlogix Learn Mode Water Resistant Pendant Panic... User manual

Interlogix ATS1235 Assembly instructions

Interlogix

Interlogix ATS1235 Assembly instructions

Interlogix DC108 Series Assembly instructions

Interlogix

Interlogix DC108 Series Assembly instructions

Interlogix Simon XT User manual

Interlogix

Interlogix Simon XT User manual

Interlogix ZEROWIRE ZW-6404 User manual

Interlogix

Interlogix ZEROWIRE ZW-6404 User manual

Interlogix Advent User manual

Interlogix

Interlogix Advent User manual

Interlogix advisorone Assembly instructions

Interlogix

Interlogix advisorone Assembly instructions

Interlogix ZeroWire User manual

Interlogix

Interlogix ZeroWire User manual

Interlogix AS272 Assembly instructions

Interlogix

Interlogix AS272 Assembly instructions

Interlogix ITI Simon User manual

Interlogix

Interlogix ITI Simon User manual

Interlogix advisorone User guide

Interlogix

Interlogix advisorone User guide

Interlogix Simon XT User manual

Interlogix

Interlogix Simon XT User manual

Interlogix UltraView UVC-6120-1 User manual

Interlogix

Interlogix UltraView UVC-6120-1 User manual

Interlogix ACL805SUW-BS User manual

Interlogix

Interlogix ACL805SUW-BS User manual

Interlogix TX-7211-05-1 Assembly instructions

Interlogix

Interlogix TX-7211-05-1 Assembly instructions

Interlogix Simon XTi-5 Version 2 User manual
Interlogix

Interlogix Simon XTi-5 Version 2 User manual

Interlogix Alliance system User manual

Interlogix

Interlogix Alliance system User manual

Interlogix xgen Operating instructions

Interlogix

Interlogix xgen Operating instructions

Interlogix NX-595E User manual

Interlogix

Interlogix NX-595E User manual

Interlogix Simon 3 User manual

Interlogix

Interlogix Simon 3 User manual
Popular Security System manuals by other brands

Lorex L23WD SERIES Quick setup guide

Lorex

Lorex L23WD SERIES Quick setup guide

ITC VA-6000 Series Operation manual

ITC

ITC VA-6000 Series Operation manual

CASTLE EURO user manual

CASTLE

CASTLE EURO user manual

Bpt YAP/300 US Instructions for use and installation

Bpt

Bpt YAP/300 US Instructions for use and installation

Aico Ei3018 instruction manual

Aico

Aico Ei3018 instruction manual

NAPCO Freedom F-64 Brochure & specs

NAPCO

NAPCO Freedom F-64 Brochure & specs

HumanTechnik Signolux manual

HumanTechnik

HumanTechnik Signolux manual

Western Digital ReadyView WDBULT0020HWT-HESN user manual

Western Digital

Western Digital ReadyView WDBULT0020HWT-HESN user manual

Elk 319KF1 quick start guide

Elk

Elk 319KF1 quick start guide

Eaton i-on16 installation guide

Eaton

Eaton i-on16 installation guide

Lorex L19LD800 Series instruction manual

Lorex

Lorex L19LD800 Series instruction manual

HumanTechnik Signolux Operation instructions

HumanTechnik

HumanTechnik Signolux Operation instructions

Gemini 932IT Installation and user guide

Gemini

Gemini 932IT Installation and user guide

DSW EAS-202 manual

DSW

DSW EAS-202 manual

Radionics D7212 owner's manual

Radionics

Radionics D7212 owner's manual

Yale SV-4C-2ABFX-2 quick guide

Yale

Yale SV-4C-2ABFX-2 quick guide

Metra Electronics Spyclops PRO MTH1295 quick start guide

Metra Electronics

Metra Electronics Spyclops PRO MTH1295 quick start guide

Bosch Plena Power Amplifier Software manual

Bosch

Bosch Plena Power Amplifier Software manual

manuals.online logo
manuals.online logoBrands
  • About & Mission
  • Contact us
  • Privacy Policy
  • Terms and Conditions

Copyright 2025 Manuals.Online. All Rights Reserved.