manuals.online logo
Brands
  1. Home
  2. •
  3. Brands
  4. •
  5. Intermec
  6. •
  7. Docking Station
  8. •
  9. Intermec D5020 User manual

Intermec D5020 User manual

MyriadMMMyriadMM
D5020
Communications
Dock
Instructions
D5020 Communications Dock Instructions
*068976-003*
*068976-003*
Corporate Headquarters
6001 36th Avenue West
Everett,Washington 98203
tel 425.348.2600
fax 425.355.9551
www.intermec.com
MyriadMMMyriadMM
2
Intermec Technologies Corporation
6001 36th Avenue West
Everett, WA 98203
U.S. service and technical support: 1-800-755-5505
U.S. media supplies ordering information: 1-800-227-9947
Canadian service and technical support: 1-800-668-7043
Canadian media supplies ordering information: 1-800-268-6936
Outside U.S.A. and Canada: Contact your local Intermec service supplier.
The information contained herein is proprietary and is provided solely for
the purpose of allowing customers to operate and/or service Intermec
manufactured equipment and is not to be released, reproduced, or used for
any other purpose without written permission of Intermec.
Information and specifications in this manual are subject to change
without notice.
2002 by Intermec Technologies Corporation
All Rights Reserved
The word Intermec, the Intermec logo, Data Collection PC, INCA
(under license), MobileLAN, JANUS, IRL, Trakker Antares, EZBuilder, TE
2000, Data Collection Browser, dcBrowser, Universal Access Point, UAP,
Duratherm, EasyCoder, Precision Print, PrintSet, Virtual Wedge, and
CrossBar are either trademarks or registered trademarks of Intermec.
Throughout this manual, trademarked names may be used. Rather than put
a trademark (or ) symbol in every occurrence of a trademarked name,
we state that we are using the names only in an editorial fashion, and to
the benefit of the trademark owner, with no intention of infringement.
11
MyriadMMMyriadMM
3
Learning About the D5020
The D5020 Communications Dock is an accessory for the Intermec 5020 or
5023 (502X) Data Collection PC™. Use the communications dock to
•transfer data and applications to and from another device using IrDA
or RS-232 serial communications.
•charge the 502X batteries.
There are two models of the D5020 dock:
•D5020 IrDA communications dock
•D5020 RS-232 communications dock
Communications Dock Parts and Functions
Use this illustration to locate the important parts of the D5020 dock:
1Fast charge battery slot Charges a battery pack in under 3 hours.
2Battery status light Indicates the charging status of the battery
pack in the fast charge battery slot.
3Power status light Indicates the power and connection status.
4Communications status light Indicates data transfer between the
502X and the host.
For information on what the status lights indicate, see “Understanding the
Status Lights”later in this guide.
5020CDIS.001
2
1
3
4
10
•Inspect the contacts on the dock and the 502X for proper alignment.
•Clean the optical interface windows on both the 502X and the dock.
Optical
interface
window
5020CDI001.eps
•Clean the contacts on the dock and the 502X using a cotton swab and
isopropyl alcohol.
Physical and Environmental Specifications
Electrical requirements: 85 to 264 VAC
43 to 63 Hz
Serial interface: 9-pin RS-232 null-modem cable
(Part No. 070268)
Optical interface: 1 IR receiver, 1 IR transmitter
Interface speeds: up to 115200 baud
Operating environment:
Charging temperature: 0°C to 40°C (32°F to 104°F)
Operating temperature: -20°C to 50°C (-4°F to 122°F)
Humidity: 0 to 95%, non-condensing
Storage environment:
Temperature: -20°C to 70°C (-4°F to 158°F)
Humidity: 0 to 95%, non-condensing
Warning
To prevent fire or electric shock, do not expose the D5020
to rain or moisture.
Avertissement
Pour éviter des risques d’incendie ou de choc électrique, ne
pas exposer le D5020 à la pluie ou à l’humidité.
MyriadMMMyriadMM
4
Power Cords, Cables, and Accessories
You need the following equipment to use the D5020 dock:
•AC power cord (see the next section)
•IR transceiver for the D5020 IrDA communications dock
Or, Intermec null-modem cable (Part No. 070268) for the D5020 RS-232
communications dock
•(Optional) D5020 Ganging Jumper Kit (Part No. 069600) to connect
multiple docks
Each of these accessories is ordered and purchased separately. For help,
contact your Intermec sales representative.
Ordering Power Cords
The AC power cord is ordered separately. If you are using the D5020
Ganging Jumper Kit (Part No. 069600), order one power cord for every
five docks. Otherwise, order one power cord for every dock.
Country Part Number
Chile and Italy 586282
South Pacific 586281
Denmark and Greenland 586283
Europe 586267
Liechtenstein and Switzerland 586276
North America and Central America 586105
United Kingdom 586266
Connecting Multiple Docks
The D5020 Ganging Jumper Kit (Part No. 069600) is ordered separately.
The kit contains four ganging jumpers, four clips, and an instruction
sheet. The ganging jumper links the power between multiple docks and
the clip connects the docks together. You use the ganging jumper and
clips to power up to five docks with one power cord.
9
Charging the 502X Batteries
You can use the dock to charge the 502X main battery pack. You can
charge the battery pack while it is inside the 502X or you can charge an
extra main battery pack in the fast charge battery slot. You should always
have a charged main battery pack in the 502X to prevent the loss of data.
Method of Charging Battery Pack Time to Fully Charge
Inside the 502X ≤15 hours
In the fast charge battery slot ≤4 hours
Use only Intermec battery pack Part No. 068537 in the fast charge battery
slot. For help on charging the bridge battery, see the 5020 Data
Collection PC User’s Manual (Part No. 068975) or the 5023 Data
Collection PC User’s Manual (Part No. 070698).
Troubleshooting
If you are unable to establish a good connection with the 502X and the
green Power status light is not lit, you may need to:
•Set the same serial or IrDA port parameters for the 502X and the serial
or IrDA device.
•Be sure you have the correct Intermec cable (Part No. 070268) for the
serial communications dock.
•Ensure that the electrical outlet has power.
•Insert the 502X firmly in the dock.
•Connect the dock to AC power.
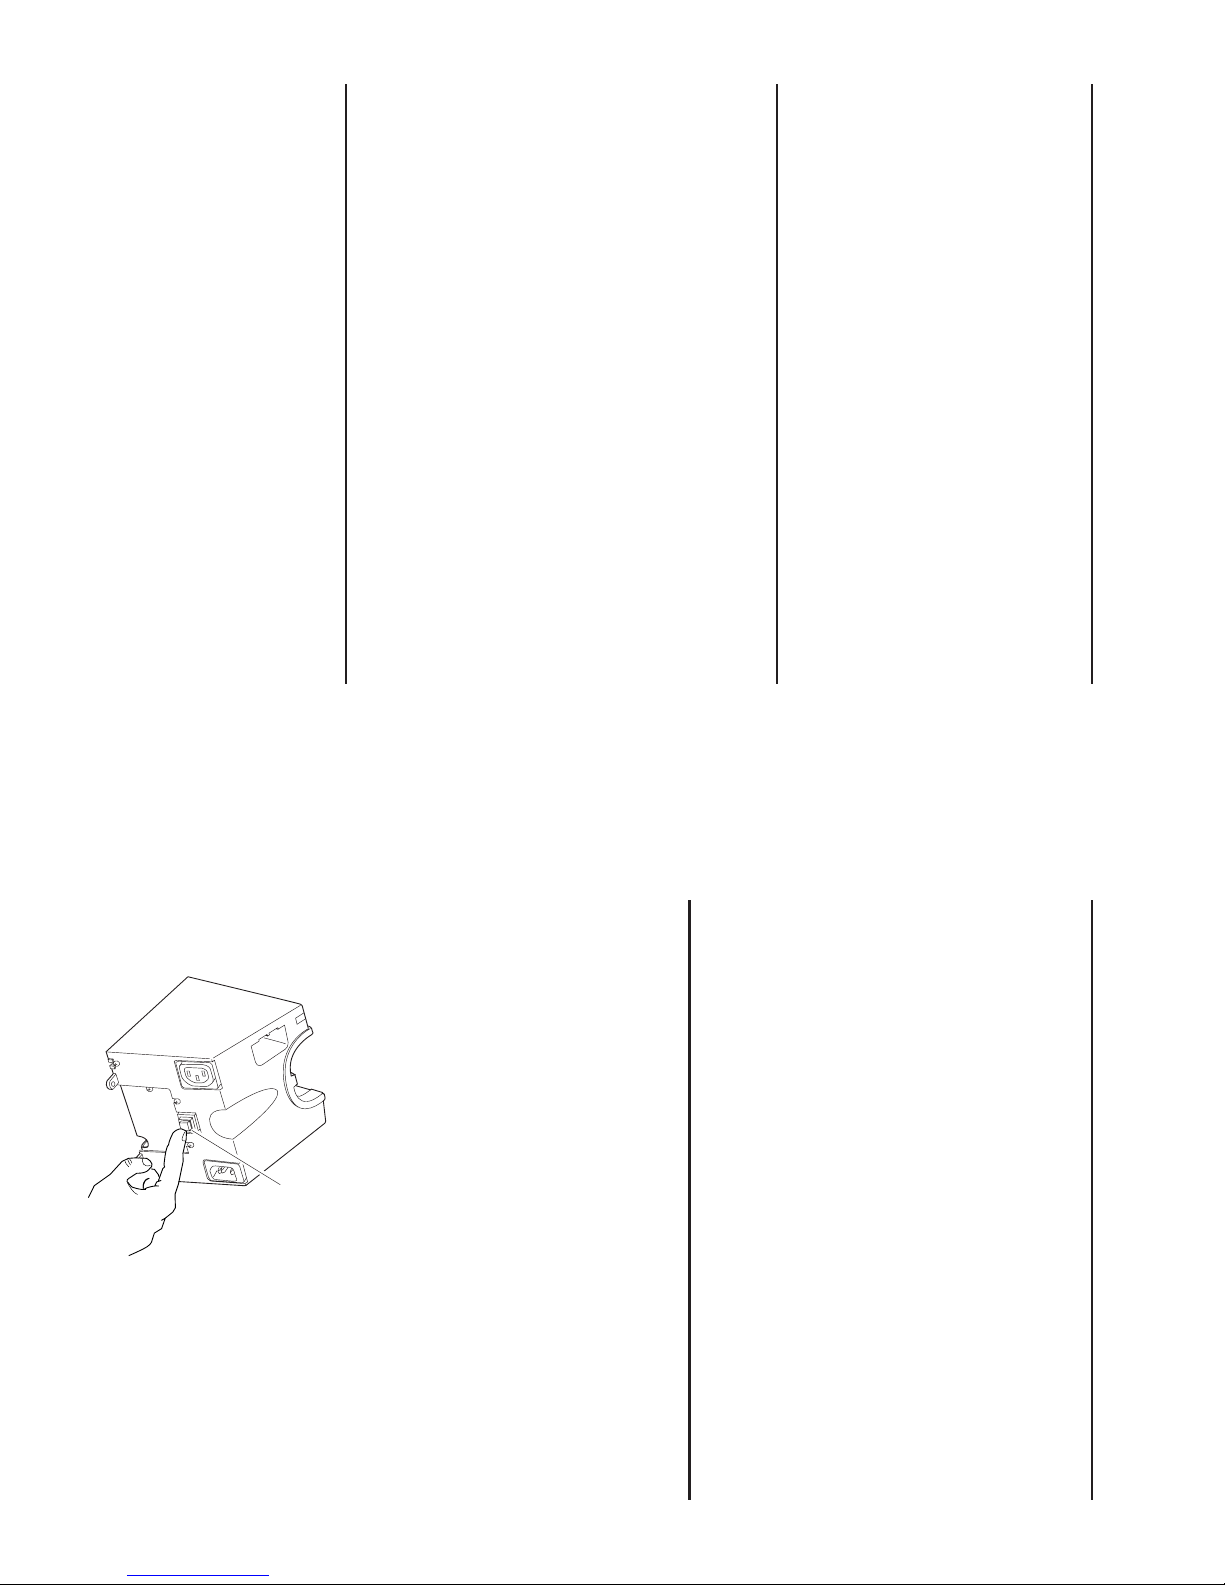
•Verify that the circuit breaker on the back of the dock is pushed in.
Circuit
breaker
5020CDIS002.eps
MyriadMMMyriadMM
5
Setting Up the Communications Dock
Before setting up the communications dock, you need to choose a flat,
stable, and clean surface that is within 1.5 m (5 ft) of an electrical source.
Setting up the dock involves these tasks:
•Setting up the dock for communications (RS-232 or IrDA).
•Inserting the 502X into the dock.
Setting Up the RS-232 Communications Dock
You need to use an Intermec null-modem cable (Part No. 070268, sold
separately) for RS-232 communications.
To set up the dock for RS-232 communications
1. Insert the 9-pin RS-232 connector into the COM port on the underside
of the dock. Route the cable under the dock and out the back.
2. Connect the other end of the cable to a serial device.
To device
5020CDIS.005
RS-232
connector
COM port
Front mounting
hole
Rear mounting
hole (2 places)
Cable routing
channel
8
Inserting the 502X into the Dock
After you have connected power and
communications cables, you are ready to
insert the 502X into the dock and start using
it. You can insert a 502X with a handstrap
attached.
Note: You must have a battery pack
installed in the 502X for all operations.
To use the communications dock
1. Place the 502X on the cradle surface of
the dock and slide it into the dock.
If the Power status light is green, the
502X has a good connection to the dock.
2. Press Bto turn on the 502X.
3. Start your application on the 502X or on
the desktop computer.
If the Communications status light is
flashing green, data is being transmitted
and received.
Understanding the Status Lights
The D5020 has three status lights to indicate the current status. For help
finding each status light, see “Communications Dock Parts and Functions”
earlier in this guide.
Status Light State Indicates
Communications Flashing green Data is being transferred.
Battery Flashing green Battery pack is charging.
Green Battery pack is charged.
Flashing red Battery pack is bad.
Power Amber Power is connected.
Green Good connection with the 502X.
5020CDIS.003
MyriadMMMyriadMM
6
3. Connect the power cord to the power connector on the back side of
the dock. Connect the other end of the power cord to an AC outlet.
Power
connector
Power
cord
5020CDIS.008
4. You can secure the dock to a flat surface using the two rear mounting
holes and two #8 pan head screws (not provided). Do not overtighten.
You can also secure the front of the dock for extra stability. Insert a
#8-32 pan head screw (not provided) through the mounting surface
and into the front mounting hole on the underside of the dock. Make
sure the screw does not extend into the dock more than 1.27 cm
(0.5 in) into the dock. Do not overtighten.
Setting Up the IrDA Communications Dock
The IrDA dock does not ship with an IR transceiver. You need to
purchase at least one IR transceiver for IrDA communications.
To set up the dock for IrDA communications
1. Connect the power cord to the power connector on the back side of
the dock. Connect the other end of the power cord to an AC outlet.
2. Connect the IR transceiver to your host computer or device.
3. Position the IR transceiver 7.6 to 10.2 cm (3 to 4 in) from the IrDA
port on the back of the dock.
7
Setting Up the IrDA Communications Dock
5020CDIS015.eps
IrDA port
IR transceiver
Rear mounting
hole (2 places)
Power
cord
Power
connector
Note: If you use the D5020 Ganging Jumper Kit (Part No.
069600) to connect several IrDA docks together, you need to
position the IrDA transceiver behind the dock with which you
want to communicate.
4. You can secure the dock to a flat surface using the two rear mounting
holes and two #8 pan head screws (not provided). Do not
overtighten.
You can also secure the front of the dock for extra stability. Insert a
#8-32 pan head screw (not provided) through the mounting surface
and into the front mounting hole on the underside of the dock. Make
sure the screw does not extend into the dock more than 1.27 cm
(0.5 in) into the dock. Do not overtighten.

Other Intermec Docking Station manuals

Intermec PEN*KEY 6400 User manual

Intermec

Intermec PEN*KEY 6400 User manual

Intermec 6640 User manual

Intermec

Intermec 6640 User manual

Intermec D5020 Quick start guide

Intermec

Intermec D5020 Quick start guide

Intermec AV6 User manual

Intermec

Intermec AV6 User manual

Intermec FlexDock User manual

Intermec

Intermec FlexDock User manual

Intermec AV8 User manual

Intermec

Intermec AV8 User manual

Intermec AV10 User manual

Intermec

Intermec AV10 User manual

Intermec CN3 Series User manual

Intermec

Intermec CN3 Series User manual

Intermec CN2 User manual

Intermec

Intermec CN2 User manual

Intermec CN3 Series User manual

Intermec

Intermec CN3 Series User manual

Intermec AD10 Manual

Intermec

Intermec AD10 Manual

Intermec AD1 User manual

Intermec

Intermec AD1 User manual

Intermec FlexDock DX1 User manual

Intermec

Intermec FlexDock DX1 User manual

Intermec CN2A User manual

Intermec

Intermec CN2A User manual

Intermec AD10 User manual

Intermec

Intermec AD10 User manual

Intermec FlexDock DX1 User manual

Intermec

Intermec FlexDock DX1 User manual

Intermec AD24 User manual

Intermec

Intermec AD24 User manual

Intermec CH50 User manual

Intermec

Intermec CH50 User manual

Intermec FlexDock DX2 User manual

Intermec

Intermec FlexDock DX2 User manual

Intermec AD8 User manual

Intermec

Intermec AD8 User manual

Intermec CK60 Ethernet Multidock User manual

Intermec

Intermec CK60 Ethernet Multidock User manual

Intermec FlexDock DX1 User manual

Intermec

Intermec FlexDock DX1 User manual

Intermec AD3 Manual

Intermec

Intermec AD3 Manual

Intermec CN3 Series User manual

Intermec

Intermec CN3 Series User manual

Popular Docking Station manuals by other brands

Clas Ohlson 39-1271 quick start guide

Clas Ohlson

Clas Ohlson 39-1271 quick start guide

Logic3 MIP108 instruction manual

Logic3

Logic3 MIP108 instruction manual

Lutron Electronics launchport am.2 manual

Lutron Electronics

Lutron Electronics launchport am.2 manual

Sony RDP-M15iP operating instructions

Sony

Sony RDP-M15iP operating instructions

Ewent EW7011 user manual

Ewent

Ewent EW7011 user manual

Channel Vision iBus AB-311 instructions

Channel Vision

Channel Vision iBus AB-311 instructions

Kitsound escape user manual

Kitsound

Kitsound escape user manual

Targus USB-C DISPLAYPORT ALT MODE DOCKING STATION WITH 85W POWER... user guide

Targus

Targus USB-C DISPLAYPORT ALT MODE DOCKING STATION WITH 85W POWER... user guide

StarTech.com USB3SMDOCKV quick start guide

StarTech.com

StarTech.com USB3SMDOCKV quick start guide

Conrad Wii operating instructions

Conrad

Conrad Wii operating instructions

Asus ADSU001 quick start guide

Asus

Asus ADSU001 quick start guide

Jensen JiMS 220 - Docking Digital Music System owner's manual

Jensen

Jensen JiMS 220 - Docking Digital Music System owner's manual

Pyle PHSCI20B manual

Pyle

Pyle PHSCI20B manual

Yamaha PDX-31 owner's manual

Yamaha

Yamaha PDX-31 owner's manual

Philips AJ300DB Specifications

Philips

Philips AJ300DB Specifications

IOGear GUD3C11 quick start guide

IOGear

IOGear GUD3C11 quick start guide

iHome iD7 instruction manual

iHome

iHome iD7 instruction manual

SIIG AV-GM0AL3-S1 manual

SIIG

SIIG AV-GM0AL3-S1 manual

manuals.online logo
manuals.online logoBrands
  • About & Mission
  • Contact us
  • Privacy Policy
  • Terms and Conditions

Copyright 2025 Manuals.Online. All Rights Reserved.