manuals.online logo
Brands
  1. Home
  2. •
  3. Brands
  4. •
  5. Ironmaster
  6. •
  7. Fitness Equipment
  8. •
  9. Ironmaster Super Bench PRO Quick reference guide

Ironmaster Super Bench PRO Quick reference guide

Assembly & Operating Instructions
Ironmaster Super Bench PRO
Congratulations on your purchase of this fine Ironmaster product. Be sure to read and understand the
operating instructions to achieve the best performance and avoid injury.
1x Ironmaster Emblem
4x M12 x 100mm Hex Bolts
4x M12 Nylock nuts
8x M12 Washers
NOTE:
2x 19mm box wrench or Ratchet
wrench (Not included) required
for assembly
2x Super Bench Foot
Bolt Pack Contents:
1x Incline Seat
1x Super Bench frame
Box Contents:
1x Bolt Pack
and Ironmaster
Emblem
Bench Main Pad
1x Instruction manual (Not Shown)
Description:
This adjustable exercise bench is designed to be used for dumbbell training, in a rack or cage for barbell training, or with
many various optional attachments. It is a heavy duty multi use bench with 11 angle positions and includes a removable
incline seat. Some tools are required for assembly as indicated in the following steps. The maximum load capacity
including the user is 1000 LBS/450 KGS in the flat position and 600 LBS/270 KGS when tilted or the incline seat is used.
Incline Seat shown on bench Incline Seat
Assembly:
1. Remove contents from box. Find bolt pack.
2. Install foot while bench is upside down for convenience
but do not tighten. 2x M12 x 100mm bolts 4x M12
Washers and 2x Nylock Nuts.
3. Repeat process with opposite foot. Do not tighten.
NOTE: Foot with Wheels can be mounted on either
side according to preference, but the standard posi-
tion is as shown in Manual.
4. Turn Super bench upright with feet on the floor before
tightening bolts. Tighten bolts on level surface only to
assure the bench is level. Bolt tension of 30ft lbs recom-
mended.—Do not overtighten which may cause leveling
issues.
5. Remove adhesive backing from Ironmaster Emblem and
install as shown in desired location.
NOTE: Assembly requires 2x 19mm wrenches (Not
included).
Operation:
Be sure the locking lever enters the locking ring notches completely before using the bench. To adjust, lift the locking
lever and move the bench to any of the 11 desired angles and lock lever into position. The incline seat simply plugs in
from the side into position. There are three choices of plug ins available to best match height/comfort of user.
CAUTION: Keep fingers clear of locking lever where it engages with the locking ring.
CAUTION: Make sure locking lever seats completely into any of the 11
positions within the locking ring. Failure to locate properly my result in the
locking lever slipping out of position during use. If the locking ring cannot
locate correctly please see troubleshoting. Should these adjustments fail
to solve the problem, discontinue use and contact Ironmaster for
further assistance.
The Super Bench can be set to 11 angles: 0, 5, 10, 20, 30, 40, 50, 60, 70, 80, and 85 degrees.
Tighten securely once
both feet are installed
M12 Washer and M12
Nylock Nut on inside of
frame
Install M12 X100mm bolt
and M12 Washer from
outside
LOCKING LEVER
LOCKING LEVER LOCKING LEVER
100mm Bolt
12mm Nylock Nut
Washers
For further details regarding the Super Bench, operation, use with accessories, tutorials and
video links, please visit our website at www.ironmaster.com
First, locate the Pull pin at the front of
the frame under the main bench pad.
To operate, Loosen the THREADED
KNOB (if needed), then pull PULL PIN
until attachment can slide in and lock
into position. Use the THREADED
KNOB to tighten the attachment for
added security.
Using the Super Bench PRO with accessories:
The Ironmaster Super Bench PRO is designed to accommodate an array of attachment (Note only Ironmaster attach-
ments are to be used with the Super Bench PRO). Located at the front of the Super Bench PRO is the receiver tube
which will accommodate most Ironmaster attachments (except the Leg attachment , which will uses a
Leg Attachment designed specifically for the lower bench height of the Ironmaster Super Bench PRO).
WARNING: Never under any circumstances use any of the Super Bench accessories with either a faulty or missing
pull pin in conjunction with the Super Bench. Serious injury could occur.
If the Pull pin fails to operate correctly or for any reason, fails to locate properly with the Ironmaster accessory,
discontinue use and contact your nearest dealer.
Specific installation instructions for the various Ironmaster accessories can be found in the User manuals provided
with each Ironmaster accessory.
THREADED KNOB Unscrew until
accessory can slide into receiver
then tighten to secure attachment as
shown
Pull head of PULL PIN to allow the
accessories to be installed as
shown.
Install the attachment into the re-
ceiver tube until you hear an audible
‘click’ as the Pull pin barrel locks the
accessory into position.
Once the accessory is located, re-
tighten the THREADED KNOB by
turning clockwise until snug as
shown
Simply pull Pin outward to
allow attachments to slide
into receiver tube
PULL PIN
THREADED KNOB
Receiver
tube
CAUTION: Although the PULL PIN is spring loaded and a positive lock,
it is nevertheless recommended that the THREADED KNOB be
tightened firmly while any accessories are being used with the Super
Bench.
Check foot bolts regularly and tighten
as needed. Only use the Ironmaster
Step bench on a level non skid surface.
Failure to tighten bolts adequately will
result in a wobbly bench.
Excessive sweat and moisture can
cause damage to paint, finish and
upholstery. Regular cleaning after
workouts will significantly improve the
condition of your bench as well as
extend longevity.
Maintenance and Troubleshooting:
The Super Bench PRO is of very robust construction and will provide many years of trouble-free operation. For best
performance, please follow these simple steps for maintenance and increased product longevity.
1. Make sure to check and tighten (if needed) the four foot bolts on a regular basis. If bolts are discovered to be
loose, do not use the bench until bolts are retightened to approx 30 ft lbs.
2. The main pivot bolt needs to be checked on occasion. If this bolt loosens over time, the bench will not feel as sol-
id. You will require 2x 19mm wrenches to tighten this bolt. However, use care, if over-tightened the bench will not
function properly as the seat deck frame will be unable to rotate freely to sit into the lower frame and therefore it
will be difficult to bring the bench back to a full prone position.
3. Lubrication—yearly or as needed. The portion of the frame where the upper frame and lower frame meet is pre-
lubricated from the factory with a generous amount of grease. Over time, this can become dirty/dried out and lead
to premature rubbing/wear. If lubricant is overly dirty or dried out, wipe the area clean with a dry cloth and re-
lubricate the area with a light general grease where the seat frame base and lower frame meet when the bench
seat is down. Also use a sparing amount of general purpose grease or oil on the locking lever area contact points
(after cleaning).
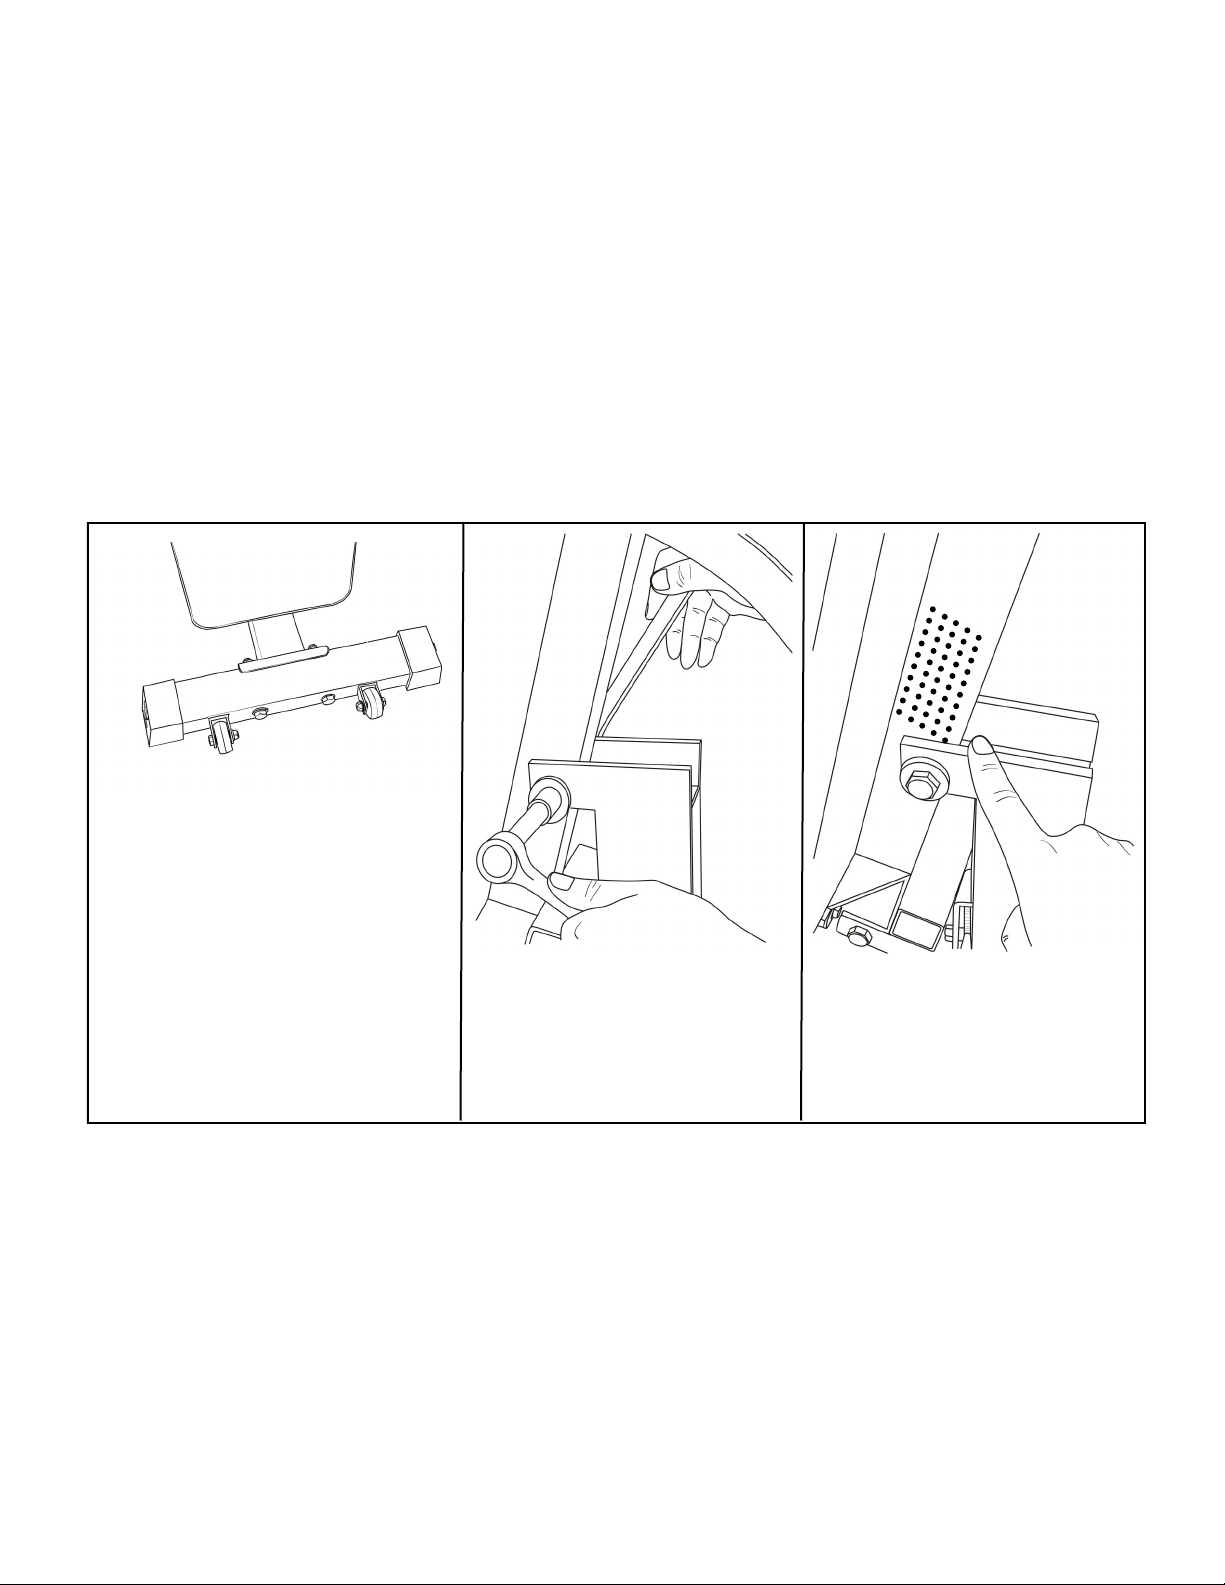
The pivot bolt needs to be checked
periodically. If seat has a slight side
to side movement, tighten until
movement ceases. Do not over
tighten as it will impede movement.
Check for adequate lubrication
where the bottom of the seat frame
meets the lower frame as shown.
Use a light general grease in both
the pivot area and lever locking
mechanism (not pictured)
Warranty Information:
Ironmaster warrants to the original purchaser that this Home Fitness Product will be free from defects in workmanship and materials for a specific peri-
od from date of purchase based on the part type listed below. During the warranty period, Ironmaster will either repair or replace, at its option, defec-
tive part(s) at no charge. Warranty covers in home use only.
1 year for normal wear items such as rubber, upholstered parts and surface finishes.
10 years for frame and structural components.
Shipping costs are not included in the warranty and some items may need to be sent to Ironmaster for repair or replacement. Installation of any parts
and labor involved is not included. The warranties described above shall be the sole and exclusive remedy available to the purchaser. Correction of
defects, in the manner and for the period of time described above, shall constitute complete fulfillment of all liabilities and responsibilities of Ironmaster
to the purchaser with respect to the product, and shall constitute full satisfaction of all claims, whether based on contract, negligence, strict liability or
otherwise. In no event shall Ironmaster be liable or in any other way responsible for damages or defects in the product which were caused by repairs
or attempted repairs performed by anyone other than Ironmaster or Authorized service Contractor. This warranty shall not apply if the defect was
caused by misuse, neglect or normal wear and tear of the product purchased. Nor shall Ironmaster be liable or in any way responsible for any inci-
dental or consequential economic or property damage. Some states do not allow the exclusion of incidental or consequential damage, so the above
exclusion may not apply to you.
For customer service, contact your local distributor or:
Ironmaster LLC,14562 167th Ave SE Monroe, WA 98272 USA
Web site: www.ironmaster.com Email: [email protected]m Tel: 800-533-3339 or 1-360-217-7780

Other Ironmaster Fitness Equipment manuals

Ironmaster IM2000 Quick reference guide

Ironmaster

Ironmaster IM2000 Quick reference guide

Ironmaster Pec Dec Quick setup guide

Ironmaster

Ironmaster Pec Dec Quick setup guide

Ironmaster Quick-Lock Kettlebell User manual

Ironmaster

Ironmaster Quick-Lock Kettlebell User manual

Ironmaster Cable Tower Quick setup guide

Ironmaster

Ironmaster Cable Tower Quick setup guide

Ironmaster HYBRID BENCH PAD Quick reference guide

Ironmaster

Ironmaster HYBRID BENCH PAD Quick reference guide

Ironmaster PRO Stand Quick reference guide

Ironmaster

Ironmaster PRO Stand Quick reference guide

Ironmaster Hyper Core Attachment Quick reference guide

Ironmaster

Ironmaster Hyper Core Attachment Quick reference guide

Ironmaster Quick-Lock User manual

Ironmaster

Ironmaster Quick-Lock User manual

Ironmaster Leg Attachment for SuperBench Quick reference guide

Ironmaster

Ironmaster Leg Attachment for SuperBench Quick reference guide

Ironmaster Cable Tower Attachment Quick setup guide

Ironmaster

Ironmaster Cable Tower Attachment Quick setup guide

Ironmaster Quick-Lock Dumbells User manual

Ironmaster

Ironmaster Quick-Lock Dumbells User manual

Ironmaster Spotting Stand User manual

Ironmaster

Ironmaster Spotting Stand User manual

Ironmaster Leg Attachment Quick reference guide

Ironmaster

Ironmaster Leg Attachment Quick reference guide

Ironmaster IM1500 Quick setup guide

Ironmaster

Ironmaster IM1500 Quick setup guide

Ironmaster Quick-Lock Ultimate Training Vest User manual

Ironmaster

Ironmaster Quick-Lock Ultimate Training Vest User manual

Popular Fitness Equipment manuals by other brands

Impex Marcy MWB-60205 owner's manual

Impex

Impex Marcy MWB-60205 owner's manual

AMPLITRAIN AmpliCube user manual

AMPLITRAIN

AMPLITRAIN AmpliCube user manual

Matrix VARSITY Series manual

Matrix

Matrix VARSITY Series manual

BLUEFIN Fitness BLADE AQUA M-1 instruction manual

BLUEFIN Fitness

BLUEFIN Fitness BLADE AQUA M-1 instruction manual

stilum lixus Mounting instructions

stilum

stilum lixus Mounting instructions

Digi 1st T-5020 quick start guide

Digi 1st

Digi 1st T-5020 quick start guide

CalGym CG-7503 owner's guide

CalGym

CalGym CG-7503 owner's guide

Barbarian line POWER-CAGE Construction manual

Barbarian line

Barbarian line POWER-CAGE Construction manual

Pivot 450 OWB owner's manual

Pivot

Pivot 450 OWB owner's manual

York Fitness G500 owner's manual

York Fitness

York Fitness G500 owner's manual

Cortex MF420 user manual

Cortex

Cortex MF420 user manual

TOGU CHALLENGE DISC 2.0 instruction manual

TOGU

TOGU CHALLENGE DISC 2.0 instruction manual

Stairmaster TwistLock Dumbbell owner's manual

Stairmaster

Stairmaster TwistLock Dumbbell owner's manual

SpeedFun FURIOUS Use and Assembly Instructions

SpeedFun

SpeedFun FURIOUS Use and Assembly Instructions

Marcy SM–4008 Exercise guide

Marcy

Marcy SM–4008 Exercise guide

Batca LINK LD-4 owner's manual

Batca

Batca LINK LD-4 owner's manual

Domyos Domyos STEP 160 operating instructions

Domyos

Domyos Domyos STEP 160 operating instructions

SA Sport 135 quick start guide

SA Sport

SA Sport 135 quick start guide

manuals.online logo
manuals.online logoBrands
  • About & Mission
  • Contact us
  • Privacy Policy
  • Terms and Conditions

Copyright 2025 Manuals.Online. All Rights Reserved.