ISDT P20 User manual

用户手册
P20双通道
智能充电器
2S 8S
2S 8S
SMART
CHARGER
P20
DC IN
CH1
CH2

欢迎您登陆艾斯特官方网站www.isdt.co了解更多智能平衡充电器功能,购买丰富相关配件。
由于产品功能的不断更新,您手中的说明书可能会与实际操作有所出入。请以实际智能平衡充电器功能为准。
感谢您购买ISDT P20 智能平衡充电器。
警告与安全提示
不要在无人值守的情况下使用充电器,如充电器出现任何功能异常,请立即终止使用并对照说明书查阅原因;
确保充电器远离灰尘、潮湿、雨和高温,避免阳光直射及强烈震动;
请将充电器放置于耐热、不易燃及绝缘的表面。不要放置在车座、地毯等类似的地方使用。
请确保易燃、易爆炸物品远离充电器的操作区域;
确保您已充分了解所使用电池的充放电特性及规格,并在充电器中设置恰当的充电参数。
如参数设定错误,可能对充电器及电池造成损坏,甚至发生火灾、爆炸等灾难性后果。
•
•
•
•
为确保您的安全和良好的用户体验,请在使用本产品前阅读本说明和警告。
使用过程中确保本产品远离热源及潮湿环境,并注意通风散热;
本产品工作过程中将产生大量热量,切勿让儿童操作,以免烫伤;使用结束后,应尽快断开及移除电池。
㫨蟇瞐瑧䯋
㙬鶯"
接入电池前请确保电池电压与本产品工作电压范围相符;
工作过程中请确保选择的串数与接入电池串数一致。
型号:P20
输入电压范围:DC 10~34V
输出电压范围:DC 1~34V
最大输入电流:35A
充电电流:0.2~20A ×2
放电电流:0.2~1.5A ×2
平衡电流:1.5A/Cell Max
最大放电功率:15W ×2
最大充电功率:500W ×2
直流电源:2~30V/1~5A
支持电池类型及串数:LiFe,LiIon,LiPo 1~8S;LiHv 1~7S;Pb 1~12S;NiMH/Cd 1~16S
产品规格
并行充电功率及电流:800W/35A
并行放电功率及电流:30W/3A
工作温度:0~40℃
存储温度:-20~60℃
电池电压异常报警:支持
串数设定错误报警:支持
尺寸:105×105×47mm
重量:约350g

接口 / 按键
按键操作说明(待机界面下)
CH1菜单键:短按进入CH1详细参数界面,长按进入CH1任务设置菜单。
CH2菜单键:短按进入CH2详细参数界面,长按进入CH2任务设置菜单。
同时长按CH1和CH2菜单键:进入高级设置菜单。
SMART
CHARGER
P20
风扇散热口
USB-C升级口 电源输入口
CH1
平衡口 显示屏
通道选择键
及方向键
CH1电池
输出口
CH2
平衡口
CH2电池
输出口

在充电前必须先了解清楚所用电池允许的最大充电电流,使用过大的电流对电池充电会对电池的寿命造成
影响甚至损坏,过大的电流也会造成充电过程中电池发热甚至爆炸。电池充放电能力一般以C数来标识,
充电C数乘以电池容量就是电池所支持的最大充电电流,例如1000mAh的电池,标识充电能力是5C,那么
最大充电电流为:1000×5=5000mA=5A,也就是最大支持5A充电。对于锂电池而言,如果无法确定电池
充电C数,为了安全起见请将充电电流设定在不大于1C的值。
充电C数与充电时间的参考关系:充电时间≧60分钟/充电C数(例如使用1C充电,充电完成时间大约需要
60~70分钟),由于电池转换能效的差异,此时间有可能会有所延长。
如何确定充电电流
充电器预设电池类型及任务参数
NiCd/MH
Pb
LiFe
Lilon
LiPo
LiHv
额定
电压
1.20V
2.00V
3.20V
3.60V
3.70V
3.80V
满充
电压
1.40V
2.40V
3.65V
4.10V
4.20V
4.35V
存储
电压
3.30V
3.70V
3.80V
3.85V
放电
电压
1.10V
1.90V
2.90V
3.20V
3.30V
3.40V
平衡充 非
平衡充
支持
串数
1~16S
1~12S
1-8S
1~8S
1~8S
1~7S
最大充
电电流
20.0A
20.0A
20.0A
20.0A
20.0A
20.0A
将充电器与电源连接上电,连接好电池,长按对应通道菜单键进入任务设定菜单,菜单项如下:
任务设定
任务
电池类型
电池串数
电流设置
充电,放电,存储,销毁电池
LiHv、LiPo、LiIon、LiFe、Pb、NiMh/Cd
LiFe,LiIon,LiPo (1~8S) ; LiHv (1~7S) ; Pb (1~12S) ; NiMH/Cd (1~16S)
0.2~20A

充电
对于锂电池,强烈建议连接平衡端口均衡充电,以确保充电器能准确监测每个电池的电压,并对不一致的电
芯进行平衡操作。当使用非平衡模式(不连接电池平衡口)充电时,充电器在开始任务前会有相应的报警提示。
电流设定范围为0.2~20A。当连接BattGo电池时,电池类型、串数以及充电电流根据BattGo信息自动设定。
放电
电流设定范围为0.2~1.5A。当连接BattGo电池时,电池类型、串数以及放电电流根据BattGo信息自动设定。
存储
电流设定范围为0.2~20A。当连接BattGo电池时,电池类型、串数以及存储电流根据BattGo信息自动设定。
销毁电池
连接需要报废的电池,在任务选项中选择报废功能,可将电池放电至0V。
电流设定范围为0.2~1.5A。当连接BattGo电池时,电池类型和串数根据BattGo信息自动设定。
工作参数显示
工作中用方向键可以切换屏幕下半部分的信息显示内容,信息内容依次为:各电芯电压、各电芯内阻、
BattGo信息、SmartPower信息、工作参数。其中电芯电压及内阻仅在平衡充电模式下才会显示。
连接BattGo电池才会显示BattGo信息,且在不连接平衡口的情况下也可显示各电芯电压。
待机界面下,同时长按左右两边通道菜单键进入高级设置菜单,菜单项如下:
并行任务状态
高级设定
并行任务选择
选择该项,可将整机最大功率输出在一个电池上。
需使用一根一分二的电源线,一端连接电池,
另外两端连接充电器的电池输出口。
电池平衡口连接在充电器任一平衡口即可。
将充电器接通电源,并按要求接上电池,
在高级设置菜单中选择该项进行并行任务参数设置。
并行充电电流设定范围为 20~35A。
并行放电电流设定范围为 1.5~3A。

高级设置菜单下,选择系统设置进入系统设置菜单,菜单项如下:
系统设置
最低输入电压
该项可设置最低输入电压限制值。当使用电池作为输入电源时,此项设定可以保护电池不会过放。当充电器
检测到输入电压低于设定值,将立即停止所有在执行任务并提示输入电压过低。设定范围10~31V。
最大输入功率
该项可设置最大输入功率限制值。当连接的输入电源达不到充电器的最大工作功率(800W)要求时,为了
保护输入电源以及使充电器稳定工作,需根据电源的实际输出能力设定此参数。设定范围为100~1100W。
BattGo
当对应接口(CH1输出、CH2输出、电源输入)连接BattGo电池时,可通过此项查阅及修改BattGo电池参数。
主题
选择该项,可设置背景色为明亮/暗黑。
持续涓流
该项可选择充电完成后是否继续进行涓流充电,涓流充电功能开启可以维持锂电池电压处于满充状态。
本功能默认开启。
音量
音量设置有高、中、低及关闭四个选项。当设定为“关”时,将关闭操作提示声,但不关闭错误提示声。
自动分屏
自动分屏设置有60秒、30秒及关闭三个选项。可选择在设定时间内,主界面显示由单通道参数界面自动
切换至双通道(分屏)参数界面。亦可选择“关”,将自动分屏功能关闭。
双通道任务选择
选择该项,充电器将以相同参数对两个通道下的电池同时进行充电/放电/存储。将充电器接通电源并接上
电池,在高级设置菜单中选择该项进行双通道任务参数设置。
直流电源
选择该项,充电器的CH1将成为一个直流电源。输出电压为2~30V可调,电流为1.0~5.0A可调。

*本产品所有图片、声明及文字资料仅供参考,实际信息请参考官方网站 www.isdt.co 。
深圳艾斯特创新科技有限公司拥有对本说明书内容的最终解释权和修改权。
402P2000000
系统自检
在移除CH1及CH2所有电池连接后,选择该项进行系统自检操作。
校准
选择该项,可校准充电器的输入电压,输出电压和平衡口电压。
www.isdt.co

USER GUIDE
P20 DUAL CHANNEL
SMART CHARGER
2S 8S
2S 8S
SMART
CHARGER
P20
DC IN
CH1
CH2

Never use the charger without supervision, please stop using the charger and refer to the manual for
reasons if any functional abnormity.
Keep the charger away from dust, humidity, rain and high temperature, as well as avoid direct exposure
to the sunlight and intense vibration.
Place the charger on a heat-resisting, non-flammable and insulating surface.
Do not use it on the car’s seats, carpet or other similar places.
Keep inflammable and explosive objects away from operation areas of the charger.
Read the instruction manual carefully to be familiar with the features of the charger,
and set proper charging parameters before operating. Setting the parameters incorrectly will
result in damage to the product, personal property and cause serious injury as well.
Warnings and Safety Tips
•
•
•
•
For your safety and a better user experience,
please read this manual and follow the instruction before using the new charger.
Please visit: www.isdt.co for more details on the functions of this smart charger,
as well as purchase various accessories. Functions of products will be kept on upgrading,
the manual in your hand may be different from the actual operation, please refer to the actual functions.
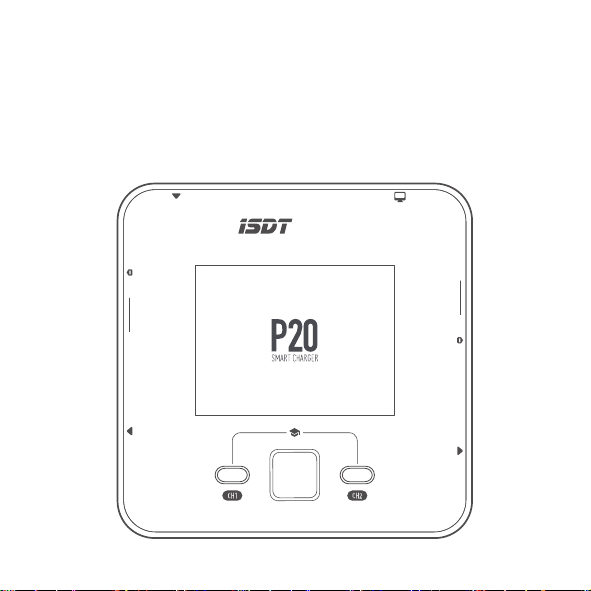
Thanks for purchasing the ISDT P20 Smart Charger.
Model No: P20
Input voltage: DC 10~34V
Output voltage: DC 1~34V
Max. input current: 35A
Charging current: 0.2~20A ×2
Discharging current: 0.2~1.5A ×2
Balance current: 1.5A/Cell Max
Max. discharging power: 15W ×2
Max. charging power: 500W ×2
DC power supply: 2~30V/1~5A
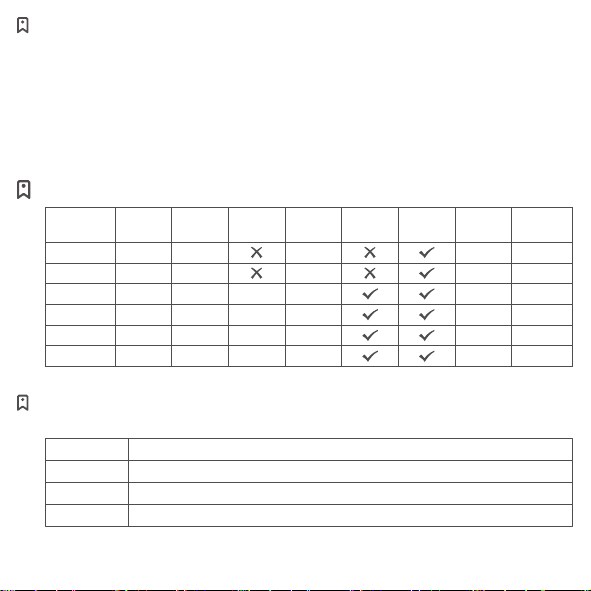
Supported battery types and cell count: LiFe,LiIon,LiPo 1~8S;LiHv 1~7S;Pb 1~12S;NiMH/Cd 1~16S
Specifications
Parallel charging power/current: 800W/35A
Parallel discharging power/current: 30W/3A
Working temperature: 0~40℃
Storage temperature: -20~60℃
Abnormal voltage alarm: Support
Incorrect cell count setting alarm: Support
Dimension: 105×105×47mm
Weight: About 350g

Port / Button
Key operation instructions (under standby interface)
CH1 Channel selection button: Short press to enter the CH1 detailed parameter interface,
Long press to enter the CH1 task setting menu.
CH2 Channel selection button: Short press to enter the CH2 detailed parameter interface,
Long press to enter the CH2 task setting menu.
Long press the CH1 and CH2 button at the same time: Enter the advanced settings menu.
SMART
CHARGER
P20
Fan Vent
CH1
Balance Port
Display
Screen
Channel Selection
Button &
Direction
Button
CH1 Power
Output
CH2
Balance Port
CH2 Power
Output
USB-C Upgrading Port Power Input

Make sure to know the maximum charging current of the battery before charging, never use excessive current
to charge to damage your battery, which will result in over heat even explosion during the charging process.
The charging and discharging capacity of battery is usually marked with C value. Multiplying the charging C
value and battery capacity equals to the maximum charging current supported by the battery. For example,
for a 1000 mAh battery with a charging capacity of 5C, the maximum charging current would be 1000*5=
5000mA; therefore, the maximum charging current is 5A. For a lithium battery, if it is impossible to confirm
the supported charging C value, please set the charging current below 1C, for the sake of its (lithium battery)
safety. The reference relation between C value and charging time: charging time ≥60 minutes/ charging C
value (e.g. it needs around 60-70 minutes to complete charging with 1C).
Due to differences in battery conversion efficiency, the time to complete the charging might be extended.
How to Confirm Charging Current
Preset Battery Type of Charger and Task Parameters
Balance
Charge
Unbalanced
Charge
NiCd/MH
Pb
LiFe
Lilon
LiPo
LiHv
Rated
Voltage
1.20V
2.00V
3.20V
3.60V
3.70V
3.80V
Full Charge
Voltage
1.40V
2.40V
3.65V
4.10V
4.20V
4.35V
Storage
Voltage
3.30V
3.70V
3.80V
3.85V
Discharge
Voltage
1.10V
1.90V
2.90V
3.20V
3.30V
3.40V
Supported
Cell Count
1~16S
1~12S
1-8S
1~8S
1~8S
1~7S
Max. Charging
Current
20.0A
20.0A
20.0A
20.0A
20.0A
20.0A
Power on smart charger, connect the battery,
and long press the corresponding channel selection button to enter the task setting menu as follows:
Operating the Charger
Task
Battery
Battery and cell count
Current
Charge, Discharge, Destroy, DC power supply, Storage
LiHv、LiPo、LiIon、LiFe、Pb、NiMh/Cd
LiFe,LiIon,LiPo (1~8S) ; LiHv (1~7S) ; Pb (1~12S) ; NiMH/Cd (1~16S)
0.2~20A

Charge
Balancing port is strongly recommended when charging lipo battery, which can make sure to monitor
voltage on each cell battery and balance it when charging. Warning beeper will yell before start charging
lipo if in non-balance mode (no connecting with balance port).
Current setting range: 0.2~20A. The battery type, cell count and charging current are auto set
accordingly when connecting with BattGo battery.
Discharge
Current setting range: 0.2~1.5A. The battery type, cell count and discharging current are auto set
accordingly when connecting with BattGo battery.
Storage
Current setting range: 0.2~20A. The battery type, cell count and storage current are auto set
accordingly when connecting with BattGo battery.
Destroy
Connect the battery to be scrapped, and select the scrap function in task options, which capable to
discharge the battery to 0V. Current setting range: 0.2~1.5A.
The battery type and cell count are are auto set accordingly when connecting with BattGo battery.
Charging Screen
Press the direction button to shift the charging information, as cell voltage, cell internal resistance,
BattGo information, working parameter. The cell voltage and internal resistance are only on display
in balancing charging mode.The BattGo information will be displayed only when connected to the
BattGo battery, and the cell voltage is able to be displayed without connected to the balance port.
Under the standby interface, long press the CH1 and CH2 button at the same time to enter the
advanced setting menu.
Advanced Settings
Dual task
Select this setting,the charger will charge/discharge/store to the two channel batteries with the same
parameters at the same time. Connect the charger with the power supply and power on,
select this setting on the advanced setting menu to set the task parameters.

Under the advanced setting menu, select the system setting into the system setting menu as follows:
System Setting Menu
Min. input voltage protection: 10~31V
All tasks in operation will be stopped at once and hint warning of low voltage,
when the input voltage is lower than the input voltage as set up.
It will protect the battery from being discharged when using battery pack as power supply.
Max. input power setting: 100~1100W
If the input power is smaller than the max working power(800W), please set up the parameter as the
actual output power as max input, to protect the input power and enable the charger to work stable.
BattGo
When the corresponding channel (CH1 output,CH2 output,Power input) connect to a BattGo battery,
you could read this and modify the related parameters of Battgo battery.
Volume
There are 4 options of High Mid Low and Off for volume setting.When the setting is OFF,
it will turn off the operation sound,but not the warning error beep.
Parallel charging
Paralled task
Select this setting, it could output Max Power
to one battery. Find a power splitter or 1/2
power cord, one end connect with the battery,
and the other two ends connect with the
battery output port. The battery balance port
could connect with any of the charger's balance
port. Connect the charger with the power supply
and power on, and connect your battery as required,
select this setting on the advanced setting menu to
set the task parameters.
DC power (CH1)
The charger CH1 is equivalent to a DC power supply when selecting this function, with output voltage
adjustable from 2 to 30V, and current adjustable from 1.0 to 5.0A.

*All product photos, statements and literature are for reference only.
For up-to-date information, please visit our official web www.isdt.co
SHENZHEN ISD TECHNOLOGY CO. LTD reserves the right of final explanation and revision for the terms.
402P2000000
Theme
Select this option to set the background color to bright/dark.
Continuous trickle
After charging is complete, choose whether to continue trickle charging. The trickle charge function is
enabled to maintain the lithium battery voltage in a fully charged state, this function is enabled by default.
Split screen
There are 3 options of 60 seconds,30 seconds and OFF for automatic split screen setting. You can
choose to switch the display of the main interface from the single-channel parameter interface to
Dual channel (split screen) parameter interface.
You can also select "Off" to turn off the automatic split screen function.
Self-test
When all batteries on CH1 and CH2 port are not connected,
please select this option to self-test task manually.
Calibration:
The input voltage, output voltage and balance voltage of the charger can be calibrated with this task.
Table of contents
Other ISDT Batteries Charger manuals