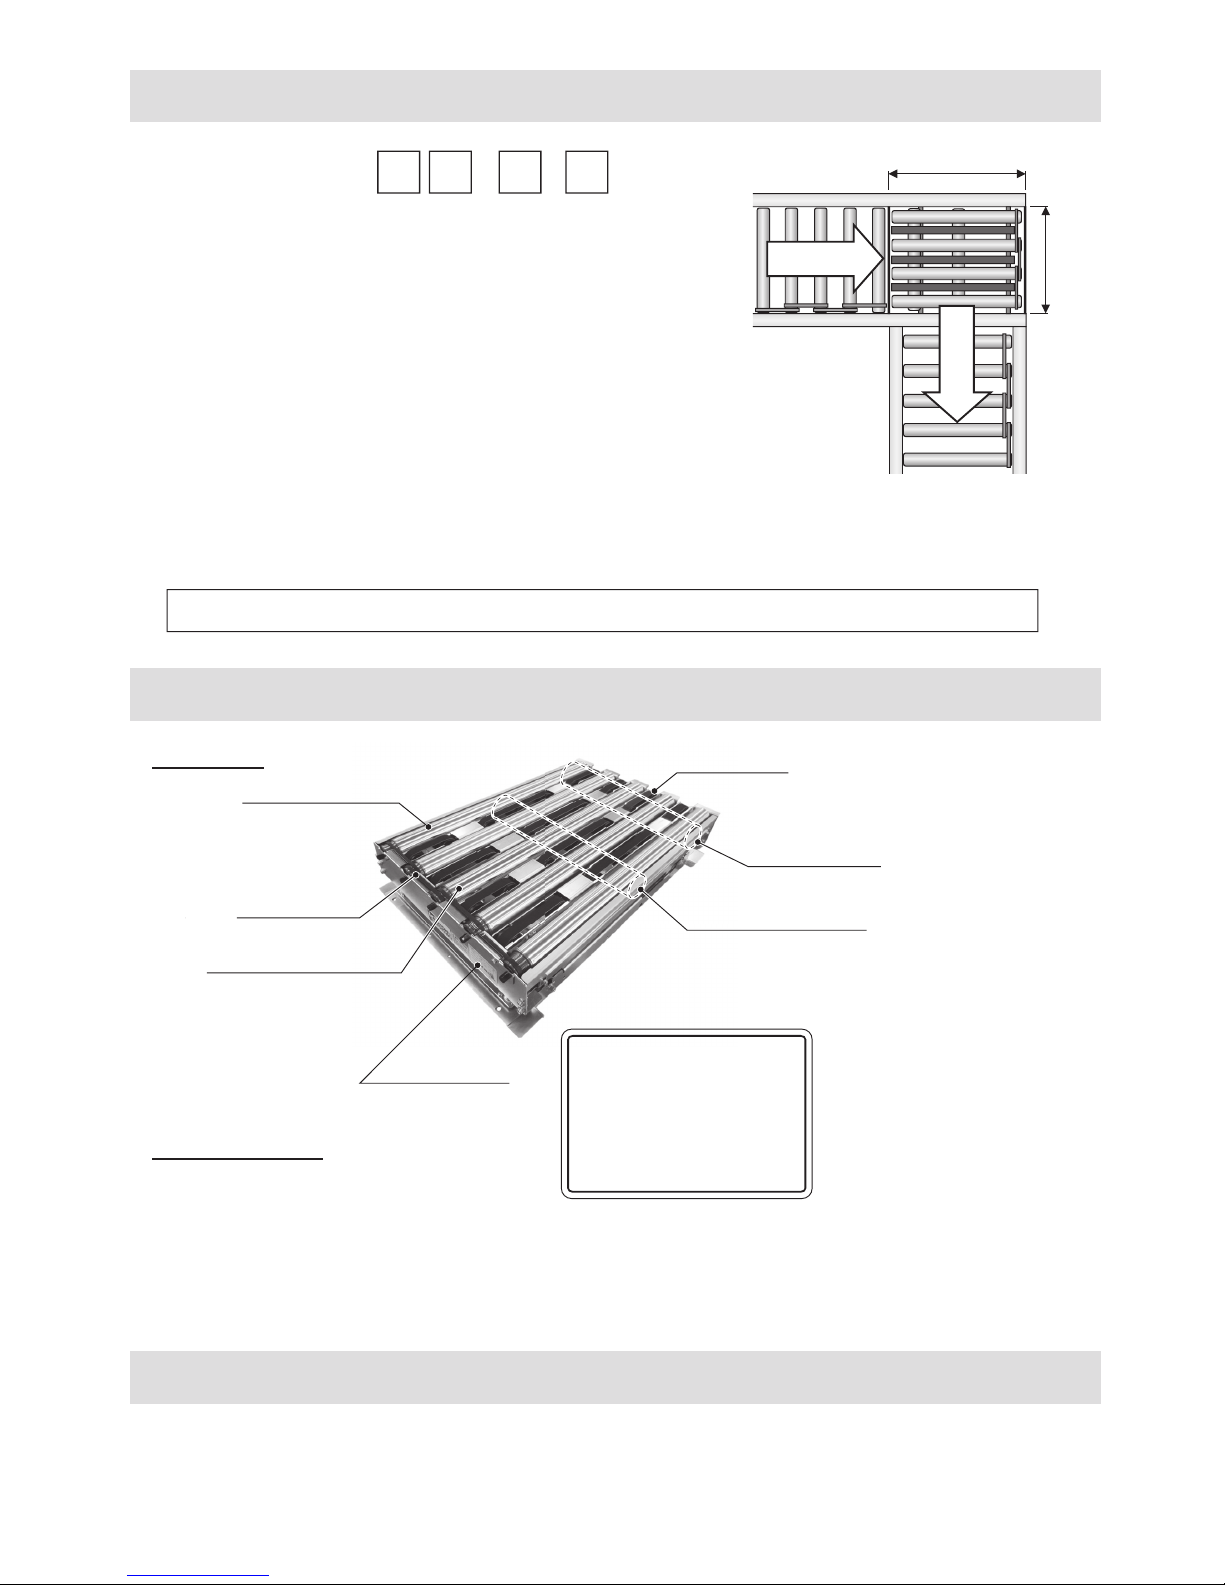
ITOH DENKI F-RAT-S300 Series User manual

F-RAT-S300
F-RAT-S300
Flat-Right Angle Transfer
No.474
1.
2.
3.
4.
5.
6.
7.
8.
Appendix1.
Appendix2.
P1
P2
P2
P2
P3 〜P5
P5 〜P10
P11 〜P14
P15 〜P16
P17 〜P18
P19
INDEX
ITOH DENKI CO.,LTD.
User Manual
Thank you for purchasing Flat Right Angle Transfer unit.
●Before using the product, carefully read this manual and retain it for future reference.
●Make sure whether the product you received complies to your purchased order, with its
designation, specification and operating voltage.
●Photo and drawing on this manual is Size B for explanations.
Important safeguards
Product designation
Structure
Power supply
Dimensions
Installation and Operation
Maintenance
Product specification
CBR-305F□Detail
Remaining Risks List/MAP
・・・・・・・・・・・
・・・・・・・・・・・・
・・・・・・・・・・・・・・・・・・
・・・・・・・・・・・・・・・
・・・・・・・・・・・・・・・・
・・・・・・・・・
・・・・・・・・・・・・・・・・
・・・・・・・・・・・
・・・・・・・
・・・

- 1 -
Do not step on the product or apply a load. It may lead to a failure or unexpected accident.
Do not touch the mechanism by hand during operation. The hand may be caught by the mechanism and injured.
Do not absolutely modify the F-RAT or the driver card. Serious injury may be caused.
Do not forcibly bend or pull the wire. Do not put a heavy item on the wire or pinch the wire. The cord may break and cause fire or
electrical shock.
To avoid a failure or electrical shock, ground the DC power supply or driver card to the conveyor frame.
Do not touch the equipment immediately after stopping. It may cause kin burn.
Do not splash water on the equipment. Electrical shock or failure may be caused.
Do not apply a strong impact or excessive force such as hitting the equipment or dropping an object. Do not use the equipment
after it is impacted or deformed. It may cause a failure.
When abnormal sound is heard during motion, stop the operation. Continued operation may cause an accident or failure.
Do not use the equipment by exceeding the specification. It may cause a failure, fire or injury.
Do not carry out operation of transfer, connection, maintenance inspection (except maintenance inspection to be performed
during operation). Switch off the power before operation.
Comply with the safety rules required for the location and equipment to be used.
Some type of driver card failure may make the input/output ON condition or OFF condition. Apply an external monitoring circuit for
the input/output signal that may lead to an injury or property damage.
Connect or disconnect a connector when the power is shut off. Do not perform wiring with the connector inserted in the driver card.
Securely attach the connector of each connecting cable to the connection point.
Incorrect wiring may cause a failure. Carefully check the wiring.
Do apply excessive force for operating the DIP switch.
Do not perform on/off operation of a relay or connector near the power line, signal line, or driver card. That may cause malfunction by
noise.
When LED circuit or Pull-up/Pull-down circuit is connected to the output circuit, unexpected operation may occur.
Apply power ON in the order of external controller→driver card. Perform power OFF in the order of driver card→External controller.
Incorrect order may cause malfunction.
Cutting the power disables electrical braking control, and the roller becomes easy to be rotated.
Do not pull out a cable during operation. It may cause a failure.
Do not forcibly rotate MDR except during maintenance inspection. That may cause driver card breakage or make the operation life
extremely short.
Do not shut off the power during MDR rotation. It may cause a failure.
Do not apply power while riding on the conveyor or while a tray is unstable condition. MDR rotation immediately after power ON
may cause injury, accident or breakage.
When error occurs frequently, remove the cause.
When disposing the equipment, make a consignment contract with an authorized industrial waste processing company for disposal.
Incorrect work or use may lead to light or medium-level injuries and/or property damages.
Comply with the following warning and perform the work correctly.
●
●
●
●
●
●
●
●
●
●
●
●
●
●
●
●
●
●
●
●
●
●
●
●
●
●
●
1.General Cautions
Warning & Caution
1 - 3.About Risk Category of this System
1 - 1.Basic Warning
Shown below are the caution items for using the product safely and avoiding danger and damage to the user.
Caution items can be classified into danger, warning and caution as described below.
Danger
Warning
Caution
The most serious danger with possibility of death or serious injury.
Incorrect handling may lead to death or serious injury, indicating potential danger.
Possible danger of light or medium injury, or only a material damage.
Warning
Warning
Incorrect handling may lead to death or serious injury, indicating potential danger.
Comply with the following warning and perform the work correctly.
About Risk Category of this System
……For your safety, please comply with them.
●
●
●
This equipment intends to comply with risk category 2 or below in EN 954-1. It does not comply with risk category 3
or higher.
●
1 - 2.Basic Cautions
Caution
Be sure to comply with all of the caution items and instructions contained in this safety manual.
To avoid functional deterioration, unexpected accident or product failure, check the operation according to this manual.
Do not use the product in an explosive, flammable or corrosive atmosphere, or near flammable material.
It may cause explosion, fire, electrical shock or injury.

FLATRIGHTANGLETRANSFER
PAYLOAD:max kg
SERIALNo.
RATEDINPUT:DC24V,A
ITOHDENKICO.,LTD
MADEINJAPAN
F
−
RAT
−
S300
−
−
−
F-RAT-S300-- -
① ② ③ ④
- 2 -
L
W
①② ③ ④
⑤
⑥
⑦⑧⑨⑩
Example : F - RAT - S300 - 17N - B - S1 Speed 17 m/min, NPN signal type, W 497 x L 758 mm, S1type
3. Structure
2. Product designation
■F-RAT
■Accessories
①Speed
17 …17 m/min (Belt / Roller transfer : 17 m/min)
60 …60 m/min (Belt / Roller transfer : 60 m/min)
90 …90 m/min (Belt / Roller transfer : 90 m/min)
②Signal type selection
N …NPN signal type (NPN proximity sensor / driver card included)
P …PNP signal type (PNP proximity sensor / driver card included)
③Size
④Type
A…W379mm×L758mm
B…W497mm×L758mm
C…W597mm×L758mm
D…W697mm×L758mm
S1
Belt transfer
Roller transfer
Transfer belt
MDR for belt transfer
MDR for roller transfer
V-ribbed belt
Product label
Idler for transfer
MDR for lifting
Label detail
①Speed type ②Signal type
③Size ④Type
⑤MDR rated current
⑥Max load weight
⑦⑧⑨Serial NO; YY/MM/DD
⑩Lot No
●F-RAT mounting hardware
●Standard driver card :
MDR for roller transfer / belt transfer ; CB-016N ×2 or CB-016P ×2
MDR for lifting ; CBR-305FN-B or CBR-305FP-B
*The other driver cards are also available as option.
●Proximity NPN sensor or Proximity PNP sensor
・ 4 sets of M8-20 bolt / M8 nut
4.Power supply
Supplied power must be a stabilized power supply of 24VDC, 5A or higher without fluctuation by load.
In addition, the power supply should not activate protection with peak current 20A, 1ms or below.
※
24VDC Battery
●
Switching power supply(24VDC・5A 120W)
●
Rectified power(With a rectifying capacitor, ripple rate 10% or below)
●

758
734
13
94
282=P94x3
379
252
9994
88
758
734
13
100
400=P100×4
9610496 100
370
497
- 3 -
145.6
170
145.6
170
5. Dimensions
■F-RAT
●SIZE A …W379mm×L758mm
●SIZE B …W497mm×L758mm
(Mounting hole pitch)
(Mounting face)
(Mounting face)
4-Mounting hole
Bolt with a hex.hole for M8
4-Mounting hole
Bolt witha hex. hole for M8

758
734
13
100
500=P100×5
10096104 100
470
597
96
758
734
13
100
600=P100×6
96100104 100
570
697
96100
- 4 -
145.6
170
145.6
170
●SIZE D …W697mm×L758mm
●SIZE C …W597mm×L758mm
(Mounting hole pitch)
(Mounting face)
4-Mounting hole
Bolt with a hex.hole for M8
(Mounting face)
4-Mounting hole
Bolt with a hex.hole for M8

- 5 -
●CB-016□
5
6
7
8
9
0
1
2
3
4
4.5
52
4738.5
40
4.5
120
129
VR1-ACC
VR2-DEC
STATUS/ERR/PWR
5. L/H
SPEED
6
5
4
0
1
9
8
7
2
3
1. AUTO/MANU
3. DIRECTION
2. INT/EXT
4. E/N-OUT
24V
1.RUN
3.V-IN
2.DIR
4.ERR
5.PLS
0V
CB-016□
18
23
3
Caution
Caution
6.Installation and Operation
6 - 1.Caution when Transporting
6 - 2.Caution for Unpacking
Prohibiting Impacts
・This product contains precision components such as bearing and microchip. Use caution for avoiding impacts by droppingor
collision during transportation as impacts may cause damage of such components.
●
6 - 3.Caution during Installation…Electrical
Checking the Circuit breaker
For the facility equipment using this product, check that a power breaker with appropriate capacity has been installed. In
case the product generates abnormal motions, protection by the breaker is sometimes effective.
If the earth leakage breaker is planned for use as a breaker, select a type compatible with inverter. Certain type of incompatible
ground fault interrupter causes malfunction by sensing high frequency component of switching power supply as leak current.
●
Checking the DC Power Supply
DC power supply must be an insulation type switching power supply certified by the safety standard ( IEC60950-1 or
UL60950-1 )for ensuring safety. Do not use non-insulation type series power supply for safety as well as conforming to
radiation noise restriction.
Current capacity of the DC power supply should have sufficient capacity to accommodate this product.
Current capacity of the wiring material should also provide sufficient margin to the specified current value.
●
Appearance Check
・Check the following when opening the crate.
①Abnormality on the unit such as dent, concave mark, smear, corrosion (rust), etc.
②Loose or missing screw.
Please report to the supplier when you find abnormality.
●
Avoiding injuries
●
Majority of this product is made from metal and careless handling may cause injury of hands.
Be sure to wear protective means such as gloves to avoid injury.
Avoiding injuries
●
Majority of this product is made from metal and careless handling may cause injury of hands.
Be sure to wear protective means such as gloves to avoid injury.
Handle the heavy item by two persons as a rule
●
Some product type weighs over 50kg. To protect the operators, transport the unit by two or more
persons as a rule of handling a heavy item.
・
・
・
■Accessory
*□=N(NPN input / output)
or P(PNP input / output)
●CBR-305F□-B
*□=N(NPN input / output)
or P(PNP input / output)
4.5
52
4738.5
40
4.5
120
129
4
3
2
1
0
9
8
7
6
5
SPEED
6
5
4
0
1
9
8
7
2
3
24V
1.RUN
3.V-IN
2.DIR
4.ERR
5.PLS
0V
4. E/N-OUT
2. INT/EXT
3. DIRECTION
1. AUTO/MANU
ERR/PWR
5. SV-BRK
6. N/P-OUT
VR1-ACC
VR2-DEC
M3:昇降用
CBR-305F□-B
3
23
18

- 6 -
Warning
Caution
Caution
6 - 4.Caution during Installation…Main Unit
●Installation environment
・This product is not equipped with a special dust or water proof measures, and is intended for use in "pollution level 2"
defined by IEC60664-1. For this reason, when the product is installed in the environment requiring dust or water proof
measures, the user needs to provide additional protection and check the performance.
●Main unit installation
・Perform installation operation always by two persons.
●Safety assurance
・If the warning label becomes hidden by installing the
product, reattach the warning label in a visible place.
・When performing maintenance operation, make sure the
main power is completely shut off.
・Vibration level of the environment in which this product is used must be 0.5G or below.
・Install this product with the tilt of 5/1000 or below.
・Comply with the safety rules required for the place of installation or equipment to be used.
・Secure a work space around this product for maintenance purpose.
・Use caution for motor cable or sensor cable not to be pinched by
other object.
・Do not attach the driver card on the F-RAT unit.
It may cause loose screws or other failure by vibration.
・Securely attach the unit on the frame by considering the product
weight, tray weight, and vibration.
DC power
supply
Breaker
Emergency stop switch Check if 24VDC input is surely turned
OFF/ON by using a circuit tester, etc.
Single phase
100V/200V
PE
When the DC power supply is integrated, check if the equipment breaker and emergency stop switch correctly operate.
Test operation and any further procedure should be performed after finishing this checking.
① ON/OFF operation of the breaker reliably turns ON/OFF of the input (single phase 100V, 200V) to the DC power supply unit.
② ON/OFF operation of the emergency switch reliably turns OFF/ON of the input (24VDC) to this product.
・Carefully check if these wiring would not contact any moving parts of this product.
Checking the Wiring
●
●During installation, use caution for installing direction (orientation). Be sure to use the specified
mounting holes. (Refer to 5. Dimension P.3, P.4).
Incorrect direction (orientation) or using non-specified securing holes may cause unexpected accident.
●Operator should not come close to any moving part that may hook or roll-in objects.
Provide a means for not permitting the operator to touch the moving part with a safety fence.
●To prevent any object from popping out of the area by collision, and to avoid injury by such object,
install a safety fence around the equipment.
・
This product
(Not yet connected)
Use caution for finger
being caught on both sides
Use caution for roll-in
by each belt and roller
Hold the underside of the unit

- 7 -
●
●Reference example for the mounting: In case of using a mounting stay (option), (Frame height is 160mm).
10
145.6
157.6
745
4040
170
18.6
Caution Use mounting holes for F-RAT-S installation,
otherwise it may cause a failure or accident.
MDR for belt transfer
For belt transfer
MDR for roller transfer
For roller transfer
MDR for lifting
For lifting
M1
M1
M3
M3
M2
M2
■Connection
SN・R
SN・S
CB-016□6
CBR-305F□-B
CB-016□6
M3
Lifting
SN・R
Roller
M1
Belt・
CRR.Wheel
SN・S
Belt・
CRR.Wheel
M2
Roller
●Belt transfer side sensor
●Roller transfer side sensor
BROWN:24V
PLC etc.
BLUE:0V
BLACK:out
Install MDR connector on each driver card.
※Connector attachment and detachment must be made after shutting off the power and by holding the connector.
※Securely attach each connector to the contact part.
PLC etc.
※
BROWN:24V
BLUE:0V
BLACK:out ※
※F-RAT zone sensor is not included. To be prepared by the user.
※ON at position detection,Output current max 100mA
■Installation
●F-RAT-S installation
Mounting
・Use assistance and recheck the installation precaution before starting the installation.
・Firmly mount the product in consideration of product weight, load weight and vibration.
2×4-M8(Mounting hole of the mounting stay)
4-φ8.4(Mounting hole of F-RAT-S)
〈Dedicated stay〉
(Mounting surface)
*Mounting stay is not included as standard accessory.

- 8 -
7mm
(
AWG:28~20
)
0V
7mm 0.08~0.5mm2
0.50〜1.5mm2(AWG:20〜14)
24V
1.RUN
3.V-IN
2.DIR
4.ERR
5.PLS
0V
5432121
0V
24VDC
CN2
CN1
24V
1.RUN
3.V-IN
2.DIR
4.ERR
5.PLS
0V
5432121
0V
24VDC
CN2
CN1
from PLC (0V input)
CB-016□
24VDC 24VDC
0V 0V
SN・S
SN・R
Y0 X0
Y1 X1
Y2 X2
Y3 X3
Y4 X4
M1
M3
M2
from PLC(0V input)
Y5 X5
CB-016□
from PLC(24V input)
from PLC(24V input)
Input/Output type for F-RAT-S : NPN Input/Output type for F-RAT-S : PNP
MDR for
roller
transfer
RUN signal
for
downstream
zone
RUN signal
for
upstream
zone
MDR for
belt
transfer
In-coming
signal
RUN signal
RUN signal
RUN signal
DIR signal
MDR for
lifting
Output Input
Proximity sensor
for
belt transfer
Proximity sensor
for
roller transfer
Product sensor
signal at
downstream zone
Product sensor
signal at
upstream zone
Note) Do not drive relay with sensor output because it may cause a malfunction
of the proximity sensor.
Make sure all of wiring is correct. Otherwise, it may cause damage / a
malfunction.
CB-016N, CBR-305FN-B wiring
CBR-305F
□
or
CB-016□
CB-016P, CBR-305FP-B wiring
■Connector Wiring
①Connect 24VDC / 0V wires to the power connector < CN1(2 contacts)>.
※Do not connect any branching wire. It may cause electrical shock,
short-circuit or failure due to over capacity of the connector.
(Connector capacity:10A)
※Do not wire in reverse polarity.
※Wiring should be made before inserting the connector into the driver card.
②Connect wires to control connector < CN2(5 contacts)>.
※Input voltage supplied to CN2#1(MDR run/stop ), CN2#2(MDR rotation
direction change) must be common to the power supply voltage.
( Connector capacity :4A)
③Plug the power connector < CN1(2 contacts)>, control connector < CN2
(5 contacts)>, MDR connector <CN3> to the driver card.
※Connector attachment/detachment must be made after shutting off the
power and by holding the connector.
※Securely insert the connector to the contact part.
(Common to CB-016/CBR-305)
24VDC
Power connector (CN1)
Control connector (CN2)
Refer to the user manual of the driver card for the detailed instruction.
http://itohdenki.co.jp > english > Download Support > User Manual > CB-016
*□=N(NPN input / output)
or P(PNP input / output)
■M3 :CBR-305F□-BSwitch setting
①VR1:Minimum(Turns to CCW)
②VR2:Minimum(Turns to CCW)
③SW1:#1-ON, #2-OFF, #3-OFF, #4-OFF
#5-OFF, #6-NPN [OFF] / PNP [ON]
④SW2:9
*
●CBR-305F□-B
4
3
2
1
0
9
8
7
6
5
SPEED
6
5
4
0
1
9
8
7
2
3
24V
1.RUN
3.V-IN
2.DIR
4.ERR
5.PLS
0V
4. E/N-OUT
2. INT/EXT
3. DIRECTION
1. AUTO/MANU
ERR/PWR
5. SV-BRK
6. N/P-OUT
VR1-ACC
VR2-DEC
M3:昇降用
CBR-305F□-B
①VR1 ②VR2 ③SW1 ④SW2
*
Do not change switch and potentiometer
from factory setting.
■Wiring diagram

1 2 3 4 5
ON
OFF
ON
OFF
ON
OFF
ON
OFF
ON
OFF
ON
OFF
ON
OFF
RUN
DIR
- 9 -
Timing chart
Tray position
M1
MDR for belt transfer
M2
MDR for roller transfer
M3
MDR for lifting
SN・S
Proximity sensor
for belt transfer
SN・R
Proximity sensor
for roller transfer
P/E sensor 1
P/E sensor 2
P/E sensor 3
RUN
STOP
RUN
STOP
Response time of a control device should be within 20ms. If not, it may cause a malfunction.
*1)
Make sure that stopping time of lifting MDR should be less than 20ms after SN・S and SN・R detect.
*1)
less than 20ms*1)
less than 20ms
■F-RAT-S control
MDR for roller transfer
(M2)
MDR for belt transfer
(M1 )
MDR for lifting
(M3 )
Proximity sensor(SN・R )
Proximity sensor(SN・S )
*Make sure wiring of the proximiry
sensor is correct.
*
*
Otherwise, it may cause damage.
3
4
5
21
ON
SW1#3
OFF
DIR
DIR
CW CCW
CCW CW
12345 12345
ERR
V-IN
RUN
DIR
1234
ERR
V-IN
RUN
DIR
1234
CW CCW
CW CCW
Rotation Direction Setting
Not
connected
Connected
・MDR rotation (F-RAT transfer) direction can be changed byusing
the switch on the driver card or external switch.
(Or can be used in parallel)
・MDR rotation direction is defined as CW or clockwise direction
when viewed from the cable side, and CCW or counter-clockwise
direction.
Belt
transfer side
Roller
transfer side
M3:Lifting
Roller transfer direction
P/E sensor 1 P/E sensor 2
P/E sensor 3
Belt transfer direction
CW CCW
M2:Roller transfer direction
M1:Belt transfer direction

- 10 -
●
6 - 5.Precautions for Trial Run
●Checking the environment for permitting trial run
Trial run should be performed without trays and make sure no abnormal operation occurs.
At such time, check the following points.
①No error LED blinks on the driver card.
②No abnormal sound or high temperature is detected.
●Make sure other devices in the system do not run.
In the case of a conveyor line integrated in a system, starting signal would cause a tray to flow
down the conveyor and cause danger. Before trial run, make sure that other elements of the
system does not operate.
●
Caution
Caution Do not apply external force to tote during operation.
It may cause a problem of transfer belt deviation.
Before a trial run, make sure the wiring and driver card setting have been correctly made.
Insufficient check may lead to a damage and failure.

Leave two grooves at inside of pulley.
Leave one groove between v-ribbed belts.
Make sure that the belt at the end of pulley
does not come off.
123
- 11 -
Precautions for Maintenance and Inspection
7. Maintenance
・
・
When a damaged component is discovered, promptly replace with a new component.
・
Do not perform disassembly other than in a designated place. Unexpected accident may occur.
・
Repair/replacement operation sometimes requires turning or lifting a component. Use caution for being caught or
pinched by other parts and injured.
Safety check before maintenance and inspection
・
After maintenance / inspection, make sure the following checking before running.
① Cover is properly closed.
② All parts are attached.
●
Part repair and replacement
●
Check after maintenance and inspection
●
●In order to avoid interference by power circuit and signals, turn off the power of all connected devices.
(a)
After turning off the power switch, leave for more than 3 minutes for discharging the DC power supply.
(b)
Indicate warning to prevent other people from turning the power.
●Perform repair or replacement operations by wearing protective means such as gloves.
Working without protective means results in hand injury such as cut by metal part.
Warning
Warning
■Transfer MDR replacement
《Replacement procedure》
①Turn off F-RAT-S and then remove the motor cable of MDR for roller transfer from the driver card
(CB-016N6).
②Loosen the screws for the pulley holding plate to remove it.
③Remove the screws for the side cover, and then remove the side cover.
④Remove idlers and belts.
⑤Remove a mounting bracket and MDR paying attention to not damage on motor cable or connector.
⑥Make sure v-ribbed belts are placed in correct position as showing on fig.2. Motor cable must be fixed
with a cable tie not to contact with moving-parts.
⑦Install new MDR in the step ⑤〜① mentioned above.
①Dedicated driver card
(CB-016N6)
④Idler for transfer
③Side cover ②Pulley holding
plate
⑤Mounting bracket of MDR
for roller transfer
⑥V-ribbed belt position
Fig.1
Fig.2
1
2
3

- 12 -
・
・
Use idler wheel at ④position in the drawing for belt
tension adjustment.
*Do not adjust the idler wheel located on other side.
④
Hanging
⑤
■Transfer belt replacement
Adjust belt tension by idler wheel, and then check the
current of MDR for belt transfer.
《Replacement procedure》
Transfer speed type
17m/min, 60m/min type
90m/min type
Tension
12N
10N
Transfer speed type
17m/min, 60m/min type
90m/min type
Tension
45N
45N
17
60
90
1.5A or less
2.3A or less
3.2A or less
Speed
Code
CAUTION for transfer belt
●After tension adjustment in the steps mentioned above (See P13), current value should be as shown in the right table.
①Remove idlers for roller transfer adjoining the replaced transfer belt. (Refer to Transfer MDR replacement, P11.)
②Loosen the screws for the belt cover, and then remove the belt cover.
③Loosen the screws for idler wheel that is for belt tension adjustment. (Do not remove the screws).
Remove transfer belt.
*Remember installed position of the transfer belt.
④Install the new transfer belt, and then tighten a screw of tension adjusting idler wheel applying tension to adjust
belt tension.(Only one idler wheel per a transfer belt is used for belt tension adjustment.)
⑤Attach the belt cover to roller plate, and then tighten a bolt to fix the belt cover.
③Idler wheel for
tension adjustment MDR for belt transfer
《Belt tension adjustment with push-pull gauge》
*5.5mm pushed down
■Belt tension reference
*Use a push-pull gauge after reading the manual
provided by the manufacturer.
*Use a belt tension meter after reading the manual
provided by the manufacturer.
②Belt cover
Belt cover
Roller plate
Roller plate
②Belt cover fixing bolt
《Belt tension adjustment with belt tension meter》*Check belt tension at the right position.
(See page13)
■Belt tension reference
・After transfer belt and MDR for belt transfer replacement, make sure there
is no interference and do running test. After running test, check tension
according to the belt tension reference mentioned above.
・ Too strong tension of transfer belt may cause a malfunction because
overload is applied to MDR for belt transfer. On the other hand too loose
tension may cause decrease transfer belt’s speed.
・ The check position of belt tension depends on the plate attaching position.
(See P13)
Push the transfer belt until the belt surface
becomes the same l evel as the roller plate
and then check belt tension. See below table.
*
Current of
MDR for
belt transfer
V-ribbed belt
side
Tightening (Belt cover fixing bolt)

- 13 -
《With push-pull gauge》《With belt tension meter》
Size
A
Size
B
Size
C
Size
D
V-ribbed belt side V-ribbed belt side
*Make a measurement in 108mm-pitch between idlers wheel. *Make a measurement in 117mm-pitch between idlers wheel.
Idler wheel for tension adjustment
Idler wheel
Idler wheel for tension adjustment
Idler wheel
108mm 117mm
Checking Position of tension for transfer belt

- 14 -
A
A
B
B
■Belt transfer MDR replacement
《Replacement procedure》
①Remove the MDR and all idlers. (Refer to Transfer MDR replacement , P11.)
*Before replacing please turn off F-RAT-S and remove the motor cable of each MDR from the driver card.
③Remove nut A, B and bolt and then replace MDR for belt transfer.
④Follow steps ③to ①mentioned above to install.
①MDR for roller transfer and idlers for transfer
②Remove all belt transfer units from the belt transfer unit in the center.
*Belt transfer unit multiplier depends on F-RAT-S type’s size.
*Make sure the belt transfer unit position is right. (See the dimensional drawing, P3- 4)
*Adjust the belt tension. (See the transfer belt replacement, P12)
②Belt transfer unit
*Hex. socket head cap bolt M6×10
*Hex. socket head cap bolt M8×15
Holding plate for belt transfer MDR
Attention) Remove belt transfer units of both side with being connected
by the holding plate of MDR for belt transfer.
*Hex. nut M12
MDR for belt transfer
Attention
Attention

- 15 -
15mA or below
On when detecting the position
Outer dia.Φ3mm 0.15
m㎡
3wires
Maximum inrush current: 100mA
Applied voltage: 30V or less
(between output and 0V)
Residual voltage: 2V or less
(100mA inrush current)
■F-RAT-S ■CB-016□/ CBR-305F□-B
■Product weight
Transfer throughput
■Recommended size of transferred goods ■Maximum load weight
37.5kg
37.5kg
10kg
50kg
50kg
10kg
Current consumption
Output
Output motion
cable
Proximity sensor
for belt transfer (SN・S) /
roller transfer (SN・R)
00 20406080100
1000
2000
4000
5000
3000
Note: Size and load weight are just guidance. (This may differ by conditions of transferred goods)
8. Product specification
Product specification
Roller Diameter
Size
Height
Speed
Stroke
Power voltage
Ambient temperature
Humidity Below
Atmosphere
Vibration
Installation
φ50mm
379mm, 497mm, 597mm, 697mm
758mm
170mm
17, 60, 90m/min
10mm
24VDC
0〜40℃(No freezing)
90%RHor less(No condensation)
No corrosive gas
0.5G or less
Indoor
Width (W) Roller transfer direction
Length (L) Belt transfer direction
Weight
37kg
43kg
49kg
55kg
Transferred goods
F-RAT-S size
Size A
Size B
Size C
Size D
Size
W300 ×L300mm〜W300 ×L650mm
W300 ×L300mm〜W400 ×L650mm
W300 ×L300mm〜W500 ×L650mm
W300 ×L300mm〜W600 ×L650mm
Size A
Speed Max. load weight
*Standard motor cable length : 1500mm / Standard sensor wire length : 1000mm
F-RAT-Ssize
Size A
Size B
Size C
Size D
Size B, C, D
17
60
90
24VDC±10%
24VDC
0.03A
4.0A
0.50 〜1.5m㎡(AWG:20 〜14)
0.08 〜0.5m㎡(AWG:28 〜20)
15msec or less
Integral 6.3A fuse
Diode against miss-wiring
95℃for circuit board
105℃for motor
4.0A
0〜40℃(No freezing)
90%RH or less(No condensation)
No corrosive gas
0.5G or less
Indoor
Power voltage
Rated voltage
Static current
Starting current
Wire size
Power connector CN1
Control connector CN2
Time difference from RUN signal
to motor starting
Protections
Thermister protection
Current limitation
Ambient temperature
Humidity
Atmosphere
Vibration
Installation
*□ = N (NPN) or P (PNP)
*7A for CBR-305
*The throughput in the graph is only for reference, not guaranteed performance.
*Slug release data is based on the total control by using id LinX for controlling the conveyors before and after F-RAT-S.
*Stopping distance and throughput vary by load size, material, bottom condition and transfer speed.
Transfer rate [%]
Throughput [product / hour]
Transfer Speed of F-RAT-S: 60m/min Size: B type
Condition of transferred product: cardboard W350xL405mm / 30kg
Slug release
Singulated release
*

- 16 -
⑦Idler wheel
・F-RAT-SFL1
・Cup square neck bolt M6 x 30mm
・U nut M6
*For idler wheel installation. Need to be purchased with idler wheel.
*
*
■Replacement parts for F-RAT-S
① Transfer belt
・Flat belt : TF10 L1630 W19
■Option for F-RAT-S
③MDR for belt transfer
・For size A・PM500FE- speed code-277-D-024-JG-C150
・For size B・PM500FE- speed code-392-D-024-JG-C150
・For size C・PM500FE- speed code-492-D-024-JG-C150
・For size D・PM500FE- speed code-592-D-024-JG-C150
*Select speed from 17 (17m/min), 60 (60m/min)or 90 (90m/min) .
*Note that it’s “PM500FC-90” for 90m/min type.
②V-ribbed belt
・3PJ336 (For pitch 100mm)
・3PJ316 (For pitch 94mm) For size A
④MDR for roller transfer
・PM500FE- speed code-674-D-024-JW-C150-VG
*Select speed from 17 (17m/min), 60 (60m/min)or 90 (90m/min) .
*Note that it’s “PM500FC-90” for 90m/min type.
⑤Idler for transfer
・IDR-50-674-JH-VG for all types
⑥Driver card (Specify input and output type NPN (N) or PNP (P).)
・CB-016□(□・・・N : NPN / P : PNP)
・CBR-305F□-B (□・・・N : NPN / P : PNP)
60
L
±5
37
(Male side) (Female side)
Model Specifications
ACE-CBM-B0600
ACE-CBM-B0850
ACE-CBM-B1200
9P Extension cable 600mm long
9P Extension cable 850mm long
9P Extension cable 1200mm long
●Extension cable
●Holding plate for F-RAT-S driver card
*
*
*
*
*
*
●Mounting stay
15.5
2×2-R4.25
Bolt with a hex. hole for M8×25
24.4
12
5
5
5.2
69
14.1
50.4
4
3.2 6
4014.5
2×2-M8
Bolt with a hex. hole for M8×16
Q
S
P5
55.5
2×2-R20
F-RAT-S
size
A
B
C
D
252
370
470
570
Q(Between frame)
381 〜499
500 〜599
600 〜699
700 〜
S
Dimension(mm)
*M8 bolt / nut / flat washer / spring washer included.
Using flat washer and spring washer
Using spring washer

- 17 -
Motor pulse signal output(2pulses/1 rev. of internal motor)
Appendix 1 .CBR-305F□Detail
③LED2 ①SW1
③LED1 ⑥SW5
④CN2
⑤CN1
SW2
SW1
LED1
LED2
4
3
2
1
0
9
8
7
6
5
SPEED
6
5
4
0
1
9
8
7
2
3
24V
1.RUN
3.V-IN
2.DIR
4.ERR
5.PLS
0V
CBR-305F□-B
4.E/N-OUT
2.INT/EXT
3.DIRECTION
1.AUTO/MANU
ERR/PWR
5.SV-BRK
6.N/P-OUT
VR1-ACC
VR2-DEC
VR2
VR1
4
3
2
1
DECACC
CBM-105
②VR1 ②VR2
24V
1.RUN
3.V-IN
2.DIR
4.ERR
5.PLS
0V
24V
1.RUN
3.V-IN
2.DIR
4.ERR
5.PLS
0V
CN1
24VDC
0V
CW/CCW
RUN/STOP
Error signal output
Motor pulse signal output
Error signal output
Motor pulse signal output
CN2
CN1
24VDC
0V
CW/CCW
RUN/STOP
CN2
NPN signal input〔FN〕type PNP signal input〔FP〕type
Time Chart
■List of Functions
ON
OFF
RUN
STOP
RUN signal input to CBR-305F
Lifting MDR
Description ON OFF Remarks
1
2
3
4
5
Auto/manual recovery selection with thermal,
low voltage, induced voltage error Manual rec. Auto rec. ON Ref.Error detail, cancellation
(Normally set to OFF)
Ref.Error signal output
OFF
Internal/external speed setting selection External Internal OFF
OFF
OFF
Rotation direction selection (Ref. rotation dir. change)
Alarm (error) signal output selection Normal time output Error time output
Braking method Servo lock Electric
6Ref.Error signal output
Error signal output setting PNP output NPN output
①SW1
(DIP switch)
0V
24VDC
⑤CN1
(Power)
⑥SW5
(Internal speed setting)
④CN2
(Control)
0
0
2.5sec
2.5sec
②VR
(Variable resistor)
③LED Ref.
(Not used)
Ref.Rotation direction change
ON:RUN/OFF:STOP
Ref.Error signal output
Error signal output
MDRexternal speed setting
MDRrotation direction change
Motor pulse output
MDRstart/stop (Approx 7.3mA current flows)
No. Description Remarks
5
4
3
2
1
2
1
1
2
1
2
ON
OFF
RUN
STOP 1s
RUN signal input to CBR-305F
Lifting MDR
●Normal up/down motion
●Abnormal up/down motion
※CN2#3(V-IN) is not used.※CN2#3(V-IN) is not used
Caution M3:Lifting driver card has been set by the factory.
Do not change. Change may lead to a failure.
CBR-305 is a dedicated driver for up/down
motion. MDR is driven by RUN signal input,
but is automatically stopped after counting
predetermined motor pulses.
Counting the specified
motor pulses
Counting the specified
motor pulses
【Wiring】
Caution
Normally set to "9"
Indication
Color
Caution
Indicates powered condition
Indicates error type
Green
Red
Error detail, canceling method
Remarks
Description Remarks
Min
Min
Startup time frm RUN signal input to set speed
Startup time from STOP signal input to set speed
Default
Default
(End of CCW) (End of CW)
Minimum Maximum
Always set to min.
Using other than min.
may cause a failure.
〔FN〕type:OFF
〔FP〕type:ON
Always set to min.
Using other than min.
may cause a failure.

- 18 -
( ) ( )
Supplied voltage to MDR gets 30V or
below and CN2#2 ON→OFF→ON or
OFF→ON→OFF
Supplied voltage to MDR gets 30V or below and CN2#1 ON→OFF→ON
to cancel error and start.
Supplied voltage to MDR gets 30V or below
Secure power voltage 18V or higher,
CN2#2 ON→OFF→ON or OFF→ON→OFF
Secure power voltage 18V or higher
Shut off the power and connect the connector
1 min after reaching recovery temp, error signal cancellation and immediate start
Shut off the power and replace the driver card
Driver card failed
■Rotation Direction Change
■Error Signal Output
■Error Detail, Cancellation Method
・MDR rotation can be changed by external switch.
※MDR rotation in the right turn direction is defined as CW when
viewed from the cable side, and left turn as CCW.
※0V must be common to the power supply.
※CN2#2 carries approx. 7.3mA current.
※Power ON/OFF operation generates error signal. Make the
control to ignore error signal from the driver card for 0.5sec at
power ON, and 2sec at power OFF.
※Use a protection resistor to suppress current to 25mA or below.
Use of higher current damages the transistor in the driver card.
※Protection resistor 100Ωis furnished in the driver card.
※Error signal cancellation by CN2#1 ON →OFF →ON
immediately starts MDR.
※At low power voltage (8.5V or below), the motion same as power
shut down or unexpected motion may occur.
SW1#3
OFF
CW/CCW
CCW
CW
CW/CCW
123456
ERR
V-IN
RUN
DIR
1234
ERR
V-IN
RUN
DIR
1234
SW1#4
ON
SW1#6
OFF
ON
OFF
Error-time signal output Normal-time signal output
PNP open-collector outputNPN open-collector output
Normal time open Error time open
・Error can be checked by LED1(green), 2(red), and CN2#4 signal.
(
green
)(
red
)
LED1 LED2 CN2#4(
Error signal
)
SW1#4OFF SW1#4ON
−
Stop
−
−
(
Normal operation
)
No power Supply 24V DC
After reaching recovery temp, CN2#1 ON→OFF→ON to cancel error and start
After reaching recovery temp, CN2#2
ON→OFF→ON or OFF→ON→OFF Start by CN2#1 ON→OFF→ON
After reaching recovery temp, CN2#2
ON→OFF→ON or OFF→ON→OFF
Start by CN2#1 ON→OFF→ON
Start within 1 min.
Steady ON OFF
Blinking
(1Hz)
Blinking
(6Hz)OFF(1.5秒)
Blink twice(6Hz)
Error can be canceled by power OFF(2sec or longer)
Start by CN2#1 ON→OFF→ON
CN2#1 ON→OFF→ON to cancel error and start
Immediate start
Secure power voltage 18V or higher, CN2#1 ON→OFF→ON to cancel error and start
※1 MDR rotation above the set speed may also generates error.
※1
・SW1#4 can change setting of normal-time signal output
or error-time signal output.
・CN2#4 delivers error signal output.
−
MDR
Open
Open Open
Stop
−
Open
Output
Output
Stop
Open
Output
Start by CN2#1 ON→OFF→ON
Stop
Open
Output
Immediate start
Start by CN2#1 ON→OFF→ON
Stop
Open
Output
Stop
Open
Output
CN2#2 ON→OFF→ON or OFF→ON→OFF
※Normally use
OFF condition
Not
connected
Connected
Transistor in the driver is ON
during error
Transistor in the driver is OFF
during error.
LED Indication
Manual
recovery
setting
Manual
recovery
setting
Manual
recovery
setting
Auto rec
setting
Auto rec
setting
Auto rec
setting
Error Signal Cancellation MDR Restart
Error Cause
Thermal protection has
been activated by
temperature rise of
driver card or MDR
(Thermal error)
MDR connector
has been separated
4sec elapsed with locked
MDR
(Lock error)
Power voltage is 15V or
below
(Low voltage error)
40V or higher voltage
occurred for 2sec or 60V
or higher for 0.1sec.
(Back EMF error)

3-00K-1706
P5
P5
P10
P1
P6
P11
P11
P6
- 19 -
http://www.itohdenki.co.jp
Europe, Middle East, Africa: Itoh Denki Europe SAS
Phone: +33 (0)4 50 03 09 99 Fax: +33 (0)4 50 03 07 60
www.itoh-denki.com
North & South America: Itoh Denki USA, Inc
Phone: +1 570 820 8811 Fax: +1 570 820 8838
www.itohdenki.com
Specifications are subject to change without prior notice.
Asia/Oceania: Itoh Denki Asia Limited
Phone: +852 2427 2576 Fax: +852 2427 2203
China: Itoh Denki Shanghai Company Limited
Phone: +86 21 6341 0181 Fax: +86 21 6341 0180
www.itohdenki.com.cn
Headquarters: Itoh Denki Co.,Ltd.
Phone: +81 (0)790 47 0955 Fax: +81 (0)790 47 1325
www.itohdenki.co.jp
Appendix 2.Remaining Risks List, MAP
■List of Remaining Risks
■Remaining Risk MAP
1
No.
2
3
5
・
・
6
7
8
4
・
・
No.2
Caution
No.3
Caution
No.6
Caution
No.8
Warning
No.7
100V/200V
PE
No.1
No.4
No.5
Preparation
Stage Operation
Qualification
for operation
Fully reading
the manual and
understanding
the content
Position on unit
Product
metal part
Danger
level
Caution
Remaining risk factor Presumed measures Implemented
measures
Manual
pages
Uncrate/
transfer
Between moving
parts and
between moving
part and
stationary part
Power supply
to driver card
Injury by product metal part Wear protection: gloves, etc. Explained in
the manual
Explained in
the manual
Explained in
the manual
Explained in
the manual
Explained in
the manual
Explained in
the manual
Explained in
the manual
Explained in
the manual
・Attach a
warning/caution
label
・
Preparation
No specific
position
No specific
position
The upper
surfase of
product
No specific
position
No specific
position
Caution
Transfer
2 or more operators hold
product by both hands while
supporting the bottom.
Operation Caution
Trial opr.
Cut off the control to avoid
motion of other parts
before starting the unit.
Operation Caution Operator rides on the unit
and slips and falls down
Enclose the area with
safety fence to prevent
operator coming close.
Train the operator not to
ride on the equipment
Operation Caution
Enclose the area with safety
fence to keep people off and
stop object to pop out.
Maintenance
Maintenance
Warning
All
inspections
All
inspections
Power-on action by someone
makes the product move
unexpectedly and causes injury
Post a warning sign to
prevent unrelated personnel
from supplying power.
Warning Operator's finger or hand is
caught by the product
Work carefully by wearing
protective items such as
gloves.
Operation Warning
All
operations
All
operations
All
operations
Operator's fingers/hand are
caught between the unit and
moving part, or between
moving parts
Enclose the area with
interlocked fence to prevent
operator coming close.
Add a cover to the gap in
the unit to eliminate gap.
Remaining risk without specified position on the unit
DC power
supply
Breaker
Emergency stop switch
This product
Single phase
Caution Caution
Warning
Warning
Heavy item transfer by a
single operator may cause
injury or damage on product
During stand-alone trial
operation, unexpected load
transfer causes injury
Operator is injured by a load
popped out of the C/V
Other manuals for F-RAT-S300 Series
2
Table of contents
Other ITOH DENKI Industrial Equipment manuals

ITOH DENKI
ITOH DENKI F-RAT-NX75 User manual

ITOH DENKI
ITOH DENKI MABS User manual

ITOH DENKI
ITOH DENKI F-RAT-NX75 User manual

ITOH DENKI
ITOH DENKI F-RAT-U225 Series User manual

ITOH DENKI
ITOH DENKI PM605KT Guide

ITOH DENKI
ITOH DENKI POWER MOLLER 24 Pop-D Divert User manual

ITOH DENKI
ITOH DENKI MABS User manual

ITOH DENKI
ITOH DENKI POWER MOLLER IB-P03 Guide

ITOH DENKI
ITOH DENKI POWER MOLLER 24 F-RAT-U225 User manual

ITOH DENKI
ITOH DENKI POWER MOLLER 24 F-RAT-S300 User manual