manuals.online logo
Brands
  1. Home
  2. •
  3. Brands
  4. •
  5. IULOCK
  6. •
  7. Door Lock
  8. •
  9. IULOCK IU-20 User manual

IULOCK IU-20 User manual

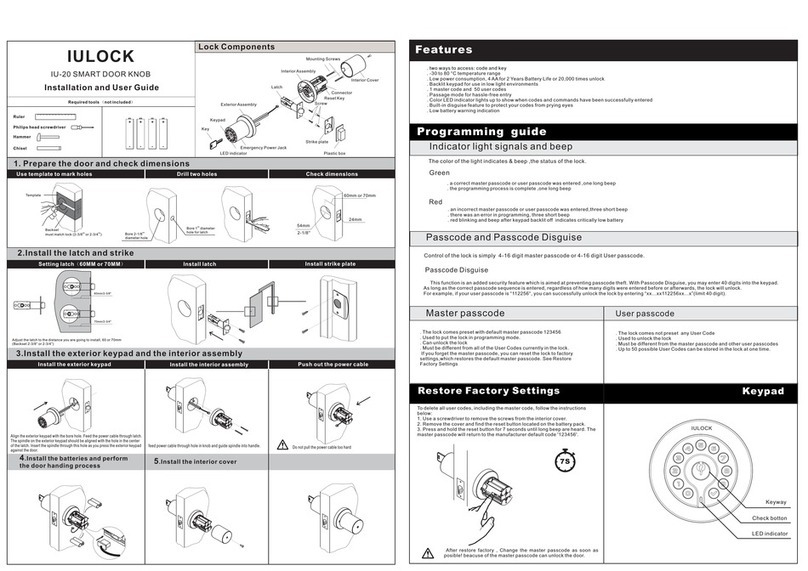
60mm or 70mm24mm54mm60mm/2-3/8"Lock Components1. Prepare the door and check dimensionsKeyKeypadLED indicator
Emergency Power Jack (type-c)
Exterior AssemblyPlastic boxStrike plateScrewLatchInterior AssemblyMounting ScrewsReset KeyConnectorInterior CoverRequired tools (not included)RulerPhilips head screwdriverHammerChiselUse template to mark holesDrill two holesCheck dimenslons4.Install the batteries and performthe door handing process5.Install the interior cover
feed power cable through hole in knob and guide spindle into handle.
Align the exterior keypad with the bore hole. Feed the power cable through latch.The spindle on the exterior keypad should be aligned with the hole in the center of the latch. Insert the spindle through this hole as you press the exterior keypad against the door.
Adjust the latch to the distance you are going to install, 60 or 70mm(Backset 2-3/8” or 2-3/4”)Bore 1'' diameter hole for latchBore 2-1/8'' diameter holeTemplateBacksetmust match lock (2-3/8'' or 2-3/4'')2.Install the latch and strikeInstall latchInstall strike plate3.Install the exterior keypad and the interior assemblySetting latch(60MM or 70MM)Install the exterior keypadInstall the interior assemblyPush out the power cable with a screwdriver70mm/2-3/4"+-+-+-+-2-1/8''IULOCKIU-20 Smart door knob Installation and User GuideFeatures. two ways to access: code and key. -30 to 80 °C temperature range. Low power consumption, 4 AA for 2 Years Battery Life or 20,000 times unlock . Backlit keypad for use in low light environments. 1 master code and 50 user codes . Passage mode for hassle-free entry. Color LED indicator lights up to show when codes and commands have been successfully entered. Built-in disguise feature to protect your codes from prying eyes. Low battery warning indication Programming guide Indicator light signals and beep This function is an added security feature which is aimed at preventing passcode theft. With Passcode Disguise, you may enter 40 digits into the keypad. As long as the correct passcode sequence is entered, regardless of how many digits were entered before or afterwards, the lock will unlock.For example, if your user passcode is “112256“, you can successfully unlock the lock by entering “xx...xx112256xx...x”(limit 40 digit).Passcode and Passcode Disguise. The lock comes preset with default master passcode 123456. Used to put the lock in programming mode.. Can unlock the lock. Must be different from all of the User Codes currently in the lock. If you forget the master passcode, you can reset the lock to factory settings,which restores the default master passcode. See Restore Factory Settings . The lock comes not preset any User Code. Used to unlock the lock. Must be different from the master passcode and other user passcodes. Up to 50 possible User Codes can be stored in the lock at one time.Master passcodeUser passcodeTo delete all user codes, including the master code, follow the instructions below:1. Use a screwdriver to remove the screws from the interior cover.2. Remove the cover and find the reset button located on the battery pack.3. Press and hold the reset button for 7 seconds until long beep are heard. The master passcode will return to the manufacturer default code '123456'.Restore Factory Settings Change the master passcode as soon as posible! beacuse of the master passcode can unlock the door.After restore factory , 7SKeypad
IULOCK
Check bottonLED indicator
The color of the light indicates & beep ,the status of the lock.
. a correct master passcode or user passcode was entered ,one long beep. the programming process is complete ,one long beep. an incorrect master passcode or user passcode was entered,three short beep . there was an error in programming, three short beep. red blinking and beep after keypad backlit off indicates critically low batteryGreenRedControl of the lock is simply 4-16 digit master passcode or 4-16 digit User passcode.Passcode DisguiseKeyway
4 AA alkaline batteries
Programming»If you make a mistake during programming,press the check button repeatedly until the keypad lights up. Then start over.
ADDING USER PASSCODE
√
1
√
master passcode
√
New user passcode
√
New user passcode
√
Note : The New User Passcode must be different from all of the Passcodes currently in the lock.
CHANGING THE MASTER PASSCODE & USER PASSCODE
√
2
√
master passcode
√
Old passcode
√
New passcode
√
New passcode
√
Note : The New Passcode must be different from all of the Passcodes currently in the lock.
DELETING USER PASSCODE
√
3
√
master passcode
√
unwanted user passcode
√
DELETING ALL USER PASSCODE
√
4
√
master passcode
√
ENABLE PASSAGE MODE
√
5
√
master passcode
√
With this function active, you can open the door without requiring a passcode. press any key to turn off this function when it is no longer needed.
ENABLE BEEPER
√
6
√
master passcode
√
1
√
DISABLE BEEPER
√
6
√
master passcode
√
0
√
The beeper can be turned off if desired. Beeps will still sound to indicate a low battery.
PressPressPressPress
Press
Press
EnterEnterEnter same
PressPressPressPress
Press
Press
EnterEnterEnter sameEnter
Press
PressPressPressPress
Press
EnterEnter
PressPressPressPress
Enter
PressPressPressPress
Enter
PressPressPressPress
Enter
PressPressPressPress
Enter
PressPressPressPress
Φ24mm35-65mm60mm70mmΦ54mmΦ2.4mm Lifetime Limited Mechanical and Finish Warranty and 1-Year Limited Electronics Warranty Subject to the terms and conditions of the warranty, IULOCK extends a lifetime limited mechanical and finish warranty and a one-year limited electronics warranty to the original consumer user (“Original User”) of our IULOCK brand product (“Product”) against defects in material and workmanship, as long as the Original User occupies the residential premises upon which the Product was originally installed.See answers www.iulock.com for specific warranty details WarrantyImportant Safeguards 1. Read all instructions in their entirety. 2. Familiarize yourself with all warning and caution statements. 3. Remind all family members of safety precautions. 4. Protect your user passcode and master passcode. 5. Dispose of used batteries according to local laws and regulations. This Manufacturer advises that no lock can provide complete security by itself. This lock maybe defeated by forcible or technical means. or evaded by entry elsewhere on the property. No lock can substitute for caution, awareness of your environment, and common sense. Builder's hardware is available in multiple performance grades to suit the application. In order to enhance security and reduce risk, you should consult a qualified locksmith or other security professional.WARNING:Why is it beeping after keypad light off?The battery may be low. Please replace the battery.The lock doesn't work?Try replacing the battery or using the backup battery. If the lock still does not work, contact customer support.Why can't I open the door?You may be waiting too long to open the door. After entering a code, turn the handle to open the door while the lock LED indicator light is green. Once the LED indicator light is off, the lock will return to locked position immediately.Why I can open without passcode?You maybe open the passage mode, you can turn off this function by pressing any key.I forgot all my codes.The lock must undergo a hard reset in order to set the master code back to default and erase all other codes. In order to perform a hard reset, you must have access to the back of the door. If none of the above information resolves your issue, please visit our website at: www.iulock.com TroubleshootingTemplate

Other IULOCK Door Lock manuals

IULOCK IU-20 User manual

IULOCK

IULOCK IU-20 User manual

IULOCK IU-20 User manual

IULOCK

IULOCK IU-20 User manual

IULOCK IU-20 User manual

IULOCK

IULOCK IU-20 User manual

IULOCK IU-20 User manual

IULOCK

IULOCK IU-20 User manual

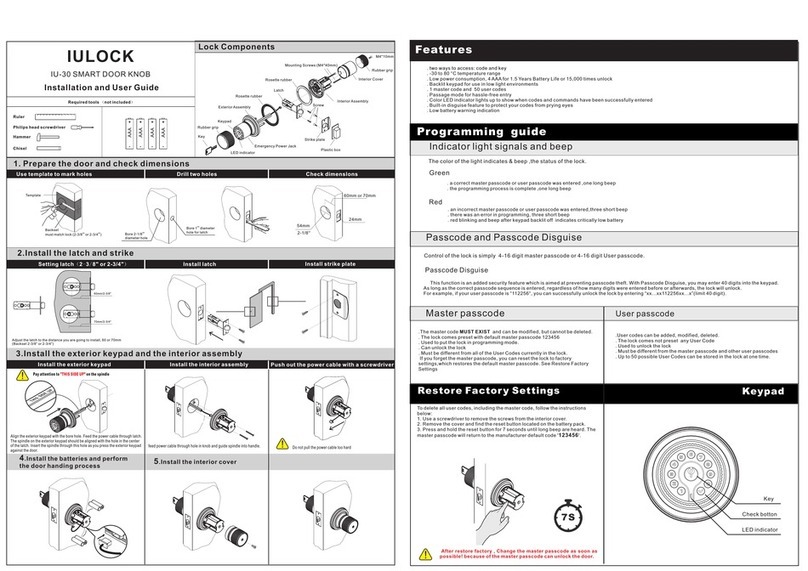
IULOCK IU-30 User manual

IULOCK

IULOCK IU-30 User manual

Popular Door Lock manuals by other brands

Assa Abloy Access 3 Technical manual

Assa Abloy

Assa Abloy Access 3 Technical manual

Assa Abloy Yale YDM3109A user manual

Assa Abloy

Assa Abloy Yale YDM3109A user manual

Signature Hardware MARWICK installation instructions

Signature Hardware

Signature Hardware MARWICK installation instructions

Schlage COBRA MPM Installation instructions and user guide

Schlage

Schlage COBRA MPM Installation instructions and user guide

KFV AS 2 Series Cleaning and maintenance instructions

KFV

KFV AS 2 Series Cleaning and maintenance instructions

I.H.T IHTSDL707 user manual

I.H.T

I.H.T IHTSDL707 user manual

Wittkopp SmartCam installation instructions

Wittkopp

Wittkopp SmartCam installation instructions

Detex ADVANTEX 70 Series installation instructions

Detex

Detex ADVANTEX 70 Series installation instructions

SAFETRON 600 Series installation manual

SAFETRON

SAFETRON 600 Series installation manual

Dorma STE 400 Mounting instructions

Dorma

Dorma STE 400 Mounting instructions

Maco SMART DEADBOLT Installation and user guide

Maco

Maco SMART DEADBOLT Installation and user guide

urmet domus 1083/12 Configuration guide

urmet domus

urmet domus 1083/12 Configuration guide

Omnia OM7-B manual

Omnia

Omnia OM7-B manual

Sylvan SL37E installation instructions

Sylvan

Sylvan SL37E installation instructions

Assa Abloy IKON eCLIQ SPARK N112 User instructions

Assa Abloy

Assa Abloy IKON eCLIQ SPARK N112 User instructions

KEYA ELOCK PLUS manual

KEYA

KEYA ELOCK PLUS manual

Kwikset CP/BP 49726 / 02 Quick installation guide

Kwikset

Kwikset CP/BP 49726 / 02 Quick installation guide

HES 5900 Series installation instructions

HES

HES 5900 Series installation instructions

manuals.online logo
manuals.online logoBrands
  • About & Mission
  • Contact us
  • Privacy Policy
  • Terms and Conditions

Copyright 2025 Manuals.Online. All Rights Reserved.