iWantit iPHWAV10 User manual

dock for iPhone & iPod
with clock radio
iPHWAV10
instruction manual
(iPod and iPhone not included)
iPHWAV10_IB_final110509.indd 1 09/05/2011 4:45 PM

iPHWAV10_IB_final110509.indd 2 09/05/2011 4:45 PM

Contents
unpacking .......................................................................................................................................... 4
product overview ............................................................................................................................ 5
- front view ........................................................................................................................................................................... 5
- rear view ............................................................................................................................................................................. 5
- top view .............................................................................................................................................................................. 5
control panel................................................................................................................................................................ 5
remote control ............................................................................................................................................................ 6
removing the insulating strip from the remote control............................................................................... 7
battery installation for the remote control.......................................................................................................7
- handling the battery ...................................................................................................................................................... 7
- handling the remote control....................................................................................................................................... 7
remote control operation range........................................................................................................................... 8
power source..................................................................................................................................... 8
mains power ................................................................................................................................................................ 8
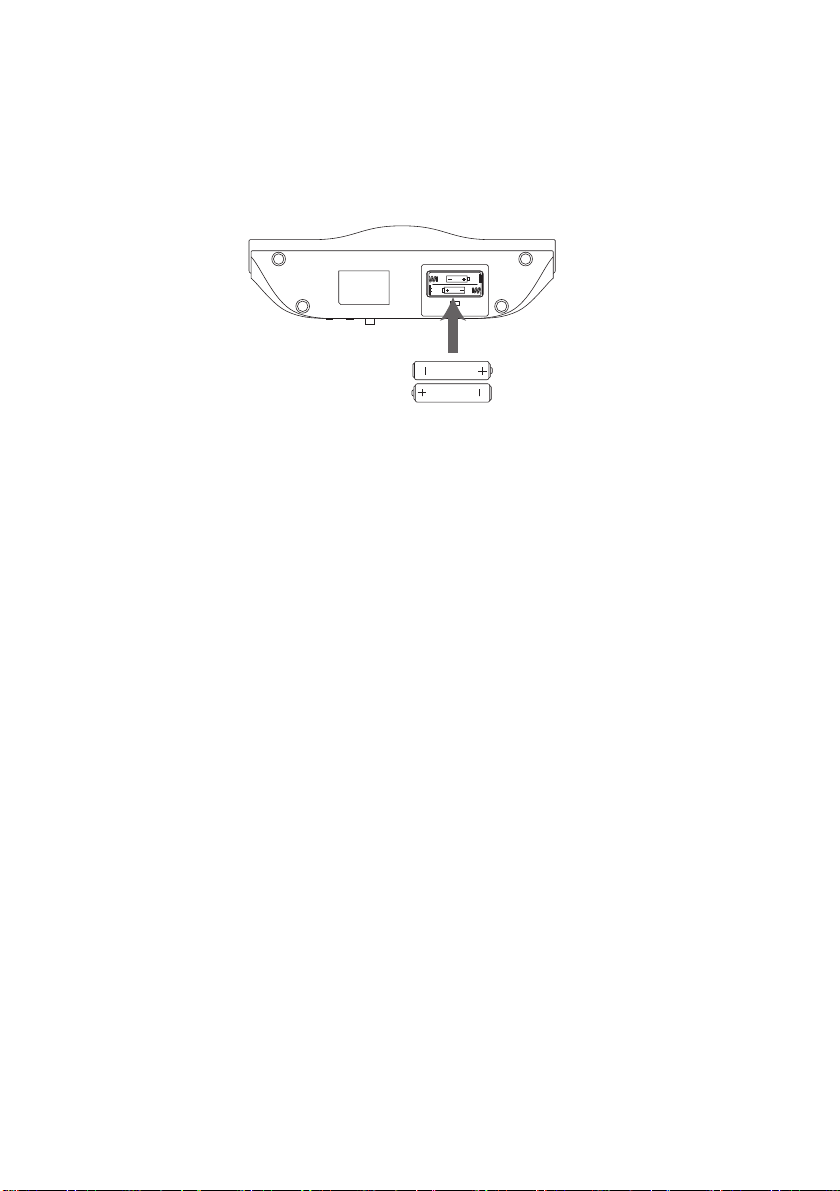
battery power (for clock backup only) ............................................................................................................... 9
- handling the batteries ................................................................................................................................................... 9
switching on your unit for the rst time ....................................................................................10
basic operation ............................................................................................................................... 10
switching On/O......................................................................................................................................................10
selecting modes .......................................................................................................................................................10
adjusting the volume..............................................................................................................................................10
setting the clock .......................................................................................................................................................11
setting the alarms ....................................................................................................................................................12
snooze function........................................................................................................................................................12
sleep function............................................................................................................................................................13
display brightness control ....................................................................................................................................13
FM operation................................................................................................................................... 13
selecting FM mode ..................................................................................................................................................13
auto scan.....................................................................................................................................................................13
manual scan ...............................................................................................................................................................13
storing stations .........................................................................................................................................................14
recalling a stored station.......................................................................................................................................14
audio mode................................................................................................................................................................14
iPod/iPhone operation .................................................................................................................. 15
selecting iPod/iPhone mode................................................................................................................................15
inserting the iPod/iPhone.....................................................................................................................................15
control iPod touch / iPhone (remote control only)......................................................................................15
charging your iPod/iPhone...................................................................................................................................16
AUX IN operation............................................................................................................................ 16
maintenance.................................................................................................................................... 16
hints and tips................................................................................................................................... 17
specications................................................................................................................................... 17
safety warnings............................................................................................................................... 18
iPHWAV10_IB_final110509.indd 3 09/05/2011 4:45 PM

4
The Main Unit
Mains Adapter
(P.N.: 153-002305-21F1)
AUX Cable
(3.5mm to 3.5mm)
(P.N.: 601-094010-2821)
Instruction Manual
(P.N.: iPHWAV10-002)
Remote Control
(P.N.: 083-866i37-0071)
If items are missing or damaged, please contact Partmaster (UK only).
Tel: 0844 800 3456 for assistance.
unpacking
Remove all packaging from the unit. Retain the packaging. If you dispose of it please do so
according to local regulations.
The following items are included:
Thank you for purchasing your new iWantit Dock for iPhone & iPod with Clock Radio.
We recommend that you spend some time reading this instruction manual in order that you fully
understand all the operational features it oers. You will also nd some hints and tips to help you
resolve any issues.
Read all the safety instructions carefully before use and keep this instruction manual for future
reference.
STANDBY/
SOURCE
MEM./CL. SET
MENU SNOOZE
ENTER
DIMMER
FM ST.
AL. 2
AL. 1
SLEEP
AL. ON/OFF MEMORY
SKIP SKIP SOURCE
STANDBYTUNE+TUNE–
AL.1SLEEP
MEM.–
CL.SET
MEMORY
AL.2
MEM.+
dock for iPhone & iPod
with clock radio
iPHWAV10
instruction manual
(iPodand iPhone not included)
iPHWAV10_IB_final110509.indd 4 09/05/2011 4:45 PM

5
product overview
front view
rear view
top view
1. iPod/iPhone Support
2. LCD Display
3. IR Sensor
Sensor behind the speaker cover.
4. Speakers
5. Control Panel
1
4 2 3 4
55
SKIP SKIP SOURCE
STANDBYTUNE +TUNE –
AL. 1SLEEP
MEM. –
CL. SET
MEMORY
AL. 2
MEM. +
6. Control
For adjusting the iPod/ iPhone
support.
7. Backup Battery (for clock only)
8. DC IN Socket
9. AUX IN Socket
10. FM Aerial
8
6
7 9 10
DC IN
AUX IN
FM ANT.
THICKER SLIMMER
11 1312 14
11. VOLUME – Button
To decrease the volume.
12. iPod/iPhone Connector
13. VOLUME + Button
To increase the volume.
14. SNOOZE/DIMMER Button
control panel
1. MEMORY / CL. SET Button
2. SLEEP Button
3. MEM. – / AL. 1 Button
4. MEM. + / AL. 2 Button
1 5 632 7 8
4
8
SKIP SKIP SOURCE
STANDBYTUNE +TUNE –
AL. 1SLEEP
MEM. –
CL. SET
MEMORY
AL. 2
MEM. +
5. TUNE – / SKIP Button
6. Button
7. TUNE + / SKIP Button
8. STANDBY/SOURCE Button
iPHWAV10_IB_final110509.indd 5 09/05/2011 4:45 PM

6
remote control
1. STANDBY/SOURCE Button
• In standby mode, press this button
to turn the unit on.
• In ON mode, press this button to
toggle between FM, iPod/ iPhone,
AUX mode. Press and hold this
button to turn the unit o.
2. STOP Button
Press to stop playback.
3. MENU / MEM. / CL. SET Button
• In iPod mode, press this button to
display the iPod/iPhone menu on
the iPod/ iPhone menu screen.
• In standby mode, press and hold
this button to set the clock and date.
• In FM mode, press this button to
select which preset to store the
tuned station.
4. LEFT/RIGHT (SKIP )
Button
• Press to move back to the beginning
of the current chapter/ tracks/
titles or move forward to the next
chapters/tracks/titles on the iPod/
iPhone.
• Press to tune into desired radio
stations.
• Press to increase/reduce digits
during alarm/ clock setting.
1
2
7
3
4
5
6
8
9
10
12
13
11
STANDBY/
SOURCE
MEM./CL. SET
MENU SNOOZE
ENTER
DIMMER
FM ST.
AL. 2
AL. 1
SLEEP
AL. ON/OFF MEMORY
UP/DOWN Button
Press to select the options on the iPod/
iPhone menu screen.
ENTER Button
Press to conrm the selection on the
iPod/iPhone menu screen.
5. FM STEREO Button
6. SLEEP Button
7. AL. ON/OFF Button
Press to turn the Alarm 1 and Alarm
2 on/o by pressing the button
repeatedly.
8. MUTE Button
Press to mute and restore the unit
sound.
9. PLAY/PAUSE Button
Press to start playback or pause.
10. SNOOZE/DIMMER Button
11. MEM. +/– (AL. 1/2) Button
Press to select the preset FM radio
station.
12. VOLUME + Button
Press to increase the volume.
13. VOLUME – Button
Press to decrease the volume.
iPHWAV10_IB_final110509.indd 6 09/05/2011 4:45 PM

7
removing the insulating strip from the remote control
Remove the insulating mylar strip from the
battery if the battery is being used for the rst
time. It is located at the bottom back side of the remote
control.
battery installation for the remote control
1. Press and hold the battery release tab and pull
out the battery holder completely.
handling the battery
• Improper or incorrect use of batteries may cause corrosion or battery leakage, which
could cause re, personal injury or damage to property.
• Install the battery correctly by following the polarity (+ and –) indications in the battery
compartment.
• When the battery is exhausted, the remote control will not function.
• Only use the battery type indicated in this manual.
• Do not dispose of the used battery as domestic waste. Dispose of it in accordance with
the local regulations.
• Small button cell batteries such as the one used in the remote control are easily
swallowed by young children and this is dangerous. Keep loose button cells away from
young children and make sure that the battery holder tray is secure in the remote
control. Seek medical advice if you believe a cell has been swallowed.
• If you are not going to use the unit for a long time, remove the batteries to avoid damage
from battery leakage and corrosion.
handling the remote control
• Take care of your ngernails when you press and hold the battery release tab.
• Do not drop or cause impact to the remote control.
• Do not spill water or any liquid on the remote control.
• Do not place the remote control on a wet object.
• Do not place the remote control under direct sunlight or near sources of excessive heat.
• Remove the battery from the remote control when not in use for a long period of time,
as it could cause corrosion or battery leakage and may result in physical injury and/or
property damage including re.
2. Remove the old battery, and place a new
battery (“CR2025” 3V) in the holder.
iPHWAV10_IB_final110509.indd 7 09/05/2011 4:45 PM

8
remote control operation range
Point the remote control at the unit no more than 5
metres from the remote control sensor and within
60° of the front of the unit. The operating distance
may vary depending on the brightness of the
room.
power source
mains power
• This unit was designed to operate with a mains adapter with 5V DC 2000mA output.
• Connecting the unit to any other power source may cause damage to the unit. Unwind
the cable of the mains adapter to its full length. Connect the mains adapter to the DC IN
socket of the main unit, then connect the mains adapter to a mains socket. Make sure
the mains adapter is fully inserted into the mains socket. The unit is now connected and
ready to use.
• To switch the unit o completely, press and hold the STANDBY/SOURCE button
on the unit or on the remote control and withdraw the mains adapter from the mains
socket.
SKIP SKIP SOURCE
STANDBYTUNE+TUNE–
AL.1SLEEP
MEM.–
CL.SET
MEMORY
AL.2
MEM.+
Within about 5m
30° 30°
STANDBY/
SOURCE
MEM./CL.SET
MENU SNOOZE
ENTER
DIMMER
FMST.
AL.2
AL.1
SLEEP
AL.ON/OFF MEMORY
DC IN
AUX IN
FM ANT.
THICKER SLIMMER
iPHWAV10_IB_final110509.indd 8 09/05/2011 4:45 PM

9
battery power (for clock backup only)
1. Open the battery door and insert 2 x AAA batteries type (not included) with the correct
polarity as indicated by the “+” and “–” symbols inside the battery compartment.
2. Replace the battery door making sure the batteries are rmly and correctly in place.
The clock , date and alarm settings are now saved and you do not need to adjust them
again even if the main unit is disconnected from power.
handling the batteries
• Improper or incorrect use of batteries may cause corrosion or battery leakage, which
could cause personal injury or damage to property.
• Install the batteries correctly by following the polarity (+ and –) indications in the battery
compartment.
• Only use the battery type indicated in this manual.
• Do not install new batteries with used ones and do not mix dierent types of batteries.
• Do not dispose of the used batteries as domestic waste. Dispose of them in accordance
with local regulations.
• If you are not going to use the unit for a long time, remove the batteries to avoid damage
from battery leakage and corrosion.
iPHWAV10_IB_final110509.indd 9 09/05/2011 4:45 PM

10
switching on your unit for the rst time
Connect the mains adapter to the unit and then to the mains socket. Press the
STANDBY/SOURCE button on the unit or on the remote control to turn the unit on.
basic operation
switching On/O
After connecting the mains adapter to the unit and the mains socket, the unit will enter
Standby mode.
• Press the STANDBY/SOURCE button on the unit or on the remote control to switch
the unit to Power On mode.
• Press and hold the STANDBY/SOURCE button to switch the unit back to Standby
mode.
• Disconnect the mains adapter from the mains socket if you want to switch the unit o
completely.
selecting modes
Press the STANDBY/SOURCE button on the unit or on the remote control repeatedly
during ON mode to switch between modes (FM, iPod or AUX).
adjusting the volume
• Press the or button to increase / decrease the volume.
• Press the MUTE button on the remote control to switch the sound o. The volume
level will ash on the display and the audio output will temporarily terminate. Press the
MUTE button again to resume audio listening.
iPHWAV10_IB_final110509.indd 10 09/05/2011 4:45 PM

11
setting the clock
When the unit is connected to the mains socket with the mains
adapter for the rst time, time digits ‘ ’ & date digits‘ ’ will show
on the display.
1. In Standby mode, press and hold the MEMORY/CL.SET button
on the unit or press the MENU/MEM./CL.SET button on the
remote control to enter the clock set mode.‘ ’ will ash on the
display indicating that the clock is set for 24-hour cycle.
2. Press the SKIP buttons on the unit or on the remote
control to switch the clock format between 12-hour and 24-hour.
Press the MEMORY/CL.SET button on the unit or the MENU/
MEM./CL.SET button on the remote control to conrm.
3. The hour digits will ash. Press the SKIP buttons to
adjust the hour digits, then press the MEMORY/CL.SET button
on the unit or the MENU/MEM./CL.SET button on the remote
control to conrm.
4. When the hour digits are conrmed, the minute digits will ash.
Press the SKIP buttons to adjust the minute digits, then
press the MEMORY/CL.SET button on the unit or the MENU/
MEM./CL.SET button on the remote control to conrm.
5. When the clock time is set, the year digits will ash. Press the
SKIP buttons to adjust the year digits, then press the
MEMORY/CL.SET button on the unit or the MENU/MEM./
CL.SET button on the remote control to conrm.
6. The month digits will ash. Press the SKIP buttons to
adjust the month digits, then press the MEMORY/CL.SET button
on the unit or the MENU/MEM./CL.SET button on the remote
control to conrm.
7. The day digits will ash. Press the SKIP buttons to adjust
the day digits, then press the MEMORY/CL.SET button on the
unit or the MENU/MEM./CL.SET button on the remote control
to conrm.
In 12-hour mode, ‘ ’ will be displayed on the left side of the clock to show the time status.
iPHWAV10_IB_final110509.indd 11 09/05/2011 4:45 PM

12
4. Alarm 1 can be enabled and disabled by pressing the MEM –/
AL.1button on the unit or the AL ON/OFF button on the
remote control repeatedly until the 1indicator disappears.
5. To set ALARM 2, press and hold the MEM +/AL.2 button on the
unit or on the remote control. The alarm indicator 2and the
hour digits will ash. Repeat steps 1-3.
6. Alarm 2 can be enabled and disabled by pressing the MEM +/
AL.2 button on the unit or the AL ON/OFF button on the
remote control repeatedly until the 2indicator disappears.
7. To turn o the alarm, press the STANDBY/SOURCE button
when the alarm sounds. The 1or 2indicators will still show in
the display and the alarm function will still be active the next
day.
snooze function
1. Press the SNOOZE/DIMMER button when the alarm sounds. The corresponding
alarm indicators 1or 2will ash. The alarm will go o and will then sound again in
approximately 10 minutes. Press the STANDBY/SOURCE button on the unit or on
the remote control to turn o the snooze function.
setting the alarms
1. In standby mode, press and hold the MEM –/AL.1 button on the
unit or on the remote control to set ALARM 1. The alarm indicator
1and the hour digits will ash. Press the SKIP buttons
to adjust the hour digits, then press the MEM –/AL.1 button to
conrm.
2. The minute digits will ash. Press the SKIP buttons to
adjust the minute digits, then press the MEM –/AL.1 button to
conrm.
3. The wake up mode display will ash. Press the SKIP
buttons repeatedly to select the wake up mode. (FM/iPhone/
BUZZ). Press the MEM –/AL.1 button to conrm.
• To wake up to ‘FM Broadcasting’, you have to pre-tune your
desired radio channel in FM radio mode before setting the
wake up function.
• To wake up to iPod/iPhone playback, you must have you iPod/
iPhone docked.
• Wake up to Buzzer.
In case you forgot to dock your iPod/iPhone, the buzzer alarm will sound once the alarm
time is reached.
1
1
1
1
2
1
iPHWAV10_IB_final110509.indd 12 09/05/2011 4:45 PM

13
We suggest brightening the display in bright environments and dimming the display in dark
environments.
Extend the FM Aerial to its full length. It may be necessary to adjust the direction of this
aerial until you nd the best position.
sleep function
This function automatically switches the unit to standby mode after the preset time has
elapsed.
1. To activate the sleep function, press the SLEEP button on the unit or on the remote
control, “120” and “Sleep” indicators will show on the display.
2. Press the SLEEP button repeatedly to select the sleep time (in minutes):
120 mins 90 mins 60 mins 30 mins
OFF 5 mins 10 mins 20 mins
3. When the display shows your desired sleep time, stop pressing the SLEEP button on
the remote control. “ ” will show on the display to indicate that the sleep timer
function is activate. The time begins to count down from the number of minutes
selected.
4. To cancel the sleep function, press the SLEEP button on the unit or on the remote
control repeatedly until “ ” disappears from the display.
display brightness control
In the Power ON or Standby mode, press the SNOOZE/ DIMMER button on the unit or on
the remote control to dim or brighten the display.
FM operation
selecting FM mode
Press the STANDBY/SOURCE button on the unit or on the remote control repeatedly to
select FM mode.
auto scan
To search for an FM station, press and hold the SKIP buttons to start scanning
up or down the frequency band. Once a station has been found, the scanning will stop
automatically.
manual scan
To search FM stations manually, simply press the SKIP buttons repeatedly until your
desired frequency is reached.
iPHWAV10_IB_final110509.indd 13 09/05/2011 4:45 PM

14
storing stations
You can store up to 10 of your favourite stations to the preset stations. This will enable you
to access your favourite stations quickly and easily.
1. To store a preset, you must rst be listening to the station that
you would like to save, then press the MEMORY/CL. SET button
on the unit or the MENU/MEM./CL. SET button on the remote
control. will ash on the display.
2. Press the MEM. +/– buttons on the unit or the MEMORY +/–
buttons on the remote control to select your desired preset
station number.
3. Press the MEMORY / CL. SET button on the unit or the MENU
/ MEM. / CL. SET button on the remote control to conrm the
selection.
4. The station will be stored and the display will then show the
clock again.
recalling a stored station
Once you have saved a station to one of the preset buttons, press the MEM. +/– buttons on
the unit or the MEMORY +/– buttons on the remote control to select your desired preset
station number.
audio mode
Press the FM ST. button on the remote control to toggle between Stereo and Mono modes.
The unit will automatically switch between stereo and mono mode, but you can override this
and switch this function manually.
This is helpful when receiving poor signal reception.
iPHWAV10_IB_final110509.indd 14 09/05/2011 4:45 PM

15
Always remove the case of your iPod/iPhone before inserting it into the dock.
If you experience any unwanted distortion during iPod/ iPhone playback, it is recommended
that you set the EQ in your iPod/iPhone to the o position.
The volume control on your iPod/iPhone will not function while it is docked.
• The unit cannot show any music information of your iPod/ iPhone. Please view the music
information from your iPod/ iPhone display.
• You will need to unlock your iPod touch / iPhone before you can control it from the remote
control (music only).
iPod/iPhone operation
selecting iPod/iPhone mode
Press the STANDBY/SOURCE button on the unit or on the remote control repeatedly to
select iPod mode.
inserting the iPod/iPhone
1. Insert your iPod/iPhone into the iPod/iPhone dock.
control iPod touch / iPhone (remote control only)
Press the MENU/MEM./CL. SET button on the remote control, the iPod will go to the
previous menu. Press the UP/DOWN buttons to select the next/previous iPod menu.
Press the ENTER button to enter the selected menu. Settings are changed in the same way
once the menu item has been highlighted.
2. Turn the CONTROL behind the speaker to adjust the position of
the support until it touches the rear panel of your iPod/ iPhone.
3. If the iPod/iPhone is connected, the unit will start playback after
a few seconds. The iPod/iPhone battery will automatically start to
charge until it is fully charged.
4. Select your desired music and play the connected iPod/iPhone
as usual.
• Press the PLAY/PAUSE button to start / pause playback.
• Press the SKIP buttons to select the previous or next song.
• Press and hold the SKIP buttons on the remote control to fast backward /
forward through a song.
• Press the or button on the unit or on the remote control to adjust the sound
level as desired.
DCIN
AUXIN
FMANT.
THICKER SLIMMER
iPHWAV10_IB_final110509.indd 15 09/05/2011 4:45 PM

16
charging your iPod/iPhone
1. Your iPod/iPhone has an internal non-removable battery. The battery may need to be
charged if it has not been used for a while.
2. The iPod/iPhone will automatically recharge while it is docked to the unit. Recharging
will occur during standby and during operation.
AUX IN operation
1. Before connecting to the mains socket, use a 3.5mm LINE IN
cable (included) to connect your audio device to the AUX IN
socket at the rear of the unit.
2. Connect the mains adapter to the mains socket. The unit will be
in standby mode.
3. Press the STANDBY/SOURCE button on the unit or on the
remote control to switch on.
4. Press the STANDBY/SOURCE button repeatedly to select AUX
mode.
5. In AUX mode, you may operate your audio device directly for
playback features.
maintenance
• If you charge the iPod/iPhone while playing music, it may take a longer time.
• The unit must be in iPod mode to operate iPod/iPod Touch/iPhone with the remote
control.
• 1st, 2nd & 3rd generation iPods cannot be charged.
Ensure to unplug the unit from the mains socket before cleaning.
• To clean the unit, wipe the case with a slightly moist, lint-free cloth.
• Do not use any cleaning uids containing alcohol, ammonia or abrasives.
• Do not spray an aerosol at or near the unit.
iPHWAV10_IB_final110509.indd 16 09/05/2011 4:45 PM

17
hints and tips
problem cause / solution
Power
System does not turn on
or does not respond to the
remote control.
• Make sure mains adapter is properly connected to
the mains socket and the unit properly and that it has
power.
• Check that the remote control has a battery. The battery
may need to be replaced.
No Sound Adjust the volume, it may not be turned up.
Static Sound Signal reception is too low. Adjust the aerial or move the
unit to a stronger signal location.
Sound is distorted Volume is too high. Adjust the volume control.
Desired station not found Weak signal. Use the manual tune function.
iPod/iPhone
The unit doesn’t play iPod/
iPhone les or doesn’t
function as expected.
• Make sure the iPod/iPhone is connected properly.
• Standby mode may be activated; press the STANDBY/
SOURCE button again.
• Make sure the iPod/iPhone is switched on.
• Vibrations may have caused the iPod/iPhone to come
loose from the docking station.
• Check iPod mode or AUX mode is selected.
• Reinsert iPod/iPhone.
Remote Control
No functions or short
range.
• Insert new batteries.
• Aim the remote control directly towards the remote
sensor.
If the unit is not working properly disconnect the power source and then reconnect it.
specications
model iPHWAV10
mains supply Mains adapter Input 100-240V ~ 50/60 Hz 0.3A
Mains adapter Output DC 5V 2.0A
output power 2 x 2W
battery power 1.5V x 2 (AAA size) (for clock back-up only)
radio frequency range FM87.5 – 108 MHz
Specications and features are subject to change without notice.
iPHWAV10_IB_final110509.indd 17 09/05/2011 4:45 PM

18
safety
• Always disconnect the unit from the mains
supply before connecting/ disconnecting other
devices or moving the unit.
• Unplug the unit from the mains socket during
a lightning storm.
• In the interests of safety and to avoid
unnecessary energy consumption, never leave
the unit switched on while unattended for
long periods of time, e.g. overnight, while on
holiday or while out of the house. Switch it o
and disconnect the mains plug from the mains
socket.
mains adapter cable
• Make sure the unit is not resting on top of the
mains adapter cable, as the weight of the unit
may damage the cable and create a safety
hazard.
interference
• Do not place the unit on or near appliances
which may cause electromagnetic interference.
If you do, it may adversely aect the working of
the unit, and cause a distorted sound.
batteries
• Batteries used in the unit are easily swallowed
by young children and this is dangerous.
• Keep loose batteries away from young children
and make sure that the battery holder tray is
secure in the unit. Seek medical advice if you
believe a cell has been swallowed.
• Please dispose of batteries correctly by
following the guidance in this manual.
supervision
• Children should be supervised to ensure that
they do not play with the unit and the remote
control.
• Never let anyone especially children push
anything into the holes, slots or any other
openings in the case - this could result in a fatal
electric shock.
safety warnings
• Read all the instructions carefully before using
the unit and keep them for future reference.
• Retain the manual. If you pass the unit onto a
third party make sure to include this manual.
• Check that the voltage marked on the rating
label matches your mains voltage..
damage
• Please inspect the unit for damage after
unpacking.
• Do not continue to operate the unit if you are
in any doubt about it working normally, or if it
is damaged in any way - switch o, withdraw
the mains adapter and consult your dealer.
location of unit
• The unit must be placed on a at stable surface
and not subjected to vibrations.
• Do not place the unit on sloped or unstable
surfaces as the unit may fall o or tip over.
• The mains socket must be located near the unit
and should be easily accessible.
• This unit is designed for indoor use only..
temperature
• Avoid extreme degrees of temperature, either
hot or cold. Place the unit well away from heat
sources such as radiators or gas/ electric res.
• Do not expose the battery to direct sunlight or
sources of excessive heat..
naked ames
• Never place any type of candle or naked ame
on the top of or near the unit.
moisture
• To reduce the risk of re, electric shock or
product damage, do not expose this unit
to rain, moisture, dripping or splashing. No
objects lled with liquids, such as vases, should
be placed on the unit.
• If you spill any liquid into the unit, it can cause
serious damage. Switch it o at the mains
immediately. Withdraw the mains plug and
consult your dealer..
ventilation
• To prevent the risk of electric shock or re
hazard due to overheating, ensure that
curtains and other materials do not obstruct
the ventilation vents.
• Do not install or place this unit in a bookcase,
built-in cabinet or in another conned space.
Ensure the unit is well ventilated.
iPHWAV10_IB_final110509.indd 18 09/05/2011 4:45 PM

CAUTION
RISK OF ELECTRIC SHOCK
DO NOT OPEN
The lightning ash with arrowhead
symbol, within an equilateral triangle, is
intended to alert the user to the
presence of uninsulated“dangerous
voltage” within the unit’s enclosure that
may be of sucient magnitude to
constitute a risk of electric shock.
The exclamation point within an
equilateral triangle is intended to alert
the user to the presence of important
operating and maintenance (servicing)
instructions in the manual
accompanying the unit.
service
• To reduce the risk of electric shock, do not
remove screws. The unit does not contain
any user-serviceable parts. Please leave all
maintenance work to qualied personnel.
• Do not open any xed covers as this may
expose dangerous voltages.
maintenance
• Ensure to unplug the unit from the mains
socket before cleaning.
• Do not use any type of abrasive pad or abrasive
cleaning solutions as these may damage the
unit’s surface.
• Do not use liquids to clean the unit.
iPHWAV10_IB_final110509.indd 19 09/05/2011 4:45 PM

Notes for battery disposal
The batteries used with this product contain chemicals that are harmful to the
environment. To preserve our environment, dispose of used batteries according to your
local laws or regulations. Do not dispose of batteries with normal household waste.
For more information, please contact the local authority or your retailer where you
purchased the product.
NOTE: If you require a replacement for any of the items listed below, please quote their
corresponding part numbers:
Replacement Part Part Number
Remote Control 083-866i37-0071
Mains Adapter 153-002305-21F1
AUX Cable 601-094010-2821
(P.N. iPHWAV10-002)
DSGRetailLtd•MaylandsAvenue•HemelHempstead
Herts•HP27TG•England
This symbol on the product or in the instructions means that your
electrical and electronic equipment should be disposed at the end of its
life separately from your household waste. There are separate collection
systems for recycling in the EU.
For more information, please contact the local authority or your retailer
where you purchased the product.
Visit Partmaster.co.uk today for the easiest way to buy
electrical spares and accessories. With over 1 million spares
and accessories available we can deliver direct to your door
the very next day. Visit www.partmaster.co.uk or call 0844 800 3456 (UK customers only)
Calls charged at National Rate.
All trademarks are the property of their respective owners and all rights are acknowledged.
iPhone and iPod are trademarks of Apple Inc.,
registered in the U.S. and other countries.
“Made for iPod” and “Made for iPhone”mean that an electronic accessory has been designed to connect
specically to iPod or iPhone respectively, and has been certied by the developer to meet Apple
performance standards.
Apple is not responsible for the operation of this device or its compliance with safety and regulatory
standards.
iPHWAV10_IB_final110509.indd 20 09/05/2011 4:45 PM
Table of contents
Other iWantit Docking Station manuals

iWantit
iWantit iPHUDK11 User manual

iWantit
iWantit IBTLI14 User manual

iWantit
iWantit iPD1312 User manual

iWantit
iWantit iPHUDK10 User manual

iWantit
iWantit iMOO11 User manual

iWantit
iWantit iPHBABY10 User manual

iWantit
iWantit IHFUSBN13 User manual

iWantit
iWantit iPOD1010 User manual

iWantit
iWantit iW300 User manual

iWantit
iWantit iPH1212 User manual