Iwatsu ICON Series User manual


Iwatsu ICON Series IX-5930 IP Key Telephone
This guide descr ibes basic an d adv anced features
and operations for your Iwatsu ICON Series IX-5930
or IX-5910 IP Telephone.
For more i nformation, re fer to y our I watsu Owner’s
Manual or contact your author ized Iw atsu distribu-
tor.
Only I watsu qualified p ersonnel are author ized to
install any component of an Iwatsu system. Should
you require service, please contact y our a uthorized
Iwatsu distributor.
Self-Labeling K eys - The IX-5930
and IX -5910 are equipped with self -
labeling key s that support sy stem features on tw o
menu pages. Use the lef t and right Navigation keys
to toggle between pages. Underlined k eys have an
associated sub-menu.
IX-5910 Self-Labeling Display Example:
Multipurpose Ke ys - These keys
can be pr ogrammed f or specif ic func-
tions, including outside line access, individual exten-
sion selection, and one-touch feature operation.
Key L amps - These lamps light up or
flash when someone is using the line or
feature corresponding to t hat key. A green lamp
indicates that y ou ar e using that line/f eature. A red
lamp indicates that someone else is using that line/
feature.
INTRODUCTION
1
Page 1 Page 2
7 FRI 12:06 PM
Display Chg
Repeat Dial
Music
TextMessage
Alarm Clock
Call Back
Save/Redial
Memory Dial
External Q
2
Text Web
7 FRI 12:06 PM
Intercom
Directory
Call Log
Call FWD
Conference
Voice Mail
Screen Call
Park
Page All
Redial
1
SCOTT P x2325 SCOTT P x2325
Speaker
Key
Self-Labeling Keys
Indicator Lamp
Microphone
Volume Control Keys
Mute Key
Transfer Key
Feature Key
Hold/DND Key
Speaker
Navigation/
Setup Keys
15-Line
24-Character
Display
Ext or Sys Info
Date/Time

SPEAKER - This key allo ws y ou to dial
and receive outside or internal calls and talk
without lifting the receiver.
TRANSFER - This ke y allow s you to transfer a
call from your phone to another extension.
FEATURE - This key is used to access additional
Iwatsu system features.
HOLD/DND (H old/Do N ot Di sturb) - This key
is used to put a call on Hold or to set the Do Not
Disturb f unction a nd pr event a ny calls from ringing
at your extension.
Note: See Hold/Quick Forward on page 21.
Volume Control
The - and + volume control keys are used to adjust
the Handset, Ringer , and Sp eaker v olume lev els
based on the state of the telephone.
• Receiver (Han dset) Volu me - When using the
Handset or Bluetooth headset, the volume control
key allo ws you to ad just the h andset volume to
one of five levels.
• Ringer Vo lume - Pressing the ringer v olume
control key while the station is inactive allows you
to adjust the ringer volume to one of four levels.
• Speaker V olume - When us ing the Speaker-
phone, the v olume co ntrol key s allow y ou to
adjust the speaker volume to one of ele ven
levels.
MUTE - When talking using the h andset,
pressing the M ute key mutes t he handset tr ansmit-
ter. If using the speakerp hone, pressing the Mute
key mutes the station microphone. When using the
headset jack or Blueto oth, the Mute ke y mutes the
transmitter on the headset.
Intercom - The int ercom system is the inte rnal
network use d to comm unicate between the tele-
phone e xtensions in your I watsu system. Pr essing
the Intercom m enu key conne cts y ou to a n inte r-
com line for conversation with other extensions.
Voice Mai l - This key is used to access y our
voice mailbox.
Bluetooth Headset - A Blue tooth Hea dset is
active when this icon appe ars on y our displa y.
Requires an IX-59BTINF Bluetooth Module.*
MUTE
SPEAKER
2
TRANSFER FEATURE HOLD/DND
MUTE
Volume
UpDown

911 Dialing
At def ault, y our Iwatsu system is progr ammed to
automatically contact your local Public Sa fety An-
swering Point (PSAP) when 911 is dialed. Enhanced
911 Serv ice ensures that when 911 is dialed from a
system e xtension, inf ormation that all ows the P SAP
to identify the caller’s location in a building is sent to
the PSAP al ong with the cal l. Check with your s ys-
tem installer or Authorized Iwatsu Distributor to make
sure your system is pr ogrammed for Enhanced 911
Service.
Last Number Redial
To au tomatically redial the last outside (e xternal)
number you called:
• Press the Redial key (if programmed).
Making an Intercom Call
• Press th e SPEAKER ke y or lift the r eceiver and
wait for dial tone.
• Dial an extension number.
or
If you hav e a DSS (Direct Station Selection) ke y
assigned for the extension you are calling:
• Press the assigned extension key.
Making an Outgoing Call
• Press the SPEAKER key or lift the receiver.
• Press 9. You will he ar a dial
tone.
• Dial telephone number.
Make a dialing mistake?
Note: If you ar e pr e-dialing a number and make a
mistake, you can use the F EATURE key to delete
digits,
or
• Press the FLASH or outside line key to get new
dial tone.
• Dial again.
Picking Up a Call On Hold
• Press the key with either the green or the red
flashing lamp to pick up the call being held on that
line.
Note: Requires an Intercom (I CM) key to retrieve an
internal call on hold.
3
BASIC FEATURES

Placing a Call On Hold
When speaking on an outside line:
• Press the HOLD/DND key.
The a ctive outside line key lamp f lashes g reen on
your phone and red at other extensions.
If the call is not picked u p, the call will ring again at
your phone.
Receiving a Call From Another Extension
When you hear the inter com c all signal - either t he
caller’s voice or intercom ring tone:
• Pick up the receiver and the call is connected.
Receiving an Incoming Call
When your phone rings and lamp flashes:
• Press the SPEAKER ke y or lif t the recei ver to
connect the call.
If your p hone does n ot co nnect you t o the ca ll
automatically
When your phone rings and lamp flashes:
• Lift the receiver.
• Press the key with the f lashing lamp to connect
the call.
Save Dialed Number
While speaking on an outside line:
• Press the FEATURE key and dial 2+1.
To dial the saved number
• Lift the receiver.
• Press the FEATURE key and dial 2+1.
Transferring a Call to Another Extension
When speaking on an outside line:
• Press the TRANSFER ke y. When you hear dial
tone.
• Dial an extension number.
or
• Press an extension key.
• Announce the call w hen the extension answers
and hang up or just hang up.
4

5
Self-Labeling Display
The Iwatsu ICON Series IP Telephones are
equipped w ith Self -Labeling keys that suppor t sys-
tem f eatures. When a key is changed on the ke y
pattern of your phone, the label will change. Under-
lined keys have an associated sub-menu.
IX-5930/5910 Self-Labeling Display Navigation
To navigate the Self-Labeling display:
• Use the Next page and Previous page key s to
access page 1 and page 2 on the display.
• The Setup Menu key is used to acce ss Blue-
tooth setu p, LCD C ontrast, I watsu Ticker, a nd
User Options.
Self-Labeling Name Change
You can manually change the name of a key on the
display. T his does not change the f unction of the
key, only how it appears on your display.
Note: If you change the label on a key and that key
assignment is changed, the la bel you assigned to
that key will not change. You cannot change the
name of a Pr ess Page key th rough the key tele-
phone.
To change the name of a key on the display
• Press and hold (five seconds) the key that cor-
responds to the label you want to change.
• When the Label Name Change screen appears,
use the dial pad and the navigation keys to enter
the new name for the key.
• Press Save to sa ve your chan ges or Cancel to
exit the name change without saving.
Note: Characters advance automatically when
changing keys. Advance manually for the same
key.
SELF-LABELING DISPLAY
-,.,&,/,0
[space],@, 1
0
2
ABC
5
JKL
8
TUV
#
3
DEF
6
MNO
9
WXYZ
1
*
4
GHI
7
PQRS
[,],_,!,*(,),?,, ,#
a,b,c,2d,e,f,3
g,h,i,4j,k,l,5m,n,o,6
p,q,r,s,7t,u,v,8w,x,y,z,9

6
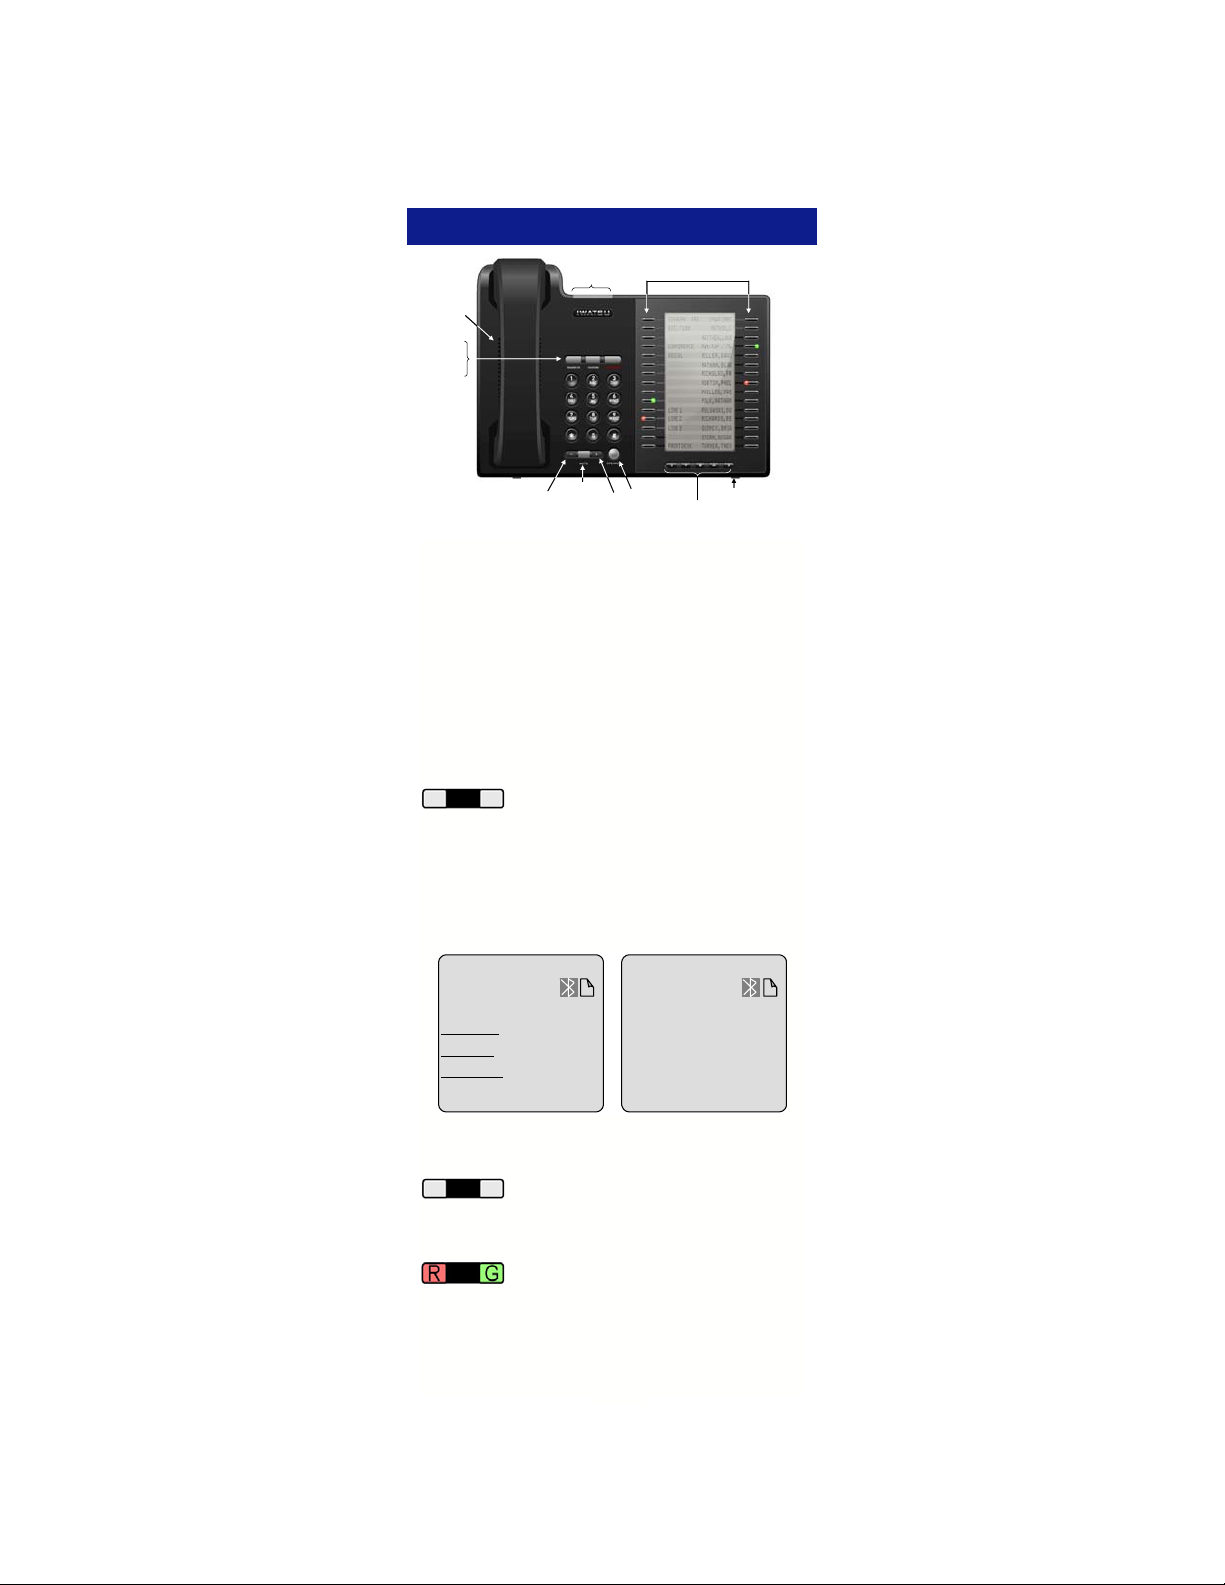
From the Setup M enu you ca n pair a Bluetooth
headset, change the LCD C ontrast, activ ate an
Iwatsu Ticker (T FD), and perform station program-
ming th rough the User Opt ions selection. T he
Setup menu can only be accessed while the phone
is in the idle mode.
Bluetooth*
(Bluetooth QD ID: B012826)
From the Bluetoot h menu, you can Disco ver (pair),
Connect, and Disconnect a Bluetooth headset.
Refer to page 27 for additiona l Bluetoo th inf orma-
tion.
Note: Follow the Blue tooth m anufacturers instr uc-
tions to pr epare your Bluetoot h device for pairing.
Your Blu etooth device must be in the pairing mod e
before beginning this procedure.
To Discover (Pair) a Bluetooth device
• Press the Setup Menu key.
• Press Bluetooth.
• If Blu etooth does not appear on y our LCD ,
you do not ha ve an I X-59BTINF Bluetoot h
module installed in your telephone.
• Press Discover.
• Searching will flash on your display.
• When the discovery process is com plete, select
the ke y that corr esponds to t he na me of the
Bluetooth device your are pairing.
• If Unknown appears on your display, continue
the pairing process. In most cases the dev ice
will pair successfully.
• Enter the Bluetooth dev ice’s Password and
press Enter. (Example password: 0000)
• When pairing is com plete, press Exit. Y ou will
see the Bluetooth icon on your display.
To Disconnect o r Co nnect your Paired B lue-
tooth device
• Press the Setup Menu key.
• Press Bluetooth.
• Select Disconnect or Connect.
• Press Exit.
Setup Menu
Return a key label to its default name
If you have changed the nam e of the key and wish
to return the key name to its default setting:
• Press and hold (f ive seconds ) the desired key
that corresponds to the label you want to retur n
to the default name.
• Delete the key name, press Save without enter-
ing a new name.
• The default key label is now displayed.
SETUP MENU

7
LCD Contrast
Change the LCD contrast
• Press the Setup Menu key.
• Press LCD Contrast.
• Use the Left and Right ar row keys to decrease
or increase the display contrast.
Iwatsu Ticker (TFD)
A ticker URL m ust be pr ogrammed in the s ystem
database to activate this feature.
To Activate the Ticker
• Press the Setup Menu key.
• Press Iwatsu Ticker (TFD).
• Select a ticker (TFD). Up to f ive data sources
can be programmed in the system database.
• Select the ticker scroll Speed:
• Slow
• Medium
• Fast
• Select the Line where the ticker will appear:
• First or Second line of the display.
• The ticker that y ou selected will displa y Acti-
vated.
• Press Exit to return to the main screen.
To Deactivate the Ticker
• Press the Setup Menu key.
• Press Iwatsu Ticker (TFD).
• Select the ticker that is Active (TFD 1-5) . When
the Activ ated TFD is selected, the LCD w ill dis-
play Canceled.
• Press Exit to return to the main screen.
User Options (Station Programming)
Note: If yo ur station does no t have an assigned
Station Passw ord, yo u will not have access to this
feature.
From the User Opt ions menu, you can access and
change your Station U ser ID , Station Password,
Dial Conf irmation T one, Hand set Volum e Control,
Hold Re call T imer, Camp-On Recall T imer, Station
Ring T one, Key Assignments, LCD Backlight D ura-
tion, and Caller ID on Hold.
Note: If Key A ssignments does not appear on your
display, you do not have access to this pr ogram-
ming item. Stations th at share a common key pat-
tern cannot change Key Assign ments and you can-
not change a key while the LED for that key is lit
(red or green/solid or flashing).
Change Your Station User ID
*Please Do Not Change this ID

8
Change Your Station Password
Note: Please Do Not change this password.
Change Your Dial Confirmation Tone
• Press the Setup Menu key.
• Press User Options.
• Enter your Station Password and press Enter.
• Select Dial Confirmation Tone.
• Use the lef t or right nav igation keys to toggle the
Dial Confirmation Tone ON or OFF.
• Press Save and Exit to sav e your change and
return to the main screen.
Change Your Default Handset Volume
If a change is m ade to the v olume while off-hook,
the v olume is r eset to the value programmed her e
after going on-hook.
• Press the Setup Menu key.
• Press User Options.
• Enter your Station Password and press Enter.
• Select Handset Volume Control.
• Use the le ft or r ight na vigation keys to scr oll to
set your Handset Volume to one of four options:
• Minimum Volume Level
• Medium Volume Level
• Maximum Volume Level
• Use Last Volume Level (Retain last setting)
• Press Save and Exit to sav e your change and
return to the main screen.
Change Your Hold Recall Timer
• Press the Setup Menu key.
• Press User Options.
• Enter your Station Password and press Enter.
• Press the right nav igation key to move to the
next menu page.
• Select Hold Recall Timer.
• Use the d ial pad to ente r a new H old Recall
Time.
• Range = 0-255 seconds
• Default = 0 (When set to 0, the system default
Hold Recall Time is used)
• Press Save and Exit to sav e your change and
return to the main screen.

9
Change Your Camp-On Recall Timer
• Press the Setup Menu key.
• Press User Options.
• Enter your Station Password and press Enter.
• Press the right nav igation key to move to the
next menu page.
• Select Camp-On Recall Timer.
• Use the dial pad to enter a new Camp-On Recall
Time.
• Range = 0-255 seconds.
• Default = 0 (When set to 0, the system default
Camp-On Recall Time is used).
• Press Save and Exit to sav e your change and
return to the main screen.
Change Your Station Ring Tone
You may choose o ne of eight different ring tones to
distinguish your station from others.
• Press the Setup Menu key.
• Press User Options.
• Enter your Station Password and press Enter.
• Press the r ight nav igation key to scroll to the
next menu page.
• Select Station Ring Tone.
• Use the lef t or right na vigation key s to scr oll
through and select one of nine ring tones:
• System Tone.
• Station Ring Tones 1-8.
• Press Save and Exit to sav e your change and
return to the main screen.
Change a Key Assignment on Your Station
Note: If Key Assignment does not appea r on your
display, you do not have access to this pr ogram-
ming item. Stations th at share a common key pat-
tern cannot change Key Assign ments and you can-
not change a key while the LED for that key is lit
(red or green/solid or flashing).
• Press the Setup Menu key.
• Press User Options.
• Enter your Station Password and press Enter.
• Press the right nav igation key to move to the
next menu page.
• Select Key Assignment.
• Use the lef t or right na vigation key s to scr oll
through and select one of the Key A ssignment
Categories.
• Select the Key T ype you want to add to your key
pattern.
• Select the key y ou wish to ch ange on y our sta-
tion. T he new K ey T ype that y ou selected will
display in the key location you have selected.
• Select Exit to return to the main screen.

10
Change the LC D B acklight Duration - The LCD
backlight timer can be adjusted for each IX-5930/IX-
5910.
• Press the Setup Menu key.
• Press User Options.
• Enter your Station Password and press Enter.
• Press the r ight nav igation key to scroll to the
LCD Backlight Duration menu page.
• Select LCD Backlight Duration.
• Use the lef t or right na vigation key s to scr oll
through and se lect a backligh t time of 30 sec-
onds (default), 1, 3, 5, 10, 20, 30, 60, 90, or 120
minutes.
• Press Save and Exit to sav e your change and
return to the main screen.
Caller ID On Hold - Enable / Disable Caller ID On
Hold.
• Press the Setup Menu key.
• Press User Options.
• Enter your Station Password and press Enter.
• Press the r ight nav igation key to scroll to the
Caller ID On Hold menu page.
• Select Enabled (default) or Disabled.
• Press Exit to return to the main screen.

Call Log
Your IX-5930 and IX-5910 are programmed to cap-
ture, store, and display telep hone num bers and
Caller ID information for the last 10 Incoming and 10
Outgoing calls with Caller ID, ANI, or DNIS in forma-
tion and time and date stamp.
Note: ACD and ICM Voice An nounce calls are not
stored in the Call Log.
View the Call Log
• Press the Call Log key to display the menu.
• Select an entr y from the Call Log to v iew the
number, trunk, and date and time stamp.
Make a Call from the Call Log
• Press the Call Log key.
• Select an entr y from the Call Log to v iew the
number, trunk, and date and time stamp.
• Press Dial to call the entry that you selected.
You can also delete the Call Log record by selecting
Delete.
Store a Call Log Entry to Personal Speed Dial
This feature is used to store a C all Log en try to a
Personal Speed Dial Bin.
• Press the Call Log key.
• Select the entry from the Call Log.
• Press Save.
• Select a location to store the number. T his can
be an unused <EMPTY> entry or you can s elect
an existing entry to overwrite.
• Select Exit to return to the main menu.
Note: If the Call Log entry you just saved does not
have a na me associa ted w ith the telephone num-
ber, r efer to the D irectory section of this guide to
Add a Name to a Personal Directory entry.
Add Digits to a Call Log Entry
This feature is u sed to add digit(s) t o a Call Lo g
entry before making a call.
• Press the Call Log key.
• Select the entry from the Call Log.
• Enter th e d igit(s) to be added t o th e en try (for
example you may need to add a 1 to dial a long-
distance number).
• Press Dial to call the entry that you selected.
Note: Making a call from the Call Log r equires a
Float or CO line key in the key pattern.
DISPLAY MENU FEATURE OPERATION
11

Call Forward
You can set your phone to forward calls to anothe r
extension, to an ex ternal tele phone number, or a
number stored in your Personal Speed Dial Bin.
You can also separate Call Forward destinations for
ICM calls and CO incoming calls. For example, you
could f orward all ICM calls to ex ternal nu mber or a
number prog rammed in you Personal Speed Dial
Bin and all CO calls to another extension.
Program a Forward Destination
• Press the Call FWD key.
• Press Program.
• Select an ite m to pr ogram. You can select an
<EMPTY> en try or overwrite/edit an ex isting
entry.
• From the Mode Selectio n screen, select Set/
Select Mode.
• You can also choose t o delet e C O or ICM
data or clear a profile from this screen.
• Enter the Call Type you wish to forward.
• CO & ICM (Outside/Intercom).
• CO Only (Outside).
• ICM Only (Intercom).
• Enter the Forward Mode.
• Immediate.
• Busy/No Answer.
• No Answer.
• External/PSD (Personal Speed Dial).
• Press Enter.
For Immediate, Busy/No Answer, No Answer
• Enter the Extension number where you want
your calls forwarded and press Enter.
• Using the dial pad and navigation keys, enter
the Label (name) you want to associat e with
this entry and press Enter to continue. (Refer
to page 5 for data entry).
For External/PSD
Select the E xternal Destination T ype - E xternal
Number or Personal Speed Dial Bin:
• External Number - Enter an external number
where you want y our calls f orwarded and
press Enter.
Note: The external number is store d in Per-
sonal Speed Dial Bin 99.
• Personal Sp eed D ial Bin - If you hav e per-
sonal speed dial num bers pro grammed, you
can select one of those entries.
• Using the dial pad and navigation keys, enter
a Label (nam e) f or the number or entr y you
just enter ed and press Enter to continue.
(Refer to page 5 for data entry).
Note: After programming Call Forwarding, you must
activate a forward destination.
12

Activate a Forward Destination
• Press the Call FWD key.
• Select the ke y that corr esponds to a pr e-
programmed forwarding destination.
• The selected forward destination w ill flash when
activated.
• Press Exit to return to the main menu. The red
LED w ill ligh t on the Call FWD key w hen
forwarding is active.
Forward Status / Forward Cancel
To che ck the For ward status of your phone or to
cancel station forwarding:
• Press the Call F WD key. The active selection will
be flashing and your status will appear on the top
two lines of the display.
• Press the cor responding key t o Cancel cal l
forwarding.
• Press Exit to end the operation and return to the
main screen.
Call Forward—Follow-Me
Set Follow Me (From the destination extension)
• Press the Call FWD key.
• Select the Follow-Me key.
• Enter the number f or the extension y ou are
forwarding from.
• Press Enter.
• Press Exit to end the operation.
Cancel Follow-Me (From the forwarded station)
• Press Call FWD.
• Select the flashing (active) entry.
• Press Exit to end the operation.
Conference Call
The Iw atsu Enterpr ise-CS allows you to m ake
conference calls w ith a ny combination of up to four
extensions and outside lines on the same call.
To Make a Conference Call:
While speaking on an outside or internal call:
• Press th e Conference key (Conference w ill
flash).
• Make your next call (internal or outside call).
• When the party you are cal ling answ ers,
press the Conference key again.
or
• Press Park to park the call.
• Make your next call.
• Press Conference and then Park to complete the
conference.
• After you hea r a tone burst, all par ties a re
connected.
To add another extension or outside line, repeat the
same procedure.
13

14
Directory
Your IX-5930/IX-5910 is equip ped w ith a D irectory
for access to the Inter nal Dire ctory, System Speed
Dial, Personal Speed Dial, and Direct Bin Access.
Internal (Internal Station Directory)
• Press the Directory key.
• Press Internal.
• Select an entry:
• Select an entry on the screen
or
• Select Search and use the dial pad to enter a
search string
or
• Select Navigate an d use the left and right
arrows to page through the Internal Directory
or use the up and down arrows to scroll one
entry at a time.
• To make a call, select the key that corresponds
to the entry you want to call.
LED Sta tus: Solid = Busy, flashing = D ND, and no
LED = available.
External (System Speed Dial Directory)
• Press the Directory key.
• Press External.
• Select an entry:
• Select an entry on the screen
or
• Select Search and use the dial pad to enter a
search string.
or
• Select Navigate an d use the left and right
arrows to page through the Internal Directory
or use the up an d down arrows to scroll line
by line.
• To make a call, select the key that corresponds
to the entry you have selected.
Personal (Personal Speed Dial Directory)
• Press the Directory key.
• Press Personal.
• Select a pr ogrammed entr y o n the scree n and
the number is dialed.
or
• Select Program to program a new entry.
• Select an <Empty> entry or select an entry to
overwrite.
• Using the dial pad, enter a Name for the new
entry. Press Save.
• Using the d ial pad, enter a Number fo r t he
new entry. Press Save.
• Enter the Trunk G roup number (Ra nge =
000-250). 0 = Optimized. Press Save.
• You are returned to the main menu.
Note: You can press Exit to cancel the operation at
any time.

15
Direct Bin Access (Personal Speed Dial Bin)
• Press the Directory key.
• Press Direct Bin Access.
• Enter the Personal Sp eed Dial Bin Number 90-
98 or System Speed Dial Bin Number 000-899.
Note: Personal Speed Dial Bin 99 is used to stor e
the External Call Forward Destination.
Note: Personal Speed Dial Bin number is displayed
when you make a call using Personal Speed Dial.
Add a Name to a Personal Directory Entry
This feature is u sed to add a na me to a stor ed
Personal Speed Dial Directory entry.
• Select Directory.
• Select Personal.
• Select Program and then select the ke y
associated w ith the Personal Spee d D irectory
entry you need to edit.
• From the Enter a Name menu:
• Use the Delete ke y to clear Nam e field (the
caller ID number will displa y in this f ield w hen
there is no name associated with the entry).
• Use the dial pad to en ter a new N ame for your
entry.
• Select Save to sav e th e chang e to the entries
profile name. You will also nee d to se lect Save
for the entry ’s Phone Num ber and T runk Group
Number. If needed , you can make changes to
each of those fields during this process.
-,.,&,/,0
[space],@, 1
0
2
ABC
5
JKL
8
TUV
#
3
DEF
6
MNO
9
WXYZ
1
*
4
GHI
7
PQRS
[,],_,!,*(,),?,, ,#
a,b,c,2d,e,f,3
g,h,i,4j,k,l,5m,n,o,6
p,q,r,s,7t,u,v,8w,x,y,z,9

17
Redial
To autom atically r edial the last (C O call) outsid e
number you called:
• Press the Redial key (If programmed).
Voice Mail
Your Voice M ail Bo x is accessed through the dis-
play menu.
To Access Voice Mail
• Select the Voice Mail menu key.
• If this is the first time that you have connected
to y our voice m ail box, follow the directions
for setting up your voice mail.
• When pr ompted, e nter y our password and fol-
low the voice directions.

19
Busy ICM Callback
When y ou ca ll another e xtension and get a busy
signal, do not hang up.
• Press the ICM CALLBACK key.
• Hang up after you hear a confirmation tone.
When the busy ex tension bec omes available, the
system will call you back.
• Lift the receiver and y ou ar e au tomatically con-
nected to the extension.

20
Call Divert
When a call is ringing at y our station and y our sta-
tion is idle, off hook, or on a call, you can send that
call immediately to your Call F orward No Answer
Destination. This is typically your voice mailbox.
• Press your Voice Mail key.
Note: Call Divert does not apply to ACD Calls.

21
Do Not Disturb
If you do not wish to be disturbed, you can set your
extension to prevent an y call s f rom ringing to or
getting through to your extension.
• Do not lift receiver.
• Press the HOLD/DND key.
The lamp on the HOLD/DND key will stay lit.
To cancel Do Not Disturb
• Do not lift receiver.
• Press the HOLD/DND key.
The lamp on the HOLD/DND key will go out.
Exclusive Hold On Outside Line
A call on “ex clusive” hold may only be picked up
from your extension.
While speaking on an outside call
• Press the key for the outside line you are already
using. T he green lamp on tha t outside line key
will flash slowly on your phone. The red lamp will
stay lit at other extensions.
To retrieve a call on Exclusive Hold
• Press the same outside line k ey on your phone
again to be connected to the call.
Other manuals for ICON Series
1
This manual suits for next models
2
Table of contents
Other Iwatsu IP Phone manuals

Iwatsu
Iwatsu ICON IX-5930 Series User manual

Iwatsu
Iwatsu Enterprise 3.0 User manual

Iwatsu
Iwatsu ADIX APS User manual

Iwatsu
Iwatsu ICON Series IX-5910 User manual

Iwatsu
Iwatsu ADIX APS Omega-Phone Digital Multiline... User manual

Iwatsu
Iwatsu Icon IX-5900 User manual

Iwatsu
Iwatsu Platinum Series User manual