Iwatsu Enterprise 3.0 User manual

All features listed except those marked with a † require the user to lift the receiver before
operating the feature. Press [FEAT]+[#]+[9]+[button] to determine the function of a button.
Absence Message
Return Time.....................[Absence Message] + 1 + HH:MM
Return Date .....................[Absence Message] + 2 + DD
Meeting Time...................[Absence Message] + 3 + HH:MM
Telephone No..................[Absence Message] + 4 + (Phone No.) + #
Cancel.............................[Absence Message] + *
Account Code .....................[Account Code] + (Code) + *
Auto Repeat Dial.................[Auto Repeat Dial]
Cancel.............................[Auto Repeat Dial] + *
BGM-On†............................[BGM]
Off† .................................[BGM]
Busy ICM Callback..............[ICM Call Back]
Cancel.............................[ICM Call Back] + *
Busy Number Callback........[Timed Trunk Queue]
Cancel.............................[Timed Trunk Queue] + *
Busy Trunk Queue ..............[Trunk Queuing]
Cancel.............................[Trunk Queuing] + *
Call Coverage [CCV]...........[Delayed n], [Immed. n], [No ring n]
Immediate........................[CCV] + 1
Delay Indication ...............[CCV] + 2
No Ring ...........................[CCV] + 3
Call Mode Change ..............Tone to Voice: ICM extension + #
Call Mode Change†.............Voice to Tone: [Calling Mode CHG]
Call Park Pick Up................[Call Park Pickup] + Ext.No.
Call Pick Up
Internal Group..................[Call Pickup In]
External Group.................[Call Pickup Out] + Group No.
Direct Extension...............[Spec. Call Pickup] + Ext.No.
Conference
Add On............................[TRAN] + Ext.No.+ [ADD]
Multi Line.........................[HOLD] + (Line 2) + [ADD] + (Line 1)
Trunk to Trunk .................[HOLD]
Display Change...................[LCD Mode Change]
Extension Lock....................[Station Lockout] + (Password)
Release ...........................[Station Lockout] + (Password)
Flexible Call Forwarding
All....................................[FORWARD] + Call Type (1-3) + 1 + (Destination)
Busy/No Answer ..............[FORWARD] + Call Type (1-3) + 2 + (Destination)
No Answer.......................[FORWARD] + Call Type (1-3) + 3 + (Destination)
All External ......................[FORWARD] + Call Type (1-3) + 4 + (Destination (90-99))
Cancel.............................[FORWARD] + * + Call Type (1-4)
Follow Me [FORWARD] + [FORWARD] + Call Type + (Ext. No.)
Flash-Short.........................[Short Flash]
Last No. Redial ...................[SPEED] + #
Meet-Me Page Answer........[Meet Me]
Memo Dial
Set...................................[Memo Dial] + (Phone No.) + [Memo Dial]
Dial..................................[Memo Dial]
Message Waiting
Set...................................[MESSAGE] + #
Cancel.............................[MESSAGE] + * + Ext.No.
Display.............................[MESSAGE]
Answer ............................[MESSAGE] + #
Clear................................[MESSAGE] + * *
Privacy Release..................[Privacy Release]
Save No. Redial..................[Save No. Redial]
Speaker Phone
Full/Half duplex................[Speaker Duplex]or [FEAT]+ [6] + [6]
Speed Dial Registration†
Number............................[FEAT] + [SPEED] + (Code) + (Phone No.) + [FEAT]
Trunk Group.....................[FEAT] + [SPEED] + # + (Code) + (LineNo.) + [FEAT]
Name...............................[FEAT] + [SPEED] + * + (Code) + (Name) + [FEAT]
Speed Dial..........................[SPEED] + (Code)
Speed Dial-Scroll ................[SPEED] + * + (Code) + */# + [SPEED]
Transfer to Park..................[TRAN] + [PARK] + Ext.No.
Time Reminder
Set...................................[Reminder] + HH:MM
Cancel.............................[Reminder] + *
Universal Night Answer.......[UNA Pickup]
Whisper Page .....................Press *
Depending on the hardware, software and programmed functions in your Iwatsu system,
available features and feature operations may differ from those listed in this guide. For
more information contact your authorized Iwatsu distributor.
FEATURE OPERATION CODES
1-800-974-5070
www.iwatsu.com
Iwatsu Voice Networks
8001 Jetstar Drive
Irving, TX 75063

The Enterprise 18i/d Platinum Series Telephone
This guide describes basic and advanced features
and operations for Iwatsu Enterprise-CS Platinum
Series IP and Digital Telephones.
For more information, refer to your Iwatsu Owner’s
Manual or contact your authorized Iwatsu distributor.
Only Iwatsu qualified personnel are authorized to
install any component of an Iwatsu system. Should
you require service, please contact your authorized
Iwatsu distributor.
Multipurpose Keys - These keys can be
programmed for specific functions, including
outside line access, individual extension selection,
and one-touch feature operation.
Note: Multipurpose keys must be programmed for
your individual station and are denoted in this guide
by [ ]. For example: [TEXT MSG].
Key Lamps - These lamps light up or flash
when someone is using the line or feature
corresponding to that key. A green lamp indicates
that you are using that line/feature. A red lamp indi-
cates that someone else is using that line/feature.
Speaker - This button allows you to dial and
receive outside or internal calls and talk with-
out lifting the receiver.
Mute Key - When talking using the handset,
pressing the Mute key mutes the handset
transmitter. If using the speakerphone, press-
ing the Mute key mutes the station microphone.
When using the headset jack, the Mute key mutes
the transmitter on the headset.
INTRODUCTION
1
Forward
Call Log
EZDial
VMail
Park
SpeedDial
Redial
15 TUE 10:40 AM
Scott X3202
L
Last Number Redial........................................3
Layer 2 Switch................................................23
M
Mailbox ........................................................... 2
Making an Intercom Call................................. 3
Making an Intercom Group Call...................... 3
Making an Outgoing Call ................................3
Master Hunt Groups ....................................... 19
MENU KEYS...................................................5
Message Waiting............................................19
Multipurpose Keys..........................................1
Mute Key.........................................................1
N
Notes Page.....................................................24
P
Paging.............................................................19
Park ................................................................ 9
Personal Ringing Tones ................................. 20
Picking Up a Call On Hold..............................4
Putting a Call On Hold....................................4
R
Receiving a Call From Another Extension...... 4
Receiving an Incoming Call............................4
Redial.............................................................. 10
S
Save Dialed Number....................................... 4
Speaker .......................................................... 1
Speed Dial (18i/d)...........................................11
Speed Dial (12i/d)...........................................12
T
Text Messaging ..............................................20
TRAN (Transfer).............................................2
Transferring a Call to Another Extension........4
Transfer to Park.............................................. 10
U
Universal Night Answer ..................................22
V
Voice Mail.......................................................14
Volume Control............................................... 2
(Receiver, Ringer, and Speaker Volume)
W
Whisper Page.................................................22
26

Symbols
911 Support....................................................3
Keys................................................................1
A
ADVANCED FEATURES................................14
Answering Machine Emulation
(Voice Mail Monitor)...............................14
B
BASIC FEATURES.........................................3
Busy ICM Callback .........................................15
Busy Number Callback ...................................15
C
Call Coverage.................................................15
Call Log...........................................................7
Call Pick-Up....................................................17
Internal Group.............................................17
Direct Extension..........................................17
Call Recording ................................................17
Call Storage (System).....................................16
Conference Call..............................................6
D
DIRECT INWARD SYSTEM ACCESS ...........23
DISPLAY MENU FEATURE OPERATION.....6
Do Not Disturb ................................................18
E
ePod (Easy Point of Decision) .......................2
E-Response Help Call ....................................14
Exclusive Hold On Outside Line .....................18
EZDial.............................................................7
F
FEAT (Feature)...............................................2
FEATURE OPERATION CODES.....Back Cover
Flash...............................................................18
Forward...........................................................8
Forward (Follow-Me).......................................8
Forward (Quick Set)........................................9
H
HOLD/DND (Hold/Do Not Disturb)..................2
Half / Full-Duplex Speakerphone Toggle........3
I
ICM.................................................................2
INTRODUCTION ............................................1
K
Key Lamps......................................................1
25
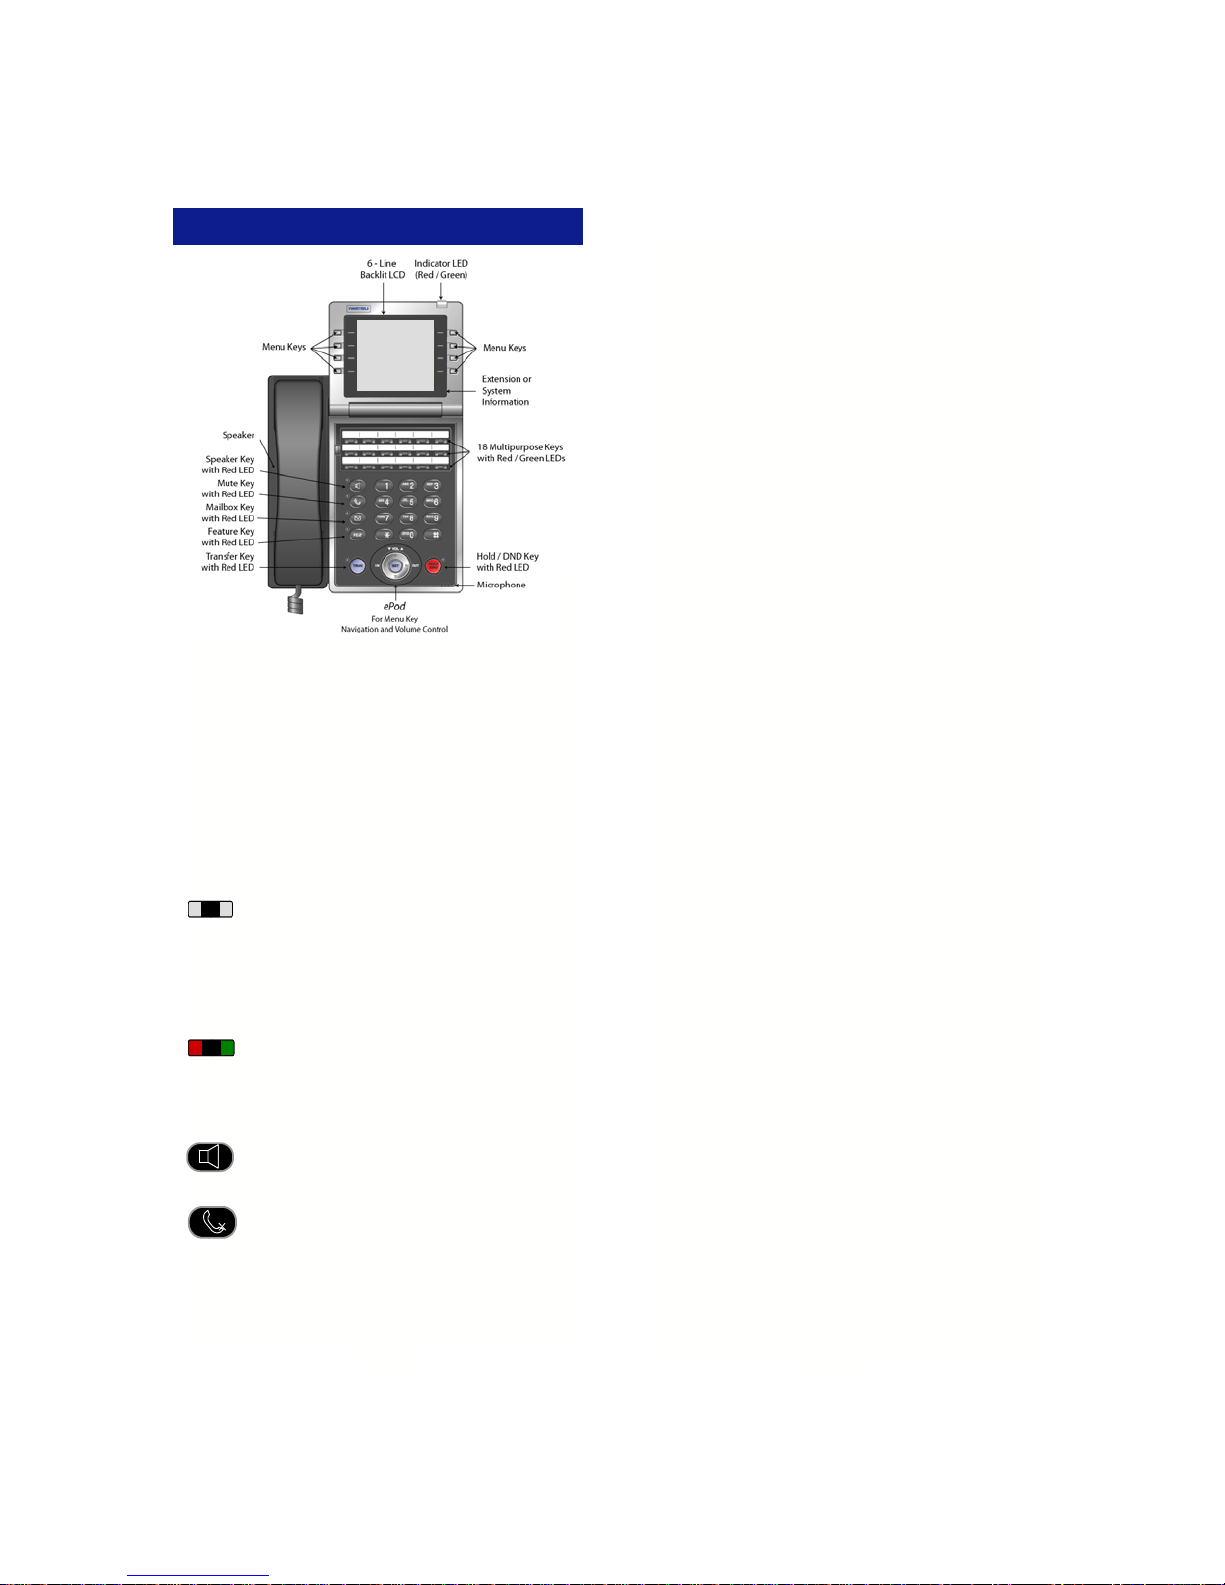
INDEX Mailbox - This key is used to access your
voice mailbox.
FEAT (Feature) - This button is used to
access many Iwatsu system features.
TRAN (Transfer) - This button allows you
to transfer a call from your phone to another
extension.
HOLD/DND (Hold/Do Not Disturb) -
This key is used to put a call on Hold or to
set the Do Not Disturb function and prevent
any calls from getting through or ringing at your
extension.
ePod (Easy Point of Decision) is used for easy
access to the Display Menu, navigating the Call
Log, and changing volume levels on your Enterprise
18i/d Telephone.
• Press IN or OUT to access incoming or outgoing
call records.
• Press the VOL up or down arrows to control
receiver, speaker, ringer, and handset volumes.
• Press the SET button and use the arrows to
scroll through the menu options.
Volume Control:
The UP and DOWN arrow volume control keys are
used to adjust the Handset, Ringer, and Speaker
volume based on the state of the telephone.
• Receiver (Handset) Volume - When using the
Handset, the volume control key allows you to
adjust the handset volume to one of three levels.
• Ringer Volume - Pressing the ringer volume
control button allows you to adjust the ringer
volume to one of four levels.
• Speaker Volume - When using the Speaker, the
volume control allows you to adjust the speaker
volume to one of eleven levels.
ICM - The intercom system is the internal network
used to communicate between the telephone exten-
sions in your Iwatsu system. Pressing the [ICM]
button connects you to an intercom line for conver-
sation with other extensions.
2
TRAN
FEAT
HOLD
/DND
Enterprise 18i/d Enterprise 12i/d
SET
VOL
IN OUT V O LV O L
SET
VOL
IN OUT

911 Dialing
At default, your Iwatsu system is programmed to
automatically contact your local Public Safety An-
swering Point (PSAP) when 911 is dialed. Enhanced
911 Service ensures that when 911 is dialed from a
system extension, information that allows the PSAP
to identify the caller’s location in a building is sent to
the PSAP along with the call. Check with your sys-
tem installer or Authorized Iwatsu Distributor to make
sure your system is programmed for Enhanced 911
Service.
Half / Full-Duplex Speakerphone Toggle
To toggle the speakerphone from half to full-duplex:
• Lift the receiver.
• Press [Speaker Duplex].
or
• Press FEAT and dial +(full-duplex).
• Press FEAT and dial ++(half-duplex).
Last Number Redial
To automatically redial the last outside (external)
number you called:
• Lift the receiver.
• Press Scroll > Speed button and dial (12i/d).
or
• Press the Redial menu key (18i/d only).
Making an Intercom Call
• Press the Speaker key or lift the receiver and
wait for dial tone.
• Dial an extension number.
or
If you have a [DSS] (Direct Station Selection) button
assigned for the extension you are calling:
• Press the assigned extension button.
or
If you have an EZDial entry assigned for the
Extension (18i/d only):
• Press EZDial and select the extension.
Making an Intercom Group Call
• Dial the Intercom Group access number when
you hear the intercom dial tone.
Making an Outgoing Call
• Press the Speaker key or lift the receiver.
• Press an outside line button. You will hear a dial
tone.
• Dial telephone number.
Make a dialing mistake?
• Press the [FLASH] or outside line button to get
new dial tone.
• Dial again.
3
BASIC FEATURES
24
NOTES

23
Direct Inward System Access (DISA) allows an
external caller to access Iwatsu system features
from outside the office. Feature operation for DISA
calls is the same as those for the Single Line Tele-
phone. Certain DISA features, including making an
outside call and system paging access require a
security password.
Note: DISA must be enabled in the system. Check
with your system administrator.
Operation
• When the phone system answers, the caller will
hear either a message or a special DISA dial
tone.
To Interrupt the Message
• Press +. You will hear DISA dial tone.
To make an intercom or hunt group call
• Dial the desired extension number or hunt group
access code.
To access all DISA features:
• Dial +.
• Dial .
• Dial the assigned password. You will have the
calling capabilities assigned to the DISA line.
or
• Dial an extension number followed by that exten-
sion’s Station Restriction Password. You will
have the same calling capabilities as that exten-
sion.
• Wait for the intercom dial tone.
• Dial the desired extension number, hunt group
access code, paging access code or outside line
access code and phone number.
To register a flash to make another call
• Dial +.
• Once an outside call has been made, another
call may not be placed.
DIRECT INWARD SYSTEM ACCESS
There are two jacks on the back of your Platinum
Series IP Telephone. One jack is labeled “PC” and
the other is labeled “LAN”. Use the PC jack to
connect to a second device.
To use the layer 2 switch:
• Connect on Category 5 cable from the PC jack
on the IP telephone to the NIC card on your
PC.
• Connect one Category 5 cable from the LAN
jack on the IP telephone to the wall jack con-
nected to the local area network.
For a full list of Display Menu features, please
refer to the IP Telephone User Guide in your
Iwatsu Owner’s Manual.
LAYER 2 SWITCH
Picking Up a Call On Hold
• Press the key with either the green or the red
flashing lamp to pick up the call being held on
that line.
Putting a Call On Hold
When speaking on an outside line:
• Press the HOLD/DND button.
The active outside line button lamp flashes green on
your phone and red at other extensions.
If the call is not picked up, the call will ring again at
your phone.
Receiving a Call From Another Extension
When you hear the intercom call signal - either the
caller’s voice or intercom ringing tone:
• Pick up the receiver and the call is connected.
or
• Speak into the microphone without lifting the
receiver.
Receiving an Incoming Call
When your phone rings and lamp flashes:
• Press the Speaker key or lift the receiver to
connect the call.
If your phone does not connect you to the call
automatically
When your phone rings and lamp flashes:
• Lift the receiver.
• Press the button with the flashing lamp to
connect the call.
Save Dialed Number
While speaking on an outside line:
• Press the FEAT button and dial +.
or
• Press the [SAVE DIAL] button (if assigned).
You will hear a confirmation tone that indicates the
phone number you just dialed has been saved.
To dial the saved number
• Lift the receiver.
• Press the FEAT button and dial +.
or
• Press the [SAVE DIAL] button (if assigned).
• The saved number is automatically dialed.
Transferring a Call to Another Extension
When speaking on an outside line:
• Press the TRAN button. When you hear dial
tone.
• Dial an extension number.
or
• Press an extension button or EZDial selection
(if assigned).
• Announce the call when the extension answers
and hang up or just hang up.
4

5
Menu Key Features
The Enterprise 18i/d and Enterprise 12i/d Digital
Telephones are equipped with menu keys. Fre-
quently used features that are accessible via the
Menu keys are listed below:
Note: Depending on your software version, all
menu keys listed below may not appear on your
display.
• Call Conference.
• Call Forward.
• Call Park.
• Voice Mail.
• Speed Dial.
Only available on the Enterprise 18i/d:
• Call Log for incoming and outgoing calls.
• EZDial for access to ten direct station selections.
(When programmed in the system database)
• Redial.
Enterprise 18i/d Menu Key Access
Access the display menu by one of two methods:
1. Select the corresponding Menu key next to the
feature shown on the display.
or
2. Select the ePod SET button located below the
telephone key pad and using the UP, DOWN, IN,
and OUT arrows to scroll through the menu as
shown below.
Enterprise 18i/d Display Menu
MENU KEYS
Scroll Up
Scroll Down
Set
Key
Scroll Left Scroll Right
VMail
Park
15 TUE 10:40 AM
Scott
Forward
Call Log
EZDial SpeedDial
Redial
X3202
22
Universal Night Answer
If you need to pick up an incoming call when the
system is in the night mode:
• Lift receiver.
• Press FEAT button and dial +.
or
• Press the [UNIVERSAL NIGHT ANSWER] but-
ton (if assigned).
You are connected with the incoming call.
Whisper Page
You may communicate with a busy station without
interrupting their call using the Whisper Page fea-
ture.
To communicate with a busy extension:
• After calling a busy station, press the button.
• You may now speak to that extension.
To Respond to Whisper Page
After receiving a whisper page while on a call:
• Press the button to speak with the extension
that called using the whisper page feature.
• Press the button a second time to resume
speaking with the original calling party.
Note: The original calling party cannot hear the
whisper page or your response to a whisper page.
To Respond to Whisper Page with a Text Mes-
sage:
After receiving a whisper page while on call follow
the procedures in Text Messaging feature.

21
To display a stored text message
• Press [TEXT MSG] + to display a stored text
message.
To respond to a stored text message by calling
the originating extension:
• Press [TEXT MSG] + to display the stored text
message.
• Press a second time to call the station that
sent the text message.
To delete a stored text message
While your text message key is lit:
• Press [TEXT MSG] + + .
Scrolling and Selecting Text Messages
To Scroll through the available system text mes-
sages:
• Go off hook and press [TEXT MSG] + + text
message number (00-89).
• With a message displayed press to scroll for-
ward and to scroll backward.
To scroll through the available personal text
messages
• Go off hook and press [TEXT MSG] + + text
message number (90-99).
• With a message displayed press # to scroll for-
ward and to scroll backward.
Registering Personal Text Messages
To enter a personal text message:
• Press FEAT + [TEXT MSG] + text message
number (90-99).
• Press the following keys for text message data
entry:
• Press [FEAT] to end the operation.
[FEAT] All delete [HOLD] Enter/1 character delete
-,.,[space],1
G,H,I,4
A,B,C,2 D,E,F,3
M,N,O,6
W,X,Y,Z,9
Upper/lower case
J,K,L,5
T,U,V,8
&,0
P,Q,R,S,7
Alphanumeric
6
Enterprise 12i/d Display Menu Access
Access the display menu by selecting the corre-
sponding Menu key below the feature name shown
on the display.
Enterprise 12i/d Display Menu
First Screen
Second Screen
15 TUE 10:40 AM
Speed Fwd Scroll
15 TUE 10:40 AM
Speed Fwd Scroll
15 TUE 10:40 AM
VMail Park Scroll
15 TUE 10:40 AM
VMail Park Scroll
DISPLAY MENU FEATURE OPERATION
Conference Call
The ECS allows you to make conference calls with
any combination of up to four extensions and
outside lines on the same call.
To Make a Conference Call:
Note: All outside parties must be added to the
conference prior to adding an internal party.
While speaking on an outside (Ext) or internal (ICM)
call: The 12i/d display text is denoted with ( ).
• Press the Conf button on the display.
• Select Internal (ICM) or Outside (Ext):
• Internal (ICM)—Dial the extension you wish
to add to the conference or make your
selection from the EZDial menu (if
programmed).
• When the party you are calling answers,
select the Add Call (Add) menu key.
or
• Outside (Ext)—
• Select New Call (New) and dial the
number you wish to add to the conference.
• When the party you are calling answers,
select the Add Call (Add) menu key.
or
• Select Held Call (Held) to add a parked
call or call on hold to the conference.
• After you hear a tone burst, all parties are
connected.
To add another extension or outside line, repeat the
same procedure.

7
Call Log (18i/d only)
Your Enterprise 18i/d is programmed to capture,
store, and display telephone numbers and Caller ID
information for the last 10 Incoming and 10 Outgo-
ing calls with Caller ID, ANI, or DNIS information.
View the Call Log
Using the Menu:
• Press the Call Log menu on your display.
• Select Incoming or Outgoing Call Log.
• Make your Selection:
• Next (For next Call Log entry).
• Previous (For Previous Call Log entry).
• Delete (Number displayed).
• Dial (Number displayed or press Set to dial).
• In/Out (Switch between Incoming and Outgo-
ing Call Log).
• Exit (To exit the Call Log).
Add Digits to a Call Log Entry
This feature is used to add digit(s) to a Call Log
entry before making a call.
• Press the IN or OUT button to display an Incom-
ing or Outgoing Call Log entry.
• Enter the digit(s) to be added to the entry (for
example you may need to add a to dial a long-
distance number).
• Press the Set button to dial the number.
Note: This feature requires a Float or CO line key in
the key pattern and ECS software version 3.0 or
above.
Using the ePod to Navigate the Call Log
• Press the IN or OUT button to display the Incom-
ing or Outgoing Call Log entries.
• Use the Up or Down buttons to scroll through
the Incoming or Outgoing Call Log.
• To place a call, select an entry and press Set.
EZDial (18i/d only)
Your Enterprise 18i/d can be programmed to have
one to ten direct station selections located in the
EZDial directory.
• The EZDial feature will not appear on your tele-
phone menu display until programmed in the
system database by your Authorized Iwatsu Dis-
tributor.
Note: When a change is made to your EZDial pro-
gramming, it is important to reset your Enterprise
18i/d telephone for the EZDial change(s) to take
effect.
Scroll Up
Scroll Down
Incoming
Call
Records
Outgoing
Call
Records
SET
Press
to Dial
20
Personal Ringing Tones
You may choose one of eight different ringing tones
to distinguish your station from others.
To play a ringing tone at your system extension:
• With your station idle press FEAT + +
+ -.
To select a ringing tone for your system exten-
sion:
• With your station idle press FEAT + + + -
+ .
To restore default ringing tone at your system
extension:
• With your station idle press FEAT + + + +
.
Text Messaging
You may send a manual signaling or busy bypass
text message to the display of another system ex-
tension. You may also send a stored text message
that lights the Text Message button [TEXT MSG] at
another system extension.
Busy Bypass/Manual Signaling Text Messages
To select and send a manual signaling text mes-
sage:
• Lift the receiver and press [TEXT MSG] + text
message number (00-99), or [TEXT MSGn].
• Dial an extension number or press [DSS] or
[CCV].
To select and send a busy bypass text message
While calling a busy or idle extension:
• Press [TEXT MSG] + text message number (00-
99), or [TEXT MSGn].
To respond to a busy bypass text message while
on a call
While on a call with a busy bypass text message on
your display:
• Press [TEXT MSG] + + text message number
(00-99) + [TEXT MSG].
To delete a busy bypass text message from your
display
While a text message is on your display:
• Press [TEXT MSG] + + .
Stored Text Messages
To select and send a stored text message to
another system extension
While calling a busy or idle extension:
• Press [TEXT MSG] + text message number (00-
99), or [TEXT MSGn].
• Press .

19
Master Hunt Groups
The Enterprise-CS allows extensions to be pro-
grammed into Hunt Groups. Each Hunt Group is
assigned code and when dialed the system
searches for the first idle extension.
To Call a Hunt Group
• Lift the receiver.
• Wait for the dial tone.
• Dial Hunt Group access code.
or
• Press [HUNT] if assigned as a Multipurpose
button.
Message Waiting
To Leave a Message
When the extension you are calling is busy or does
not answer:
• Do not hang up.
• Press the [MESSAGE] button and .
• After you hear the confirmation tone, hang up.
The [MESSAGE] button lamp will stay lit at the
called extension.
To Cancel Message Waiting
If you want to cancel a message you left at an ex-
tension:
• Lift the receiver.
• Press the [MESSAGE] button and , then dial
the extension number.
• After you hear a confirmation tone, hang up.
The [MESSAGE] button lamp will go out at the
extension.
Note: This feature is not available if the [MBOX]
key is used for voicemail access.
To Answer Messages
When the [MESSAGE] button lamp is lit at your
extension:
• Lift the receiver.
• Press the [MESSAGE] button until the desired
extension number is displayed.
• Press .
The system will automatically call back the exten-
sion that left the message.
Paging
• Lift the receiver or press the Speaker key.
• Press the [PAGE] key or dial the page access
code.
• When you hear the confirmation tone, make your
announcement by speaking into the receiver.
• Hang up or press the Speaker button to end the
page.
8
To Access the EZDial Directory:
• Press the EZDial menu key (If programmed).
• Press the menu key next to the station name or
number you wish to call.
Forward
Set Forward Destination
From the Display Menu:
• Press the Forward (or Scroll > Fwd)menu key
on your display.
• Press Set.
• Enter the Call Type you wish to forward.
• CO & ICM (Outside/Intercom).
• CO Only (Outside).
• ICM Only (Intercom).
CO and ICM calls can be forwarded to different
numbers.
• Enter the Destination:
• Internal (Int) - Enter the Forward Mode for
Internal Calls.
• All calls to another extension or hunt
group.
• Busy/NA (B/NA) calls to another
extension or hunt group.
• No Answer (NA) calls to another
extension or hunt group.
• Enter the extension number for forwarding.
• External (Ext) - Enter the destination using
Personal Speed Dial Codes 90-99.
• Press the Speaker button to end the operation.
An asterisk* will appear next to the Forward feature
on your display when the station has been
forwarded.
Forward Status / Cancel
To check the Forward status of your phone or to
cancel station forwarding:
• Press the Forward (or Scroll > Fwd) menu
key—only once to see the current status.
• The 12i/d will first display the current forward
status for two seconds.
• Press Clear, to cancel forwarding.
• Press the Speaker button to end the operation.
Forward—Follow-Me
Set Follow Me (From the destination extension)
• Press the Forward (or Scroll > Fwd)menu key.
• Press Follow Me (18i/d).
or
• Press Scroll > Follow (12i/d).
• Enter the Call Type you wish to forward:
• All Calls (CO/Intercom).
• CO Only.
• ICM Only.
• Enter the extension number of the station to
forward.
• Press the Speaker button to end the operation.

9
Cancel Follow Me (From the forwarded station)
• Lift the receiver (handset).
• Press Forward (or Scroll > Fwd)—only once.
• The 12i/d will first display the current forward
status for two seconds.
• Press Cancel.
• Press the Speaker button to end the operation.
Forward—Quick Set
The Forward—Quick Set feature allows you to turn
on/off the current forward destination programmed
on your 18i/d or 12i/d telephone.
Forward Quick Set Active/Inactive
Follow the Set Forward Destination procedure on
the previous page to enable the Quick Set menu.
The Quick Set menu will not be active if the
Forward Cancel feature has been used or if the
station has not been forwarded.
Use the Quick Set menu to activate and deactivate
your station’s forward status.
Once the station has been forwarded, follow the
steps below to set the forward status to inactive or
active:
• Press Forward (18i/d).
• Press Quick Set.
• Press Exit to return to the main menu.
or
• Press Scroll > Fwd (12i/d).
• Press Scroll > Q-Set.
• Lift the receiver to return to the main menu.
• When the asterisk*appears, forward is active
• When the asterisk*disappears, forward is
inactive.
Park
Park a call so that it can be answered from another
extension.
Putting a call in Call Park
When speaking on an outside line:
• Select the Park menu key.
• You will hear confirmation tone and an asterisk*
will appear next to the Park menu key.
• Hang up the phone.
If the call is not picked up, the call will return to
your phone.
Picking up a call that is Parked
From the extension that parked the call:
• Lift receiver or press the Speaker key.
• Press the Park* menu key.
From another extension:
• Lift receiver or press the Speaker key.
• Press the Park menu key.
• Dial the extension number where the call is
parked to pick-up the call.
18
Do Not Disturb
If you do not wish to be disturbed, you can set your
extension to prevent any calls from ringing to or
getting through to your extension.
• Do not lift receiver.
• Press the HOLD/DND button.
The lamp on the HOLD/DND button will stay lit.
To cancel Do Not Disturb:
• Do not lift receiver.
• Press the HOLD/DND button.
The lamp on the HOLD/DND button will go out.
Hold/Quick Forward Operation
• If your phone is equipped with this feature,
pressing HOLD/DND will automatically forward
all incoming calls to your fixed call forward
destination.
Exclusive Hold On Outside Line
A call on “exclusive” hold may only be picked up
from your extension.
While speaking on an outside call:
• Press the button for the outside line you are
already using. The green lamp on that outside
line button will flash slowly on your phone. The
red lamp will stay lit at other extensions.
To retrieve a call on Exclusive Hold:
• Press the same outside line button on your
phone again to be connected to the call.
Flash
Flash allows you to receive a dial tone on the same
outside line that you are using without having to
hang up. Flash may also be used to receive an
intercom dial tone to place another intercom call.
After you complete a call or if you make a
dialing mistake:
• Press [FLASH].
• Dial the new number.
To Use Centrex or PBX features:
• Press [S FLASH]:
• Dial the new number or feature code.
If your phone does not have [FLASH] or [S
FLASH] buttons:
• Press FEAT then dial +for Flash.
• Press FEAT then dial +for Short Flash.

17
To change the type of indication at your phone:
• Do not lift the receiver.
• Press the FEAT button.
• Press the desired [CALL COVERAGE] button.
The present indication mode will be displayed.
• Dial the number for the desired mode.
• Dial for immediate display and ringing.
or
• Dial for delayed indication (display and ringing
starts if call is not answered within a
preprogrammed time).
or
• Dial for no ringing (lamp indication only).
Call Pick-Up
Internal Group
You may answer calls to any extension in your pick-
up group without dialing the extension number.
When you hear a call ringing at another extension:
• Lift receiver.
• Press FEAT and dial +.
or
• Press the [GROUP CALL PICK-UP] button (if
assigned).
The incoming call is connected to your extension.
Direct Extension
You may also answer an incoming call at another
extension.
• Lift the receiver.
• Press the FEAT button and dial +.
or
• Press the [DIRECT CALL PICK-UP] button.
• Dial the number of the extension where the call is
ringing.
The incoming call is connected to your extension.
Call Recording
You can record a call to voice mail by following the
procedures listed below:
Important: Use of this feature may be prohibited by
state law.
To start recording a call to voice mail
While on an ICM, outside line or conference call:
• Press the [RECORD] button.
• Your call will begin recording to voice mail.
Note: A four-party conference call cannot be
recorded.
To stop recording a call to voice mail
While recording a call with the [RECORD] button lit:
• Press the [RECORD] button or hang up.
To play a recorded call:
• Follow the same procedure for playing a voice
mail message.
10
Transfer to Park
You can transfer a call to another user’s individual
park on their telephone. The call can then be picked
up remotely from another telephone. The call can
also be picked up from the telephone where it is
parked.
Transferring a call to another user’s individual
park
When speaking on an outside line:
• Press TRAN + the Park menu key.
• Dial the number of the extension where the call
is to be parked, or press the extension button (if
assigned).
• When you hear confirmation tone, hang up.
• An asterisk*will appear next to the Park menu
key on the user’s phone.
• If desired, use the paging system to inform the
user of the call parked on their telephone.
Picking up a call parked on your individual park
from your telephone
• Lift the receiver or press the Speaker key.
• Press the Park menu key.
Picking up a call parked at another telephone
• Lift the receiver or press the Speaker key.
• Press the Park menu key.
• Dial the number of the extension where the call
is parked, or press the extension button (if
assigned).
Redial (18i/d only)
To automatically redial the last (CO call) outside
number you called:
• Press the Redial menu key.

11
Speed Dial (18i/d only)
Enterprise 18i/d Speed Dial navigation:
The Enterprise 18i/d has enhanced speed dial
menu features that allow you to easily Call, Search,
and Edit speed dial listings.
To Speed Dial a Number
When you want to Speed Dial a registered number,
perform one of the following operations:
Quick Dial
• Press SpeedDial.
• Dial the Speed Dial Code or select one of the
personal speed dial entries.
The system will automatically dial the registered
number.
Outside Line Pre-Select
• Press an outside line button.
• Press the SpeedDial button, then dial the two or
three-digit Speed Dial Code.
The system will automatically dial the registered
number.
Speed Dial Programming
Edit an existing or create a new personal speed
dial entry (Bin 90-99):
• Press SpeedDial and select Edit.
• Select:
• Number to change or add phone number.
• Enter the Bin number (90-99) to edit.
• Use the key pad to enter the new phone
number.
• Select Save to save your entry.
To register a pause time:
• At the desired location, press HOLD/
DND.
• Dial to for the desired pause time in
seconds and then dial the remaining dig-
its.
• Name to change or add a name.
• Enter the Bin number (90-99) to edit.
• Use the key pad to enter the new name.
After each letter, select the Enter/Del but-
ton to move to the next character.
• Select Save to save your edited entry.
• The 18i/d must be reset for the change to
appear in the personal speed dial listing.
• Trunk to change the trunk group number
associated with a speed dial entry.
• Enter the Bin number (90-99) to edit.
• Enter the new trunk group (000-250).
• Select Save to save your change.
Call Storage (System)
Your telephone may be programmed to capture,
store and display telephone numbers and IDs from
calls received with Caller ID, ANI or DNIS informa-
tion. This feature requires a Call Storage Key to be
programmed on your key pattern.
To view call information:
For station:
• Press Speaker.
• Press the illuminated [USAS] key to display in-
formation about the first call that occurred at
your station.
• Press to scroll forward and to scroll back-
ward in sequence.
For trunk group:
• Press Speaker.
• Press the illuminated [UST] key, or
• Press the [USAT] key + trunk group number to
display information about the first call that oc-
curred on a specific trunk group.
• Press to scroll forward and to scroll back-
ward in sequence.
To delete a call record from system memory:
• With a call record displayed, press the [UAD]
key.
To make a call by automatically dialing the
Caller ID number:
• Display a call record.
• Press the [USAS] key, [USAT] + trunk group
number or [UST] key a second time.
or
• Press [FLT], [OPT], or [COL].
To add digits to the displayed number before
calling out:
• Display a call record.
• Dial the additional digits to be added to the out-
going number (the added digits do not appear on
the display when entered).
• Press the [USAS] key, [USAT] + trunk group
number or [UST] key a second time.
or
• Press [FLT], [OPT], or [COL].
OPT
USAS
USAT/
UST
FLT
COL
UAD
KEY KEY MEANING KEY LABEL
Retrieve Caller ID for Abandoned or All Calls
from Your Station
Retrieve Caller ID for All Calls to Your Station that
were Abandoned on a Specific Trunk Group
(Flexible) or (Fixed 1-250)
Floating Outside Line Group Access
Optimized Routing (Make an Outgoing Call
using Least Cost Routing)
Central Office Line Key (Used to Access a
Specific Trunk to Make an Outgoing Call)
Abandoned Call Delete (Delete Caller ID for Calls
that Rang Your Station but Ceased Before You or
Voice Mail answered)
16

To activate / deactivate or change the Voice Mail
Monitor mode:
• While your station is idle, press Speaker.
• Press FEAT.
• Press the [Voice Mail Monitor] key.
• Press to deactivate Voice Mail Monitoring.
• Press to activate manual Voice Mail
Monitoring.
• Press to activate auto Voice Mail Monitoring.
Busy ICM Callback
When you call another extension and get a busy
signal, do not hang up.
• Press the FEAT button and dial +.
or
• Press the [ICM CALLBACK] button (if assigned).
• Hang up after you hear a confirmation tone.
When the busy extension becomes available, the
system will call you back.
• Lift the receiver and you are automatically
connected to the extension.
Busy Number Callback
When an outside number you have called is busy,
you may tell the system to remind you to try again.
• Do not hang up.
• Press the FEAT button and dial +.
or
• Press the [TRUNK CALLBACK] button (if
assigned).
• Dial the desired time you want to be called back.
• Hang up after you hear a confirmation tone.
After the set time, the system will call you back to try
again.
• Lift receiver to automatically dial the number.
To cancel busy number callback:
• Lift the receiver.
• Press the FEAT button and dial ++.
or
• Press the [TRUNK CALLBACK] button and .
• Hang up after you hear a confirmation tone.
Call Coverage
Multipurpose buttons on digital multiline telephones
can be assigned as Call Coverage buttons to
indicate calls ringing at another extension. If you
have a Call Coverage button for another extension
on your telephone, you can answer calls ringing at
that extension by pressing the Call Coverage
button.
To answer a call at another extension:
When you hear the Call Coverage tone or see the
green Call Coverage lamp indication on your phone.
• Lift the receiver.
• Press the [CALL COVERAGE] button.
• You will be connected to the call.
15 12
Speed Dial Search
Search for a speed dial entry:
• Press SpeedDial and select Search.
• Select:
• Next to see the next entry
• Prev to see the previous entry.
• Next Ltr to enter the next letter.
• Use the letters on the key pad to focus
your search.
• Dial to dial the entry selected.
• Exit to exit SpeedDial
• Press the Speaker button or hang-up to end the
call.
Speed Dial (12i/d)
Note: The name, number, or trunk group being
registered is not displayed on the 12i/d telephone
display.
To Speed Dial a Number
When you want to Speed Dial a registered number,
perform one of the following operations:
Quick Dial
• Lift the receiver.
• Press Scroll > Speed, then dial the Speed Dial
Code.
The system will automatically dial the registered
number. This operation will not work unless you
register the outside line group number.
Outside Line Pre-Select
• Lift the receiver.
• Press an outside line button.
• Press Scroll > Speed, then dial the Speed Dial
Code.
The system will automatically dial the registered
number.
Alphanumeric Speed Dial By Name Feature
• Press Scroll > Speed > Speed.
• To search for a registered name, press the
numbers on the dial pad .
• To focus the search, press HOLD/DND, and
enter another character.
• To scroll through the registered names, press
FORWARD or BACKWARD .
• Press Speed to dial the number.
Personal Speed Dial Registration - To register
personal speed dial numbers:
• Press the FEAT button.
• Press the Speed button, then dial the desired
Personal Speed Dial Access Code (Bin 90-99).
• Enter the phone number.
• Press FEAT to end the operation.

13
Personal Speed Dial Registration - To register
several speed dial numbers:
• Press the FEAT button.
• After entering a phone number, press the Speed
button.
• Enter another speed dial code number, repeat
the same procedure.
To register a pause time:
• At the desired location, press HOLD/DND.
• Dial to for the desired pause time in
seconds.
Note: Pause may not be used on ISDN PRI or
ISDN BRI lines.
To register a short flash:
• At the desired location, press [FLASH].
Note: Short Flash may not be used on ISDN PRI or
ISDN BRI lines.
To set an outside line to be selected for speed
dialing:
• Do not lift receiver.
• Press the FEAT button.
• Press Speed and , then dial the desired
Personal Speed Dial Code (Bin 90-99).
• Dial the desired outside line group number (000-
250).
• Press FEAT to end the operation.
To register a directory name for a speed dial
number:
• Do not lift receiver.
• Press the FEAT button .
• Press the Speed button and , then dial the
desired Personal Speed Dial Code (Bin 90-99).
• Register the letters of the name using the dial
pad.
• Press the button until the desired letter is
displayed, then press the HOLD/DND button to
enter that letter or number (up to 10 characters).
• Press FEAT to end the operation.
[FEAT] All delete [HOLD] Enter/1 character delete
-,.,[space],1
G,H,I,4
A,B,C,2 D,E,F,3
M,N,O,6
W,X,Y,Z,9
Upper/lower case
J,K,L,5
T,U,V,8
&,0
P,Q,R,S,7
Alphanumeric
Voice Mail
Your Voice Mail Box can be accessed through the
display menu or via the Mail Box key located on the
telephone key pad.
To Access Voice Mail
• Select the Vmail menu key.
or
• Press the Voice Mail key on the key pad.
Note: If you have an IX-4EVMC voice mail card
installed in your system, your Vmail display menu
may appear with a message count (i.e., 2 Msgs).
The display will show up to 999 messages.
If this is the first time that you have connected to
your voice mail box, follow the directions for setting
up your voice mail.
14
Making an E-Response Help Call
If programmed, your ECS System provides
emergency notification to a group of telephones or
paging system.
Note: This feature is in addition to 911 Support.
• Go off hook and do not dial for more than 10
seconds.
or
• Go off hook and begin dialing a system
extension. Between digits pause for more than
10 seconds.
or
• At intercom (ICM) dial tone dial the E-Response
Group access number.
The system will initiate an E-Response Help Call to
the stations in your E-Response Group and/or a
paging system.
Answering Machine Emulation (Voice Mail
Monitor)
Station users may monitor voice mail messages as
they are recorded. During recording monitor, the
station user may select to initiate a conversation
with the caller. You may activate or deactivate this
feature from your extension.
To begin Voice Mail Monitor
When a call is answered by voice mail at an idle
station, you will hear a monitor tone.
• The [Voice Mail Monitor] key red LED will begin
to flash.
• Press the [Voice Mail Monitor] key.
• When the [Voice Mail Monitor] key green LED
lights, you will hear the caller’s message as it is
recorded.
• Press the [Voice Mail Monitor] key a second
time to begin talking to the caller.
or
• Press Speaker or hang up to end voice mail
monitoring. The caller’s message will be saved to
your voice mailbox.
ADVANCED FEATURES
Table of contents
Other Iwatsu IP Phone manuals

Iwatsu
Iwatsu ICON IX-5930 Series User manual

Iwatsu
Iwatsu Icon IX-5900 User manual

Iwatsu
Iwatsu Platinum Series User manual

Iwatsu
Iwatsu ADIX APS Omega-Phone Digital Multiline... User manual

Iwatsu
Iwatsu ICON Series User manual

Iwatsu
Iwatsu ADIX APS User manual

Iwatsu
Iwatsu ICON Series IX-5910 User manual