manuals.online logo
Brands
  1. Home
  2. •
  3. Brands
  4. •
  5. JABSCO
  6. •
  7. Water Pump
  8. •
  9. JABSCO 18670 Series User manual

JABSCO 18670 Series User manual

Model Voltage
18670-0123 12 Vdc
18670-0923 12 Vdc
18670-0943 24 Vdc
PLUMBING CONNECTIONS
Pump ports have external 1" hose barb and internal 1/2"
pipe threads. Also provided are two male port adapters
to allow the attachment of 3/4" female garden hose
fittings. Use hose that does not kink when bent and with
sufficient wall thickness to prevent collapse when used
on suction side of pump. Hoses should be routed so that
some water will be retained in pump body to wet the
impeller. Wetting the impelleraids in primingand
extends impeller life. Useastrainer on the intake hose to
stop trash and solids from going through the pump. All
hoses must have airtight connections to enable faster
priming.
Total Head Capacity
PSI Feet Meters GPM LPM
2.1 5 1.5 9 34.1
4.3 10 3.0 8.4 31.8
6.5 15 4.6 7.7 29.1
8.7 20 6.1 6.9 26.1
Table shows approximate Head-Flow for new pump.
COMMERCIAL DUTY
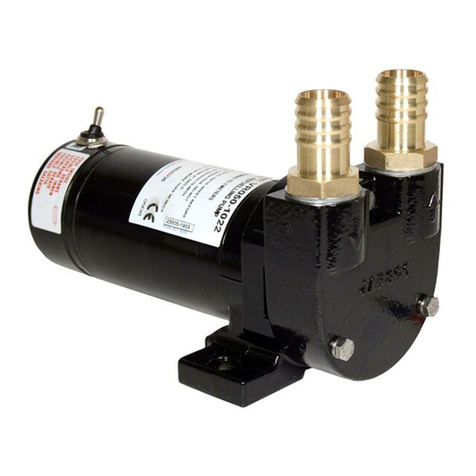
WATER PUPPY
FEATURES
Body: Bronze
Impeller: Jabsco Nitrile compound
Seal: Lip Type
Ports: 1/2" Internal Pipe Threads
1" External Hose Barb
Adapter for 3/4" ExternalGarden
HoseThread included
Motor: Permanent magnet type, fully enclosed,
stainless steel shaft, ball type shaft
bearing, has adequate torque to
reverse the pump
Dimensions: 3" (76mm) high, 6-7/8" (175mm) long,
4-3/4" (120mm) wide
Weight: 6 lb (2.7 kg)
MotormeetsUSCGElectrical Standard183.410 and ISO
8846 MARINE for IGNITION PROTECTION on gasoline
powered vessels.
APPLICATION
Use for bilge pumping, livewell circulation, washdown
and general pumping requirements. For intermittent duty,
motor may be reversed to empty bait tank.
Pump has a dry prime suction lift of about 6 feet (2m) and
a lift to 20 feet (6m) when primed. BE SURE SUCTION
LINES ARE AIRTIGHT.
INSTALLATION
The pump must be mounted inadry location—the motor
is not waterproof and must not be submerged.
SELECTION OF A COOL VENTILATED location will gen-
erally extend pump motor life. The unit can be mounted in
any desired position. It is best to mount so that water
dripping from loose port connection will not wet the
motor. The pump head may be rotated 180° on the motor
to change the direction of flow.
Model 18670-Series
Explosion Hazard. Do not pump gasoline, solvents, thinners
or other flammable liquids. To do so can cause an explosion
resulting in injury or death.
WARNING
!
Explosion Hazard. Do not operate with rivets removed from
motor case. Explosion resulting in personal injury, death or
property damage can occur. Case openings must be sealed
to avoid explosion and maintain ignition protected rating.
WARNING
!
Model 18670-Series
ELECTRICAL CONNECTIONS
Connect black wire to negative (–) terminal of battery.
The orange wire should run to a properly sized (see
electrical specifications) overload protected switch or
circuit breaker, with a wire from switch or breaker to
positive (+) terminal of battery. Electrical circuit must be
independent of all other accessories. A reversing switch
may be used to reverse the pump (JABSCO Part
Number 18753-0652). Preferred motor rotation is clock-
wise looking at shaft end of motor. To prolong motor
life, install pump so normal motor rotation is clockwise.
Use proper wire size as determined by wire table below.
OPERATION
Flexible impeller pumps must NOT be run dry, as the
pumped liquid is the lubricant for the impeller. Observe
the outlet and shut off pump as soon as liquid stops
flowing. An automatic level switch is convenient to
control the pump in some applications.
The pump cannot run against a closed outlet such as
encountered when using a garden hose type shut-off
nozzle.
Pressure for normal operation should not exceed 20 feet
of head (8.7 psi).
Temperature of pumped liquid may be in the range of 45°
- 180°F (7° - 82°C).
ELECTRICAL SPECIFICATIONS – MINIMUM WIRE SIZE
AMP FUSE WIRE SIZE PER FEET OF RUN*
Model No. VOLTAGE DRAW SIZE 0'-10' 10'-20' 20'-30' 30'-40'
18670-0123 12 Vdc 11.5 20 #14 (2.5) #12 (4) #10 (6) #10 (6)
18670-0923 12 Vdc 11.5 20 #14 (2.5) #12 (4) #10 (6) #10 (6)
18670-0943 24 Vdc 5 10 #16 (1.5) #16 (1.5) #16 (1.5) #14 (2.5)
* Length of run is combined length of positive and negative conductors from power source to pump and back to ground. Wire size is SAE gauge
and metric (millimetres2).
WIRING DIAGRAM
Explosion hazard. If pump is operated in an area
containing flammable vapors, motor wire leads must
be
joined by insulated mechanical locking connectors.
Loose or inadequate wire connections can spark
resulting in an explosion. Property damage, injury
or death can occur.
WARNING
!
PARTS LIST
Part
Key Description Qty. Number
1 Screw Kit (End Cover) 1 91004-0090
(4 screws/kit)
2 End Cover 1 18647-0000
3 O-Ring* 1 18753-0660
4 Impeller* 1 6303-0003
5 Seal* 1 18753-0384
6 Body†1 18645-0000
7 Slinger 1 6342-0000
8 Motor 1
Model 18670-0123 12V 18753-0050
Model 18670-0923 12V 18753-0659
Model 18670-0943 24V 18753-0051
9 Screw (Pump to Motor) 2 98019-0020
10 Port Adapter Kit (2 each) 1 18753-0103
Service Kit 90061-0031
* Parts Contained in Service Kit.
† When replacing a pump body that uses a round end cover (3 hole
pattern) it is also necessary to replace the end cover, screws and
replace the gasket with an O-ring (order keys 1, 2 & 3).
MAINTENANCE
Check wires and connections to be sure corrosion is
not adding additional resistance to the motor circuit
and causing a low voltage condition at the motor. Low
voltage can inhibit motor from starting and cause
fuse to blow. Full voltage should be available to prevent
motor damage.
NOTICE: If pump is idle for extended periods, the impeller
may stick to the pump body, preventing motor rotation
and causing blown fuses. To correct, remove end cover
and impeller, clean body and impeller, then lubricate with
water or small amounts of grease before assembly.
If pump is to be in freezing temperatures, drain by
loosening end cover screws.
A Service Kit, or at least spare impellers, should be
carried aboard to be assured of pumping capability.
DISASSEMBLY
1. Remove end cover screws, end cover and O-ring.
2. Withdraw impeller.
3. Loosen and remove two slotted hex screws, which
attach body to motor.
4. Tap body lightly between ports and remove body
from motor.
5. With a 1/2" diameter dowel, push against the shaft
seal from back (motor) side of the body to dislodge
it from the seal bore.
NOTE: Do not tamper with or disassemble motor.
ASSEMBLY
1. Lubricate seal with water and position it in seal bore
with lip, or hollowed-out side of seal, pointing
towards the impeller bore. With a 1/2" diameter
dowel, push against the shaft seal into its bore until
it contacts the bottom.
2. Lubricate motor shaft and install body on motor.
3. Lubricate impeller bore and, aligning flat in impeller
with flat on motor shaft, install impeller with clock-
wise rotary motion.
4. Install O-ring, end cover and screws.
EXPLODED VIEW
DIMENSIONAL DRAWING
Inches (Millimetres)
C© Copyright 2009, ITT Corporation All Rights Reserved Form: 43000-0738 Rev.C 08/09
For more information
visit us online at www.jabsco.com
12/07
AL¼ - 200 Self Priming Flexible Impeller Pump
Performance
Parts List
Dimensions in mm (inches)
AL¼ - 200 Series
Note : Performance shown is for a new pump, pumping water at
20ºC, performance may vary by up to 15%. Consult
factory for performance of alternative impeller compounds.
Key Description Part Number
A
Impeller Kit
(Contains Impeller (X),
O-Ring (X))
B
End Cover Kit
(Contains End Cover (X),
Screws (X), O-Ring (X))
C
Shaft Kit
(Contains Shaft (X),
Bearings (X), Retaining
Rings (X & X), Dust Shield
(X))
D
Service Kit
(Contains Impeller (X),
O-Ring (X), Mechanical
Seal (X), End Cover
Screws (X))
E
Seal Kit
(Contains Mechanical Seal
(X), O-Ring (X), Support
Washer (X))
Warranty: All products of the company are sold and all services of the company are offered subject to the company’s warranty and terms and conditions of sale, copies of which will be furnished upon request.
The information provided herein is for guidance only, it does not constitute a guarantee of the performance or specification of any individual product or component.
©Copyright 2003 ITT Industries 43000-0789
UK
Xylem
Bingley Road, Hoddesdon
Hertfordshire EN11 0BU
Tel: +44 (0)1992 450145
Fax: +44 (0)1992 467132
USA
Xylem
100 Cummings Center Drive
Suite 535-N, Beverly, MA 01915
Tel: +1 978 281-0440
Fax: +1 978 283-2619
ITALY
Xylem
Via Tommaseo, 6
20059 Vimercate, Milano
Tel: +39 039 685 2323
Fax: +39 039 666 307
GERMANY
Xylem
Oststrasse 28
22844 Norderstedt
Tel: +49-40-53 53 73-0
Fax: +49-40-53 53 73-11
JAPAN
Xylem
3-21-10, Shin-Yokohama
Kohoku-Ku, Yokohama, 222-0033
Tel: +81-045-475-8906
Fax: +81-045-477-1162
www.xyleminc.com
Warranty: All products of the company are sold, and all services of the company are offered subject to the company’s warranty and terms of sale, copies of which will
be furnished upon request. Details correct at time of printing. We reserve the right to change specifications without prior notice.
© Copyright 2015Xylem Inc. Jabsco is a trademark of Xylem Inc. or one of its subsidiaries. 43000-0738 Rev. E 8/2015
COMMERCIAL WARRANTY
Warranty. For goods sold to commercial buyers, Seller warrants the goods sold to Buyer hereunder (with the exception of membranes, seals,
gaskets, elastomer materials, coatings and other "wear parts" or consumables all of which are not warranted except as otherwise provided in the
quotation or sales form) will be (i) be built in accordance with the specifications referred to in the quotation or sales form, if such specifications
are expressly made a part of this Agreement, and (ii) free from defects in material and workmanship for a period of one (1) year from the date of
installation or eighteen (18) months from the date of shipment (which date of shipment shall not be greater than thirty (30) days after receipt of
notice that the goods are ready to ship), whichever shall occur first, unless a longer period is specified in the product documentation (the ìWarran-
tyî).
Except as otherwise required by law, Seller shall, at its option and at no cost to Buyer, either repair or replace any product which fails to conform
with the Warranty provided Buyer gives written notice to Seller of any defects in material or workmanship within ten (10) days of the date when
any defects or non-conformance are first manifest. Under either repair or replacement option, Seller shall not be obligated to remove or pay for
the removal of the defective product or install or pay for the installation of the replaced or repaired product and Buyer shall be responsible for
all other costs, including, but not limited to, service costs, shipping fees and expenses. Seller shall have sole discretion as to the method or means
of repair or replacement. Buyerís failure to comply with Sellerís repair or replacement directions shall terminate Sellerís obligations under this
Warranty and render the Warranty void. Any parts repaired or replaced under the Warranty are warranted only for the balance of the warranty
period on the parts that were repaired or replaced. Seller shall have no warranty obligations to Buyer with respect to any product or parts of a
product that have been: (a) repaired by third parties other than Seller or without Sellerís written approval; (b) subject to misuse, misapplication,
neglect, alteration, accident, or physical damage; (c) used in a manner contrary to Sellerís instructions for installation, operation and mainte-
nance; (d) damaged from ordinary wear and tear, corrosion, or chemical attack; (e) damaged due to abnormal conditions, vibration, failure to
properly prime, or operation without flow; (f) damaged due to a defective power supply or improper electrical protection; or (g) damaged
resulting from the use of accessory equipment not sold or approved by Seller. In any case of products not manufactured by Seller, there is no
warranty from Seller; however, Seller will extend to Buyer any warranty received from Sellerís supplier of such products.
THE FOREGOING WARRANTY IS EXCLUSIVE AND IN LIEU OF ANY AND ALL OTHER EXPRESS OR IMPLIED WARRANTIES, GUARANTEES,
CONDITIONS OR TERMS OF WHATEVER NATURE RELATING TO THE GOODS PROVIDED HEREUNDER, INCLUDING WITHOUT LIMITA-
TION ANY IMPLIED WARRANTIES OF MERCHANTABILITY AND FITNESS FOR A PARTICULAR PURPOSE, WHICH ARE HEREBY EXPRESSLY
DISCLAIMED AND EXCLUDED. EXCEPT AS OTHERWISE REQUIRED BY LAW, BUYERíS EXCLUSIVE REMEDY AND SELLERíS AGGREGATE
LIABILITY FOR BREACH OF ANY OF THE FOREGOING WARRANTIES ARE LIMITED TO REPAIRING OR REPLACING THE PRODUCT AND
SHALL IN ALL CASES BE LIMITED TO THE AMOUNT PAID BY THE BUYER FOR THE DEFECTIVE PRODUCT. IN NO EVENT SHALL SELLER BE
LIABLE FOR ANY OTHER FORM OF DAMAGES, WHETHER DIRECT, INDIRECT, LIQUIDATED, INCIDENTAL, CONSEQUENTIAL, PUNITIVE,
EXEMPLARY OR SPECIAL DAMAGES, INCLUDING BUT NOT LIMITED TO LOSS OF PROFIT, LOSS OF ANTICIPATED SAVINGS OR REVENUE,
LOSS OF INCOME, LOSS OF BUSINESS, LOSS OF PRODUCTION, LOSS OF OPPORTUNITY OR LOSS OF REPUTATION.
This manual suits for next models

3

Other JABSCO Water Pump manuals

JABSCO 6400 Series User manual

JABSCO

JABSCO 6400 Series User manual

JABSCO 29200-0120 User manual

JABSCO

JABSCO 29200-0120 User manual

JABSCO 59510-Series User manual

JABSCO

JABSCO 59510-Series User manual

JABSCO 5850-0001 User manual

JABSCO

JABSCO 5850-0001 User manual

JABSCO 30560-0 Series User manual

JABSCO

JABSCO 30560-0 Series User manual

JABSCO 50840 Series User manual

JABSCO

JABSCO 50840 Series User manual

JABSCO 4720 Series User manual

JABSCO

JABSCO 4720 Series User manual

JABSCO 18330 Series User manual

JABSCO

JABSCO 18330 Series User manual

JABSCO 2620 Series User manual

JABSCO

JABSCO 2620 Series User manual

JABSCO 17860 Series User manual

JABSCO

JABSCO 17860 Series User manual

JABSCO 30570-0 Series User manual

JABSCO

JABSCO 30570-0 Series User manual

JABSCO 50870 Series User manual

JABSCO

JABSCO 50870 Series User manual

JABSCO 37202-2712 User manual

JABSCO

JABSCO 37202-2712 User manual

JABSCO 11860-0005 User manual

JABSCO

JABSCO 11860-0005 User manual

JABSCO 52700 User manual

JABSCO

JABSCO 52700 User manual

JABSCO 17800 series User manual

JABSCO

JABSCO 17800 series User manual

JABSCO 52700 User manual

JABSCO

JABSCO 52700 User manual

JABSCO 30520-4 Series User manual

JABSCO

JABSCO 30520-4 Series User manual

JABSCO 30520-0001 User manual

JABSCO

JABSCO 30520-0001 User manual

JABSCO 18940-0010 Owner's manual

JABSCO

JABSCO 18940-0010 Owner's manual

JABSCO 30550-0 Series User manual

JABSCO

JABSCO 30550-0 Series User manual

JABSCO 12490 Series User manual

JABSCO

JABSCO 12490 Series User manual

JABSCO 59520 Series User manual

JABSCO

JABSCO 59520 Series User manual

JABSCO 30520-310 User manual

JABSCO

JABSCO 30520-310 User manual

Popular Water Pump manuals by other brands

Grundfos CRN-H MAGdrive Installation and operating instructions

Grundfos

Grundfos CRN-H MAGdrive Installation and operating instructions

Earthsafe M200 Installation, operation and maintenance manual

Earthsafe

Earthsafe M200 Installation, operation and maintenance manual

Johnson Pump AQUA JET WD 3.4 instruction manual

Johnson Pump

Johnson Pump AQUA JET WD 3.4 instruction manual

Xylem LOWARA LR Series Installation, operation and maintenance instructions

Xylem

Xylem LOWARA LR Series Installation, operation and maintenance instructions

Pfeiffer Vacuum HENA 200 operating instructions

Pfeiffer Vacuum

Pfeiffer Vacuum HENA 200 operating instructions

Time Electronics 7195 user manual

Time Electronics

Time Electronics 7195 user manual

Lutz-Jesco MAGDOS LA operating instructions

Lutz-Jesco

Lutz-Jesco MAGDOS LA operating instructions

TradePro TP-V5-USA Operating instructions & parts manual

TradePro

TradePro TP-V5-USA Operating instructions & parts manual

WilTec 61543 Operation manual

WilTec

WilTec 61543 Operation manual

Wacker Neuson PSG2 500 Operator's manual

Wacker Neuson

Wacker Neuson PSG2 500 Operator's manual

STA-RITE 10DOM05221 owner's manual

STA-RITE

STA-RITE 10DOM05221 owner's manual

Pfeiffer Vacuum HENA 401 operating instructions

Pfeiffer Vacuum

Pfeiffer Vacuum HENA 401 operating instructions

Powerhorse M109292C owner's manual

Powerhorse

Powerhorse M109292C owner's manual

National Vacuum Equipment WPT 480/P Owner's Manual and Operating Instructions

National Vacuum Equipment

National Vacuum Equipment WPT 480/P Owner's Manual and Operating Instructions

Calpeda NG operating instructions

Calpeda

Calpeda NG operating instructions

ProMinent DFB13 instruction manual

ProMinent

ProMinent DFB13 instruction manual

Cosmo DN 25 Instructions for use

Cosmo

Cosmo DN 25 Instructions for use

Stihl WP 300 instruction manual

Stihl

Stihl WP 300 instruction manual

manuals.online logo
manuals.online logoBrands
  • About & Mission
  • Contact us
  • Privacy Policy
  • Terms and Conditions

Copyright 2025 Manuals.Online. All Rights Reserved.