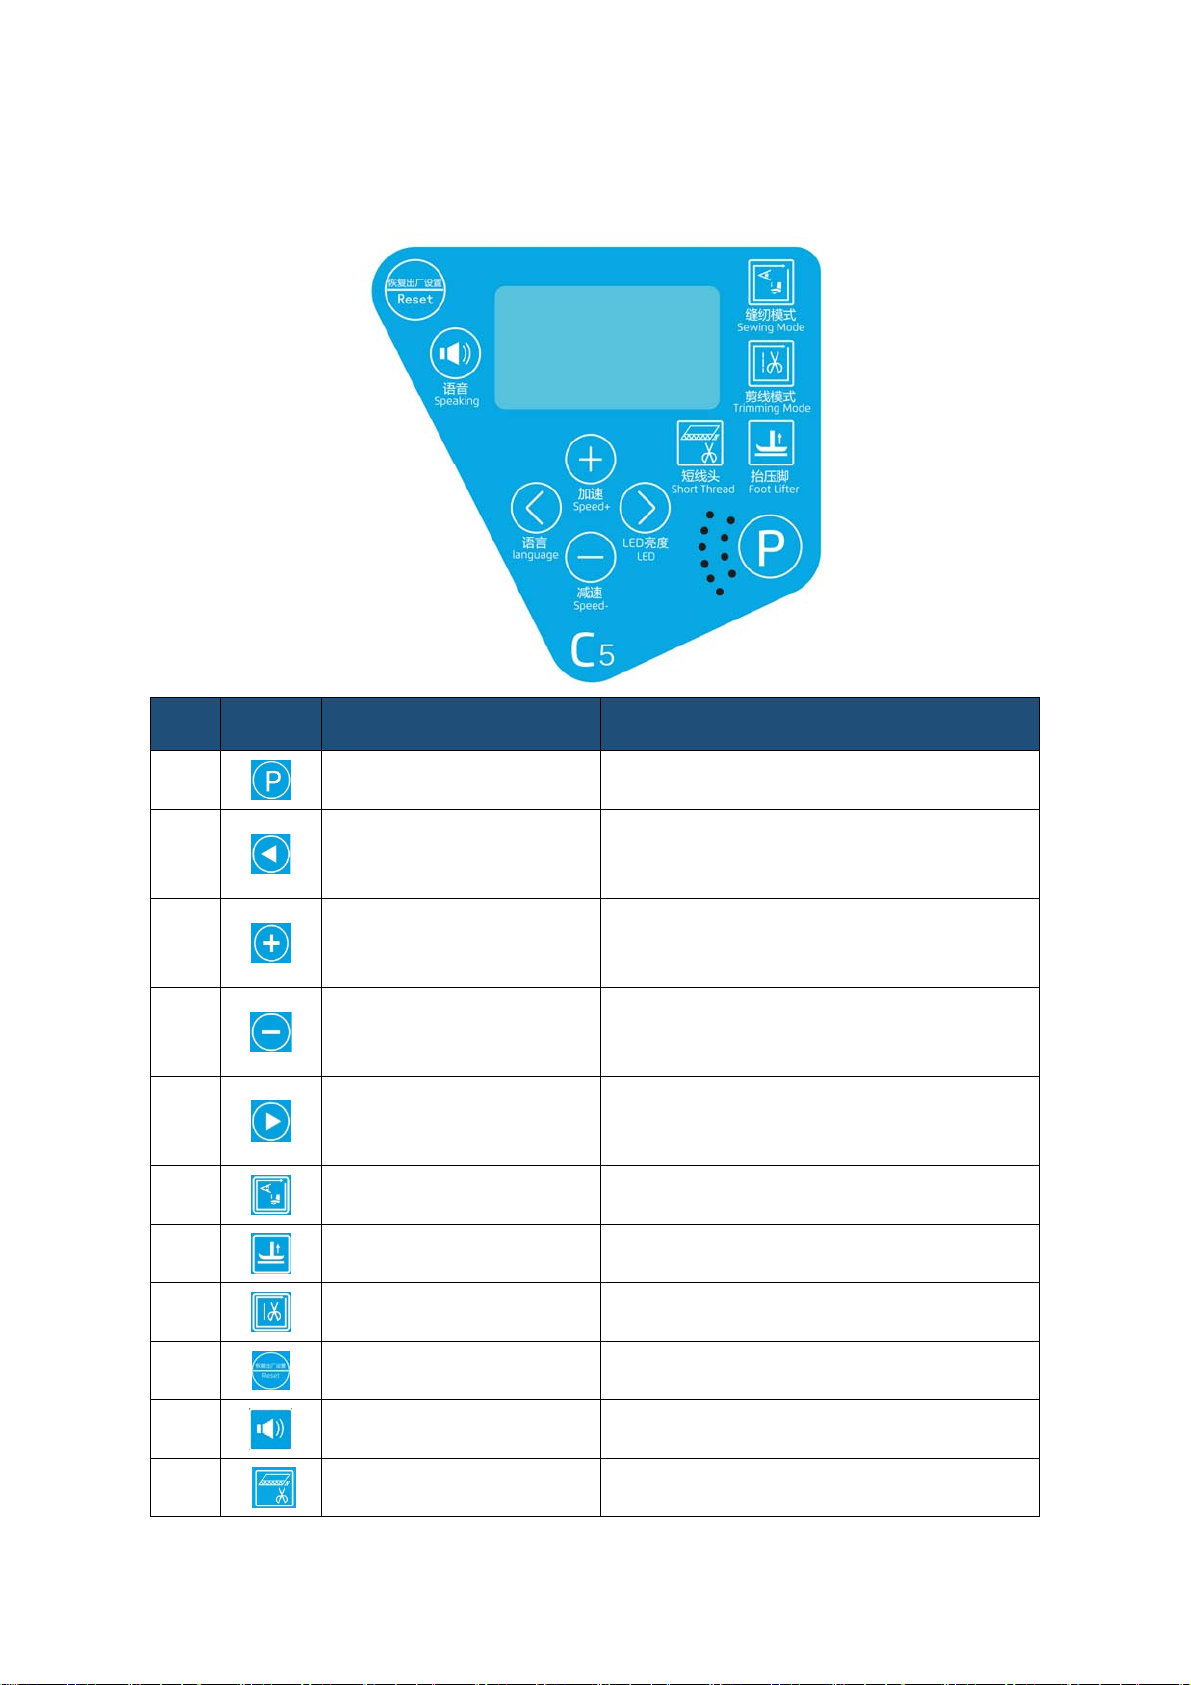
Jack C5 User manual

C5 包缝机
面板操作说明书 V1.8
Instructions of C5 overlock sewing machine panel operation
2020-6-1
EC5

目 录
Catalogue
1.显示及操作界面 Display and operation menu........................................................1
1.1显示界面介绍 Operation Panel Instructions...........................................................1
1.2按键设置介绍 Button setting Instructions...............................................................2
2.常用参数设置 Common parameters setting...........................................................2
2.1全智能/半智能/全电脑模式的设置 Automatic/ Semi‐automatic/ Full manual
mode settings..............................................................................................................................2
2.2抬压脚模式的设置 Presser foot lifter mode setting..............................................2
2.3剪线参数的设置 Trimmer parameter setting.........................................................2
2.4转速的修改 Modify speed.............................................................................................3
2.5技术区参数的修改 Change technician parameter..................................................3
2.6工艺区参数的修改 Change technician parameter..................................................3
2.7恢复出厂设置 Restore factory setting.......................................................................4
2.8语音种类设置 Voice Language Setting.......................................................................4
2.9穿线灯开关的设置 LED light setting
............................................................................4
2.10按键锁定设置 Button lock setting..............................................................................4
2.11语音快捷开关 Voice quick switch............................................................................4
2.12防切布传感器快捷开关 Sensor for anti‐cutting the cloth swift switch...........5
2.13布料计件值强制清除 Forced removal of cloth piece value..................................5
2.14面料选择 Fabric selection............................................................................................5
2.15传感器自动校准 Sensor automatic calibration.......................................................6
2.16厚料电压阈值设定 Thick material voltage threshold setting...........................6
2.17短线头面料设置 Short thread fabric setting...........................................................6
2.18定期保养 Regular maintenance..................................................................................7
2.19短线头模式快捷开关 Short thread mode quick switch.........................................7
3数码管显示说明 Digital tube display Instructions.................................................7
4参数列表 Parameters list...........................................................................................8
4.1操作参数说明表 Operating parameters Instructions..........................................8
4.2监控参数 Monitoring parameters..........................................................................14
5错误码说明表 Error Code Instructions............................................................15
6警告码说明表 Warning Code Instructions...........................................................17
7调速器Speedcontroller...................................................................................................18

1
1. 显示及操作界面 Display and operation menu
1.1 显示界面介绍 Operation Panel Instructions
序号
No.
图标
Icon
说明
Description
备注
Remark
1 用户参数设置键
Customer parameter settings button
2
左移键
Left button
语音种类设置键
Voice language setting
2、参数内容区内,向左选择参数项
Towards the left to choose parameter
3
上移键
Up button
1、向上调速键
Increase speed button
2、参数内容区内,设定数值递增键
Increase the number within a parameter
4
下移键
Down button
1、向下调速键
Decrease speed button
2、参数内容区内,设定数值递减键
Decrease the number within a parameter
5
右移键
Right button
机头灯亮度调节
control machine head LCD light brightness
参数内容区内,向右选择参数项
Towards the right to choose parameter within a parameter
6
缝纫模式键
Sewing mode button 更改缝纫模式
Change the sewing mode
7
抬压脚功能键
Presser foot lifter function button 更改自动抬压脚模式
Change auto presser foot lifter mode
8
剪线参数设置键
Trimmer parameter setting button 更改剪线线头长短及剪线开关
Change the length of the thread and thread switch
9
复位键
Reset button 长按 1.5S 恢复出厂设置
long press for 1.5 seconds restoring factory setting
10
语音导航键
Voice navigation button 语音播报开关
Voice broadcast switch
11
短线头键
Short thread button 剪线补偿开关
Trimmer compensation switch

2
1.2 按键设置介绍 Button setting Instructions
长按 P键( )约 1.5 秒,将进入用户参数调整模式;通过左移键( )和右移
键( )修改参数项,按上移键( )和下移键( )修改相应参数的值,按 P键( )
确认并保存,按左移键( )或右移键( )不保存并退到参数项设置界面,再次按 P
键( )退到待机界面。
Long press ( )for 1.5 seconds and machine will enter the user parameter adjustment mode. Press left button
( )and right button( )to modify the parameter. Press up button( )and down button( )
to modify the value of the corresponding parameter. Press enter button( )to confirm and save and press left
button()or right button()if user doesn’t want to save and will return to the parameter setting interface.
Press()again will return
to standby interface.
2. 常用参数设置 Common parameters setting
2.1 全智能/半智能/全电脑模式的设置 Automatic/ Semi‐automatic/ Full
manual mode settings
按下缝纫模式选择键( )时,即可修改缝纫模式;连续按下此键时,缝纫模式按以
下三种模式循环:全智能、半智能、全电脑。设置完后按 P键( )进行确认保存,5S
无按键则不保存退到待机界面。
Press sewing mode button( ),sewing mode can be modified. Continuous press down this button, sewing mode
will be cycled as following three modes: Automatic/ Semi‐automatic/ Full manual. Press enter mode()to
confirm and save after finishing setting. No Pressing for 5 seconds return to standby interface if user doesn’t want
to save.
2.2 抬压脚模式的设置 Presser foot lifter mode setting
按下抬压脚模式调整键( )时,即可修改抬压脚模式、降速速度、薄厚切换降速
使能;连续按下此键时,模式循环如以下几种:前抬、后抬、前后抬、关闭、降速速度 U18、
薄厚切换降速使能 U20。按上移键( )和下移键( )修改相应参数的值,设置完后
按P键( )进行确认保存,5S 无按键则不保存退到待机界面。
Press presser foot function button()to modify presser foot mode,speed reduction,thin and thick switch speed
reduction; Continuous press down this button, sewing mode will be cycled as following modes: Front lifter, Back
lifter, Front and back lifter, Closed. finish,speed reduction U18,thin and thick switch speed reduction U20.Press up
button()and down button( )to modify corresponding parameter value,Press enter button()
to save and confirm after finishing setting. No Pressing for 5 seconds return to standby interface if user doesn’t
want to save.
2.3 剪线参数的设置 Trimmer parameter setting
按下剪线参数设置键( )时,即可修改剪线状态;P94=0/1 时,修改的是剪线模
式P7、前剪线延迟针数 P27 或后剪线延迟针数 P28(防切布传感器延迟针数 P50)参数,P94=2

3
时,修改的是剪线吸风模式、前剪线吸风关闭针数 P30 或后剪线吸风关闭延时 P31 参数。
连续按此键时,参数项循环如下:前剪线(吸风)开、后剪线(吸风)开、前后剪线(吸风)
开、关闭、前剪线延迟针数/前剪线吸风关闭针数、后剪线延迟针数(防切布传感器延迟针
数)/后剪线吸风关闭延时,按上移键( )和下移键( )修改相应参数的值,设置
完后按 P键( )进行确认保存,5S 无按键则不保存退到待机界面。(每次按键先进入
当前剪线状态,按以上顺序循环)
Press trimmer parameter setting button()to modify parameter for trimmer status;when P94=0/1,it
is to modify trimmer mode P7,and the delay stitches number of trimmer before sewing P27 or the delay stitches
number of trimmer after sewing P28(The delay stitches number of anti-cutting cloth sensor P50).WhenP94=2,
It is modify for trimmer suction mode,front trimmer suction closed needle number P30 or back trimmer suction
close delay P31.Continuous press down this button, sewing mode will be cycled as followings: trimmer and
suction before sewing on、trimmer and suction after sewing on、trimmer and suction both before and after sewing
on、off、delay stitches number of trimmer before sewing、the delay stitches number of trimmer after sewing(the
delay stitches number of sensor for anti-cutting the cloth)Press up button()and down button()
to modify the value of the corresponding parameter,enter button()to save and confirm after finishing
setting. No Pressing for 5 seconds return to standby interface if user doesn’t want to save..(every press enter the
current trimmer status firstly and cycled as below).
2.4 转速的修改 Modify speed
在待机界面按上移键( )和下移键( )可以快速调整最高转速值,按上移键
()递增 100 RPM,按下移键( )递减 100 RPM。设置完按 P键( )进行确认
保存,5S 无按键则不保存退到待机界面。
Press the up button( )and down button( )in standby interface can rapidly adjust the highest speed
value. Press up button( )increases 100 RPM while press down button( )decreases 100 RPM. After
finishing settings, press enter button( ) to save the parameter. If customer doesn’t want to save, No Pressing
for 5 seconds back to standby interface if user doesn’t want to save.
2.5 技术区参数的修改 Change technician parameter
按组合键 P键( ) + 抬压脚键( )约 1.5 秒,将进入技术员参数调整模式,
显示 P26,通过左移键( )和右移键( )修改参数项,按上移键( )和下移键
()修改相应参数的值,设置完按 P键( )进行确认保存,5S 无按键则不保存退
到待机界面。
Press button( ) and enter button( )together for 1.5 seconds,the machine will enter the technician
parameter adjustment mode and the panel will display P26.Press left button( )and right button( )to
change the parameter. Press up button( )and down button( )to modify the value of corresponding
parameter. Press enter button ( ) to confirm and save No Pressing for 5 seconds back to standby interface if
user doesn’t want to save.
2.6 工艺区参数的修改 Change technician parameter
按组合键 P键( ) +下移键( )约 1.5 秒,将进入工艺区参数调整模式,显

4
示U01,通过左移键( )和右移键( )修改参数项,按上移键( )和下移键( )
修改相应参数的值,设置完按 P键( )进行确认保存,5S 无按键则不保存退到待机界
面。
Press the combination button P( )+down button( ) for about 1.5 seconds, and it will enter the
technician parameter adjustment mode, display U01, modify the parameter items by left button()and right
button(), press up button( ) and down button( ) to modify the value of the corresponding
parameters, set up and press P button()for confirmation and preservation, and 5S button-free will not be
saved back to be waiting machine interface.
2.7 恢复出厂设置 Restore factory setting
按复位键( )约1.5 秒参数将恢复用户保存参数,参数范围为用户参数与技术员参
数。按左移键( )和右移键( )约 1.5 秒,恢复出厂参数、恢复关联参数。(P21 =
1时按 P键保存一组用户常用参数,复位键恢复用户保存参数,未保存前出厂参数与用户保
存区参数相同。P19/P20 版本号参数、P66/P67/P68 转接板占空比参数、P73 出厂默认转速参
数、P90 监控查看使能参数、P94/P95 机型选择参数等不恢复出厂设置)。
Press reset button( )for 1.5 seconds ,Parameters will restore users saving Parameters. Parameters range from
uses parameter to technician parameter, Press left button( )and right button( )together for 1.5 seconds,
Parameter will restore factory parameters .and associated parameters.when P21=1,P button for saving users
common parameters, reset button for restoring users saving parameters, before saving, factory parameters are the
same as users saving parameters,P19/P20 version no. Parameter,P66/P67/P68 the duty cycle parameters of the
adapter board, P73 the default speed parameters of factory, P90 monitoring and checking parameters.P94/P95
model selection parameter can not reset to the factory setting.
2.8 语音种类设置 Voice Language Setting
按左移键( )切换语音种类,左键按下后,播报当时所选的语音种类,按 P键( )
确定,更改语音种类。
Press the left shift key ( ) to switch the voice type. When the left button is pressed, the voice
type selected at that time is broadcasted. Press the P key ( ) to confirm and change the voice
type.
2.9 穿线灯开关的设置 LED light setting
穿线灯亮度分为四档,在待机显示界面,按右移键( )穿线灯光亮度在 4个档位间
循环调节。(其中一个档位为关闭)
LED light is divided into four gears, On the standby interface ,Press right button( ), LCD light
brightness will be cycled in four modes.(one is off)
2.10 按键锁定设置 Button lock setting
更改参数项 P62 为1时,锁定按键后,按键动作无响应。长按剪线参数设置键( )
约1.5 秒解除锁定,按键恢复使用。
When modifying parameter P62 to 1,button will be locked and no response. Long Press trimmer parameter
()for 1.5 seconds will cancel the lock setting. press restore used.
2.11 语音快捷开关 Voice quick switch
长按语音导航键( )1.5s,进行语音开关切换。短按语音键进行开机欢迎语音开关

5
切换。出现故障时,短按语音键播报当前故障解决方法。
Long press voice navigation button ( )for 1.5s,for voice toggle. Short press voice button for welcome
voice switch when start. When failures, short press voice button broadcast solution for failures that happening.
2.12 防切布传感器快捷开关 Sensor for anti‐cutting the cloth swift
switch
长按模式键( )3s,进行防切布传感器开关切换。
Long press mode button for 3 seconds, for sensor for anti‐cutting the cloth switch toggle.
防切布传感器默认打开时,防切布传感器延迟针数(P50)默认为 0。(若 P50 项用户
保存参数值更改,则 P50 项参数等于用户保存参数值)
When the anti-cutting sensor is opened by default, the number of delay needles (P50) of the anti-cutting
sensor is 0 by default. (If the P50 user saves parameter values to change, then the P50 parameter is equal to the
user saves parameter values)
防切布传感器默认关闭时,后传感器延迟针数(P28)默认为 8。(若 P28 项用户保存
参数值更改,则 P28 项参数等于用户保存参数值)
防切布传感器默认关闭时,后传感器延迟针数(P28)默认为 8。(若 P28 项用户保存参数值更改,则 P28
项参数等于用户保存参数值)
When the anti-cutting cloth sensor is turned off by default, the number of delay needles (P28) of the rear
sensor is defaulted to 8. (If the P28 user saves parameter values to change, then the P28 parameter is equal to the
user saves parameter values)
注意:进入其他界面时,不按任何键约 5秒不保存退出到待机界面。
When entering the other interface, without saving and don’t press any key for 5 seconds will automatically go
to the standby interface.
注意:在自动模式下前传感器设定针数走完之前必须让中传感器触发,让机器正
常运行,否则会自动停机。
In automatic mode, before needle number that front sensor sets will be done, the middle sensor must be
triggered, for machine running normally or the machine will be stopped.
注意:在机器运行时,任何按键动作都无效,只有在机器停止后才能进入以上参
数设置模式。
When the machine is running, pressing any buttons is invalid. Only after the machine stops can enter the
above parameters setting mode.
2.13 布料计件值强制清除 Forced removal of cloth piece value
按键非锁定条件下长按剪线键( )约 1.5s,自动清除布料计件值,并显示 CLC。
Press the trimmer button( )for about 1.5 seconds under the condition of non-lock button, automatically
clearing the cloth piece value and displaying CLC.
2.14 面料选择 Fabric selection
在待机界面下,长按右移键( )1s 以上,进入面料选择设置界面,显示当前布料类
型(普通面料显示为 H,网纱面料显示为 S,薄料显示为 A),短按右移键( )进行 H、
S和A切换,短按 P键进行保存,此时会重新自动校准传感器电压值,显示 OK 表示选择成
功。
退出方式:1、切换成功/失败后自动退出
2、5s 内无按键操作自动退回待机界面
Under the standby interface, press the right button( )for more than 1s, enter the fabric selection setting
interface, display the current fabric type (normal fabric shows H, mesh fabric shows S, thin material shows A),

6
press the right button()for H, S and A switching, press the P key for saving, at this time, the sensor voltage
value will be automatically calibrated again. Showing OK indicates successful selection.
Exit mode: 1.Automatically exit after successful/unsuccessful handover
2.Automatically return to standby interface for key-less operation in 5s
2.15 传感器自动校准 Sensor automatic calibration
长按 P键( )+语音键( )约 1.5 秒便开始传感器自动校准,校准结束后显示
OK 则说明识别成功,否则识别失败。
注:
1、第四传感器使能时(U22=1),P67 以第四传感器电压值进行设定,否则以第二传
感器进行设定;
2、自动校准时,如果某一传感器未使能,则该传感器不进行自动校准且保持默认值不
变;
3、当面料类型改变或第四传感器使能状态改变时,会自动进行传感器自动校准。
Press P button( )+voice button( )for about 1.5 seconds to start the automatic sensor calibration,
and display OK after calibration indicates that the recognition is successful, otherwise the recognition will fail.
1. When the fourth sensor is enabled (U22 = 1), P67 is set by the voltage value of the fourth sensor, otherwise
it is set by the second sensor.
2. In automatic calibration, if a sensor is not enabled, the sensor does not automatically calibrate and keeps
the default value unchanged.
3. When the fabric type changes or the fourth sensor enabled state changes, the sensor will be automatically
calibrated.
2.16 厚料电压阈值设定 Thick material voltage threshold setting
长按抬压脚键( )约 1.5 秒进入厚料电压阈值设定界面,显示压脚高度电压值,调
整压脚高度(布料厚度),长按 P键保存当前显示值到 U15 参数(此数值即为厚料判断阈
值),成功显示 OK 且有语音提示“厚料标准设定成功”,回到待机界面;失败显示 Er。
识别过程中按 P键( )自动退出。
注:当保存的值大于基值-50 或小于 U16 时,会导致保存失败
基值重新设定方法:将 PA2 更改为 1,确保压脚下无布料后,长按抬压脚键( )约
1.5 秒进入厚料电压阈值设定界面,系统自动保存当前值为基值。
Press the presser foot lifter( ) for about 1.5 seconds to enter the thick material voltage threshold setting
interface, display the presser foot height voltage value, adjust the presser foot height (cloth thickness),
and press the P key to save the current display value to the U15 parameter (this value is the thickness judgment
threshold). The OK is successfully displayed and the voice prompt "the thick material standard setting is
successful" is returned. Standby interface; Failure display Er. Press P button()to exit automatically during
recognition.
Note: When the saved value is greater than the base value - 50 or less than U16, the saved value will fail.
Based value reset method: Change PA2 to 1, ensure that no cloth under the presser foot, press the presser foot
button()for about 1.5 seconds to enter the thick material voltage threshold setting interface, and the system
automatically saves the current value as the base value.
2.17 短线头面料设置 Short thread fabric setting
短按短线头键( ),即可进行短线头面料选择;连续按下此键时,模式循环如以下
几种:针织模式 K、梭织模式 W、大针距模式 L。设置完后按 P键( )进行确认保存,
5S 无按键则不保存退到待机界面。
面料选择更改时,针距 U25 参数会自动关联为对应的默认值。

7
Short press the short thread button ( ), you can select the fabric of the short thread. When you press
this button continuously, the pattern cycle is as follows: knitting mode K, woven mode W, large gauge mode L.
After setting up, press the P button
( )to confirm and save, and the 5S key-less does not save and return to
the standby interface.
When fabric selection is changed, the needle gauge U25 parameter is automatically associated with the
corresponding default value.
2.18 定期保养 Regular maintenance
当机器使用时间到达定期保养提醒时间后,面板会显示 A09/A10,并语音播报提示,
10min 后再次播报提示且不再显示 A09/A10 直到下一个提醒时间到。可通过修改 PA0/PA1
的参数值设定提醒时间或关闭该提醒功能。
注:定期保养提醒过程中可正常缝纫。
When the machine use time arrives at the regular maintenance reminder time, the panel will display A09/A10,
and voice broadcast prompt, 10 minutes later again broadcast prompt and no longer display A09/A10 until the next
reminder time arrives. The alarm time can be set or the alarm function can be turned off by modifying the
parameter values of PA0/PA1.
Note: Normal sewing can be done during regular maintenance reminder.
2.19 短线头模式快捷开关 Short thread mode quick switch
长按短线头键( )3s,进行短线头模式开关切换。
短线头模式开启时,第四传感器开关会自动关联开启,且会重新自动校准传感器电压值,
显示 OK 表示选择自动校准成功。
自动剪线补偿打开时,剪线快捷键中的前剪线延迟针数 P27 更改为出厂针距 U25。
注意:短线头模式开启时,如果自动补偿针数无效,则自动关闭第四感应器。
Press the short thread button ( )for 3 seconds to switch the short thread mode.
When the short thread mode is turned on, the fourth sensor switch will be automatically turned on, and the
sensor voltage value will be automatically calibrated again. The OK indicates that the selection of automatic
calibration is successful.
When automatic trimming compensation is opened, the number of delayed needles in the front trimming line
P27 in the trimmer quick button is changed to the factory needle spacing U25.
Note: When the short thread mode is turned on, if the number of automatic compensating needles is invalid,
the fourth sensor will be automatically turned off.
3数码管显示说明 Digital tube display Instructions
(1)数字部分: Digital section
实际数值
Actual
numerical value 0 1 2 3 4 5 6 7 8 9
数码管显示
Digital tube
display
(2)英文字母部分:English letter section
英文字母
English letter A B C D E F G H I J
数码管显示
Digital tube
display
英文字母
English letter K L M N O P Q R S T
数码管显示
Digital tube
display

8
英文字母
English letter U V W X Y Z
数码管显示
Digital tube
display
4参数列表 Parameters list
4.1 操作参数说明表 Operating parameters Instructions
序号
No
功能参数
Function parameter
范围
Range
默认值
Default
参数说明
Description
用户区:按住“P”键1.5 秒进入 User parameter mode,press “P”button for 1.5 seconds
P1 最高转速 Max. speed 500 - 7000 6000 RPM
P2 停针定位选择
Needle stop positioning
selection 0 - 3 1
0:不定位 1:上针位 2:下针位 3: 下针位(后
踩不找上针位)
0:no needle position
1:up needle position
2:down needle position
3: down needle position(rear tread will not to find
up needle position)
P3 起缝速度 Starting speed 500 - 7000
6000(砍刀
Thread trimmer)RPM
4000(侧吸 Side
suction)
P4 启动模式 Start-up model 0 - 1 0 0:自动模式 1:脚控模式
0:automatic mode 1:foot control
P5 模式选择
Sewing mode selection 0 - 2 1 0:全电脑 1:半智能 2:全智能
0: Computerized 1:semi‐automatic
2:fully automatic
P6 语音音量调节
Voice volume adjustment 0 - 3 2 0:关闭 1-3:开启
0:off 1-3:on
P7 自动剪线
Auto trimming 0 - 3 3
0:关闭 1:前剪
2:后剪 3:前后剪
0:off
1:trimmer before sewing
2:trimmer after sewing
3:trimmer both before and after sewing
P8 自动后吸气
Auto suction 0 - 3
1(砍刀 Thread
trimmer)0:关闭 1:前剪线吸气开
2:后剪线吸气开 3:前后剪线吸气开
0: off
1:suction on for start trimmer
2:suction on for back trimmer
3:suction on for start and back trimmer
3(侧吸
Side suction)
P9 反踏剪线开关
Counter pedal trimmer 0 - 1 1 0:关闭 1:开启
0:off 1:on
P10 自动抬压脚
Auto press foot lifter 0 - 3 0
0:关闭 1:前抬
2:后抬 3:前后抬
0:off
1:lifter before sewing
2:lifter after sewing
3:lifter both before and after sewing
P11 车缝中途停止时抬压脚
Press foot lifter when
half-stopping 0 - 1 0 0:关闭 1:抬压脚
0:off 1:presser foot lifter
P12 剪完线停止时抬压脚
Press foot lifter after trimming 0 - 1 0 0:关闭 1:抬压脚
0:off 1:presser foot lifter
P13 半反踏抬压脚
Semi-counter presser foot
lifter 0 - 1 1 0:关闭 1:半反踏或反踏抬压脚
0:off 1:Semi-counter presser foot lifter

9
P14 手动吸气
Manual suction switch 0 - 2 2 0:关闭 1:后吸 2:前后吸
0:off 1:rear suction
2:front suction and rear suction
P15 机头灯开关
Head lamp switch 0 - 3 1 0:关闭 1-3:开启
0:off 1-3:on
P16 休眠功能开关
Dormancy function switch 0 - 1 1 0:关闭 1:开启
0:off 1:on
P17 半智能连续缝制
Semi-automatic constant rate
trimming 0 - 2 2
0:关闭 1:前踏可连续缝制
2:连续缝纫,忽略前传感器使能开关
0:off
1:Front step continuous sewing
2:Constant sewing and ignore the front sensor
switch
P18 半智能恒速剪线
Semi-automatic constant rate
trimming 0 - 1 1 0:关闭 1:固定前剪线前运行速度
0:off 1:fix the machine speed when front
thread trimmer
P19 下位机版本号
Program version V**
电控软件版本号
Control box software version number
P20 上位机版本号
PC version No. V**
面板软件版本号
Panel software version number
P21 用户常用参数
User common parameters 0 - 1 0
0:无操作;
1:保存参数为用户常用参数;
0:no operation
1:saving parameters into user common parameters
P22 前传感器开关
Front sensor switch 0 - 1 1 0:关闭 1:开启
0:off 1:on
P23 前吸风打开时间
Opening time of manual
suction 1 - 250 5 前吸风打开时间(*100 ms)
Opening time of manual suction(*100 ms)
P24 吸风关闭时间
Turn off time of suction 0 - 250 0 前吸风关闭时间,0表示无关闭(*100 ms)
Time when front suction off,
0 is not off(*100 ms)
P25 后传感器开关
Back sensor switch 0 - 1 1 0:关闭 1:开启
0:off 1:on
技术员区:同时按住“P”键和“抬压脚”键进入
Technician parameter:At the same time, press the "P" button and the "presser foot lifter" button to enter
P26 前后传感器间针数
The stitch number between
front sensor and back sensor 1 - 250 100
P27 前剪线延迟针数
The delay stitches number of
trimmer before sewing 0 - 50 1 针数越大,线头越短
The bigger of the value, the shorter of the thread
length
P28 后剪线延迟针数
Delay stitches number of
anti cutting the cloth‐
0 - 50 3 针数越小,线头越短
The smaller of the value, the shorter of the thread
length
P29 前剪线吸风开启针数
Front trimming suction open
thread number
0 - 50 1 电机运行后经过 P29,吸风开启
After the motor running to P29,suction on
P30 前剪线吸风关闭针数
Front trimming suction off
thread number 0 - 250
0(砍刀 Thread
trimmer)0:吸风与前剪线同步关闭;
其他:吸风开启后经过 P30 针数关闭
0:front trimming suction and front trimming
synchronous closing
Other:when after front trimming suction opening
go by P30,thread number off
25(侧吸 Side
suction)
P31 后剪线吸风关闭延时
Delay time after back suction
off 1 - 50
15(砍刀 Thread
trimmer)*100ms
30(侧吸 Side
suction)1针1needle
P32 防切布传感器开关
Sensor for anti-cutting the 0 - 1 1(砍刀 Thread
trimmer)0:关闭 1:开启
0:off 1:on

10
cloth switch 0(侧吸 Side
suction)
P33 防切布传感器灵敏度
Sensitivity of sensor for
anti-cutting the cloth 200 - 400 330 参数越大,越能识别半透明材料
The bigger of the parameter, the more capable to
identify translucent materials
P34
后传感器与防切布传感器间
针数
Stitch number between back
sensor and sensor for
anti-cutting the cloth
1 - 200 99
P35 停车延迟针数
Delay stitch number when stop
sewing 0 - 99
0(砍刀 Thread
trimmer)
30(侧吸 Side
suction)
P36 后剪线吸风开启针数
Back trimming suction open
thread number 1 - 200 3
P37 前传感器灵敏度
Sensitivity of front sensor 200 - 400 330 参数越大,越能识别半透明材料
The bigger of the parameter, the more capable to
identify translucent materials
P38 后传感器灵敏度
Sensitivity of back sensor 200 – 400 330 参数越大,越能识别半透明材料
The bigger of the parameter, the more capable to
identify translucent materials
P39 前抬压脚保持时间
Delay time before presser foot
lifter 1- 50 2 (*100ms)
P40 后抬压脚启动时间
Start time after presser foot
lifter 0 - 20 0 (*100 ms)
P41 压脚全出力时间
Full output time of presser foot 1 - 50 10 (*10 ms)
P42 压脚出力周期信号
Periodic signal of presser foot
output 0 - 50 15 (/10 ms)开通时间,总周期 5MS
Turn-on time, total cycles 5MS
P43 压脚下放时间
Time of presser foot put down 1 - 99 10 (*10 ms)
P44 压脚保护时间
Time of presser foot protection 1 - 20 5 S
P45 剪线时间 Trimming time 1 - 100 25
P46 连续送布吸气
Continuous feeding and
suction 0 - 2 2
0:关闭前吸气 1:连续吸气
2:前吸气与后吸气同步
0:Closed suction 1:Continuous suction
2:Front and rear suction in synchronization
P47 手动剪线动作开关
Manual trimmer switch 0 - 1 1 0:关闭 1:开启
0:off 1:on
P48 开机自动找上定位
Automatically find up
positioning 0 - 1 0 0:关闭 1:开启
0:off 1:on
P49 压脚关闭周期信号
Periodic signal of presser foot
closed 0 - 50 35 (/10 ms)关闭时间,总周期 5MS
Turn-off time, total cycles 5MS
P50 防切布传感器延迟针数
The delay stitches number of
anti-cutting cloth sensor 0- 200 0
P51 点针参数
Point needle parameter 0 - 9 3 暂无 No have so far
P52 测试速度
Speed testing 500 - 7000 5500 RPM
P53 测试工作时间
Work time testing 1 - 60 3 S
P54 测试停止时间 1 - 60 3 S

11
Stop time testing
P55 A项测试
A Testing 0 - 2 0 0:关闭 1:开启 2: 休眠
0:off 1:on 2: dormancy
P56 B项测试
B Testing 0 - 1 0 0:关闭 1:开启 (电磁铁测试)
0:off 1:on (electromagnet testing)
P57 压脚保护开关
Presser foot safety switch 0 - 1 1 0:关闭 1:开启
0:0ff 1:on
P58 缝台保护开关
Sewing plate safety switch 0 - 1 1 0:关闭 1:开启
0:0ff 1:on
P59 针杆护罩保护开关
Needle bar cover safety switch 0 - 1 1 0:关闭 1:开启
0:0ff 1:on
P60 - - -
P61 休眠时间 Sleeping time 1 - 250 30 分钟 Unit: minutes
P62 面板按键锁定
Panel button lock 0 - 1 0
0:不锁定 1:锁定 0:unlock 1:lock
(面板锁定后长按剪线键解除锁定)
After the panel is locked, press the clipping button
to unlock it
P63 降速开关
Slow down speed button 0 - 1 0
P64 降速针数
Stitch number of slow down
speed 1- 800 4
P65 降速速度
The speed of slowing down 500 - 7000 3500 RPM
P66 前传感器档位调节
Adjusting gear of front sensor 1 - 180 -- 参数值越大,传感器电压值越大
The greater the parameter values.The greater the
voltage value of the sensor
P67 后传感器档位调节
Adjusting gear of back sensor 1 - 180 -- 参数值越大,传感器电压值越大
The greater the parameter values,The greater the
voltage value of the sensor
P68 防切布传感器档位调节
Adjusting gear of sensor for
anti cutting‐the cloth 1 - 180 -- 参数值越大,传感器电压值越大
The greater the parameter values,
The greater the voltage value of the sensor
P69 计件数计数单位
Unit number counting 1 - 50 10 执行设置剪线次数,计件数加 1
Setting per unit trimmer number,piece count plus1
P70 计件数总数设定
Total counting setting 1 - 9999 100
P71 计件数计数模式
Counting mode 0 - 5 0
0:关闭;1:升序循环计数;2:降序循环计数;
3:升序计满报警;4:降序计满报警;
5:清除计满报警
0:off;1:ascending cycle count;2:descending
cycle count;3:ascending full alarm;4:descending
full alarm;5:remove full alarm
P72 强制后剪线延迟针数
The stitches number of
constraint back trimmer 0 - 80 36
布料前剪线后离开前、后传感器且未遮住第三传
感器经过设定针数后执行后剪线。
Adjust the back trimmer function even the fabric
does not cover the anti-cutting sensor, can adjust
the stitches number before the trimmer function
active.
P73 出厂默认转速参数
Default Speed Parameters
0 - 1 0
0:四线机型默认转速 P01=6000 P03 =5500
0:Default speed of four thread model
1:五线机型默认转速 P01=5000 P03 =5000
1:Default speed of five thread model
系统员参数(P+上键,设置三位密码进入“111”)
System member parameters (P + up button, set three passwords into "111")
P75 转接板报错使能
Transfer board error reporting
enablement 0 - 1 1 0:关闭;1:打开转接板检测功能;
0:off;1:Open the switch board detection function

12
P76 背光亮度调节参数
Backlight brightness
adjustment parameters 1 - 3 3
P77 内部限速 Internal speed limit 500-7000 6000 RPM
P78 显示模式
Display mode 0-4 0
0:正常缝纫的模式和转向
1:实时显示当前速度
2:前传感器感应电压值
3:后传感器感应电压值
4:第三传感器感应电压值
0: Normal sewing mode and turning
1: Real-time display of current speed
2: Induced Voltage Value of Front Sensor
3: Induced Voltage Value of Rear Sensor
4: Third Sensor Induced Voltage Value
P79 恢复出厂设置
Restore factory settings
0-1 0
0:无操作; 1:恢复所有出厂参数;
0:No operation; 1:Restore all factory parameters
P80 语言种类选择
Choice of Language
Categories 0-9 0
0:中文 1:英文 2:俄语 3:阿语 4:土语 5:
葡语 6:西语 7:印尼 8:越南 9:波兰语 0:
Chinese 1: English 2: Russian 3: Arabic 4: Turkish
5: Portuguese 6: Spanish 7: Indonesia 8: Vietnam 9:
Polish
P81 同步吸气,前吸屑关闭针数
Synchronized suction, front
suction closed needle number 0 - 250 0
0:前吸屑与前剪线吸气同步关闭
其他:前吸屑开启 P81 针数后关闭
0:Front suction and front trimmer synchronous
closing
Other:when after front suction opening go by P81,
thread number closing
P82 同步吸气,后吸屑关闭针数
Synchronized suction, back
suction closed needle number 0 - 250 0
0:后吸屑与后剪线吸气同步关闭
其他:后吸屑开启 P82 针数后关闭
0:Back suction and back trimmer synchronous
closing
Other:when after front suction opening go by P82,
thread number closing
P83
前剪线松线电磁阀开启针数
Stitch number of front
trimming loose line solenoid
valve on
0 - 50 1
0:前剪线松线电磁阀关闭
其他:前剪线松线电磁阀经(P83)-1 针数开启
0:Front trimming loose line solenoid valve opening
Other:Front trimming loose line solenoid valve go
by (P83)-1 open thread number
P84
前剪线松线电磁阀关闭针数
Stitch number of front
trimming loose line solenoid
valve off
1 - 50 1
P85
后剪线松线电磁阀开启针数
Stitch number of back
trimming loose line solenoid
valve on
1 - 50 12
0:后剪线松线电磁阀关闭
其他:后剪线松线电磁阀经 P85 针数开启
0:back trimming loose line solenoid valve off
Other: back trimming loose line solenoid valve
open by P85 stitch number
P86
b剪线松线电磁阀关闭针数
Stitch number of back
trimming loose line solenoid
valve off
1 - 50 50
P87 手动吸气持续时间(*100ms)
Duration time of manual
suction 1-50 3
P88 手动吸气电机转速
Speed of manual suction motor 500 – 7000 3500
P89 - - -
C3 使用 used
P90 错误查看使能
Error viewing enable 0 - 1 0
P91 薄料感应延时滤波延时针数
Delay needle number of 0 - 100 30

13
induction delay filter for thin
material
P92 面料识别布料类型
Fabric identification 0 - 2 0 0:普通面料模式 1:网纱模式 2:薄料模式
0: Normal fabric mode 1:Mesh mode 2: Thin fabric
mode
P93
厚料感应延时滤波延时针数
Delay needle number of
induction delay filter for thick
material
0 - 100 0
P94 机型选择 Type selection 0 - 2 0 0:电动 1:气动 2:侧吸
0: Electric 1: Pneumatic 2: Side suction
P95 机型选择使能
Model selection enable 0 - 1 0 0:不使能 1:使能
0:not enable 1:enable
P96
三排的吸风模式
Three-row suction mode 0 - 2 0 0:前吸风与后吸风同步 1:间歇吸风(三排电
磁阀)2.长吸风(三排电磁阀)
0: Synchronization of front suction and rear suction
1: Intermittent suction (three-row solenoid valve) 2.
Long suction (three-row solenoid valve)
P97 间歇吸风开启针数
Number of needles for
intermittent suction opening
1 - 200 50
P98 间歇吸风关闭延时时间
Intermittent suction closure
delay time
1 - 25 5
单位 Unit:100ms
P99 预留 Reserved - -
P100
保养提醒时间
Maintenance reminder time 0 - 9999 60 单位 Unit:h
0:不使能;1-9999:提醒时间
0:not enable;1-9999:reminder time
P101
白油更换提醒时间
White grease replacement
reminder time
0 - 500 6 单位 Unit:month 月
0:不使能;1-500:提醒时间
0:not enable;1-500:reminder time
P102
厚料基值使能
Base enable of thick material 0 – 1 0 1:进入厚料阈值设定时自动获取基值
1:Automatic acquisition of base value when
thickness enters the threshold setting of thick
material
P112
前剪线吸风中途停车吸风使
能
Enable of front trimming
suction when motor stop
0-1 0
P117 后剪线吸风加速速度
Geared-up speed of back
trimming
300 0-1000
rpm
工艺参数(P+下键) Processing parameters (P + down button)
U15 厚度检测阈值
Thickness detection threshold 100 - 500 300 单位 Unit:0.01V
U17
过梗后提速时间
Speed-up time after bone cross
sewing
1 - 50 5 单位 Unit:100ms,U20=2 时,厚料降速后开始
计时,U17*100ms 后提速(如果是薄料,则立即
提速)
When U20 = 2, the timing begins after the heavy
material decelerates, and increases after U17 *
100ms (if it is thin material, it increases
immediately).
U18 降速速度
Deceleration speed 500 - 7000 5000 单位 Unit:Rpm
U19
薄厚料切换速度增量
Increment of switching speed
for thin and thick materials
1 – 100 10 1rpm/ms,从厚料变为薄料时,速度以 U19 的幅
度从降速速度提速到正常速度
When changing from thick material to thin
material, the speed increases from decreasing speed
to normal speed in the range of U19.
U20 薄厚料切换降速使能
Switching speed reduction
enabling for thin and thick
0 – 2 0 0:无降速;1:厚料降速模式;2:过梗后提速
模式
0: no deceleration; 1: thick material deceleration

14
materials mode; 2: deceleration mode after bone cross sewing
U21 第四传感器灵敏度
Fourth sensor sensitivity 200 – 400 330 单位 Unit:0.01V
U22 第四传感器使能参数
Fourth sensor enabling
parameter
0 - 1 1
U24 剪线补偿功能使能参数
Compensation function of
trimming enabling parameter
0 – 1 1
U25
出厂针距设定
Out-of-factory Needle gauge
setting
0 – 60 40 单位 Unit:0.1mm
0:禁用手动设定针距 其他:使用手动设定针
距
0: Disable manual setting of needle gauge . Others:
Use manual setting of needle gauge
U26 自动补偿面料类型选择
Selection of automatic
compensation fabric types
0 - 2 0 0:针织面料;1:梭织面料;2:大针距模式
0:knitting fabric;1:woven fabric;2:large gauge
mode
U27 压脚降噪全开时间
Full opening time of presser
foot noise reduction
1-50 2
单位 Unit:10ms
U28 压脚降噪 PWM 开启时间 1
PWM opening time 1 of
presser foot noise reduction
0-50 35
单位 Unit:0.1ms,总周期 Total cycle 5ms
U29 压脚降噪 PWM 控制时间
PWM control time of presser
foot noise reduction
0-50 8
单位 Unit:10ms
U30
压脚降噪模式
Presser foot noise reduction
mode
0-3 0
0-降噪功能关闭;1-U29 时间内占空比从 100%降
到U28 设定值均匀变化;2-在U29 时间内占空比
从U28 降到 U31 设定值均匀变化;3-在U29 时
间内按恒定 U28 占空比
0-noise reduction function is turned off; duty cycle
decreases from 100% to U28 setting value
uniformly in 1-U29 time; duty cycle decreases from
U28 to U31 setting value uniformly in 2-U29 time;
and 3-U28 duty cycle is constant in U29 time.
U31 压脚降噪 PWM 开启时间 2
PWM opening time 2 of
presser foot noise reduction
0-50 15
单位 Unit:0.1ms,总周期 Total cycle 5ms
4.2 监控参数 Monitoring parameters
P+右键进入监控界面,左右键调节监控参数项,按 P键进入当前监控参数值。在监控参
数值界面,短按 P键即可退出监控模式,按左右键可调节监控参数项。
P + right button to enter the monitoring interface, left and right button to adjust the monitoring parameters,
press P key to enter the current monitoring parameters. In the monitoring parameter value interface, the
monitoring mode can be withdrawn by pressing P key, and the monitoring parameter items can be adjusted by
pressing left and right keys.
序号 No. 内容 Content
M0 退出监控模式 Exit monitoring mode
M1 当前计件数 Currentpiececount
M2 机型类型 Typeofmodel
M3 Q轴电流 Q-axiscurrent
M4 交流输入电压 Ac input voltage
M5 踏板电压值 Pedal voltage sampling value
M6 保留 Reserved
M7 前传感器电压值 Front sensor voltage value
M8 中传感器电压值 Middle sensor voltage value
M9 后传感器电压值 Back sensor voltage value
M10 实时速度值 Real time velocity value
M11 防干扰前传感器电压值(保留)Anti-interference front sensor voltage value (reserved)

15
M12 防干扰中传感器电压值(保留)Anti-interference middle sensor voltage value (reserved)
M13 防干扰后传感器电压值(保留)Anti-interference back sensor voltage value (reserved)
M14 母线电压值 Busvoltage
M15 保留 Reserved
M16 保留 Reserved
M17 转接板软件版本号 Switch board version number
M18 电控软件修复版本号 Rehabilitation Version Number of Electronic Control Software
M19 主控板软件版本号 Version Number of Main Board Software
M20 面板软件版本号 Version Number of panel software
M21 面板修复版本号 Rehabilitation Version Number of panel
M22 测试监控输出 1 Test monitoring output 1
M23 测试监控输出 2 Test monitoring output 2
M24 测试监控输出 3 Test monitoring output 3
M25 测试监控输出 4 Test monitoring output 4
M32 厚度检测电压值 Voltage value of thickness measurement
M33 第四传感器电压值 Voltage Value of fourth sensor
5错误码说明表 Error Code Instructions
机器出错报警时,语音播报当前故障,如面板显示 E03 时,语音播报“操作面板与控器
箱通讯异常”,按下语音导航键( )播报故障原因及解决办法“请检查操作面板和控制
箱连接线是否松动;请尝试恢复出厂设置或将电源重启;上述如仍无法解决请联系当地服
务商或拨打 4008876858”。在播报时按下 P 键( )或语音键将停止当前播报内容。(故
障恢复,语音停止播报)
When the machine fails to alarm, the voice broadcasts the current malfunction. For example, when the panel
displays E03, the voice broadcasts "abnormal communication between the operation panel and the control box".
Press the voice navigation key ()to report the cause of the malfunction and the solution. "Please check
whether the connection line between the operation panel and the control box is loose; Please try to restore the
factory settings or restart the power supply. If the above can not be solved, please contact the local service provider
or dial 4008876858. Pressing the P key( )or the voice key during broadcasting will stop the current
broadcasting content. (Failure recovery, voice stop broadcasting)
序号
No 内容(出现故障则播报)
content(refer to the fault) 对策(按下语音导航键( )播报)
Solution(press voice guidance button)
E1 电机堵转
Motor stuck
请检查机头是否卡死或者转动困难;
请检查电机插头、电机传感器接头是否松动或脱落;
上述如仍无法解决请联系当地服务商或拨打 4008876858。
Please check whether the machine head stuck or not, or rotate very tough;
Please check whether the motor plug and sensor connection loose or not,or fall off ;
if cannot solve the problem, please contact with the local agent or call 4008876858
E2 软件过流
Software over-current
请检查使用电压是否正常;
请尝试恢复出厂设置或将电源重启;
上述如仍无法解决请联系当地服务商或拨打 4008876858。
Please check the voltage normal or not;
please try to do factory reset or restart;
if cannot solve the problem, please contact with the local agent or call 4008876858
E3
操作面板与控制箱通讯异常
The connection problem of
panel and control box
请检查操作面板和控制箱连接线是否松动;
请尝试恢复出厂设置或将电源重启;
上述如仍无法解决请联系当地服务商或拨打 4008876858。
Please check whether the connection of panel and control box loose or not;
please try to do factory reset or restart;
if cannot solve the problem, please contact with the local agent or call 4008876858.
E4 电机霍尔错误
The motor hall error
请关闭系统电源,检查电机霍尔信号接头是否松动或脱落,将其恢复正常后重启系
统。
上述如仍无法解决请联系当地服务商或拨打 4008876858。
Please turn off the machine ,then check whether the motor plug connection loose or not,

16
or fall off,
Restart the system after returning to normal .
If cannot solve the problem, please contact with the local agent or call 4008876858.
E5
停针信号异常
The needle stop position signal
abnormal
请关闭系统电源,检查电机停针信号接头是否松动或脱落,将其恢复正常后重启系
统。
上述如仍无法解决请联系当地服务商或拨打 4008876858。
Please turn off the machine, then check the motor needle position signal plug connection
loose or not, try factory reset,
Restart the system after returning to normal .
If cannot solve the problem, please contact with the local agent or call 4008876858.
E6 压脚保护功能开启
Presser foot safety switch ON
请检查压脚是否推回到正确位置;
仍无法解决需要临时使用请将 P57 项参数里的 1 改为 0 即可;
上述如仍无法解决请联系当地服务商或拨打 4008876858。
Please check whether the presser foot back to the correct position or not ,
If still can’t solve the problem, then change value“1”to “0”in parameter P57.
If cannot solve the problem, please contact with the local agent or call 4008876858.
E7 缝台保护功能开启
Sewing plate safety switch ON
请检查缝台是否推回到正确位置;
仍无法解决需要临时使用请将 P58 项参数里的 1改为 0即可;上述如仍无法解决请
联系当地服务商或拨打 4008876858。
Please check whether the sewing plate back to the correct position or not ;
If still can’t solve the problem, then change value “1”to “0”in parameter P58 .
If cannot solve the problem, please contact with the local agent or call 4008876858.
E8
针杆护罩保护功能开启
Needle bar cover safety
switch ON
请检查针杆护罩是否放回到正确位置;
仍无法解决需要临时使用请将 P59 项参数里的 1 改为 0 即可;上述如仍无法解决请
联系当地服务商或拨打 4008876858。
Please check whether the needle bar back to the correct position or not ,
If still can’t solve the problem, then change value “1”to “0”in parameter P59.
If cannot solve the problem, please contact with the local agent or call 4008876858.
E9 脚踏板连接异常
Pedal connection abnormal
请检查脚踏板插头是否连接控制箱或者松动;
上述如仍无法解决请联系当地服务商或拨打 4008876858。
Please check whether the pedal plug is connecting with control box or not ,or loosening .
Check if the connection connects the electronic control.
If cannot solve the problem, please contact with the local agent or call 4008876858.
E10 硬件过流
Hardware over-current
请检查供电电压是否正常;
请尝试恢复出厂设置或将电源重启;
上述如仍无法解决请联系当地服务商或拨打 4008876858。
Please check whether the voltage is normal or not;
Please try to do factory reset or restart;
If cannot solve the problem, please contact with the local agent or call 4008876858.
E11
停机时过压
Stop over-voltage
请检查供电电压是否正常;
请尝试恢复出厂设置或将电源重启;
上述如仍无法解决请联系当地服务商或拨打 4008876858。
Please check whether the voltage is normal or not;
Please try to do factory reset or restart;
If cannot solve the problem, please contact with the local agent or call 4008876858.
E12 系统欠电压
System under-voltage
请检查供电电压是否正常;
请尝试恢复出厂设置或将电源重启;
上述如仍无法解决请联系当地服务商或拨打 4008876858。
Please check whether the voltage is normal or not;
Please try to do factory reset or restart;
If cannot solve the problem, please contact with the local agent or call 4008876858.
E13 制动回路异常
Brake circuit fault
请联系当地服务商或拨打 4008876858。
Please contact with the local agent or call 4008876858.
E14 参数读写异常
Parameter read-write fault 请尝试关闭电源重启如仍无法解决请联系当地服务商或拨打 4008876858。
Please turn off the machine and restart, If can’t solve the problem , Please contact with
the local agent or call 4008876858
E15
电机超速保护(暂无)
Motor over-speed protection
(not available)
E16 电机反转(暂无)
Motor reversal (not available)
请恢复出厂设置;上述如仍无法解决请联系当地服务商或拨打 4008876858
Please try factory reset, If can’t solve the problem , Please contact with the local agent
or call 4008876858
E17 运行时过压(暂无)

17
Running over voltage (not yet)
E18 电机过载(暂无)
Motor overload (not yet)
请检查机头是否卡死或者转动困难;
请检查电机插头是否松动或脱落;
上述如仍无法解决请联系当地服务商或拨打 4008876858。
Please check whether the machine head stuck or not, or rotate very tough;
Please check whether the motor plug and sensor connection loose or not, or fall off ;
if cannot solve the problem, please contact with the local agent or call 4008876858.
E19 电流检测回路异常
Current detection loop fault
请尝试关闭电源重启如仍无法解决请联系当地服务商或拨打 4008876858。
Please try on power off and restart, if cannot solve the problem, please contact with the
local agent or call 4008876858.
E20 电源关闭
Power off
E24 语音芯片工作异常
Voice chip working fault
请尝试恢复出厂设置或将电源重启;
上述如仍无法解决请联系当地服务商或拨打 4008876858。
Please try to do factory reset or restart, if cannot solve the problem, please contact with
the local agent or call 4008876858.
E26
转接板与控制器通讯异常
Adapter plate and controller
communicates fault
请检查转接板与控制箱连接线是否松动;
请尝试恢复出厂设置或将电源重启;
上述如仍无法解决请联系当地服务商或拨打 4008876858。
Please check if the connection between transfer board and control box loose or not;
Please try factory reset or restart.
If cannot solve the problem, please contact with the local agent or call 4008876858.
E27 恢复出厂设置错误
Factory reset fault
关机重启后,重新恢复出厂设置。
After Power off ,then do the factory reset.
E28
剪线电磁铁报错
Shearing electromagnet control
fault
E29
抬压脚电磁铁报错
Voltage foot electromagnet
control fault
EA1 计件数升序计数满
The ascending count is full
按 P 键清除,或设置 P71 项参数为 5。
Press P to clear, or change value to “5”in parameter P71.
EA2 计件数降序计数满
The descending count is full
按 P 键清除,或设置 P71 项参数为 5。
Press P to clear, or change value to “5”in parameter P71.
注意 Note:
1、当系统报 E06(压脚安全保护)时,在压脚放到正确位置后,按 P键( )清 除 E06
错误。
2、全智能模式下,E6、E7、E/8 无法通过更改 P57、P58、P59 参数值为 0清除。
3、当系统报 E05(停针信号异常)时,系统自动将 P2 更改为 0,10s 后自动清除错误。
注:计件数计数满,暂无对应语音,报错时播报“预留”。
1、When the screen show E6(presser foot safety protection),when the press foot come back to correct position,
press ( )to clear E06.
2、In the fully intelligent mode,E6、E7、E/8 can not be cleared by changing P57、P58、P59 values to 0.
3、When the system reports E05 (abnormal stop signal), the system automatically changes P2 to 0, and
automatically clears the error after 10 seconds.
Note:When the counting is full, there is no reference voice,error reporting”reservation”.
6警告码说明表 Warning Code Instructions
序号
No.
内容
Content
对策
Countermeasure
A-01 前传感器自动校准失败
Automatic calibration failure
of front sensor
检测前传感器的接收和发送器表面是否干净
Whether the surface of the receiver and transmitter of the front sensor before
detection is clean or not
A-02 中传感器自动校准失败
Automatic calibration failure
of middle sensor
检测中传感器的接收和发送器表面是否干净
Whether the surface of the receiver and transmitter of the middle sensor
before detection is clean or not
A-03 后传感器自动校准失败
Automatic calibration failure 检测后传感器的接收和发送器表面是否干净
Whether the surface of the receiver and transmitter of the back sensor before

18
of back sensor detection is clean or not
A-04 自动校准超时
Automatic calibration timeout
A-08 面板和电控机型不匹配
Mismatch between panel and
control box model
将电控与面板程序升级为匹配的程序
Upgrade the electronic control and panel program to a matching program
A-09 白油定期保养警告
White grease regular
maintenance warning
A-10 定期清洁警告
Regular cleaning warning
7调速器Speedcontroller
将调速器(件 1)按下图所示的方向,使用 4颗ST4.8自攻嫘钉(件 2)将调速器安装
到台板下方合适的位置。
UsefourpiecesST4.8tappingscrew(PartNo.2)toinstalltheabovespeedcontrollerunderthe
stand&tabletotherightposition.
序号 No.名称 Partsdescription数量 pcs
1调速器 Speedcontroller1
2十字槽盘头自攻螺钉 ST4.8*22TappingScrewST4.8*224
Table of contents
Languages:
Other Jack Sewing Machine manuals

Jack
Jack JK-58420J Product guide

Jack
Jack JK-T781E User manual

Jack
Jack JK-1900BSK User manual

Jack
Jack T1310 User manual

Jack
Jack C4 User manual

Jack
Jack JK-T781E User manual

Jack
Jack H2 Series Specification sheet

Jack
Jack k4 Series Product guide

Jack
Jack JK-2284 Product guide

Jack
Jack JK-58420J Product guide