Jack H2 Series Specification sheet

H2 系列
产品使用说明书
H2
series
product
instruction
manual
使用说明和零件样本下载地址:
PLEASE DOWNLOAD THE MANUAL AND SPARE PARTS FROM THE FOLLOWING WEBSITE:
ÇäŇÌÇÁ Èfåêä ãÊêÈ ÇäÈÙäêåÇÈ èâXÙ ÇāÈĖÏêä åæ ÇäåèâÛÇäÊÇāé:
POR FAVOR DESCARGAR EL MANUAL Y LIBRO DE PARTES Y REPUESTOS LO SIGUIENTE EN
SITIO WEB:
Пожалуйста, загрузите инструкцию по эксплуатации идеталировку
(список запасных частей ) со следующеrо вебсайта:
http://download.chinajack.com
产品标准代号:
Q/T K001-2017
Standard code of the products: Q/T K001-2017
杰克缝纫机
JACK SEWING MACHINE
HTTP://WWW.CHINAJACK.COM
杰克科技股份有限公司
JACK TECHNOLOGY CO.,LTD.
公司地址
(Address of Company):
中国浙江省台州市椒江区三甲东海大道东段 1008 号
NO.1008,DONGHAI AVENUE EAST,JIAOJIANG DISTRICT,TAIZHOU CITY,ZHEJIANG
邮编
:318000
国内销售部
(Domestic Trade Department):
电话
(TEL):0086-0576-881177788 88177789
传真
(FAX):0086-0576-881177758
国贸部
(International Trade Department):
电话
(TEL):0086-0576-881177782 88177774
传真
(FAX):0086-0576-881177787
免费售后服务电话:
400-8876858
http://www.chinajack.com
资料如有更改,恕不另行通知,以实物为准。
You will be not informed if the file has been revised. Please set sample as standard.

目录CONTENT
1.主要技术规格............................................................................................................................................................................................................................... 1
2.操作准备....................................................................................................................................................................................................................................... 1
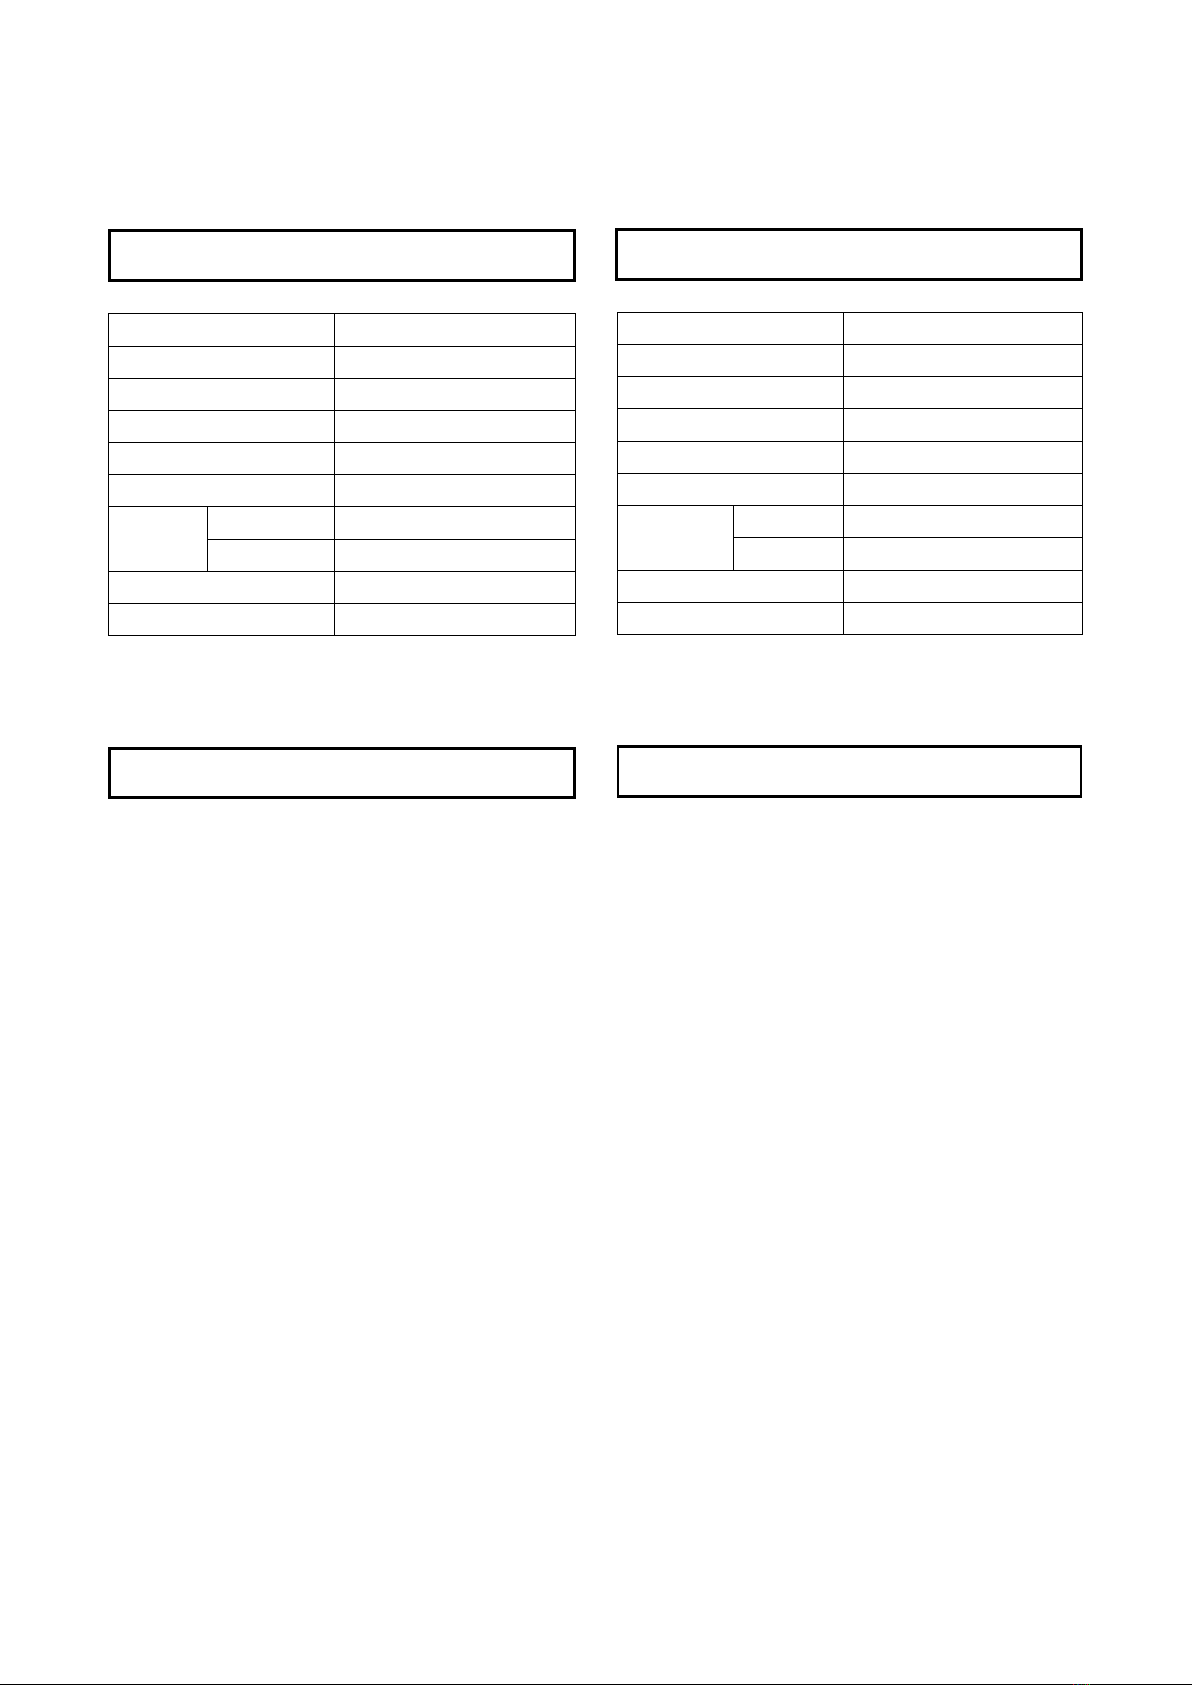
3.润滑(图 1)/Lubrication(Fig1)............................................................................................................................................................................................ 2
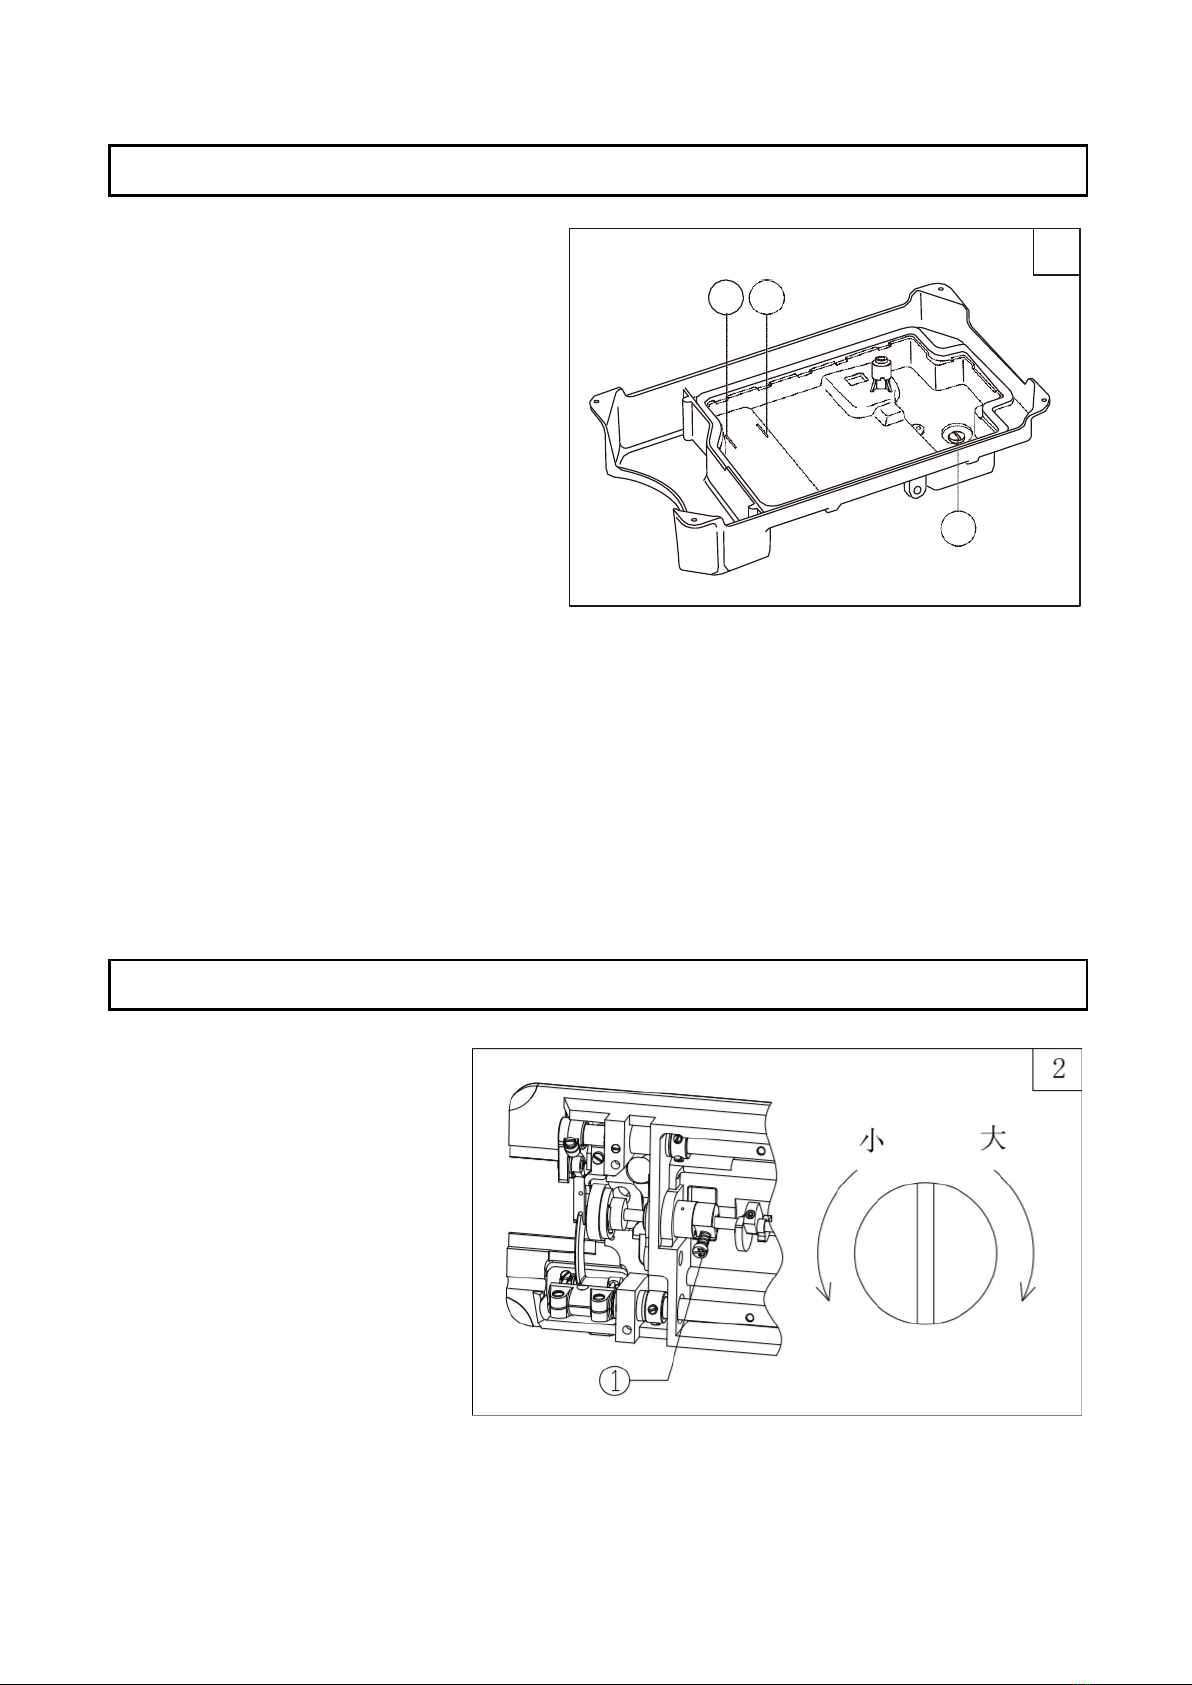
4.调节旋梭油量(图 2)/Adjusting the amount of oil in the hook(Fig 2) ..................................................................................................................................... 2
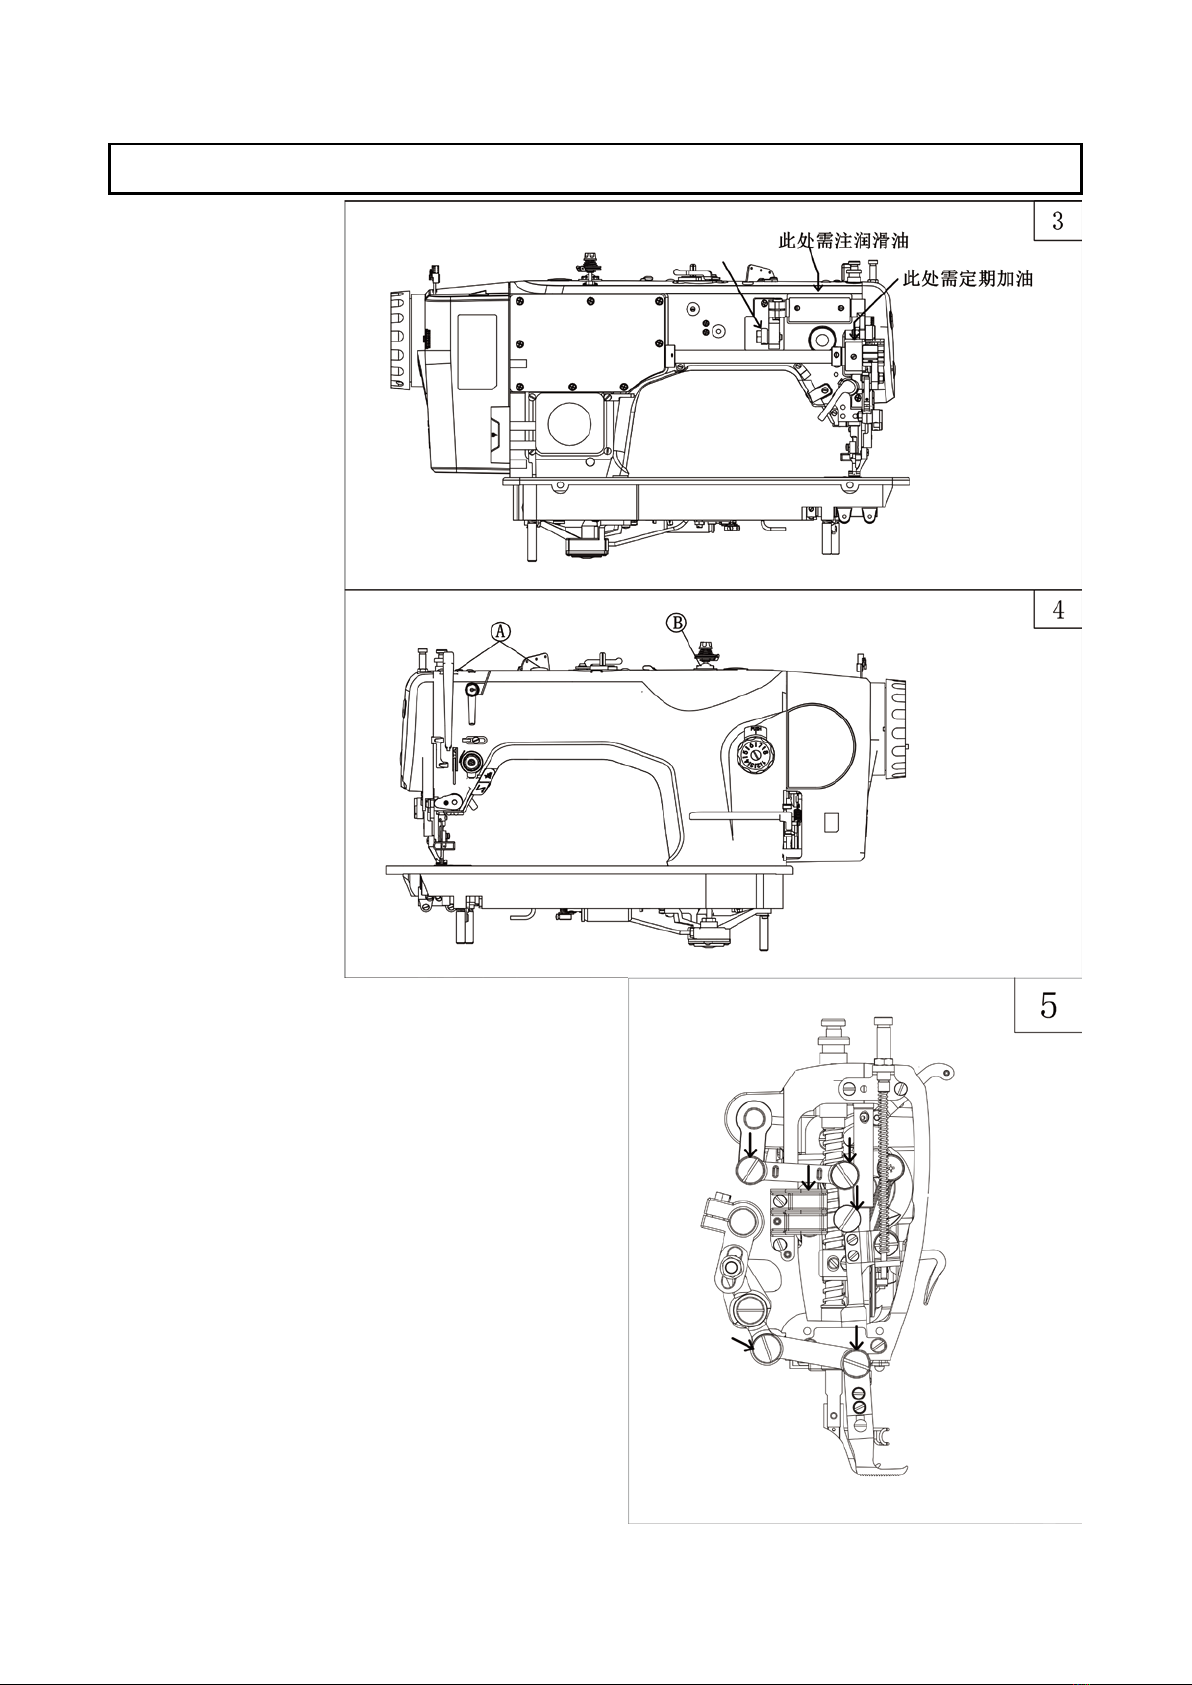
5.试车(图 3、4、5)/Test run(Fig 3 4 5).............................................................................................................................................................................. 3
6.油泵进油调节(图 6)/OIL PUMP SUPPLY ADJUSTMENT(Fig 6)........................................................................................................................................ 4
7.安装机针(图 7)/Installing the needle(Fig 7).................................................................................................................................................................... 4
8.机针、缝线和缝料的配合(图 8)/ Matching of needle, suture and sewing material(Fig 8)......................................................................................... 5
9.穿面线(图 9)/ Noodle thread(Fig 9)................................................................................................................................................................................. 5
10.绕线调节(图 10)/winding the bobbin thread (Fig 10) ........................................................................................................................................................ 6
11.针距、倒顺送料(图 11)/ Needle pitch, reverse feed(Fig 11)....................................................................................................................................... 6
12.挑线部位进油(图 12)/ Oil in the thread take-up part(Fig 12)...................................................................................................................................... 7
13.压脚压力调节(图 13)/ADJUST THE PRESSURE OF PRESSER EOOT(Fig 13)................................................................................................................... 7
14.缝线张力(图 14 15)/Suture tension(Fig 14 15)............................................................................................................................................................. 8
15.挑线簧调节(图 16、17)/ Thread take-up spring adjustment(Fig 16 17)..................................................................................................................... 9
16.底面线张力调节(图 18、19、20)/ Bottom thread tension adjustment(Fig 18 19 20)............................................................................................ 10
17.机针与旋梭同步调整(图 21.22.23.24)/ Synchronous adjustment of needle and rotary hook(Fig 21 22 23 24).................................................... 11
18.旋梭装卸(图 25)/ Hook loading and unloading(Fig 25).............................................................................................................................................. 12
19.送布牙安装(图 26、27)/ Feed dog installation(图 26 27)......................................................................................................................................... 12
20.送布牙平面调节(图 28)/ Feeding tooth plane adjustment(Fig 28)........................................................................................................................... 13
21.针距误差调节(图 29)/ Synchronous feeding adjustment(Fig29)............................................................................................................................... 13
22.送布同步调节(图 30,31,32)/ Synchronous feeding adjustment(Fig 30 31 32)......................................................................................................... 14
23.松线器挺线调节(图 33)/ Adjust opening time of the tension discs(Fig 33).............................................................................................................. 15
24.上送料机构的调节(图 34)/Adjusting the tension releasing mechanism(Fig 34)...................................................................................................... 15
25.压脚交叉提升机构的调节(图 35)/Adjusting presser foot alternate lift mechanism(Fig35).................................................................................... 16
26.摆压脚、小压脚总提升量的调节(图 36)/Adjusting the lift amount of presser foot together with walking foot(Fig36)...................................... 16
27.摆压脚、压脚前后方向间隙的调节(图 37)/Adjusting the clearance between presser foot and walking foot(Fig 37)......................................... 17
28.定期清扫(图 38,39,40)/ Clean regularly(Fig 38 39 40)............................................................................................................................................... 17
29.工业缝纫机安全使用注意事项/ /Notes for safe use of industrial sewing machines.......................................................................................................... 18
30.环保要求/Environmental requirements.................................................................................................................................................................................. 18

缝料
中厚料、厚料
最高转速
2200
针/分
最大针距 8mm
最大缝厚能力 8mm
压脚交互量 3.5-5.5mm
机针 DPx17(20#~23#)
压脚提
升高度
手控 7mm
膝控 16mm
旋梭
自动润滑大旋梭
供油方式
全自动供油
(
1
)试擦机器
机头装箱前为了防止机件生锈,各部分均涂有
较厚的防锈油脂,同时机头装箱后,还可能在较长
的贮藏和长途运输阶段造成油脂硬化和积聚在机器
表面的灰尘,所以必须将表面的油脂和灰尘用汽油
和洁净的软布试擦干净。
(
2
)检查
机器出厂时,虽然经过周密的检查和试验,但
在长途运输中也可能受到强烈的振动使机件松动或
歪曲,所以应该作一次周密仔细的检查,并用手轻
轻转动主动轮,看机件之间有无转动困难,碰撞现
象或其它不均匀的阻力,不正常的声响,如有应做
适应的调整,机器情况正常后才可正式试车。
Material Medium and heavy duty
Max sewing speed 2200spm
Max. stitch length 8mm
Max. thickness 8mm
Alternate presser fool lift volume
3.5-5.5mm
Needle
DPx17(20#~23#)
Presser
foo lift
by hand
7mm
by knee
16mm
Hook
Auto-lubricating big rotating hook
Lubrication
Auto lubrication
(
1
)
Cleaning the machine
Before leaving the factory, the machine parts are coated with
rust-preventive grease, which may be hardened and contami-
nated by dust during storage and shipment. This grease must
be removed with gasoline.
(
2
)
Examination
Though every machine is confirmed by strict inspection and test
before leaving the factory, the machine parts may be loose or
deformed after long distance transportation with jolt. A
thorough examination must be performed after cleaning the
machine. Turn the balance wheel to see if there is running
obstruction, parts collision, uneven resistance or abnormal
noise. If these exist, adjustment must be made accordingly
before run-in operation.
1.
主要技术规格
2.
操作准备
1.MAIN SPECIFICATIONS
2.PREPARATION
1

1.
油量
油量必须按油盘内标记加注。图中标记
(A)是油量最高位。(B)是油量最低位。注意
油量不得低于标记(B),否则缝纫机各部位就会
出现进油停止,造成发热咬死等情况。
2.
加油
必须使用 18#高速缝纫机油, 运转前油量
加至标记(A)。
3.
换油
①旋下放油螺钉(C),排净废油。
②扫清油盘污尘,旋紧放油螺钉(C), 加 注
新油。
1. Oil amount
Please fill the oil according to the mark indicated on the oil pan. Mark (A) means the highest position. Mark (B)
means the lowest position. If the oil amount is lower than the Mark (B), oil will not be pumped and machine will
be jammed.
2. Fill the oil
Please fill the 18# sewing oil into the oil pan until to the Mark (A).
3. Change the oil
①Uninstall the screw (C), and drain out the used oil.
②Clean the oil pan, and tighten the screw (C), fill the fresh oil again according the requirement.
放倒机头,转动油量调节螺钉①调
节油量大小。
Put down the head and tighten or
loosen oil amount adjustment screw to
increase of decrease the amount of oil
in the book.
3.
润滑(图
1
)
/Lubrication
(
Fig1
)
4.
调节旋梭油量(图
2)/Adjusting the amount of oil in the hook(Fig 2)
1
C
A
B
2

新机器在开始使用
和长期搁置重新使用时
先卸下机头上部的橡皮
塞(A)和面板,按图
示的位置充分加油,然
后装上面板,抬起压脚
进行低速运转 1000-
1500 针/分,并观察油
窗(B)的喷油情况,
润滑正常后,仍需保持
低速 30 分钟的运转试
验,以后逐步提高缝纫
速度;经过一个月左右
的使用,使机器充分跑
合。然后根据工作的性
质再提高到一定缝速。
图4箭头所示,提升轴
中套处每隔半年加注固
体润滑脂,摆动轴前套
处每隔 1-2 天滴加白油
1-2 滴,溢出白油擦拭
干净。
When the new
machine starts to use or
is put on hold for a long time, it first unloads the rubber
plug (A) and the panel on the upper part of the machine
head, fills up the oil sufficiently according to the graphic
position, then installs the upper panel, and raises the
Presser Foot to run1000-1500 needles/min at low speed,
and observes the oil injection situation of the oil
window(B). After lubrication is normal, it still needs to
keep running at low speed for 30 minutes. After testing,
the sewing speed is gradually increased, and after about
one month's use , the machine can fully run and sew. Then
according to the nature of the work, it can be increased to
a certain seam speed. As shown by the arrow in Fig.4, the
solid grease is added every six months in the sleeve of the
lifting shaft, and 1-2 drops of white oil are added every 1-2
days in the front sleeve of the swinging shaft, and the
white oil is wiped clean.
5.
试车(图
3
、
4
、
5
)
/Test run
(
Fig 3 4 5
)
3

通常情况下,不作油泵进油调节,在
低速运转时,观察油窗,无喷油现象时,
请合拢间隙。
Generally no adjustment is for oil pump.
When the machine is running at a low speed,
observe the oil screen .If no oil splashing,
close the clearance.
转动上轮,使机针上升到最高位置,旋松夹
针螺钉。将机针的长槽朝向操作者的左面,然后
把针柄插入针杆下部的针孔内,使其碰到针杆孔
的底部为止,再旋紧夹针螺钉 1 固定机针即可。
注意:如图(b)所示,机针没有碰到针杆孔
的底部。如图(c)所示针槽方向面对操作者,都
是错误的。
Turn the upper wheel to raise the needle to the
highest position and loosen the needle clamping
screw. Point the long groove of the needle toward
the left of the operator, and then insert the needle
handle into the needle hole at the bottom of the
needle bar until it touches the bottom of the needle
bar hole, and then tighten the needle clamp screw 1
to fix the needle.
Note: As shown in figure (b), the needle does
not touch the bottom of the needle bar hole. As
shown in figure (c), the direction of the needle
groove facing the operator is wrong
6.
油泵进油调节(图
6
)
/OIL PUMP SUPPLY ADJUSTMENT
(
Fig 6
)
7.
安装机针(图
7
)
/Installing the needle
(
Fig 7
)
7
1
a
b
c
长槽
向左
间隙
4

面线采用左捻线,底线则左、右捻均可使用,
缝线捻向的鉴别,可按图十所示把缝线捏住,以右
手按图箭头方向搓转缝线,若线股越搓越紧,则是
左捻线,反之即为右捻线。
请使用 DP×17 型或 135×17 型机针, 机针
的粗细应适合缝料的性质。如用过细的机针缝制紧
厚的织物,机针就容易折断,也会引起跳针、断线
等现象。相反如果用过粗的机针缝制紧密的织物,
则会因针孔太大而损坏织物。所以应根据缝料性质
不同,机针和缝线的粗细都要适当地进行选择。
The upper thread is left-twisted, and the bottom
thread can be twisted left or right. To identify the twisting direction of the suture, you can pinch the suture as
shown in Figure 10 and twist the suture in the direction of the arrow with your right hand. The tighter the twist,
the left twist, and the opposite is the right twist.
Please use DP×17 or 135×17 needles. The thickness of the needle should be suitable for the nature of the
sewing material. If you use a needle that is too thin to sew tight and thick fabrics, the needle will easily break,
and it will also cause skipped stitches and thread breakage. On the contrary, if a thick needle is used to sew tight
fabrics, the fabric will be damaged due to too large needle holes. Therefore, the thickness of the needle and
thread should be appropriately selected according to the nature of the sewing material.
穿面线时针杆应在最高位置,然后将线架上引出线头按
顺序穿线。
( a ) 穿过上面三孔线勾①。
( b ) 穿过机壳上部小夹线过线板②上的左过线孔,再
通过小夹线板,然后穿过小夹线过线板②上的下过线孔。
( c ) 在夹线座的夹线板③之间通过。
( d ) 向上穿过挑线簧④,经过大线勾⑤和线勾⑥,向上从
右向左穿过挑线杆⑦的穿线孔。
( e ) 向下通过面板线勾⑧,下线勾⑨,及针杆过线环⑩,
从左面穿过孔机针⑾的针孔,并引出 100 毫米左右的线备
用。引底线时,先将面线头捏住,转动主动轮使 针杆向下
运动,再回升到最高位置,然后拉起捏住的面线线头,底线
即被牵引上来,最后将底、面二根线头一起置于压脚下前方
When threading the upper thread, the needle bar should be at
the highest position, and then thread the thread ends on the thread
stand in order.(a) Pass through the upper three-hole hook ①.(b) Pass through the left thread hole on the small thread
clamping plate ②on the upper part of the casing, then pass the small thread clamping plate, and then pass through
the lower thread hole on the small thread clamping plate ②.(c) Pass between the thread tension plates ③of the
thread tension seat.(d) Pass the thread take-up spring ④upwards, pass the large thread hook ⑤and the thread
hook ⑥, and pass the thread take-up lever ⑦upwards from right to left. (e) Go down through the panel thread hook
⑧, lower thread hook ⑨, and needle bar thread passing ring ⑩, pass through the needle hole of the hole machine
needle ⑾from the left, and draw out a thread of about 100 mm for use. When drawing the lower thread, first pinch
the upper thread end, turn the driving wheel to move the needle bar downward, and then return to the highest
position, then pull up the pinched upper thread end, the lower thread is pulled up, and finally the bottom and upper
thread .The thread ends are placed together in front of the presser foot.
8.
机针、缝线和缝料的配合(图
8
)
/ Matching of needle, suture and sewing material
(
Fig 8
)
9.
穿面线(图
9
)
/ Noodle thread
(
Fig 9
)
8
9
1
2
3
4
5
6
7
8
9
10
11
5

1.打开电源。
2.将梭芯插入绕线轴①的底部。
3.根据箭头所示的方向,先将线在梭芯上绕几
圈
4.扳动绕线摆杆②.
5.将压脚抬起来。
6.踩下踏板,便开始自动绕底线了。
7.当梭芯绕满后,绕线摆杆②便会自动复位。
*如果梭芯线排列不齐,可以通过松开过线架
螺丝钉④及移动绕线摆杆②位置进行调节。
*绕线量由满线跳板上的满线度调节螺钉③加
以调节。注意:适当的绕线量为平行绕线至梭
芯外径的 80%。
1. Turn the power on;
2. Place the bobbin onto the bobbin winder shaft 1;
3. Wind the thread several circles around the bobbin in the direction indicated by arrow;
4. Push down the bobbin presser arm2;
5. Lift the presser foot;
6. Depress the treadle, the winding operation will start;
7. Once finished, the bobbin presser arm 2 will recover automatically.
*If the thread winding is not neat and even, loosen the screw 4 to adjust the position of bobbin winder base.
*Turn the screw 3 to adjust the bobbin winding amount.
Tighten the screw to increase the winding amount.
Loosen the screw to increase the winding amount;
Note: The proper winding amount should be around 80% of the bobbin capacity.
针距的长短,可以用转动针距标盘(A)来
调节。逆时针转动时针距调长;顺时针转动时针
距调短。针距标盘(A)的平面(B)上的数字表
示针距长短尺寸(单位为毫米)。注:调节针距
时,要把针距按键(D)往里按压,调整好后放
手复位。
需要倒向送料时,可以将倒缝操纵杆 (C)
向下揿压,即能进行倒缝,手放松后,倒缝操纵
杆(C)自动复位,恢复顺向送料。
The length of the stitch length can be adjusted by
turning the stitch length dial (A).Inverse turn the
clockwise to make the pitch longer; turn clockwise
to make the pitch shorter. The number on the
plane (B) of the stitch length dial (A) indicates the length of the stitch length (in millimeters). Note: When adjusting
the stitch length, press the stitch length button (D) inward and let it reset after adjustment.
When reverse feeding is needed, you can press the reverse stitching lever (C) downward to start reverse
stitching. After the hand is released, the reverse stitching lever (C) will automatically reset to resume forward
feeding.
10.
绕线调节(图
10
)
/winding the bobbin thread (Fig 10)
11.
针距、倒顺送料(图
11
)
/ Needle pitch, reverse feed
(
Fig 11
)
11
A
B
C
D
6

挑线,针杆部位采用羊毛软线进油。长期使用
后,如失去正常的进油作用,软(油)线被污染或硬
化,就应更换新的羊毛软线,更换方法如下:
a.打开机头面板,卸下调压螺钉、调压螺钉锁紧螺母
和压紧杆等。
b.再卸下挑线连杆铰链轴(A)和挑线连杆(B)。
c.拉出针杆上套筒的软油线(C)。
d.旋松机壳顶部(左方)上两只油线固定板螺钉,把
油线固定板(D)从机头中取出。
e.重新换羊毛软线。
f.安装的过程是上述过程的相反。
The thread take-up and the needle bar are filled with wool soft thread. After long-term use, if the normal oil
intake function is lost, the soft (oil) thread is contaminated or hardened, a new wool soft thread should be
replaced. The replacement method is as follows:
a. Open the machine head panel, and remove the pressure regulating screw, pressure regulating screw lock nut
and compression rod.
b. Then remove the thread take-up link hinge shaft (A) and the thread take-up link (B).
c. Pull out the soft oil line (C) of the upper sleeve of the needle bar.
d. Loosen the two oil line fixing plate screws on the top (left) of the casing, and take the oil line fixing plate (D)
out of the machine head.
e. Change the wool cord again.
f. The installation process is the opposite of the above process.
压脚的压力,要根据缝料的厚度加以调节。首先
旋松调压螺钉锁紧螺母(A),缝厚料时,应加大压脚压
力,这时将机头顶部的调压螺钉按图 a所示箭头方向
转动,反之,缝纫薄料时,可按图 b所示的方向转动
调压螺钉,以减少压脚的压力。最后旋紧调压螺钉锁
紧螺母(A)即成。
压脚的压力,应以能正常推送缝料为宜。
Pressure of presser foot is to be adjust in accordance
with thickness of materials to be sewn.
First loosen Lock Nut(A).For heavy materials, turn the
pressure regulating thumb screw as shown in Fig.3(a) to
increase the pressure, while for light materials, turn the
pressure regulating thumb screw as shown in Fig.3(b) to decrease the pressure. Then tighten Lock Nut(A). The
pressure of presser foot is recommended to be less as long as normal feeding is ensured.
12.
挑线部位进油(图
12
)
/ Oil in the thread take-up part
(
Fig 12
)
13.
压脚压力调节(图
13
)
/ADJUST THE PRESSURE OF PRESSER EOOT
(
Fig 13
)
12
A
B
C
D
13
A
A
a
b
7

缝线的张力要根据缝料的差别,缝线的粗细
以及其他一些因素变动。
实际使用中,是根据缝纫出来的线迹,来调
整底、面线的张力,使之得到正常的线迹。
底线张力调整,只要用小号螺钉起子旋转梭
心套上梭皮螺钉(A)加大或减小底线压力即可。
一般来说,底线如果用 50#涤纶线, 梭心
装入梭心套后,拉出缝线穿过梭心套线孔,捏住
线头吊起梭心套, 梭心套则能缓缓下落,就可以
使用。
面线张力以底线张力为基础。面线张力调
整, 主要变换夹线组件中挑线簧张力, 挑线簧
摆动幅度, 夹线簧张力及线勾的位置等。
The tension of the suture varies according to
the difference of the sewing material, the thickness
of the suture and other factors.
In actual use, the tension of the bottom and
upper threads is adjusted according to the stitches
sewn out to obtain normal stitches.
To adjust the bobbin thread tension, just use a
small screwdriver to turn the bobbin screw (A) on
the bobbin case to increase or decrease the bobbin thread pressure.
Generally speaking, if 50# polyester thread is used for the bottom thread, after the bobbin is loaded into the
bobbin case, pull out the suture through the bobbin case thread hole, Pinch the end of the thread and lift the
bobbin case, the bobbin case can fall slowly, You can use it.
The upper thread tension is based on the lower thread tension. The upper thread tension adjustment
mainly changes the tension of the thread take-up spring in the thread tension assembly, the swing amplitude of
the thread take-up spring, the tension of the thread tension spring and the position of the thread hook.
14.
缝线张力(图
14 15
)
/Suture tension
(
Fig 14 15
)
14
15
A
A
B
8

挑线簧摆动幅度为 5~8毫米。缝纫簿的缝料
(短针距)则要减弱挑线簧的张力放宽摆动幅
度,缝制特别厚的缝料则反之。
1、挑线簧张力调节
先旋松夹线调节座螺钉(A), 夹线螺钉
(B)就能转动,顺时针转动时张力增加,反之则
减少,调节好后,仍将夹线调节座螺钉(A)旋
紧。
控制方法:
松开夹线调节座螺钉(A), 将夹线螺钉
(B),逆时针转动,使挑线簧 C的张力压缩到 0 ,
再把夹线螺钉(B)顺时针转动, 至挑线簧(C)
触及夹线调节止动缺口,然后, 夹线螺钉(B)
再逆时针回转二分之一转动角度即可,最后旋紧
夹线调节螺钉座(A)。
2、挑线簧摆动幅度的调节旋松夹线调节座固
定螺钉(B),转动夹线器(C),调节其摆动幅
度,夹线器(C)顺时针转动,摆动幅度增大,反
之则减少。通常,机器在出厂前,挑线簧均已调
整妥善,只是在缝纫特殊的缝料或特殊的缝线
时,才需要重新进行调整
The swing amplitude of the thread take-up
spring is 5-8 mm. Sewing material for sewing book
(short needle Width), the tension of the thread take-up spring should be weakened to relax the swing range, and
the reverse is the case when sewing particularly thick sewing materials.
1. Thread take-up spring tension adjustment
First loosen the thread tension adjusting seat screw (A), the thread tension screw (B) can be turned, the
tension will increase when turned clockwise, and vice versa, the tension will decrease. After adjustment, still
tighten the thread tension adjusting seat screw (A).
Control Method:
Loosen the thread tension adjusting seat screw (A), turn the thread tension screw (B) counterclockwise to
compress the tension of the thread take-up spring C to 0, and then turn the thread tension screw (B) clockwise to
the thread take-up spring (C) Touch the notch of the thread tension adjustment stop, then, turn the thread tension
screw (B) counterclockwise by half the angle of rotation, and finally tighten the thread tension adjustment screw
seat (A).
2. Adjustment of the swing amplitude of the thread take-up spring. Loosen the fixing screw (B) of the thread
clamp adjusting seat, turn the thread clamp (C) to adjust its swing range, turn the thread clamp (C) clockwise, the
swing amplitude increases, and vice versa. Usually, the thread take-up spring has been adjusted properly before
the machine leaves the factory. It is only necessary to readjust it when sewing special sewing materials or special
sewing threads.
15.
挑线簧调节(图
16
、
17
)
/ Thread take-up spring adjustment
(
Fig 16 17
)
16
17
A
B
C
D
C
B
A
5-8mm
9

线勾装配位置的调节,关系到缝纫质量的优
劣。线勾装配位置,应适合缝料与缝纫条件。
线
勾
左
侧中
间右
侧
位
置
缝
料
厚
料
中厚料
薄
料
缝纫机的正常线迹应该如图a,如果线迹不正
常,会出现缝料起皱和断线现象,应对底、面线
的张力加以调节。使之达到正常的线迹。
a、如果面线太紧,底线太松, 则应逆时针旋
转夹线螺母,放松面线的压力。或用小号螺钉起
子旋紧梭皮螺钉,加大底线的压力。
b. 如果面线太松,底线太紧,则应顺时针旋
转夹线螺母,以加大面线的压力或用小号螺钉起
子,旋松梭皮螺钉,减少底线的压力。
c.如出现图 d、e 的线迹,也可以参照上述
方法加以调节
The adjustment of the assembly position of the
thread hook is related to the quality of sewing. The
hook assembly position should be suitable for sewing
material and sewing conditions.
Wire hook
position
Left middle right
Sewing
material
Thick
material
Medium thickness
material
thin
material
The normal stitches of the sewing machine
should be as shown in Figure a. If the stitches are
abnormal, the sewing material will wrinkle and
thread breakage. The tension of the bottom and
upper threads should be adjusted. Make it reach the
normal stitch.
a. If the upper thread is too tight and the bottom
thread is too loose, turn the thread clamping nut
counterclockwise to relax the pressure on the upper
thread. Or use a small screwdriver to tighten the
bobbin screw to increase the pressure on the bottom
thread.
b. If the upper thread is too loose and the
bottom thread is too tight, turn the thread tension nut clockwise to increase the pressure on the upper thread or
use a small screwdriver to loosen the bobbin screw to reduce the pressure on the bottom thread.
c. If the traces in Figure d and e appear, you can also adjust them by referring to the above method
16.
底面线张力调节(图
18
、
19
、
20
)
/ Bottom thread tension adjustment
(
Fig 18 19 20
)
18
a
b
c
d
e
10

1、机针位置的调节
用手转动主动轮,使针杆(C)下降至最低位
置,卸下面板(A)上的橡皮塞,旋松针杆(C)
上的针杆接头螺钉(B),上下移动针杆(C),
初步定出同步位置(针杆的同步位置,当针杆下
降至最低位置时,机针线孔的中心(D)应与旋梭
内周面(E)在同一位置上。如图24所示位置)。
旋紧针杆接头螺钉(B),塞上橡皮塞即成。
2、旋梭同步的调节
旋梭和机针之间的相互运动关系,对缝纫性
能的影响很大。标准的同步关系是:用手转动上
轮,使机针向下运动到最低位置后再向上回升2.5
毫米,这时旋梭钩线尖(D),应与机针的中心线
(C)一致,在此位置时, 钩线(D)应高于机针
线孔(E)上边约1.2毫米。
在调节旋梭的同步关系时,还要注意到旋梭
尖与机针的侧面间隙。机针(D)缺口,底部与旋
梭钩线尖(C)的间隙为0.05毫米
1. Adjustment of needle position
Turn the driving wheel by hand to lower the
needle bar (C) to the lowest position, remove the
rubber plug on the panel (A), loosen the needle bar
connector screw (B) on the needle bar (C), and move
the needle bar (C) up and down. The synchronization
position is initially determined (the synchronization
position of the needle bar. When the needle bar is
lowered to the lowest position, the center (D) of the
needle thread hole should be at the same position as
the inner circumference (E) of the hook. As shown in
Figure 24 Show location). Tighten the needle bar
connector screw (B), and plug the rubber stopper.
2. Adjustment of the hook synchronization:
The mutual movement relationship between
the hook and the needle has a great influence on the
sewing performance. The standard synchronization
relationship is: turn the upper wheel by hand to
make the needle move down to the lowest position
and then rise back up by 2.5 mm. At this time, the
hook thread tip (D) should be consistent with the
needle center line (C) .At this position, the hook
thread (D) should be about 1.2 mm higher than the
upper edge of the needle thread hole (E).
When adjusting the synchronization relationship of the rotary hook, also pay attention to the side clearance
between the tip of the rotary hook and the needle. The needle (D) notch, the clearance between the bottom and
the hook thread tip (C) is 0.05 mm
17.
机针与旋梭同步调整(图
21.22.23.24
)
/ Synchronous adjustment of needle and rotary hook
(
Fig 21 22 23 24
)
21
22
23
24
A
B
C
D
E
C
D
E
D
C
B
A
0.05mm
11

先将针杆上升到最高位置,拆下针板,取下
机针和梭心套。旋下定位勾螺钉(C), 把旋梭定
位勾(A)取下。再旋松旋梭螺钉(D)。 使旋梭
在它的转动轴上能够自由转动,接着用手转动上
轮,使送料牙架走向高处。到此,可以用手去旋
转旋梭,使它让过牙架徐徐取出。安装旋梭过程
是上述过程的回复。
旋梭定位勾的安装位置应是旋梭定位勾(A)
的勾尖侧面与机针(B)的侧面应成一致。另外其
两侧面之间隙为0.5~0.7毫米。
First raise the needle bar to the highest
position, remove the needle plate, and remove the
needle and bobbin case. Unscrew the positioning
hook screw (C), and take off the hook positioning hook (A). Loosen the hook screw (D) again. Make the rotary
hook rotate freely on its rotating shaft, and then turn the upper wheel by hand to make the feeding frame move
to a high place. At this point, you can rotate the hook by hand to make it slowly take out the tooth frame. The
hook installation process is a response to the above process.
The installation position of the hook positioning hook should be such that the side of the hook tip of the hook
positioning hook (A) and the side of the needle (B) should be consistent. In addition, the gap between the two
sides is 0.5 to 0.7 mm.
a.当送布量最大,送布牙(A)前端靠近针板
槽前侧时,送布牙前端与针板槽前侧的间距为1.5
毫米,这是标准的送布牙安装位置。
b.调节送布牙位置时,先让送布牙运动至针
板最前侧停止,然后旋松送布轴曲柄螺钉(A)
(见27b),将牙架(B)按图27a所示箭头方向移
动,以调节位置,调节好后,再把螺钉(A)旋
紧。
a. When the feed amount is the largest and the
front end of the feed dog (A) is close to the front side
of the needle plate groove, the distance between the
front end of the feed dog and the front side of the
needle plate groove is 1.5 mm. This is the standard
feed dog installation position.
b. When adjusting the position of the feed dog,
first let the feed dog move to the front side of the
needle plate and stop, then loosen the feed shaft
crank screw (A) (see Figure 29b), and set the bracket
(B) as shown in Figure 29a Move in the direction of
the arrow to adjust the position. After adjustment,
tighten the screw (A).
18.
旋梭装卸(图
25
)
/ Hook loading and unloading
(
Fig 25
)
19.
送布牙安装(图
26
、
27
)
/ Feed dog installation
(图
26 27
)
25
26
27
A
B
C
D
0.5-0.7mm
A
1.5mm
A
B
a
b
12

送布牙一般是水平位置。高于针板平面0.8~
1.2毫米。当缝制条件需倾斜时应调节。
a.旋松牙架曲柄轴螺钉(A)。
b.用螺钉起子压在牙架曲柄偏心轴的槽里,使
偏心轴左右转动。
c.最后将(A)螺钉拧紧。
送布牙前面高时,可防止布料起缩,不容易
出现空针。
送布牙前面低时,可防止布料跑偏,底线不
易断
The feed dog is generally horizontal. 0.8~
1.2mm above the plane of the needle board. It
should be adjusted when the sewing conditions need
to be inclined.
a. Loosen the crankshaft screw (A) of the tooth
frame.
b. Use a screwdriver to press in the groove of the eccentric shaft of the bracket crank to make the eccentric
shaft rotate left and right.
c. Finally tighten the (A) screw.
When the front of the feed dog is high, the fabric can be prevented from shrinking and shrinking, and empty
stitches are not easy to appear.
When the front of the feed dog is low, the fabric can be prevented from running off and the bottom thread is
not easy to break.
旋松螺钉(A)转动针距调节凸轮(B)
顺时针转:——顺缝针距变大。
倒缝针距变小。
逆时针距:——顺缝针距变大。
倒缝针距变小。
Loosen screw (A), and turn stitch length
adjusting cam (B).
Turn clockwise: forward sewing, stitch length
enlarged; reverse sewing, stitch length shorten.
Turn counter-clockwise: forward sewing stitch length
shorten; reverse sewing, stitch length enlarged.
20.
送布牙平面调节(图
28
)
/ Feeding tooth plane adjustment
(
Fig 28
)
21.
针距误差调节(图
29
)
/ Synchronous feeding adjustment
(
Fig29
)
28
标记
偏心轴标记位置
水平
正上方
正下方
送布牙
标准
前面上升最大
前面下降最大
29
顺
逆
13

1、标准位置
转动上轮,降低送布牙(A), 当和针板表面
(B)相平时,机针(C)的针尖应与针板、送布
牙表面同在一水平面上。
调整可以通过调节送布凸轮和抬牙凸轮的安
装位置进行。
2、抬牙凸轮的安装
打开后盖板,卸下挡油板,用左手逆时针转
动上轮,油孔对上上轴齿轮第二只固定螺钉
(A),以上轴齿轮第二只固定螺钉(A)为基
准,抬牙凸轮的第二只固定螺钉(B)中心,将对
齐(A)中心,稍微向下偏一点。
3、送布凸轮的安装
继续逆时针转动上轮,以抬牙凸轮第二只紧
固螺钉(B)为基准,迸布凸轮的第三只紧固螺钉
(C)中心,将对齐(B)中心, 稍微向上偏一点
(如将两螺孔缺口标记对成一直线亦可)。
1. Standard position
Turn the upper wheel to lower the feed dog (A).
When it is level with the needle plate surface (B), the
needle point of the needle (C) should be on the
same level as the needle plate and the surface of the
feed dog. The adjustment can be carried out by
adjusting the installation positions of the cloth
feeding cam and the lifting cam.
2. Installation of the lifting cam
Open the rear cover, remove the oil baffle, turn
the upper wheel counterclockwise with your left
hand, use the second fixing screw (A) of the upper
shaft gear as the reference, and the center of the
second fixing screw (B) of the lifting cam will be
aligned ( A) The center, slightly lower.
3. Installation of feeding cam
Continue to turn the upper wheel
counterclockwise, and take the second fastening
screw (B) of the lifting cam as the reference, and lay
the center of the third fastening screw (C) of the
cam, which will be aligned with the center of (B), slightly upward ( If the marks of the two screw holes are aligned
in a straight line)
22.
送布同步调节(图
30,31,32
)
/ Synchronous feeding adjustment
(
Fig 30 31 32
)
30
31
32
A
B
C
B
C
14

压脚在提升范围内,夹线器上的夹线板有一
个张开期,挺线的时间可进行调节。调节时,先
卸下机头背面的橡皮擦,用螺丝刀(B)旋松膝控
提升杠杆(左)螺钉(A),这时松线凸轮可以左
右转动,往右移挺线慢,往左移挺线快。
The tension discs should be pushed apart to
open when the presser foot is lifted. But the open
timing of the tension discs can be adjusted as
follows: Remove face plate and the rubber plug at
rear side of arm and loosen screw (A) of the knee
lifting lever (left), then the tension releasing cam can
be moved leftward or rightward when the cam is moved right-ward. It is later to open, otherwise it is earlier to
open.
上、下同步送料是该产品的重要性能之一。
在缝纫过程中,应根据各种缝料的摩擦系数的不
同和缝纫工艺的不同要求,对上送料机构的摆压
脚滑块与摆压脚轴的中心距(L)进行调节。
调节方法:
增大中心距 L——上送料量增大。
减小中心距 L——上送料量减少。
对于某些制品的特殊缝纫要求,如缝件的上
层的送料量要求大于(或小于)下层的送料量,
也可以根据以上原理在一定范围内调节使用。
During the sewing, the center gauge (L)
between the walking foot sliding block and its shaft can be adjusted according to the differences of the friction
coefficients of the friction coefficients of materials and the sewing process.
Method: Increase L -- the upper feed amount enlarged
Reduce L – the upper feed amount shorten
For special sewing requirements, for example, the upper layer of material needs more amount than the lower
layer does, in this case, adjustment can be done in the range of above theory for operation.
23.
松线器挺线调节(图
33
)
/ Adjust opening time of the tension discs
(
Fig 33
)
24.
上送料机构的调节(图
34
)
/Adjusting the tension releasing mechanism
(
Fig 34
)
33
左
右
D
34
15

根据缝料疏松和结实程度的不同,在缝纫
中,对摆压脚、小压脚的交叉提升量,可在一定
的范围内进行适当的调节。在一般的中厚料缝纫
中,摆压脚提升量为 5.5mm 之内,小压脚提升时
为3.5mm 左右。当其他机构不变的情况下,两压
脚提升量之和基本上是一定值。两提升量的变化
近似于按反比定律变化。即:摆压脚的提升量增
加,则小压脚的提升量就减少。反之也然。
调节方法:旋松偏心轮连杆调节曲柄螺钉
A,按图示向上转动压脚升降前曲柄,摆压脚的提
升量增大,反之,向下转动,小压脚的提升量减
少。但其调节量有一定的范围限调,不宜过大。
调好后,将螺钉拧紧, 用手转动上轮,检查一切
正常后方可使用。
During the sewing, the alternate lift amount can be adjusted according to the nature of material. In general
sewing, the amount of walking foot is 5.5mm,and the presser foot lift amount is 3.5mm.
Method: loosen the screw A. turn presser foot front crank up ward to increase the amount of walking foot.
Turn it downward to reduce the presser foot amount, the range of adjusting amount is not too
在缝纫过程中,要改变摆压脚、小压脚的提
升量,其调节方法是:先将偏心轮连杆螺钉(A)
旋松,然后调节该螺钉与压脚升降轴中心距 B;
如果使摆压脚、小压脚的提升量都增加,则使中
心距 B调小;反之,则可使提升量都减少。其调
节量也有一定的范围,调节幅度不宜过大,调节
好后,将螺钉拧紧,慢慢转动上轮,检查有无碰
撞现象,一切正常后方可使用。
The lift amount of walking presser foot together
with presser foot can also be adjusted slightly. When
adjust-ting, loosen screw (A) adjust its center
distance B between the screw (A) and the presser
foot lift shaft. The lift amount is increased as to
shorten the center distance B, and the lift amount is
decreased as to widen the center distance B. After adjustment, tighten the nut again.
25.
压脚交叉提升机构的调节(图
35
)
/Adjusting presser foot alternate lift mechanism
(
Fig35
)
26.
摆压脚、小压脚总提升量的调节(图
36
)
/Adjusting the lift amount of presser foot together with walking foot
(
Fig36
)
35
36
上
下
B
A
16

在缝纫过程中,有时用大针距缝纫,有时用小针距缝
纫,在大针距缝纫时,摆压脚前后的行程比较大。反之,
就小了。为了在缝纫过程中,使摆压脚槽的前端与小压脚
后端面不碰撞,且保证有一定的间隙 C(一般取 1.5mm 左
右)。故在小针距缝纫时,需要摆压脚向针杆靠拢点,调节
方法:首先旋松摆压脚前曲柄螺钉,然后向上转动压脚摆
动轴,则摆压脚就向针杆靠拢,调节时,应该注意间隙 C
的定值要求。
In sewing operation, for preventing the walking foot from
striking on presser foot a proper clearance C of approx. 1.5mm
should be maintained between them. When the clearance is
too small or too big, necessary to adjust, loosen rear crank
screw and turn the rock shaft, then the walking foot moves near the needle bar. When adjust, be sure to note the
fixed number of the clearance C.
请根据使用程度,定期进行清扫送布牙、旋梭、梭心套和
油泵滤网等。
1、送布牙的清扫
先卸下针板,清除送布牙(A)间距(牙槽)内的尘垢,
然后再安好针板。
2、旋梭的清扫
清除旋梭(A)周围的尘垢,如图所示,同时用软布拭擦
梭心套。
3、油泵滤网的清扫
如图所示,清除滤网(A)上的尘屑。
Please regularly clean the feed dog, rotary hook, bobbin case
and oil pump filter according to the degree of use.
1. Cleaning the feeding teeth
Remove the needle plate first, remove the dust and dirt in the
gap (teeth) of the feed dog (A), and then install the needle plate.
2. Cleaning the hook
Clean the dust around the hook (A), as shown in the figure,
and wipe the bobbin case with a soft cloth.
3. Cleaning the oil pump filter
As shown in the figure, remove the dust on the filter (A).
27.
摆压脚、压脚前后方向间隙的调节(图
37
)
/Adjusting the clearance between presser foot and walking foot
(
Fig 37
)
28.
定期清扫(图
38,39,40
)
/ Clean regularly
(
Fig 38 39 40
)
37
C
上
下
38
39
40
A
A
A
17

1.必须遵守基本措施;
2.必物经过专业培训,对缝纫机设备性能有所了解;
3.使用前应检查所有安全装置;
4在安装机针、更换机针、压脚、针板、送布牙、弯针、旋梭或修理时,应立即关闭电源;
5.离开缝纫机或工作场所时应关闭电源;
6.使用离合马达时,要等待马达完全停止后再进行;
7.缝纫机及附属装置使用的机油,润滑油等液体流入眼睛或沾到皮肤上应立即清洗;
8.禁止用手触摸缝纫机通电时的零件或装置;
9.有关工业用平缝机与包缝机的修理、改造、主要机构的调整由专门技术人员来进行;
10.一般的维修保养由专人进行;
11.在电气方面的修理应在电气技术员的监督和指导下进行;
12 缝纫机使用期间应定期清扫;
13.为了正常安全运转,应安装地线,同时应在不受高频焊接机等强噪声源影响的环境下使用;
14.电源插头应由专人安装;
15.工业用平缝机、包缝机在指定用途以外不能使用。
1. Basic measures must be observed.
2. Pass the specialized training and master sewing machine equipment performance.
3. All safety devices should be checked before use.
4. When installing needle, and changing needle, presser foot, plate, feed dog, bent needle, hook or repairing, the power supply should be turned off
immediately.
5. Power should be turned off when leaving the sewing machine or workplace.
6. When using the clutch motor, please wait until the motor stops completely.
7. The machine oil and other liquids used in sewing machines and ancillary devices should be cleaned immediately when they are put into eyes or touch skin.
8. Do not touch the parts or devices when the machine is powered by hand.
9. The repair, renovation and adjustment of the main mechanisms of the relevant industrial sewing machines and overseers shall be carried out by specialized
technicians.
10. General maintenance is carried out by specially-assigned persons.
11. Electrical repairs should be performed under the supervision and direction of the electrical technician.
12 The machine should be cleaned regularly during operation.
13. In order to operate normally and safely, ground lines should be installed, and they should be used in an environment free from strong noise sources such as
high frequency welding machine.
14. Power plug should be installed by specially-assigned person.
15. Industrial lockstitch sewing machine and overlook sewing machine can not be used except the designated use.
1.使用过程中产生的废油及其他废弃物请根据当地环保的要求进行合理的处置。
2.请在使用完后及时关闭电源,减少电能的消耗。
3.请在说明书要求的电压及环境下使用,以延长产品的使用寿命,减少废弃物的产生。
4.机器报废后请勿将本机器及其附件作为普通的生活垃圾处理。请遵守本设备及其附件处理的本地法令,并支持回收行动。
1. Please dispose the waste oil and other waste products properly according to local environmental protection requirements.
2. Please turn off the power after use to reduce power consumption.
3. Please use under the voltage and environment required in the manual to extend the service life of the product and reduce waste generation.
4. Do not treat the machine and its accessories as ordinary household garbage after being scrapped. Please comply with local laws governing the disposal of the
equipment and its accessories and support recycling operations.
29.
工业缝纫机安全使用注意事项
/ /Notes for safe use of industrial sewing machines
30.
环保要求
/Environmental requirements
18
Other manuals for H2 Series
1
Table of contents
Other Jack Sewing Machine manuals