Jack JK-SHIRLEYIIE User manual

Operation and Daily Service Manual
JK-SHIRLEYIIE
www.chinajack.com
Edited by Customer Service Center
Translated by International Trade Department

Product and technical parameter
Instruction of Operation Panel
Preparation before trial sewing
Instruction of mechanical adjustments
Instruction of pedal control
Application of needle position
Selection of mode
Speed
Trial sewing
Needle position
Presser foot lifter
Thread tension device
Bar tacking
Adjustment of feed dog
Adjustment of Presser foot lifter
Thread-Trimming
Standard method of adjustment of trimming
Introduction of System Operation
Factory reset
Common fault treatment(1-7)
Daily maintenance
Attachment (1)
Attachment 2 (Common sewing fault)
Common problems of Shirley IIE (Powermax)and solutions
Contents
KNEE FREE
KNEE FREE
KNEE FREE
JK-SHIRLEYIIE
computerized machine
Ordinary computerized
machine
Email:Sales@jackgroup.com.cn
1
2
3
4
5
6
8
8
9
10
10
11
11
12
13
14
15
16
16
20
21
22
24
14

JK-SHIRLEYIIE
With powermax control box
Presser foot PK
Simple Beautiful
Efficient Saving energy
Stable Low noise
1

Technical parameter
JK-SHIRLEYIIE
Model
Fabric
Needle size
Maximum needle gauge
Auto-bar tacking
Auto-press foot lifter
Auto-trimmer
MAX height of Press foot lifter
Factory setting of Press foot lifter
Distance of press foot by hand lifter
Max speed
Thread tension
Integrated computerized lockstitch
Thin ,medium
DBX1, 14#
5mm
Standard
Standard
Standard
5/9/12MM
9MM
5MM
5000RPM
Standard
Operator Panel instructions
Needle position key
Press foot lifter key
Trimmer key
Start&end back tacking key
Free sewing key
Multi-segment sewing mode key
“W ”mode sewing key
Function key
Thread tension key
Speed key
2
Preparation before sewing (Threading)
Turn the sunken side of bsx1
Needle to the right side
Turn the needle to the top side
Threading guide
Thread tension of the thread
length after trimming
Thread tension
Needle dial
Back stitch wrench
Electronic back stitch key
Put in the hook Adjust the tread
tension of button line
Fix the
button line
Put the
Bobbin case
Assemble
the needle
Assemble
the needle
3

Mechanical adjustments
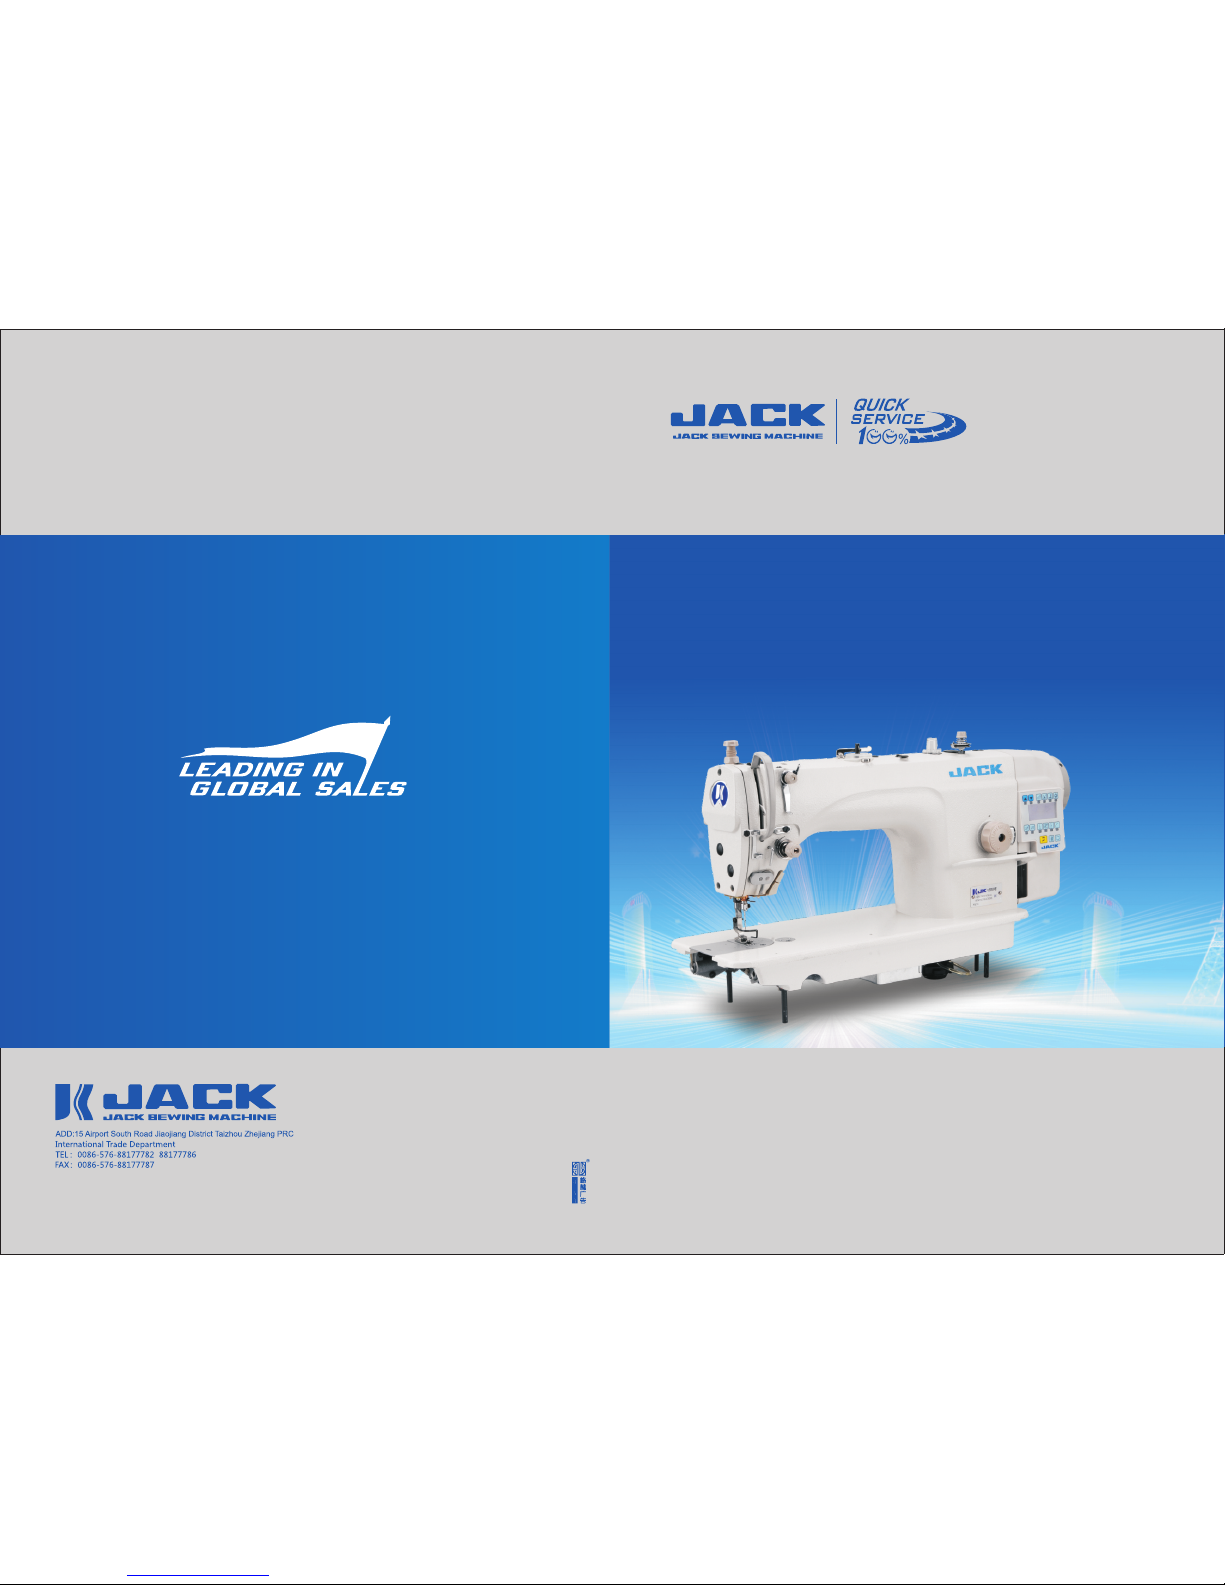
The first tension device adjustment
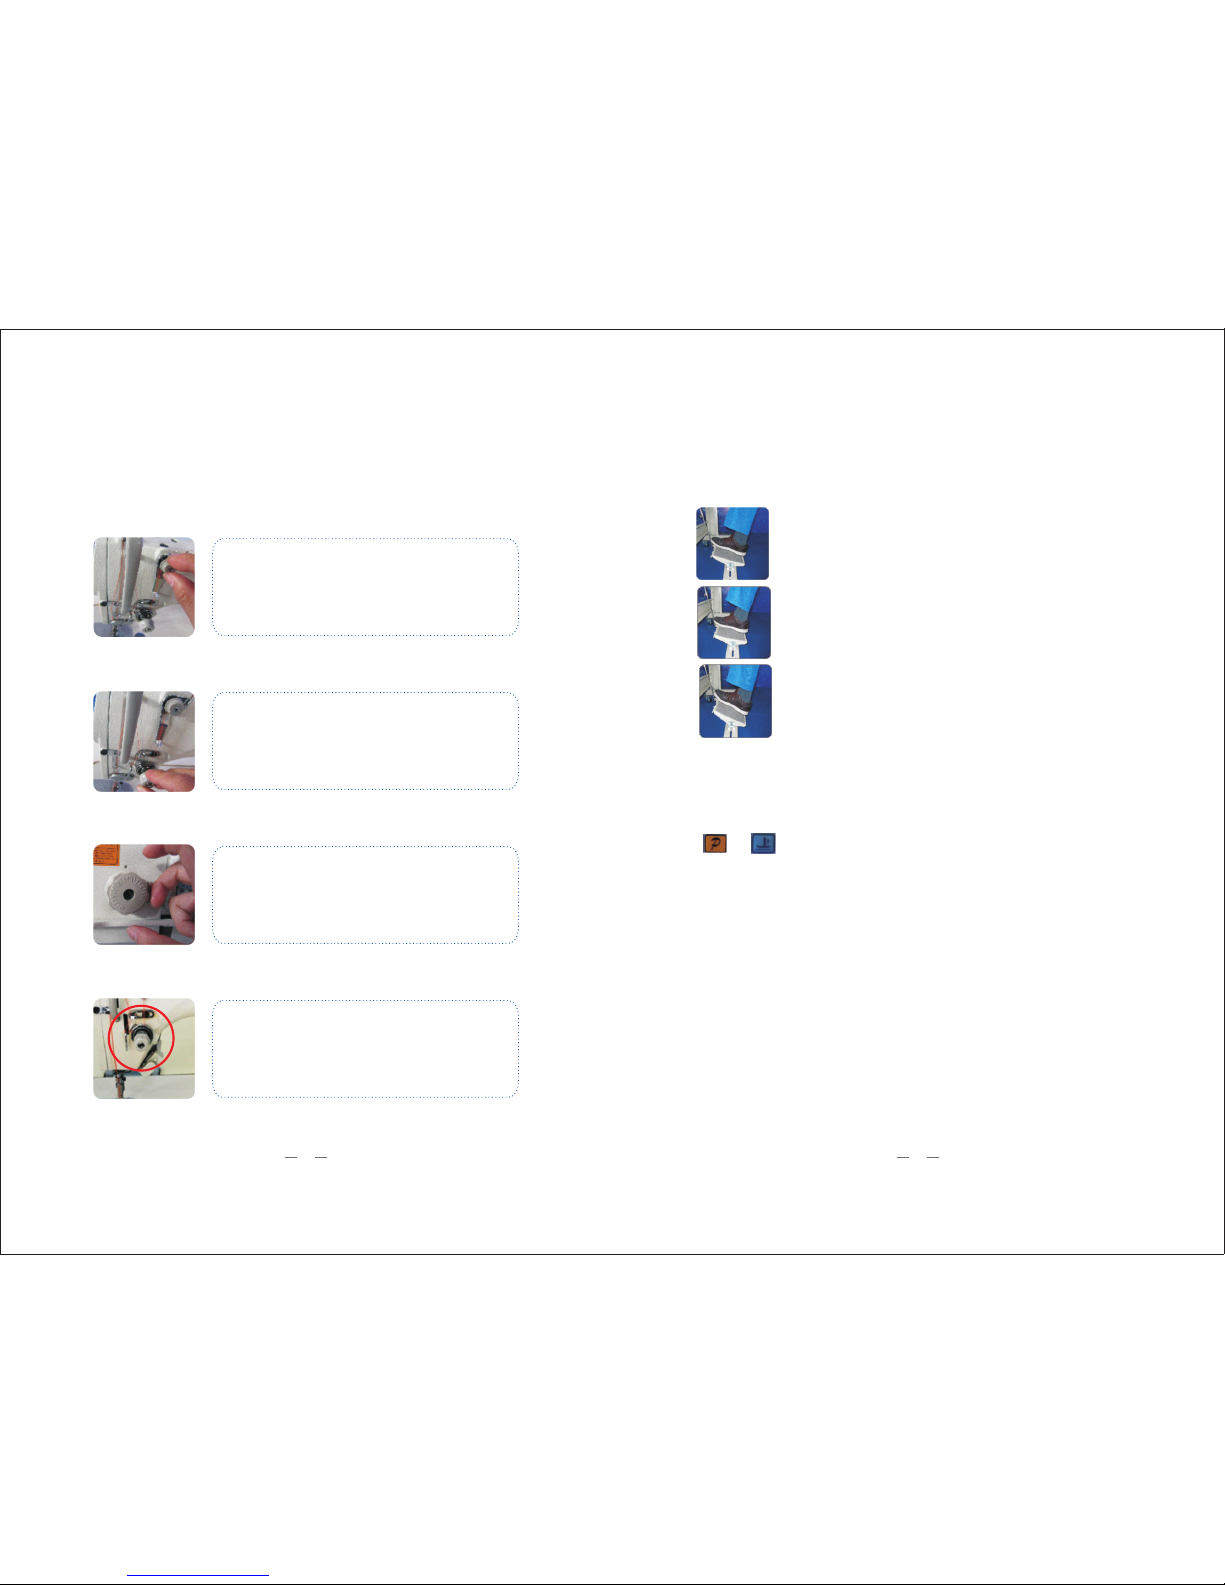
Control the length on the needle after automatic trimming
and the thread length around 4-4.5 cm is the best. Adjusting
the knob in clockwise way, thread will be short; otherwise, it
will be long.
The main tension device adjustment
Control the tension of thread during sewing. Adjusting the
knob in clockwise way, the tension will be bigger; otherwise,
it will be smaller.If the under-thread loose, the tension
should be adjusted stronger, but too stronger would cause
upper-thread be cut easily
Needle gauge adjustment
The left hand holds the backstitch wrench, with the middle
finger back from the lock to the needle, with the thumb and
index finger rotating needle gauge plate. The gage will be
smaller when turning in clockwise way and will be bigger
when turning in anti-clockwise way.
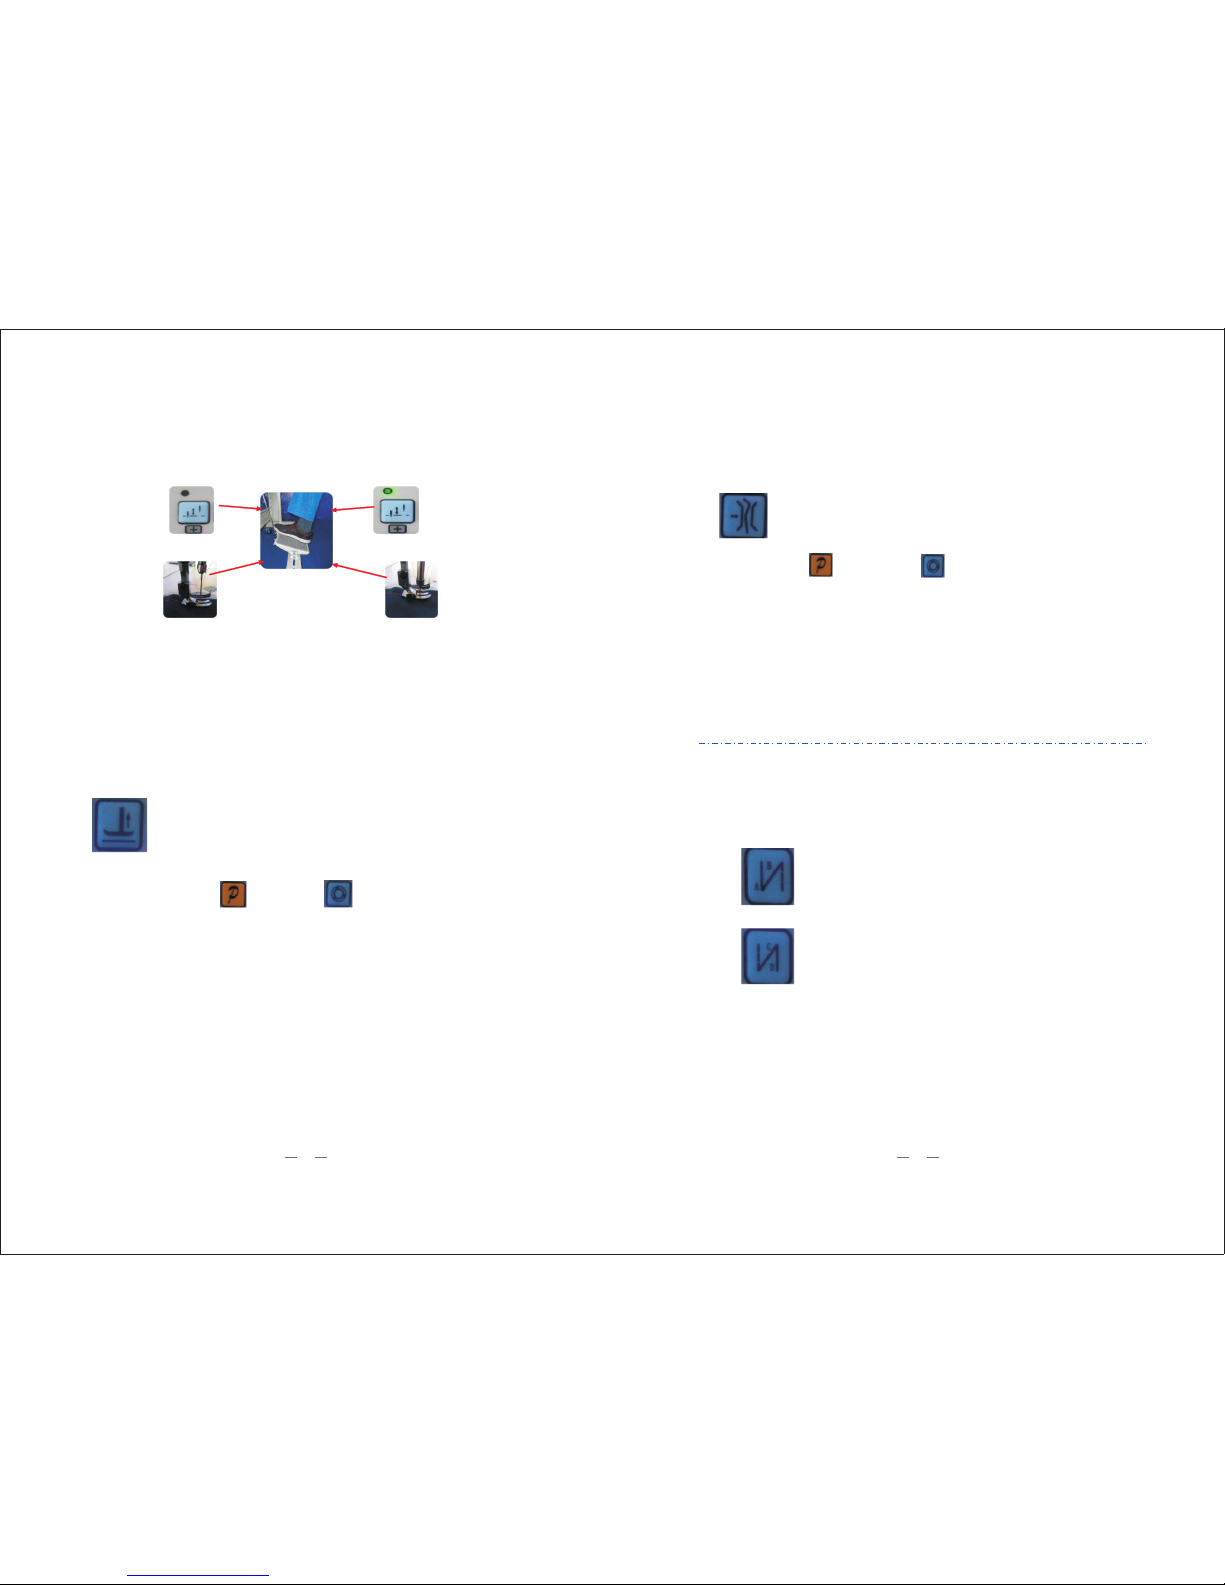
Reverse-sewing button Operation
During sewing, keep pressing the reverse-sewing button , the
machine will be in reverse-sewing state; otherwise, the
machine will be in sewing state.
Press and together to enter technician mode, the pedal control mode can be changed
by adjusting the following parameter:
P30: Pedal Curve mode setup (0:Auto Calculated liner Curve; 1:Two segment liner Curve;
2:Arithmetic Curve; 3:S curve)
P34: Pedal trimming position set (the value is not higher than the parameter [35]);
when adjust P34, need to adjust the value of P35 closer to the value of P36, that’s the sensitivity of
trimming
P35: Press foot lifting (the value is between[34]and[36].)
P36: Pedal back mid position (the value is between[35]and[37] .)
P37: Pedal step upon running position (the value is between[36]and[38]) , if want the machine
to response faster, need to turn down the value of P37, but the value should be higher than P36
P38: Pedal low speed running position(the value is between[37]and[39])
P39: Pedal simulation the largest of value (the value is not lower than the parameter [ 38])
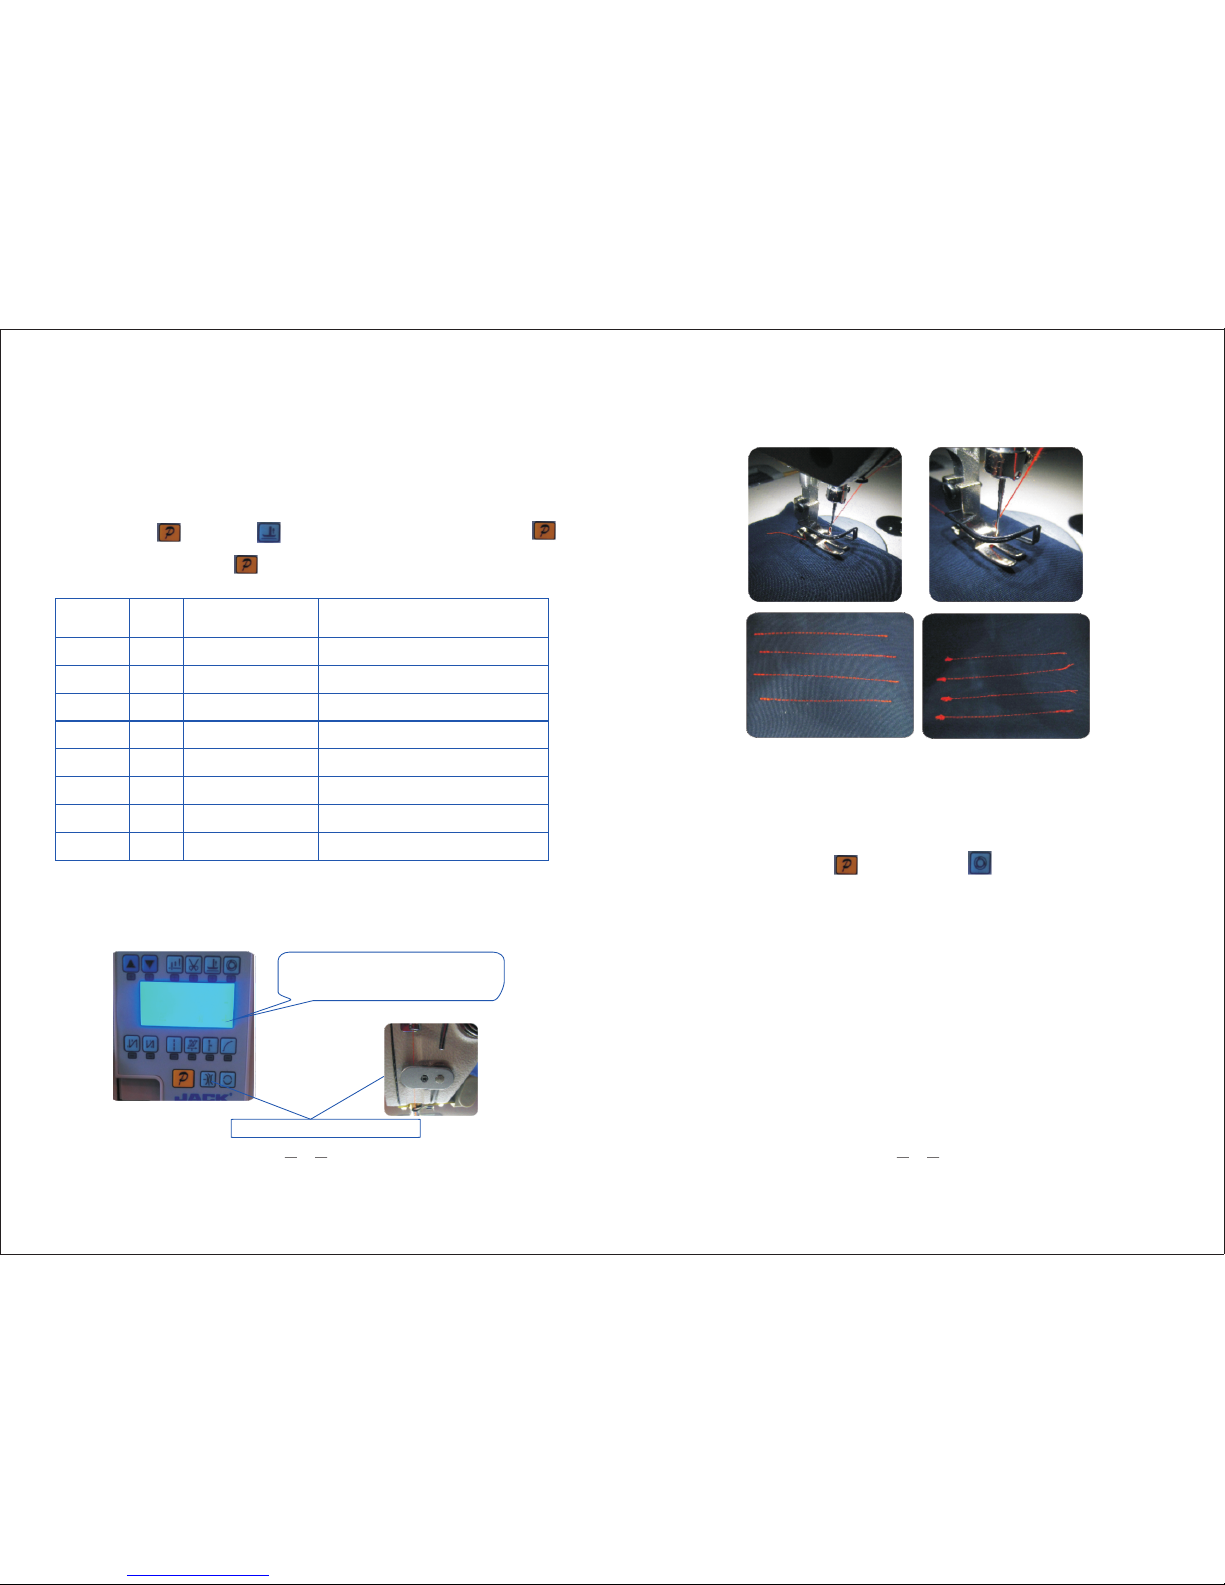
Turn on the power, machine will be up needle position ,the pedal will be as
original state
Step forward to run:
When powered on, the speed will change as the pedal stepped deeper, the
deeper the pedal stepped ,the higher the speed will be.
Step backward to trim and stop:
After sewing, step the rear of pedal, machine will trim and stop. If there is
presser foot lifter accessories, presser foot will lift when stepping backward
further .
Instruction of Pedal Control
Original state
45

Press this key, the machine enters into “free sewing
mode”, the sewing length can be controlled by the
operator, that is why we called this function as“free
sewing model”. It’s often used for lap seam and bar-
tacking sewing.
Press this key, the machine enters into “fixed-stitch
sewing mode”, the sewing length and segment is
confirmed by the operator through control panel, and
sewing will be finished automatically. The operator
only needs to pedal the speed controller, then will
work automatically till finishing the trimming. It’s
often used for sewing the fixed-length thread
segment and the trademark.
Press this key, the machine enters into “W pattern
bar-tacking sewing mode”, the bar-tacking stitches
and times are set up by the operator through control
panel, and sewing will be finished automatically. The
operator only needs to pedal the speed controller,
then machine will work automatically till finishing
the trimming. It’s often used for straight bar-tacking
sewing.
Intelligent sewing
simple operation
Intelligent sewing
simple operation
You can set the stitch
length according to
customer’s requirement
,after sewing ,it will auto
trimmer and auto stop .
You can set edges number
and stitch numbers of each
edge according to
customer’s requirement
,after sewing ,it will auto
trimmer and auto stop .
Common Fixed-stitch
length sewing model:
It is used to sewing
rectangular lables.
Fixed-stitch length
sewing model 2:
Fixed-stitch length
sewing model 1:
Selection of Sewing Mode
67

Speed
Keeping press then press , will be displayed “Pd-0000”, press
enter “P62-2101”, press to confirm.
Parameter
code
P00
P01
P02
P03
P05
P10
P11
P12
Default
200
3500
3000
3000
250
1800
1800
1800
Parameter
definition
Beginning sewing speed
Sewing speed
Fixed-length
sewing speed
Manual reinfored
sewing speed
Trimming thread speed
The beginning
reinforced sewing speed
The finishing
reinforced sewing speed
“W” sewing speed
Adjusting instruction
Limit the maximum beginning speed
Limit the maximum sewing speed
Limit the maximum fixed-length
sewing speed
Limit the maximum manual
sewing speed reinfored
The speed of mainshaft when trimming
The speed of mainshaft when the
beginning reinforced sewing
The speed of mainshaft when the
finishing reinforced sewing
The speed of mainshaft
when “W” reinforced sewing
Trial sewing
The control panel parameter can be adjust ,
please refer to the parameter instruction book.
Electronic tension device switch
no thread on upper side realize clean sewing
in the bottom side
Needle Position
Press and hold button ,press button at the same time ,
enter into “system programmer parameter mode”
P42: needle position up adjustment
With this parameter can realize machine to stop at any angle position
When adjust the parameter, make sure to rotate the hand wheel by hand ,after adjust to a suitable position
and then,press button “ P” to save
P43: needle-down position down adjustment
With this parameter can realize machine to stop at any angle position
(adjustment method is the same as P42)
89

Presser foot lifter
Thread tension device
Press and it can open or close small thread tension device easily
1.After the user press the ,and it press the at the same time,it will enter into system
parameter modification mode
2.P19:choose clamp thread function:(0:off,1:on)
P1A:Angle for clamping thread start
P1C:Angle for clamping thread finish
Bar tacking
Front reinforce stitching switch
Behind reinforce stitching switch
Technology source parameter modification mode
P13:the needle tracing compensation A for front reinforce stitching
P14:the needle tracing compensation B for front reinforce stitching
P15:the needle tracing compensation A for behind reinforce stitching
P16:the needle tracing compensation B for behind reinforce stitching
1. Press this button continuously, this function of auto-presser foot
lifter can be cycling switch between -“function on in middle
way/function off ”and -“function on after thread trimming and stop/
function off ”.Suitable for many different operation customs, and
different procedure of sewing demands.
2.Press and hold button ,press button at the same time ,
enter into “system programmer parameter mode”
4P78-53revise as P78-200(solenoid full output strength time)
P79-05revise as P79-04(full output strength connect time)
P7A-05revise as P7A-06(full output strength disconnect time)
.
P44:Delay time of presser foot lifter down
This parameter is defined as the interval time between the presser lifter down
and the begin of sewing . the bigger of the numerical value ,the speed of starting,
sewing the smaller the numerical value , the speed of starting sewing is faster.
3.“system programmer parameter” P35: setting of presser foot lifter position
Needle positioning mode
When we swith on the power, If indicator light is off, it means needle up,
If indicator light is on, it means needle down
Note:
During stitching, if you want to change the needle positioning according to
your requirement,please stop the machine,make sure the pedal in the original
position, then press the needle positioning button to change as you want.
If indicator light is off
it means needle up
If indicator light is on
it means needle down
The pedal is in the
original position
Needle Up Needle Down
Application of needle position
10 11

Adjustment of feed dog
Height adjustment for feed dog
Unscrew the braces screw
For light fabric, appropriately
adjust feed dog lower
For heavy fabric, appropriately
adjust feed dog higher .After
finishing ,tighten the screws.
Adjustment for feed dog gradient
Unscrew the screw,turn the brace
and adjust the eccentric shaft, it can
adjust teeth front or back,high or
low.This step depend on different
fabric.
Front or back for feed dog
Adjust the needle spacing to
maximum, unscrew the braces screw,
and it can adjust feed dog front and
back, when the machine is running,
please pay attention to the teeth
front and back and can not touch the
throat plate ,and feed dog left and
right also can can not have the
friction with needle plate.
Change the presser footer:
loose the footer screw then can change
the presser footer.
Adjust the footer and needle:
When the needle is not in the middle of the
presser footer ,or the feed dog is in low
position. Unscrew and adjust the presser to
the right position . Then tighten it.
Adjusting the pressure of
the presser footer:
Lifting the footer, put the fabric below the footer,
put down the footer, pull the fabric by hand, if
the fabric can be easily pull out, so need increase
the pressure of the footer. Loose the press rod
nut, rotate it in the clockwise direction, if you
want to reduce the pressure, please rotate it in the
anticlockwise direction.
Footer protect:
When the machine work without
fabric, must move up the presser
footer protection wrench, lift the
footer, can reduce the ware rate of
the teeth and presser footer.
Adjustment of the presser foot lifter
12 13

Thread trimming
Standard method of adjustment trimming
Needle bar running
direction
Hook running
direction
Hook scattering
thread point
Needle center line
The distance
between hook
scattering thread
point and need
center line is about
5mm
Retaining screw
of trimming cam
Trimming driving ball
Movable knife start point
Adjust method:
Before adjusting the trimming time, we must adjust the height of needle
bar, the time of hook drawing thread and needle position.
When the hook scattering thread point is about 5mm away from the
needle center line as the picture shows, adjust the trimming cam to the
position where the trimming movable knife just starts.
Adjust Description
When the movable knife scattering thread, do not let the hook loose
thread. Make sure the hook take in enough thread so that the thread tail
will be longer.
Introduction of system operation
Setting to technician parameter
Setting to system officer parameter
Keep pressing the at the same time . Then loosen both button and press
again to access to technician parameter
Keep pressing button and button at the same time, loosen, then press button
again to access to system officer parameter.
Press the button can turn on or turn off the
thread trimming function.
Press at the same time, can enter the technician
parameter mode.
P05: Set the trimming speed
Press and press at the same time, can enter system
parameter mode.
P03: Start angle shear line
P04: End angle shear line
P0A: Shear line strength angle
+
+
14 15

Press button first, then press .
When the displayer shows Pd-0000,
press button to enter P62-2101,
again press button to save.
Factory Reset
(Err-01)
REASON: Hardware overcurrent
The way to check:
1.
2. Replace the control box with “Replace exclusion method” to see whether the control box is
damage or not.
3. Replace the main shaft motor with “Replace exclusion method” to see whether the motor is
damage.
Solution:
1. If the power supply voltage is not in the normal range, please check the power cable design
is normal or not.
2. If the control box is damage, please replace it or send it back to supplier for repairing.
3. If the motor is damaged, please replace it or send it back to supplier for repairing.
Check whether the power supply voltage is 220V +/-20V with a multimeter;
( -06)Err
REASON: Solenoid circuit fault
The way to check:
1.check the DC resistance of each solenoid is normal or not with a multimeter (you can
compare with the normal machine)
2. Replace the control box with “Replace exclusion method” to see whether the control box is
damage or not.
Solution:
1.If any of the solenoid is damage, please replace that solenoid.
2.If the control box is damage, please replace it or send it back to supplier for repairing.
The way to check:
1.check if power line connection between motor and control box is broken or not.
2.Interchange the control box to check it it is the control box problem.
Solution:
1.If connection problem, just need to improve connection.
2.If control box problem, change another one or send the defective control box back to
company to repair.
(Err-07)
REASON: Current sensor fault
Common fault treatment(1)
Common fault treatment(2)
Common fault treatment(3)
16 17

( -10)Err
REASON: Panel no display or panel no power
The way to check:
1.check if connection between panel and control box is broken or not.
2.Interchange the panel to check if it is the panel problem.
3.Interchange the control box to check if it is the control box problem.
Solution:
1.If connection problem, just need to improve connection.
2.If panel problem, just change the panel.
3.If control box problem, change another one or send the defective control box back to
company to repair.
The way to check:
1.Testing discharge cement resistor is burn out or not;
Solution:
1. Replace the cement resistor with same model.
2. Replace the control box or send it back to supplier for repairing.
(Err-09)
REASON: Discharge circuit fault.
The way to check:
1.Check if there is any other mechanical fault from machine in running condition.
2.Recheck motor angle.
3.Interchange the control box to check control box have problem or not.
Solution:
1.Make sure there is no any mechanical fault from machine.
2.Use P43 , change the last digital parameter from 0 to 2 , step on the pedal, recheck the motor
angle , then change the last digital parameter from 2 to 0 and save.
3.If control box problem, change another one or send the defective control box back to
company to repair.
( 12/13/15)Err-
REASON: Motor initial rotor position fault
The way to check:
1.Check if connection between motor encoder and control box is in good condition or not.
2.Interchange the encoder to check if it is the encoder problem.
3.Interchange the control box to check if it is the control box problem.
Solution:
1.If connection problem, just need to improve connection.
2.If encode problem, just change the encode.
3.If control box problem, change another one or send the defective control box back to
company to repair.
(Err-08)
REASON: Motor blocked
Common fault treatment(4)
Common fault treatment(5)
Common fault treatment(6)
Common fault treatment(7)
18 19

Daily Maintenance
Keep the machine surface clean
Keep the oil in the oil reservoir not
lower than the scale
Make sure that there's oil spraying up in
the oil sight window during running
Keep the small oil reservoir clean,
no thread dust gathering
Keep the big oil reservoir with clean oil,
not getting dirty to black
Clean all around the hook regularly
Disassembly the plate, clean the feed dog
and knife bracket regularly
Attachment 1
Machine maintenance knowledge
Daily maintenance:
After work-off, turn off the power first. Clean the dust on the machine and machine head,
table, thread holder, and make sure the oil are clear of oil tank.
Weekly maintenance:
Clean the machine surface and feed dog by disconnecting the needle plate. Take over
machine clean the fragment of thread and fabric. Make up the oil if the oil line is lower than
the lowest line.
Half year maintenance:
Change all of machine oil. Disconnect the oil screw under the oil tank than unload the oil
(PS: PUT A CONTAINER UNER THE TANK TO CATCH THE OIL), clean the tank then
install the oil screw and reload the clean oil. Check the whole machine body adjust or
replace what parts are noisy.
20 21

the fabric not flat enough
bottom thread is break
needle break
Whether the presser foot pressure is too weak
To adjust the pressure of presser foot
High-low about the feed dog , whether not flatness
To adjust the feed dog height and parallelism
Whether the bottom thread is suitable
To adjust the bottom thread tight
Whether the needle is bended
To change the needle
Whether the needle installed well
To install the needle correctly
Whether threading correctly
To threading in right way
Bottom thread is too tight
To adjust the tension of bottom thread.
Whether the hook and needle have well matched
To adjust the hook and needle match well
Whether the needle installed well
To install the needle correctly
Whether the hook and needle have well matched
To adjust the hook and needle match well
Whether the knife position and moveing time is right
To adjust the trimmer position in right way
Whether the needle size is appropriate
To choose the right needle
upper thread is not tight
enough
bottom thread is not
tight enough
the thread loose under the
fabric
skipped stitching during
sewing
skipped stitching when
starting sewing
The tension of upper thread is weak, or the tension
of bottom thread is too strong.
To adjust the tension of upper thread or bottom thread.
The tension of bottom thread is weak, or the tension
of upper thread is too strong.
To adjust the tension of upper thread or bottom thread.
Whether the thread line is smooth or not
To polish the thread line
Whether the needle is bended
To change the needle
Whether the needle installed well
To install the needle correctly
Whether threaded correctly
To thread in right way
Whether the presser foot pressure is too weak
To adjust the pressure of presser foot
Whether the needle is suitable for the fabric
To change a better needle which is suitable for the
fabric
Whether the upper thread is too short after trimming
To adjust the thread tension or trimming time, make
the upper thread longer
Whether the speed of starting sewing is too fast
To adjust the speed of starting sewing
Whether the bottom thread is too short or moveble
knife and fixed knife has burr after trimming
To deburred the knife and fixed knife,
and adjust the stopper spring.
moveble
Common sewing fault
Attachment 2
22 23

The common problems and solutions of JK-SHIRLEY IIE
(Powermax)
1 Q: How to lift presser foot when we are sewing?
Answer: The control system of this type of sewing machine has the function that operators
just need to press the button “Presser Foot Lift”continuously to achieve circulatory Switch
between four patterns “no lift presser foot- midway parking presser foot lift—trimming
parking presser foot lift—Midway parking and trimming parking presser foot lift ”flexibly.
When users set “presser foot lift ” during sewing and after cutting , icon of this function will
be lighted in the panel, so the machine can achieve this function; besides, when the presser
foot presses the cloth in sewing, half reverse tread trample also can realize the presser foot
function.
2.Q: How to lift presser foot automatically after cutting?
Answer: The control system of this type of sewing machine has the function that only
operators press button “Presser Foot Lift”continuously, which the sewing machine can
achieve circulatory Switch between four patterns “no lift presser foot- midway parking
presser foot lift—trimming parking presser foot lift—Midway parking and trimming parking
presser foot lift ”flexibly. When users set“trimming parking presser foot lift” , icon of this
function will be lighted in the panel, so this function can be achieved. And presser foot will be
putted down after finishing cutting after the time of presser foot lifting set by the system and
if you want to lift the presser foot again just to half counter trample to realize the presser foot
function.
3.Q: Why workers feel heavy when trimming?
Answer: Too low rotating speed results in the heavy feeling when cutting, or Pedal counter
trample too much when cutting.
A 、 For low rotating speed , workers could solve this problem to adjust the technician
parameters 05. First, to press button“ P ”meanwhile to press the button“presser foot
lift”when“Pd-0000 appeared, pressing“P” again to enter the technician parameter “05-
XXXX”,then adjust “05” to “05-0270”(The actual setting value is 270), then press“P”to
save and exit .Watching out the speed of trimming can’t be set too large in case of resulting in
a lot of noisy, and cutting will be unsteady. Please follow the rules of operation as the
standard strictly. Generally speaking, adjustment values is 230-270.
B 、For reverse tread resulting in cutting route too big, to adjust rear number of "Technician
parameter" and " the number behind 34"bigger and always set parameter from 50 to 180. if
Value is too small, trimming will be felt heavy; too big , when presser foot life during sewing
will be easy to mistakenly trigger cut line. According to the worker’s habit to make adjust,
operators usually set between 80 and 100 appropriately.
.
4.Q: Presser foot can’t be controlled well when half reverse tread, and trim mistakenly.
This phenomenon is caused by unreasonable parameter settings of trimming position
and Presser Foot Lift position.(the method of getting into The technician parameters as
above)Increase the value of P35 appropriately. Increase the numerical difference of "35"
and "34" . bigger this difference is , more obvious time of "trimming" and " presser foot lift"
action gap will be , on the contrary, the smaller the value is, the easier to mistakenly trimming
when presser foot lift. This difference is generally not less than 50, the closer "35" number
and parameter value "36" number parameter is, the easier to fulfill "half reverse tread presser
foot lift" is, but the difference of the "36"should be no less than 100, otherwise the presser
foot will automatically lift when stopped in the middle. This parameter can be adjusted
depending on the habits of the operator.
5.Q: Why it can’t trimming after adjusting reverse tread parameters ?
This phenomenon is caused by the small setting of the pedal cut line position which
the parameters (Technician parameters 34) is set too small. This parameter can be adjusted
appropriately larger than before. Generally it often set between 80-100. When setting this
parameter, the value can not be bigger than "technicians parameter" and "35" setting value.
6.Q:The function “presser foot lift during sewing” wasn’t open, why the presser foot lift
when stop sewing?
Answer: This phenomenon is caused by unreasonable parameter settings, and you will
turn down technician parameters (press P + button presser foot lift to enter ) value of P35
appropriately, always increase it between 200 and 300, at the same time, operators would
better to make the value of P36 to about 500 . If the difference between parameter "36" and
"35" is less than 100, the presser foot will lift automatically when half-way stop.
.Q: why the machine starts sewing before putting down presser foot?
Answer: this phenomenon exist because of the delay of presser foot putting down set
too shortly. Please press and hold down the “P” after power source being opened, meanwhile
then press the "circle" on the panel, entering “system member parameter model”.Please turn
the parameter values of “P44”up appropriately which usually between 200 and 300.Bigger
the values is ,longer the time of starting sewing delay is, which means that the interval bet
between two action “Putting down presser foot” and “Starting sewing” is longer, vice versa.
It can be adjusted appropriately according to operator ’s habits and different sewing art.
.Q: how to adjust the problem of presser foot putted down too slowly?
Answer: this phenomenon caused by the delay of presser foot putting down set too shortly.
Please press and hold down the“P”key after power source being opened, meanwhile then
press the "circle" button on the panel, entering “ system member parameter model”.Please
turn the parameter values of “P44”down appropriately which usually between 200 and 300.
9 .Q: how to make presser foot raise half when machine is bone (sewing the material
from thin to thick)?
Answer: this problem involve in operation habits, and in this condition it is
7
8
24 25
Attachment 3

unnecessary to raise presser foot. when machine is bone only operator only need to pull with
hand before sewing, and it is absolutely unnecessary to raise presser foot. on the contrary,
stitch length is uneven and stitch trace is caused not beautiful if the presser foot is raised. on
this point we have to pay attention to adjust operator to change this bad operation habits .
10 .Q:
material in a high speed.
Answer: this problem is in our consideration, and the machine has been set three
different presser foot height, respectively 5mm、9mm and 12mm,and the The factory
standard height is 9 mm. User can change the most height only if open machine rear cover
plate, and change the fixed screw position on the presser rod.
11.Q:How to adjust the presser foot higher , but not too high?
Answer: what you need can’t be meet due to the Electromagnet presser foot used in this
machine. The pattern control you want can be realized, but the control cost will be expensive.
our corporate mission is“Provide sewing machinery with the best cost-performance ratio to
all”. As to the function of presser foot, the way of controlling Electromagnet can meet user’s
need basically, meanwhile our product possessed highly cost effective. Other special
individual demand just need to adapt and there is no difference substantially.
12.Q:Why your machine’s out-factory parameter does not set before, and they have to be
adjusted after the machine sold to us?
Answer:Actually, Our standard parameters are the results of surveying large amounts of
users. It customized to 80% users who can well-adapted this set of parameter. There may be a
little difference between different regions, different users and the inefficiencies and habits.
All these parameter is easy to adjust. With those adjustments, the sewing machines can well-
adapted all kinds of individual practice habits.
13.Q:Compared with a large presser foot lifting electromagnet used in sewing machine
before, how does the small one stand the force?
Answer: do not worry about this. Such design is out of scientific rule. We are just
optimizing the structure. It takes about 12.6Kg when the large presser foot lifter works, but
after optimizing the structure, it takes only 9.2Kg or much less in the same condition. You can
use it with ease.
14.Q:how can workers get used to handle the auto presser foot lifter for they used knee
to control it before?
Answer: It is just a matter of workers’ habits. Workers may not well adjust the change
at the beginning, but if they take an hour to adjust the change, which they will be accustomed
to this structure. On the other hand, this change has another advantage of this machine. It not
only equips excellent sewing functions as well as general sewing machines, but also releases
worker ’s knees. Female can wear dress all the summer with this special design. They will not
get illness related knees out of over-working. Workers can be attracted by this advantage.
How to raise presser foot a little instead of too much in order to make sew thin
15 Q: Will the electromagnet be short circuit or electricity leakage with inner-equipped
presser foot lifter, where is so oily?
Answer: we adopt custom- made electromagnet, which is completely enclosed. It will not
lead to oil leakage failure for the wire circuit is made by a pouring meddle. Customers can use
it freely.
16.Q:How to set the function of multi-segment sewing ?
Answer: first step, press full line in the panel,(the last but one button in the second line).
Second step, when the panel flashes yeg-4, we adjust the number to set the sewing-segment
you need, and then press the circle button on the lower right corner. Finally, users want to set
free sewing mode, they only need to press the dotted line.
17.How to set the function of automatic length-fixed sewing ?
Answer: the function of length-fixed sewing function and phase multi-segment sewing are
combined. When users need to set length-fixed sewing, they can handle it like these steps.
First step, press full line in the panel(the last but one button in the second line). Second step,
when the panel flashes yeg-4, change 4 to 1. Third step, press the circle button on the lower
right corner. We can set needle number. Fourth step, after setting needle number, press P to
make sure. If users want to set free sewing mode, they only need to press the dotted line.
18.Q:How to close the small electronic tension device?
Answer: there is an electronic tension device sign on the panel, users can press the button to
open or close the electronic tension device.
19.Q:How to restore to factory settings?
Answer: When the machine is on, please press the button “P”, and then press the button
“presser foot lifter”,and Pd-0000 will be showed on the panel. After that, press the button “P”
again into “62-2101”,and press the button “P”constantly for 4 seconds until one movable
dotted line is displayed on the middle of the panel, which shows that factory settings is
restored. Don’t modify the parameter values behind “62” optionally, otherwise it will fail to
restore to factory settings or restore to error program.
20.Q:How to increase the max speed of the machine?
Answer: When the power is on, please press the button “P”,and then press the button “presser
foot lifter”. Pd-0000 will be displayed on the panel. After that, press the button “P” into the
parameter “P01”,and turn up the value corresponded with the parameter “P01”. If your
machine’s service time is less than three months, don’t turn up the max speed more than
3500r/min; if more than three months, please don’t turn up the max speed more than
4200r/min.For the over-fast speed will short the machine wearing life, and increase the rate
of wire breakage.
21.Q:How to adjust the position of power-off of the machine without the positioning
magnetic steel as installed on the hand wheel?
Answer: The machine employs built-in positioner, and the position of power-off is electric
controlled. Press the button “P” constantly and the button “circle” at the same time, and then
.
26 27

into the “ parameter mode of system operator”P42. You can modify the upper stop position
through adjusting the parameter value of P42,and modify the under stop position through
adjusting the value “P43”.After finishing adjustment, press “P” to store it.
22 Q:How to adjust the speed?
Answer: Press the two triangle keys on the top left corner of the panel to adjust the stitching
speed within the max rotating speed as the system presets.
23.Q:Why does the electromagnet always make a noisy sound when the machine lifts
presser foot? Is there any problem?
Answer: The noise ,which is made by the micro vibration of the coil generated by the“the
eddy current”when the electric current flow through the coil is normal. And the higher the
power is, the louder the noise is. So please don’t worry about it.
.
Overseas Market Planing Center
28
MEMO

MEMO MEMO
Table of contents
Other Jack Sewing Machine manuals