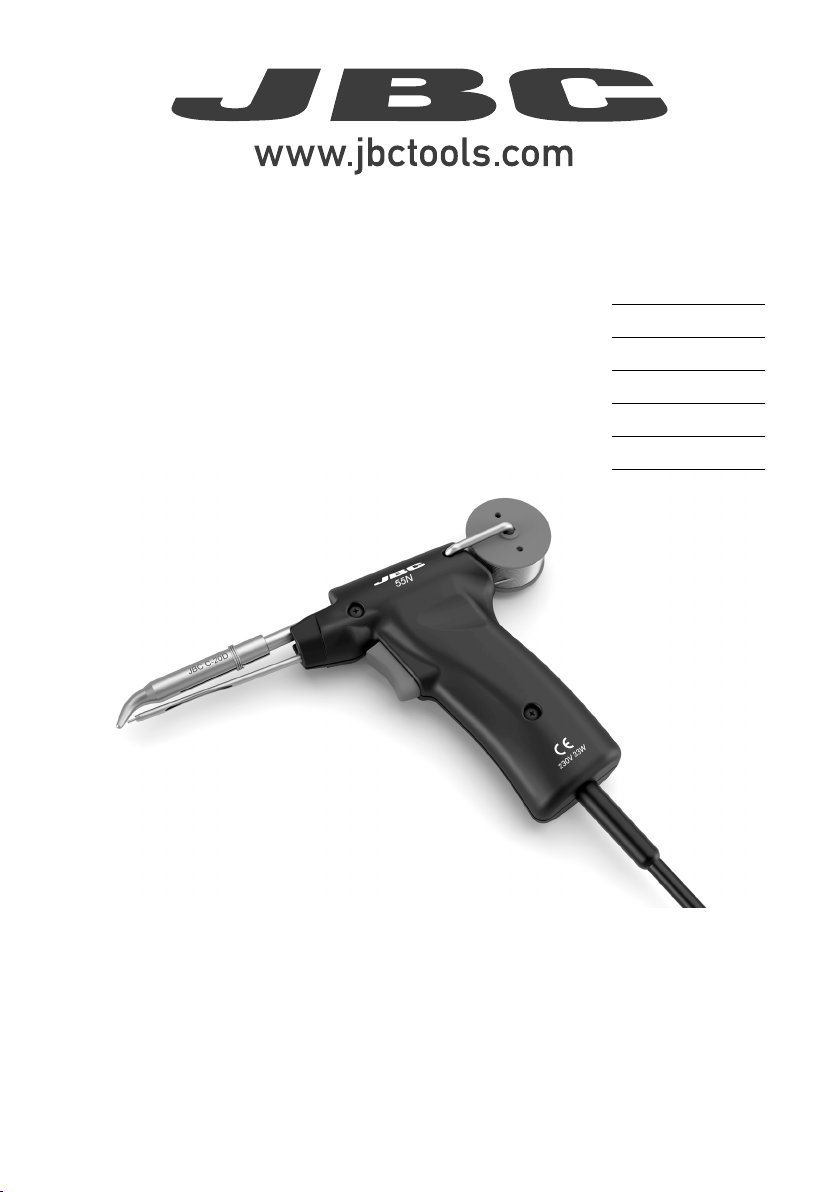
jbc 55N PULSMATIC User manual

Italiano 12
Deutsch 10
Français 8
Español 6
55N
Pulsmatic Solder Feed Iron (230V)
English 3
Page
INSTRUCTION MANUAL

2
This manual corresponds to the following reference:
Este manual corresponde a la siguiente referencia:
Ce mode d’emploi s’applique aux référence suivante :
Dieses Handbuch bezieht sich auf die folgende Artikelnummer:
Questo manuale si riferisce ai codice seguente:
Ref. 2552016 (230V)

3
PACKING LIST / LISTA DE CONTENIDO / LISTE DE COLISAGE /
PACKLISTE / LISTA DI IMBALLAGGIO
Ref. SN5450 (1x)
Ref. 0552851 (1x)
Ref. 0019212 (1x)
C-20D
Ref. 0550509 (1x)
Ref. 0033092 (1x)
55N 230V (1x)

3
Solder
Wire
4
Before using this equipment, we recommend you read these instructions carefully.
ENGLISH
TECHNICAL DATA
55N Pulsmatic, Ref. 2552016
- Power supply: 230 V
- Power: 33 W
- Maximum temperature: 450 °C
- Time to reach...
250°C: 2 min
300 °C: 3 min
- Connection: Schuko-Plug (Type F)
Includes the following:
- Long-life tip C-20D Ref. 0550509
- Replacement reel
INSTRUCTIONS FOR USE
Check that the mains voltage is the same as
specified on the unit.
Do not plug in the soldering iron without a tip, as
this might damage the heating element.
To avoid incidents, the hot soldering iron should
be kept inside the TS1200 Stand, which is sold
separately.
SOLDER REEL TYPES
Solder reel with ø 1mm solder wire.
Alloy: 99%Sn / 0.3%Ag / 0.7%Cu - 50 g
Green solder reel: SN5450
REPLACING THE REEL
The reel is pressed into the support arm, where
it is held in place.
To extract the reel, rest the shaft end on a
convenient surface and press down on the reel
until it is released (1).
Before fitting a new reel, pull out the solder wire
remaining inside the guide tube (2).
The solder flux may cause clogging at the end of
the guide tube: clean when necessary.
To fit the new reel, position it in such a way that
the solder wire runs off at the bottom (3); insert
the end of the wire into the tool (4) and manually
feed it in until it can be fed using the trigger.
Note: Always use a 1 mm diameter solder wire.
Guide Tube
Solder Reel
Support Arm
1
2
4

* Not included, sold separately
5
STAND FOR SOLDERING IRON*
The TS1200* stand is suitable for the 55N soldering
iron. Leave the soldering iron in the stand when
not in use.
The stand also allows cleaning of the tip with an
integrated sponge. Note: Use only deionized
water to wet the sponge. If normal water is used,
the tip may become contaminated by the salts
dissolved in the water.
Remove the tip by pulling the soldering iron
backwards through one of the side openings (2).
Insert the new tip onto the heating element. Use the
holes of the tip extractor to fix the tip and make sure
it is inserted as far as it will go (3).
SOLDER REEL HOLDER*
For production-line purposes we recommend using
our Stand for Holder Reel, BES, which enables
solder reels in sizes up to 2.5 kg to be used.
Simply wrap a couple of turns of the solder wire
around an empty reel as shown.
TIP CARE
- Unplug the soldering iron.
- To clean the tips, use the damp sponge included
in the JBC stand. Note: Only deionised water (car
battery watter) should be used in order to wet the
sponge. If normal water was to be used, it is very
likely that the tip will become dirty due to the salts
dissolved within the water.
- Do not file the tips or use abrasive tools which
may damage the tip’s protective surface coating
and avoid knocking them about.
REPLACING THE TIP
Use the tip extractor Ref. 0114108*, and proceed
as shown in these images.
BES
Stand for
Solder Reel
Insert the tip into the circular opening of the right
size and push to slide back the holding ring and
release the tip (1).
ENGLISH
Empty Solder Reel
1
2
3
Holding Ring

Tubo Guía
Bobina de estaño
Brazo del soporte
1
2
4
Antes de poner en marcha el aparato, recomendamos leer con atención las instrucciones que a
continuación se detallan.
ESPAÑOL
DATOS TÉCNICOS
55N Pulsmatic, Ref. 2552016
- Alimentación: 230 V.
- Potencia: 33 W
- Temperatura máxima: 450 °C.
- Tiempo para alcanzar...
250°C: 2 min
300 °C: 3 min
- Conexión: Schuko-Plug (Tipo F)
Se suministra con:
- Punta Larga duración C-20D Ref.0550509
- Bobina de estaño
INSTRUCCIONES
DE FUNCIONAMIENTO
Compruebe que el voltaje de la red sea el indicado
en el aparato.
No conectar el soldador sin punta, podría dañar
la resistencia.
Para evitar incidentes, el soldador caliente debe
guardarse en el Soporte TS1200, el cual puede
adquirirse por separado.
CAMBIO DE CARRETE
El carrete está introducido a presión en el brazo del
soporte, quedando sujeto por el anclaje del mismo.
Para extraerlo, apoye el extremo del eje sobre una
superficie y presione sobre el carrete hasta vencer
la resistencia (1).
El fundente del estaño puede provocar la
obstrucción de la salida del tubo guía, límpielo si
es necesario.
Para colocar el nuevo carrete, oriéntelo para que
el hilo de estaño salga por la parte inferior (3) e
introdúzcalo en el orificio de entrada (4) hasta que
el mecanismo de arrastre pueda actuar.
Nota: Utilice siempre hilo de estaño de 1 mm de
diámetro.
TIPOS DE BOBINA DE ESTAÑO
Bobina con hilo de ø1mm
Aleación: 99%Sn / 0.3%Ag / 0.7%Cu - 50 g
Carrete color verde: SN5450
Antes de colocar un nuevo carrete, extraiga el
estaño que quede dentro del tubo guía (2).
6
3
Hilo de
estaño

BES
Soporte para
Bobina de
Estaño
Carrete vacío
1
2
3
Anillo de
sujeción
* No incluido, se vende por separado.
ESPAÑOL
Introduzca la punta en la ranura circular del tamaño
adecuado y empuje para deslizar hacia atrás el anillo
de sujeción y liberar la punta (1).
Extraiga la punta tirando del soldador, en sentido
longitudinal, usando una de las ranuras laterales.
Introduzca la nueva punta y asegúrese de que ha
penetrado a fondo presionando contra la ranura
de ajuste.
SOPORTE PARA BOBINA ESTAÑO*
En producción recomendamos utilizar nuestro
soporte BES, que permite usar bobinas de estaño
de hasta 2,5 kg. Basta con dar un par de vueltas
de hilo de estaño a un carrete vacío antes de
introducirlo en la herramienta.
CONSERVACIÓN DE LAS PUNTAS
- Desconecte el soldador.
- Para su limpieza utilice la esponja húmeda que
llevan los soportes JBC. Nota: Es necesario utilizar
solo agua desionizada para humedecer la esponja.
Si utiliza agua normal es muy probable que la
punta se ensucie con las sales disueltas que hay
en el agua.
- No lime ni utilice herramientas abrasivas que
puedan destruir la capa de protección superficial
y evite los golpes.
CAMBIO DE PUNTAS
Utilice el extractor de puntas Ref. 0114108 y siga el
proceso que se indica a continuación.
7
SOPORTE PARA EL SOLDADOR*
El soporte TS1200* es adecuado para el soldador
55N. Coloque el soldador en el soporte cuando
no lo utilice.
El soporte también permite limpiar la punta con
una esponja integrada. Nota: Utilice sólo agua
desionizada para humedecer la esponja. Si se
utiliza agua normal, la punta puede contaminarse
por las sales disueltas en el agua.

Tube Guide
Bobine d’étain
Bras de support
1
2
43
Fil d’étain
FRANÇAIS
Avant de mettre l’appareil en marche, nous vous conseillons de lire attentivement les instructions ci-dessous.
DONNÉES TECHNIQUES
55N Pulsmatic,Réf. 2552016
- Alimentation : 230 V
- Puissance: 33 W
- Température maximum: 450°C.
- Temps de chauffe pour...
250°C: 2 minutes
300 °C: 3 minutes
- Connexion : Schuko-Plug (Type F)
Est livrée avec:
- Panne longue durée C-20D Réf.0550509
- Bobine de soudure
INSTRUCTIONS
DE FONCTIONNEMENT
Vérifiez que le voltage du réseau correspond à
celui qui figure sur le corps de l’appareil.
Ne jamais brancher le fer à souder sans sa panne,
cela pourrait endommager la résistance.
Pour plus de sécurité, nous vous proposons un
support spécialement conçu pour ranger le fer
à souder lorsqu’il est encore chaud. En option :
modèle TS1200.
REMPLACEMENT DE LA BOBINE
La bobine se clipse dans le bras de support où
elle demeure fixée par un ancrage.
Pour l’extraire, faire reposer l’extrémité de l’axe
sur une surface quelconque et exercer une
pression suffisante pour vaincre la résistance de
la bobine (1).
Retirer les résidus d’étain demeurant à l’intérieur du
tube guide avant d’introduire la nouvelle bobine (2).
Le flux d’étain peut parfois obstruer l’extrémité du
tube guide. La nettoyer si nécessaire.
Orienter la bobine à mettre en place de façon à
ce que le fil d’étain sorte par la partie inférieure,
puis l’introduire dans l’orifice d’entrée jusqu’à ce
que le mécanisme d’entrainement puisse jouer.
Note : Utiliser exclusivement du fil d’étain de
1mm de diamètre.
TYPES DE BOBINE D’ÉTAIN
Bobine avec fil d’étain ø1 mm
Alliage: 99%Sn / 0.3%Ag / 0.7%Cu - 50 g
Bobine de couleur verte: SN5450
8

BES
Support pour
Bobine d’Étain
Bobine vide
1
2
3
Bague
* Non inclus, vendu séparément
FRANÇAIS
Insérer la panne dans l’ouverture circulaire
correspondante et pousser pour faire coulisser la
bague vers l’arrière et libérer la panne (1).
Retirer la panne en tirant le fer à souder dans le sens
de la longueur, en utilisant l’une des fentes latérales.
Inséree la nouvelle panne et s’assurer qu’elle a
pénétré complètement en appuyant sur l’un des
trous.
CONSERVATION DES PANNES
- Débrancher le fer à souder.
- Pour le nettoyage, utilisez l’éponge humide
fournie avec les supports JBC. Note : Il est
nécessaire d’utiliser de l’eau deionisée pour
humidifier l’éponge. Si vous utilisez de l’eau
courante, il est très probable que la panne soit
contaminée par les sels dissous contenus dans
l’eau.
- Ne pas limer; ne pas employer d’outils abrasifs:
ils pourraient endommager le revêtement protecteur
de la panne. Éviter les chocs.
SUPPORT BOBINE D’ÉTAIN *
Pour la production, nous vous recommandons
d’utiliser notre Support BES qui permet d’employer
des bobines contenant jusqu’à 2,5 kg d’étain. Il
suffit de donner deux tours de fil d’étain autour
d’une bobine vide.
REMPLACEMENT DE LA PANNE
Utiliser l’extracteur de pannes Réf. 0114108 et
suivre les indications ci-dessous.
SUPPORT POUR FER À SOUDER *
Le support TS1200* est adapté au fer à souder
55N. Laissez le fer à souder dans le support
lorsqu‘il n‘est pas utilisé.
Le support permet également de nettoyer la panne
à l‘aide d‘une éponge intégrée. Note : N‘utilisez
que de l‘eau déminéralisée pour mouiller l‘éponge.
Si vous utilisez de l‘eau normale, la panne risque
d‘être contaminée par les sels dissous dans l‘eau.
9

Führungsrohr
Lötdrahtspule
Spulenarm
1
2
3
4Lötdraht
Wir empfehlen Ihnen, die folgenden Anweisungen sorgfältig zu lesen, bevor Sie den Kolben in Betrieb
nehmen.
TECHNISCHE DATEN
55N Pulsmatic,Ref. 2552016
- Speisespannung: 230 V
- Leistung: 33 W
- Max. Temperatur: 450 °C
- Aufheizzeit bis...
250°C: 2 Min.
300 °C: 3 Min.
- Anschluss: Schukostecker (Type F)
Im Lieferumfang enthalten:
- Long-life-Spitze C-20D Ref.0550509
- Lötdrahtspule
HINWEISE ZUR BEDIENUNG
Überprüfen Sie bitte, daß die Netzspannung
mit der auf dem Gerät angegebenen Spannung
übereinstimmt.
Niemals den Lötkolben ohne montierter Spitze
einschalten, da dies eine Beschädigung des
Heizwiderstands zur Folge hätte.
Zur Vermeidung von Unfällen ist der heiße
Lötkolben stets im als Zubehör erhältlichen
Lötkolbenständer TS1200 aufzubewahren.
SPULENWECHSEL
Die Lötdrahtspule ist auf den Spulenarm gepresst
und wird mittels Klips an Ort und Stelle gehalten.
Zur Entnahme der Lötdrahtspule das Ende des
Spulenarms auf eine feste Oberfläche auflegen und
anschließend gegen die Spule drücken, bis diese
freigegeben wird (1).
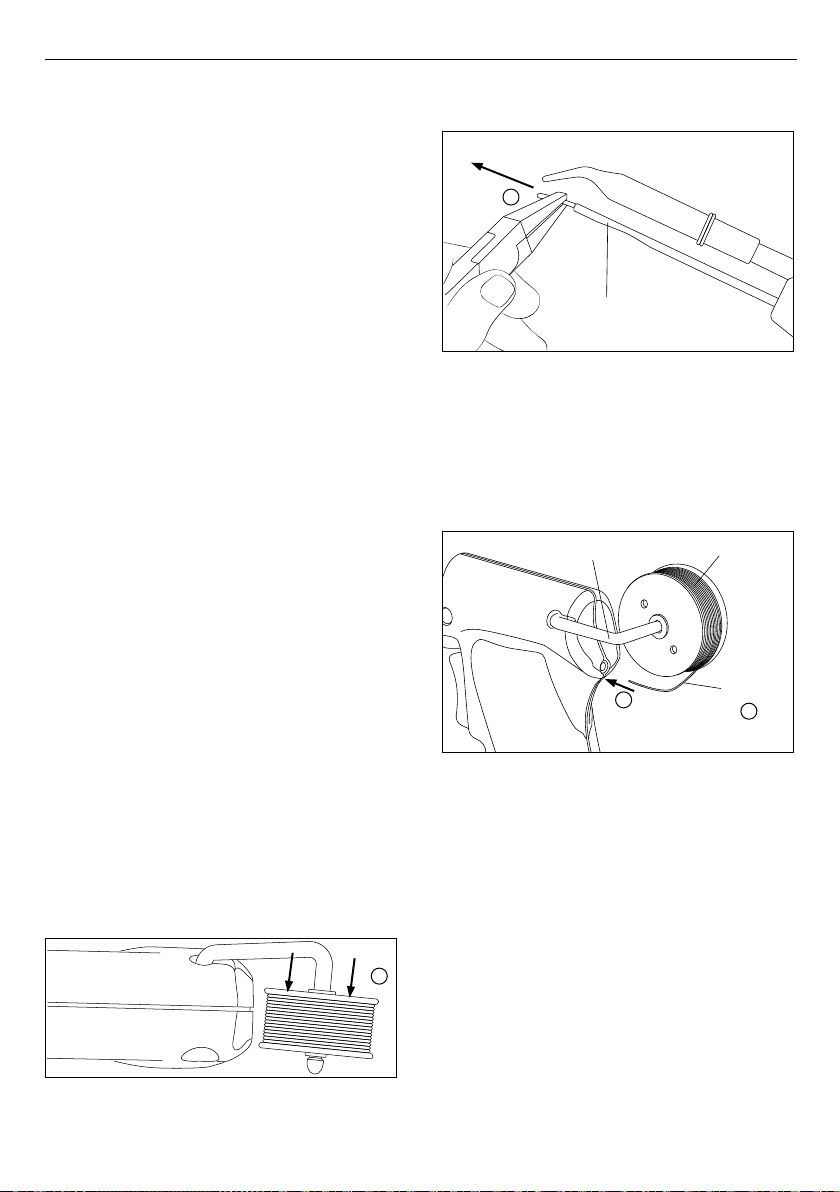
Vor Aufsetzen der neuen Lötdrahtspule den noch
in dem Führungsrohr verbleibenden Lötdraht
herausziehen (2).
Das Flußmittel des Lötdrahtes kann die Verstopfung
des Führungsrohres bewirken, weshalb dieses
gegebenenfalls zu reinigen ist.
Zum Aufsetzen einer neuen Lötdrahtspule ist diese
so auszurichten, dass der Lötdraht an der Unterseite
abgespult wird (3). Den Lötdraht anschließend in
die Eingangsöffnung des Führungsrohr einführen
(4), bis der Vorschubmechanismus greift.
Hinweis: Stets Lötdraht mit 1 mm Durchmesser
verwenden.
LÖTDRAHTSPULENTYPEN
Spule mit Lötdraht: ø1mm
Legierung: 99%Sn / 0.3%Ag / 0.7%Cu - 50g
Grüne Lötdrahtspule: Ref. SN5450
DEUTSCH
10

BES*
Halterung für
Lötdrahtrollen
Leere Spule
1
2
3
Haltering
Haltering
* Nicht im Lieferumfang enthalten, separat erhältlich
Führen Sie die Spitze in eine passende runde
Öffnung und drücken Sie, um den Haltering
zurückzuschieben und die Spitze zu lösen (1).
Zum Entfernen der Spitze diese in eine passende
seitliche Öffnung einsetzen und den Lötkolben nach
hinten ziehen (2). Entfernen Sie den losen Haltering
von dem Heizelement.
Setzen Sie die neue Spitze auf das Heizelement.
Stecken Sie die Spitze in eine passende Öffnung
und drücken Sie sie gegen den Abzieher (3) bis die
Spitze bis zum Anschlag aufgesetzt ist.
HALTERUNG FÜR
LÖTDRAHTROLLEN*
Für den Einsatz in der Produktion empfehlen wir
die Verwendung der Halterung für Lötdrahtrollen
BES, die die Arbeit mit Lötdrahtrollen von bis zu
2,5 kg erlaubt. Wickeln Sie etwas Draht von der
Rolle ab und wickeln dann ein zwei Windungen
um eine leere Spule. Den Lötdraht anschließend
in das Führungsrohr einführen.
WECHSEL DER LÖTSPITZE
Verwenden Sie den Spitzenabzieher* Ref. 0114108,
und beachten Sie die folgenden Hinweise:
WARTUNG DER SPITZEN
- Zu erst den Netzstecker ziehen.
- Zur Reinigung der Spitzen den angefeuchteten
Schwamm des TS1200 Ständers verwenden.
- Keine Feilen oder scharfe Werkzeuge verwenden,
damit die Schutzschicht der Spitze nicht
beschädigt wird. Vermeiden Sie Stöße.
DEUTSCH
LÖTKOLBENSTÄNDER*
Der Ständer TS1200* ist für den Lötkolben 55N
geeignet. Lassen Sie den Lötkolben im Ständer,
wenn er nicht benutzt wird.
Der Ständer ermöglicht ausserdem die Reinigung
der Spitze mit einem integriertem Schwamm.
Hinweis: Zum Befeuchten des Schwamms nur
entionisiertes Wasser verwenden. Wenn normales
Wasser benutzt wird, kann die Spitze durch die
im Wasser gelösten Salze verschmutzt werden.
11

Tubo Guida
Bobina di stagno
Braccio di supporto
1
2
43
Filo di
stagno
Prima di accendere l’apparecchio, Le consigliamo di leggere attentamente le istruzioni che seguono.
DATI TECNICI
55N Pulsmatic, (Rif. 2552016)
- Tensione d’alimentazione: 230 V
- Potenza: 33 W
- Temperatura massima: 450 °C
- Tempo per...
250 °C: 2 minuti
300 °C: 3 minuti
- Collegamento: Schuko-Plug (Tipo F)
Si fornisce con:
- Punta Lunga Durata C-20D (Rif.0550509)
- Bobina di stagno
ISTRUZIONI PER L’USO
Controllare che il voltaggio della rete coincida con
quello indicato sull’apparecchio.
Non collegare il saldatore senza punta: si potrebbe
daneggiare la resistenza.
Per evitare incidenti, il saldatore caldo deve essere
collocato nel supporto TS1200, che può essere
acquistato separatamente.
SOSTITUZIONE DEL ROCCHETTO
Il rocchetto è inserito a pressione nel braccio di
supporto, e vi rimane fissato dal blocco dello stesso.
Per estrarlo, appoggiare l’estremità dell’asse su
una superficie e premere sul rocchetto sino a
vincerne la resistenza.
Prima di collocare il nuovo rocchetto, estrarre lo
stagno rimasto all’interno del tubo guida.
Il fondente dello stagno può provocare l’ostruzione
dell’estremità del tubo guida. Se necessario, pulirlo.
Nel collocare il nuovo rocchetto, orientarlo in modo
che il filo di stagno esca dalla parte inferiore ed
introdurlo nel foro di entrata finché il meccanismo
di trascinamento possa agire.
Nota: Utilizzare sempre filo di stagno di 1 mm
di diametro.
TIPI DI BOBINE DI STAGNO
Bobina con filo di ø1 mm
Lega: 99%Sn / 0.3%Ag / 0.7%Cu - 50 g
Bobina di colore verde: SN5450
ITALIANO
12

BES
Supporto per
Bobine di Stagno
Rocchetto vuoto
1
2
3
Anello
* Non incluso, in vendita separatamente
Inserire la punta nella scanalatura circolare della
dimensione appropriata e spingere per far scorrere
indietro l’anello di ritegno e rilasciare la punta (1).
Rimuovere la punta tirando il saldatore, nel senso
della lunghezza, utilizzando una delle fessure
laterali (2).
Inserire la nuova punta e accertarsi che sia penetrata
completamente premendo contro la scanalatura di
fissaggio (3).
SUPPORTO
PER LA BOBINA DI STAGNO
In produzione, consigliamo di utilizzare il nostro
supporto BES, che permette di usare bobine di
stagno sino ad 2,5 kg. È sufficiente far fare al filo
di stagno un paio di giri attorno ad un rocchetto
vuoto, come indicato.
PULIZIA DELLA PUNTA
- Togliere la spina del saldatore dalla presa di
corrente.
- Per la sua pulizia utilizzare la spugna umida sui
supporti JBC. Per inumidire la spugna è necessario
usare solo acqua distillata. Nota: Se si utilizza acqua
normale il calcare può danneggiare la punta.
- Non limare e non utilizzare utensili abrasivi
che possono distruggere la cappa di protezione
superficiale della punta ed evitare i colpi.
SOSTITUZIONE DELLA PUNTA
Utilizzare l’estrattore di punte (Rif. 0114108) e
seguire il procedimento indicato qui di seguito.
ITALIANO
SUPPORTO PER IL SALDATORE *
Il supporto TS1200* è adatto al saldatore 55N.
Quando non si usa, il saldatore deve essere
collocato nel supporto.
Il supporto consente inoltre di pulire la punta con
una spugna integrata. Nota: utilizzare solo acqua
deionizzata per inumidire la spugna. Se si usa
acqua normale, la punta può essere contaminata
dai sali disciolti nell‘acqua.
13

14
LONG-LIFE TIPS SELECTION TS1200
Classic Stand for Soldering Irons
BES
Support for Solder Reel
F1204
Fume Extractor
Suction Pump
and Filter

1Nucleo di rame
2Ferro
3Nichel
4Cromo
5Stagnatura
Come vengono fabricate le punte Lunga Durata JBC
Questi strati di protezione evitano che
lo stagno sia in contatto con le basi di
rame e la possa danneggiare. Così si
ottiene una durata della punta superiore
di 10 o 20 volte alla durata della punta
convenzionale,conservandolasuaforma
iniziale senza deformazione per l’usura.
1Kupferkern
2Eisen
3Nickel
4Chrom
5Verzinnung
Wie sind die JBC-Spitzen mit hoher Lebensdauer
Alle diese Schutzschichten vermeiden,
daß das Zinn in Berührung mit der
Kupferbasiskommt, undsiebeschädigt;
hierdurch wird eine um 10 bis 20 mal
höhere Lebensdauer erreicht als bei
derkonventionellenKupferspitze,unter
Beibehaltung der ursprüngliche Form
ohne Verformung durch Verscheiß.
1Noyau de ciuvre
2Fer
3Nickel
4Chrome
5Étain
Comment sont fabriquées les pannes Longe Durée JBC
Toutes ces couches de protection
évitent que l’étain n’entre en contact
avec la base de cuivre et ne produise sa
détérioration,cequipermetd’obtenirune
durée de vie 10 ou 20 fois supérieure à
celle de lapannede cuivre traditionnelle,
tout en conservant sa formeinitiale sans
déformation par l’usure.
1Núcleo de cobre
2Hierro
3Niquel
4Cromo
5Estañado
Cómo se fabrican las puntas de Larga Duración JBC
Estas capas de protección evitan que
el estaño entre en contacto con la base
de cobrey produzca su deterioro,con lo
que se consigue una duración de 10 a
20 veces superior a una punta de cobre
convencional, conservando su forma
inicial sin deformación por el desgaste.
15
1 Copper core
2 Iron
3 Nickel
4 Chromium
5 Tin plate
How are the JBC long life tips manufactured
These protection layers avoid that tin
comes into contact with the copper
basisand damagesit whichgivestip a10
to 20 times longer working life than the
traditional tip, while keeping its original
shape without deformation by wear.
WARRANTY ENGLISH
The JBC 2 years warranty, guarantees
thisequipmentagainstallmanufacturing
defects, covering the replacement of
defectiveparts and all necessarylabour.
Warranty does not cover product wear
due to use or mis-use.
In order for the warranty to be valid,
equipment must be returned, postage
paid, to the dealer where it was
purchased.
GARANTÍA ESPAÑOL
JBC garantiza este aparato durante
2 años, contra todo defecto de
fabricación,cubriendolareparacióncon
sustitucióndelas piezasdefectuosase
incluyendo la mano de obra necesaria.
Quedan excluidas de esta garantía las
averías provocadas por mal uso del
aparato y desgaste por uso.
Es indispensable para acogerse a
esta garantía el envio del aparato al
distribuidordonde seadquirió,a portes
pagados.
GARANTIE FRANÇAIS
JBC garantit cet appareil 2 ans
contre tout défaut de fabrication.
Cela comprend la réparation,
le remplacement des pièces
défectueuses et la main d’oeuvre
nécessaire.
La garantie ne couvre pas l’usure liée
à l’utilisation et à la mauvaise utilisation
du matériel.
Pour bénéficier de cette garantie il
est indispensable d’envoyer l’appareil
chez le distributeur où il a été acquis,
en ports payés.
1234 5

Questo prodotto non deve seguire il
normale percorso di smaltimento dei rifiuti.
Secondo la direttiva europea 2012/19/UE, le
apparecchiature elettroniche alla fine della
loro vita devono essere raccolte e restituite
ad un impianto di riciclo autorizzato.
GARANTIE DEUTSCH
Für das vorliegende Gerät übernimmt
JBC eine Garantie von 2 Jahren, für
alle Fabrikationsfehler. Diese Garantie
schliesst die Reparatur bzw. den
Ersatz der defekten Teile sowie die
entsprechenden Arbeitskosten ein.
Ausgeschlossen von dieser Garan-
tie sind durch unsachgemässen
Gebrauch hervorgerufene Betriebs-
störungen und normale Gebrauchs-
abnutzungen.
Zur Inanspruchnahme dieser Garantie
muss das Gerät portofrei an den
Vertriebshändler geschickt werden,
bei dem es gekauft wurde. Fügen Sie
dieses vollständig ausgefüllte Blatt bei.
GARANZIA ITALIANO
La JBC garantisce quest’apparato 2
annicontroognidifettodifabbricazione,
e copre la riparazione e la sostituzione
dei pezzi difettosi, includendo la mano
d’opera necessaria.
Sono escluse da questa garanzia
le avarie provocate da cattivo uso
dell’apparato e logorio da utilizzo.
Per usufruire di questa garanzia, è
indispensabile inviare, in porto franco,
l’apparato al distributore presso il quale
èstatoacquistato,unitamentea questo
foglio debitamente compilato.
DiesesProduktsolltenichtmitdemHausmüll
entsorgt werden. In Übereinstimmung mit
der europäischen Richtlinie 2012/19/EU
müssen elektronische Geräte am Ende ihrer
Lebensdauer eingesammelt und einem
autorisierten Recyclingbetrieb zugeführt
werden.
Ce produit ne doit pas être jeté à la poubelle.
Conformément à la directive européenne
2012/19/UE,les équipements électroniques
en fin de vie doivent être collectés et
renvoyés dans une installation de recyclage
autorisée.
Este producto no debe desecharse
en la basura. De acuerdo a la
directiva europea 2012/19/UE,
los equipos electrónicos al final de su vida
se deberán recoger y trasladar a una planta
de reciclaje autorizada.
0033092-110124
This product should not
be thrown in the garbage.
In accordance with the
European directive 2012/19/
EU, electronic equipment at the end of
their life must be collected and returned
to an authorized recycling facility.
PACKAGE / PAQUETE / PAQUET /
PAKET / PACCHETTO
- Net Weight / peso neto / poid net /
Nettogewicht / peso neto:
3.82 kg / 8.41 lb
- Total Package / paqueta total /
ensemble complet / Gesamtpaket /
pacchetto totale:
258 x 328 x 208 mm / 4.3 kg
10.15 x 12.9 x 8.1 in / 9.5 lb
This manual suits for next models
1
Table of contents
Languages:
Other jbc Power Tools manuals