JBM 54291 User manual

MÁQUINA PARA CARGA DE AIRE ACONDICIONADO...........................2
AIR CONDITIONING CHARGING MACHINE..........................................12
54291
MANUAL DE INSTRUCCIONES · INSTRUCTION MANUAL · GUIDE D’UTILISATION · BEDIENUNGSANLEITUNG ·
MANUALED’USO·MANUALDEINSTRUÇÕES·MANUALDEINSTRUCŢIUNI·HANDLEIDING·
ÜZEMELTETÉSIUTASÍTÁS·РУКОВОДСТВОПОЭКСПЛУАТАЦИИ·INSTRUKCJAOBSŁUGI

· 2 ·
REF.54291
PRESENTACIÓN DEL PRODUCTO
Esta máquina ha sido diseñada para hacer trabajos de
limpieza, recuperación de refrigerante, vacío, inyección de
aceite y recarga de refrigerante en el sistema de aire acon-
dicionado del vehículo.
Es totalmente automática. Una vez congurados los pará-
metros para cada función, la máquina realizará todos los
procesos sin necesidad que el operario deba estar atento en
todo momento.
Es adecuada tanto para refrigerantes R134a como R1234yf
y lleva incorporada una impresora para certicar el trabajo
realizado.
Principales características:
- Completamente automática.
- Fácil de utilizar
- Con ventana de inspección de gran tamaño y luz LED de
fondo.
- Los manómetros colocados en posición vertical facilitan la
observación de los valores de presión incluso desde dentro
del vehículo.
- Alta tasa de recuperación de gas y aceite.
- Con pantalla LCD de gran tamaño
- Con base de datos e impresora.
- El software y la base de datos pueden ser actualizados.
INSTRUCCIONES DE SEGURIDAD
Lea atentamente estas instrucciones antes de
usar el producto.
Si no sigue correctamente estas instrucciones
se podrían producir daños personales y/o al
producto.
Guarde estas instrucciones para futuras consultas.
La máquina está diseñada para ser usada y reparada
únicamente por personal cualicado.
La máquina está diseñada para poder ser usada con
refrigerantes R134a o R1234yf. Tome nota que si desea
cambiar de refrigerante necesita usar un tanque diferente y
asegurarse que todas las mangueras están completamente
limpias.
Llene el sistema de aire acondicionado (A/C) con la canti-
dad de refrigerante recomendada por el fabricante.
Compruebe el manual del vehículo para saber cuál es el tipo
de refrigerante que utiliza.
No mezcle diferentes tipos de refrigerante, ya que la máqui-
na no funcionaría correctamente.
Manténgase lejos de partes móviles, elementos giratorios y
componentes calientes.
Lleve ropa de protección y gafas.
El operario debe estar muy familiarizado con el sistema de
A/C del vehículo y con el funcionamiento de la máquina.
Siempre que el motor esté apagado, asegúrese que la llave
de contacto está en posición de apagado completo.
No exponga la máquina a la luz del sol directa o a la lluvia.
Use solo en áreas bien ventiladas.
Nunca transporte por una pendiente de más de 30 grados.
No toque la conexión de alto voltaje de la fuente de
potencia.
ESPECIFICACIONES TÉCNICAS
Tipo de refrigerante: R134A / R1234YF
Potencia del compresor: 3/8 HP
Capacidad del compresor: 12,12cm3
Potencia de la bomba de vacío: 180W
Velocidad de recuperación del refrigerante: 450g/min (gas),
800g/min (líquido)
Tasa de recuperación: 99%
Velocidad de carga de refrigerante: >2 Kg/min
Capacidad de la bomba de vacío: 100l/min
Capacidad del tanque de refrigerante: 12L
Capacidad de la botella de aceite nuevo: 280ml
Capacidad de la botella de aceite usado: 500ml
Temperatura de trabajo: 10-500
Humedad relativa de trabajo: 085%
Presión máxima de trabajo: 20 BAR
Medidas de la pantalla LCD: 240*128mm
Rango del manómetro de alta presión: -1 ~ 35bar
Rango del manómetro de baja presión: -1 ~ 20bar
Fuente de potencia: 220V±10%, 50/60Hz
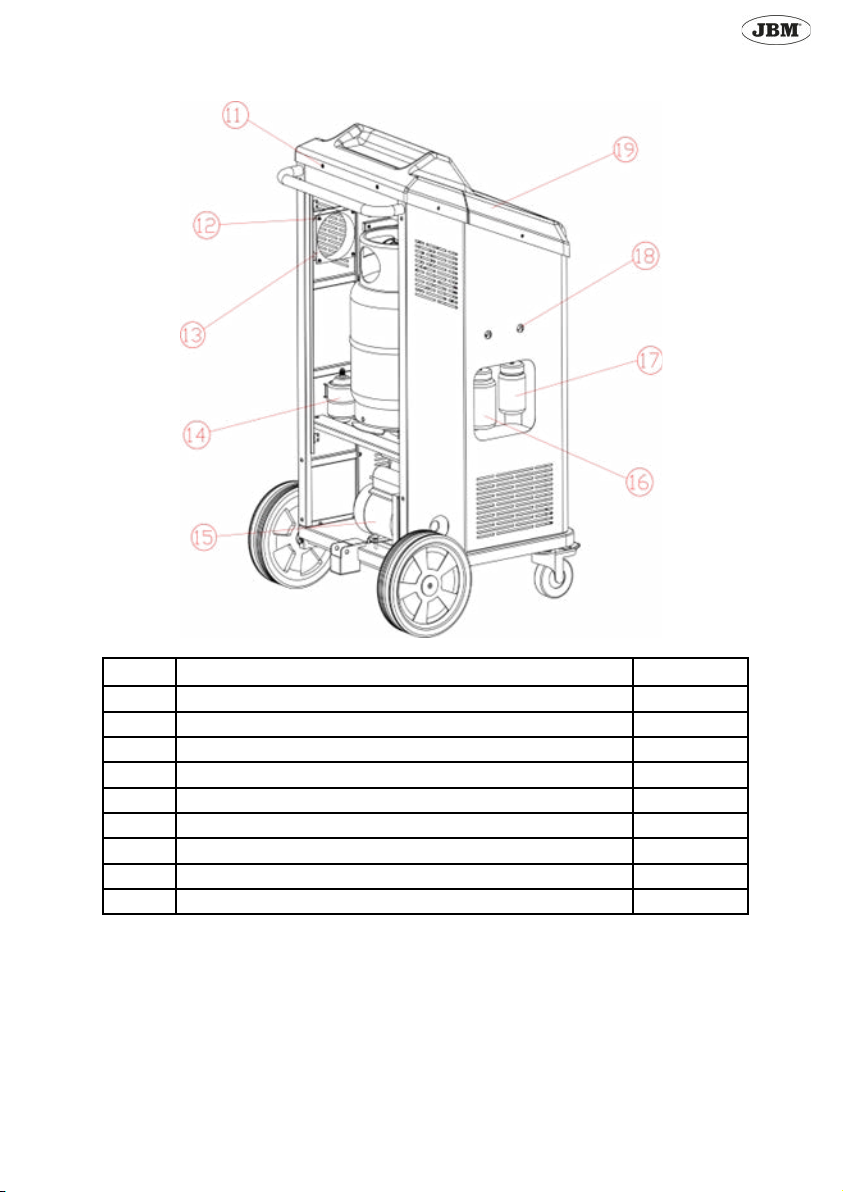
LISTADO DE PARTES
N. Descripción
1 Manómetro para alta presión
2 Manómetro para baja presión
3 Manómetro para el tanque
4 Ventana
5 Impresora
6 Pantalla LCD
7 Panel de operación
8 Puerto para alta presión
9 Puerto para baja presión
10 Puerto auxiliar
11 Botón para aceite nuevo
12 Botón para aceite usado
13 Botella para aceite usado
14 Botella para aceite nuevo
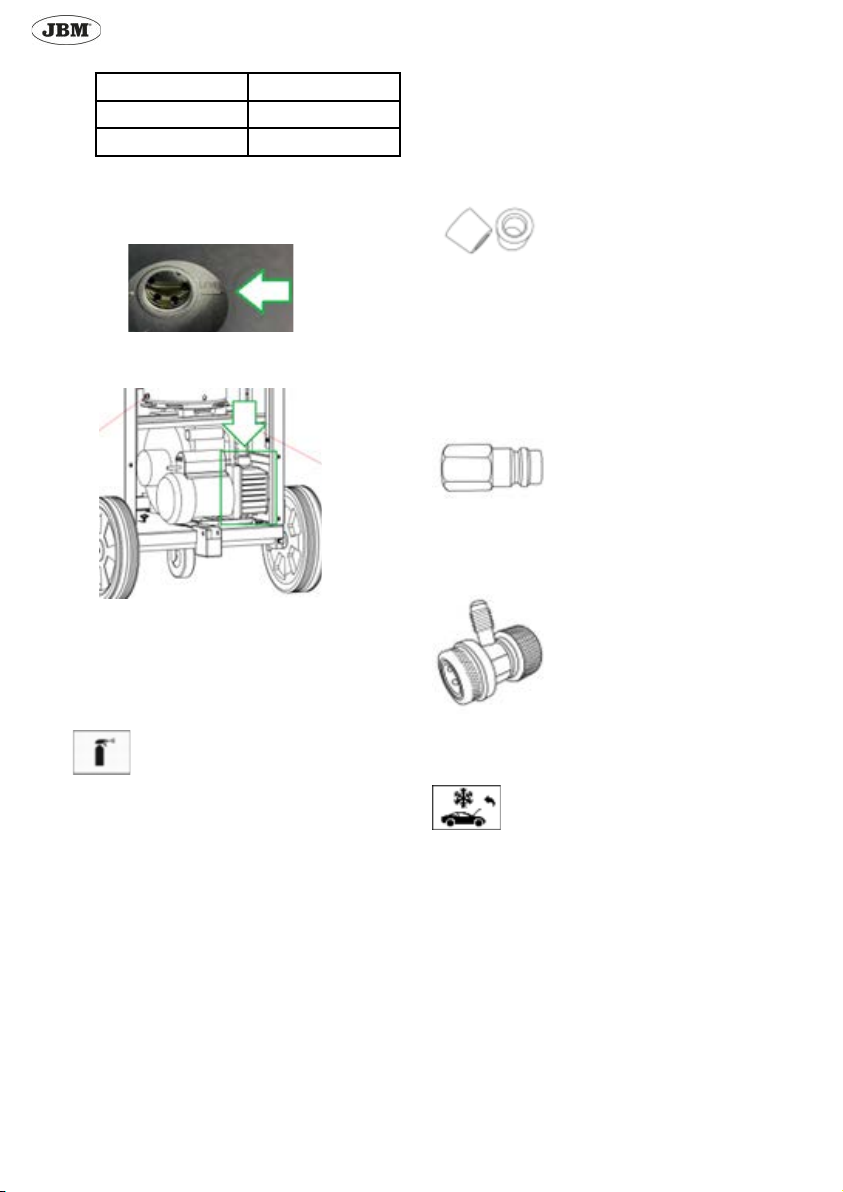
15 Ventana para comprobación del nivel
de aceite de la bomba de vacío
MONTAJE
Conecte la manguera roja al puerto de alta presión.
Conecte la manguera azul al puerto de baja presión.
Inserte el adaptador para gas de alta presión (rojo) a la
manguera roja.
Inserte el adaptador para gas de baja presión (azul) a la
manguera roja.
Localice en el vehículo la válvula de alta presión del sistema
de A/C.
Conecte a esta válvula la manguera roja.
Localice en el vehículo la válvula de baja presión del sistema
de A/C.
Conecte a esta válvula la manguera azul.
MANUAL DE INSTRUCCIONES
ES

· 3 ·
REF.54291
FUNCIONAMIENTO
PRIMER USO
Seleccione el idioma (Inglés/Español) y presione ENTER.
Seleccione el tipo de refrigerante que desea utilizar.
Nota: Usted puede cambiar el tipo de refrigerante posterior-
mente, pero para ello necesitará otro tanque de refrigerante
y asegurarse que las mangueras están completamente
limpias (Consulte el apartado “Limpieza de las mangueras”).
Seleccione las unidades y presione ENTER.
Introduzca 4 litros de refrigerante en el tanque.
Preparación antes de usar
Compruebe si hay refrigerante suciente en el tanque.
Debería haber entre 4 y 6 kilos.
Para comprobar la cantidad de refrigerante que hay en el
tanque, presione .
Vacíe la botella para aceite usado.
La pantalla mostrará la cantidad de refrigerante dentro del
tanque.
Compruebe el sistema de A/C del vehículo. Si hubiese algu-
na fuga, repárela antes de usar la máquina.
¡Advertencia! Nunca encienda el aire acondicionado mien-
tras esté usando la máquina.
ENCENDIDO
Limpieza/recuperación
Use esta función para limpiar el sistema
de A/C.
Una vez realizada la limpieza, la máquina
recuperará el aceite y el refrigerante del
sistema de A/C.
Recuperación de refrigerante
Use esta función para recuperar el refrige-
rante que haya en el sistema de A/C del
vehículo.
Vacío
Use esta opción para crear el vacío en el
sistema de A/C.
Llenado de aceite nuevo
Para introducir aceite nuevo en el sistema
de A/C.
Recarga
Use esta opción para cargar el refrigerante
en el vehículo.
Modo automático
Utilice esta función para que la máquina
realice automáticamente las operaciones
seleccionadas.
Base de datos
Puede comprobar la cantidad de refrigeran-
te y aceite que debe usar.
Mantenimiento del equipo
- Sustitución del ltro
- Limpieza de los tubos
- Calibración
Descarga de gases no-condensables
Conguración del sistema
- Idioma
- Conguración de parámetros
- Recarga del tanque de refrigerante
- Cambio del tipo de refrigerante
Información del equipo
- Información del sistema
- Información del taller
- Información del equipo
Ayuda
Descripción de los códigos de alarma.

· 4 ·
REF.54291
PRESENTACIÓN DEL PRODUCTO
Usando esta función podrá limpiar el aceite del sistema de
A/C y recuperar el refrigerante que haya en el sistema.
Antes de realizar la operación de limpieza, encienda el A/C y
déjelo funcionar de 5 a 10 minutos.
Congúrelo a la mínima temperatura y potencia media de
salida de aire.
Apague el A/C del vehículo.
¡Advertencia! No encienda el aire acondicionado durante el
proceso de recarga. Podría estropear el sistema de A/C.
Seleccione la función de recarga y presione la tecla ENTER.
Congure el tiempo de recarga.
Presione ENTER para empezar.
Nota: Para asegurar un correcto rendimiento del proceso de
limpieza, este debería durar más de 30 minutos. El tiempo
de limpieza no incluye el tiempo de recuperación. Una vez se
haya acabado la recarga, la máquina proseguirá automáti-
camente con la función de recuperación.
Cuando la operación haya terminado, la máquina se parará
automáticamente.
Nota: Es normal que se oiga un ruido producido por la
válvula solenoide. No lo detenga. El aceite usado puede ser
drenado automáticamente.
¡Advertencia! Está estrictamente prohibido presionar el
botón para aceite nuevo y usado durante el proceso de
limpieza/recuperación
RECUPERACIÓN
Usando esta función puede recuperar el refrigerante que
haya dentro del sistema de A/C.
Seleccione la función Recuperación/reciclaje y presione la
tecla ENTER.
Presione ENTER para empezar.
Después de haber recuperado el aceite, lo drenará automá-
ticamente.
Cuando la operación haya terminado, la maquina se deten-
drá automáticamente.
FUNCIÓN DE VACÍO
Esta función le permite limpiar el vapor de agua que se
encuentra en el sistema de A/C.
La duración de la operación debe ser mayor a 15 minutos.
Generalmente se necesitan 15 minutos para sistemas de A/C
frontal y 20 minutos para sistemas con A/C frontal y trasero.
Seleccione la función de Vacío y presione la tecla ENTER.
Elija la duración de la operación de vacío.
Presione ENTER para empezar.
Cuando la operación haya terminado, la máquina se parará
automáticamente.
LLENADO DE ACEITE NUEVO
Nota: Antes de llenar de aceite nuevo debe realizar la
función de vacío.
¡Advertencia! Si el sistema de aire acondicionado no está
en modo de vació, no presione el botón para aceite usado.
Podría provocar una explosión de las botellas.
Ponga aceite nuevo en la botella de aceite nuevo.
Nota: Tenga en cuenta que debe añadir más cantidad de
aceite nuevo que cantidad de aceite usado que va a drenar.
Como mínimo de poner 20ml de más. De este modo evitará
que entre aire en el sistema de A/C.
Hay dos modos para añadir aceite nuevo:
- Manual
- Automático
MÉTODO 1: MANUAL
Después de haber realizado la operación de vacío, presione
el botón para aceite nuevo para llenar la botella.
MÉTODO 2: AUTOMÁTICO
Después de haber llenado la botella con aceite nuevo,
seleccione y presione ENTER.
Escriba la cantidad de líquido que quiere añadir.
Presione ENTER para empezar.
RECARGA
Seleccione la función de recarga y presione ENTER.
La recarga de refrigerante se puede realizar de dos modos:
- Manual
- Automático
Método 1: Manual
Escriba la cantidad de refrigerante que quiere cargar.
Presione ENTER para empezar.
Cuando nalice la operación, la máquina se parará auto-
máticamente.
Método 2: Automático
Seleccione el vehículo en la base de datos para congurar la
cantidad de refrigerante a recargar.
Nota: Durante el proceso de recarga, la pantalla puede que
le muestre la necesidad de encender el aire acondicionado
para completar el proceso de recarga. Luego, deberá llenar
el tanque con más refrigerante.

· 5 ·
REF.54291
MODO AUTOMÁTICO
Utilice esta función para que la máquina realice automática-
mente las operaciones seleccionadas.
Primero, usted debe introducir los parámetros y a continua-
ción la maquina realizará todas las operaciones automáti-
camente.
Antes de usar esta opción debe vaciar completamente la bo-
tella de aceite usado y llenar sucientemente la botella de
aceite nuevo.
Seleccione la función de modo automático y presione EN-
TER.
Introduzca los parámetros:
- Lavado: Sí/No
- Tiempo de lavado
- Tiempo de la operación de vacío
- Cantidad de aceite nuevo
- Cantidad de refrigerante
Presione ENTER para empezar.
Cuando nalice la operación, la máquina se parará automá-
ticamente.
MANTENIMIENTO
Sustitución del ltro
Seleccione “Mantenimiento” y presione ENTER
Seleccione “Cambio de ltro”.
Quite el ltro viejo y ponga uno nuevo.
Después de cambiar el ltro, presione ENTER.
Introduzca el código del ltro usando las teclas ARRIBA/
ABAJO.
Nota: El código son los cuatro últimos dígitos del número de
serie.
Limpieza de las mangueras
Después de dos meses de uso de la máquina debería realizar
una limpieza de las mangueras.
Además, si desea utilizar otro tipo de refrigerante asegúrese
de realizar esta operación previamente.
Use este adaptador para unir las dos mangueras entre sí.
Siga los pasos que se muestran en pantalla
Calibración
Para usar esta función, introduzca la contraseña “1510”.
Para realizar la calibración necesitará un objeto con un peso
conocido.
Dependiendo del componente en el cual quiera realizar la
calibración, el peso del objeto deberá ser uno u otro.
En esta table puede ver el peso que debería tener el objeto.
Nivel de aceite de la bomba de vacío
Asegúrese que el nivel de aceite de la bomba de vacío es
siempre el adecuado.
Puede comprobar el nivel de aceite en la parte lateral de la
máquina.

· 6 ·
REF.54291
Nivel de aceite de la bomba de vacío
Asegúrese que el nivel de aceite de la bomba de vacío es
siempre el adecuado.
Puede comprobar el nivel de aceite en la parte lateral de la
máquina.
Si necesita añadir más aceite, abra la máquina e introduzca
aceite en este depósito:
Tipo de aceite: ISO/DP 6521.3
Nota: La máquina le avisará si es necesario añadir más aceite.
Descarga de gases no-condensables
Cuando la máquina muestre una alarma de alta presión,
deberá activar esta función.
Para activar esta función, presione .
Nota: Es recomendable activar esta función una vez al mes.
CONFIGURACIÓN DEL SISTEMA
Idioma
Seleccione esta función para cambiar el idioma.
Conguración de parámetros
Unidades
Seleccione esta función para cambiar la unidad de medida.
Selección del tanque de recarga
Seleccione esta función para elegir si quiere que la máquina
cargue el refrigerante desde el tanque principal o el auxiliar.
Si quiere recargar desde un tanque auxiliar necesita conectar
el nuevo tanque al puerto auxiliar de la máquina.
Nota: Si usted recarga desde un tanque auxiliar, la pantalla
no mostrará la cantidad de refrigerante que hay dentro del
tanque auxiliar.
Llenado del tanque principal
Si la cantidad de refrigerante en el tanque principal es de
menos de 4kg, la función de limpieza no hasta que haya
añadido más refrigerante en la máquina.
Componente Peso del objeto
Tanque principal 10-20kg
Botella 1-3kg
Hay dos maneras para llenar el tanque de refrigerante.
Método 1
Conecte un nuevo tanque con refrigerante al puerto de baja
presión de la máquina.
Nota: Debe conectar la manguera en el oricio de líquido del
tanque. Si el tanque no tiene oricio de líquido, colóquelo
boca abajo.
Bloquee el puerto de alta presión de la máquina con un tapón.
Abra la válvula del tanque nuevo.
En el menú de conguración del sistema, seleccione la opción
de llenado del tanque principal.
Introduzca la cantidad que desea cargar.
Cuando la máquina le indique que ya ha cargado la cantidad
indicada, cierre la válvula del tanque.
La máquina nalizará el proceso de llenado automáticamente.
Método 2
Ponga este conector el nuevo tanque.
Nota: Debe conectar la manguera en el oricio de líquido del
tanque. Si el tanque no tiene oricio de líquido, colóquelo
boca abajo.
Conecte el adaptador de alta presión (o baja presión) en el
tanque.
Cuando vea que la cantidad total de refrigerante dentro del
tanque principal sea superior a 4,5kg, cierre la válvula del
tanque auxiliar.
La máquina nalizará el proceso de llenado automáticamente.
Cambio de tipo de refrigerante
Si desea cambiar de refrigerante, seleccione esta opción y
proceda tal como se muestra en pantalla.
INFORMACIÓN DEL EQUIPO
Muestra la siguiente información:
- Información del sistema
- Información del taller
- Información del equipo
Información del sistema
Puede comprobar el estado de trabajo de la máquina.
La pantalla indicará:
Nota: En este método puede usar el puerto de alta presión o
el puerto de baja presión.
Use la manguera para conectar el tanque a la máquina.
En el menú principal, selección la función de Recuperación

· 7 ·
REF.54291
- Horas de trabajo del compresor
- Horas de trabajo de la bomba (total)
- Horas de trabajo de la bomba (ciclo)
- Número de veces que se ha usado la máquina
Información del taller
Puede congurar y comprobar la información del taller
DESHECHO
Asegúrese de desechar este producto en un centro de
reciclaje autorizado.
LISTADO DE PARTES (exploded view)
CONTENIDO
- Máquina para carga de aire acondicionado
- Adaptador de alta presión
- Adaptador de baja presión
- Manguera de alta presión
- Manguera de baja presión
- Adaptador de expansión
Presione y al mismo tiempo para congu-
rar.
Use la tecla y para seleccionar.
Use la tecla y para entrar el contenido.
Información del equipo
Puede comprobar la siguiente información:
- Número de serie
- Versión de software
- Versión de hardware
- Versión de base de datos
- Fecha de fabricación
- Tapones para sellado (x2)
- Adaptador para autolimpieza
- Cable de potencia

· 8 ·
REF.54291
No. Name Quantity
1 High-pressure manometer,35bar 2
2 Printer 1
3 Weighing sensor 1
4 Hexagonal screws 8
5 Condenser assembly 1
6 Compressor components (220V 50/60Hz) 1
7 Control module assembly 1
8 The ship type switch 1
9 Power outlet 1
10 Low pressure gauge15bar 1
PARTS LIST (EXPLODED VIEW)
1.1 Parts diagram

· 9 ·
REF.54291
No. Name Quantity
11 Cross recessed at head screws 6
12 Cross recessed pan head screws 4
13 Fan, with iron mesh, 120*120*38mm 1
14 Dry lter 1
15 Vacuum pump, AC220V-50/60HZ 1
16 Used oil bottle assembly 1
17 New oil bottle assembly 1
18 Metal button switch 2
19 Blister cover 1
1.2 Parts diagram

· 10 ·
REF.54291
No. Name Quantity
20 Drive plate 1
21 Alarm indicator 1
22 High pressure hanging pipe joint - Red-R134a 1
23 Low pressure hanging pipe joint - Blue-R134a 1
24 Hexagon socket head cap screws, M6*25 2
25 Load cell 30kg, with terminal 1
26 Cylinder, r134a 1
27 Fan, DC12V 1
28 Window Component 1
1.3 Parts diagram

· 11 ·
REF.54291
1.4 Parts diagram
No. Name Quantity
29 Cabinet components 1
30 Hexagon socket head cap screw, m6*12 10
31 Flat gasket, 6*18*1.5 8
32 Hexagon nut, M6 4
33 Cross recessed outer hexagon bolt, m6*25 4
34 Fan, with iron mesh, 150*150*50mm, AC220V 1
35 Cross recessed pan head screw, m4*40 4
36 Switching Mode Power Supply 1
37 Control panel 1
38 Key facial mask 1
39 Monochrome display 1

· 12 ·
REF.54291
PRODUCT’S PRESENTATION
This machine is designed for ushing, refrigerant recovery,
vacuum, oil injection and refrigerant recharging in the vehi-
cle’s air condition system.
It is fully automatic. Once the conguration parameters are
set, the machine will do all the processes without any need
to pay attention to it.
It is suitable for R134a and R1234yf refrigerants and has a
printer to certify the work that has been done.
Features:
- Fully automatic
- Easy to operate.
- With large-size inspection tube with LED backlighting.
- Vertically installed gauges that let the operator be able to
observe the pressure parameters even from inside the car.
- High recycling rate of gas and oil.
- With large size LCD.
- With database and printer
- Program and database can be updated.
SAFETY INSTRUCTIONS
Read carefully this owner’s manual before using
the product.
Failure to comply with these instructions could
result in personal injury and/or damage
to the product.
Please keep the instructions for future reference.
The machine is designed to be used and repaired by quali-
ed personnel only.
The machine is designed to be used for R134a or R1234yf
refrigerant. Please note that if you want to change the refri-
gerant you need to use a dierent tank and make sure that
all the hoses are clean.
Fill the air condition (A/C) system with the quantity of refrige-
rant recommended by the manufacturer.
Check the vehicle user manual to know which type of refrige-
rant uses the vehicle.
Do not mix dierent type of refrigerant, otherwise it will easily
lead to malfunction of the machine.
Keep away from moving parts, rotating elements and hea-
ting components.
Wear protective clothing gloves and goggles.
The operator must be fully familiar with the vehicle’s A/C
system and the operation of the machine.
Check whenever the engine is turned o that the ignition key
is turned to the full o position.
Do not expose the machine to direct sunlight or rain.
Use only in well-ventilated work areas.
Never exceed 30 ° tilt in transit.
Do not touch the high voltage power supply connection.
TECHNICAL SPECIFICATIONS
Type of refrigerant: R134A / R1234YF
Compressor power: 3/8 HP
Compressor capacity: 12,12cm3
Vacuum pump power: 180W
Coolant recover speed: 450g/min (GAS), 800g/min (LIQUID)
Percentage of recovery: 99%
Coolant charge speed: >2 Kg/min
Vacuum pump capacity: 100l/min
Refrigerant tank capacity: 12L
New oil capacity: 280ml
Used oil capacity: 500ml
Working temperature: 10-500
Relative humidity: 085%
Maximum working pressure: 20 BAR
LCD display measurement: 240*128mm
High pressure manometer range: -1 ~ 35bar
Low pressure manometer range: -1 ~ 20bar
Power supply: 220V±10%, 50/60Hz
PARTS LIST
N. Description
1 High pressure gauge
2 Low pressure gauge
3 Tank pressure
4 Window
5 Printer
6 LCD display
7 Operation panel
8 High pressure port
9 Low pressure port
10 Auxiliary port
11 New oil button
12 Used oil button
13 Used oil bottle
14 New oil bottle
15 Inspection window for vacuum pump
oil level
ASSEMBLY
Connect the red hose to the high-pressure port.
Connect the blue hose to the low-pressure port.
Insert the high-pressure gas adapter (red) to the red hose.
Insert the low-pressure gas adapter (blue) to the blue hose.
Locate in the vehicle the high-pressure valve of the A/C
system.
Connect to this valve the red hose.
Locate in the vehicle the low-pressure valve of the A/C
system.
Connect to this valve the blue hose.
INSTRUCTION MANUAL
EN

· 13 ·
REF.54291
OPERATION
FIRST USE
Select the language (English/Spanish) and press ENTER.
Set the refrigerant type: select one you will use.
Note: You can change the refrigerant type later, but you
need to use another refrigerant tank and make sure the
hoses are completely clean (Please see “Pipe cleaning”
section).
Select the units and press ENTER.
Put 4 kg of refrigerant into the tank.
Preparations before operation
To check if there has enough refrigerant in the tank.
The volume should be 4~6 kg.
To check the quantity of refrigerant inside the tank, press
Empty the used oil bottle.
The display will show the quantity of refrigerant inside the
tank.
Check the automotive A/C system. If there has any leakage,
it must be repaired before using the machine.
Warning! When the machine is running, never run the A/C
system.
ENCENDIDO
Flushing/recovery
Use this function to ush the A/C system.
After ushing, the machine will automatica-
lly recover oil and refrigerant from the A/C
system.
Refrigerant recovery
Use this function to recover the refrigerant
in the vehicle’s A/C system.
Vacuum
Use this function to make the vacuum in the
A/C system.
New oil adding
To ll new oil into the A/C system
Recharging
Use this function to charge the refrigerant
into the vehicle.
Automatic mode
Using this function, the machine will perform
automatically the selected operations.
Database
You can check the amount of refrigerant and
oil needed.
Equipment Maintenance
- Dry-lter exchange
- Pipe-line cleaning,
- Calibration
Discharge non-condensable gases
System function
- Language
- Parameter setting
- Supply main tank
- Change refrigerant type
Equipment info
- System inquiry
- Servicer info
- Equipment info
Help
Descriptions of the alarming code.

· 14 ·
REF.54291
FLUSHING/RECOVERY
Using this function, you will be able to clean out the oil of the
A/C system and recover the refrigerant in the system.
Before ushing the pipeline of automotive A/C system, plea-
se turn on A/C system and run it for 5 to 10 minutes.
Set it at the lowest temperature and medium wind.
Turn o the vehicle’s air conditioning.
Warning! Do not start the air conditioning during the ushing
process! It could cause damages to the A/C system.
Select the Flushing Function and press the ENTER key.
Set the ushing time.
Press the ENTER key to start.
NOTE: In order to achieve a good ushing performance, the
ushing time should be more than 30 minutes.
The ushing time does not include the time of recovery pro-
cess. Once the ushing is nished, the machine will run the
recovery function automatically.
When nished, it will stop automatically.
Note: It is normal that there is a sound of the solenoid valve
during the working process. Please do not stop it. The used
oil can be drained out automatically.
Warning! It is strictly forbidden to press the button of new
and used oil bottles while the ushing/recovery function is
running.
RECOVERY
Using this function you can recover the refrigerant remained
in the A/C system.
Select the Recovery Function and press the ENTER key.
Press the ENTER key to start.
After the recovery is nished, it will drain the used oil auto-
matically.
When nished, it will stop automatically.
VACUUM FUNCTION
This function allows you clean the water vapor out from the
A/C system.
The duration of the operation should be more than 15
minutes.
Generally, it needs 15 minutes for frontal A/C and 20 minutes
for front and rear A/C systems.
Select the Vacuum Function and press the ENTER key.
Choose the vacuum operation duration time.
Press the ENTER key to start.
When the operation is nished, the machine will stop auto-
matically.
NEW OIL ADDING
Note: Before adding new oil, you need to perform the
vacuum function.
Warning! If the automotive air conditioning system is not in
vacuum state, do not press the switch of the new oil bottle.
Otherwise it could cause an explosion of the bottles.
Pour new oil into the new oil bottle.
Note: Keep in mind that you need to add more new oil quan-
tity than the used oil that you will drain out. You should put
at least 20ml more new oil.
By doing this you will avoid air going into the A/C system.
There are two methods to add new oil:
- Manual
- Automatic
Method 1: Manual
After vacuum, press the button switch of the new oil bottle to
ll the new oil.
Method 2: Automatic.
Method2 :Control automatically.
Select the New oi adding Function and press the ENTER key.
Set the adding amount.
Press the ENTER key to start.
RECHARGING
Select the recharging function and press the ENTER key.
There are two methods to add refrigerant:
- Manual
- Automatic
Method 1: Manual
Set the quantity of refrigerant that you want to recharge.
Press the ENTER key to start.
When the operation is nished, the machine will stop auto-
matically.
Method 2: Automatic.
Select the vehicle in the database to set the quantity of
refrigerant.
Note: In the recharging process, the screen may display that
you need to turn on the car air-conditioning to complete the
recharging process.
Later, you should supply new refrigerant into the tank.

· 15 ·
REF.54291
AUTOMATIC MODE
Using this function, the machine will perform automatically
the selected operations.
First, you need to set the parameters and then the machine
will go through all the processes automatically.
Before running, you must empty the used oil bottle entirely
and ll enough new oil into the new oil bottle.
Select the Automatic mode function and press the ENTER
key.
Set parameters:
- Flushing: Yes/No
- Flushing time
- Vacuum time
- New oil quantity
- Refrigerant quantity
Press the ENTER key to start.
When nished, it will stop automatically.
MAINTENANCE
Select “Maintenance” and press ENTER.
Select Exchange dry-lter
Take out the old lter and put a new one.
After changing the lter press ENTER.
Enter the code of the dry-lter by pressing UP/DOWN keys.
Note: The code are the last four digits of the serial number.
Hose cleaning
After two months of using the machine, you should perform
a hose cleaning.
Also, if you want to change the type of refrigerant make sure
you perform this operation previously.
Use this adaptor to connect the two hoses.
Follow the instructions on the screen.
Calibration
To use this function, input the password “1510”.
To perform a calibration, you will need an object with a
known weight.
Depending on the component you want to calibrate, the ob-
ject should have a dierent weight.
In the table below you can nd which is the weight that
should have the object.
Component Object weight
Main tank 10-20kg
Bottle 1-3kg

· 16 ·
REF.54291
Vacuum pump oil
Make sure that the oil level in the vacuum pump is always
enough.
You can check the oil level on the side of the machine.
If you need to add more oil, open the machine and add the
oil in this tank:
Oil type: ISO/DP 6521.3
Note: The machine will warn you if more oil is needed.
Non-condensable gases discharge
When the machine displays the high-pressure alarm, you
should do this function.
To activate this function, press .
Note: It is recommended to do this function once a month.
SYSTEM CONFIGURATION
Language
Select this function to change the language.
Parameter setting
Units
Select this function to change the measurement unit.
Recharging tank select
Select this function to choose if the machine will charge the
refrigerant from the main tank or the auxiliary tank.
If you want to recharge from an auxiliary tank you need to
connect the new tank to the machine’s auxiliary port.
Note: If you recharge from an auxiliary tank, the screen will not
display the quantity of refrigerant inside the auxiliary tank.
Main tank rell
If the refrigerant amount in the main tank is less 4kg, the
ushing function cannot run any more until supply enough
refrigerant
into the machine.
There are two ways to supply the refrigerant into the tank.
Method 1
Connect a new tank with refrigerant to the low-pressure port
of the machine.
Note: You should connect the hose to the liquid port of
the tank. If the tank has no liquid port, please place the
refrigerant tank upside down.
Block the HP port of equipment with a cap.
Open the valve of the new tank.
In the System function menu, select the supply main tank
function.
Set the supplying amount.
Note: Set the amount according to remain amount in the tank.
When machine indicates that the setting amount has been
charged, please close the valve of the refrigerant tank.
The machine will automatically nish the charging process.
Method 2
Put this connector into the new tank.
Note: You should connect the hose to the liquid port of the
tank. If the tank has no liquid port, please place the refrigerant
tank upside down.
Connect the high-pressure (or low-pressure) coupler to the
tank.
Change refrigerant type
If you want to change the refrigerant type, select this function
and proceed as the screen displays.
EQUIPMENT INFORMATION
It displays the following information:
- System inquiry
- Servicer info
- Equipment info
System inquiry
You can check the working status of the machine.
The screen will show:
- Total working hours of the compressor
- Total working hours of the pump (total)
- Total working hours of the pump (cycle)
- Number of times the machine has been used
Note: In this method, you can use the high-pressure port or the
low-pressure port.
Use the hose to connect the tank to the machine
In the main menu, select the Recovery function .
When you see that the total amount of refrigerant inside the
main tank is more than 4.5kg, close the auxiliary tank’s valve.
The machine will automatically nish the charging process.

· 17 ·
REF.54291
Servicer info
Here you can set and check the servicer and dealer
information.
DISPOSAL
Make sure to dispose this product in an authorized recycling
centre.
CONTENTS
- Air conditioning charging machine
- High pressure coupler
- Low pressure coupler
- High pressure hose
- Low pressure hose
- Expansion joint
- Seal caps (x2)
- Self-cleaning coupler
- Power cable
Press and at the same time to setup.
Use the and keys to select.
Use the and keys to set the content.
Equipment info
You can check the following information:
- Serial number
- Software version
- Hardware version
- Database version
- Manufacture date
No. Name Quantity
1 High-pressure manometer,35bar 2
2 Printer 1
3 Weighing sensor 1
4 Hexagonal screws 8
5 Condenser assembly 1
6 Compressor components (220V 50/60Hz) 1
7 Control module assembly 1
8 The ship type switch 1
9 Power outlet 1
10 Low pressure gauge15bar 1

· 18 ·
REF.54291
No. Name Quantity
1 High-pressure manometer,35bar 2
2 Printer 1
3 Weighing sensor 1
4 Hexagonal screws 8
5 Condenser assembly 1
6 Compressor components (220V 50/60Hz) 1
7 Control module assembly 1
8 The ship type switch 1
9 Power outlet 1
10 Low pressure gauge15bar 1
PARTS LIST (EXPLODED VIEW)
1.1 Parts diagram

· 19 ·
REF.54291
No. Name Quantity
11 Cross recessed at head screws 6
12 Cross recessed pan head screws 4
13 Fan, with iron mesh, 120*120*38mm 1
14 Dry lter 1
15 Vacuum pump, AC220V-50/60HZ 1
16 Used oil bottle assembly 1
17 New oil bottle assembly 1
18 Metal button switch 2
19 Blister cover 1
1.2 Parts diagram

· 20 ·
REF.54291
No. Name Quantity
20 Drive plate 1
21 Alarm indicator 1
22 High pressure hanging pipe joint - Red-R134a 1
23 Low pressure hanging pipe joint - Blue-R134a 1
24 Hexagon socket head cap screws, M6*25 2
25 Load cell 30kg, with terminal 1
26 Cylinder, r134a 1
27 Fan, DC12V 1
28 Window Component 1
1.3 Parts diagram
Table of contents
Languages:
Other JBM Cleaning Equipment manuals