JDE Cafitesse 120 Next Generation User manual

Catesse 120
Next Generation
Operator manual
595209002 2014 - 03

The English version is the original version of the operator manual.
Other languages are translations of the original operator manual.
Copyright 2014 © D.E. Master Blenders 1753, Netherlands
Manufacturer:
N&W Global Vending SpA
Via Roma 24
24030 Valbrembo (BG)
Italy

Introduction .................................4
About the dispenser ......................4
About this operator manual ...........4
Safety instructions ......................5
General..........................................5
Installation .....................................6
Transport, storage and operation ..7
Servicing the dispenser .................7
Food safety instructions (HACCP) 8
Components of the dispenser.. 11
Front of the dispenser ................. 11
Rear of the dispenser .................. 11
Icons on the display.....................12
Operating the dispenser ...........13
Place cups and pots correctly .....13
Drink delivery...............................13
Portioned or continuous drink
delivery ........................................14
Drink delivery with preselections .15
Inserting and removing product
packs ...........................................17
Switching on the dispenser .........19
Switching off the dispenser .........19
Locking/unlocking the dispenser .20
1
2
3
4
TABLE OF CONTENTS
Cleaning the dispenser.............21
Overview of
cleaning procedures ....................21
Cleaning procedures without
cleaning tablet .............................22
Cleaning procedures with
cleaning tablet .............................26
Manual daily cleaning..................32
Programming the dispenser..... 33
Starting the operator mode.......... 33
Menu navigation ..........................34
Counter readings /
resettable counter readings.........35
Set resettable counters to zero ...37
Changing cup volumes................38
Changing drink strength ..............39
Setting date and time ..................40
Setting the cleaning days ............41
ECO settings ...............................43
Setting telephone numbers .........45
Display messages and trouble
shooting .....................................47
Technical specication .............50
5
6
7
8
Options.......................................52
Software options..........................52
Hardware accessories.................52
Index ...........................................54
Cleaning procedures without
cleaning tablet ...........................56
Cleaning procedures with
cleaning tablet ...........................58
9
10
2014 - 03 3

About the dispenser
The Catesse 120 is a dispenser for
the delivery of coffee, espresso, tea,
cocoa containing drinks, and only hot
water in commercial sectors.
The dispenser functions using special
disposable product packs. These
patented „Bag-in-Box“ (BIB) product
packs contain high quality liquid drink
concentrate for drink production. The
dispenser can hold one product pack.
The drinks can be dispensed into cups
and pots of various sizes.
Optionally you can request your
Catesse system supplier to equip
your dispenser
with a payment system for drink
vending (see „Options“)
with a height extension foot for the
delivery into larger pots and air pots
(see „Options“)
with a one line cold water valve
for the delivery of cold water (see
„Options“)
with a two line cold water valve for
the delivery of cold drinks and cold
water (see „Options“)
•
•
•
•
About this operator manual
This operator manual describes the
main applications and functions of
the dispenser. Before starting to
use the dispenser, please read this
operator manual to ensure that you
have understood the operation of the
machine and the safety instructions.
You will nd the following symbols
throughout this operator manual,
please pay attention to them:
Note:
Additional information which may
be helpful during the dispenser
operation.
Caution:
Information to which you should
pay careful attention in order to
ensure food safety, to prevent
personal injury or damage to the
dispenser.
Warning:
Dangers that can result in
severe personal injury, death
and/or severe damage to the
dispenser.
Danger:
DANGERS THAT WILL RESULT
IN SEVERE PERSONAL
INJURY OR DEATH.
1 INTRODUCTION
with a special mixing unit for the
delivery of cocoa containing drinks
(see „Options“)
with a door lock to prevent
unauthorized access to the
dispenser.
with a USB release key for a
temporary drink delivery, when the
dispenser is in blocked mode.
Please note, that the options listed
above may not apply in each country.
•
•
•
4 2014 - 03

General
Please read the instructions in this
operator manual carefully before using,
cleaning or moving the dispenser.
Ensure that you and all other persons
who operate, clean or move the
dispenser are familiar with, and act
according to, the safety and hygiene
aspects of the dispenser.
You may only use the dispenser
according to the instructions in this
operator manual for the delivery of
drinks. The manufacturer is not liable
for any damage or injury resulting from
improper use of the dispenser or from
non-compliance with the procedures
described in this operator manual.
The installation, servicing, repair
and programming of the dispenser
may only be carried out by an
authorised and appropriately trained
service technician assigned by your
Catesse system supplier.
Only use original spare parts for the
operation of the dispenser.
The operation, lling and cleaning of
the dispenser may only be carried
out by authorised and trained
personnel.
•
•
•
The dispenser is not suitable for
outdoor use.
The dispenser must be installed
where it can be supervised by
trained personnel.
Warning:
The liquids delivered by the
dispenser are hot!
Avoid scalding!
Keep hands and other body
parts away from the dispenser
while drinks are being
dispensed and during the
cleaning program.
Warning:
Do not place cups, pots, or
containers lled with hot
liquids on top of the dispenser.
There is the risk of being
scalded, in case the cups/pots/
containers fall down.
Warning:
Keep sufcient space around
the dispenser to get away
easily in case of hot liquid
splashes.
•
•
Warning:
This dispenser is not intended
for use by persons (including
children) with limited physical,
sensory and mental faculties,
or persons with insufcient
experience and/or knowledge
of the dispenser.
This does not apply if they
are supervised by a person
responsible for their safety
or have received instructions
on how to use the dispenser.
Children should be supervised
to ensure that they do not play
with the dispenser.
Warning:
Place the dispenser on a table
or counter with a minimum
height of 60 cm/24 in to avoid
that young children can press
a drink button.
Caution:
Check and empty the drip tray of
the dispenser regularly to avoid
the risk of being scalded and to
avoid a wet oor (slip danger)
when (hot) liquids spill out of the
drip tray.
2 SAFETY INSTRUCTIONS
2014 - 03 5

Installation
The installation and programming of
the dispenser may only be carried out
by authorised and appropriately trained
service technicians assigned by your
Catesse system supplier.
The dispenser is designed for
installation indoors on a stable surface
such as a table or counter.
When setting up the dispenser,
ensure there is a clearance of
approximately 5 cm / 2 in between
the dispenser and the wall.
Protect the dispenser against frost,
rain and direct sunlight.
Protect the dispenser against
running water, splashes, spray or
steam, heat and heavy dust.
Warning:
The dispenser may not be
cleaned using a water jet and
is not suitable for installation
on a surface where a water
jet may be used in the vicinity
(e.g. for cleaning purposes).
•
•
•
Ensure that there is sufcient space
around the dispenser for ventilation.
Keep the front and rear of the
dispenser accessible for cleaning
and servicing.
Connect the dispenser to the
drinking water supply in compliance
with local regulations.
Caution:
Only hose sets as per EN 61770
may be used to connect the
water supply.
Caution:
If you intend to use the dispenser
to deliver cold drinks, please
check the drinking water quality
according to local regulations
beforehand to ensure that you
obtain cold drinks that pose no
health risks.
•
•
•
Connect the dispenser according
to local regulations to a secured
electric circuit.
If you connect the dispenser to a plug
in the wall, then:
Use a grounded safety socket in
compliance with local regulations.
Ensure that the electric circuit is
protected by a residual current
device.
Ensure that the plug remains
accessible after installation.
Warning:
Never touch the power source
or plug if your hands, the
power cord or socket are wet.
If you connect the dispenser to a
permanently wired power source
(without mains plug), then ensure that
the electric circuit is equipped with a
circuit breaker with a contact gap of
minimum 3 mm / 0.12 in that controls
all poles.
•
•
•
•
6 2014 - 03
l
2 SAFETY INSTRUCTIONS

Transport, storage and
operation
Always store and transport the
dispenser in the original packaging.
Before storing or transporting the
dispenser:
Place the product packs in the
refrigerator.
Clean the dispenser.
Contact your Catesse system
supplier so that an authorised and
trained service technician can drain
the water from the boiler and protect
the dispenser against frost damage.
Warning:
The dispenser may not
be subject to frost during
operation, storage or transport.
If you suspect there is frost damage
following storage or transport, contact
your Catesse system supplier to have
the dispenser checked and a function
test implemented.
•
•
•
Servicing the dispenser
The servicing, repair and programming
of the dispenser may only be carried
out by authorised and appropriately
trained service technicians assigned
by your Catesse system supplier.
Warning:
If the mains cable of the
dispenser is damaged, switch
the dispenser off and contact
your Catesse system supplier
to have the mains cable
replaced.
2014 - 03 7
2 SAFETY INSTRUCTIONS
l
latte coffeelatte
coffeelatte coffee
latte coffeelatte
coffeelatte coffee
latte coffeelatte
coffeelatte coffee
latte coffeelatte
coffeelattecoffee
latte coffeelatte
coffeelatte coffee
latte coffeelatte
coffeelatte coffee
latte coffeelatte
coffeelatte coffee
latte coffeelatte
coffeelatte coffee
latte coffeelatte
coffeelatte coffee
latte coffeelatte
coffeelatte coffee
latte coffee
coffee latte
latte coffee
coffee latte
latte coffee
coffee latte
latte coffee
coffee latte
latte coffee
coffee latte
latte coffee
coffee latte
latte coffee
coffee latte
Fig. 1 Fig. 2 Fig. 3
Food safety instructions
(HACCP)
As the operator of the dispenser,
you are responsible for its safe and
hygienic operation. Please comply
therefore with the following instructions
in order to meet the food safety
standards.
Storage of product packs
Store the product packs according
to the description on the packaging
(g. 1).
Please note the „Best before“ date
printed on the packaging (g. 2).
•
•
Always use the product packs
according to the „rst in -rst out“
principle (product packs stored rst
must be used rst).
Do not use a product pack if the
„Best before“ date has expired.
•
•
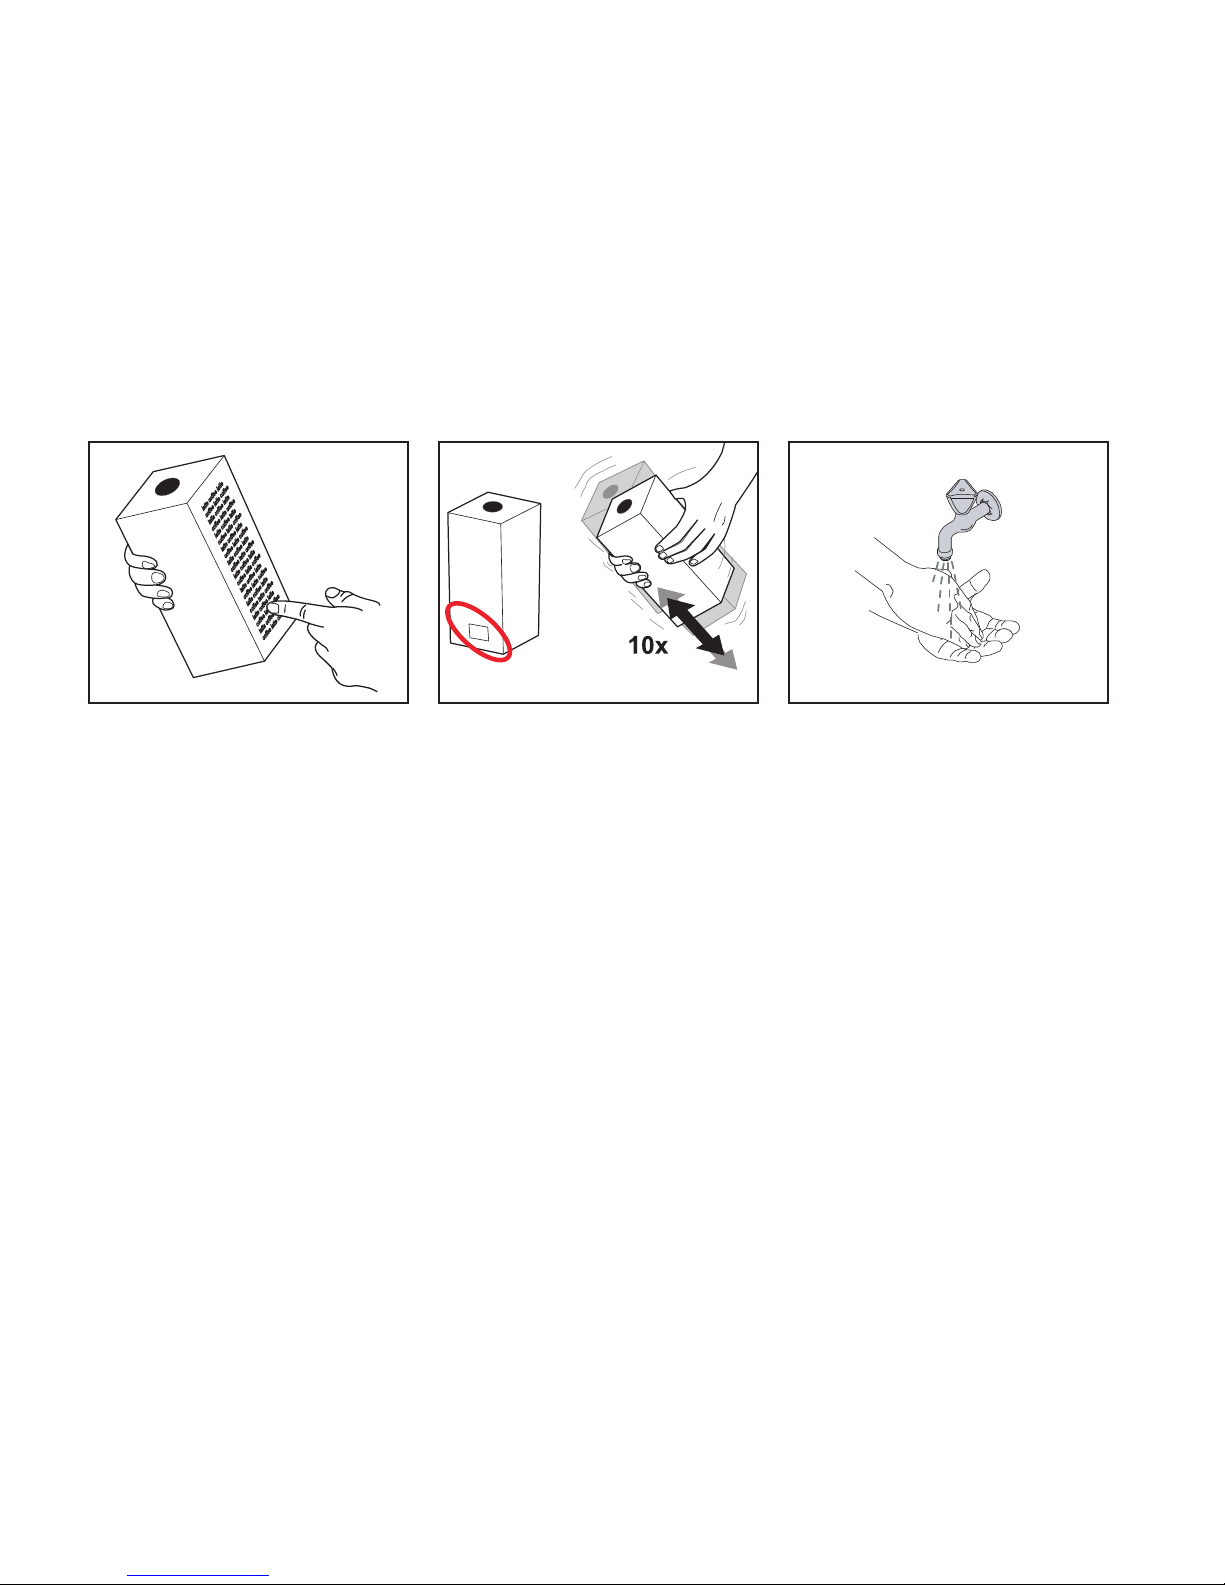
Handling the product packs
Wash your hands before touching a
product pack (g. 3).
Shake the product pack at least
10 times before inserting it in the
dispenser (g. 2).
Read the instructions on the rear of
the pack.
Check the product pack for any
damage. Never use a damaged
product pack.
Check the „Best before“ date on
the label of the product pack. Do
not use a product pack if the „Best
before“ date has expired.
1.
2.
3.
4.
5.
8 2014 - 03
l
2 SAFETY INSTRUCTIONS

Fig. 4 Fig. 5
Follow the instructions on the
product pack. Write at least the
expiry date on the product pack
(g. 4).
Note:
When the product pack is open,
ensure that no liquid spills out
onto clothing, the oor or other
equipment.
6. Caution:
Do not touch the tip of the doser
with your hands or the cleaning
cloth. If the doser needs cleaning,
rinse with clear water only (g. 5).
If you do not use the dispenser for a
longer period (e.g. during a company
holiday), follow the instructions in
the chapter „Switching the dispenser
on/off“.
2014 - 03 9
2 SAFETY INSTRUCTIONS
l
Cleaning the dispenser
Clean the dispenser regularly
Clean the surface around the
dispenser.
Wash your hands before touching
the dispenser or a product pack.
Clean the dispenser according
to the instructions in the operator
manual (see chapter „Cleaning the
dispenser“).
During cleaning, check the „Best
before“ and „Expiry“ dates on the
product pack in the dispenser. If
the „Best before“ or „Expiry“ date is
expired, replace the product pack.
Schedule cleaning activities and
record them.
Caution:
Clean all dispenser parts that
come into contact with the
product with a cleaning agent.
Use cleaning tablets for
dispensers, which deliver cocoa
containing drinks.
Only use cleaning agents and
cleaning tablets recommended
by the food industry and your
Catesse system supplier.
1.
2.
3.
4.
5.
Training
Train new staff regarding food safety
instructions (HACCP).
Inform new staff about schedules
and cleaning procedures.
Ensure that new staff reads the
operator manual before operating
the dispenser. Keep the operator
manual close to the dispenser.
If there are any other questions, please
contact your Catesse system supplier.
•
•
For safe handling, dosing and
use of cleaning agents, follow the
instructions on the label of the
cleaning agent.
Danger:
DO NOT SPRAY OR SPLASH
THE DISPENSER WITH WATER.
DO NOT USE A WATER JET
FOR CLEANING.
NEVER IMMERSE THE
DISPENSER IN WATER.
Danger:
NEVER TILT THE DISPENSER
TO CLEAN BEHIND OR BELOW
IT.
AVOID SCALDING!
THE BOILER CONTAINS VERY
HOT WATER THAT CAN SPILL
OUT IF YOU TILT OR MOVE
THE DISPENSER.
10 2014 - 03
l
2 SAFETY INSTRUCTIONS

Fig. 6 Fig. 7
1
6
7
8
5
2
3
4
11
12
13
109
Fig. 8
14
15
16
17
3 COMPONENTS OF THE DISPENSER
Front of the dispenser:
1 - Dispenser door
2 - Display
3 - STOP-button
4 - Drink buttons
5 - Preselection buttons
6 - Door lock with key (option)
7 - Port for USB key
8 - Door release button
9 - LOCK/Clear-Error switch
10- Cooling compartment
11 - Cup tray
12- Drip grid
13- Drip tray
Rear of the dispenser:
14- Condensate grid
15- Water supply hose
16- Power cord
17- Water supply hose for cold drinks/
cold water (option)
2014 - 03 11
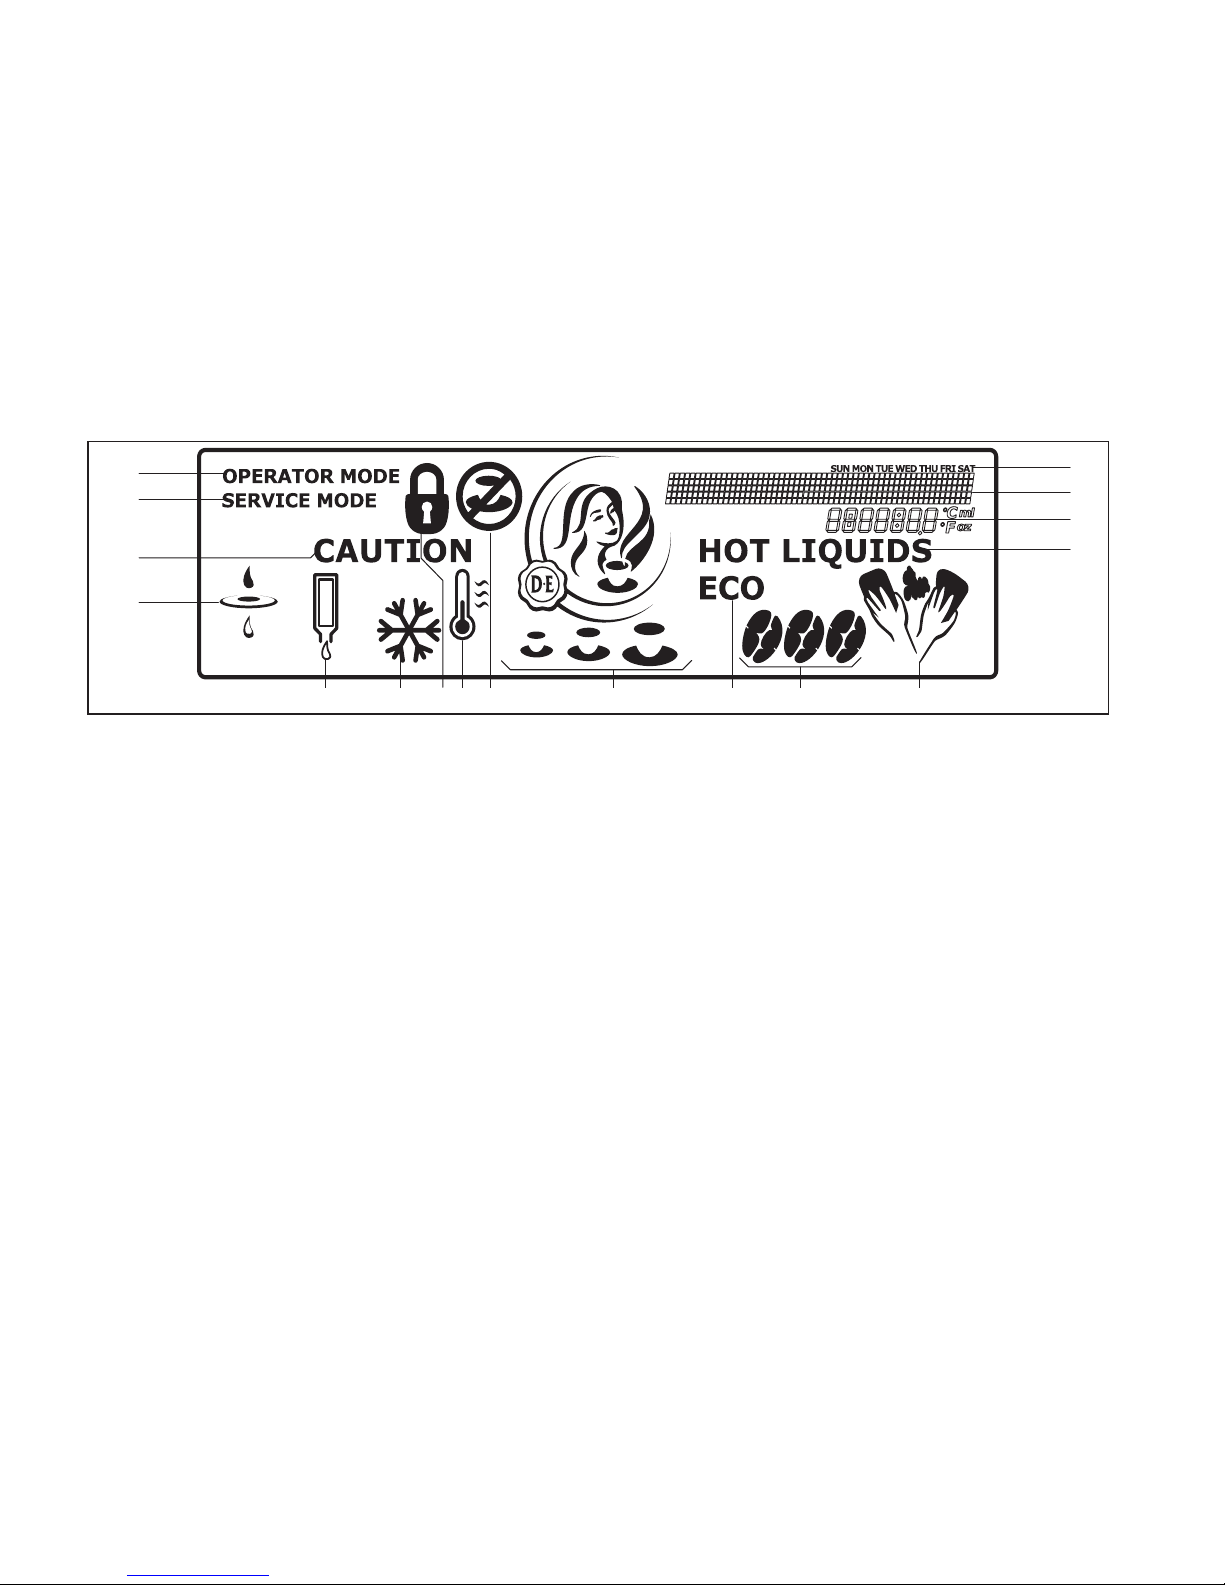
Fig. 9
b.
a.
c. c.
l.
d.
e. f. h.g. i. k. m. n.
q.
p.
o.
Icons on the display:
OPERATOR MODE
the USB operator stick is inserted
and the operator mode is active
SERVICE MODE
the service mode is active
CAUTION HOT LIQUIDS
the dispenser delivers hot water or
hot drinks or
the dispenser is ushed
FILTER
replace the water lter
PRODUCT PACK
insert a full product pack
ICED-preselection (option)
dispense a drink as cold drink
a.
b.
c.
d.
e.
f.
LOCK
the dispenser is locked an cannot
dispense drinks
TEMPERATURE
water temperature in the boiler is
too low and the dispenser is heating
up
DELIVERY BLOCKED
the dispenser cannot deliver the
selected drink
VOLUME-preselection
select a small, medium, or large
drink
ECO
the energy saving mode is active
g.
h.
i.
k.
l.
STRENGTH-preselection
select a mild, normal or strong drink
CLEANING
clean the dispenser
WEEKDAYS
MESSAGE-line
Messages are displayed to guide
you through the programming steps,
or in case of errors
INFO-eld
display of cooling compartment
temperature, time, etc.
m.
n.
o.
p.
q.
12 2014 - 03
l
3 COMPONENTS OF THE DISPENSER

Fig. 10 Fig. 11 Fig. 12
4 OPERATING THE DISPENSER
Place cups and pots correctly
The dispenser has two product outlets:
Left: for coffee, tea, and
cocoa containing drinks (option)
Right: for hot water
Caution:
Place your cup or pot under the
outlet below the drink button of
your selection.
Place your cup on the cup tray
(g. 10).
Tilt the cup tray upwards to provide
enough room for a pot (g. 11).
Place the pot on the drip tray
(g. 12).
A special dispenser foot may be
required for larger pots.
•
•
•
•
•
Drink delivery
Warning:
The liquids dispensed by
the dispenser are hot! Avoid
scalding!
Keep hands and other body
parts away from the dispenser
while drinks are being
delivered.
Never leave children
unsupervised near the
dispenser.
To deliver a drink:
Place your cup on the cup tray
(g. 10).
Press the drink button of your
choice. The drink will be delivered
via the corresponding outlet.
Press the STOP button if you want
to interrupt or cancel the drink
delivery.
1.
2.
3.
2014 - 03 13

Fig. 13 Fig. 14
Portioned or continuous drink
delivery
During installation, the service
technician programs the dispenser
to operate with one of the following
delivery options.
Portioned delivery:
The drink button only needs to be
pressed once (g. 13).
The dispenser stops automatically
after one portion is delivered. (The
respective portion volumes can
be programmed by the service
technician).
•
Caution:
Press the STOP button if the
cup or pot is too small for the
delivered drink volume and when
there is the risk of scalding by
spilling of hot liquids.
Continuous delivery:
The drink button must be kept
pressed until the cup or pot is full
(g. 14).
The dispenser stops when
you release the drink button.
Note:
We recommend portioned
delivery with xed cup sizes
in selfservice areas where
customers may not be familiar
with the operation of the
dispenser.
•
14 2014 - 03
l
4 OPERATING THE DISPENSER

Fig. 15
ICED VOLUME STRENGTH
Drink delivery with preselections
Your dispenser supports preselection
options. The service technician may
have activated these preselection
options during installation. When the
preselection button is pressed, the
following preselection options are
displayed on the display (g. 15):
ICED-preselection (option)
VOLUME-preselection
(small - medium - large)
STRENGTH-preselection
(mild - normal - strong)
•
•
•
ICED-preselection (option)
Place your cup on the cup tray.
Press the preselection button
«ICED» to activate this
preselection.The icon for iced is
displayed (g. 15).
Press a drink button. The iced drink
is delivered.
Press the STOP button to return to
the default state.
1.
2.
3.
4.
VOLUME-preselection
Place your cup on the cup tray.
Press the preselection button
«VOLUME» to activate this
preselection.
Three cup icons (small - medium
- large) are displayed (g. 15).
Press the preselection button until
the required portion size is marked
in black. The selection is cyclic.
Press a drink button. The drink is
delivered with the selected portion
size.
Press the STOP button to return to
the default state.
1.
2.
3.
4.
5.
2014 - 03 15
4 OPERATING THE DISPENSER
l

Fig. 16
ICED VOLUME STRENGTH
STRENGTH-preselection
Place your cup on the cup tray.
Press the preselection button
«STRENGTH» to activate
this preselection. Three bean
icons are displayed (g. 16).
Press the preselection button
until the required drink strength is
marked in black. Selection is cyclic.
(1 bean = mild, 2 beans = normal,
3 beans = strong).
Press a drink button. The drink
will be delivered with the selected
strength.
Press the STOP button to return to
the default state.
1.
2.
3.
4.
5.
Note:
All preselection buttons can be
combined with one another.
Warning:
The liquids dispensed by
the dispenser are hot! Avoid
scalding! Keep hands and
other body parts away from the
dispenser.
Note:
If you press a preselection
button, but do not press the
delivery button, the dispenser will
return to the default state after a
few seconds.
16 2014 - 03
l
4 OPERATING THE DISPENSER

Fig. 17
Inserting and removing product
packs
Empty product pack detection
If you select a drink and the
corresponding product pack is empty,
a drink will not be delivered. The icon
for empty product pack will be shown
on the display (g. 17).
The delivery of hot or iced water is still
possible.
If the operator menu «OPERATOR
NR» shows the setting «SHOW
OPERATOR NR» set to «YES», the
entered telephone number will be
shown on the display (g. 17).
The following text will scroll in the
message line:
COFFEE NOT AVAILABLE
123456789
Call the operator when necessary.
Note:
You can enter the operator
number yourself via the operator
menu (see „Programming the
dispenser“)
2014 - 03 17
4 OPERATING THE DISPENSER
l

latte coffee
coffee latte
latte coffee
coffee latte
latte coffee
coffee latte
latte coffee
coffee latte
latte coffee
coffee latte
latte coffee
coffee latte
latte coffee
coffee latte
Fig. 18 Fig. 19 Fig. 20
Replacing an empty product pack
Caution:
Before inserting a new product
pack, follow the instructions in
chapter „Food safety instructions
(HACCP)“.
Wash your hands before touching a
product pack.
Do not use a frozen product pack.
Caution:
Read the instructions on the
product pack. Never use a
damaged product pack. Do not
use a product pack if the „Best
before“ date has expired (g. 18).
1.
2.
Shake the product pack at least 10
times (g. 18).
Remove the plastic wrapper and
write the „Expiry date“ on the
product pack (g. 19).
Follow the instructions on the
product pack to open the doser
(g. 19).
3.
4.
5.
Open the dispenser door.
Insert the product pack (g. 20).
Close the dispenser door.
Dispense a test drink.
6.
7.
8.
9.
18 2014 - 03
l
4 OPERATING THE DISPENSER

Switching on the dispenser
Caution:
Ensure, that the dispenser is
connected to the water supply.
Open the water tap.
Insert the power plug.
The dispenser starts heating up water
and starts cooling down the cooling
compartment. Drink delivery will be
blocked until the water in the boiler has
reached the correct temperature.
A ashing thermometer and the icon
for „Delivery blocked“ will be shown on
the display:
PLEASE WAIT
BOILER IS
HEATING UP
Note:
Depending on the dispenser
model (see „Technical
Specications“) and the ambient
temperature, the heating of the
boiler can take between 30 and
120 minutes. The cooling of the
product compartment can take 24
hours or more.
1.
2.
Note:
If the dispenser has been shut
down for longer periods, the date
and time must be set, so that the
dispenser and the programmed
cleaning cycles are reactivated.
Once the water has reached the preset
temperature, the display shows the
animated symbol illustrated below.The
dispenser is now ready for operation.
Switching off the dispenser
Remove the product pack and
check the „Expiry” date.
Store the product pack in a
refrigerator until you switch the
dispenser back on again.
When the expiry date has passed,
throw the product pack away.
Warning:
Do not freeze product packs.
Clean and ush the dispenser.
Pull the power plug out of the
socket.
Close the water tap.
1.
•
•
2.
3.
4.
2014 - 03 19
4 OPERATING THE DISPENSER
l

Fig. 21 Fig. 22 Fig. 23
Locking/unlocking the dispenser
Open the dispenser door (g. 21).
Press the LOCK/Clear-Error switch
to block the drink delivery (g. 22).
The lock icon appears on the display.
Drink delivery will be switched off. The
cooling compartment and the boiler will
remain in operation.
1.
2.
To unlock the dispenser, press the
LOCK/Clear-Error switch again to
enable drink delivery (g. 22).
3.
Drink delivery in locked mode
(option)
Insert the USB release key into the
USB port on the dispenser to enable
temporary drink delivery (g. 23).
As long as the USB release key is
inserted, drinks can be delivered.
When the key is removed, the locked
mode is reactivated and the lock icon
is shown in the display.
•
20 2014 - 03
l
4 OPERATING THE DISPENSER
Table of contents
Other JDE Coffee Maker manuals

JDE
JDE L'OR Supreme User manual

JDE
JDE EXCELLENCE COMPACT User manual

JDE
JDE PRMSS-001 User manual

JDE
JDE Gallery 310 User manual

JDE
JDE schaerer Barista Pro BF BiB User manual

JDE
JDE EXCELLENCE COMPACT BLACK User manual

JDE
JDE Sprso Giro User manual

JDE
JDE PROFESSIONAL CAFITESSE QUANTUM TOUCH User manual

JDE
JDE Cafitesse 300 User manual


 quick start guide")


