Jimmy HW10 User manual

Instruction Manual 3 in 1 Full House Cleaning Cordless Vacuum&Washer
Manuale d'uso Aspirapolvere e lavapavimenti senza li 3 in 1 per la pulizia della
casa completa
Gebrauchsanweisung 3-in-1 kabelloser Staubsauger für das ganze Haus
Инструкция по эксплуатации Беспроводная пылесосная поломоечная машина «три в
одном» для целого дома
Mode d'emploi Aspirateur sans l 3-en-1 pour toute la maison
Instrucciones de uso Aspirador inalámbrico 3 en 1 para toda la casa
Instrukcja Obsługi 3 w 1Bezprzewodowy odkurzacz i mop
HW10


1
Contents
English 2
русский язык
71
Français 57
Italiano
43
Español
29Deutsch
15
Polski 85

2
Product Assembly
Parts Name
Spray mouth
Self cleaning button
Handle on/off button
Handle mode button
Battery release button
LCD screen
Mute Button
Handheld on/off button
Handheld mode button
Dust cup release button
Suction inlet release
Clean water tank
handle
Clean water tank
lling plug
Dirty water tank
release button
Metal tube cover
Handle push button
Spray button
Metal tube
Handheld release
button
Battery pack
Decorative lights
Handheld cleaner
Dust cup
Metal tube release
button
Dirty water tank
Upright cleaner
Clean water tank
Wheel
Holder 1 Holder 2
Charging base
Carpet
brushroll
Cleaning brush Cleaning
solution Upholstery
tool Adaptor
Electric mattress
head Crevice
tool

3
Product assembly and
disassembly
Note: Cut off electricity before product assembly and
disassembly.
Metal tube assembly and disassembly
Insert the metal tube into the mainbody vertically
until a“click”sound is heard. Make sure metal
tube is rmly locked(Fig 1). To remove the metal
tube, push the metal tube release button down
to the end and pull the metal tube upward.(Fig 2)
Battery pack assembly and disassembly
1.Slide battery pack along the slot and press the
battery pack down firmly until a“click”sound is
heard. The battery pack is locked.
2.Press the battery pack release button and pull
the battery pack in the direction opposite to the
assembly to unlock the battery pack.
Note: Except for the replacement of the battery pack, the
battery pack doesn’t need to be taken out frequently.
Handheld vacuum cleaner assembly
Insert the dust cup suction inlet of the handheld
vacuum into the groove of the mainbody cover.
Push the handheld cleaner towards the metal
tube until a "click" sound is heard, the handheld
vacuum cleaner is installed successfully to
mainbody. And machine is used as a upright
vacuum cleaner at this time (Fig 4). To remove
the handheld vacuum cleaner, just press the
handheld release button and lift the handheld
vacuum cleaner diagonally upwards. (Fig 5)
Charging holder assembly (Fig 6)
Press the holder 1 and holder 2 into the charging
base until a “click” sound is heard.
Packing List
Handheld
cleaner Floorhead Metal tube Battery
pack
Charging
base Adaptor Carpet
brushroll
Cleaning
brush
11111111
Electric
mattress
head
Upholstery
tool
Crevice
tool
Cleaning
solution Holder 1 Holder 2 Instruction
Manual
1111111
1 2
4 5
Metal tube
release
button
Metal tube
3
Battery
pack
Battery pack
release button
Handheld
release
button
Handheld
vacuum
cleaner
holder2
6
holder1
Charging
base

4
Place machine to charging base(Fig 7)
To put machine back to charging base, hold
machine handle to lift the machine,, aim charging
slot on bottom of machine to the charging
socket on charging base and put the machine
into charging base. To use the machine, hold
machine handle and lift out machine from
charging base.
Dirty water tank assembly and
disassembly
To take off dirty water tank, hold machine with
one hand and hold dirty water tank with another
hand, press dirty water tank release button to
pull out dirty water tank. (Fig 8-1)
To assemble dirty water tank, place dirty water
tank bottom into mainbody, push dirty water tank
towards mainbody until a “click” sound is heard.
(Fig 8-2)
Brushroll window and brushroll
assembly and disassembly
To take off brushroll window, hold brushroll window
latch and pull upward to remove brushroll window.
To assemble brushroll window, align the clips on two
sides of brushroll window with the slots on two sides of
oorhead. Press brushroll window down until a “click”
sound is heard. (Fig 9)
To disassemble the brushroll, pull the brushroll
cap outward to take out brushrol. To assemble the
brushroll, hold brushroll cap, slide brushroll over the
cylinder until brushroll reaches the end. (Fig 10)
Clean water tank assembly and
disassembly
To take off clean water tank, hold the clean water
tank handle and pull out the clean water tank. To
assemble clean water tank, put the clean water
tank back to nozzle, align with the brushroll window.
(Fig 11)
Use of the Product
Note: When using it for the rst time, please fully charge
the machine before using it.
Use of upright vacuum cleaner
Press the handle on/off button, the LCD screen
and decorative lights will light up, default is in
Auto mode (Fig 12), press the mode button to
switch to Floor mode (Fig 13), press the mode
7
Charging
slot
Charging socket
8-1 8-2
9
Dirty water
tank release
button
Brushroll
10
12 13
Clean
water tank
Clean water
tank handle
Brushroll
window
11
Brushroll window latch
Clean water
tank handle
Brushroll
cap
Mainbody

5
14
16
18
19-2
Metal
tube
Metal tube
extension
rod
button twice to switch to Turbo mode (Fig 14)
, press the mode button three time to switch to
Carpet mode(Fig 15). Press the mode button
again to go back to Auto mode. Press the handle
on/off button again to turn off the machine, the
display screen and the decorative lights go out.
Note:
1. When cleaning carpet, please clean the
oorhead rst (refer to " Cleaning and Maintenance,
Floorhead Cleaning" for details) and replace the
carpet brushroll.
2. When the battery level is lower than 20%, it
cannot be switched to Carpet mode and Turbo
mode.
Water spray function
When upright vacuum cleaner is working, press
the water spray button, the spray mouth sprays
fan-shaped water; release the water spray button
to stop spraying water. (Fig 16)
Use of handheld vacuum cleaner
Take off handheld cleaner, press the handheld on/off
button, the display and decorative lights will light up,
default is in ECO mode (Fig 17), press the handheld
mode button to switch to MAX mode (Fig 18), Then
press the handheld mode button to switch back to
ECO mode; Press the handheld on/off button again
to turn off the machine, the display screen and the
decorative lights go out.
The handheld vacuum cleaner can be connected with
upholstery tool, crevice tool, electric mattress head or
metal tube, to clean different areas.
1.Connect with upholstery tool to clean the dust and
particles on furniture surface . (Fig 19-1)
2.Connect with metal tube to clean dust on high places.
Open the metal tube top cover, push the handle button
upwards to extend the metal tube, and then insert the
tube to suction inlet of the handheld vacuum cleaner to
clean the dust in high place. (Fig 19-2)
3.Connect with crevice tool to clean narrow places.
(Fig 19-3)
4.Connect electric mattress head to clean dust, hair,
dust mite ect on bed or fabric sofa. (Fig 19-4)
Note:
1. When the battery is lower than 20%, it cannot be
switched to max mode.
2. When using handheld vacuum cleaner, do not
vacuum water, otherwise it will cause motor defect.
19-1
Button
Upholstery
tool
Handheld
cleaner
Electric
mattress
head
19-4
19-3
Crevice
tool
15
17

6
Machine charging
Connect the adapter to the power supply, put the
upright vacuum cleaner into the charging base to
start charging.(Fig 20)
Note:
1. Before the rst use, please fully charge the battery
pack, and before the second charge, please empty the
battery to ensure the life of the battery pack;
2. If the product is to be long idled, please charge it
once every three months;
3. When not charging, please remove the adapter from
the socket to prevent the danger of accidental touching.
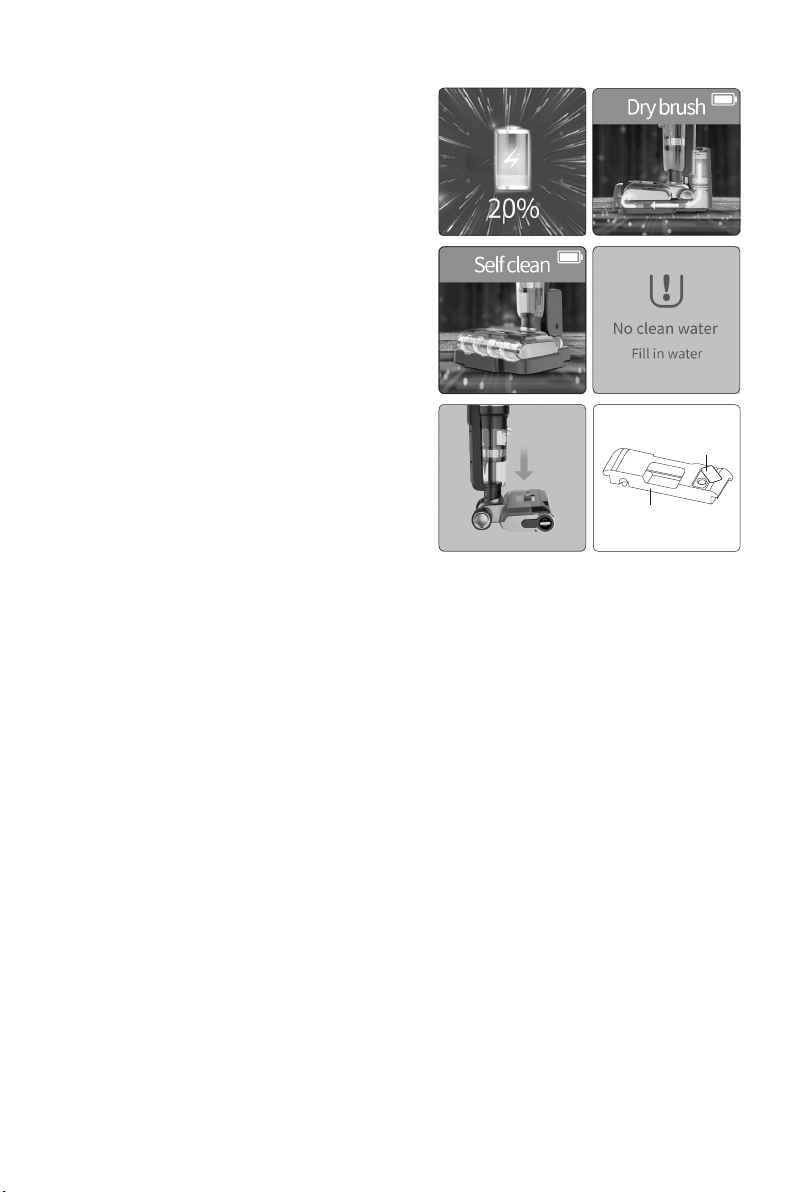
Brushroll air-drying function (Fig 21)
In the charging mode, press and hold the handle
mode button for 3 seconds to enter the brushroll
air-drying mode for 4 hours. During the air-drying
process, the decorative light is on, and the
brushroll will rotate slightly at intervals to adjust
the air-drying position; Press again mode button
to turn off the drying mode.
Note:This mode is designed to prevent humid brushroll
from breeding bacteria or odors. (The display is shown
in Fig 21)
Brushroll & air path self-cleaning
function
In the charging mode, press the self-cleaning button to enter the cleaning mode (The display is
shown in Fig 22).After the self-cleaning is completed, the machine enters brushroll air-drying mode
and returns to the charging mode; during the self-cleaning process, to end the self-cleaning mode in
advance , press on/off button and machine will return to charging mode.
Note:
1. Self clean mode is only to clean oorhead air path and hardoor brushroll. Do not run self clean on the carpet
brushroll.
2. Before turning on the self clean mode, please empty dirty water in the dirty water tank rst, check that the
machine has been rmly placed on the charging stand, the adapter is plugged into the socket and connected
to the charging stand. The clean water tank retains at least 1/2 water volume; After completing self cleaning,
please clean the dirty water tank again.
3. When the battery is less than or equal to 10% power, the self-cleaning mode cannot be turned on, and it can
be turned on normally after charging for a period of time.
Clean water tank empty indicator
When using the water spray function, the voice/screen shows "No clean water, ll in water" (Fig
23 and Fig 24 alternately display), please turn off the machine and add water to the clean water
tank.When using the clea self clean mode, if it is detected that there is no water in the clean
water tank, the brushroll self cleaning will be stopped. To continue self cleaning, please add
water to the clean water tank and empty the dirty water tank, then restart self clean mode.
Note:When adding clean water, you can add the equipped JIMMY cleaning solution, the ratio is about 1 bottle
cap of cleaning solution to one full water tank, the water temperature cannot exceed 40°C.
Fill up clean water tank: After removing the clean water tank, open the water lling plug, turn it to the
side to expose the water inlet hole, pour clean water and cleaning solution in, and then plug back to
the original position and reinstall the clean water tank to oorhead. (Fig 25)
24
23
22
21
25
Clean water tank
Water lling
plug
20

7
26 27
28 29
31-2
31-1
31-4 31-5
31-3
30
Dirty water tank full indicator
When the upright vacuum cleaner detects that
the dirty water tank is full, the whole machine will
stop and give a voice reminder. Please clean the
full dirty water tank and put it back. (Fig 26 and
Fig 27 alternately display)
When it is detected that the dirty water tank is full
in self clean mode, the machine will stop working
and give a voice reminder. Please clean the full
dirty water tank and put it back.
Dirty water tank cleaning: Take out dirty water
tank upper cover and filter frame, dump the
dirty water, assemble the dirty water tank after
washing, and put it back on the oorhead. (refer
to " Cleaning and Maintenance of dirty water
tank" for details)
Brushroll stuck indicator
When the cleaner is in working or cleaning
mode, if the brushroll is stuck, the whole machine
will stop and give a voice reminder. (Fig 28
and Fig 29 alternately display) Please take out
the brushroll, clean up the foreign matter or
entangled hair on the brushroll.
Brushroll cleaning: After removing the window,
pull out brushroll, use the blade on the cleaning
brush to cut the hairs winding on brushroll, and
clean the foreign matter attached to the brushroll
and oorhead, Install brushroll and window back.
(Fig 30) (refer to " Cleaning and Maintenance of
Floorhead Assembly " for details)
Air path blocked indicator
When the upright cleaner is in working or self
clean mode, if the air path is blocked, the
machine will stop working and give a voice
reminder. Please follow the instruction on display
screen to check the possible blocked parts and
clean up.
When handheld vacuum cleaner is working, if the
air path is blocked, cleaner will automatically stop. At this time, the dust cup and HEPA need to
be cleaned. (The content displayed on the screen is: the blockage of the upright vacuum cleaner
is shown in Fig 31-1、31-2、31-3、31-4、31-5, and the blockage of the handheld vacuum
cleaner is shown in Fig 31-1、31-2)
Air path cleaning:
1.Disassemble the dirty water tank, take out dirty water tank upper cover and lter, wash all parts
and them asssemble back.
2.Use pipe brush to clean the dirt, foreign objects and hair inside air path of oorhead.
3.Remove the dust cup, empty the dust cup, remove HEPA, then take out cyclone and
disassemble it, clean all parts and reassemble the dust cup. (Refer to "Cleaning and
Maintenance" for details)

8
Voice function
The voice of the new machine is turned on by
default, press the mute button to turn off the voice
function; press the mute button again to turn on
the voice function. (Fig 32)
Note:When using handheld vacuum cleaner, there is no
voice function.
Battery power indicator
When the upright cleaner is working, if the voice
reminds " Low battery. Please charge the
battery ", Please use it after charging. (Fig 33)
When the upright cleaner is working, if the voice
reminds " Low battery. Machine will be turned off
soon. Please charge the battery ", the power is
about to be exhausted, and it will automatically
shut down. Need to charge for use.
When using vacuum cleaner, the icon on top
right corner of the sceen displays left battery
power: full grid means 75% to 100% battery;
3/4 grid means to 50% to 75% battery; 1/2 grid
means 25% to 50% battery; 1/4 grid means
1% to 25% of the battery; the blank means the
battery being empty, and it needs to be charged
before use.
Cleaning and Maintenance
Dirty water tank cleaning(Fig 34)
After turning off the vacuum cleaner, remove the dirty water tank, lift the water tank top cover,
and remove the foam lter frame from it, open the ip cover of the foam lter frame, take out the
foam lter. Pour out dirty water and dirt in the water tank, then wash dirty water tank, water tank
cover, foam lter frame and foam lter. If there is foreign matter in the dirty water tank pipe, it
can be cleaned with a cleaning brush; dry the above parts after washing. And then reassemble
all the parts back into dirty water tank.
Note:
1. After using upright vacuum cleaner, it is recommended to clean the dirty tank immediately;
2. When reinstalling the lter,do not fold the black soft rubber under the lter.
Floorhead cleaning (Fig 35)
After removing the brushroll window, brushroll, clean water tank, and dirty water tank, insert
the cleaning brush through the circular hole below the installation position of the dirty water
tank to clear foreign matter and scales in the pipe, and the clogged hair; Use the blade on the
cleaning brush cut off the entangled hair on the brushroll; Wipe the dirty parts of the machine (the
brushroll can be placed in the accessory holder for drying ).
Note:Do not wash the oorhead separately after removing the brushroll.
Cleaning
brush
Cleaning brush storage
Brushroll
storage
Foam
lter
Dirty water tank
34
Black soft
rubber
Mesh lter
35
Charging base
Foam lter frame
Dirty water tank
top cover
HEPA /
Adaptor
storage
32
Mute button
33

9
Dust cup cleaning (Fig36-1,36-2)
Press the dust cup release button to remove the
dust cup from the handheld vacuum cleaner;
press the suction inlet release button to open
the suction inlet and empty the dust cup; Take
out the cyclone assembly ; Take out the HEPA
lter; Hold the metal mesh, rotate it to unlock the
metal mesh, and then remove it downward.
After cleaning, wiping, and drying each part,
assemble the dust cup in turn, and then installed
on the handheld vacuum cleaner.
Maintenance and Storage
it is recommended to clean the dirty water
tank, lter, brushroll and brushroll window after
each use. If there is any of below situation: ( ①
HEPA lter leaks dust; ②Foam lter severely
damaged; ③The brushroll has serious hair
loss,or has strong vibration and abnormal noise during use), it is recommended to purchase
consumables and replace it to avoid machine performance.
when the machine is long idled, place it in a cool and dry place, avoid direct sunlight or wet
environment.
When pack and store the machine, Please be sure to clean the machine and dry all parts to
prevent damage to the machine.
Important Safety Instructions
Read all instructions and warnings before using this appliance. Failure to follow the warnings
and instructions may result in electric shock, fire or serious injury.
Warning
1.The appliance is only for household use.
2.Before use the product, check whether the local voltage is consistent with the voltage marked
on the power adaptor.
3.Inspect the product before use, stop use if the product or adaptor is damaged.
4.Use only as described in this manual.
5.This appliance cannot be used by children and persons with reduced physical, sensory
or mental capabilities or lack of experience and knowledge unless they have been given
supervision or instruction concerning use of the appliance in a safe way and understand the
hazards involved.
6.Do not use this product as a toy. Keep this product away from the reach of children. Take care
of children and make sure they will not regard this product as a toy.
7.Do not touch plug with wet hand.
8.Use extra care when cleaning on stairs to prevent falling.
9.Do not use or disassemble or replace any component if there is damage on power cord, plug,
battery or conductive parts. Disassembly or replacement of the components by yourself may
36-1
36-2
Dust cup
HEPA lter
Metal mesh
Suction
inlet
release

10
cause electric shock or re. JIMMY will not take responsibility. Once damaged, the product need
to be repaired or replaced by JIMMY, JIMMY’s distributor or qualified person designated by
JIMMY to avoid injury.
10.Recharge only with the adaptor specied by JIMMY.
11.Only to use the battery pack specied by JIMMY. Use of any other battery pack may cause
explosion, injury and or product damage.
12.If the product does not operate in accordance with the instructions, is seriously impacted,
falls from a height, is damaged, or falls into the water, do not use it and contact JIMMY or
JIMMY distributor .
13.Only use JIMMY specied replacement parts or attachments.
14.Do not pull or press the cable. Keep cable away from heated surfaces. Do not place the
cable in a closed door or pull it through a sharp edge or corner. Keep the cable away from
walking area. Do not operate product across the cable.
15.Unplug the product when it is not used or before repairing.
16.Do not drag the cord or carry cord to move the product, or use cord as handle.
17.The product is a rechargeable electric appliance. Do not leave the machine to run
unattended.
18.Remove battery pack when the product is cleaned, repaired or long idled.
19.Do not get close to heating appliance or expose under sunshine longtime, to prevent over
heating causing housing deformation.
20.Keep objects that may obstruct air path from air inlet and outlet to prevent machine
overheating.
21.Product mainbody and oorhead have electric components, cannot be washed under water.
22.Do not clean or disassemble brushroll cover or brushroll when the machine is power on or
under working to prevent injury.
23.Do not use the product to pick up amming objects like burning charcoal or cigarette etc.
24.Do not use the product to pick up sharp objects like broken glass.
25.Do not use the product to pick up lime, cement, toner, gypsum powder, our and other ultra-
ne substances.
26.Do not use the product to pick up acid-base cleaning liquid, washing powder and other
corrosive liquids.
27.Do not use the product to pick up inammable and explosive objects like gasoline, alcohol,
perfume, paint, etc.
28.Do not disassemble the closed machine, and do not try to change the performance of the
machine. Only get help from the professional personnel of the manufacturer, its maintenance
department or similar departments, otherwise it will cause danger.
29.Turn off power and unplug charger if the products is long idled.
30.Product technical specication of this manual are based on results from lab tests of JIMMY or
designated third parties. The company reserves all rights for nal explanations.

11
About use of the product
1.This product is suitable for hard floor in indoor environment, including waxed floor, rubber
oor, tile oor and sealed wood oor, solid wood oor and other at surface, use of the product
on unat ground may not achieve the best effect.
2.Do not turn on the machine before dirty water tank and clean water tank are assembled in
place according to instruction.
3.Do not shake the product up and down or collide violently to prevent dirty water from owing
into the motor; when the product is turned on, do not lift or carry the machine up and down, and
do not tilt the product to one side or lay it at on the oor to prevent dirty water from owing into
the motor.
4.Do not run the product for a long time with the oat blocking the air inlet to avoid damage.
5.After using the product, clean the dirty water tank, suction nozzle, air path and store it in
ventilated and dry place. Wet place will affect the insulation and life of electrical appliances.
About Cleaning Solution
1.A large amount of cleaning solution entering into the motor may cause damage to the
appliance.
2.Mix the solution with clean water according to the instructions (the ratio of solution to clean
water is 1:50). It is recommended to use provided cleaning solution. Do not use cleaning
solution contains acid, alkali,alcoholic solution or substances harmful to the environment.
3.Keep cleaning solution out of reach of children. If any solution gets into the eyes, immediately
flush them with clean water. If any solution is swallowed by accident, see medical care
immediately.
4.Dirty water and solution disposal should comply with local environmental regulations.
About disposal of battery
1.The battery in the product contains materials harmful to the environment. Take out the battery
pack from the product before disposal.
2.Turn off the product and unplug adaptor before taking out battery pack.
3.Handle the waste battery pack safely and properly. Do not put it into re, water or soil.
4.If the disposed battery leakage causes pollution to skin or clothes, Wash with clean water and
see medical care immediately.

12
Problem Possible cause Solution
Can not start
or stop during
use
Low battery power Recharge battery
On/off button is not pressed down Press down on/off button
Brushroll is entangled Clean brushroll
Dirty water tank full Clean dirty water tank
Battery pack not assembled properly Reassemble battery pack
Suction inlet blocked Clean suction inlet and filter
Weak suction
Suction inlet blocked Clean suction inlet and filter
No HEPA assembled Assemble HEPA
Abnormal noise
Suction inlet blocked Clean suction inlet and filter
No HEPA assembled Assemble HEPA
Spray mouth
does not spray
water
Clean water tank empty Fill clean water tank
Water spray button not pressed Press water spray button
Clean water tank not assembled properly Reassemble clean water tank
Water spray out
from air path
HEPA and dust cup are put to use
without fully dry
Dry the HEPA and dust cup
after washing before use
Metal filter is not assembled in the dirty
water tank
Assemble metal filter in dirty
water tank
Soft plastic folds under the filter Reassemble the filter, the soft
glue must not be folded
Troubleshooting
Please check the following points before contacting the after sale service.
Note: If the above troubleshooting guide fails to provide a solution or the screen displays error code F1 to F8,
please contact after service or local distributor for support.

13
Product Specication
Technical parameters
Circuit
Product name Cordless Vacuum&Washer
Model HW10
Rated Power 400W
Rated Voltage 25.2V
Battery Capacity 3800mAh
Charging Time 4h
Adaptor Input 100-240V ~ 50-60Hz
Lithium battery
Battery
protection
PCB
Handheld
contacts
Transfer
PCB 1
Handheld
switch button
PCB
Lights
Control PCB
Brushless
motor
Trumpet
Display screen
PCB
Mute switch
button PCB
Handle switch
button PCB
Self-cleaning
switch button
PCB
Dirty water
tank PCB
Transfer PCB 3
Floorhead
motor
Adaptor
Air fan
Water pump
Transfer
PCB 2

14
Manufacturer Information
Manufacturer Kingclean Electric Co., Ltd
Address No.1 Xiangyang Road, Suzhou New District, Jiangsu Province
215009, China
Disposal
The machine, accessories and packaging should be sorted for environmental-friendly recycling.
Do not dispose of the machine into household waste!
Only for EC countries:
According to the European Guideline 2012/19/EU, machine that are no longer usable, and
according to the European Guideline 2006/66/EC, defective or used battery packs/batteries,
must be collected separately and disposed of in an environmentally correct manner.
Battery packs/batteries:
Integrated batteries may only be removed for disposal by qualied personnel. Opening the
housing shell can damage or destroy the machine.
Do not dispose of battery packs/batteries into household waste, re or water. Battery
packs/batteries should, if possible, be discharged, collected, recycled or disposed of in an
environmental-friendly manner.
Subject to change without notice.
Warranty Information
This product enjoys two years warranty from the date of purchase.
Excluded from the guarantee is normal wear, commercial use, alterations to the appliance as
purchased, cleaning activities, consequences of improper use or damage by the purchaser
or a third person, damage, that can be attributed to external circumstances or caused by the
batteries.

15
NOTES

16
NOTES


Web:www.jimmyglobal.com
Email:[email protected]
Contact us -we'll get back within 1 business day.
jimmytechnology
1K-01
Table of contents
Other Jimmy Vacuum Cleaner manuals