JOBOBIKE COMMUTER User manual

1 2
About us
Dear Sir/Madam:
JOBOBIKE has been present on the bikes market for two
decades. We have been producing bikes for well-known
worldwide clients’ brands. Helping others to succeed
has resulted in our own success. Today, we are one of
the leading companies in the electric bikes industry.
After many years of hard work, it's time to shift our
identity: from being an “E-bike supplier” to become
“JOBOBIKE.” The knowledge we have gathered allows us
to create distinctive electric bikes that are built to suit the
modern lifestyle. We oer incredible biking experience,
ensuring competitive prices.
Your faithfully
Muriel.H
Member of the Management Board of JOBO Group
Our values
J
O
B
O
Joy of life full of new experiences
Opportunity to bike further
Biking without limitations
Options of transport
Just biking with JOBOBIKE
No matter where you are and where you’re heading to, our bikes fit
your lifestyle. City or countryside, flat or rocky roads, our bikes will get
you there. Moreover, our lifetime customer service is always with you.

3 4
Manual use instruction
This manual contains the details
of the equipment, operation, and
maintenance of the product along
with our advice to you.
Before you start using your new
bike, it is necessary to read through
the instructions. If you are unclear
about any steps, you can always
find additional information and
instructions on our website:
www.jobobike.eu
Table of content
About Us
Our values
Manual Use Instruction
Table of contents
1
2
3
3-4
5-6
7-11
12-15
15-17
17
17-18
18
English Installation Guide
General Info
Assembly Instructions
Operation instruction
Cautions
Error code definition
Warranty terms
Main parameters of the bike
19-20
21-25
26-29
29-31
31
31-32
32
Instrukcja montażu w języku angielskim
Informacje Ogólne
Instrukcja montażu
Instrukcja obstugi
Środki ostrożności
Kody błędów
Gwarancja
Specyfikacja roweru
33-34
35-39
40-43
43-45
45
45-46
46
Deutsches Handbuch
Allgemeine Informationen
Montageanleitung
Betriebsanleitung
Vorsichtsmaßnahmen
Fehlercode Definition
Gewährleistung
Wichtigste Parameter
47
47-48
49
49
50
Terms and conditions
General provisions
Services
Delivery
Complaints for the goods under warranty
Disclaimer

5 6
1 12 23
2 13 24
3 14 25
4 15 26
5 16 27
6 17 28
7 18 29
8 19 30
9 20 31
32
10 21
11 22
1
2
3
4
5
6
7
8
9
10
11
12
13
14 15 16 17 18 19
32
31
30
29
28
27
26
23
22
21
20
24
25
The manual you have received is the basic help for assembling and using your bike. Please read this manual carefully and
follow the instruction. Once you read it and still in need for help, please visit our website, contact us by email, or give us a call
on the phone.
Commuter is a 250 watt bike. Please follow all relevant laws and regulations in your country or region when riding this bike.
General Info
NO. ACCESSORY NAME. NO. ACCESSORY NAME. NO. ACCESSORY NAME.
Saddle Spoke Front wheel axle
Seat post Derailleur Suspension fork
Seat post clamp Kickstand Front fender
Rear rack Chain Front light
Rear light Crank set Headset bearings
Rear fender Pedal Stem
Rear Brake Frame Display
Fender support Battery Grips
Rear Brake disc Tire Brake lever
Shift leverHub motor Front brake
Rim Front Brake disc

7 8
Open the package and take out all of the parts. Be careful of not
missing even a little piece of part. The parts shall include:
3.1 Screw the bolt anticlockwise and remove the parts that we
don’t need.
3.2 Install the handle stem on the front fork stem.
3.3 Expose the bolt mounting hole and then screw the bolt tightly
with a wrench clockwise.
3.4 Adjust the angle of the handle stem, then lock the quick
release to fix the handle stem and the handlebar.
4.1 Remove the two plastic covers that attached to the tire for hub
protection.
4.2 Remove the plastic sheet from the brake caliper.
Assembly Instructions Step 2
Step 3
Step 4
Step 1
Install the handlebar
Install the front wheel
Unpack the bike
Unfold the kickstand to make the
bike stand up
• Frame
• Front wheel
• Front wheel axle
• Pedals
• Charger
• Front light
• Keys
• Toolbag
• Manual
(3.2) (3.3)

9 10
4.3 Insert the quick release into the front wheel hub axle hole.
Note:There are two springs on the quick release.
4.4 Install the tire axle into the front fork groove. Note:Make sure
the brake disc is placed between the two brake pads.
4.5 Fix the nut of front wheel quick release with right hand and
screw the quick release handle clockwise with left hand.
4.6 Fold the quick release handle to fix the tire tightly.
5.1 Install the front fender and headlight on the front fork bridge
with matching bolt and nut.
Note:Make sure the brake disc of the wheel will not rub the brake
pad when it is rotating under the condition of not taking the brake.
5.2 Screw the nut with wrench to tighten the front fender and the
headlight.
5.3 loose the bolt with a
wrench to adjust the headlight
angle so the light can
illuminate the road ahead.
Tighten the bolt when the
adjustment is done.
5.4 Connect the headlight cable.
Note:Make the two arrows stay in a line when pushing the connector
5.5 Screw the two bolts to fix the side brace of fender.
Make the handlebar at a 90 degrees angle to the tire and then
screw the two bolts tightly.
Step 5 Step 6
Adjust and tighten the handle
stem
Install the front fender and the
headlight
1
1
1
2
2
2
Light
Nut
Bolt
Fender

11 12
Battery power
Speed
Pedal assistance level
Riding parameter
L
7.1 The label with a “L” mark indicate it is a left pedal and the
label with a “R” mark indicate it is a right pedal.
7.2 Screw the left pedal bolt into the left crank with the wrench
anticlockwise.
7.3 Screw the right pedal bolt into the right crank with the wrench
clockwise.
1. Hold the button for about 2s to switch on /o the bike.
2. The bike will switch o automatically when the bike not working in about 10 minutes.
3. Short press the “i” button to check dierent parameter about speed and driving mileage.
TRIP (km) →ODO(km)→MAX (Km/h)→Avg(Km/h).
4. Short press "+" button to add the pedal assistance level.
Short press button to minus the pedal assistance level.
Assist Level “0”:The min pedal assistance level(No assistance provided by motor).
Assist Level “1”:The default pedal assistance level.
Assist Level “5”:The max pedal assistance level.
5. Hold the button all the time to activate the push-assistance function and you will see the function indicator .
The push-assistance function will be disabled as soon as you release the button.
The speed is about 6 Km/h when in the mode of Push-assistance.
6. Short press the button to turn on the front light . The screen shows the indicator when you turn on the front light.
Short press the button again to turn o the front light. the indicator disappears when turn o the front light.
Operation instruction
Step 7 Step 8 Inflate the tires
Install the pedals
Check whether the tire beads and tires are evenly seated on the
rims.Use a pump with a Schrader valve and pressure gauge to
inflate each tire to the recommended air pressure which write on
the tire sidewall.
NOTICE: Both wheels must be properly secured
before operating your bike.If you are not able to
assembly your bike, please contact us or look for
some help from a certified, reputable local bike
mechanic .Ensure all hardware is tightened
properly. Also ensure that all safety checks in the
following sections are performed before the first
use of the bike.
Note: Do not over inflate or under inflate the tire.
L
R
R
Inflate

13 14
7. Clench the brake handle to slow down or stop the bike. 9. Install the battery.
Put the battery into the battery base and push it until lock clicks.
Note:Please take good care of your keys.
Turn the key clockwise to unlock the battery and then lift the
battery up from the battery base.
Note:Please take good care of your keys.
10. Remove the battery.
8. Switch the shifter by“+ "and“-”button to adjust the speed for
fitting with dierent road conditions.
11. Charge the battery.
4 lights: High power
3 lights: Middle power
2 lights: Low power
1 light: Must charge
(13.1) Move the saddle up
or down to your desired
height,screw the handle to
make it tight or loose,
then fold the saddle quick
release to make the saddle
post fixed tightly.
(11.1) Open the anti-dust cover and plug the charger into the
Battery socket.
(11.2) The red light on the charger will turn on when charging.
(11.3) The red light will turn to green when the charging is
completed.
13. Adjust the saddle height.
12. Press the button and you will see the battery power Indicator
Charge port
Battery Charge
Tighten
Loose Press hard
-
+

15 16
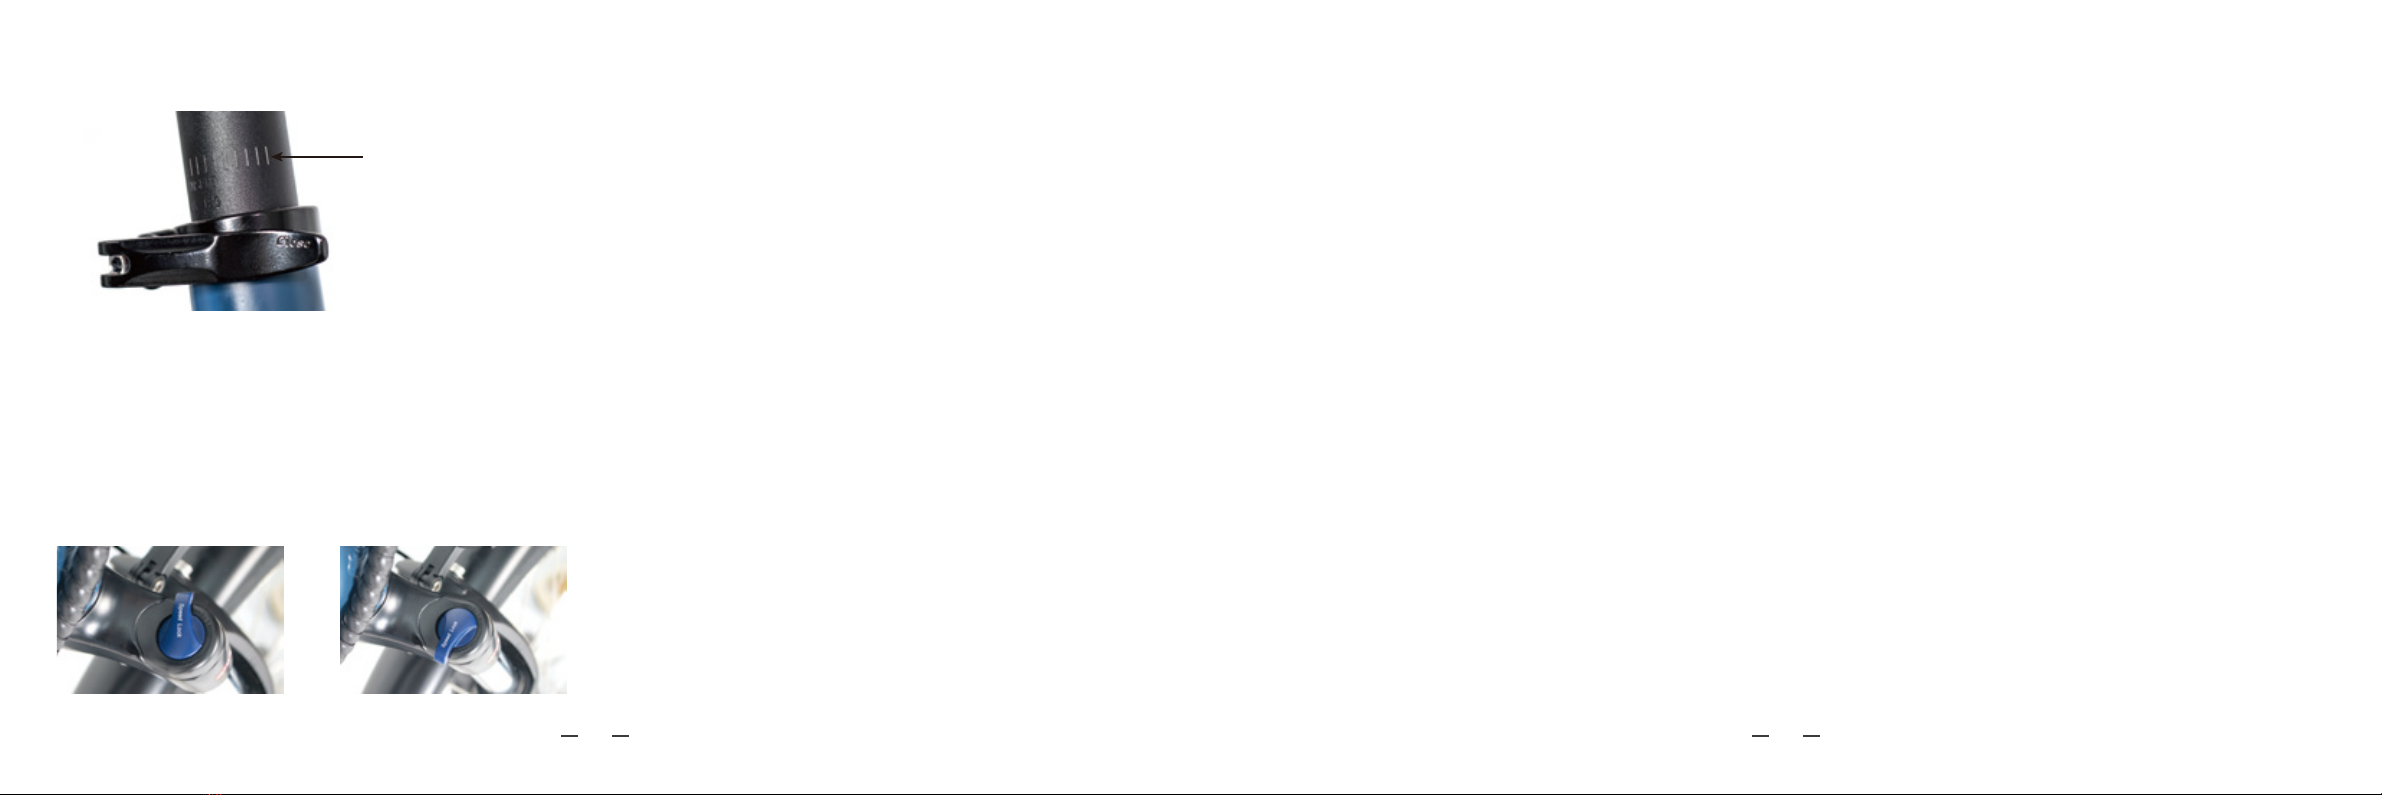
(13.2) Do not make the min insert mark exposed.
14 . Suspension fork adjusting。
(14.1) To make the Suspension soft, turn the speed lock
handle anticlockwise until the end
(14.2) To make the suspension sti, turn the speed lock handle
clockwise until the end.
(1) Make sure the front and rear brakes are sensitive, and the brake
pads are not seriously worn (more than 1/3).
(2) Make sure the tire pressure is sucient and the tire is not
seriously worn.
(3) Make sure the mechanical parts are not broken or loose
especially the handbar, front fork and wheels. make sure all bolts
and fasteners are fastened enough.
(4) Make sure the disc brake disc is not cracked or deformed, make
sure the chain does not touch the wheel.
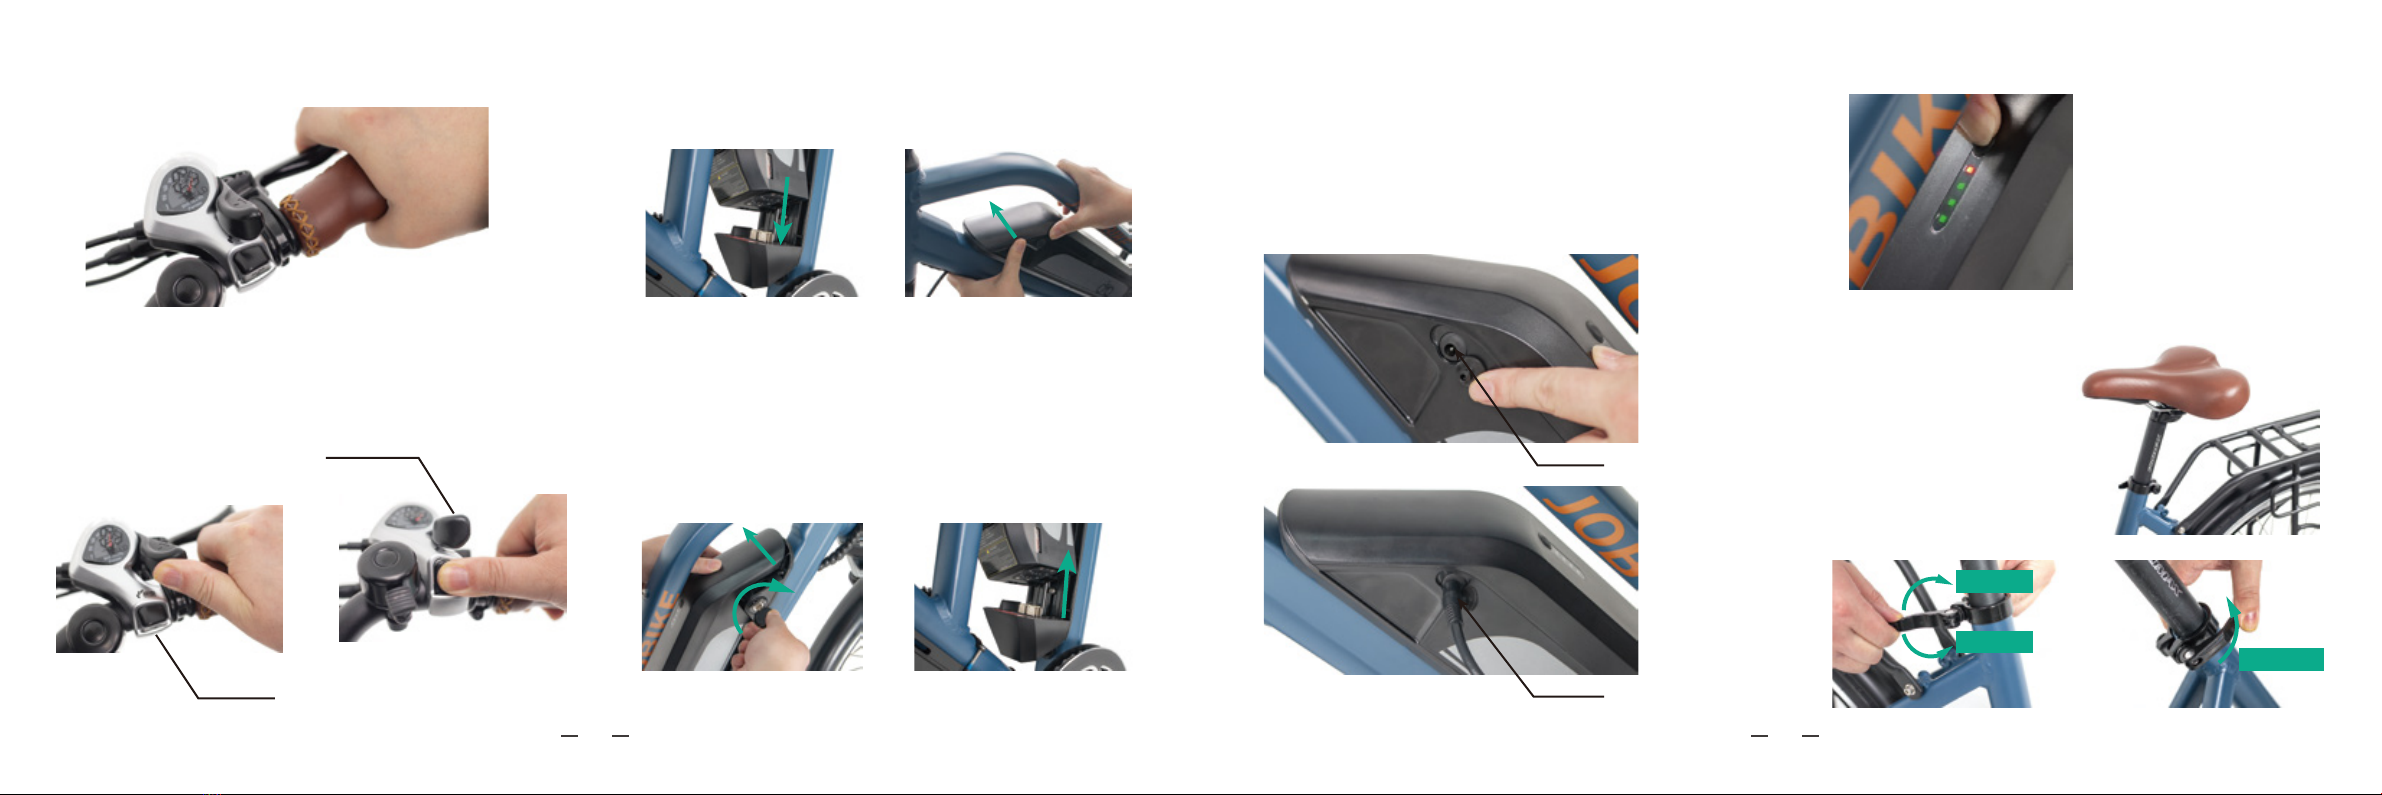
(5) Make sure that the battery has enough power and the battery
has been firmly stuck in the battery compartment.
(1) Turn the throttle slowly when starting the bike. Starting too fast
will cause excessive current and aect the service life of
components.
(2) Frequent braking and starting shall be minimized to save
electric power consumption and prolong the working life of
electrical components.
(3) In order to reduce the current of the electrical components, it is
better to use pedal assistance when riding on steep slopes.
(4) Stop the bike immediately for inspection when the bike makes
abnormal noise during the riding.
(5) To slow down or stop the bike we recommend you to operate the
rear brake first, and then operate the front brake.
(6) In rainy or snowy weather, kindly suggest to take the brake
slowly in advance rather than taking a sudden brake.
(7) It is recommended to ride in good weather and road conditions.
Do not riding in heavy rain, otherwise the water will get into the
display, battery and other electrical components and cause failure.
(8) Please follow the local trac rules, take safety measures and
wear safety helmets when riding.
(9) Do not ride an bike when you are in poor health.
(1) The bike frame needs to be wiped up for the long-term
storage. Lubricate the flywheel, chain and chain puller if these
parts are lack of lubricating oil.Repaint the bike frame to
prevent rusting if the frame is scratched.
(2) The bike shall be stored in a dry, cool and tidy place.
(3) Turn o the power button to cut o the battery power if there is
a power button on the battery.
(1) Make sure the battery and charger are not damaged when
using.
(2) Make sure the battery and charger stay far away from the
environment of fire, immersion, overheating, high humidity,violent
vibration, collision etc.
(3) Make sure the outer substance especially the metal sta will
not penetrate into the charger.
(4) Make sure the charger is being used at rated voltage and
frequency.
(5) Disconnect the charger immediately from the power supply
socket when the charger is in the state of sparks, smoke and other
abnormal conditions.
(6) Make sure the battery is not being stored in the state of low
power.(Charge the battery for every 3 months ).
(7) Make sure the battery is not being excessively discharged and
charge the battery in time when it is running out of power.
(8) Make sure the battery is not being excessively charged and cut
Cautions
Check before riding
Tips duringthe riding Precautions for long-term storage
Battery and charger operation
Min Insert

17 18
o the power in time when the battery is full of power(led indicator
turns green).
(9) Make sure the charger you used is provided by JOBOBIKE and it
can only be used to charge the matched bike battery.
(10) The battery shall be placed in a dry and cool environment
when charging.
(11) Make sure the battery and the charger are being repaired by
the professional if there are break down.
JOBOBIKE provides 24 months limit warranty for all customers.The
after-sales service cycle starts from the date of product
delivery.The customer shall bear the postage required for parts
delivery.
In case of non-human damage to the product during the warranty
period, JOBOBIKE will provide free replacement parts or remote
after-sales support, and the special problems will be solved by
both parties through negotiation.
The repair parts may be non-new parts, but our company
guarantees that the functions of the parts are completely normal.
Accessories category and warranty period:
(1)Frame and front fork: 5 years.
(2)Motor, controller, battery, charger, display, light, handlebar,
etc.: 2 years.
We will not provide the warranty item with the following
conditions.
(1) The customer is unable to provide valid frame serial number.
(2) The whole bike and parts have exceeded the warranty period.
(3) Failure or damage caused by unauthorized private
modification or maintenance.
(4) Failure or damage caused by the usage of accessories that not
designated by Jobobike.
(5) Failure or damage caused by incorrect installation, usage and
operation.
(6) Failure or damage caused by the using of the product in a
non-specified working environment.
(7) Normal wear and tear of the tires, brakes and pedals are not
covered by the warranty.
(8) Failure or damage caused by irresistible factors(such as fire,
earthquake, lightning, flood, etc.).
All videos of assembly instructions can be found on ocial
JOBOBIKE YouTube channel .If you have any questions, please
contact the Jobobike technical support team at www.jobobike.eu
Error code definition
Warranty Non warranty terms Assembly videos
Main parameters of the bike
Mode: Commuter
Display: YL-81F
Motor: XF-C-700C
Battery capacity: 36V18.2AH
Controller: 36V250W
Charger parameter: 36V-3.0A
Push assistance speed: 6km/h
Speed limitation: 25km/h
Power assistance: 5 levels
Brake: Hydraulic disc brake
Derailleur: 7 levels
Riding distance: up to 120km
The charging time: 6 - 7 hours
Whole Size: 1830mm * 1200mm * 660mm
Wheel size: 26inch * 1.95inch
Payload: 120kg
Weight: 25kg
Error Code Definition
Current Abnormal
Throttle Abnormal
Motor Phase Abnormal
Motor Hall Signal Abnormal
Brake Abnormal
Communication Abnormal
21
22
23
24
25
30

19 20
1 12 23
2 13 24
3 14 25
4 15 26
5 16 27
6 17 28
7 18 29
8 19 30
9 20 31
32
10 21
11 22
1
2
3
4
5
6
7
8
9
10
11
12
13
14 15 16 17 18 19
32
31
30
29
28
27
26
23
22
21
20
24
25
Niniejsza instrukcja zawiera podstawowe informacje na temat montażu oraz użytkowania Twojego roweru. Prosimy przeczytać ją
uważnie i stosować się do zawartych w niej wskazówek. Jeżeli po zapoznaniu się z instrukcją nadal potrzebujesz pomocy, odwiedź stronę
internetową JOBOBIKE, lub skontaktuj się z nami mailowo/telefonicznie.
Commuter to rower elektryczny z silnikiem o mocy 250W. Rower powinien być użytkowany zgodnie z prawem obowiązującym w Twoim
kraju.
Informacje Ogólne
NO. NAZWA CZĘŚCI NO. NAZWA CZĘŚCI NO. NAZWA CZĘŚCI
Siodełko Szprychy Oś przedniego koła
Sztyca podsiodłowa Przerzutki Widelec amortyzowany
Zacisk sztycy Nóżka Przedni błotnik
Kontroler Łańcuch Przednie światło
Tylny bagażnik Mechanizm korbowy Łożyska główki sterowej
Tylny błotnik Pedały Wspornik kierownicy
Tylny hamulec Rama Wyświetlacz
Wzmocnienie błotnika Bateria Chwyty kierownicy
Tylny hamulec tarczowy Opona Dźwignia hamulca
Dźwignia przerzutkiSilnik w piaście Przedni hamulec
Obręcz Przedni hamulec tarczowy

21 22
Otwórz karton i wyjmij z niego wszystkie części. Uważaj, aby nie
zgubić nawet najmniejszego elementu. W zestawie znajdują się:
3.1 Dokręć śrubę w kierunku przeciwnym do ruchu wskazówek
zegara i usuń zbędne elementy.
3.2 Zamontuj kierownicę na trzpieniu przedniego widelca.
3.3 Odsłoń otwór montażowy kierownicy, a następnie mocno
dokręć śrubę zgodnie z ruchem wskazówek zegara.
3.4 Wyreguluj kąt ustawienia kierownicy, a następnie
zablokuj klamrę, aby ustabilizować pozycję połączonych
elementów.
4.1 Usuń plastikowe osłony piasty przymocowane do koła.
4.2 Zdejmij plastikową osłonę z zacisku hamulca.
Instrukcja montażu Krok 2
Krok 3
Krok 4
Krok 1
Zamontuj kierownicę
Montaż przedniego koła
Rozpakuj rower
Rozłóż nóżkę rowerową, aby
postawić rower
• Rama
• Koło przednie
• Ośka przedniego koła
• Pedały
• Ładowarka
• Przednie światło
• Kluczyki
• Saszetka z narzędziami
• Instrukcja
(3.2) (3.3)

23 24
4.3 Zamontuj oś koła w rowku przedniego widelca
Uwaga: Na szybkozamykaczu znajdują się dwie sprężyny.
4.4 Zamontuj oś koła w rowku przedniego widelca.
Uwaga: Upewnij się, że tarcza hamulcowa została umieszczona
pomiędzy dwoma klockami hamulcowymi.
4.5 Prawą dłonią przytrzymaj nakrętkę szybkozamykacz
przedniego koła, a następnie lewą dłonią dokręć uchwyt zgodnie
z ruchem wskazówek zegara.
4.6 Zaciśnij szybkozamykacz, aby zablokować pozycję koła.
5.1 Zamontuj przedni błotnik i lampkę na przednim widelcu za
pomocą pasujących śrubek i nakrętek oraz klucza imbusowego.
Uwaga: Upewnij się, że tarcza hamulcowa przedniego koła nie
ociera o klocki hamulcowe (pod warunkiem, że hamulec nie jest
zaciągnięty).
5.2 Dokręć nakrętkę kluczem, aby ustabilizować pozycję przedniego
błotnika oraz lampy.
5.3 Poluzuj śrubę mocującą
reflektor, aby wyregulować
jego kąt. Reflektor powinien
skutecznie oświetlać drogę
przed Tobą podczas jazdy. Po
zakończeniu regulacji dokręć
poluzowaną wcześniej śrubę.
5.4 Podłącz przewód reflektora.
Uwaga: Podczas łączenia przewodów zwróć uwagę na położenie
oraz kierunek strzałek. Powinny być w jednej linii.
5.5 Dokręć dwie śruby, aby skutecznie przymocować wspornik
błotnika.
Ustaw kierownicę pod kątem 90 stopni w stosunku do koła, a
następnie mocno dokręć dwie śruby.
Krok 5 Krok 6
Wyreguluj i dokręć wspornik
kierownicy
Zamontuj przedni błotnik i
przednią lampę
1
1
1
2
2
2
lampkę
nakrętek
śrubek
przedni błotnik
(4.5) (4.6)

25 26
L
7.1 Lewy pedał oznaczony jest naklejką z literą „L”, natomiast
prawy pedał oznaczony jest naklejką z literą „R”.
7.2 Dokręć lewy pedał w kierunku przeciwnym do ruchu
wskazówek zegara za pomocą klucza.
7.3 Dokręć prawy pedał w kierunku przeciwnym do ruchu
wskazówek zegara za pomocą klucza.
1. Przytrzymaj przycisk aby włączyć/wyłączyć rower.
2. Rower wyłączy się automatycznie, jeśli nie będzie używany przez 10 minut.
3. Wciśnij przycisk ”i”, aby przełączyć się między funkcjami:
Maksymalna prędkość (km/h) → Średnia prędkość(km/h)→ Czas wycieczki(min)→Dystans wycieczki(Km).
4. Wciśnij przycisk “+”, aby zwiekszyć poziom wspomagania.
Wciśnij przycisk aby zmniejszyć poziom wspomagania.
Poziom wspomagania “0”:Silnik nie dostarcza mocy.
Poziom wspomagania “1”:Standardowy tryb wspomagania.
Poziom wspomagania “5”:Maksymalny tryb wspomagania.
5. Wciśnij przycisk aby uruchomić wspomaganie prowadzenia. Na wyświetlaczu ukaże się ikona
Wspomaganie prowadzenia wyłączy się, gdy tylko zwolnisz przycisk „WALK”. Prędkość wspomagania prowadzenia to około 6 km/h.
6. Wciśnij przycisk, by włączyć przednie światło. Na wyświetlaczu ukaże się ikona . Aby wyłączyć przedniej światło, wciśnij
ponownie ten sam przycisk. Ikona na ekranie , zniknie po wyłączeniu światła.
Instrukcja wyświetlacza
Step 7 Step 8 Napompuj opony
Zamontuj pedały
Upewnij się, że opony są odpowiednio osadzone na felgach. Użyj
pompki wyposażonej w zawór Schrader oraz manometr, by
dopompować każdą z opon do zalecanego poziomu ciśnienia,
wskazanego na boku opony.
UWAGA:Przed użyciem roweru obydwa koła
muszą być prawidłowo zamontowane. Jeżeli nie
jesteś w stanie zmontować swojego roweru
samodzielnie, skontaktuj się z nami lub poszukaj
pomocy u profesjonalnego mechanika rowerowego.
Upewnij się, że wszystkie części są odpowiednio
przymocowane i dokręcone. Przed pierwszą jazdą
upewnij się także, że wszystkie czynności opisane w
niniejszej instrukcji zostały wykonane prawidłowo.
Pamiętaj: Nie przekraczaj zalecanego poziomu ciśnienia.
L
R
R
poziom baterii
Prędkość
Poziom wspomagania
Parametr jazdy

27 28
7. Zaciśnij dźwignię hamulca, aby spowolnić lub zatrzymać rowe. 9. Instalacja baterii.
Umieść baterię w ramie roweru i dociśnij aż usłyszysz kliknięcie.
Uważaj: aby nie zgubić swoich kluczy.
Przekręć kluczyk zgodnie z ruchem wskazówek zegara, aby
odblokować baterię i wyciągnij ją z ramy.
Uważaj: aby nie zgubić swoich kluczy.
10. Wyjmij baterię.
8. Zmieniaj poziomy przerzutki za pomocą dźwigni “+” i
przycisku “-”, aby dostosować bieg do warunków terenu.
11. Naładuj baterię.
4 zielone diody:
bateria w 80% - 100%
3 zielone diody:
bateria w 65% - 80%
2 zielone diody:
bateria w 50% - 65%
1 zielona dioda:
bateria w 20% - 50%
żadna dioda się nie świeci:
bateria w 0% - 20%
(13.1) Podnieś lub obniż
siodełko do wybranej przez
siebie wysokości. Następnie
dokręć uchwyt i złóż
szybkozamykacz, aby
siodełko nie zmieniało
swojej pozycji podczas
jazdy na rowerze.
(11.1) Odsłoń zaślepkę i podłącz ładowarkę do baterii.
(11.2) Podczas ładowania zaświeci się czerwona dioda na
ładowarce.
(11.3) Po zakończeniu ładowania czerwone dioda zmieni kolor
na zielony.
13. Ustaw wysokość siodełka.
12. Naciśnij przycisk, aby zobaczyć poziom naładowania baterii
Port ładowania
Ładowanie baterii
Dokręć
Odkręć Naciśnij
-
+

29 30
(13.2) Pamiętaj, aby oznaczenie przedstawione na zdjęciu nie
było widoczne kiedy ustalisz już wysokość siodełka. Określaono
bezpieczną wysokość.
14. Regulacja amortyzatora.
14.1 Aby zwiekszyć miękkość amortyzatora (mniej sztywny),
przekręć regulator w kierunku przeciwnym do ruchu
wskazówek zegara
14.2 Aby zwiekszyć sztywność amortyzatora, przekręć
regulator w kierunku zgodnym z ruchem wskazówek zegara.
(1) Upewnij się, że przednie i tylne hamulce są dostatecznie czułe,
a klocki hamulcowe nie są poważnie zużyte (więcej niż 1/3).
(2) Upewnij się, że ciśnienie w oponach jest wystarczające, a
opona nie jest poważnie zużyta.
(3) Upewnij się, że części mechaniczne nie są uszkodzone,
zwłaszcza kierownica, widelec przedni i koła. Upewnij się, że
wszystkie śruby i złącza są solidnie dokręcone.
(4) Upewnij się, że tarcza hamulca nie jest pęknięta ani
zdeformowana, sprawdź, czy łańcuch nie dotyka koła/opony.
(5) Upewnij się, że bateria jest wystarczająco naładowana oraz
solidnie zamocowana w przegródce na baterię.
(1) Rozpoczynając jazdę na rowerze, przekręć manetkę powoli.
Zbyt gwałtowne ruszanie (przekazywanie napięcia) może
wpływać na żywotność komponentów elektronicznych.
(2) Częste hamowanie i rozpoczynanie jazdy powinny być
zminimalizowane, aby oszczędzić energię elektryczną
zmagazynowaną w baterii oraz przedłużyć żywotność
komponentów elektronicznych.
(3) Aby zmniejszyć przepływ prądu w komponentach
elektronicznych, zalecamy używać wspomagania jazdy podczas
pokonywania bardziej stromych podjazdów.
(4) W przypadku wystąpienia niepokojących dźwięków podczas
jazdy, natychmiast zatrzymaj rower w celu przeprowadzenia
kontroli i zdiagnozowania źródła hałasu.
(5) Aby zwolnić lub zatrzymać rower, zalecamy w pierwszej
kolejności korzystanie z hamulca tylnego.
(6) Podczas jazdy w trudnych warunkach takich jak: deszcze lub
śnieg, radzimy hamować delikatnie, aby ograniczyć możliwość
wpadnięcia w poślizg.
(7) Zaleca się korzystanie z roweru s przypadku dobrych warunków
pogodowych oraz drogowych. Unikaj jazdy w ulewnym deszczu.
Zalanie wodą może uszkodzić wyświetlacz, baterię lub inne
podzespoły elektroniczne i spowodować awarię.
(8) Podczas jazdy przestrzegaj przepisów ruchu drogowego, stosuj
środki bezpieczeństwa, noś kask ochronny.
(9) Nie korzystaj z roweru, gdy jesteś w złym stanie zdrowia.
(1) Rower powinien zostać wytarty do sucha. Nasmaruj wszystkie
ruchome części: koła, łańcuch, piasty. Jeśli rama jest porysowana,
zastosuj w tych miejscach środek antykorozyjny.
(2) Rower należy przechowywać w suchym, chłodnym i
uporządkowanym miejscu.
(3) Jeśli na baterii znajduje się przełącznik zasilania, ustaw go w
pozycji OFF, aby odciąć przepływ prądu.
(1) Upewnij się, że bateria i ładowarka nie zostały uszkodzone
podczas użytkowania.
(2) Upewnij się, że bateria i ładowarka znajdują się z dala od
potencjalnego źródła ognia, zanurzenia, przegrzania, wysokiej
wilgotności, gwałtownych wibracji itp.
(3) Upewnij się, że ładowarka jest używana przy odpowiednim
napięciu i częstotliwości prądu.
(4) Jeżeli ładowarka nagrzeje się zbyt mocno (do temperatury
wyższej niż 70 ℃), pojawi się dym, iskry lub innej niepokojące
zjawisko, natychmiast odłącz ją od prądu.
(5) Upewni się, że przechowywana bateria jest naładowana do
odpowiedniego poziomu. Naładuj baterię co 3 miesiące i utrzymuj
poziom jej zmagazynowanej energii w okolicy 70% jej pojemności.
(6) Upewnij się, że substancja znajdująca się w baterii nie przenika
do ładowarki, co mogłoby spowodować zwarcie.
(7) Upewnij się, że bateria nie jest rozładowana do 0% pojemności.
Ładuj baterię gdy poziom spadanie do około 20% pojemności.
Pozwoli to wydłużyć żywotność ogniw w niej zawartych.
Środki ostrożności
Upewnij się przed rozpoczęciem jazdy.
Wskazówki podczas korzystania z roweru
Bateria oraz jej ładowanie
Min Insert
Środki ostrożności i dobre praktyki w przypadku
długotrwałego przechowywania roweru

31 32
(8)Gdy bateria naładuje się w pełni odłącz ją od ładowarki
(wskaźnik LED zaświeci się na zielono).
(9) Upewnij się, że używasz ładowarki, którą otrzymałeś wraz z
zakupem roweru.
(10) Ładowanie baterii powinno odbywać się w suchym oraz
chłodnym pomieszczeniu.
(11) Pamiętaj, że w przypadku awarii baterii lub ładowarki,
powinny one być serwisowane przez wyspecjalizowany w tym
serwis.
JOBOBIKE zapewnia wszystkim klientom 24-miesięczną gwarancję
na zakupiony rower wraz jego komponentami.Cykl obsługi
posprzedażowej oraz gwarancji rozpoczyna się od daty
dostarczenia produktu. Klient ponosi koszty dostawy roweru.
W przypadku uszkodzeń roweru, innych niż spowodowane przez
użytkownika, w okresie gwarancyjnym, JOBOBIKE zapewnia
bezpłatne części zamienne lub zdalne wsparcie posprzedażowe.
W przypadku innych, nietypowych usterek, zostaną one
rozwiązane po indywidualnym zapoznaniu się z problemem.
Zastrzegamy sobie, że dostarczone części zamienne mogą nie być
nowe, ale nasza firma gwarantuje ich pełną sprawność. Okres
gwarancji na części zamienne jest taki sam jak na rower. W okresie
gwarancyjnym rower objęty jest serwisem pogwarancyjnym po
każdej wykonanej naprawie, począwszy od dnia dostarczenia
produktu.
Kategoria akcesoriów i okres gwarancji:
(1) Rama i przedni widelec: 5 lat.
(2)Silnik, układ sterujący, bateria, ładowarka, wyświetlacz,
światła, kierownica itp.: 2 lata.
Gwarancja nie obejmuje sytuacji gdy:
(1) Klient nie był w stanie podać prawidłowego numeru seryjnego
ramy.
(2) Okres gwarancji przekroczył czas zawarty w regulaminie.
(3) Awaria lub uszkodzenie spowodowane zostały poprzez własne
modyfikacje lub konserwację.
(4) Awaria roweru nastąpiła w sytuacji użycia akcesoriów, które
nie zostały wskazane przez JOBOBIKE.
(5) Awaria lub uszkodzenie zostały spowodowane
nieprawidłowym montażem, użytkowaniem lub obsługą roweru.
(6) Awaria lub uszkodzenie produktu zostały spowodowane
niewłaściwą konserwacją roweru.
(7) Doszło do zużycia opon, hamulców i pedałów. Są to
standardowe części eksploatacyjne.
(8) Awaria lub uszkodzenie zostały spowodowane przez czynniki
niemożliwe do przewidzenia (pożar, trzęsienie ziemi, uderzenie
pioruna, powódź itp.).
Wszystkie filmy instruktażowe rowerów dostępne są na oficjalnym
kanale JOBOBIKE w serwisie YouTube.
Kody błędów
Gwarancja Uszkodzenia nieobjęte
gwarancją
Filmy Instruktażowe
Specyfikacja roweru
Model:Commuter
Wyświetlacz:YL-81F
Model silnika:XF-C-700C
Parametry napięcia baterii:36V18.2AH
Kontroler:36V250W
Parametry ładowarki:36V-3.0A
Prędkość w trybie wspomagania pchania:6 km/h
Limit prędkości:25km/h
Ilość poziomów wspomagania jazdy:5
Hamulce: hydraulische Bremse
Przerzutka:7-biegowa
Zasięg: do 120km
Czas pełnego naładowania baterii:6 - 7 godzin
Wymiary:1830mm x 1200mm x 660mm
Rozmiar kół:26 cali
Ładowność:120kg
Waga:25kg
Kod błędu Definicja
Błąd natężenia prądu
Błąd manetki
Błąd fazy silnika
Błąd sygnału czujnika Halla
Błąd hamulca
Błąd połączenia
21
22
23
24
25
30

33 34
1 12 23
2 13 24
3 14 25
4 15 26
5 16 27
6 17 28
7 18 29
8 19 30
9 20 31
32
10 21
11 22
1
2
3
4
5
6
7
8
9
10
11
12
13
14 15 16 17 18 19
32
31
30
29
28
27
26
23
22
21
20
24
25
Diese Anleitung dient Ihnen als Hilfestellung für den Zusammenbau und die Benutzung Ihres Fahrrads. Bitte lesen Sie sie sorgfältig durch
und befolgen Sie die Anweisungen. Sollten Sie weitere Hilfe benötigen, besuchen Sie bitte unsere Website, kontaktieren Sie uns per E-Mail
oder rufen Sie uns an.
Das Commuter ist ein 250-Watt-Fahrrad. Bitte befolgen Sie alle relevanten Gesetze und Vorschriften in Ihrem Land oder Ihrer Region,
wenn Sie dieses Fahrrad fahren.
Allgemeine Informationen
NNAME DES ZUBEHÖRS NNAME DES ZUBEHÖRS NNAME DES ZUBEHÖRS
Sattel Speiche Vorderradachse
Sattelstütze Schaltwerk Federgabel
Sattelstützenklemme Ständer Frontkotflügel
Gepäckträger Kette Vorderes Licht
Rücklicht Kurbelgarnitur Steuersatz-Lager
Hinteres Pedal Vorbau
Hintere Bremse Rahmen Anzeige
Schutzblechhalterung Batterie Grie
Hinterrad-Bremsscheibe Reifen Bremshebel
SchalthebelNabenmotor Vorderradbremse
Felge Vorderrad-Bremsscheibe

35 36
Önen Sie das Paket und nehmen Sie alle Teile heraus. Achten Sie
darauf, dass kein noch so kleines Teil fehlt. Folgende Teile sollten
enthalten sein:
3.1 Drehen Sie die Schraube gegen den Uhrzeigersinn und
entfernen Sie die nicht benötigten Teile.
3.2 Montieren Sie den Lenkervorbau auf die Vordergabelschaft.
3.3 Legen Sie das Befestigungsloch für die Schraube frei und drehen Sie
die Schraube mit einem Schraubenschlüssel im Uhrzeigersinn fest.
3.4 Stellen Sie den Winkel des Lenkervorbaus ein und verriegeln
Sie dann den Schnellspanner, um den Lenkervorbau und den
Lenker zu befestigen.
4.1 Entfernen Sie die beiden Kunststoabdeckungen, die zum
Schutz der Nabe am Reifen angebracht sind.
4.2 Entfernen Sie die Plastikfolie vom Bremssattel.
Montageanleitung Schritt 2
Schritt 3
Schritt 4
Schritt 1
Montieren Sie den Lenker
Montaż przedniego koła
Packen Sie das Fahrrad aus
Klappen Sie den Fahrradständer
aus, um das Fahrrad aufzurichten
• Rahmen
• Vorderrad
• Vorderradachse
• Pedale
• Ladegerät
• Vorderes Licht
• Schlüssel
• •Werkzeugtasche
• Handbuch
(3.2) (3.3)

37 38
4.3 Stecken Sie den Schnellspanner in das Achsloch der Vorderradnabe.
Hinweis: Am Schnellspanner befinden sich zwei Federn.
4.4 Montieren Sie die Reifenachse in die Rille der Vorderradgabel.
Hinweis: Vergewissern Sie sich, dass die Bremsscheibe zwischen den
beiden Bremsbelägen platziert wurde.
4.5 Befestigen Sie die Mutter des Vorderrad-Schnellspanners mit
der rechten Hand und drehen Sie den Schnellspannhebel mit der
linken Hand im Uhrzeigersinn.
4.6 Klappen Sie den Schnellspannhebel ein, um den Reifen sicher
zu befestigen.
5.1 Montieren Sie das vordere Schutzblech und den Scheinwerfer mit
der passenden Schraube und Mutter an die Vordergabelbrücke.
Hinweis: Vergewissern Sie sich, dass die Bremsscheibe des Rades
nicht an den Bremsbelägen reibt, wenn sie sich dreht und nicht
gebremst wird.
5.2 Schrauben Sie die Mutter mit einem Schraubenschlüssel fest, um
das vordere Schutzblech und den Scheinwerfer zu befestigen.
5.3 Lösen Sie die Schraube mit
einem Schraubenschlüssel, um
den Winkel des Scheinwerfers
so einzustellen, dass das Licht
die Straße vor Ihnen
ausleuchten kann. Ziehen Sie
die Schraube dann fest, um die
Einstellung beizubehalten.
5.4 Schließen Sie das Scheinwerferkabel an.
Hinweis: Achten Sie darauf, dass die beiden Pfeile in einer Linie
bleiben, wenn Sie auf den Stecker drücken.
Schrauben Sie die beiden Bolzen fest, um die Seitenstrebe des
Kotflügels zu befestigen.
Stellen Sie den Lenker in einem 90-Grad-Winkel zum Reifen auf
und schrauben Sie dann die beiden Bolzen fest.
Schritt 5 Schritt 6
Stellen Sie die Gristange ein
und ziehen Sie sie fest
Montieren Sie den vorderen
Kotflügel und den Scheinwerfer
1
1
1
2
2
2
Scheinwerfer
Nüsse
Schraube
Kotflügel
(4.5) (4.6)
Table of contents
Languages:
Other JOBOBIKE Bicycle manuals

JOBOBIKE
JOBOBIKE Eddy-X User manual

JOBOBIKE
JOBOBIKE TRANSER User manual

JOBOBIKE
JOBOBIKE Henry User manual

JOBOBIKE
JOBOBIKE ROMER User manual

JOBOBIKE
JOBOBIKE VIVA User manual

JOBOBIKE
JOBOBIKE Bruno User manual

JOBOBIKE
JOBOBIKE Eddy User manual

JOBOBIKE
JOBOBIKE Henry User manual

JOBOBIKE
JOBOBIKE Linda User manual

JOBOBIKE
JOBOBIKE Sam User manual